Human Arioso Power System User manual

Manual
Arioso
System
Power (TOC)


Manual
Arioso
System
Power (TOC)

Inspection Certificate
•
Item : Water Purification System
•
Model :
•
Serial No. :
•
Date :
•
Origin : Republic of Korea
Authorized Signature
We hereby certify that goods has been inspected before
shipment and found in good order.

General Description 5
8
10
11
12
14
16
22
24
26
33
35
36
37
38
40
42
43
44
System Structure
TOC meter Structure
Installation Condition
Installation Method Ⅰ
Installation Method Ⅱ (Diagram)
Display
Operating
Volume Dispensing ∙ Dispensing Time
Filter Exchange and Display / Default Value
Error Message / Default Value
TOC Meter Error & UV Lamp
Adapter
Using Method of Level Sensor
Using Method of Water Softner
Pre-Treatment system
Accessories
Parts for a instrument
Maintenance
1
2
3
4
5
6
7
8
9
10
11
12
13
14
15
16
17
18
19
Index
Manual


General Description
1. Arioso Power (TOC) System
1) Feed Water
3) STD Accessories
2) Included filters
4) Optional Accessories
5) Applications
1
The Power System is the unique water purification system combining
2 systems-RO System & UP System. It can produce simultaneously from the city/ground water.
And, it is a perfect instrument in space budget and efficiency.
: Tap Water / Ground Water (Water Softner required)
: Manual, Power Cord, Level Sensor, Hand Lever
- Pretreatment : Pre filter + 10 ” A/C Filter
- RO System : RO Pack
- UP System : ① UP Pack
② 0.2 Capsule filter
- TOC System (option)
① 254/185 UV Lamp
② MW 5000 UF filter
③ Printer
④ Foot-pedal s/w
⑤ Pressure regulater
⑥ Wall-mounting bracket
⑦ Water Tank (20L / 30L / 40L / 60L)
⑧ Frame
① General laboratory tests
② Preparations of stock solution
③ Washing & rinsing for glasswares
④ Analytical Instruments
⑤ Microorganism analysis
⑥ Cell Culture
⑦ DNA/RNA Tests
m
Arioso Power (TOC) System
5

6) Flow Schematic
∙ RO System
∙ UP System
①
Pretreatment system
Ⓐ
UP pack
④⑥
Pressure sensor
Ⓓ
Resistivity sensor
②
Temp sensor
Ⓑ
254/186 UV lamp
⑦
RO pack
Ⓔ
0.2 final filter (PF final filter)
③⑧
Conductivity sensor
Ⓒ
MW5000 UF filter
⑨
Water sensor
2. Features
∙
Certified CE, ISO 9001, ISO 14001, NRTL
∙
Awarded Korean excellent products
∙
Auto calibraion for water sensor
∙
Extensible point of use
∙
Frost alarm message
∙
3, 5 steps water level sensor
∙
Filter exchange indicator : Beep & charactor display
∙
Languages : English, Korean, etc
∙
Self-diagnosis functions
Drain RO Product UP Product
① ② ③ ④ ⑤⑥⑦ ⑧ Ⓐ
Ⓑ
ⒸⒹ
Ⓔ
Tank
⑨
Ts
m
Human Corporation
6

∙
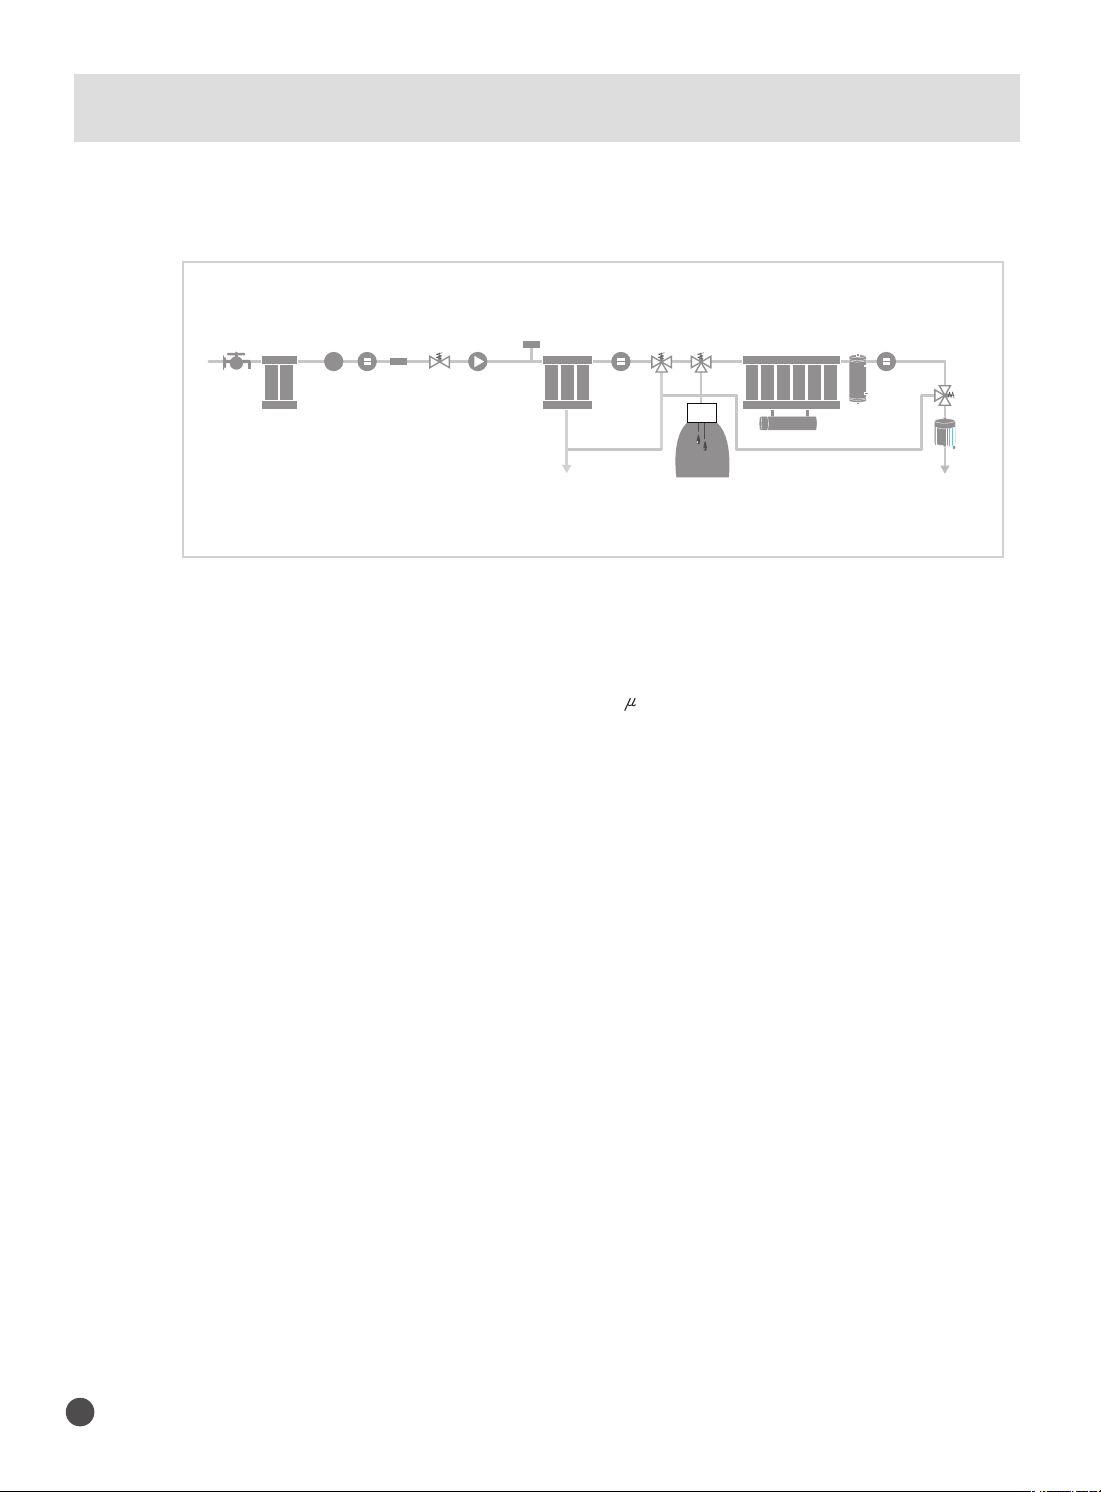
Feed water requirement ; TOC < 50 ppb
3. Specifications
Water Quality
-TOC (ppb)
5~10 5~10 0~50~55~10 0~5
-Endotoxin (Eu/㎖)
NA < 0.125 NA < 0.125 < 0.001 < 0.001
-Bacteria (cfu/㎖)
< 1 < 1 < 1 < 1 < 1 < 1
-Particles ( > 0.22㎛/㎖)
< 1 < 1 < 1 < 1 < 1 < 1
-RNases (ng/㎖)
- < 0.01
<4
-DNases (pg/㎖)
-DNases (pg/
)
-
-
-
-
-
-
-
<0.01
<4
-
-
Dimensions (WxDxH)
320 x 490 x 475 mm
Power
230V / 110V, 50/60Hz, 60W
Standard Accessories
Pretreatment System, ROmembrane, UP Pack, Level Sensor, Manual,Power Cord
Optional Accessories
· Printer · Foot-Pedal switch · Pretreatment system · Low pressure valve, Wall-mounting bracket
· Water tank(20L, 30L, 40L, 60L) · Vent filter for PE water tank ·Frame
Arioso Power Arioso Power Arioso Power Arioso Power Arioso Power Arioso Power
ⅠⅠ
+70
Ⅱ
Ⅱ
+70
Ⅲ Ⅱ
(TOC)
Arioso Power
Ⅲ
(TOC)
Product flow rate
(RO, UP)
Max. 15 L/HrMax. RO : 15 L/Hr
UP : 70 L/HrMax. 25 L/HrMax. RO : 25 L/Hr
UP : 70 L/Hr Max. 25 L/HrMax. 35 L/HrMax. 35 L/Hr
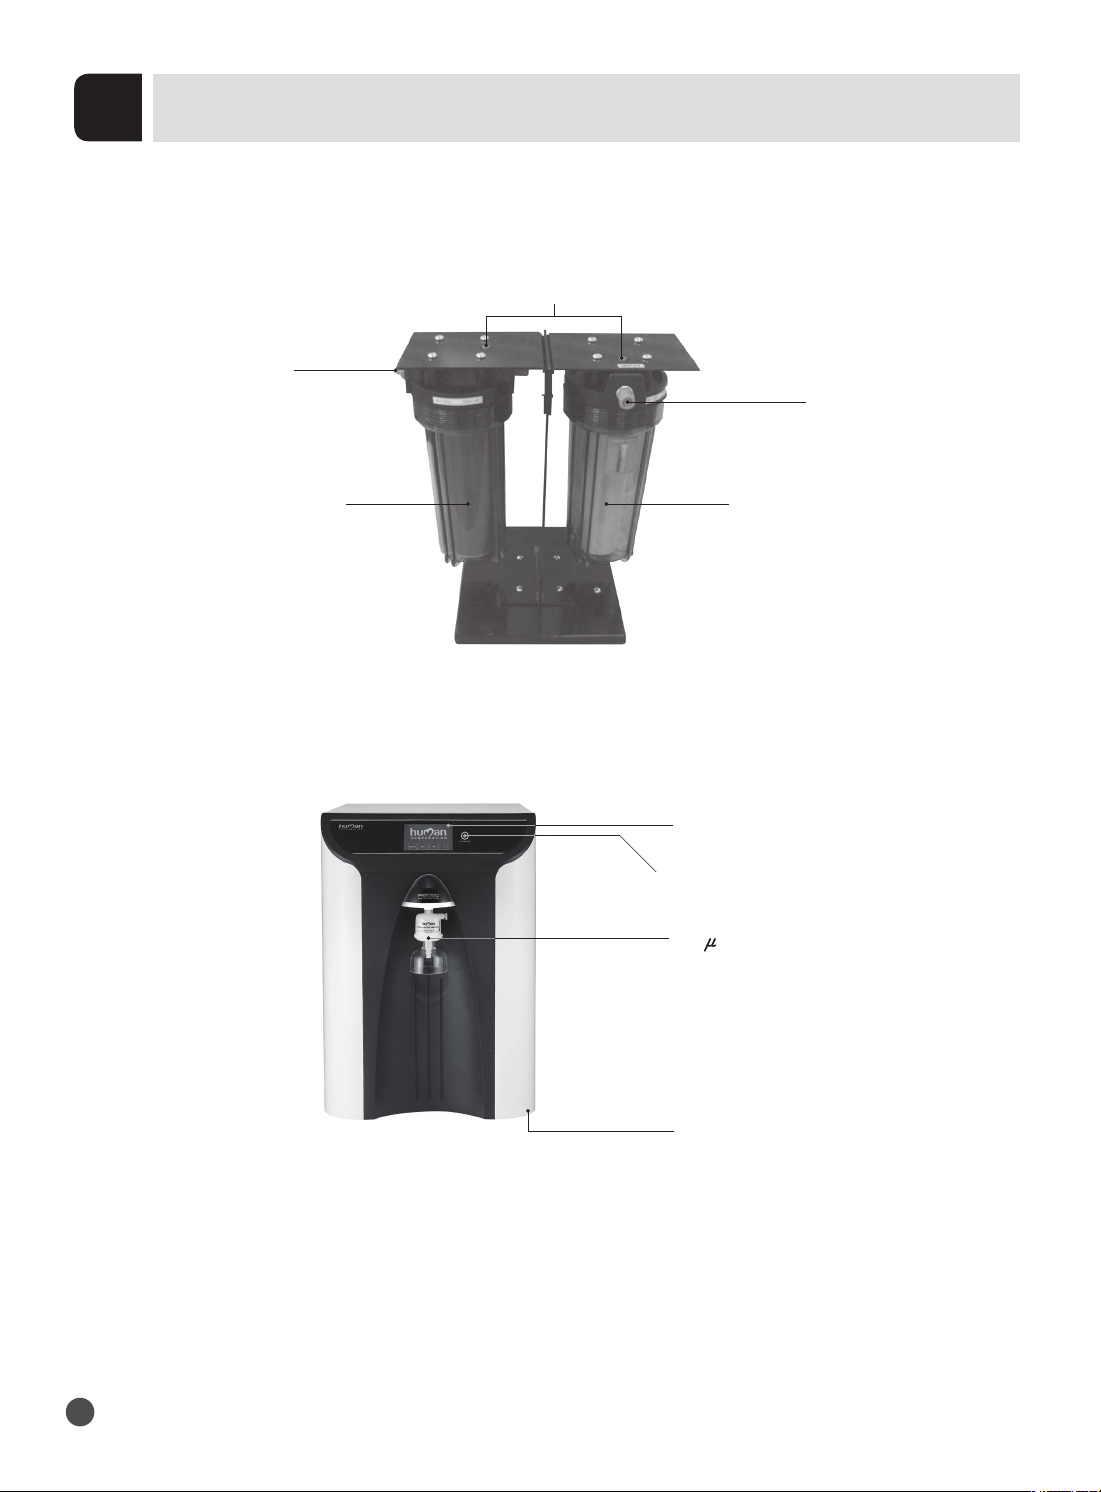
Display& Controller
Large color 70 x 52 touch screen
←
Waterqualitydisplay
Ambient temp : -10 to 100
←
Feed water temp : 0 to 100℃
←
Feed water : 0 to 999 ㎲/㎝
←
Pure water (RO) : 0.2 to 250.0㎲/㎝
←
Ultra Pure (UP) : Up to 18.3 ㏁·㎝
←
←
←
←
←
←
←
-TOC : 0 to 200 ppb
Pressure display
Digital Pressure Sensor (0~10kg/㎠)
①Feed water pressure ②RO membrane pressure
Self-check function
· Various valves · Auto sensor calibration(RO, UP)
· System operation status · Self-diagnosis
Cleaning function
· Auto regular flushing · Auto regular cleaning · Auto cleaning lower than setting value
System function
· Filter replacement alarm & display (A/C, RO/UP pack, UF, UV lamp, 0.2㎛CF, etc)
· Volumetric time setting (RO/UP) · Language(English, Korean, etc)
· Auto/Manual Pressure S/W · Extensible point of use
Type
Scholar Scholar-UV
Bio Integrate
_PF _PF
0.2㎛final filter
STDSTDSTDSTD
Pyrogen free final filter
STDSTD
254/185 UV lamp
STDSTDSTD
MW 5000 UF filter
STDSTD
< 0.01 < 0.01
< 4 < 4
Arioso Power (TOC) System
7

System Structure
1. Pretreatment System (HMC
-
PT
-
3)
2. Main System / Front
2
Air Vent Button
(Red Button)
Display
0.2 Capsule filter
Locking system
UP/RESET switch
10 ” Pre Filter
10 ” A/C Filter
Output
[From this port to main instrument
using Blue 6mm(OD) tubing] Input
[From tap water to this port
using Blue 10mm(OD) tubing]
m
Human Corporation
8

4. Main System / Back Side
3. Main System / Front-inside
①
Input Port [6mm(OD)]
Connect to output of Pre-treatment system
using Blue 6mm(OD) tubing
②
Pure Water Product Port
Connect to Water tank using White 6mm(OD) tubing
③
Drain Port
Connect to Sink using Blue 6mm(OD) tubing
④
TOC Input (Option)
Connect to Input of TOC Meter using transparent 4mm(OD) tubing
⑤
Printer Port (Option) - 4 pin
Connect to Printer
⑥
TOC Meter Power Port (Option) - 5 pin
Connect to Power of TOC meter
⑦
Level Sensor - 2, 3, 6 pin
After connect level sensor, put it Water Tank
⑧
Power switch
Connect to Power
RO Pack
254/185 nm UV Lamp
MW 5000 UF Filter
UP Pack
(TOC Version)
(General version without TOC Meter)
①
①
②
②
③
③
④⑤
⑤
⑥⑦
⑦
⑧
⑧
Arioso Power (TOC) System
9
Product / Drain valve
Control Water volume with Ⓐ valve ,
and then fix Ⓐ valve by turning Ⓑ valve clockwise.
(※Do not fasten too strongly.)
(‘Auto drain valve’is installed in Arioso Power I.)
Ⓐ valve
Ⓑ valve

TOC Meter Structure (Option)
3
1. Front
2. Back
① Water Flow Controller
Control Water Flow of TOC Meter (15-20㎖/min : approx.
30-35drops / 10 sec) Set the ball in‘② Flow Meter’
between RED lines.
② Flow Meter for TOC
Hole
(Fit for the back-left rubber feet of main system.)
※ If there is air inside Flow Meter, Ball could go down.
RED Line
Ball
∙
TOC Meter Power Port
Connect to Main system ⑥ TOC Meter Power Port
(Refer to page 09)
∙
TOC Meter Input
Connect to Main system ④ TOC Input using transparent
4mm(OD) tubing
∙
TOC Meter Output
Connect to Sink using transparent 4mm(OD) tubing
※ Make sure that tubing is not twisted and set upside.
Human Corporation
10

Installation Condition
4
1. Environmental Conditions
1) Indoor installation
2) Altitude should be up to 2000m
3) Ambient temperature : 5℃ ~ 40℃
(If the temperature is lower the 5℃, the system can be frozen up)
4) Maximum relative humidity : 80%
5) Power : 230 ± 10%V, 50/60㎐ ± 1㎐, 60W
6) Pollution degree 2
7) Installation Categories Ⅱ
8) The instrument should be placed on steady workbench that is free
from a strong vibration source.
9) The location room should be free from a strong electro magnetic
interference source or harmful or corrosive gases.
CAUTION!! - Refer to accompanying documents
CAUTION!! - ELECTRIC SHOCK
“ To avoid electrical shock, do not open the cover.
Refer servicing to qualified personnel only.”
Arioso Power (TOC) System
11

Installation Method Ⅰ
5
1. Pretreatment System (Refer to Page 8)
2. Main System (Refer to Page 9)
3. Main System (Refer to Page 8)
1) Unscrew the locking system at under of Main body and Open it.
2) Lock the door again when you are using the instrument.
2) Before connect the main system, wash 10 ” A/C filter by opening Tap Water.
[Drain minimum 60 sec.]
※
1) Connect the Input of Pretreatment System into the Tap Water. [Blue 10mm(OD) tubing]
3) Connect the Output of Pretreatment into the Input Port in back side of main system.
[Blue 6mm(OD) tubing]
Human Corporation
12
①
Input Port [6mm(OD)]
Connect to output of Pre-treatment system
using Blue 6mm(OD) tubing
②
Pure Water Product Port
Connect to Water tank using White 6mm(OD) tubing
③
Drain Port
Connect to Sink using Blue 6mm(OD) tubing
④
TOC Input (Option)
Connect to Input of TOC Meter using transparent 4mm(OD) tubing
⑤
Printer Port (Option) - 4 pin
Connect to Printer
⑥
TOC Meter Power Port (Option) - 5 pin
Connect to Power of TOC meter
⑦
Level Sensor - 2, 3, 6 pin
After connect level sensor, put it Water Tank
⑧
Power switch
Connect to Power

5. TOC Meter Installation Method
4. Connect Front Pack (Refer to Page 9)
1) Connect RO pack Line
2) Connect UP Pack line
3) Connect 0.2 Capsule Filter
4) Connect 254/185 UV Lamp (Option)
5) Connect MW 5000UF filter (Option)
① Put TOC Meter back-right of Main system.
② Insert the back-left rubber feet
of main system into the hole of TOC meter.
m
Arioso Power (TOC) System
13

Installation Method Ⅱ (Diagram)
6
1. Pre-treatment System Diagram
Air Vent RED button
①
Open the tap after connecting lines.
②
Drain water for approx.
60sec to wash A/C filter.
③
Connect to input port of Main system
after close the tap. (Page 9)
10 ” Pre Filter
Blue 10
mm(OD)
tubing
10 ” A/C Filter
Human Corporation
14

2. Back side of Main System
TOC Meter
Printer
•Level Sensor Type
⑴ 2 step level sensor
⑵ 3 step level sensor
⑶ 5 step level sensor
sink
①
①
Blue 6mm(OD) input tubing
②
White 6mm(OD) (RO product) tubing
③
Blue 6mm(OD) (RO Drain) tubing
④
Transparent 4mm(OD) (TOC meter Input) tubing
⑤
Printer cable (4pin)
⑥
TOC meter Power (5pin)
⑦
Level Sensor
⑧
Power Cable port & Switch
TOC drain
②③④⑤⑥ ⑦ ⑧
Arioso Power (TOC) System
15
Pretreatment
Output

Display
7
1. Main Display
2. Operation Display
MODE
R
U
SET
UP/RESET
UP/RESET
A1.2 bar/F M1.2 bar/F
: Setting Operating Condition
: Produce / Stop RO water Key
: Produce / Stop UP water Key
: Checking Instrument
or
: ① Press this, Produce / Stop UP water
② Press for 3sec, back to Main display
1)
① A (Auto) : Only works when the Tap water pressure is in 1~5bar(kg/㎠).
It doesn’t work when the Tap water pressure is over 5bar(kg/㎠) or
blow than1bar(kg/㎠). (Default Value : 1~5bar, Modifiable at )
② M (Manual) : Only works regardless of Tap water pressure
(Remarks : It works even though there is no supplied water!)
③ 1.2 bar/F : Present Feed Water pressure
④ Setting Method :
MODE
SET ⇨
NEXT Auto Manual
→ → or
Human Corporation
16

5.2 bar/RO -bar/RO
2)
① Pressure of RO Membrane (Default Value : 3 to 7 bar)
Regulate Pressure of RO Membrane, the ratio of RO product / Drain volume
by controlling
② Analog Pressure guage is equipped when it does not have Pressure sensor of RO membrane.
Product / Drain Valve
3)
① RO Product : 0.2 /cm
② Feed water Conductivity : 148 /cm (Default Value : < 350 / c m )
RO
148
/cm
feed
0.2
4)
① UP Product : 18.3
cm at 25℃
② TOC : 2 ppb (Option)
UP
2 ppb
cm
TOC
18.3
① 15.0℃ : Temperature of Feed Water
② : Beep ON
③ : Beep OFF
④ Setting method :
or
5)
15.0
℃/F
15.0
℃/F
or
SET Beep ON Beep OFF
→
① 21.0℃ Amb : The present Ambient Temperature (Default Value : > 5℃)
② Caution: The system can be frozen up if the temperature is lower than 5℃!
6)
21.0
℃Amb
∙ Water Tank
( 2step ,3step ,5step )
7)
or (without Pressure sensor)
Arioso Power (TOC) System
17
s
s
s s
Ω
∙
M
Ω
∙
M
Model Auto Drain Valve
생 산 비 율
Arioso Power Ⅰ
Arioso Power Ⅱ
Arioso Power Ⅲ
Product
4
4
5
Drain
6No
6Built-in
Auto Drain Valve ;
It automatically adjust
the ratio of product
and drain water
volume.
5

(Unit ; /cm)
1)
2)
4)
5)
6)
7)
3)
3. Mode Display
※ For changing Default value Touch display → change the value with key.
or
RO / UP
Value Setting
AC / UV
Time Setting
0.2CF / MW5000
Time Setting
Feed
Water µs/cm
Pressure
Value Setting
Running time
RO / UP / AC / UV LAMP
RO / UP
Volume Dispensing
RO / UP
Dispensing Time
: Setting replacement period of RO / UP Pack
① 1
st
Value : 1st Alert message RO/UP pack replacement
②
2nd
Value : 2nd Alarm message RO/UP pack replacement
Setting replacement period of AC Filter, UV Lamp (Unit ; hour)
Set the or first.
Replace period for 0.2 Capsule Filter (or PF Filter) and MW5000 UF Filter
※ In the case of Scholar - PF, Scholar - UV - PF Type
Replace 0.2CF →PF Filter!
Setting Max value of Feed water Conductivity.
① FD : Setting Feed Water Pressure (Unit ; kg/㎠, bar)
② RO : Setting RO membrane Pressure (Unit ; kg/㎠, bar)
Display total accumulated running time of
RO Pack, UP Pack, AC Filter, UV Lamp 0.2 CF, UF Filter. (Unit ; hour)
∙ Setting dispensing Volume
(Vloume : 0.01 to 99.0 L)
∙ Setting dispensing time
(Option)
or
SET →※
m
m
Human Corporation
18
s
Volume Dispensing Dispensing Time
This manual suits for next models
1
Table of contents
Popular Water Filtration System manuals by other brands

Watts
Watts SmartStream UV WB002 Installation, operation and maintenance manual

Sicce
Sicce GREEN RESET 25 instructions

Rainfresh
Rainfresh BH010 Installation and operating instructions

Sealey
Sealey CV500.01 instructions

Waterman
Waterman Sand filter with UV system Operating and assembly instructions

PuriTeam
PuriTeam Purity UC-12 manual

Grohe
Grohe Blue Pure 31299001 manual

BWT
BWT Protector mini HWS C/R Installation and operating instructions

GRE
GRE AQUALOON instruction manual

Philips
Philips AC4141 Specifications

BLUE COLLECTION
BLUE COLLECTION KIVI quick start guide

NEW MILLENIUM CONCEPTS
NEW MILLENIUM CONCEPTS Berkey Light quick start guide