Humanware CLASSMATE User manual

Rev.9- 20090202
CLASSMATE
USER GUIDE
by HumanWare
revision 9- 20090202

HumanWare
www.humanware.com
ClassMate User Guide
Rev.9- 20090202
2
User Guide

HumanWare
www.humanware.com
ClassMate User Guide
Rev.9- 20090202
3
About ClassMate Reader
HumanWare is proud to introduce a revolutionary device for people with reading difficulties. The
ClassMate Reader is a tool designed to help students and adults in and out of the classroom and
workplace improve reading comprehension, increase reading speed and develop strong
vocabulary. This tool is indispensable for students and adults who need to refer back to
previously recorded notes, tests or chapter summaries, as well as for anytime, anywhere
learning.
The ClassMate Reader is a unique, portable and lightweight system about the size of a portable
gaming system with a large LCD screen. You can listen to audio versions of your textbooks and
reading materials, while following the highlighted text on screen. The system promotes phonetic
recognition and fluency.
The ClassMate Reader has several features only found on more expensive PC-based software
solutions such as text-to-speech, highlighting, dictionary, text and vocal notes and audio book
navigation.
The ClassMate’s study features are designed to assist you in retrieving information through the
use of text notes, highlighting, bookmarks and voice notes. The ClassMate Reader can play
various electronic book formats such as the new NIMAS (National Instructional Material
Accessible Standard) format, and including DAISY, Bookshare.org, text, wav, and MP3 books.
The player also provides integrated text-to-speech for reading books in text format, such as those
from Bookshare.org. It uses removable SD flash memory cards or USB memory sticks to store
books and electronic texts. It can easily transfer files from a PC with its standard USB connection.
We wish you many pleasant hours discovering all the facets of your new ClassMate Reader!
Note: The ClassMate Reader will be referred to as the ClassMate throughout the text.
Copyright 2009. All rights reserved, HumanWare Canada.
This User Guide is protected by copyright belonging to HumanWare, with all rights reserved.
According to copyright law, the manual may not be copied in whole or in part, without written
consent from HumanWare.

HumanWare
www.humanware.com
ClassMate User Guide
Rev.9- 20090202
4
Table of Contents
1. Overview of ClassMate Player................................................................................................. 6
1.1 Unpacking the Player....................................................................................................... 6
2. Physical Description of the ClassMate..................................................................................... 7
2.1 Description....................................................................................................................... 7
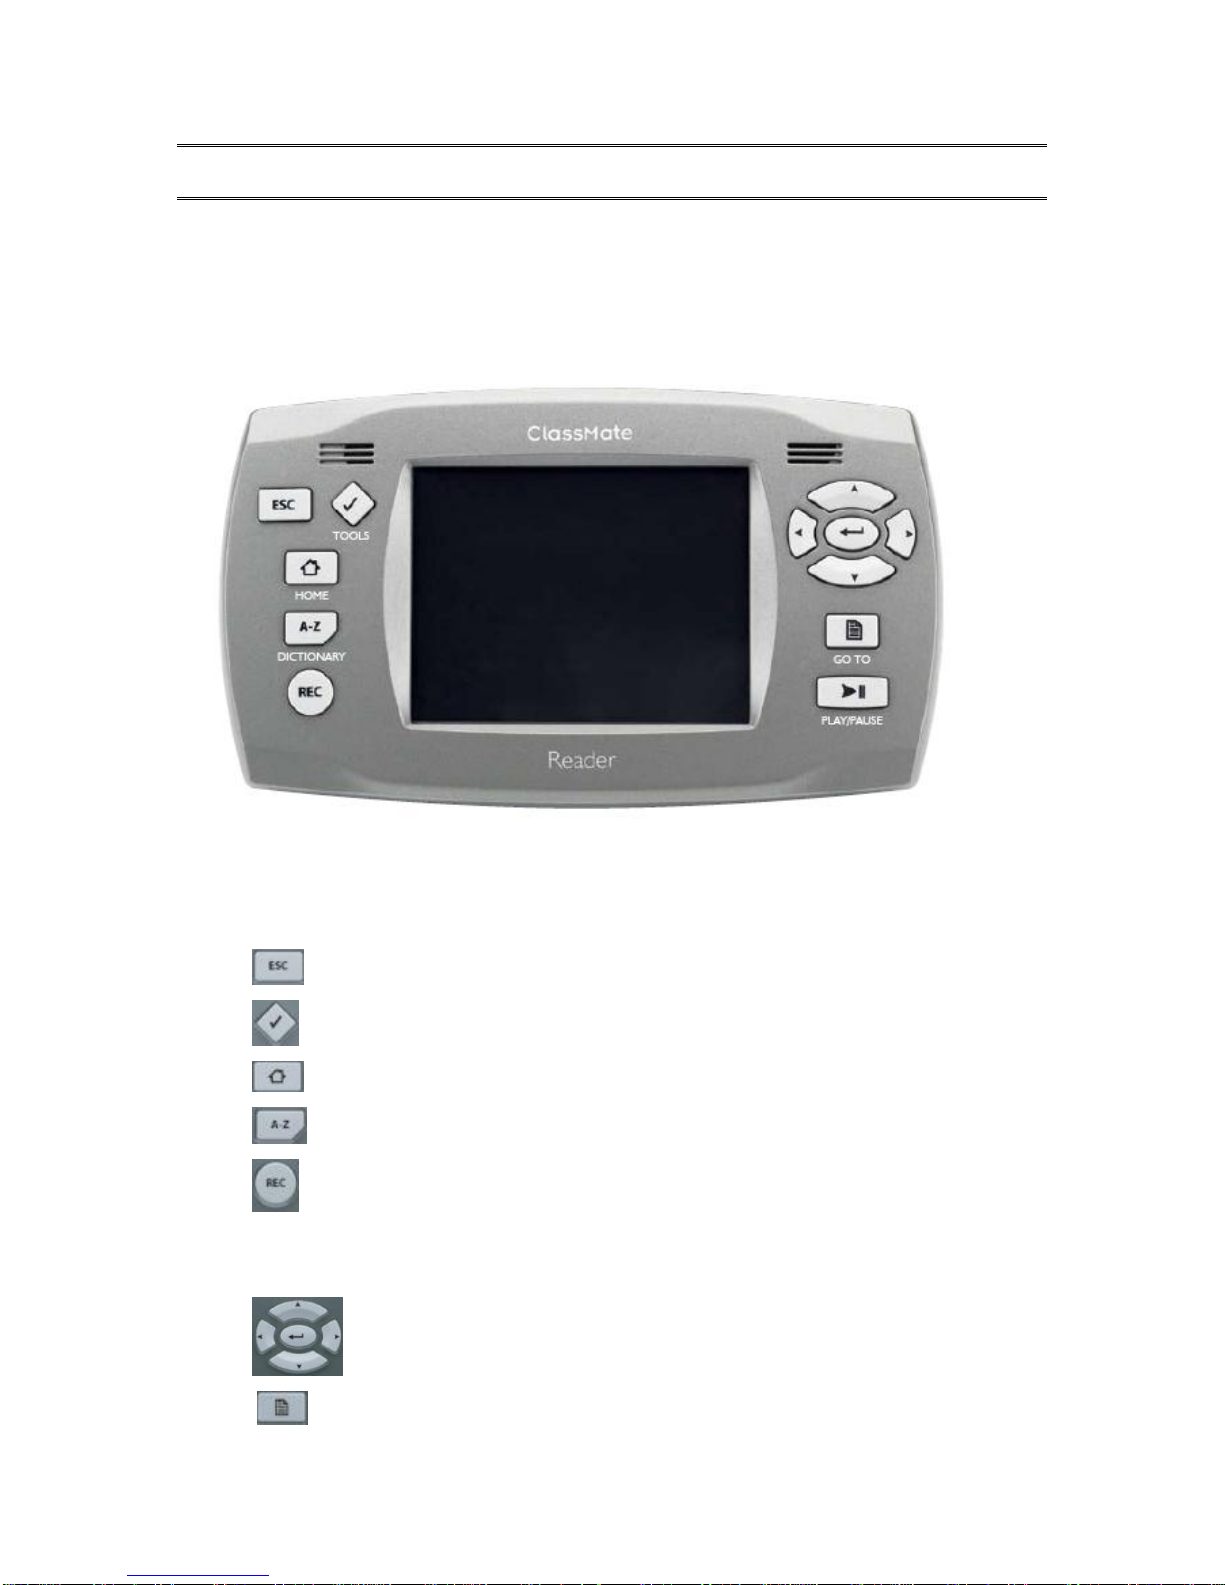
2.1.1 Face of the Player........................................................................................................ 7
2.1.2 Left Edge of the Player................................................................................................ 8
2.1.3 Right Edge of the Player.............................................................................................. 8
2.1.4 Top Edge of the Player................................................................................................ 8
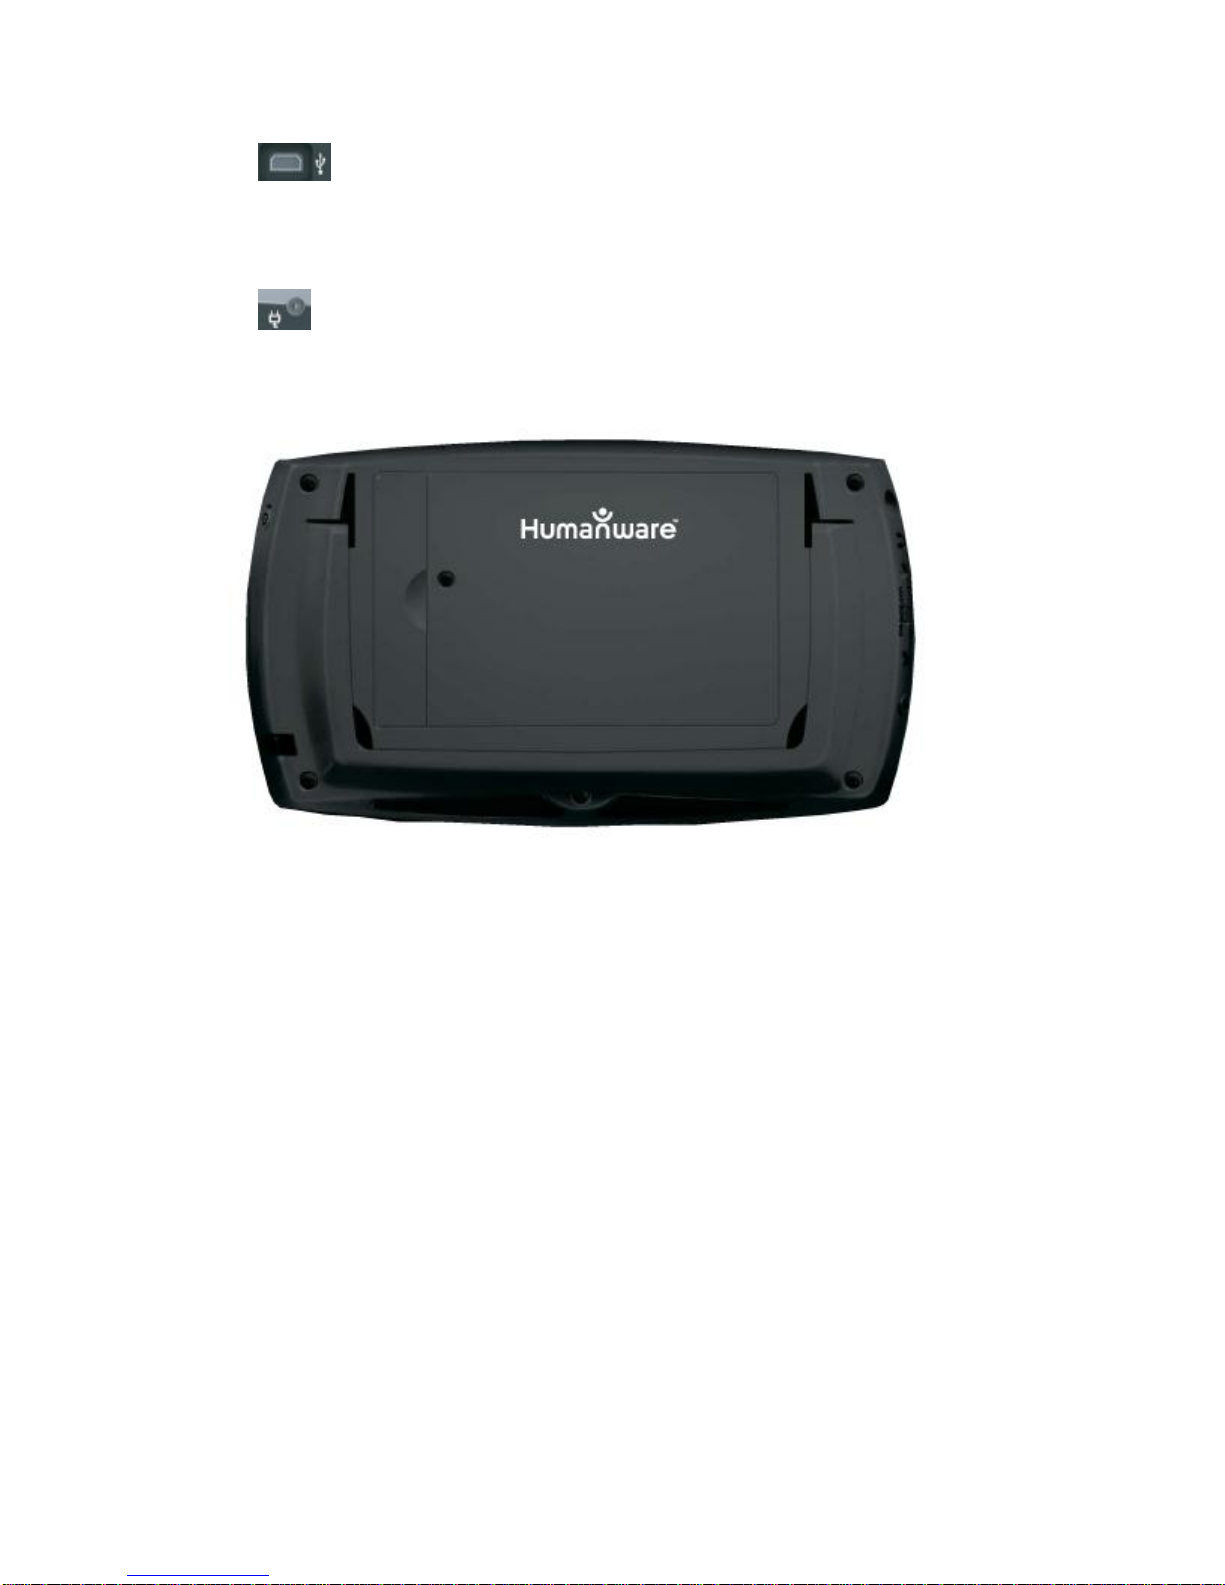
2.1.5 Back Side of the Player ............................................................................................... 9
2.1.6 Battery removal and installation procedure ................................................................. 9
2.2 Powering On/Off ClassMate.......................................................................................... 10
2.2.1 Player Reset using Power Button.............................................................................. 10
2.3 Inserting and Removing the SD card............................................................................. 10
2.3.1 Protecting information/writing to SD card.................................................................. 10
2.4 Memory Card Detection................................................................................................. 11
2.5 Bookshelf Structure ....................................................................................................... 11
2.5.1 Other Reserved File Names...................................................................................... 12
2.6 Audible books................................................................................................................ 12
2.6.1 Audible Structure ....................................................................................................... 13
2.7 Podcasts Bookshelf....................................................................................................... 13
2.8 Transferring Files between your PC and ClassMate..................................................... 13
2.8.1 Upgrading your ClassMate........................................................................................ 13
2.8.2 Using Windows Explorer for File Transfer................................................................. 14
2.8.3 Folders and their respective contents........................................................................ 15
2.8.4 Disconnecting the player from the computer............................................................. 15
2.9 Access Password protected books (RFB&D)................................................................ 16
2.10 Key Describer mode...................................................................................................... 16
2.11 Keyboard Locking.......................................................................................................... 16
2.12 Battery ........................................................................................................................... 16
3. Basic Functions...................................................................................................................... 18
3.1 Text Window.................................................................................................................. 18
3.2 Open a Book.................................................................................................................. 19
3.2.1 Open Last Active Book .............................................................................................. 20
3.3 Listening to Music.......................................................................................................... 20
3.3.1 Shuffle mode (Music only)......................................................................................... 20
3.4 Delete a Book ................................................................................................................ 21
3.5 Read a Book.................................................................................................................. 21
3.6 Using the Stylus............................................................................................................. 21
3.6.1 Tap............................................................................................................................. 21
3.6.2 Tap and Drag............................................................................................................. 22
3.7 Using the Keyboard....................................................................................................... 22
3.8 Add Voice Note.............................................................................................................. 22
3.9 Navigating Menus.......................................................................................................... 23
3.10 Navigating a Book.......................................................................................................... 23
3.10.1 DAISY Mode.......................................................................................................... 23
3.10.2 Text Mode.............................................................................................................. 24
3.11 Scrolling through a book while playing book ................................................................. 24
3.12 Go to Page / Heading.................................................................................................... 24
3.13 Find Text........................................................................................................................ 25
4. Settings................................................................................................................................... 26
4.1 Visual Settings............................................................................................................... 26
4.1.1 Font Size/Style........................................................................................................... 26
4.1.2 Color Text/Background.............................................................................................. 26

HumanWare
www.humanware.com
ClassMate User Guide
Rev.9- 20090202
5
4.1.3 Contrast ..................................................................................................................... 26
4.1.4 Spacing Word/Line .................................................................................................... 26
4.1.5 Vertical Cursor Placement......................................................................................... 27
4.1.6 Default........................................................................................................................ 27
4.2 Audio Settings................................................................................................................ 27
4.2.1 Playback type selection............................................................................................. 27
4.2.2 Audio Interface........................................................................................................... 28
4.2.3 Speed and Volume Settings...................................................................................... 28
4.2.4 Text to Speech Selection........................................................................................... 28
4.2.5 Default........................................................................................................................ 28
4.3 Timer Mode.................................................................................................................... 28
4.4 Calibration...................................................................................................................... 29
5. Study Tools Menu .................................................................................................................. 30
5.1 Study tools menu items ................................................................................................. 30
5.1.1 Highlight Text............................................................................................................. 30
5.1.2 Highlight Settings....................................................................................................... 31
5.1.3 Add Text Note............................................................................................................ 32
5.1.4 Add Bookmark ........................................................................................................... 32
5.1.5 Navigate Markings..................................................................................................... 33
5.1.6 Deleting Markings...................................................................................................... 33
5.1.7 Exporting Text Notes................................................................................................. 33
5.1.8 Consult Dictionary...................................................................................................... 34
6. Dictionary................................................................................................................................ 35
6.1 Looking up words........................................................................................................... 35
6.1.1 Looking up words from the text ................................................................................. 35
6.1.2 Looking up other words ............................................................................................. 35
6.1.3 Looking up words in a Definition................................................................................ 35
6.2 Dictionary Features........................................................................................................ 35
6.2.1 Syllable, Spell and Word............................................................................................ 35
6.2.2 Other Features........................................................................................................... 36
7. Appendix................................................................................................................................. 38
7.1 Dictionary Abbreviations................................................................................................ 38
7.2 Dictionary License ......................................................................................................... 39
7.3 Minimum End User Terms............................................................................................. 39
8. Technical Specifications......................................................................................................... 40
9. Battery Safety Precautions..................................................................................................... 42
10. Contact Information ............................................................................................................ 43
10.1 Related Links................................................................................................................. 43

HumanWare
www.humanware.com
ClassMate User Guide
Rev.9- 20090202
6
1. Overview of ClassMate Player
1.1 Unpacking the Player
The package contains the following items:
ClassMate player with Stylus and rechargeable battery
Power cord
Ear buds headphones
Warranty card,
Carrying case/pouch
USB cable for computer transfers
USB cable for book cartridges and USB memory sticks
ClassMate Package CD including User Guide with pictures
Tutorial CD
Please ensure that you have received all the items and that none have been damaged in
shipping.
Please note that before using your ClassMate player for the first time, you need to connect the
player to a power outlet for at least 4 and a half hours to ensure a full charge. Please note that
you can use your ClassMate player while charging the battery. With the power cord, the player
will still be operational without the battery.
Note: To avoid damaging the touchscreen, do not pack the power supply in the carrying
case.
In some countries the package may also contain a card to fill out if you wish to purchase an
optional extension to your basic warranty. If you find this card and are interested in the extended
warranty please note that the card must be returned within 30 days of your purchase. If you have
difficulty filling out the card or wish more information please contact HumanWare:
Toll Free: 1 888 723-7273 (Canada & U.S.A.)
Telephone: 1 (819) 471-4818
E-mail: ca.sales@humanware.com
Please take the time to register your units at www.humanware.com. An extended warranty and a
newswire service are also available. We will notify you when free updates are made available.

HumanWare
www.humanware.com
ClassMate User Guide
Rev.9- 20090202
7
2. Physical Description of the ClassMate
2.1 Description
This section describes the various physical components of the ClassMate.
2.1.1 Face of the Player
The face of the player can be divided into three sections. A touchscreen occupies the center
region, and there are buttons on either side of it.
On the left of the touchscreen are the following buttons from top to bottom:
: Escape
: Study Tools
: Home
: Dictionary
: Record
Note that the microphone is located above the Study tools button.
On the right of the touchscreen are the following buttons from top to bottom:
: Four-way arrow navigation buttons with the Enter button in the middle.
: Go to Page/Heading button

HumanWare
www.humanware.com
ClassMate User Guide
Rev.9- 20090202
8
: Play button
Note that the speaker is located above the Up arrow.
2.1.2 Left Edge of the Player
On the left edge of the player, starting at the back, you will find:
: Headphones jack
: Volume/Speed Up and Down
: Volume and Speed toggle button
2.1.3 Right Edge of the Player
On the right edge of the player, starting at the back of the player, you will find:
: the Power button
the SD card slot
the built-in stylus.
2.1.4 Top Edge of the Player
When facing the top edge, you will find on the left:

HumanWare
www.humanware.com
ClassMate User Guide
Rev.9- 20090202
9
: Mini USB connector: This is used to copy books from USB storage devices
or to play material saved on USB memory sticks.
On the right side:
:Power input jack: It is used to connect the player to an electrical outlet.
2.1.5 Back Side of the Player
Two features are found on the back side of the player: The Battery door and the retractable
stand. The Battery door covers most of the back of the player, and the retractable stand is built
around it. To open the stand, locate the finger opening under the front edge of the player and
extend it towards the back.
2.1.6 Battery removal and installation procedure
The ClassMate is shipped with the battery installed.
If you need to change the battery, follow these steps.
To remove battery:
Note: The following instructions assume that the ClassMate is oriented in the correct up
position.
1. The battery compartment is located in the back of the player. To remove the battery door,
you will need to loosen the screw using a standard Philips screwdriver.
2. Lift the battery door and remove from the player. On the right edge of the battery is a
bump near the center, and two tabs on either side. The left edge of the battery has a
finger tab in the middle.

HumanWare
www.humanware.com
ClassMate User Guide
Rev.9- 20090202
10
3. To remove the battery, push and lift the finger tab located on the left-hand side of the
battery and remove battery from the casing.
To install battery:
1. To install the battery, insert the right edge first, making certain the bump fits in the
appropriate opening, and push the left edge in place. The battery's label should be
facing up. Do not force the battery in place; you only have to apply a slight push.
The right side is inserted first; it should not be pushed down.
2. Replace the battery door by putting the right-hand side in first and reinsert the screw to
secure the battery door.
Note: To obtain replacement batteries, please contact HumanWare.
2.2 Powering On/Off ClassMate
To turn the player ON, press and hold the Power key, which is located on the right side of the
player, near the top corner. You will hear a beep and a welcome message.
To turn the player OFF, press and hold the Power key again. You will hear two beeps indicating
the player is powering OFF.
2.2.1 Player Reset using Power Button
If the player does not respond to any key presses including power off, hold down the Power
button for 10 seconds to force a hard reset. The player will shut down without saving anything
and will revert to settings during last shutdown. A hard reset can also be performed when the
Keyboard is locked. Note that if you perform a hard reset on a player that is operating normally,
the settings will be saved as they would be during a normal shutdown.
2.3 Inserting and Removing the SD card
To insert and remove the SD card follow these steps:
1. Hold the player facing you. The SD card slot is on the right edge of the player in the
centre.
2. One corner of the SD card is cut at a 45 degree angle.
Insert the SD card with the label facing up. The cut corner
needs to be the top left corner. If the wrong side of the
card is inserted, it will not enter completely.
3. Gently, push the card into the slot until it clicks into place. Do not use excessive force.
Only slight pressure is required to lock the SD card into place.
4. To remove the card, push down on the top edge to release it. Then pull it out.
Note: For documents over 4 gigabytes in size, you will need to use SDHC cards.
2.3.1 Protecting information/writing to SD card

HumanWare
www.humanware.com
ClassMate User Guide
Rev.9- 20090202
11
The card has a small colored lock tab on its left edge. Make sure the tab is not in the
lock position if you plan to write information on the card such as recording or deleting
voice notes.
If you only listen to books, the tab can be put in the down position to write protect the
SD card.
2.4 Memory Card Detection
When playing the contents of an SD card and it is removed from the player, the player will close
the book. The Bookmarks will be saved, but not the Voice Notes. If the memory card was
removed and reinserted, you will need to reopen the book to continue reading.
If the player is powered on with both an SD card and USB source present, the system will present
both options. The SD card will appear as the first folder within the folder tree.
2.5 Bookshelf Structure
The ClassMate recognizes various book types which are saved in separate folder structures
called Bookshelves. You select the Bookshelf using the four-way arrow navigation buttons to
move within the tree folder. You may also use the touchscreen to select the Bookshelf of your
choice. On the SD or USB source each Bookshelf is stored within a reserved folder name
beginning with $VR. Within each of these reserved folders (Bookshelves) there may be user
defined subfolders containing separate books or categories of files. Books are listed in
alphabetical order. You may put other folders and files on the SD card but it is only the
contents of the $VR reserved folders that can be located within the ClassMate
bookshelves. The Bookshelf structure and usage are defined as follows:
Bookshelf: Talking Books ($VRDTB folder)
Book types: DAISY 2.x, NISO Z39.86, NIMAS
Usage: The files comprising each of your DAISY or NISO books should be saved in separate
subfolders under this folder. Use the Up and Down navigation buttons to move from folder to
folder and from file to file. Use the Right arrow to open the contents of a folder and Left arrow to
close a folder. Click Open or press Enter to select the book. In this bookshelf the current reading
position is saved separately for each book.
Bookshelf: Music ($VRMusic folder)
Book types: Recorded music (mp3, ogg Vorbis, wav, wma)
Usage: The entire music structure is defined as a single book meaning there is only one current
reading position and set of bookmarks for the entire music structure. Set up folders within other
folders containing music files. For example, the structure could be genre, artist, album, and
tracks. Navigate using the Up and Down navigation buttons to select folder and then move
within that subfolder using the Right arrow. Press Enter or Play to start playback. Use the Left
arrow to exit a subfolder. Playback continues from the last file of one folder to the first file of the
next folder. A shuffle mode allows you to randomize playback of your music files. During
playback, use the left and right arrows to move to previous or next song (in normal or shuffle
mode).
Note: To prevent accidental deletion of all music files, the contents of the Music Bookshelf
can only be deleted using your computer.
Bookshelf: Audible books ($VRAudible folder)
Book types: audible.com books
Usage: Each Audible book is comprised of a single file. Audible books should be saved in this
reserved folder. Subfolders must not be used. Use the Up and Down navigation buttons to

HumanWare
www.humanware.com
ClassMate User Guide
Rev.9- 20090202
12
select the book of your choice. Click Open or press Enter to select the book. Do so again to start
the book. In this bookshelf the current reading position and bookmarks are saved separately for
each book. During playback, use the left and right arrows to move from section to section.
Playback stops at the end of the book. The Audible bookshelf will only be created when you
activate your ClassMate for Audible books.
Bookshelf: Other Books ($VROtherBooks folder)
Book types: Non-DAISY or non-NISO recorded books (MP3, Wav)
Usage: The files comprising each book should be saved in separate subfolders under this folder.
Example folder name: A Bug's Life. Use the UP and Down navigation buttons to move from
folder to folder and from file to file. Use the Right arrow to open the contents of a folder and Left
arrow to close a folder. Click Open or press Enter to select the book. In this bookshelf the current
reading position is saved separately for each book. Playback stops at the end of the last file of
each book.
Bookshelf: Podcasts ($VRPodcasts)
Book types: Any of the ClassMate’s supported audio file types.
Usage: Each podcast file is defined as a separate book meaning you must move from file to file
using the navigation arrows while in the Bookshelf. Files may be in subfolders. Reading position
and bookmarks are saved separately for each book (file). Playback stops at the end of each book
(file).
Bookshelf: Text ($VRText folder)
Book types: Text files (txt, html, rtf, xml)
Usage: The files comprising each book should be saved in separate subfolders under this folder.
Example folder name: A Bug's Life. Use the UP and Down navigation buttons to move from
folder to folder and from file to file. Use the Right arrow to open the contents of a folder and Left
arrow to close a folder. Click Open or press Enter to select the book. In this bookshelf the current
reading position is saved separately for each book. Playback stops at the end of the last file of
each book.
NOTE: The folders will be created automatically when a non-write-protected SD card is
inserted in the ClassMate. This does not apply to the $VRAudible folder. It is only created
if the SD card is activated for Audible books.
If the entire content of a bookshelf is deleted, this bookshelf will no longer appear in the
list.
2.5.1 Other Reserved File Names
The ClassMate may create other file names beginning with $VR on the SD or USB data source.
Removing or altering these files could result in unpredictable behavior.
2.6 Audible books
ClassMate can play Audible.com format 4 books. You must first activate the ClassMate SD card
for Audible books. To do this, connect ClassMate to your computer using the long USB cable and
then activate the ClassMate using the Audible Manager software. When Audible Manager
activates the ClassMate it will create a new reserved ClassMate folder named $VRAudible in the
root of the ClassMate SD card. It will place a hidden system (.SYS) activation file in that
$VRAudible folder which you must not delete. If you want to save Audible books on multiple SD
cards you will need to activate each SD card separately. All Audible books must also be saved in
this $VRAudible folder. To transfer Audible books you may either use the Audible Manager with
the ClassMate connected or use Windows Explorer to transfer the .aa Audible book file from the
Audible downloads folder on your computer directly to the $VRAudible folder on the SD card. If

HumanWare
www.humanware.com
ClassMate User Guide
Rev.9- 20090202
13
you use Windows Explorer for the file transfer you can take advantage of the faster transfer
speed of your computer card reader. If you choose to transfer books with Audible Manager you
must always connect the ClassMate to the computer.
2.6.1 Audible Structure
Simply place your Audible books in the $VRAudible folder. They must not be placed in
subfolders.
2.7 Podcasts Bookshelf
The Podcasts bookshelf contains a folder structure of audio files where each folder represents a
podcast feed and each file an episode of that feed. Each file (episode) is defined as a separate
podcast book.
2.8 Transferring Files between your PC and ClassMate
To connect ClassMate to your PC, power off on the player, connect one end of the long USB
cable to the mini USB on the right side of the top edge of the ClassMate and the other end to your
PC's USB port. Then turn the ClassMate back on. Windows will recognize the ClassMate SD card
as a USB drive and you can then use Windows Explorer to transfer files back and forth. If you
have an SD card reader on your PC, it will be faster to transfer files using the PC card
reader than using the USB cable with ClassMate. If you are not familiar with file transfers
using Windows Explorer you may want to install the optional ClassMate companion software. It is
now available on the HumanWare website.
The ClassMate must remain powered on while connected to the PC. While connected, its controls
will not function.
You will be able to upgrade the player with an updated SD card.
2.8.1 Upgrading your ClassMate
From time to time, HumanWare will offer upgrade files meant to improve your Classmate by fixing
problems and adding features. The upgrade process is quick and simple. To perform an upgrade,
you will need the following:
What you will need:
Your ClassMate
Power cord.
SD card
SD card reader or the ClassMate USB cable
Computer with Internet connection
Downloading the Upgrade File:
1. Open up the HumanWare up website found at www.humanware.com
2. Advance to the Products tab and select Learning Disabilities.
3. Click on the ClassMate Reader image.
4. On the right-hand side scroll down to the Support section and click Software. You will
find there the latest software version.

HumanWare
www.humanware.com
ClassMate User Guide
Rev.9- 20090202
14
5. From the ClassMate upgrade page, select the download link. Find a location on your
computer where to save this file.
6. The download will be a ZIP file containing a single upgrade (UPG) file.
7. Unzip the UPG file from the download zip file. Note that you do not need any special
unzip software. Windows XP and Vista can unzip the UPG file from the download ZIP file.
Copying Upgrade file
8. You need to place the UPG file in the root of your ClassMate's SD card. There are two
ways to accomplish this. You can either copy the file to the SD card using your
computer's SD card reader, or you can copy the file to your ClassMate's SD card directly
by using the USB cable.
Using the SD card reader
Using Windows Explorer, copy the UPG file to the root of the SD card.
Insert the SD card into your ClassMate.
If the ClassMate is on, turn it off.
OR
Using the ClassMate USB cable
Connect the USB cable to your ClassMate.
Connect the other end of the USB cable to your computer.
Turn on the ClassMate- A picture will say that you are connected.
While the ClassMate is connected to the computer by way of the USB cable,
copy the UPG file to the root of your ClassMate's SD card.
Once the copy is done, use the Windows "safely remove device" feature to end
communications between the ClassMate and your computer.
Shut the ClassMate off and unplug the USB cable.
Installing the upgrade
9. Connect the ClassMate to AC power and turn it on.
10. The ClassMate will recognize the UPG file and initiate the upgrade process. You will be
asked to confirm the upgrade. To confirm the upgrade, press the Play button. Press any
other button to cancel the upgrade. Audio messages will inform you of the start and end
of the update process which takes about 2 minutes. Note that once upgrade procedure
has started, it cannot be interrupted.
Note that you may use the same UPG file to perform multiple upgrades.
11. Delete the UPG file from the card after updating. To do so, insert the SD card in your
computer's SD card reader and locate the file using Windows Explorer. To remove, select
it using the left mouse button and press the Delete button on the keyboard. You can also
delete the file from the SD card using Windows Explorer by way of the ClassMate USB
cable.
2.8.2 Using Windows Explorer for File Transfer
1. Locate on your computer the content (on CD or Hard Drive) you wish to transfer to your
ClassMate.

HumanWare
www.humanware.com
ClassMate User Guide
Rev.9- 20090202
15
2. Connect long USB cable to the ClassMate and the other end to your computer's USB
port.
3. Turn the ClassMate On if connected by USB cable.
4. Copy the contents you wish to transfer and drag over to "removable disk". Windows will
recognize the SD card as a removable disk, whether it is in the ClassMate or an SD card
reader. Make sure to copy files in the appropriate folders.
5. Once information has been transferred to the ClassMate SD card, right-click on
"removable disk" and select "Eject" to complete the process.
2.8.3 Folders and their respective contents
$VRDTB
Playing DAISY books with the ability to navigate, for example moving within pages and chapters.
$VRMusic
Music files played by the ClassMate include mp3, Ogg Vorbis, wav and wma.
$VRAudible
Single file books. Each book may have sections.
$VROtherBooks
Other books are files such as MP3 books created with Optical Character Recognition (OCR),
Mass market MP3 audio books or podcasts from the internet.
$VRPodcasts
Single file audio broadcasts. Podcast files do not contain sections.
$VRText
Material that has been saved in html, rtf, txt and xml formats.
2.8.4 Disconnecting the player from the computer
When you disconnect from the PC, you will need to power off the ClassMate.
You can switch SD cards in the ClassMate while connected but before removing the SD or
disconnecting the ClassMate be sure to use the Safely Remove Hardware function on the
Windows System Tray. This will ensure that the data contained on the SD card is not corrupted.
The windows system tray is located in the bottom right corner of the screen. It is where the clock
and various icons are located.
To safely disconnect or remove the SD card from the player while connected to the PC, you will
need to right-click the Safely Remove icon.

HumanWare
www.humanware.com
ClassMate User Guide
Rev.9- 20090202
16
Left-click on the Safely Remove Hardware option.
Windows will inform you that you may now disconnect the player from the computer.
2.9 Access Password protected books (RFB&D)
Some DAISY books may be protected. In order to access them, you will need to authorize your
player to read these books.
To obtain the RFB&D User Authorization Key (UAK), please contact Recording for the Blind &
Dyslexic at 800-221-4792: www.rfbd.org . This is a special firmware upgrade for your Classmate
that will allow you to access your RFB&D books. The cost of the UAK is $20.00 plus shipping.
RFB&D was established in 1948. It provides materials for all people who cannot effectively read
standard print because of a visual, perceptual, or other physical disability.
For additional information on RFB&D membership, please visit:
http://www.rfbd.org/membership.htm
2.10 Key Describer mode
To access the Key Describer mode, press and hold the Home button for two seconds. When in
this mode, the player will announce the name of each button when they are pressed. To exit the
Key describer mode, press and hold Home again for two seconds. When key describer mode
has been established, a yellow box will appear in the bottom right corner.
2.11 Keyboard Locking
This player was designed so it could be carried without accidentally activating buttons or to help
some students stay focused on the reading task. To activate this option, press and hold the
Escape button for two seconds. A message will inform you that the keyboard has been locked.
When the player is in Locked mode, all key presses will be ignored and Playback will begin.
To exit locking mode, press and hold Escape for two seconds again.
Note that performing a Hard reset will shut the player even if it is in Keyboard lock mode.
2.12 Battery
The fully charged battery will provide up to 7 hours playtime. However, battery playtime may be
reduced in the following cases:
If the battery is charged for less than 4 and a half hours.
If navigation commands are used frequently.
High volume level or High Speed playback.
Level of contrast.

HumanWare
www.humanware.com
ClassMate User Guide
Rev.9- 20090202
17
After many recharge cycles (more than 250) the battery capacity will start to reduce.
The battery will automatically recharge whenever the player is plugged to AC power. The player
can be used while recharging. If the player is powered Off, you will see an indication on the
screen that the battery is charging. A full recharge takes up to 4 and a half hours.
NOTE: When the player is not connected to a power outlet, and left in pause mode for more than
15 minutes, it will shut Off automatically to save the battery.

HumanWare
www.humanware.com
ClassMate User Guide
Rev.9- 20090202
18
3. Basic Functions
3.1 Text Window
The Text window can be divided into three sections. The main section is the text area. The
appearance of the text and background can be modified. See Settings/Visual settings for
additional information.
Above the text is the toolbar in which you will find various icons and buttons.
The first icon represents the player's Speed setting. The length of the horizontal bar next to it
represents the current speed setting. Pressing this icon will bring you directly to the speed menu,
where you can adjust the settings to your needs.
The second icon represents the player's Volume setting. The vertical bars next to it
represent the current volume setting. Pressing this icon will bring you directly to the volume
menu, where you can adjust the settings to your needs.
To adjust the Speed or Volume Settings, please see Speed and Volume Settings in the
Settings menu.
Next to Speed and Volume is the Battery icon. This is a visual representation of the battery
status and charge level. If the battery charge becomes too low, the battery icon will begin to flash.
Battery charging
Fully charged battery
Battery charge high
Battery charge medium
Battery charge low
Battery charge very low
Next to the battery icon, is the Highlight button. The Highlight button is used to
highlight the selected text using the current highlight settings.

HumanWare
www.humanware.com
ClassMate User Guide
Rev.9- 20090202
19
The appearance of the Highlight button reflects these settings. The button's background color as
well as the characteristics of the button's name will serve as a reminder of the current Highlight
settings. For additional information on Highlighting, please see Highlight settings in the Study
tools section.
Next to the Highlight button are the Navigation mode buttons. These buttons
display the current navigation mode (shown with a yellow outline) and allow you alternate from
one mode to the other.
Finally, in the upper right corner, you will find the Maximize window button. This option will
maximize the size of the text area by hiding all buttons and icons. To return to normal view, tap
the blue bar at the top of the screen.
Below the text area are Navigation buttons and an Information window.
The navigation buttons are:
Play and Stop buttons. These two buttons will alternate to display the option not currently
in use. They can be found between the Rewind and Fast Forward buttons.
Rewind and Fast Forward buttons. They are used to move backwards and forwards in
the text. To activate the Rewind or Fast Forward button, press once. The player will announce
the rate of progression as it moves through the text. To end, press the Rewind of Fast Forward
button again or Play to begin reading at the new location.
Finally, in the lower left corner, you will find the Progress bar, which allows you to estimate your
position within the text. By tapping it twice, you will be able to jump to another position in the
book. This feature can be disabled in the Font and Style submenu in the Visual Settings menu.
Also, in the lower right corner is the Information window. This area is used to display
information including: the current book's title, location path and type, the number of pages,
headings and total time. Tap this area to maximize and minimize the size of this region.
3.2 Open a Book
To open a book:
1. Press the Home button to access the main menu.
2. From the Main menu select the Open Book icon. The Open Book dialog will appear.
3. From this dialog box, the user can select the book to open.
4. To open the selected book, press the Open button. The player will close the menu and
load the selected book. You may also select Cancel or press Escape to return to the
menu.
Example: Select SD Card by Arrowing down with the navigation keys and press

HumanWare
www.humanware.com
ClassMate User Guide
Rev.9- 20090202
20
1. Right arrow to open SD file
2. Down arrow to select Digital Talking Books
3. Right arrow to open book lists
4. Down arrow to highlight selection
5. Enter Key to open the book (Enter key - center of four-way
navigation)
You may only open one book at a time. If you open another book, the first one will be closed.
Note: Some RFB&D books are protected by a PIN number. If such is the case, a dialog box
will appear in which you can enter your PIN number. For additional information, please
consult the Access Password protected books section.
You may also use Open Book to open .txt documents or the Music book.
3.2.1 Open Last Active Book
At the bottom of the Open Book dialog you will find a checkbox called Open Last Active Book.
Enable this option if you want to have the last book read automatically opened when you start up
ClassMate. This option is not selected by default.
If the player is unable to open the last book, the Open book dialog will ask you to select the right
book.
Note: Make sure the book is active (open) when you shut the player.
3.3 Listening to Music
To listen to music:
1. Press the Home button to access the main menu.
2. From the Main menu select the Open Book icon. The Open Book dialog will appear.
3. From this dialog box, open the Music Files and select the Music book.
4. To open the Music book, press the Open button. The player will close the menu and load
the Music book. You may also select Cancel or press Escape to return to the menu.
5. Using the Arrows or Stylus, select the song you wish to listen. Press Play or Enter to
start song.
6. While in playback, use the Left and Right arrows to move to the previous or next song in
the list.
Note: When in Shuffle mode, all your music files will play in continuous loop.
3.3.1 Shuffle mode (Music only)
Press the Shuffle button to toggle between Shuffle mode ON and Shuffle mode OFF.
The Shuffle mode option is only available from the toolbar when listening to music. When the
Shuffle mode is enabled, the ClassMate will play random songs from your music folder after your
Other manuals for CLASSMATE
1
Table of contents
Other Humanware Personal Care Product manuals