Hunter 38257 User manual

42992 05/23/2006 1©2006 HUNTER FAN CO.
FRANÇAIS
Consulter la page 15
ENGLISH
See page 2
www.hunterfan.com
The Care Free®Ultra
Evaporative Humidifier
Model 38257
42992-01/-05.indd 1 5/23/06, 12:30:04 PM

42992-01 05/23/2006 2©2006 HUNTER FAN CO.
READ AND SAVE THESE INSTRUCTIONS
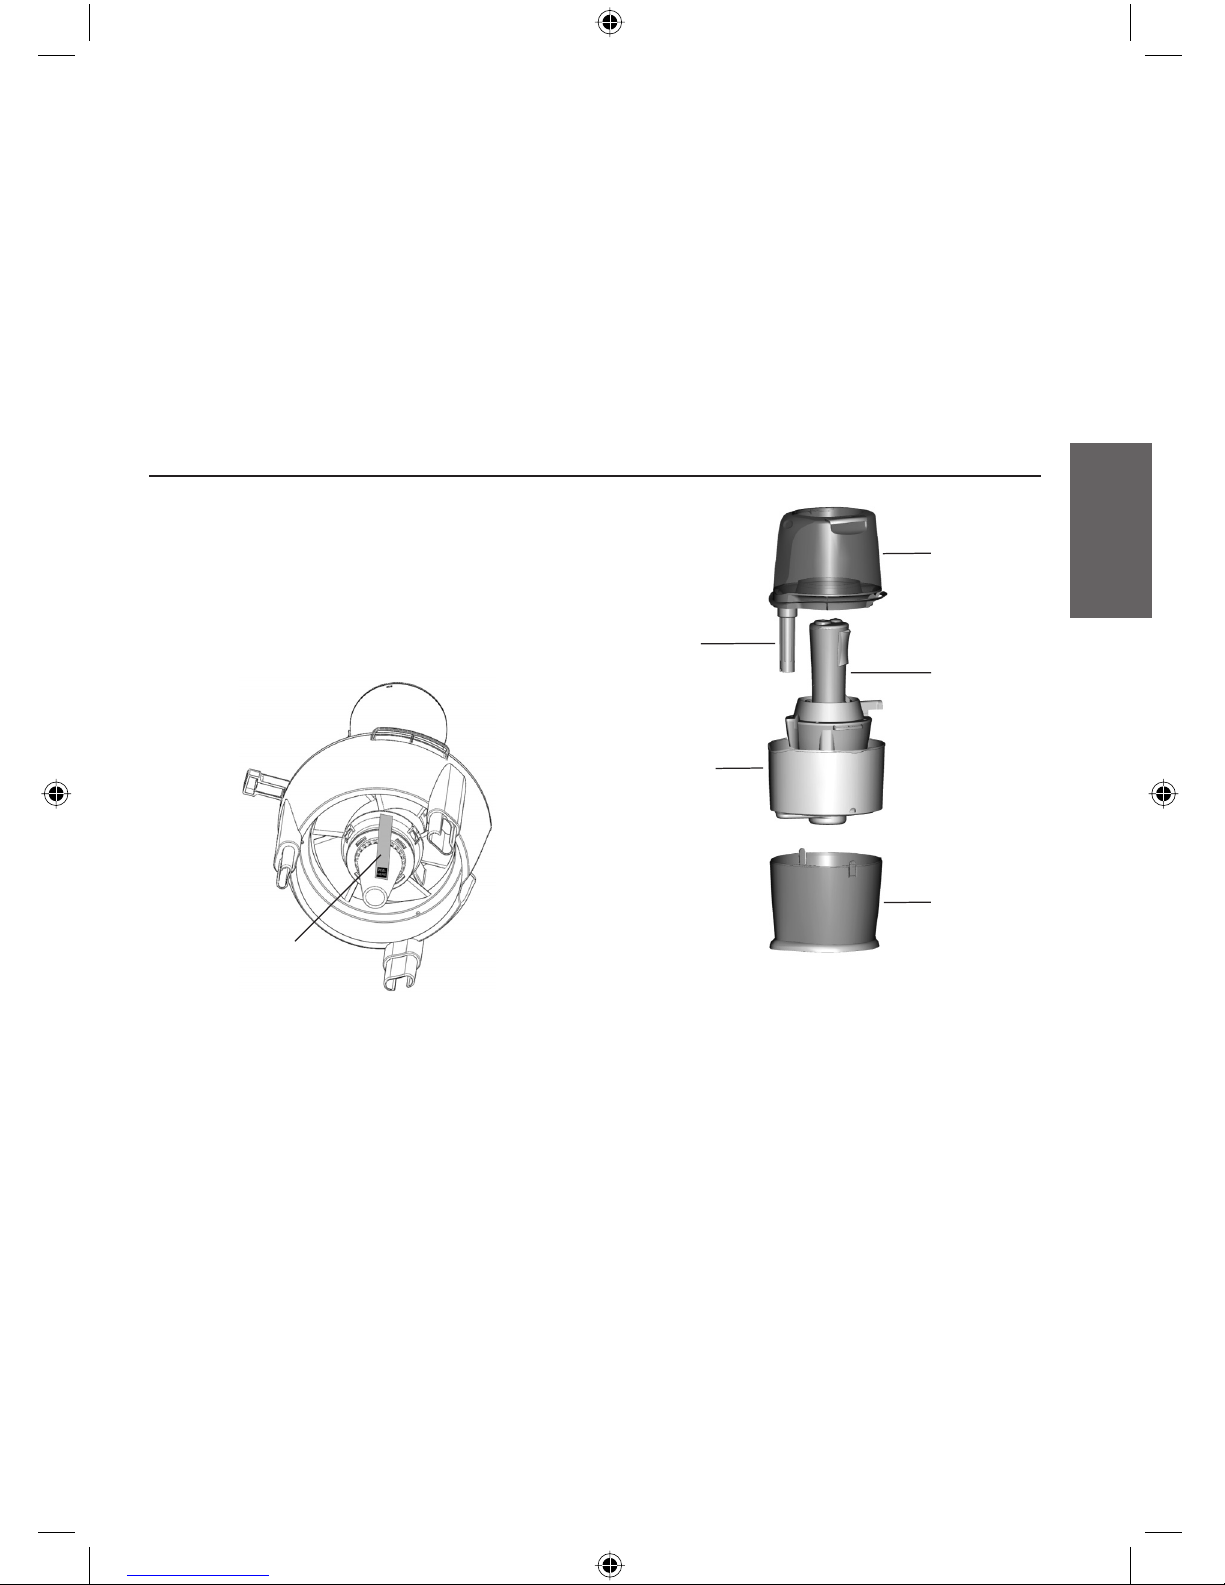
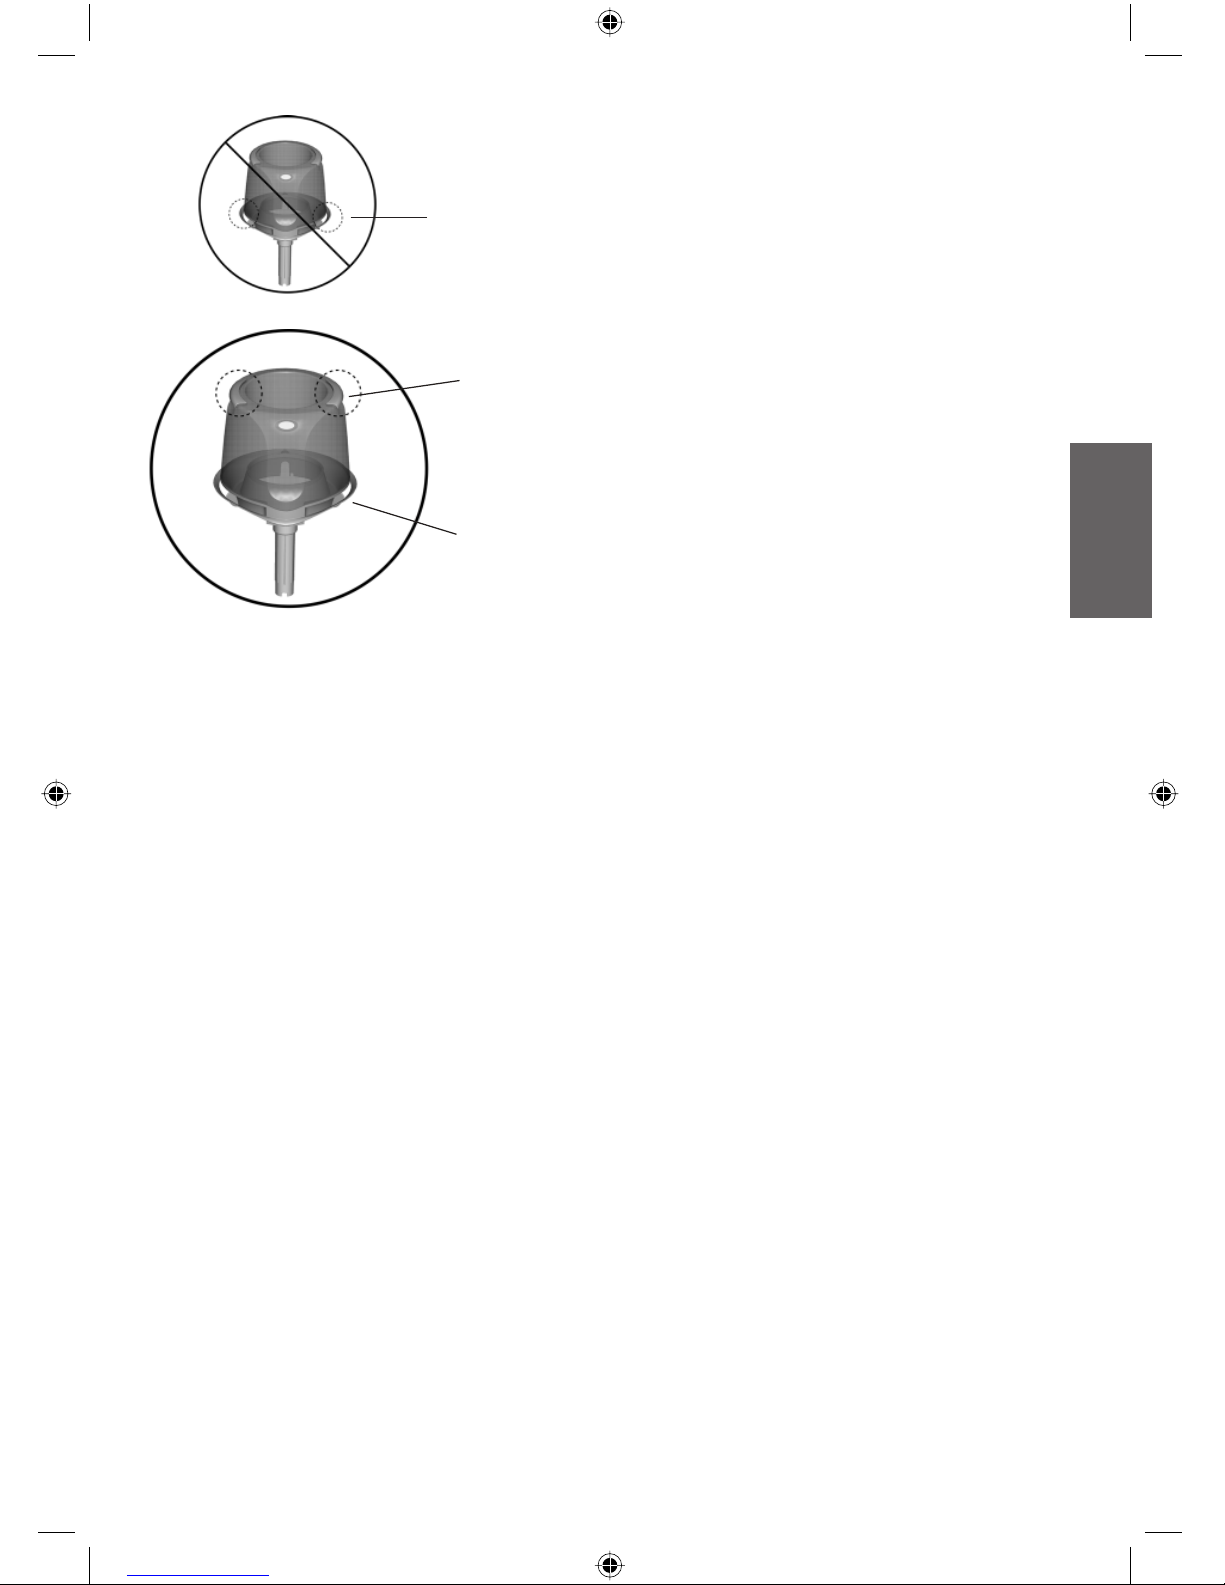
The Care Free®Ultra Evaporative Humidifier has a
unique, patented design with several innovative
features:
• Wickless Humidifier – Hunter’s exclusive
system does not require a wick to create
humidity. Water is transported up the tube
and is dispersed by centrifugal force against
the Atomizer. The tiny water particles cre-
ated from this impact are then evaporated by
the oncoming air stream and the moist air is
released through the exhaust vents beneath
the Water Tank.
• Simple Pump System – By dispersing wa-
ter via centrifugal force through openings
in the funnel pump, stagnant water in the
reservoir is eliminated and the buildup of
mineral residue that can clog conventional
pump systems and impede performance is
eliminated.
• Built-In Antimicrobial Properties – The
plastic parts in this humidifier and the filter
have built-in antimicrobial properties to in-
hibit the growth of bacteria, mold and fungi
that may affect these parts.
How the Care Free®Ultra
Evaporative Humidifier Works
Important Safety Instructions:
Read all instructions before
using this humidifier.
CAUTION: To avoid electrical shock
and/or fire, please read all instruc-
tions before use.
Thank you for purchasing the Care Free®
Ultra Evaporative Humidifier by Hunter
Fan Company. Please read and save these
instructions to receive maximum benefit
and performance from your humidifier.
1. This humidifier may not work prop-
erly on an uneven surface. ALWAYS
place this humidifier on a firm, level
and water resistant surface. ALWAYS
place the humidifier at least six (6) inches
away from walls and heat sources such
as stoves, radiators or heaters.
2. ALWAYS place the humidifier in an
area that is out of the reach of children.
3. Before using the humidifier, ex-
tend the cord and inspect for any sign
of damage. DO NOT use the product if
the cord has been damaged.
4. This product has a polarized plug
as a safety feature (one blade is wider
than the other). This plug will fit into a
polarized outlet only one way. If the plug
does not fully fit into the outlet, reverse
the plug. If it still does not fit, contact a
qualified electrician. DO NOT attempt
to defeat or override this feature.
5. ALWAYS unplug and empty the
humidifier when it is not in operation
or while it is being cleaned.
6. DO NOT tilt or move the humidifier
while it is in operation. Never move the
humidifier while there is water in the
tank. Empty the water tank, turn the unit
off, and unplug the unit before moving.
7. In addition to routine maintenance
which may be required, this humidifier
requires seasonal cleaning. Refer to and
follow the instructions for CLEANING
THE HUMIDIFIER AND THE WATER
TANK.
8. This unit was designed to be used
with distilled and/or tap water. DO NOT
add scented oils, perfumes or fragrance
additives to the water.
42992-01/-05.indd 2 5/23/06, 12:30:06 PM

42992-01 05/23/2006 3©2006 HUNTER FAN CO.
ENGLISH
ATTENTION: Before operating the unit,
remove the tape strips located on the bottom
of the power pack. These tape strips are
used to secure the pump components during
shipment and should be removed prior to
operation. See Figure 1.
1. Remove the Care Free®Ultra Evapora-
tive Humidifier from its packaging.
2. Select a location for your humidifier.
The location should be flat, hard, water-
resistant and at least six (6) inches away
from walls and sources of heat.
HUNTER WILL NOT ACCEPT RESPONSI-
BILITY FOR DAMAGE DUE TO WATER
SPILLAGE.
3. Remove the Lower Reservoir (marked
with the number 2) from the Water Tank
and Upper Reservoir (marked with the
number 1). See Figure 3.
4. Set the Lower Reservoir on the flat,
hard surface you have chosen.
NOTE: Once the unit has been filled with
water and is operating, you should not
use the Upper Reservoir handles or Water
Tank handles to pick up and relocate the
humidifier without emptying all water from
the humidifier. Prior to moving the humidi-
fier, check the water window in the Lower
Reservoir for water. If there is water in the
Lower reservoir, remove the Water Tank
and Upper Reservoir and drain all water.
Assembly of Humidifier Parts
NOTE: The antimicrobial properties built-
into this humidifier do not extend to the
water, humidified air or users. Conduct
routine cleaning and maintenance based
upon use and individual conditions.
• No White Dust – The Care Free®Ultra
Evaporative Humidifier produces no white
dust that can settle on furniture or be
inhaled.
NOTE: You may notice mineral deposits
accumulating in the tank base or on other
components. This is normal and comes
with regular usage conditions. If you
would like to remove these deposits and
maintain humidifier performance, please
see the section CLEANING THE HUMIDI-
FIER AND THE WATER TANK.
Figure 2
Lower
Reservoir
Tank
Cap
Upper
Reservoir
Water
Tank
Power
Pack
continued
Tape
Figure 1
42992-01/-05.indd 3 5/23/06, 12:30:07 PM

42992-01 05/23/2006 4©2006 HUNTER FAN CO.
5. Lift the Upper Reservoir (marked with
the number 1) and Water Tank and place
them on top of the Lower Reservoir (marked
with the number 2) so that the two tabs
in the Lower Reservoir snap into the Upper
Reservoir. See Figure 3.
6. Take the Water Tank to a sink or tub
to fill with water.
7. Unscrew the Tank Cap by twisting it
counterclockwise and fill the Water Tank
with cool water. NEVER USE HOT WATER.
See Figure 4.
Figure 4
8. Replace the Tank Cap by screwing it
back onto the Water Tank clockwise. Se-
curely tighten the Tank Cap and make sure
it is properly sealed. See Figure 5.
Figure 5
9. Carrying the Water Tank by the two
upper handles on the top of the Tank, posi-
tion the Water Tank so that the notch in the
back fits over the power supply cord and the
Tank Cap in front fits into the cut-out area
of the Power Pack. See Figure 6.
Figure 6
Tab
Figure 3
Lower
Reservoir
Water Tank
Upper
Reservoir Lower
Reservoir
Water Tank
Upper
Reservoir
Power
pack
Tank Cap
Cut-out
area of
power pack
Water
Tank
Tank Cap
Water
Tank
Tank Cap
42992-01/-05.indd 4 5/23/06, 12:30:08 PM

42992-01 05/23/2006 5©2006 HUNTER FAN CO.
ENGLISH
NOTE: Do not carry the Water Tank by the
exhaust vents. See Figure 7.
10. If the Water Tank is properly seated,
you will see air bubbles flowing up into
the tank. If you do not see air bubbles,
reposition the Water Tank as instructed
above. Make sure the Power Knob is set
to OFF and plug the humidifier into the
wall outlet.
CAUTION: Never plug in the humidifier
while your hands are wet, as electric
shock could occur.
11. Thread the power cord through both
power cord clips on the back of the hu-
midifier.
12. Turn the Power Knob to the desired set-
ting.
NOTE: If the Water Tank is not seated
properly on the Power Pack, it will not
turn on.
Exhaust
Vents
Figure 7
Do not carry
the water tank
by the exhaust
vents.
Upper
Handle
42992-01/-05.indd 5 5/23/06, 12:30:10 PM

42992-01 05/23/2006 6©2006 HUNTER FAN CO.
Operating Your Humidifier
Humidifier Controls
Figure 8
1. Power/Speed Control: Turns the humidi-
fier ON and OFF. The power should always
be OFF before unplugging the humidifier,
moving the humidifier, or refilling the water
tank. See Figure 8.
Turn the dial to set the speed to High, Me-
dium. Low and Off. See figure 9.
Figure 9
2. Humidistat Display and Controls: En-
ables you to set desired maximum humidity
level. Once this level is exceeded, the unit
will shut off until the humidity level drops.
NOTE: The humidifier may not be running
because the humidistat setting may need to
be adjusted.
3. Humidistat Light: The green light will go
off when the humidity in the room exceeds
the level that you selected with the digital
humidistat.
4. NiteGlo™Night Light Control: Turns the
night light ‘ON’ and ‘OFF’. The night light
can be turned on even if the humidifier fan
is turned OFF.
Setting the Desired Humidity
NOTE: After unplugging the humidifier to
move the humidifier, to refill the water tank
or to clean the humidifier, you must reset the
digital humidistat.
1. Use the power/speed control knob to turn
the humidifier ON by selecting a speed set-
ting.
NOTE: A speed setting must be chosen
before the humidistat will operate the hu-
midifier.
2. In normal mode use the humidistat control
buttons to set the desired humidity level.
The settings range from 30% to 80% in 5%
increments.
3. When the humidity exceeds the level you
have set, the humidistat light will go off. The
humidifier will not output humidity while
the humidity in the room is at the selected
humidity level. The humidistat light will stay
off until the humidity changes. When the hu-
midity in the room drops below the selected
level, the humidifier will cycle on again and
the humidistat light will come on.
Humidistat
Indicator Light
LCD
Screen
Down
Up
Power/Speed
Knob
NiteGlo™
Night Light
HIGH MEDIUM
LOW OFF
42992-01/-05.indd 6 5/23/06, 12:30:10 PM

42992-01 05/23/2006 7©2006 HUNTER FAN CO.
ENGLISH
Refilling The Water Tank
1. When the water level is low, turn
the Power Knob to OFF and unplug the
humidifier.
2. Lift the Water Tank and take it to the
sink or a tub to refill.
NOTE: Do not carry the Water Tank by the
exhaust vents.
3. Turn the Water Tank over and un-
screw the Tank Cap by twisting it coun-
terclockwise. See Figure 10.
Figure 10
4. Empty the Water Tank and refill it
with fresh, cool water. NEVER USE HOT
WATER.
5. Replace the Tank Cap by screwing
it clockwise onto the Water Tank. See
Figure 11.
Figure 11
6. Carrying the Water Tank by the two
upper handles on the top of the Tank, posi-
tion the Water Tank so that the notch in the
back fits over the power supply cord and
the Tank Cap in front fits into the cut-out
area of the Power Pack. If the Water Tank
is properly seated, you will see air bubbles
flowing up into the tank. If you do not see
air bubbles, reposition the Water Tank as
instructed above.
CAUTION: Never plug in the humidifier
while your hands are wet, as electric
shock could occur.
7. Make sure the Power Knob is set to
OFF and plug the humidifier into the wall
outlet.
8. Turn the Power Knob to the desired
setting.
Water
Tank
Tank Cap
Water
Tank
Tank Cap
Setting the Span
Your humidistat is set at the factory to cycle at
setting 2. If you find your system cycling too
fast or too slow, then the Span can be adjusted
to modify the cycle time.
1. Press and hold both humidistat control
buttons for two seconds to enter Span
setting mode.
2. In Span mode, use the humidistat control
buttons to adjust the Span. Raise the Span
to 3 to increase the cycle time and allow
your system to run longer. Lower the Span
to 1 to decrease the cycle time and allow
your system to run shorter.
3. The humidistat display will return to
normal mode after keys are idle for 5
seconds.
42992-01/-05.indd 7 5/23/06, 12:30:11 PM

42992-01 05/23/2006 8©2006 HUNTER FAN CO.
Many regions have hard water with high
concentrations of minerals. When water evaporates
from the Care Free®Ultra Evaporative Humidifier,
minerals may be left behind. These minerals can
form a hard white scale which can be removed by
following the cleaning instructions. The frequency
of cleaning due to mineral build-up varies
depending on the quality of water you have.
1. Turn the Power Knob to OFF and un-
plug the humidifier.
2. Remove the Water Tank and carry it
to a sink or a tub. Unscrew the Tank Cap by
twisting it counterclockwise and empty any
water in the Water Tank.
3. Lift the Power Pack and locate the
three tabs on the top of the Funnel Pump
Assembly. Press the three tabs in and remove
the Funnel Pump by pulling away from the
underside of the fan blade.
4. Remove the Pump Cap from the Funnel
Pump by holding the Pump Cap securely in
one hand while twisting the Funnel Pump in
a clockwise direction. This will unlock the two
components. See Figures 12a and 12b.
Figure 12a
Figure 12b
5. Remove the Atomizer and the Upper
Reservoir. See Figure 13.
Figure 13
6. Soak the Upper Reservoir, Funnel
Pump, Pump Cap, and Atomizer in a solu-
tion of one (1) gallon of water and eight (8)
ounces of vinegar for 30 minutes.
NOTE: If the Atomizer is covered with hard
white scale, you may want to run this com-
ponent through the dishwasher to loosen
the scale before soaking.
The Atomizer is the only dishwasher-
safe component and may be placed in
the top rack only.
7. To clean the Water Tank, fill the tank
with one (1) gallon of water and eight (8)
ounces of vinegar. Replace the Tank Cap
tightly and shake the Water Tank vigorously
until all interior surfaces have been exposed
to the solution.
8. Rinse the Water Tank several times with
cool, clean water.
9. After soaking, rinse the components
with clean water several times. Use a soft
cloth or sponge to remove any build-up.
Allow the components to dry completely if
you plan to store the humidifier.
10. To clean the surfaces of the Power Pack, wipe
with a dry, soft cloth.
Atomizer
Upper
Reservoir
Cleaning the Humidifier and the Water Tank
Pump Cap
Power Pack
Funnel Pump
Tabs
Fan Blade
Underside
Funnel
Pump
Pump
Cap
42992-01/-05.indd 8 5/23/06, 12:30:12 PM

42992-01 05/23/2006 9©2006 HUNTER FAN CO.
ENGLISH
1. Set the Lower Reservoir on the flat,
hard surface you have chosen.
2. Attach the Upper Reservoir to the
Lower Reservoir by engaging the two
tabs on the sides. See Figure 14.
Figure 14
3. Place the Atomizer in the Upper
Reservoir, aligning the three oval holes in
the Atomizer with the three prongs in the
Upper Reservoir. The side of the Atomizer
with three short posts should be facing
upward. See Figure 15.
Figure 15
4. Assemble the Pump Cap and the
Funnel Pump by aligning the arrows on
both components and inserting the Funnel
Pump into the Pump Cap. Twist the Fun-
nel Pump counter-clockwise until the two
components snap together. See figures 16a
and 16b.
Figure 16a
Figure 16b
Reassembly of Humidifier Parts
continued
Lower
Reservoir
Water Tank
Tank Cap
Upper
Reservoir
Tab
Atomizer
Power Pack
Atomizer
Posts
Pump Cap
Funnel
Pump
Funnel
Pump
Arrows Pump
Cap
42992-01/-05.indd 9 5/23/06, 12:30:13 PM

42992-01 05/23/2006 10 ©2006 HUNTER FAN CO.
5. Attach the Funnel Pump Assembly to
the Power Pack by engaging the three tabs
on the underside of the fan blade. See Figure
17.
Figure 17
6. Place the Power Pack into the Upper
Reservoir so that the three prongs in the
Power Pack go through all three holes in
the Atomizer and into the three prongs in
the base of the Upper Reservoir. Make sure
the Power Pack is securely seated and all
three prongs are in the proper position. See
Figure 18.
Figure 18
NOTE: The prongs will only fit into the Upper
Reservoir one way.
7. Follow the directions in the section
REFILLING THE WATER TANK to complete
reassembly.
If you wish to move your humidifier to a different
location, follow the instructions as listed below.
DO NOT attempt to carry the humidifier when
there is water in the Upper Reservoir, Lower
Reservoir, or the Water Tank.
1. Turn the Power Knob to OFF and un-
plug the humidifier.
2. Remove the Water Tank from the Upper
Reservoir and drain all water.
3. Remove the Upper Reservoir from the
Lower Reservoir and drain all water.
4. If there is water in the Lower Reservoir,
drain all water.
5. Set the Lower Reservoir on the hard,
flat surface you have chosen.
6. Continue assembly as outlined in the
section REASSEMBLY OF HUMIDIFIER
PARTS.
Relocating the Humidifier
Upper
Reservoir
Power Pack
Atomizer
Holes in the
Atomizer
Power Pack
Funnel Pump
Assembly
Tabs
Fan Blade
Underside
42992-01/-05.indd 10 5/23/06, 12:30:15 PM

42992-01 05/23/2006 11 ©2006 HUNTER FAN CO.
ENGLISH
Problem:
Excessive noise.
Solution:
1. Check the Water Tank to make sure
it is properly seated on the Power Pack.
2. Check the Water Tank to make sure
there are no bubbles when the Water
Tank is full and running. If there are bub-
bles, turn the unit OFF until the bubbling
stops. When the bubbling has stopped,
set the unit to the desired speed.
3. Remove and clean the Pump Cap
and Funnel Pump. Refer to the section
on CLEANING THE HUMIDIFIER AND
THE WATER TANK.
Problem:
Humidifier not working.
Solution:
1. Make sure the Power Knob is not set
to OFF.
2. Adjust the humidity level using the
Power Knob and the Humidistat Controls.
Once the room reaches the set humidity
level, the humidifier will turn OFF; this is
normal.
3. Make sure the Power Pack and Water
Tank are both fully seated in the three
tabs on the Upper Reservoir.
4. Make sure the Atomizer is facing the
proper direction.
Problem:
Humidifier will not turn on.
Solution:
1. Check the three posts on the top
surface of the Atomizer are properly en-
gaged. The side of the Atomizer with three
short posts should be facing upward.
2. Make sure the Water Tank is properly
seated on the Power Pack.
3. Check the humidity levels on the display.
If the ambient room humidity is equal to
or higher than the set level, the unit will
not turn on.
Problem:
Mineral build-up on the Water Tank or Upper
Reservoir.
Solution:
1. Refer to the section on CLEANING
THE HUMIDIFIER AND THE WATER
TANK.
Problem:
Humidity output and water usage
decreased.
Solution:
1. Make sure the Atomizer is positioned
correctly, with the side with three posts
facing upward.
2. Check the Humidistat Setting and
Power Knob to make sure they are set
to the desired humidity level.
3. Check the Water Tank to make sure
there are no bubbles when the Water
Tank is full and running. If there are bub-
bles, turn the unit OFF until the bubbling
stops. When the bubbling has stopped,
set the unit to the desired speed.
4. Clean any components that have
mineral build-up. Refer to the section
on CLEANING THE HUMIDIFIER AND
THE WATER TANK.
Troubleshooting
continued
42992-01/-05.indd 11 5/23/06, 12:30:16 PM

42992-01 05/23/2006 12 ©2006 HUNTER FAN CO.
Service Parts
To obtain a service part for your humidifier, call Hunter Customer Service at 1-888-830-1326
number of your humidifier, the name of the part you need to replace, and the part number.
Model
No. Atomizer Funnel
Pump Pump
Cap Power
Knob Tank
Cap Water
Tank
38257 96146-01-509 96150-01-509 96149-01-509 86592-02-509 96334-01-509 96333-01-326
Problem:
Excessive water drainage into lower
reservoir.
Solution:
1. Make sure the Tank Cap on the Water
Tank is tightened sufficiently and properly
sealed.
If you have questions or problems, please
call 1-888-830-1326 for assistance before
returning the unit to the retailer.
42992-01/-05.indd 12 5/23/06, 12:30:16 PM

42992-01 05/23/2006 13 ©2006 HUNTER FAN CO.
ENGLISH
Hunter Fan Company
The Care Free®Ultra Evaporative Humidifier
5 YEAR LIMITED WARRANTY
Hunter Fan Company, Inc. makes the follow-
ing warranty to the original residential user or
consumer purchaser of the Care Free®Ultra
Evaporative Humidifier.
If any part of the Care Free®Ultra Evapora-
tive Humidifier (“Humidifier”) motor fails
during the first five (5) years from the date
of installation due to a defect in material or
workmanship, we will provide a replacement
part free of charge. If no replacement part can
be provided for such motor, we will replace
your humidifier.
If your humidifier motor fails anytime within
one (1) year after the date of installation due
to a defect in material or workmanship, labor
to repair the defect will be provided free of
charge at our nearest service center or at our
Service Department in Memphis, Tennessee.
You will be responsible for all parts and labor
costs after this one year period.
If your humidifier water tank, atomizer, base,
knobs or tank cap fail at any time within one
(1) year after the date of sale to you due to
a defect in material or workmanship, we will
repair, or at our option, replace the water
tank, atomizer, base, knobs or tank cap free
of charge for parts or labor at our nearest
service center or at our Service Department in
Memphis, Tennessee.
IF THE ORIGINAL RESIDENTIAL USER OF
CONSUMER PURCHASER CEASES TO OWN
THE HUMIDIFIER, THIS WARRANTY AND ANY
IMPLIED WARRANTY WHICH THEN REMAINS
IN EFFECT, INCLUDING BUT NOT LIMITED TO
IMPLIED WARRANTY OF MERCHANTABILITY
OR FITNESS FOR A PARTICULAR PURPOSE,
ARE VOIDED.
NO WARRANTY, EXPRESSED OR IMPLIED, IN-
CLUDING ANY WARRANTY OF MERCHANT-
ABILITY OR FITNESS FOR A PARTICULAR PUR-
POSE, IS MADE IN RESPECT TO THE FILTER.
THE WARRANTY IS IN LIEU OF ALL OTHER
EXPRESS WARRANTIES. THE DURATION OF
ANY IMPLIED WARRANTY, INCLUDING BUT
NOT LIMITED TO ANY IMPLIED WARRANTY
OF MERCHANTABILITY OR FITNESS FOR
A PARTICULAR PURPOSE, IN RESPECT TO
THE MOTOR IS EXPRESSLY LIMITED TO THE
PERIOD OF THE EXPRESS WARRANTY SET
FORTH ABOVE.
This warranty is voided if your humidifier is not
purchased and used in the USA or Canada.
This warranty excludes and does not cover
defects, malfunctions or failures which were
caused by repairs by persons not authorized
by Hunter Fan Company, or accessories not
authorized by Hunter Fan Company, mishan-
dling, modifications, or damage to the humidi-
fier while in your possession, or unreasonable
use, including failure to provide reasonable and
necessary maintenance. This warranty does not
cover humidifiers used in commercial applica-
tions. There are not express or implied warran-
ties as to commercial purchasers or users.
To obtain service, contact the nearest Hunter
authorized service center or the Hunter Fan
Company Service Department at 2500 Frisco
Avenue, Memphis, Tennessee, 38114 or at
(901) 248-2222. You will be responsible for
insurance and freight or other transportation
to our factory service center. We will return
the humidifier, freight prepaid, to you. The
humidifier should be properly packaged to
avoid damage in transit since we will not be
responsible for any such damage. Proof of pur-
chase is required when requesting warranty
service. The purchaser must present the sales
receipt or other documentation that establishes
proof of purchase.
continued
42992-01/-05.indd 13 5/23/06, 12:30:17 PM

42992-01 05/23/2006 14 ©2006 HUNTER FAN CO.
HUNTER FAN COMPANY
2500 FRISCO AVENUE
MEMPHIS, TN 38114, USA
Printed in China
IN NO EVENT SHALL HUNTER FAN COMPANY
BE LIABLE FOR DIRECT, INDIRECT, SPECIAL,
CONSEQUENTIAL OR INCIDENTAL DAMAGES
IN EXCESS OF THE PURCHASE PRICE OF THE
HUMIDIFIER. YOUR SOLE REMEDY WILL BE RE-
PAIR OR REPLACEMENT AS PROVIDED ABOVE.
SOME AMERICAN STATES AND CANADIAN
PROVINCES DO NOT ALLOW:
• LIMITATIONS ON HOW LONG AN IMPLIED
WARRANTY LASTS
• THE EXCLUSION OR LIMITATION OF DIRECT,
INDIRECT, SPECIAL, INCIDENTAL OR CON-
SEQUENTIAL DAMAGES
• THE EXCLUSION OR INVALIDITY OF EX-
PRESS OR IMPLIED WARRANTIES IF THE
USER CEASES TO OWN THE HUMIDIFIER
• THE LIMITATION OF REMEDIES AND RE-
COURSES AVAILABLE TO THE PURCHASER,
OR
• THE INVALIDITY OF AN EXPRESS WAR-
RANTY WHEN A PRODUCT IS IDENTIFIED
BY BRAND NAME IS NOT USED (UNLESS
SPECIFIC CONDITIONS ARE FULFILLED)
SO THE ABOVE LIMITATIONS OR EXCLUSIONS
MAY NOT APPLY TO YOU.
THIS WARRANTY GIVES YOU SPECIFIC LEGAL
RIGHTS AND YOU MAY ALSO HAVE OTHER
RIGHTS WHICH VARY FROM STATE TO STATE
OR PROVINCE TO PROVINCE.
To learn more about Hunter Fan Company products, please see our web page at:
www.hunterfan.com
Other Home Comfort Products from Hunter
Hunter Original®QuietFlo™
True HEPA Air
Purifier
Programmable
Thermostat
42992-01/-05.indd 14 5/23/06, 12:30:17 PM

42992-05 05/23/2006 15 ©2006 HUNTER FAN CO.
FRANÇAIS
www.hunterfan.com
Humidificateur à ultra
évaporation Care Free®
Modèle 38257
42992-01/-05.indd 15 5/23/06, 12:30:18 PM

42992-05 05/23/2006 16 ©2006 HUNTER FAN CO.
LIRE ET CONSERVER CES CONSIGNES
L’humidificateur à ultra évaporation Care Free®
dispose d’une conception brevetée unique,
dotée de plusieurs caractéristiques novatrices :
• Humidificateur sans caloduc – le sys-
tème exclusif de Hunter n’a pas besoin de
caloduc pour créer de l’humidité. L’eau est
transportée au sommet du tube et dispersée
par une force centrifuge contre l’atomiseur.
Les minuscules particules d’eau créées par
cet impact s’évaporent alors sous l’effet du
courant d’air et l’air humide est relâché par
les évents d’évacuation sous le réservoir
d’eau.
• Simple système de pompe – En disper-
sant l’eau grâce à la force centrifuge par
les ouvertures de la pompe du tuyau, l’eau
stagnante dans le réservoir est éliminée
et l’accumulation de résidus minéraux qui
peut boucher un système conventionnel de
pompe est aussi éliminée.
• Propriétés antimicrobiennes intégrées
– Les pièces en plastique de cet humidifi-
cateur ont des propriétés antimicrobiennes
intégrées pour empêcher la croissance de
bactéries, de moisissures et de champignons
qui peuvent se développer sur ces pièces.
Fonctionnement de l’humidificateur
à ultra évaporation Care Free®
Importantes consignes de sécurité.
Lire toutes les consignes avant de
vous servir de cet humidificateur.
ATTENTION : Pour prévenir un choc
électrique et /ou un incendie, veuillez
lire toutes les consignes avant usage.
Merci de votre achat de l’humidificateur
à ultra évaporation Care Free®de la so-
ciété Hunter Fan Company. Veuillez lire et
conserver ces consignes que vous puissiez
bénéficier des avantages et de la perfor-
mance de votre humidificateur.
1. Cet humidificateur pourrait ne pas
fonctionner correctement sur une surface
inégale. TOUJOURS poser cet humidifica-
teur sur une surface solide, horizontale et
résistante à l’humidité. TOUJOURS poser
l’humidificateur à au moins 15 cm ( 6 po)
des murs et des sources de chaleur comme
les poêles, les radiateurs et les réchauds.
2. TOUJOURS poser l’humidificateur
dans une aire hors de la portée des en-
fants.
3. Avant de se servir de l’humidificateur,
inspecter le cordon pour vérifier s’il est
endommagé. NE PAS utiliser produit si le
cordon a été endommagé.
4. Ce produit dispose d’une fiche po-
larisée pour sa sécurité (une broche est
plus large que les autres). Cette fiche ne
peut être insérée dans une prise polarisée
que d’une seule manière. Si la fiche ne
s’insère pas complètement dans la prise,
retournez-la. Si elle ne s’insère toujours
pas, contacter un électricien qualifié. NE
PAS essayer d’annuler ou de contourner
cette caractéristique.
5. TOUJOURS débrancher et vider
l’humidificateur quand vous ne l’utilisez
pas ou que vous le nettoyez.
6. NE PAS incliner ou déplacer l’humi-
dificateur quand il fonctionne. Ne jamais
déplacer l’humidificateur quand il y de
l’eau dans le réservoir. Vider le réservoir
d’eau, éteindre l’appareil et le débrancher
avant de le déplacer.
7. En plus de l’entretien de routine
nécessaire, cet humidificateur requiert
un nettoyage saisonnier. Se reporter et
suivre les consignes du NETTOYAGE DE
L’HUMIDIFICATEUR ET DU RÉSERVOIR
D’EAU.
8. Cet appareil à été conçu pour utiliser
de l’eau distillée et ou de l’eau du robinet.
NE PAS ajouter d’huiles parfumées, de par-
fums ou d’additifs parfumés à l’eau.
42992-01/-05.indd 16 5/23/06, 12:30:19 PM

42992-05 05/23/2006 17 ©2006 HUNTER FAN CO.
FRANÇAIS
ATTENTION: Avant de faire fonctionner
l’appareil, retirer les bandes de ruban situées
à la base du bloc d’alimentation. Ces bandes
servent à maintenir les éléments de la pompe
pendant l’expédition et doivent être retirées
avant la mise en fonction. Voir Figure 1.
1. Retirer l’humidificateur à ultra éva-
poration Care Free®de son emballage.
2. Choisir un emplacement pour votre
humidificateur. L’emplacement devra être
plan, dur, résistant à l’eau et à au moins
quinze (15) centimètres (6 po) des murs et
des sources de chaleur.
HUNTER N’ACCEPTERA AUCUNE RES-
PONSABILITÉ POUR DES DOMMAGES
DUS À DES DÉVERSEMENTS D’EAU.
3. Détacher le récipient inférieur (mar-
qué du numéro 2) du réservoir d’eau et du
récipient supérieur (marqué du numéro 1).
Voir Figure 3.
4. Poser le récipient inférieur sur la sur-
face plane et dure que vous avez choisie.
NOTE : Une fois l’appareil rempli d’eau
et en fonctionnement, vous ne devez pas
vous servir des poignées du récipient supé-
rieur ou du réservoir d’eau pour soulever
et déplacer l’humidificateur sans en vider
l’eau. Avant de déplacer l’humidificateur,
vérifier l’eau par le hublot du récipient in-
férieur. S’il reste de l’eau dans le récipient
inférieur, enlever le réservoir d’eau et le
récipient supérieur et vider toute l’eau.
Assemblage des pièces de l’humidificateur
Figure 2
Récipient
inférieur
Bouchon
du réservoir
Récipient
supérieur
Réservoir
d’eau
Bloc
d’alimentation
électrique
suite
Ruban
Figure 1
NOTE : Les propriétés antimicrobiennes
intégrées à cet humidificateur ne s’éten-
dent pas à l’eau, à l’air humidifié ou aux
usagers. Faire un nettoyage et un entretien
de routine selon l’usage et les conditions
personnelles.
• Pas de poussière blanche – L’humidifi-
cateur à ultra évaporation Care Free®ne
produit aucune poussière blanche qui ferait
des dépôts sur le meuble ou qui pourrait
être inhalée.
NOTE : Vous pourriez constater le dépôt
de minéraux à la base du réservoir ou sur
d’autres éléments. Cela se produit dans des
conditions d’usage normal. Si vous désirez
enlever ces dépôts et maintenir l’efficacité
de l’humidificateur, veuillez voir le chapitre
NETTOYAGE DE L’HUMIDIFICATEUR ET
DU RÉSERVOIR D’EAU.
42992-01/-05.indd 17 5/23/06, 12:30:19 PM

42992-05 05/23/2006 18 ©2006 HUNTER FAN CO.
5. Soulever le récipient supérieur (mar-
qué du numéro 1) et le réservoir d’eau et
les placer sur le récipient inférieur (marqué
du numéro 2) afin que les deux languettes
du récipient inférieur s’enclenchent dans le
récipient supérieur. Voir Figure 3.
6. Remplir le réservoir d’eau dans un évier
ou un bain.
7. Retirer le bouchon du réservoir en le
dévissant dans le sens antihoraire et remplir
le réservoir d’eau propre et fraîche. NE
JAMAIS UTILISER D’EAU CHAUDE. Voir
Figure 4.
Figure 4
8. Replacer le bouchon en le vissant dans
le sens horaire sur le réservoir. Bien serrer le
bouchon du réservoir et vérifier qu’il est bien
étanche. Voir Figure 5.
Figure 5
9. En portant le réservoir d’eau par les
deux poignées supérieures situées à son
sommet, le mettre en place pour que l’enco-
che à l’arrière s’adapte au-dessus du cordon
d’alimentation que le bouchon du réservoir
à l’avant s’emboîte dans la découpe du bloc
d’alimentation. Voir Figure 6.
Figure 6
Languette
Figure 3
Récipient
inférieur
Réservoir
d’eau
Récipient
supérieur Récipient
inférieur
Réservoir d’eau
Récipient
supérieur
Bloc
d’alimentation
électrique
Bouchon
du réservoir
Découpe
du bloc
d’alimentation
Réservoir
d’eau
Bouchon du
réservoir
Réservoir
d’eau
Bouchon du
réservoir
42992-01/-05.indd 18 5/23/06, 12:30:21 PM

42992-05 05/23/2006 19 ©2006 HUNTER FAN CO.
FRANÇAIS
NOTE : Ne pas porter le réservoir d’eau par
les évents d’évacuation. Voir Figure 7.
10. Si le réservoir d’eau est bien engagé, vous
verrez des bulles d’air monter dans le ré-
servoir. Si vous ne voyez pas de bulles d’air,
replacer le réservoir d’eau selon les instruc-
tions précédentes. Vérifier que bouton de
mise en marche est à l’arrêt et brancher
l’humidificateur dans la prise murale.
ATTENTION : Ne jamais brancher l’hu-
midificateur avec des mains humides
car cela pourrait causer un choc élec-
trique.
11. Passer le cordon d’alimentation dans les
deux attaches prévues à cet effet à l’arrière
de l’humidificateur.
12. Tourner le bouton de mise en marche au
réglage désiré.
NOTE : Si le réservoir d’eau n’est pas bien
engagé sur le bloc d’alimentation, il ne se
mettra pas en marche.
Évents
d’évacuation
Figure 7
Ne pas porter
le réservoir
d’eau par
les évents
d’évacuation.
Poignée
supérieure
42992-01/-05.indd 19 5/23/06, 12:30:22 PM

42992-05 05/23/2006 20 ©2006 HUNTER FAN CO.
Utilisation de votre humidificateur
Commandes de l’humidificateur
Figure 8
1. Commande de mise en marche /
Vitesse : Met en marche et arrête l’humidi-
ficateur. L’humidificateur doit toujours être à
l’arrêt avant de le débrancher, de le déplacer
ou de remplir à nouveau le réservoir. Voir
Figure 8.
Tourner le cadran pour régler la vitesse à
rapide, moyenne, lente et arrêt) Voir Figure
9.
Figure 9
2. Affichage et commandes de l’hu-
midistat : Vous permet de régler le niveau
choisi d’humidité maximale. Une fois ce ni-
veau dépassé, l’appareil s’arrêtera jusqu’à
ce que le niveau d’humidité baisse.
NOTE : L’humidificateur pourrait ne pas
fonctionner si l’humidistat a besoin d’être
réglé.
3. Voyant de l’humidistat : Le voyant
vert s’éteindra quand l’humidité dans la
pièce dépassera le niveau que vous avez
choisi à l’aide de l’humidistat numérique.
4. NiteGlo™ Commande de la veilleu-
se : Allume et éteint la veilleuse. La veilleuse
peut fonctionner même lorsque l’humidifi-
cateur est à l’arrêt.
Réglage de l’humidité désirée
NOTE : Après avoir débranché l’humidifica-
teur pour le déplacer, le nettoyer ou remplir le
réservoir d’eau, vous devez régler à nouveau
l’humidistat numérique.
1. À L’aide du bouton de mise en marche
/ vitesse, mettre l’humidificateur en marche
en choisissant une vitesse.
NOTE : Une vitesse doit être choisie avant
que l’ humidistat fasse fonctionner l’humi-
dificateur.
2. En mode normal, se servir des boutons
de commande de l’humidistat pour régler
le niveau désiré d’humidité. La plage de
réglage s’étend de 30 % à 80 % par incré-
ments de 5 % .
3. Quand l’humidité dépasse le niveau
choisi, le voyant de l’humidistat s’éteint.
L’humidificateur n’émettra pas d’humidité
tant que l’humidité dans la pièce reste au
niveau choisi. Le voyant de l’humidistat res-
tera éteint jusqu’à ce que l’humidité change.
Quand l’humidité dans la pièce baisse sous
le niveau choisi, l’humidificateur se remettra
en marche et le voyant de l’humidistat se
rallumera.
Voyant lumineux
de l’humidistat
Écran
ACL
Haut
Bas
Bouton de
mise en
marche et
de vitesse
Veilleuse
NiteGlo™
RAPIDE MOYENNE
LENTE ARRÊT
42992-01/-05.indd 20 5/23/06, 12:30:23 PM
This manual suits for next models
1
Table of contents
Languages:
Other Hunter Humidifier manuals

Hunter
Hunter 32505 User manual

Hunter
Hunter 35617 User manual

Hunter
Hunter Care Free Permawick 34407 User manual

Hunter
Hunter WARM MIST 35216 User manual

Hunter
Hunter 31206 User manual

Hunter
Hunter 31006 User manual

Hunter
Hunter 32517 User manual

Hunter
Hunter 33116 User manual

Hunter
Hunter 38200 User manual

Hunter
Hunter 34355 User manual

Hunter
Hunter 34357 User manual

Hunter
Hunter 34200 User manual

Hunter
Hunter 34257 User manual

Hunter
Hunter 35218 User manual

Hunter
Hunter 35156 User manual

Hunter
Hunter 33520 User manual

Hunter
Hunter 33116 User guide

Hunter
Hunter 36202 User manual

Hunter
Hunter 33200A User manual

Hunter
Hunter 32200 User manual