HuntRite 1A-PG207 User manual

0.5 HP 350 WATT MEAT GRINDER #5
Owner’s Manual
WARNING: Read carefully and understand all ASSEMBLY AND OPERATION
INSTRUCTIONS before operating. Failure to follow the safety rules and other basic safety
precautions may result in serious personal injury.
Item #1A-PG207
READ & SAVE THESE INSTRUCTIONS

Page 2 of 17
Congratulations on your HuntRite™ purchase.
Great hunting experiences start with HuntRite™ hunting gear, designed to
deliver dependable quality and performance at an easily affordable price.
For future reference, please complete the owner’s record below:
Serial Number/Lot Date Code: ________________________________
Purchase Date: ____________________________________________
Save the receipt, warranty, and this manual. It is important that you read the
entire manual to become familiar with this product before you begin using it.
This meat grinder is designed for certain applications only. Northern Tool &
Equipment Company, Inc. and The Sportsman’s Guide are not responsible for
issues arising from modification or improper use of this product such as an
application for which it was not designed. We strongly recommend that this
product not be modified and/or used for any application other than that for
which it was designed.
DO NOT RETURN TO THE STORE.
For help with assembly, service, or missing/defective parts,
Please call our toll free number:
1-800-545-9633
Or email:
M-F 8:00 AM - 6:00 PM CST
Saturday 8:00 AM - 4:00 PM CST

Page 3 of 17
Table of Contents
Intended Use ........................................................................................................................................ 4!
Technical Specifications .................................................................................................................... 4!
Important Safety Information ............................................................................................................. 4!
Specific Operations Warnings ........................................................................................................... 5!
Grounding ............................................................................................................................................ 7!
Extension Cords .................................................................................................................................. 8!
Main Parts of the Meat Grinder ........................................................................................................ 10!
Inspection and Unpacking ................................................................................................................ 11!
Setting Up the Meat Grinder ............................................................................................................. 11!
Grinding Instructions ........................................................................................................................ 12!
Stuffing Instructions ......................................................................................................................... 12!
Cleaning and Maintenance ............................................................................................................... 14!
Replacement Parts ............................................................................................................................ 15!
Limited Warranty ............................................................................................................................... 16!

Page 4 of 17
Intended Use
This Huntrite Grinder by Sportsman’s Guide® gives you an affordable solution to processing your own
game. Why trust your hard-earned takedown to anyone else? You worked hard to harvest fresh meat, so
finish off the food cycle with this Huntrite Grinder from Sportsman’s Guide®. It gives you an affordable
Meat Grinder solution that won't take a hit out of your saving's account. Use the countertop accessory for
processing your own jerky, sausage, burgers and more. For household use only.
Technical Specifications
Property
Specification
Grinding Output
1.5 Pounds/Minute
Weight
7 Pounds
Dimensions
12” x 10” x 10”
Grinding Performance
Grinding of Sinew and Bones not recommended
Auger Material
Aluminum
Blade Material
Stainless Steel
Housing Material
Plastic
Grinding Plates Included
Stainless Steel 3mm Fine Grinding Plate
Stainless Steel 5mm Medium Grinding Plate
Stainless Steel 7mm Coarse Grinding Plate
Tubing Stuffers Included
23mm Plastic Sausage Tube, Kibbe stuffer
Food Pusher
Plastic
Wattage/Volts/Horsepower
350W/120V/0.5HP
Neck Size
#5
Meat Tray
Aluminum 8.7” x 5.8” x 0.03”
Motor
Has Forward and Reverse Mode
Important Safety Information
WARNING
• Read and understand all instructions. Failure to follow all instructions may result in serious
injury or property damage.
• The warnings, cautions, and instructions in this manual cannot cover all possible conditions or
situations that could occur. Exercise common sense and caution when using this grinder.
Always be aware of the environment and ensure that the grinder is used in a safe and
responsible manner.
• Do not allow persons to operate or assemble the grinder until they have read this manual and
have developed a thorough understanding of how it works.
• Do not modify this grinder in any way. Unauthorized modification may impair the function
and/or safety and could affect the life of the product. There are specific applications for which
the product was designed.
• Use the right grinder for the job. DO NOT attempt to force small equipment to do the work of
larger industrial equipment. There are certain applications for which this grinder was designed.
This grinder will be safer and do a better job at the capacity for which it was intended. DO NOT
use this grinder for a purpose for which it was not intended.
• Industrial or commercial applications must follow OSHA requirements.

Page 5 of 17
WARNING
WORK AREA SAFETY
• Inspect the work area before each use. Keep work area clean, dry, free of clutter, and well-lit.
Cluttered, wet, or dark work areas can result in injury. Using the product in confined work areas
may put you dangerously close to cutting tools and rotating parts.
• Do not allow the product to come into contact with an electrical source. The meat grinder is not
insulated and contact will cause electrical shock.
• Keep children and bystanders away from the work area while operating the meat grinder. Do
not allow children to handle the product.
• Be aware of all power lines, electrical circuits, water pipes, and other mechanical hazards in
your work area. Some of these hazards may be hidden from your view and may cause
personal injury and/or property damage if contacted.
WARNING
PERSONAL SAFETY
• Stay alert, watch what you are doing, and use common sense when operating the meat
grinder. Do not use the meat grinder while you are tired or under the influence of drugs,
alcohol, or medication. A moment of inattention while operating the meat grinder may result in
serious personal injury.
• Dress properly. Do not wear loose clothing, dangling objects, or jewelry. Keep your hair,
clothing and gloves away from moving parts. Loose clothes, jewelry, or long hair can be caught
in moving parts. Air vents on the meat grinder often cover moving parts and should be avoided.
• Do not overreach. Keep proper footing and balance at all times.
• Wear the proper personal protective equipment when necessary. Use ANSI Z87.1 compliant
safety goggles (not safety glasses) with side shields, or when needed, a face shield. This
applies to all persons in the work area.
• Do not use the meat grinder when tired or under the influence of drugs, alcohol or medication.
Specific Operations Warnings
WARNING
• Do not force the grinder. This may cause the grinder to jam. Grinders are safer and do a
better job when used in the manner for which they are designed. Plan your work, and use the
correct product for the job.
• Check for damaged parts before each use. Carefully check that the product will operate
properly and perform its intended function. Replace damaged or worn parts immediately.

Page 6 of 17
Never operate the product with a damaged part.
• Do not use a product with a malfunctioning switch. Any power grinder that cannot be
controlled with the power switch is dangerous and must be repaired by an authorized service
representative before using.
• Disconnect the power supply from the product and place the switch in the locked or off
position before removing blade, making any adjustments, changing accessories, cleaning or
storing the grinder. Such preventive safety measures reduce the risk of starting the grinder
accidentally.
• Store the product when it is not in use. Store it unplugged in a dry, secure place out of the
reach of children. Inspect the grinder for good working condition prior to storage and before
re-use.
• Use only accessories that are recommended by the manufacturer for use with your product.
Accessories that may be suitable for one grinder may create a risk of injury when used with
another grinder.
• Do not leave the grinder running unattended.
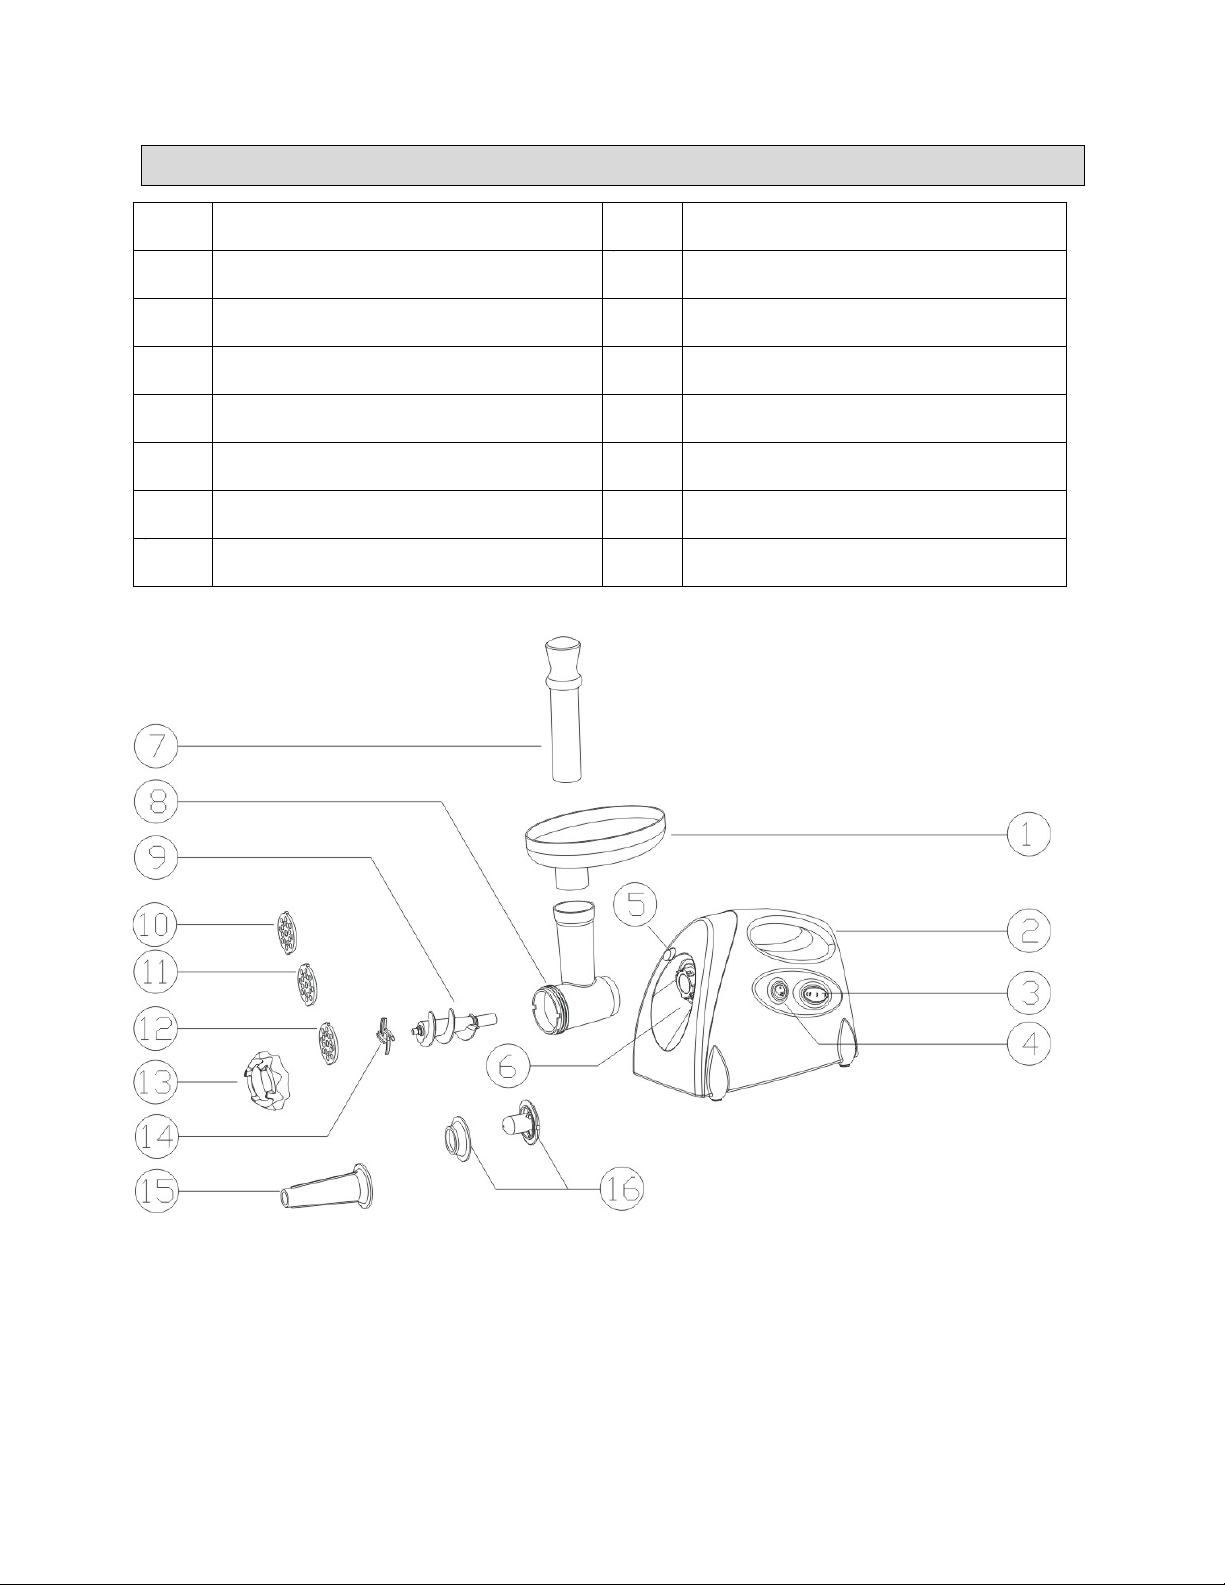
• Never operate the grinder without the tray/safety guard secured in place. Avoid contact with
moving parts. Never put your fingers near the blade while it is operation. Always use meat
pusher to push the meat into the grinder head.
• Never put the grinder near a hot burner, in an oven, or in a dishwasher. Grinder parts are not
dishwasher safe.
• Do not use grinder outdoors. This grinder is intended for household use only.
• Do not let cord hang over the edge of a table or counter, come into contact with sharp edges,
or touch hot surfaces. Do not let cord become kinked or trapped under the grinder. Do not let
the cord wind around the grinder.
• Place the grinder on a firm and stable surface away from the edge of the worktop. Never use
the grinder unless it is fully upright and completely assembled.
• Do not use in wet areas. Do not put grinder in water or other liquids. Do not operate grinder
with wet hands or while standing on a wet floor. Do not use grinder if it is wet.
• Never use abrasive cleaning agents or abrasive cloths when cleaning the unit.
• Use the grinder to cut only designated food. Do not attempt to grind frozen food, bones,
cardboard, plastic, etc. Do not grind ginger or other materials with hard fiber.
• This grinder has a sharp blade. Be careful when removing food from meat grinder. Never use
fingers to scrape food away from discharge disc while appliance is operating. Serious cuts or
injury will result.
• Clean grinder and blade according to instructions.
• Never move meat grinder when in use. When lifting grinder, carefully position your body to
avoid contact with the blade.
• Use protective cut-resistant gloves whenever handling blades.
• Avoid bumping or impacting meat grinder.
• To disconnect, turn meat grinder off, then remove plug from outlet.
• Always use meat grinder in accordance with all applicable local, state and federal fire codes.

Page 7 of 17
• Do not insert any metallic objects into the meat grinder.
• Do not carry the unit by the hopper plate or head.
• Do not run the grinder for more than 10 continuous minutes. After running for 10 minutes,
allow it to cool down for 10 minutes before using again. Follow with 10 minute ON/OFF
intervals if needed.
• Do not fix the cutting blade or cutting plate when using the kibbe attachment.
• Switch the unit from “ON” to “R” or from “R” to “ON” if the unit jams or stops for more than 30
seconds. If not the unit may jerk or bounce.
• If circuit breaker activates, do not switch on.
Grounding
WARNING
• This machine must be grounded while in use to protect the operator from electrical shock. This
unit is equipped with an electrical cord that has an equipment grounding conductor and a
grounding plug. The plug MUST be plugged into a matching receptacle that is properly installed
and grounded in accordance with ALL local codes and ordinances.
• DO NOT MODIFY THE PROVIDED PLUG. If it will not fit the receptacle, have the proper
receptacle installed by a qualified electrician.
• CHECK with a qualified electrician or service person if you do not completely understand the
grounding instructions, or if you are not sure the meat grinder is properly grounded.
Grounded Meat grinders: Meat grinders with 3-Prong Plugs
Meat grinders marked with Grounding Required have a 3-wire cord and 3-prong grounding plug. The
plug must be connected to a properly grounded outlet. If the meat grinder should electrically malfunction
or break down, grounding provides a low resistance path to carry electricity away from the user, reducing
the risk of electric shock. (See Figure A.)
The grounding prong in the plug is connected through the green wire inside the cord to the grounding
system in the meat grinder. The green wire in the cord must be the only wire connected to the meat
grinder’s grounding system and must never be attached to an electrically live terminal.
Your meat grinder must be plugged into an appropriate outlet, properly installed and grounded in
accordance with all codes and ordinances. The plug and outlet should look like those in the following
illustration.

Page 8 of 17
Double Insulated Meat grinders: Meat grinders with Two-Prong Plugs
Meat grinders marked Double Insulated do not require grounding. They have a special double insulation
system which satisfies OSHA requirements and complies with the applicable standards of Underwriters
Laboratories, Inc., the Canadian Standard Association, and the National Electrical Code. (See Figure B.)
Double insulated meat grinders may be used in either of the 120 volt outlets shown in the following
illustration.
Extension Cords
WARNING
• USE A PROPER EXTENSION CORD. Make sure your extension cord is in good condition.
When using an extension cord, be sure to use one heavy enough to carry the current your
product will draw. An undersized cord will cause a drop in line voltage, resulting in loss of
power and cause overheating.
• Be sure your extension cord is properly wired and in good condition. Always replace a
damaged extension cord or have it repaired by a qualified person before using it. Protect your
extension cords from sharp objects, excessive heat and damp or wet areas.
• Grounded meat grinders require a 3-wire extension cord. Double Insulated meat grinders can use
either a 2- or 3-wire extension cord.
• As the distance from the supply outlet increases, you must use a heavier gauge extension cord.
Using extension cords with inadequately sized wire causes a serious drop in voltage, resulting in loss
of power and possible meat grinder damage.
• The smaller the gauge number of the wire, the greater the capacity of the cord. For example, a 14-
gauge cord can carry a higher current than a 16-gauge cord. Minimum extension cord wire size is
shown in the following table:
Minimum Wire Size Of Extension Cords
Nameplate AMPS
Cord Length
25'
50'
100'
150'
0-6
18 AWG
16 AWG
16 AWG
14 AWG
6-10
18 AWG
16 AWG
14 AWG
12 AWG
10-12
16 AWG
16 AWG
14 AWG
12 AWG
12-16
14 AWG
12 AWG
NOT RECOMMENDED

Page 9 of 17
• When using more than one extension cord to make up the total length, make sure each cord contains
at least the minimum wire size required.
• If you are using one extension cord for more than one meat grinder, add the nameplate amperes and
use the sum to determine the required minimum cord size.
• Make sure your extension cord is properly wired and in good electrical condition. Always replace a
damaged extension cord or have it repaired by a qualified electrician before using it.
• Protect your extension cords from sharp objects, excessive heat, and damp or wet areas.

Page 10 of 17
Main Parts of the Meat Grinder
1
Hopper Plate
9
Auger
2
Motor Housing
10
Fine Cutting Plate
3
ON/OFF/Reverse switch
11
Medium Cutting Plate
4
ON/R Switch
12
Coarse Cutting Plate
5
Unlock Button
13
Retaining Ring
6
Head Inlet
14
Cutting Blade/Knife
7
Food Pusher
15
Stuffing Tube
8
Grinder Head
16
Kibbe Attachment

Page 11 of 17
Inspection and Unpacking
1. Inspect the package carefully upon receipt. If there are signs of damage to the packaging, carefully
check contents to ensure there are no missing or damaged parts. Report any issues within 3 days
from the receipt date.
2. We suggest you save all the packing material if future shipping of the machine is needed.
3. Keep all plastic bags away from children.
Setting Up the Meat Grinder
1. Clean all parts except body prior to first
use in warm soapy water.
2. Holding the head, insert it in the inlet as
seen in Figure 1.
3. Rotate the head as pictured in Figure 2
until a small sound can be heard. The
head has been placed in the inlet. Try to
rock the head slightly to ensure it is
placed well.
4. Place the feed screw into the head, long
end first, by turning the feed screw
slightly until it is set into the motor
housing as seen in Figure 3.
5. Place the cutting blade onto the feed
screw shaft with the blade facing the
front as illustrated in Figure 4. If it is not
fitted properly, meat will not be ground.
6. Place the desired cutting plate next to
the cutting blade, fitting protrusions in
the slots see Figure 5.
7. Support or press the center of the cutting
plate with one finger then screw the
fixing ring until tight with another hand as
in Figure 6. Do not over tighten.
8. Place the hopper plate on the head and
fix into position.
9. Before using the appliance, all
removable components must be secured
in position
10. The work surface where the meat grinder will be located must be suitable for the size and weight of
the appliance. The work surface must be level and dry. Store/use grinder within a temperature range
of 41°-95° Fahrenheit.
11. The air passage at the bottom and the side of the motor housing should be kept free and not
blocked.
12. Ensure “ON/O/R” switch is turned to the “O” position. Plug grinder into properly grounded outlet
13. Now the grinder is ready for grinding.

Page 12 of 17
Grinding Instructions
1. When using the grinder, it is important that you stand in the correct position. Do not position yourself
so that any part of your body comes in direct contact with the grinder when working.
2. The grinder must be filled when working.
3. Cut meat into 2 1/2” x 3/4" x 3/4" strips. Make sure to remove all bones, gristle, fat and sinew. Place
the meat on the meat tray.
4. Plug in and turn “ON/R” switch to “ON” position, then turn “ON/O/R” switch to “ON” position.
5. Raise the food pusher; feed the meat into the tube. Do not force the meat into the opening. Use the
food pusher to push the meat into the grinder.
6. If the meat is suitably cut beforehand there should be no problems feeding the meat through. It is also
recommended that the meat be very cold (not frozen) to reduce clogging.
7. To maintain the plate and blade make sure to turn off the grinder after all meat has gone through and
ensure that the blade and plate are always coupled.
8. Switch unit off and unplug when you have finished using the appliance, then strip the appliance and
thoroughly clean both the opening and all other components.
9. If the grinder is locked up, turn off the machine and reverse the operation to see if that clears the
obstruction. Only switch from forward to reverse when the grinder is turned off. Reversing operation
during use can damage the motor. Auger will rotate in the opposite direction and the head will empty.
If the grinder is still locked, turn grinder off, unplug the electrical cord from the outlet, disassemble the
grinder head, and remove the obstruction. Reassemble and continue grinding.
Stuffing Instructions
1. Grind the meat with the machine set up for meat grinding.
2. Set up machine for stuffing. See Figure 11.
3. Attach the grinder head to the motor housing.
4. Insert the auger into the grinder head, the geared end first.
5. Put the cutting blade and the desired cutting plate on the auger. (Make sure the notch in the grinder
plate is matched to the locater pin in the grinder head.)
6. Place the stuffing tube in the retaining ring and screw the ring on the grinder head.
7. Place the meat tray on the upright part of the grinder head.

Page 13 of 17
8. Now the grinder is ready for stuffing sausages.
9. To make sausages, slide casing of choice onto stuffing tube.
10. Mix the course ground meat with the seasonings and add to the meat tray. Turn on grinder. Use the
food pusher to gently push the meat into the grinder head. Do not force the meat too quickly, allow
the grinder to do the job.
11. Never operate the grinder without the cutting blade and one of the grinder plates in the head. Doing
so may force meat back into the motor.

Page 14 of 17
Cleaning and Maintenance
WARNING
Always be as thorough as possible when cleaning and sanitizing components. Any part exposed to
raw meat may harbor or develop bacteria, potentially causing illness or death. When cleaning with
sanitizers, always follow the manufacturer’s recommendations. Never use products that cause
exposed surface to render meat unsafe for consumption. Failure to follow this warning may lead to
illness or death!
• Clean appliance after each use.
• Never clean the meat grinder with a pressurized water-jet, industrial cleaner, or any other type
of cleaning utensil that could damage the surface of the appliance.
• Do not immerse motor housing in water. Wipe with damp cloth.
• Before cleaning, be sure to unplug the meat grinder from the power source.
• Do not use bleaching solutions containing chlorine as this will discolor aluminum surfaces.
• Before servicing the appliance, be sure to unplug the meat grinder from the power source.
• Periodically check the appliance for wear and tear.
To clean the meat grinder, do the following.
1. Meat left behind may be removed by passing a slice of bread through the grinder head.
2. Before cleaning the grinder, switch the appliance off and unplug from the electrical outlet.
3. Remove the food pusher and food tray.
4. Unscrew the retaining ring and remove all parts from the grinder head. If
retaining ring is difficult to remove, use a tool as in Figure 12. If cutting
plate is difficult to remove, place a screwdriver between the cutting plate
and the head as in Figure 13.
5. Press unlock button and before removing grinding head. Holding the
grinding head, rotate it in the same direction as in Figure 14. Then the
head can be removed easily.
6. Clean immediately after use.
7. Wash all components using warm water and a neutral detergent.
Grinder parts are not dishwasher safe. Hand dry immediately.
8. Clean motor housing with a damp cloth.
9. Make sure all parts are completely dry before remounting them.
10. Lubricate the cutting blade and the cutting plates with a vegetable based
cooking spray.

Page 15 of 17
Replacement Parts
• For replacement parts and technical questions, please call Customer Service at 1-800-545-9633
• Not all product components are available for replacement. The illustrations provided are a convenient
reference to the location and position of parts in the assembly sequence.
• When ordering parts, the following information will be required: item description, item model number,
item serial number/item lot date code, and the replacement part reference number.
• The distributor reserves the rights to make design changes and improvements to product lines and
manuals without notice.
DO NOT RETURN TO THE STORE.
For help with assembly, service, or missing/defective parts,
Please call our toll free number:
1-800-545-9633
Or email:
M-F 8:00 AM - 6:00 PM CST
Saturday 8:00 AM - 4:00 PM CST

Page 16 of 17
Limited Warranty
Northern Tool and Equipment Company, Inc. and The Sportsman’s Guide ("We'' or ''Us'') warrants to the
original purchaser only ("You" or ''Your'') that the Huntrite product purchased will be free from material
defects in both materials and workmanship, normal wear and tear excepted, for a period of one year from
date of purchase. The foregoing warranty is valid only if the installation and use of the product is strictly in
accordance with product instructions. There are no other warranties, express or implied, including the
warranty of merchantability or fitness for a particular purpose. If the product does not comply with this
limited warranty, Your sole and exclusive remedy is that We will, at our sole option and within a
commercially reasonable time, either replace the product or product component without charge to You or
refund the purchase price (less shipping). This limited warranty is not transferable.
Limitations on the Warranty
This limited warranty does not cover: (a) normal wear and tear; (b) damage through abuse, neglect,
misuse, or as a result of any accident or in any other manner; (c) damage from misapplication,
overloading, or improper installation; (d) improper maintenance and repair; and (e) product alteration in
any manner by anyone other than Us, with the sole exception of alterations made pursuant to product
instructions and in a workmanlike manner.
Obligations of Purchaser
You must retain Your product purchase receipt to verify date of purchase and that You are the original
purchaser. To make a warranty claim, contact Us at 1-800-545-9633, identify the product by make and
model number, and follow the claim instructions that will be provided. The product and the purchase
receipt must be provided to Us in order to process Your warranty claim. Any returned product that is
replaced or refunded by Us becomes our property. You will be responsible for return shipping costs or
costs related to Your return visit to a retail store.
Remedy Limits
Product replacement or a refund of the purchase price is Your sole remedy under this limited warranty or
any other warranty related to the product. We shall not be liable for: service or labor charges or damage
to Your property incurred in removing or replacing the product; any damages, including, without limitation,
damages to tangible personal property or personal injury, related to Your improper use, installation, or
maintenance of the product or product component; or any indirect, incidental or consequential damages
of any kind for any reason.
Assumption of Risk
You acknowledge and agree that any use of the product for any purpose other than the specified use(s)
stated in the product instructions is at Your own risk.
Governing Law
This limited warranty gives You specific legal rights, and You also may have other rights which vary from
state to state. Some states do not allow limitations or exclusions on implied warranties or incidental or
consequential damages, so the above limitations may not apply to You. This limited warranty is governed
by the laws of the State of Minnesota, without regard to rules pertaining to conflicts of law. The state
courts located in Dakota County, Minnesota shall have exclusive jurisdiction for any disputes relating to
this warranty.

Page 17 of 17
Distributed by:
The Sportsman’s Guide
And
Northern Tool & Equipment Company, Inc.
Burnsville, Minnesota 55306
www.sportsmansguide.com www.northerntool.com
Made in China
Table of contents