Husky 80234HWPK User manual

THANK YOU
We appreciate the trust and confidence you have placed in Husky through the purchase of this wall panel. We strive to continually create
quality products designed to enhance your home. Visit us online to see our full line of products available for your home improvement needs.
Thank you for choosing Husky!
USE AND CARE GUIDE
WALL PANEL 2-PACK
WALL PANEL STARTER PACK
2pcs.
|
8linear ft. (5 sq.ft. of wall space)
WALL PANEL 4-PACK
WALL PANEL VALUE PACK
4pcs.
|
9sq. ft. of wall space
Questions, problems, missing parts?
Before returning to the store, call
Husky Customer Service
8 a.m. - 7 p.m., EST, Monday - Friday
9 a.m. - 6 p.m., EST, Saturday
1-888-HD-HUSKY
HUSKYTOOLS.COM
Item #1003011861
Model #80234HWPK
Item #1003011846
Model #80235HWSK
Item #1003011848
Model #80236HWPK
Item #1003011845
Model #80237HWVP

2
3 HUSKYTOOLS.COM
Please contact 1-888-HD-HUSKY for further assistance.
Pre-Installation
(Wall Panel 2-Pack & Wall Panel Starter Pack)
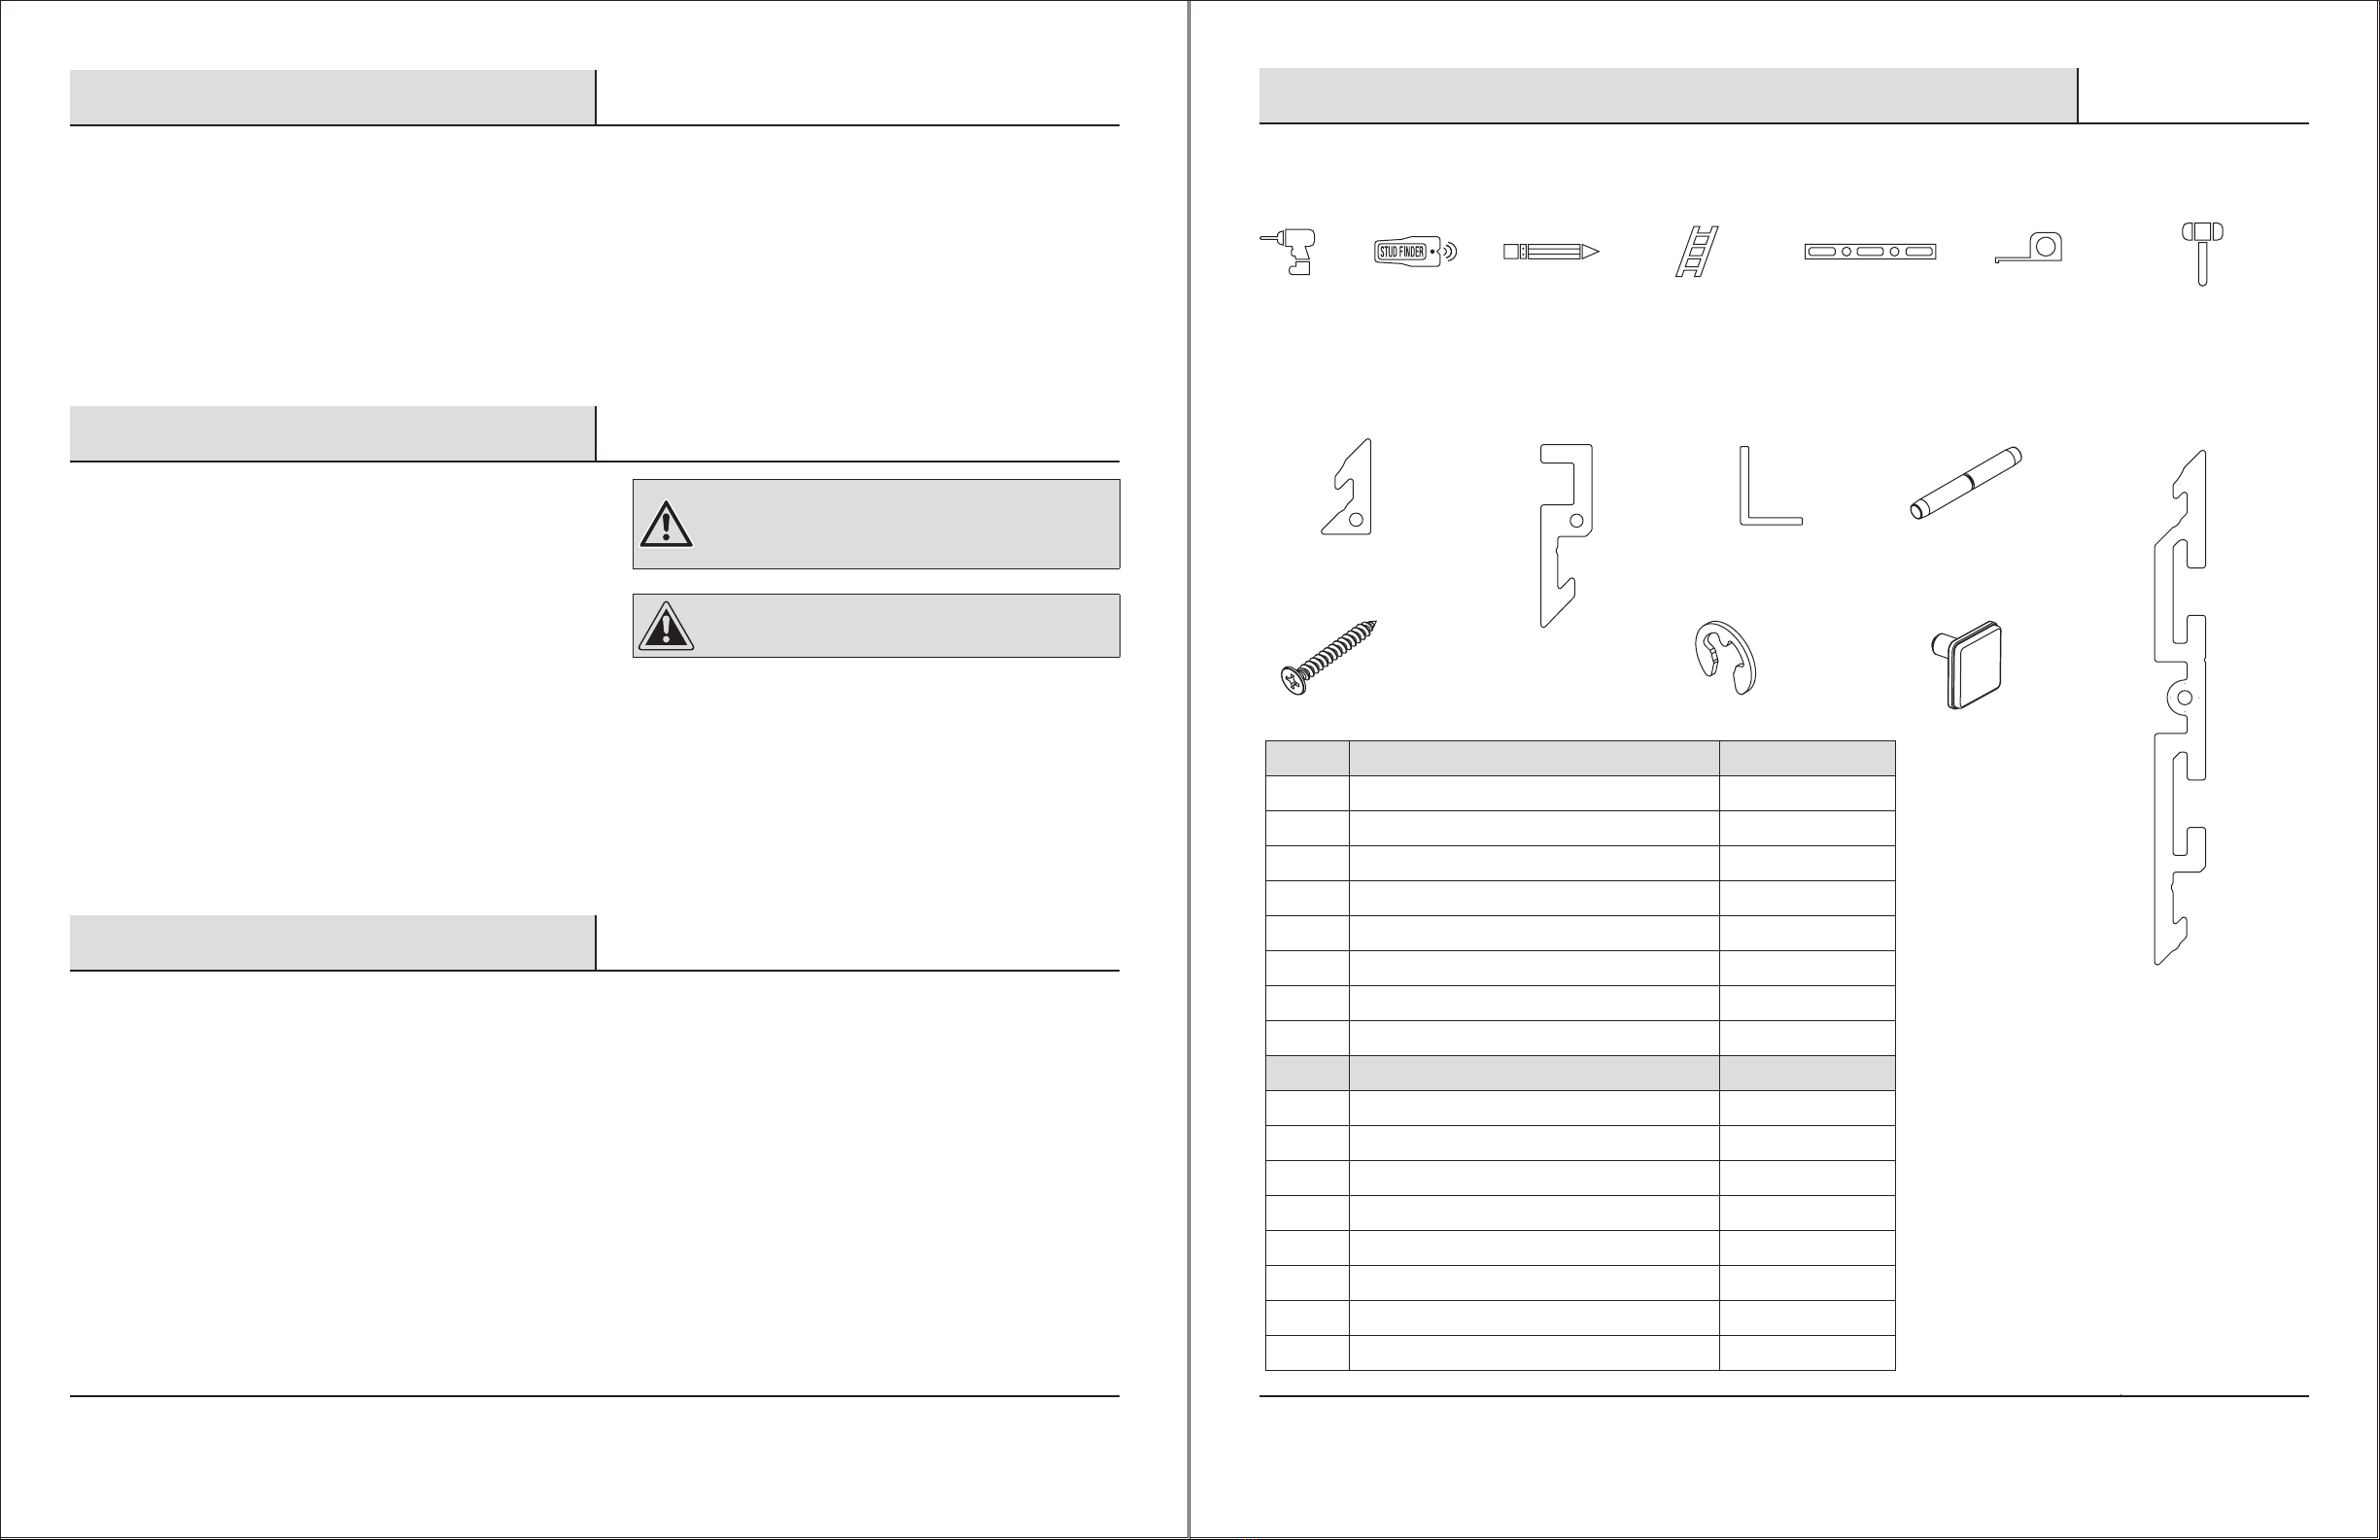
TOOLS REQUIRED
Drill Stud finder Pencil Ladder/Step stool
Level
Tape measure & Rubber mallet
INSTALLATION HARDWARE INCLUDED FOR: WALL PANEL 2-PACK & WALL PANEL STARTER PACK (8 Linear ft. /
5 sq ft. of wall space), & WALL PANEL 4-PACK & WALL PANEL VALUE PACK (9 sq ft. of wall space)
Part Wall Panel 2-Pack & Wall Panel Starter Pack Quantity
AA Bottom Rail X2
BB Top Rail X2
CC Side Trim X1
DD Dowel X3
EE Husky Wall Panel X2
FF Screws X16
GG E-Clip X3
HH Velcro Insert X4
Part Wall Panel 4-Pack & Wall Panel Value Pack Quantity
AA Bottom Rail X1
BB Top Rail X1
CC Side Trim X2
DD Dowel X6
EE Husky Wall Panel X4
FF Screws X20
GG E-Clip X6
HH Velcro Insert X8
Table of Contents
Table of Contents ...................................2
Safety Information ..................................2
Warranty ..........................................2
Pre-Installation (
Wall Panel 2-Pack & Wall Panel Starter Pack
)....3
Pre-Installation (
Wall Panel 4-Pack & Wall Panel Value Pack
).....5
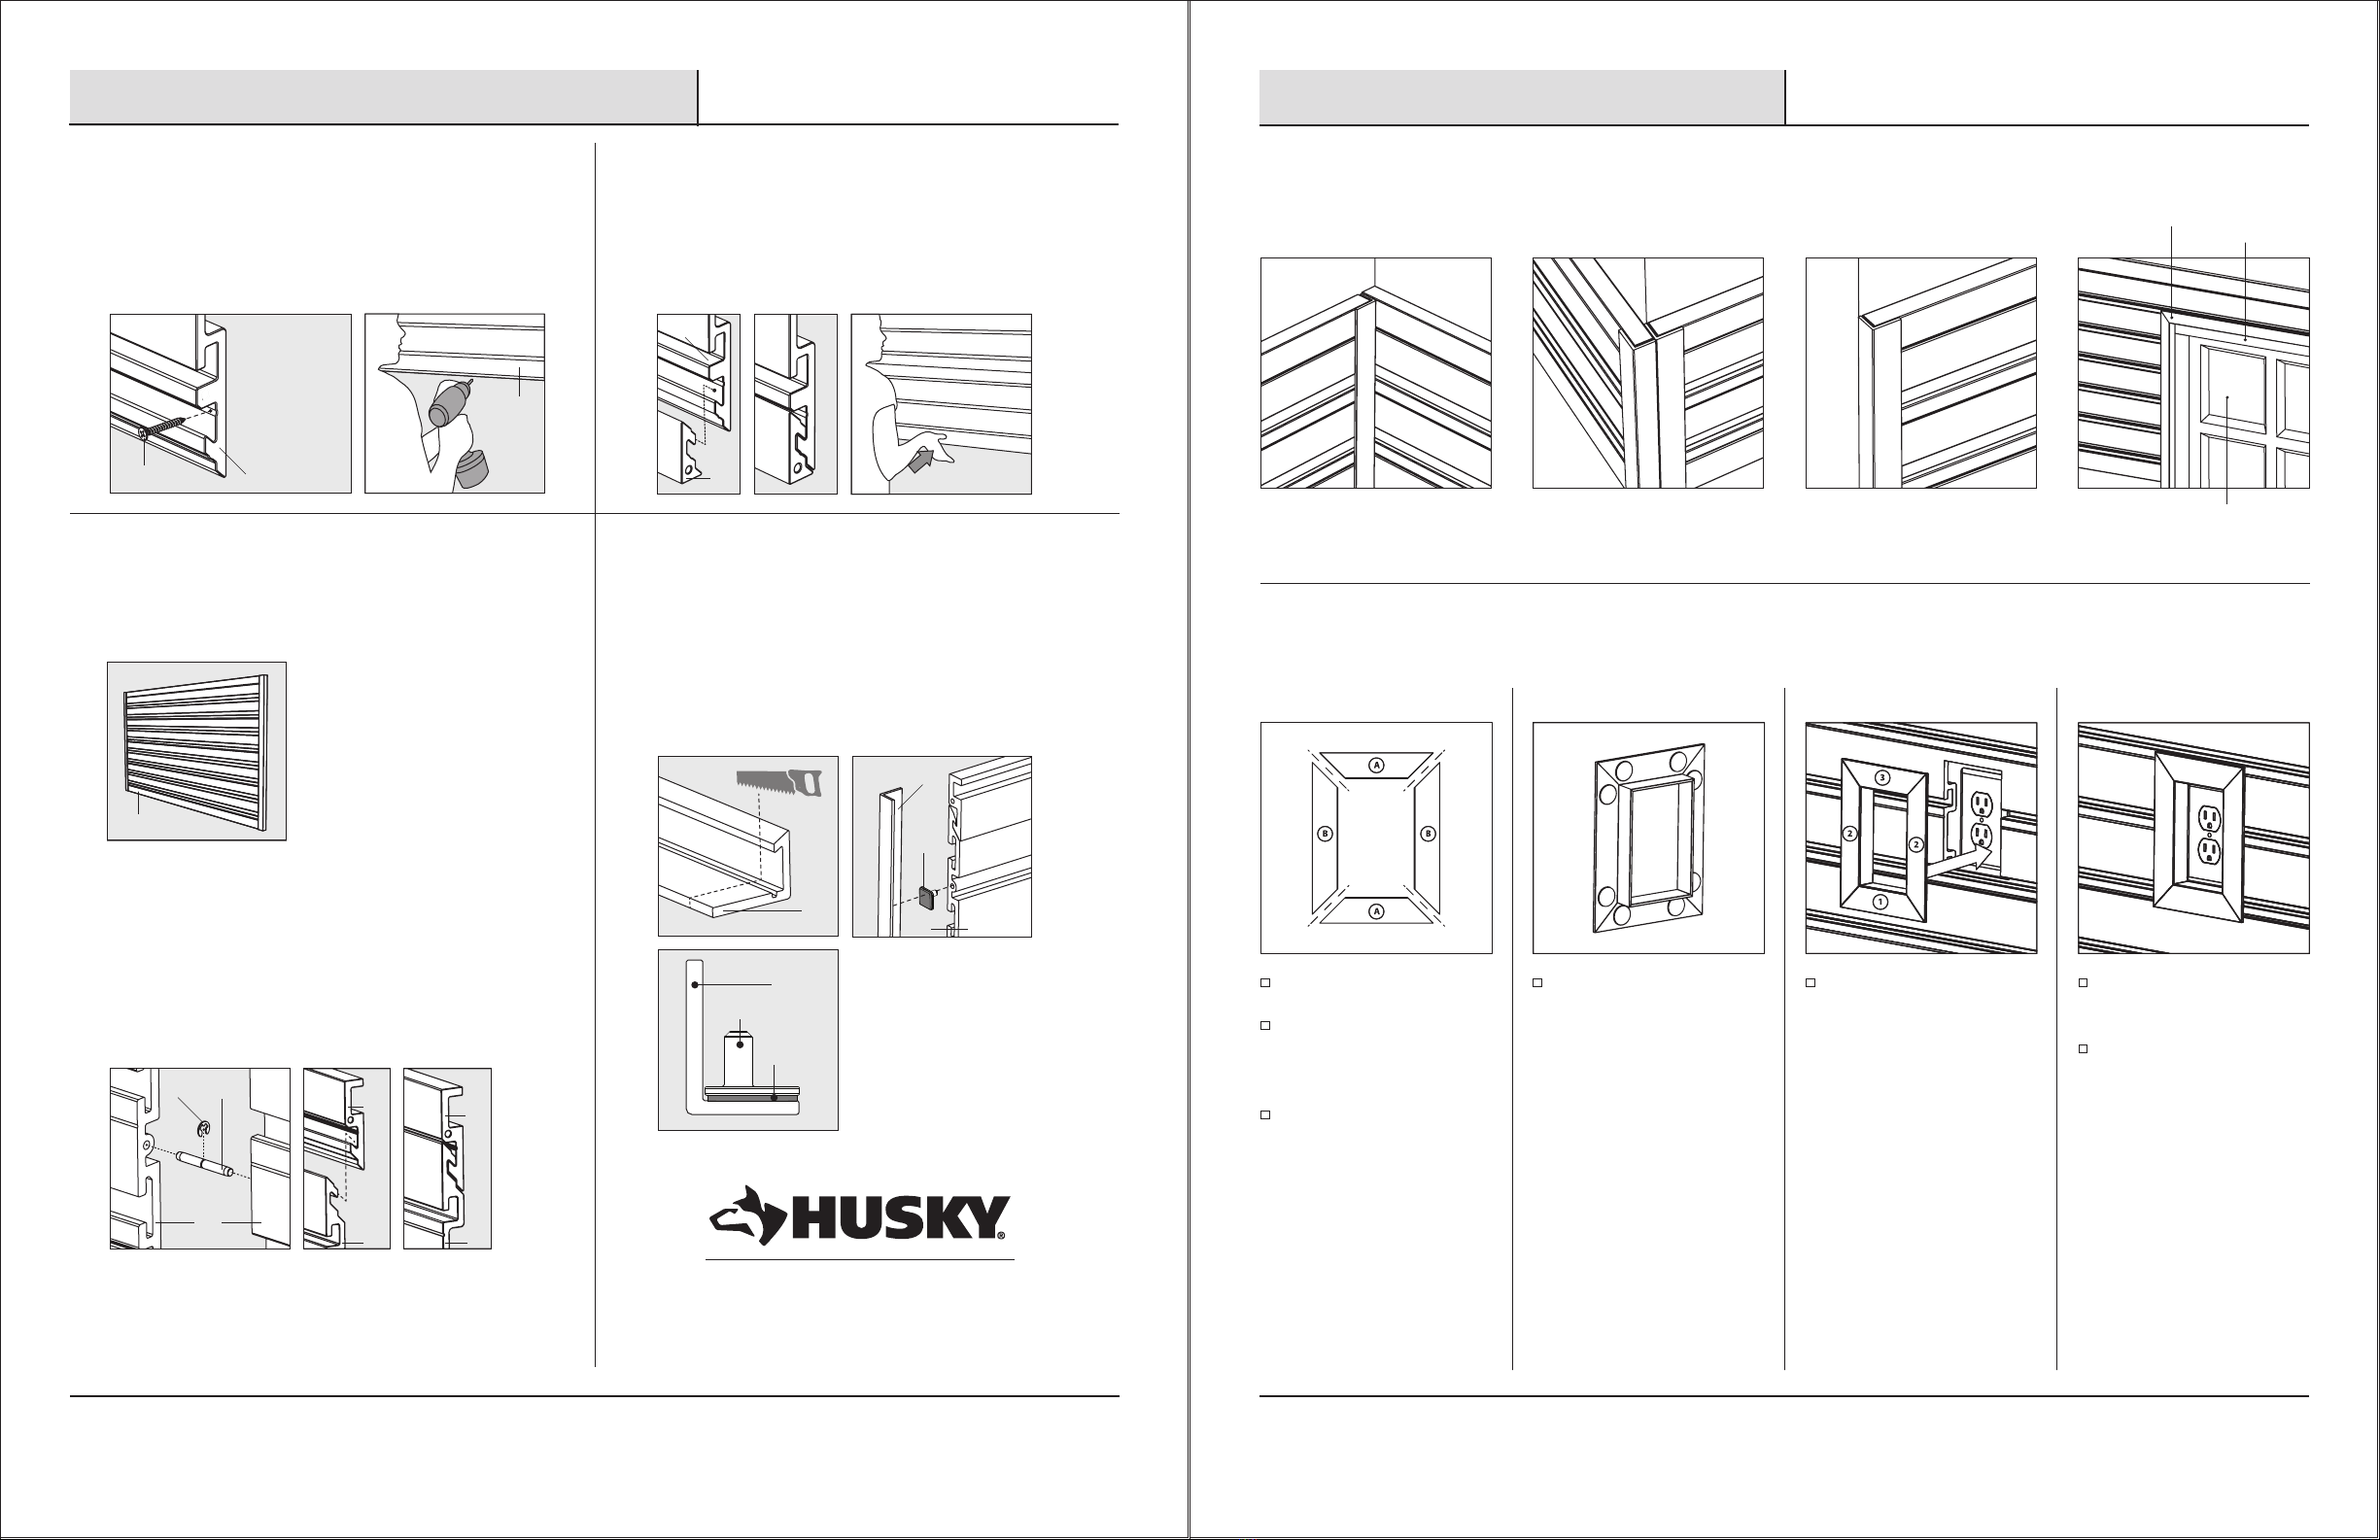
Husky Wall Configurations............................6
Installation (for Both 2-Pack & 4-Pack Kits) ............7-8
Husky Wall Trim Options .............................9
IMPORTANT NOTICE:
(Read Before Installing or Risk Damage to Husky Wall)
........10
Maintenance ......................................11
Care & Cleaning ...................................11
Troubleshooting ...................................11
Service Parts......................................11
Safety Information
HUSKY TRACK OR HUSKY WALL PRODUCTS
□Are intended for garage or basement applications
□Always be aware of noted weight limits of individual Husky
accessories
□Before installing Husky Track or Husky Wall to basement
walls, you must waterproof the basement to avoid damage
from mildew. Despite the appearance of dryness, walls
that appear dry may actually become damp after covering
Husky Wall products
□Special attention to all local codes and ordinances should be
taken prior to installation of Husky Wall panels
WARNING: California Proposition 65 Warning
This product contains a chemical known to the State
of California to cause cancer, birth defects or other
reproductive harm.
CAUTION: Maximum weight limit is 50 lbs. per
sq. ft. (2.39 kPa).
Warranty
LIFETIME WARRANTY
If your Husky product ever fails, bring it back and we will replace it free. This full warranty gives you specific rights, and you may also
have other rights, which vary state to state. For details, visit your nearby store or call 1-888-HD-HUSKY.
(AA) Bottom Rail
(FF) Screws (GG) E-Clip (HH) Velcro Insert
(BB) Top Rail (CC) Side Trim (DD) Dowel (EE) Husky Wall Panel

4
5 HUSKYTOOLS.COM
Please contact 1-888-HD-HUSKY for further assistance.
Installation - [For 2 Pack & 4 Pack]
1 Marking the height
□Mark the desired height of the Husky Wall panel on
your wall.
2 Marking the length
□Draw a level line at this point (start at stud) to the end
of where you want the track to stop.
3 Marking the studs
□With a pencil, mark your stud locations on this
level line.
4 Installing the top rail
□Place top rail (BB) just above the line (so you can see stud
marks). Make sure it is level and install screws (FF),
starting them into indented slots at each stud location.
5 Adding additional top rails
□Continue adding more top rail (BB) across the desired line
until the top rail of the track is complete. Make sure you use a
dowel (DD) and retaining ring (GG) in the middle of each dowel
to connect each top rail together (If possible try to use ½ of
one stud for each piece of top rail). Lightly tap the end of the
top rail with a mallet to seat the top rail onto the dowel.
6 Installing the Husky wall panels
□Now that your top rail (BB) is complete, use a level and
draw a line straight down each stud mark to just below
bottom of last panel that you will use for Husky Wall. Now
take each Husky Wall panel (EE) and slide into top rail (BB),
which will cover screws from previous steps.
Husky Wall Configurations
2-PANEL CONFIGURTAIONS
4-PANEL CONFIGURTAIONS
1x1 48.43”
9.06”
15.06”
96.43”
48.43”
48.43”
1x1
2x1
1x2
2x2
1x4
96.43”
48.43”
15.06”
27.06”
Please Note: choosing this
configuration will leave you
with one (1) extra top rail and
one (1) extra bottom rail.
Please Note: choosing this
configuration will leave you
with one (1) extra top rail and
one (1) extra bottom rail.
Note: make sure
screw is flush
otherwise
Husky Wall
panel will
not fit properly.
BB
FF
BB
BB
DD
GG
BB
BB
EE EE
BB BB

6
7 HUSKYTOOLS.COM
Please contact 1-888-HD-HUSKY for further assistance.
For installation instruction
videos visit us at: www.husky.com
Husky Wall Trim Options
TRIM CORNERS, END CAPS, DOORS & WINDOWS
TRIM OUTLETS & SWITCHES
Interior Corner
Front View Rear View Installation Order Finished Outlet/Switch
Exterior Corner End Cap
Side
Trim
Door or
Window
Door or
Window
Frame
Measure AC outlet cover.
Cut out a hole in Slatwall
panel .25” larger than the
outlet cover.
Cut extra side trim pieces
at 45 degree angle to fit in
the hole you just cut in the
Slatwall panel.
(Hint: cut side trim pieces a bit
longer than they need to be,
then make smaller cuts until
you get a perfect fit.
Place Velcro or adhesive
pads on the rear of the side
trim pieces.
Install trim pieces in the
order shown (1, 2, 3)
Outlet or light switch should
look smooth and finished.
Velcro or adhesive pads will
help hold trim pieces securely
in place.
Note: make sure
screw is flush
otherwise
Husky Wall
panel will
not fit properly.
Side
Trim
Insert
Velcro
Installation - [For 2 Pack & 4 Pack]
7 Securing the bottom panel
□Install screws (FF) in bottom panel (EE) again where indent
is located and where you have marked the studs.
8 Single column Husky wall
□If you are only creating a single column
Husky Wall (EE) skip to Step 10.
Multiple column Husky wall
□If you are creating a Husky Wall (EE) with multiple
columns, add dowels (DD) in each hole with retaining
rings (GG) in middle of each prior to connecting the next
panel and repeat Step 6 until all panels are installed.
9 Installing the bottom rail pieces
□Install bottom rail (AA) pieces by simply placing them in
bottom panel (EE) (where screws are installed) and firmly
pushing and locking them in.
10 Installing the side trim
□Use a long piece of side trim (CC) and cut to size (hack saw
or other appropriate saw for cutting PVC). Install the side
trim Velcro insert (HH). Press Velcro insert(s) into the holes
on the Husky Wall panel (EE) edge. Remove the adhesive
cover on Velcro and then push the side rail (CC) onto
the adhesive until it sticks securely.
FF EE
EE
EE
EE
DDGG
EE EE
BB BB
AA
EE
CC
HH
EE
CC

8
9 HUSKYTOOLS.COM
Please contact 1-888-HD-HUSKY for further assistance.
NOTICE:
PLEASE READ BEFORE INSTALLING OR RISK DAMAGING HUSKY WALL
If there is a gap between two top rails end to end or bottom
rails end to end because of the dowel / e-clip you can counter
sink the hole 1/8” with a 3/8” drill bit.
Also if you are having trouble getting the dowels in any of
the dowel holes you can bore out any of the dowel holes
with a 3/16” drill bit.
If side rails don’t fit because the panel, top rail, or bottom
rail are too long use a saw to cut off extra length.
If your having trouble getting dowels into dowel holes by
hand you can tap dowels lightly with a hammer or mallet.
Call customer service at: 1-888-HD-HUSKY
Care and Cleaning
How do I maintain and clean my new organizing system?
Husky Track and Husky Wall are heavy-duty cellular PVC extruded from the very best virgin materials thatmaintains
its clean consistent finish. Simply clean with a mild household cleaner or feather duster.
Husky Track is made from the highest quality materials and maintains a clean finish. Simply clean with a mild
household cleaner or a feather duster to maintain your track system.
Troubleshooting
What surface can Husky Track or Husky Wall be installed over?
Existing plaster, drywall, and concrete walls. To install over concrete walls use firing strips or a concrete drill bit and
“tap con” flathead screws to attach the same way as you would into a stud wall (pre-drilling screw locations).
How do I install Husky Track or Husky Wall over brick wall?
One way is to purchase concrete screws (system comes with hardware for wood) these along with a hammer drill
should work.
A second way is to fir out the wall using 2”x 2” studs. Anchor the studs to the concrete wall, a preferred method
spacing them 16” off center. For added support when storing heavier items, we recommend installing a plywood
sheet over the recently installed studs to help support our panels.
Can I add more Husky Track or Husky Wall when needed?
Yes, you can add more panels to your existing system as your storage needs arise. On each completed end, it is
easy to configure connections that allow you to add additional panels as your needs change in the future.
Can I cut Husky Track or Husky Wall?
Yes, Husky Track or Husky Wall can easily be cut using a table saw or jig saw or a hand saw. For best results use a
slider saw capable of making 12” or longer cut. Use a 90-tooth blade for a clean finish and then add our trim.
To counter sink use:
3/8” drill bit.
To bore use:
drill bit.

10
11 HUSKYTOOLS.COM
Please contact 1-888-HD-HUSKY for further assistance.
Notes
Notes

Questions, problems, missing parts? Before returning to the store,
call Husky Customer Service
8 a.m. - 7 p.m., EST, Monday-Friday, 9 a.m. - 6 p.m., EST, Saturday
1-888-HD-HUSKY
HUSKYTOOLS.COM
Retain this manual for future use.
This manual suits for next models
7
Table of contents