Husqvarna HV 703 User manual

HV703
EN Operator's manual 2-11
ES-MX Manual de usuario 12-22
FR-CA Manuel d’utilisation 23-33

Contents
Introduction............................................................... 2
Safety........................................................................3
Operation.................................................................. 5
Maintenance............................................................. 5
Troubleshooting........................................................ 8
Transportation, storage and disposal........................9
Technical data.........................................................11
Introduction
Product description
This engine is a 4-stroke combustion engine.
Intended use
The engine must only be used outdoors or in areas
with sufficient airflow.
California Proposition 65
WARNING!
The engine exhaust from this
product contains chemicals known
to the State of California to cause
cancer, birth defects or other
reproductive harm.
Engine overview
10
11
9
6
5
4
3
2
1
8
7
Note: The illustration shows one of the engine
models in this operator's manual. The protective
grille on the air intake is not included on the other
engine model.
1. Air filter
2. Air intake
3. Oil tank cap and dipstick
4. Spark plug
5. Fuel pump
6. Oil filter
7. Fuel filter
21974 - 001 - 09.12.2022

8. Serial number
9. Oil drain plug
10. Operator's manual
11. Spark plug
Serial number
Refer to
Engine overview on page 2
for the position
of the serial number. Supply the model name and
the serial number when you send an order for spare
parts.
Symbols on the product
WARNING! This product can be
dangerous and cause serious injury or
death to the operator or others. Be
careful and use the product correctly.
Read the operator's manual carefully
and make sure that you understand the
instructions before use.
Read the operator's manual carefully
and make sure that you understand the
instructions before use.
Engine oil.
Risk of fire.
Do not breathe in exhaust fumes.
The exhaust fumes from the engine
contain carbon monoxide, an odorless,
poisonous and very dangerous gas. Do
not start the engine indoors or in closed
spaces.
Hot surface.
Use hearing protection.
Note: Other symbols/decals on the engine refer
to certification requirements for some commercial
areas.
Product liability
As referred to in the product liability laws, we are not
liable for damages that our product causes if:
• the product is incorrectly repaired.
• the product is repaired with parts that are not
from the manufacturer or not approved by the
manufacturer.
• the product has an accessory that is not
from the manufacturer or not approved by the
manufacturer.
• the product is not repaired at an approved
service center or by an approved authority.
Safety
Safety definitions
Warnings, cautions and notes are used to point out
specially important parts of the manual.
WARNING: Used if there is a
risk of injury or death for the operator
or bystanders if the instructions in the
manual are not obeyed.
CAUTION: Used if there is a risk of
damage to the product, other materials
or the adjacent area if the instructions in
the manual are not obeyed.
Note: Used to give more information that is
necessary in a given situation.
General safety instructions
WARNING: Read the warning
instructions that follow before you use
the engine.
• The engine is dangerous if you are not careful
or if you use the engine incorrectly. There is a
risk of injury or death, or damage to the engine.
Before you use the engine, you must read
and understand the contents of this operator’s
manual.
1974 - 001 - 09.12.2022 3

• You must read and understand the operator’s
manual for the product that uses this engine.
There can be more safety instructions for start,
stop, operation and maintenance.
• Save all warnings and instructions.
• Do not let a person operate the engine unless
they read and understand the contents of the
operator's manual.
• Do not let a child operate the engine.
• Do not do modifications to the engine.
Safety instructions for operation
WARNING: Read the warning
instructions that follow before you use
the engine.
• Make sure that you know how to stop the engine
quickly in an emergency.
• The exhaust fumes from the engine contain
carbon monoxide which is an odorless,
poisonous and very dangerous gas.
• Do not use a combustion engine product indoors
or in areas that do not have sufficient airflow.
• Do not use the engine in areas where fire or
explosions can occur.
• If you obey all instructions for operation and
troubleshooting and the engine does not start,
speak to a Husqvarna servicing dealer. Do not
try other methods to start the engine.
• Do not use starting fluid.
• Do not spray flammable gases into the
carburetor or onto the air cleaner.
• Do not put flammable liquids into the
carburetor or onto the air cleaner.
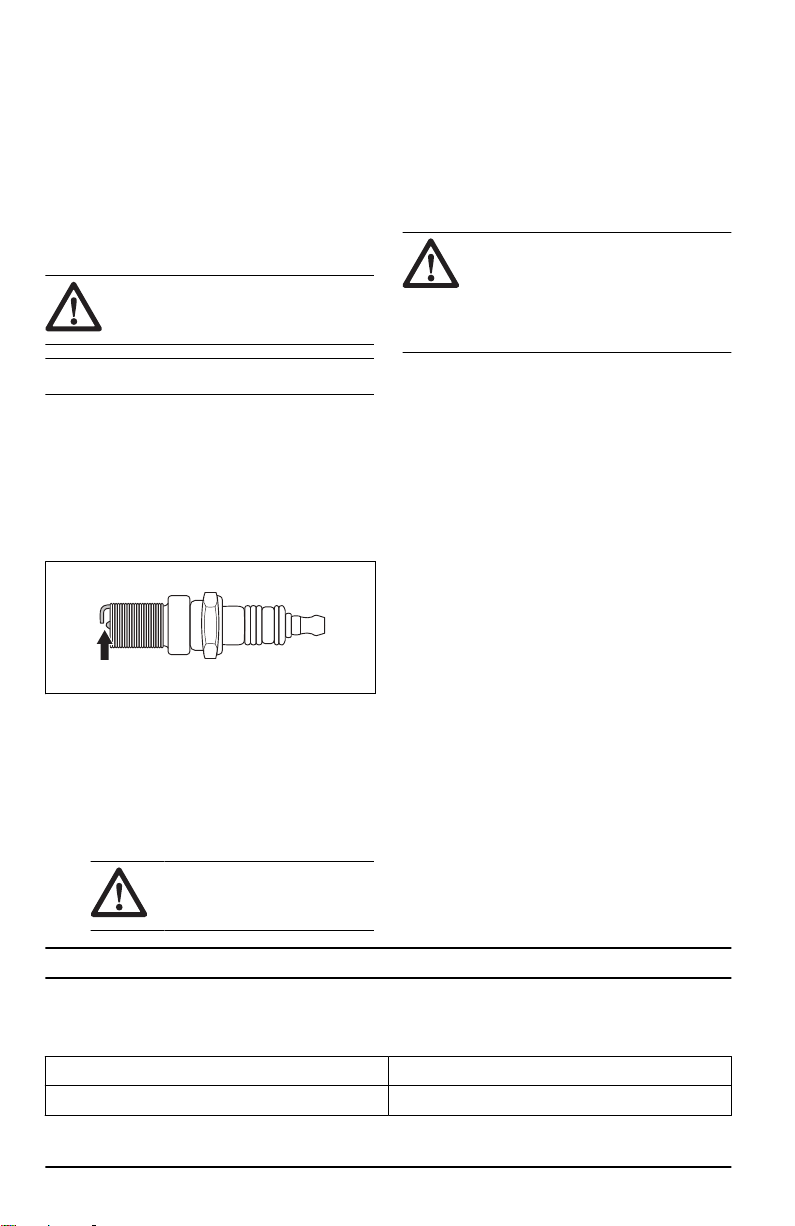
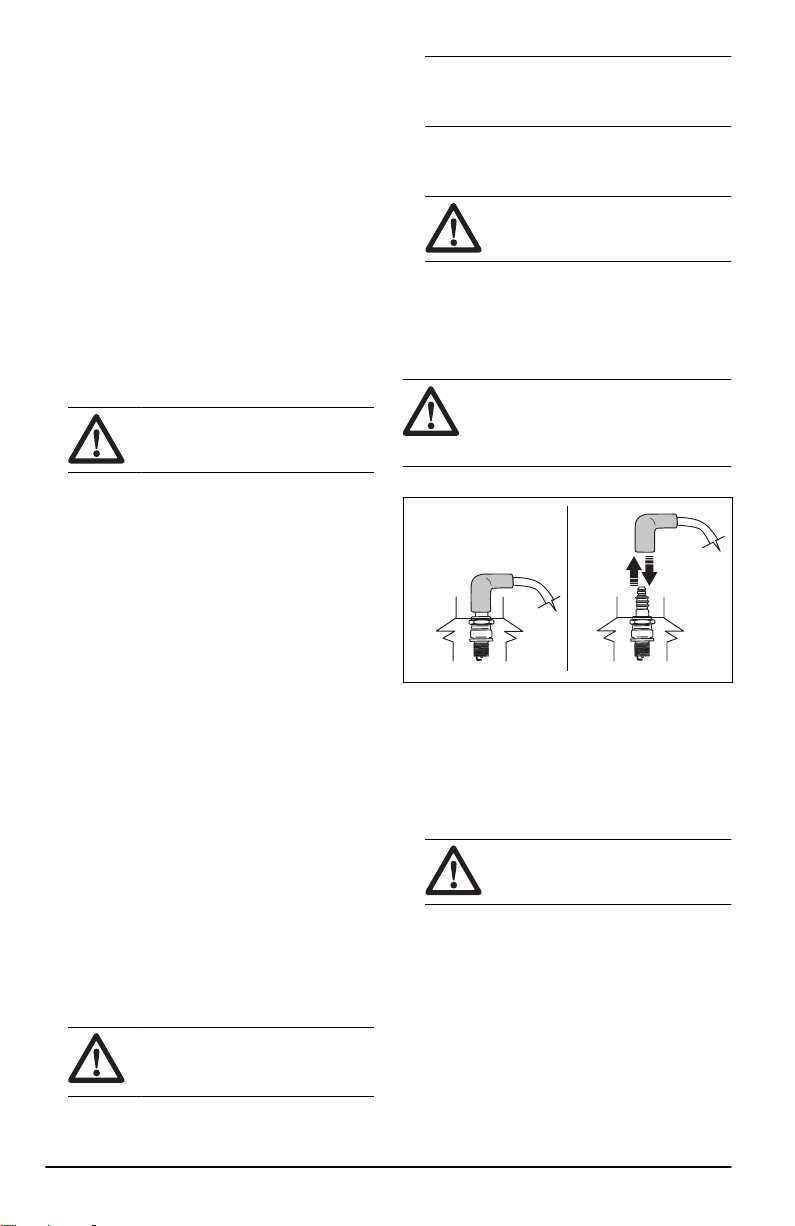
• Do not start the engine with the spark plugs
removed. Fuel can spray from the spark plug
hole and cause a fire.
Safety devices on the product
WARNING: Read the warning
instructions that follow before you use
the product.
• Do not use a product with defective safety
devices.
• Do a check of the safety devices regularly. If
the safety devices are defective, speak to your
Husqvarna service agent.
• Do not make modifications to safety devices.
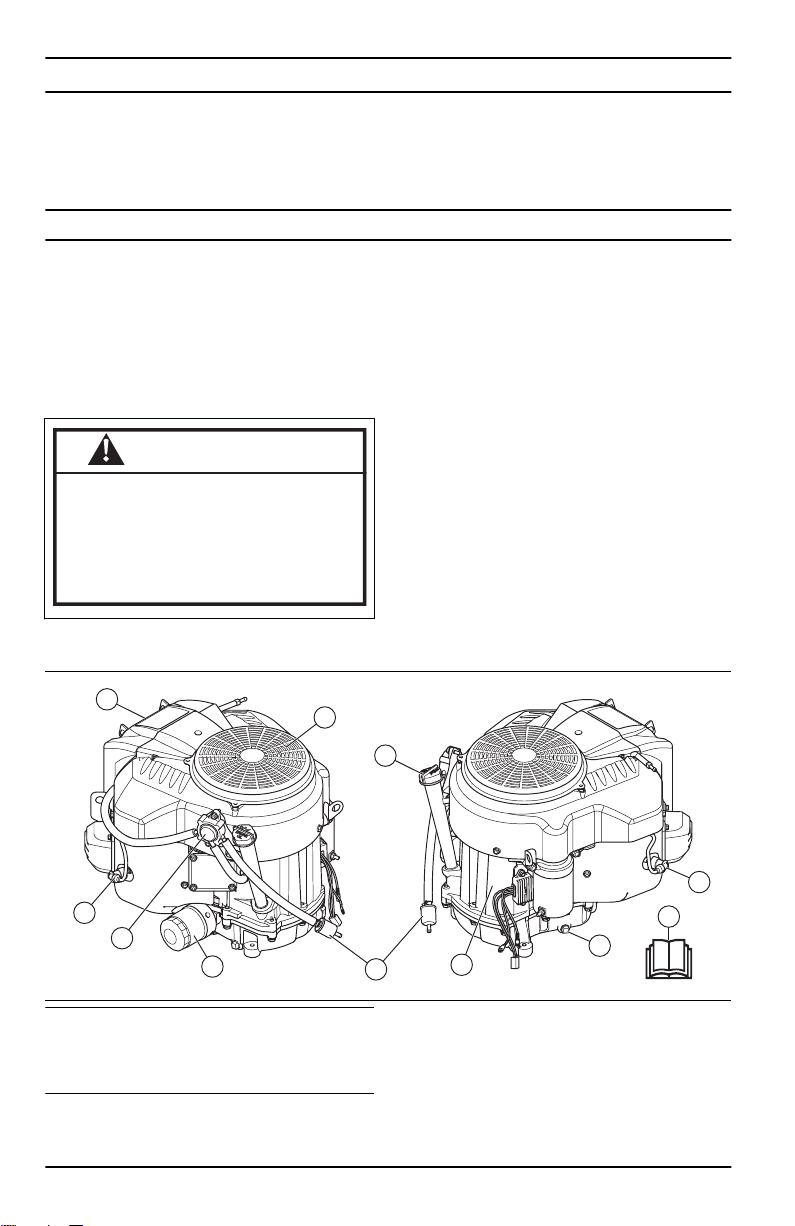
Muffler
The muffler keeps the noise levels to a minimum and
sends the exhaust fumes away from the operator.
Do not use the product if the muffler is missing or
defective. A defective muffler increases the noise
level and the risk of fire.
WARNING: The muffler becomes
very hot during and after use and when
the engine operates at idle speed. Be
careful near flammable materials and/or
fumes to prevent fire.
To do a check of the muffler
• Examine the muffler regularly to make sure that it
is attached correctly and not damaged.
Fuel safety
WARNING: Read the warning
instructions that follow before you use
the product.
• Fuel is flammable and the fumes are explosive.
Be careful with fuel to prevent injury, fire and
explosion.
• Do not breathe in the fuel fumes. The fuel fumes
are poisonous and can cause injury. Make sure
that the airflow is sufficient.
• Do not remove the fuel tank cap or fill the fuel
tank when the engine is on.
• Make sure that the engine is cool before you
refuel.
• Do not fill fuel in an indoor area. Insufficient
airflow can cause injury or death because of
asphyxiation or carbon monoxide poisoning.
• Do not smoke near the fuel or the engine.
• Do not put hot objects near the fuel or the
engine.
• Do not fill fuel near sparks or flames.
• Before you refuel, open the fuel tank cap slowly
and release the pressure carefully.
• Fuel on your skin can cause injury. If you get fuel
on your skin, use soap and water to remove the
fuel.
• If you spill fuel on your clothing, change clothing
immediately.
• Do not fill the fuel tank fully. Heat causes the fuel
to expand. Keep a space at the top of the fuel
tank.
• Tighten the fuel tank cap fully. If the fuel tank cap
is not tightened, there is a risk of fire.
• Before you start the product, move the product to
a minimum of 3 m/10 ft from where you refueled.
• Do not start the product if there is fuel or engine
oil on the product. Remove the unwanted fuel
and engine oil and let the product dry before you
start the engine.
• Examine the engine for leaks regularly. If there
are leaks in the fuel system, do not start the
engine until the leaks are repaired.
• Do not use your fingers to examine the engine
for leaks.
• Keep fuel in approved containers only.
41974 - 001 - 09.12.2022

• When the product and fuel is in storage, make
sure that fuel and fuel fumes cannot cause
damage.
• Drain the fuel in an approved container outdoors
and away from sparks and flames.
Safety instructions for maintenance
WARNING: Read the warning
instructions that follow before you do
maintenance on the engine.
• If the maintenance is not done correctly and
regularly, the risk of injury and damage to the
engine increases.
• Stop the engine and make sure that all parts are
cool before you do the maintenance.
• Disconnect the spark plug cap before you do the
maintenance.
• The exhaust fumes from the engine are hot and
can contain sparks. Do not operate the engine in
indoor areas or near flammable material.
• Always use original spare parts. Spare parts that
are not approved by the manufacturer, can cause
serious injury or death.
• Only do the maintenance as given in this
operator's manual. Let an approved service
center do all other servicing.
• Let an approved service center do servicing on
the engine regularly.
Operation
Introduction
WARNING: Read and understand
the safety chapter before you use the
product.
To do before you operate the engine
• Read this operator's manual carefully and make
sure that you understand the instructions.
• Fill engine oil and do a check of the engine oil
level. Refer to
To do a check of the engine oil
level on page 6
.
• Do the daily maintenance. Refer to
Maintenance
schedule on page 5
.
• Read the operator's manual for the product that
uses this engine. Obey the procedures that must
be done before you start the product.
Maintenance
Introduction
WARNING: Read and understand
the safety chapter before you do
maintenance on the product.
Maintenance schedule
* = General maintenance done by the operator. The
instructions are not given in this operator's manual.
X = The instructions are given in this operator's
manual.
O = This maintenance must be done by a servicing
dealer. All instructions are not given in this operator's
manual.
Engine maintenance Before
use
After the
first 5h
Each
25h
Each
50h or
yearly
Each
100h or
yearly
Each
200 h or
yearly
Do a check of the engine oil level. X1
Replace the engine oil. X X
Replace the oil filter. X X
Replace the paper air filter. X
Clean the foam air filter. Clean at shorter
intervals if the engine is used in a dusty
environment or at an ambient temperature
of more than 100°F/37°C.
X
1Also do a check of the oil level each 5 hours of operation when the engine is warm.
1974 - 001 - 09.12.2022 5

Engine maintenance Before
use
After the
first 5h
Each
25h
Each
50h or
yearly
Each
100h or
yearly
Each
200 h or
yearly
Replace the foam air filter. Replace at
shorter intervals if the engine is used in
a dusty environment or at an ambient tem-
perature of more than 100°F/37°C.
X
Examine and clean the spark plugs. Re-
place the spark plugs if it is necessary. X
Replace the spark plugs. X
Replace the fuel filter. X
Clean the cylinder cooling fins. *
Clean the air intake and the cooling fan. *
Adjust the valve head clearance for the air
intake and the exhaust valves. O O
To do a check of the engine oil level
CAUTION: Do not operate the
engine with low engine oil level or too
high engine oil level. Incorrect engine oil
level can cause damage to the engine.
CAUTION: Use detergent engine oil
for 4-stroke engines with the viscosity
range shown in the illustration.
Note: Husqvarna recommends air-cooled engine
oil with a zinc additive.
1. Stop the engine and make sure that it is level.
2. Remove the oil tank cap and dipstick.
3. Clean the oil from the dipstick.
4. Put the dipstick back and tighten the oil tank cap
fully.
5. Remove the oil tank cap and dipstick.
6. Examine the engine oil level on the dipstick.
7. If the engine oil level is below the "FULL" mark
on the dipstick, fill engine oil until the level is at
the "FULL" mark.
8. Do a check of the engine oil level again.
9. Install the oil tank cap and dipstick.
To replace the engine oil
If the engine is cold, start the engine for 1–2 minutes
before you drain the engine oil. This makes the
engine oil warm and easier to drain.
WARNING: Engine oil is very hot
directly after the engine stops. Let the
engine become cool before you drain the
engine oil. If you spill engine oil on your
skin, clean with soap and water.
1. Remove the spark plug cap.
2. Clean the area around the oil drain plug. Refer
to the operator's manual for the product that uses
this engine for the correct location of the oil drain
plug.
3. Put an applicable container below the oil drain
plug.
4. Remove the oil drain plug.
5. Let the oil drain into the container.
61974 - 001 - 09.12.2022

6. Install and tighten the oil drain plug fully.
7. Fill new engine oil to the correct level. Refer to
To do a check of the engine oil level on page
6
. Refer to
Technical data on page 11
for the
correct type of oil.
To replace the oil filter
WARNING: Use protective gloves.
If you spill engine oil on your skin, clean
with soap and water.
1. Drain the engine oil. Refer to
To replace the
engine oil on page 6
.
2. Turn the oil filter counterclockwise to remove it.
3. Lightly lubricate the rubber seal on the new oil
filter with new engine oil.
4. Turn the oil filter clockwise by hand until the
rubber seal is in position, then tighten a half turn
more.
5. Fill the engine with new engine oil. Refer to
To
do a check of the engine oil level on page 6
.
6. Start the engine and let it operate at idle speed
for 3 minutes.
7. Stop the engine and make sure that there is no
oil leakage from the oil filter.
8. Fill with engine oil to make up for the oil held in
the new oil filter.
To clean or replace the air filter
WARNING: Use approved
respiratory protection when you clean or
replace the air filter. Discard used air
filters correctly. The dust in the air filter
is dangerous to your health.
WARNING: Do not clean the
air filter with compressed air. This
causes damage to the air filter and
the risk increases that you breathe the
dangerous dust.
1. Turn the knobs (A) and remove the air filter cover
(B).
2. Remove the paper filter element (C) and the
foam filter element (D).
A
C
D
B
3. Clean the air filter housing with a brush.
4. Examine the air filter elements for damage.
CAUTION: Always replace a
damaged air filter, or the dust will
go into the engine and cause engine
damage.
5. Replace the paper filter element yearly or each
50 hours. The paper filter element cannot be
cleaned.
6. Clean the foam filter element with a solution
of detergent and warm water until all dirt is
removed.
CAUTION: Do not twist the
foam filter element.
7. Flush the foam filter element in clean water.
8. Compress the foam filter element in a dry and
clean cloth until the foam filter element is fully
dry.
9. Install the air filter in the opposite sequence.
Make sure that the tabs on the air filter cover go
into the slots on the air filter housing.
To replace the fuel filter
1. Use a pair of flat-nosed pliers to move the hose
clips (A) away from the fuel filter (B).
C
A
B
1974 - 001 - 09.12.2022 7

2. Pull the fuel filter from the ends of the fuel hoses
(C).
3. Push the new fuel filter into the ends of the fuel
hoses.
a) If there are marks for the direction of
installation on the fuel filter, make sure that
it is installed in the correct direction.
4. Push the hose clips against the fuel filter.
To examine and replace the spark
plug
CAUTION: Do not try to start the
engine if the spark plug or ignition cable
is removed.
Note: The engine has 2 spark plugs.
1. Remove the spark plug cap and clean around the
spark plug.
2. Remove the spark plug with a spark plug wrench.
3. Examine the spark plug. Replace it if the
electrodes are burned, damaged or dirty or if the
insulation has cracks or damages.
4. Measure the electrode gap and make sure that it
is correct. Refer to
Technical data on page 11
.
a) If it is necessary, bend the side electrode to
adjust the electrode gap.
5. Install the spark plug by hand until it touches the
spark plug seat.
6. Tighten the spark plug with the spark plug
wrench.
a) Tighten a used spark plug ⅛–¼ of a turn
more, and a new spark plug ½ turn more.
CAUTION: Spark plugs that
are not tightened correctly can
cause damage to the engine.
7. Install the spark plug cap.
Carburetor adjustment for high
altitude operation
The altitude has an effect on the engine performance
and emissions. If the engine is always operated at
altitudes higher than 1500 m/5000 ft, it is necessary
to adjust the carburetor. Let your servicing dealer do
the necessary adjustments.
CAUTION: Do not operate the
engine on lower altitudes if the
carburetor is adjusted for high altitudes.
This causes engine damage. Let your
servicing dealer adjust the carburetor to
factory specifications.
Emission control system
This engine uses lean carburetor adjustments
and other systems to decrease the emissions of
dangerous materials in the exhaust fumes. The air
intake, the fuel system and the exhaust system are
parts of the emission control system. If modifications
are done to the emission control system, the
emissions increase.
If modifications are done to the speed adjustment
mechanism or governor linkage, the engine does not
operate as intended. This can also cause increased
emissions.
It is necessary to use original spare parts to make
sure that the emission control system operates
correctly.
The engine must be examined and repaired by an
approved servicing dealer if 1 or more of these
problems occur:
• The engine is not easy to start or stops again
after a start.
• The engine does not operate smoothly at idle
speed.
• There are misfires in the engine during operation.
• The exhaust smoke is black or the fuel
consumption is high.
Troubleshooting
The engine does not start
Cause Solution
The fuel valve lever is set to the OFF position. Move the fuel valve lever to the ON position.
81974 - 001 - 09.12.2022

Cause Solution
The choke is open. Close the choke.
The ON/OFF switch is set to the OFF position. Set the ON/OFF switch to the ON position.
There is no fuel in the fuel tank. Fill fuel.
There is unsatisfactory fuel in the fuel tank. Drain the fuel tank and the carburetor. Refer to
To
prepare the engine for long-term storage on page
10
. Fill with clean fuel.
No fuel stabilizer has been added or the fuel tank has
not been drained before storage.
The spark plug is damaged. Do a check of the electrode gap or replace the spark
plug.
The spark plug is wet from fuel. Remove the spark plug and let it dry. Install the spark
plug.
CAUTION: Speak to an approved
servicing dealer if the problem stays.
The power of the engine is decreased
Cause Solution
The air filter is clogged. Replace the air filter.
The fuel tank contains bad gasoline. Drain the fuel tank. Fill with clean gasoline.
No fuel stabilizer has been added or the fuel tank has
not been drained before storage.
The engine speed is set too low. Increase the engine speed.
CAUTION: Speak to an approved
servicing dealer if the problem stays.
Unusual noises come from the engine
Cause Solution
The engine is operated with
high work loads.
No procedure is necessary.
The fuel tank contains bad
gasoline.
Drain the fuel tank. Fill with clean gasoline of a different brand. Speak to an
approved servicing dealer if the problem stays.
CAUTION: Do not continue to
operate the engine if there are unusual
noises during standard work loads. This
can cause damage to the engine and
void the warranty.
Transportation, storage and disposal
Transportation
• Let the engine become cool for a minimum of 15
minutes before transportation.
• Keep the engine on a level surface during
transportation to prevent fuel leakage.
1974 - 001 - 09.12.2022 9

• Attach the product that uses this engine safely
during transportation to prevent injury and
damages to the engine.
To prepare the engine for short-term
storage
The instructions that follow are applicable for a
storage period of less than 30 days.
• Clean the engine.
a) Stop the engine end let it become cool.
b) Remove grass, dirt and particles from these
areas: The cylinder cooling fins, air intake,
levers, linkage, guards and carburetor.
• Add a fuel stabilizer to the fuel or drain the
fuel tank and carburetor. Refer to
To add a fuel
stabilizer to the fuel on page 10
and
To prepare
the engine for long-term storage on page 10
.
• Put a dust cover on the engine for protection.
WARNING: Do not put a cover
on the engine if it is warm.
• Put the engine in a location with a good airflow
and away from flames and sparks.
• If it is possible, do not put the engine in a location
with high humidity.
To add a fuel stabilizer to the fuel
1. Put the fuel stabilizer in a fuel container with
fresh fuel.
2. Fill the fresh fuel with fuel stabilizer into the fuel
tank.
3. Start the engine and let it operate outdoors for 10
minutes. This is to make sure that the fuel with
the fuel stabilizer has replaced the fuel without
fuel stabilizer.
4. Stop the engine.
To prepare the engine for long-term
storage
The instructions that follow are applicable for a
storage period of more than 30 days.
1. Clean the engine.
a) Stop the engine end let it become cool.
b) Remove grass, dirt and particles from these
areas: The cooling fins, air intake, levers,
linkage, guards and carburetor.
2. Drain the fuel tank.
3. Start the engine and let it operate until all the fuel
is used and the engine stops.
WARNING: Do not operate the
engine indoors. Do not go away from
a started engine.
4. Let the engine become cool and replace the
engine oil.
Note: This is only necessary if the interval
since the last oil replacement is more than 3
months.
5. Lubricate the cylinder bore. Refer to
To lubricate
the cylinder bore on page 10
.
6. Put a dust cover on the engine for protection.
WARNING: Do not put a cover
on the engine if it is warm.
7. Put the engine in a location with a good airflow
and away from flames and sparks.
8. If it is possible, do not put the engine in a location
with high humidity.
To lubricate the cylinder bore
CAUTION: Let an approved
Husqvarna service center do this
procedure if you do not have the correct
knowledge.
1. Remove the spark plug caps.
2. Remove the spark plugs and put 1 oz/30 ml of
clean engine oil into each spark plug hole.
3. Put cloths on the spark plug holes for protection.
4. Turn the ignition key to lubricate the engine
parts.
5. Remove the cloths from the spark plug holes.
6. Install and tighten the spark plugs.
WARNING: Do not install the
spark plug caps.
Disposal
• Obey the local recycling requirements and
applicable regulations.
• Discard all chemicals, such as engine oil or fuel,
at a servicing dealer or at an applicable disposal
location.
• When the life of the engine has expired, send
the engine to a Husqvarna servicing dealer or
discard it at a recycling location.
10 1974 - 001 - 09.12.2022

Technical data
HV 703 (537566801) HV 703 (537566901)
Engine type Two cylinder, 4-stroke, forced
air cooling
Two cylinder, 4-stroke, forced
air cooling
Engine power, kW/hp @rpm 16/21.5 @3600 16/21.5 @3600
Max. torque, Nm/ft-lb @rpm 40.3/30.5 @3600 40.3/30.5 @3600
Fuel consumption, lb/hr / kg/hr @ rated hp
and @ rated rpm 11.7/5.13 @21.5 @3600 11.7/5.13 @21.5 @3600
Max. speed, rpm 3300 ±150 3350 ±150
Idle speed, rpm 2100 ±150 2100 ±150
Displacement, cm3703 703
Fuel, minimum octane grade, lead-free, max
10% Ethanol and max 15% MTBE, AKI /
RON
87/91 87/91
Fuel pump type Pulse pump Pulse pump
Starter Electric Electric
Air filter Dual-element air filter, foam
and paper (flat panel)
Dual-element air filter, foam
and paper (flat panel)
Fuel filter 120 micron 120 micron
Oil tank capacity with oil filter, oz/l 80/2.36 80/2.36
Oil filter Standard Standard
Engine oil
API Class SJ, SL, SM, SN
or SP SAE 30, SAE 20W-50,
SAE 10W-40, SAE 10-W30,
SAE 5W-30, SAE 15W-30
API Class SJ, SL, SM, SN
or SP SAE 30, SAE 20W-50,
SAE 10W-40, SAE 10-W30,
SAE 5W-30, SAE 15W-30
Oil cooler No No
Spark plug type Torch F6RTC Torch F6RTC
Electrode gap, in./mm 0.030/0.76 0.030/0.76
Dimensions, L×W×H, in./mm 18.2/461.2×20.1/510.3×18.3/
466
18.2/461.2×20.1/510.3×18.3/
466
Net weight, lbs/kg 95/43.1 95/43.1
1974 - 001 - 09.12.2022 11

Contenido
Introducción............................................................ 12
Seguridad................................................................13
Funcionamiento...................................................... 15
Mantenimiento........................................................ 15
Solución de problemas........................................... 19
Transporte, almacenamiento y eliminación de
residuos.................................................................. 20
Datos técnicos........................................................ 22
Introducción
Descripción del producto
Este motor tiene combustión de cuatro tiempos.
Uso previsto
El motor solo se debe usar al aire libre o en áreas
con suficiente flujo de aire.
Propuesta 65 de California
¡ADVERTENCIA!
Los gases de escape del motor de este
producto contienen sustancias químicas
conocidas en el Estado de California
como causantes de cáncer, defectos
congénitos y otros daños reproductivos.
Descripción general del motor
10
11
9
6
5
4
3
2
1
8
7
Nota: La ilustración muestra uno de los modelos
de motor en este manual de usuario. La rejilla de
protección de la toma de aire no se incluye en el otro
modelo de motor.
1. Filtro de aire
2. Toma de aire
3. Tapón y varilla de nivel del depósito de aceite
4. Bujía
5. Bomba de combustible
6. Filtro de aceite
7. Filtro de combustible
8. Número de serie
9. Tapón de vaciado de aceite
12 1974 - 001 - 09.12.2022

10. Manual del usuario
11. Bujía
Número de serie
Consulte
Descripción general del motor en la página
12
para conocer la posición del número de serie.
Indique el nombre del modelo y el número de serie
cuando envíe un pedido de piezas de repuesto.
Símbolos en el producto
ADVERTENCIA: Este producto puede
ser peligroso y provocar daños graves
o fatales al operador o a otras
personas. Tenga cuidado y utilice el
producto correctamente.
Lea atentamente el manual de
instrucciones y asegúrese de que
entiende las instrucciones antes de
usar el producto.
Lea atentamente el manual de
instrucciones y asegúrese de que
entiende las instrucciones antes de
usar el producto.
Aceite del motor.
Riesgo de incendio.
No inhale los gases de escape. Los
gases de escape del motor contienen
monóxido de carbono, un gas inodoro,
tóxico y muy peligroso. No arranque
el motor en interiores o en espacios
cerrados.
Superficie caliente.
Use protectores auriculares.
Nota: Otros símbolos o etiquetas del motor hacen
referencia a requisitos de certificación de algunas
zonas comerciales.
Responsabilidad del fabricante
Como se menciona en las leyes de responsabilidad
del fabricante, no nos hacemos responsables de los
daños que cause nuestro producto si:
• el producto se repara incorrectamente
• el producto se repara con piezas que no son del
fabricante o que este no autoriza
• el producto tiene un accesorio que no es del
fabricante o que este no autoriza
• el producto no se repara en un centro de servicio
autorizado o por una autoridad aprobada.
Seguridad
Definiciones de seguridad
Las advertencias, precauciones y notas se utilizan
para señalar las piezas particularmente importantes
del manual.
ADVERTENCIA: Se utilizan para
señalar el riesgo de lesiones graves
o mortales para el operador o para
aquellos que se encuentren cerca si no
se siguen las instrucciones del manual.
PRECAUCIÓN: Se utilizan para
señalar el riesgo de dañar la máquina,
otros materiales o el área adyacente
si no se siguen las instrucciones del
manual.
Nota: Se utilizan para entregar más información
necesaria en situaciones particulares.
Instrucciones generales de
seguridad
ADVERTENCIA: Lea las
instrucciones de advertencia siguientes
antes de utilizar el motor.
• El motor es peligroso si no se tiene cuidado o
si se utiliza de forma incorrecta. Existe riesgo
de lesiones, muerte o daños al motor. Antes
de utilizar el motor, es muy importante que lea
y comprenda el contenido de este manual de
usuario.
1974 - 001 - 09.12.2022 13

• Debe leer y comprender el manual de usuario
del producto que utiliza este motor. Puede
haber más instrucciones de seguridad para el
arranque, la parada, el funcionamiento y el
mantenimiento.
• Guarde todas las advertencias y las
instrucciones.
• No permita que nadie que no haya leído y
comprendido el contenido del manual de usuario
utilice el motor.
• No deje que un niño opere el motor.
• No realice modificaciones en el motor.
Instrucciones de seguridad para el
funcionamiento
ADVERTENCIA: Lea las
instrucciones de advertencia siguientes
antes de utilizar el motor.
• Asegúrese de saber cómo detener el motor
rápidamente en caso de emergencia.
• Los gases de escape del motor contienen
monóxido de carbono; un gas inodoro, tóxico y
muy peligroso.
• No utilice el motor de combustión en interiores ni
en zonas que no tengan suficiente flujo de aire.
• No utilice el motor en áreas donde se pueden
producir explosiones o fuego.
• Si obedece todas las instrucciones de
funcionamiento y solución de problemas y el
motor no arranca, hable con un concesionario de
servicio de Husqvarna. No intente utilizar otros
métodos para arrancar el motor.
• No utilice líquido de arranque.
• No pulverice gases inflamables en el
carburador ni en el purificador de aire.
• No vierta líquidos inflamables en el
carburador ni en el purificador de aire.
• No arranque el motor sin las bujías. Puede
pulverizarse combustible desde el agujero de
la bujía y provocar un incendio.
Dispositivos de seguridad en el producto
ADVERTENCIA: Lea
atentamente las instrucciones de
advertencia siguientes antes de usar el
producto.
• No utilice un producto con dispositivos de
seguridad defectuosos.
• Revise los dispositivos de seguridad de forma
regular. Si los dispositivos de seguridad están
defectuosos, comuníquese con su taller de
servicio Husqvarna.
• No realice modificaciones en los dispositivos de
seguridad.
Silenciador
El silenciador mantiene los niveles de ruido al
mínimo y envía los gases de escape lejos del
operador.
No utilice el producto si el silenciador no
está instalado o está defectuoso. Un silenciador
defectuoso aumenta el nivel de ruido y el riesgo de
incendio.
ADVERTENCIA: El silenciador
se calienta mucho durante y después
del uso y cuando el motor funciona en
régimen de ralentí. Tenga cuidado cerca
de materiales o vapores inflamables
para prevenir incendios.
Para revisar el silenciador
• Examine el silenciador con regularidad para
asegurarse de que está instalado correctamente
y que no esté dañado.
Seguridad de combustible
ADVERTENCIA: Lea
atentamente las instrucciones de
advertencia siguientes antes de usar el
producto.
• La gasolina es inflamable y sus gases son
explosivos. Tenga cuidado con el combustible
para evitar lesiones, incendios y explosiones.
• No inhale los gases del combustible. Los gases
del combustible son tóxicos y pueden provocar
lesiones. Asegúrese de que el flujo de aire sea
suficiente.
• No retire la tapa del depósito de combustible ni
llene el depósito con el motor encendido.
• Asegúrese de que el motor se enfríe antes de
llenar el depósito de combustible.
• No llene el depósito de combustible en
interiores. Un flujo de aire insuficiente puede
causar lesiones graves o fatales por asfixia o
intoxicación por monóxido de carbono.
• No fume cerca del combustible o del motor.
• No coloque objetos calientes cerca del
combustible o del motor.
• No llene el depósito de combustible cerca de
chispas o llamas.
• Antes de llenar el depósito de combustible, abra
lentamente la tapa del depósito de combustible y
libere la presión con cuidado.
• Si el combustible entra en contacto con la piel,
puede provocar lesiones. Si le cae combustible
en la piel, quítelo con jabón y agua.
• Si derrama combustible en su ropa, cámbiese la
ropa inmediatamente.
• No llene el depósito de combustible
completamente. El calor provoca que el
14 1974 - 001 - 09.12.2022

combustible se expanda. Deje espacio en la
parte superior del depósito de combustible.
• Apriete bien la tapa del depósito de combustible.
Si no aprieta la tapa del depósito de combustible,
se genera un riesgo de incendio.
• Antes de poner en marcha el producto, colóquelo
a una distancia mínima de 3m/10pies desde el
lugar donde llenó el depósito de combustible.
• No arranque el producto si hay combustible
o aceite de motor en el producto. Elimine el
combustible y el aceite del motor no deseados y
deje que el producto se seque antes de arrancar
el motor.
• Examine frecuentemente el motor en busca
de fugas. Si hay fugas en el sistema de
combustible, no arranque el motor hasta que las
repare.
• No busque fugas en el motor con los dedos.
• Almacene el combustible solo en recipientes
aprobados.
• Cuando el producto y el combustible estén
almacenados, asegúrese de que el combustible
y los gases del combustible no puedan causar
daños.
• Vacíe el combustible en un recipiente aprobado
en exteriores y lejos de chispas y llamas.
Instrucciones de seguridad para el
mantenimiento
ADVERTENCIA: Lea las
instrucciones de advertencia que
siguen antes de realizar tareas de
mantenimiento en el motor.
• Si el mantenimiento no se realiza de manera
correcta y regular, aumenta el riesgo de sufrir
lesiones y causar daños en el motor.
• Pare el motor y asegúrese de que todas
las piezas estén frías antes de realizar el
mantenimiento.
• Desconecte el sombrerete de bujía antes de
realizar el mantenimiento.
• Los gases de escape del motor están calientes
y pueden contener chispas. No haga funcionar el
motor en zonas interiores ni cerca de materiales
inflamables.
• Utilice siempre piezas de repuesto originales.
Las piezas de repuesto que no estén aprobadas
por el fabricante pueden causar daños graves o
la muerte.
• Solo realice tareas de mantenimiento como se
indica en el presente manual del usuario. Solicite
a un taller de servicio aprobado que realice
cualquier otro mantenimiento.
• Solicite a un taller de servicio aprobado hacer el
mantenimiento regular del motor.
Funcionamiento
Introducción
ADVERTENCIA: Asegúrese de
leer y comprender el capítulo de
seguridad antes de utilizar el producto.
Haga lo siguiente antes de poner en
marcha el motor
• Lea atentamente el manual del usuario y
asegúrese de entender las instrucciones.
• Llene de aceite el motor y compruebe el nivel de
aceite. Consulte
Para revisar el nivel de aceite
del motor en la página 16
.
• Realice el mantenimiento diario. Consulte
Programa de mantenimiento en la página 15
.
• Lea el manual de instrucciones del producto que
utiliza este motor. Obedezca los procedimientos
que se deben realizar antes de iniciar el
producto.
Mantenimiento
Introducción
ADVERTENCIA: Lea
detenidamente el capítulo de seguridad
antes de realizar mantenimiento en el
producto.
Programa de mantenimiento
* = Mantenimiento general por parte del operador.
Las instrucciones no se proporcionan en este
manual de usuario.
X = Las instrucciones se proporcionan en este
manual de usuario.
1974 - 001 - 09.12.2022 15

O = Un concesionario de servicio debe realizar
este mantenimiento. No se proporcionan todas las
instrucciones en este manual de usuario.
Mantenimiento del motor
Antes
del uso
Después
de las
primeras
5h
Cada
25h
Cada
50h o
anual-
mente
Cada
100h o
anual-
mente
Cada
200h o
anual-
mente
Revise el nivel de aceite del motor. X2
Cambie el aceite del motor. X X
Reemplace el filtro de aceite. X X
Reemplace el filtro de aire de papel. X
Limpie el filtro de aire de espuma. Lim-
pie a intervalos más cortos si el motor
se utiliza en un entorno polvoriento o
a una temperatura ambiente superior a
100°F/37°C.
X
Reemplace el filtro de aire de espuma.
Reemplace a intervalos más cortos si el
motor se utiliza en un entorno polvoriento
o a una temperatura ambiente superior a
100°F/37°C.
X
Examine y limpie las bujías. Reemplace
las bujías si es necesario. X
Reemplace las bujías. X
Reemplace el filtro de combustible. X
Limpie las aletas de refrigeración del cilin-
dro. *
Limpie la toma de aire y el ventilador de
refrigeración. *
Ajuste la holgura del cabezal de la válvula
de las válvulas de toma de aire y de esca-
pe.
O O
Para revisar el nivel de aceite del
motor
PRECAUCIÓN: No haga
funcionar el motor con un nivel de aceite
bajo o demasiado alto. Un nivel de
aceite incorrecto puede causar daños al
motor.
PRECAUCIÓN: Utilice aceite
detergente para motores de cuatro
tiempos con el rango de viscosidad
indicado en la ilustración.
Nota: Husqvarna recomienda aceite para motores
refrigerado por aire con un aditivo de zinc.
2Compruebe también el nivel de aceite cada 5horas de funcionamiento cuando el motor esté caliente.
16 1974 - 001 - 09.12.2022

1. Detenga el motor y asegúrese de que esté
nivelado.
2. Retire el tapón del depósito de aceite y la varilla
de nivel.
3. Limpie el aceite de la varilla de nivel.
4. Vuelva a colocar la varilla de nivel y apriete el
tapón del depósito de aceite.
5. Retire el tapón del depósito de aceite y la varilla
de nivel.
6. Examine el nivel de aceite del motor con la
varilla de nivel.
7. Si el nivel de aceite del motor está por debajo
de la marca “FULL” (Lleno) de la varilla de nivel,
llene aceite del motor hasta que el nivel esté en
la marca “FULL” (Lleno).
8. Revise el nivel de aceite del motor de nuevo.
9. Instale el tapón del depósito de aceite y la varilla
de nivel.
Para cambiar el aceite del motor:
Si el motor está frío, arránquelo entre 1 y 2minutos
antes de drenar el aceite del motor. Esto calienta
el aceite del motor, por lo que se drena más
fácilmente.
ADVERTENCIA: El aceite del
motor tiene una temperatura muy alta
luego de que el motor se detiene. Deje
que el motor se enfríe antes de drenar
el aceite del motor. En caso de que el
aceite del motor entre en contacto con
su piel, límpiela con agua y jabón.
1. Retire el sombrerete de bujía.
2. Limpie el área alrededor del tapón de vaciado
de aceite. Consulte el manual de usuario del
producto que utiliza este motor para conocer
la ubicación correcta del tapón de vaciado de
aceite.
3. Coloque un recipiente adecuado debajo del
tapón de vaciado de aceite.
4. Retire el tapón de vaciado de aceite.
5. Deje que el aceite drene en el recipiente.
6. Instale y apriete completamente el tapón de
vaciado de aceite.
7. Cargue con aceite de motor nuevo hasta el
nivel adecuado. Consulte
Para revisar el nivel de
aceite del motor en la página 16
. Consulte
Datos
técnicos en la página 22
para conocer el tipo de
aceite correcto.
Para reemplazar el filtro de aceite
ADVERTENCIA: Use guantes
protectores. En caso de que el aceite
del motor entre en contacto con su piel,
límpiela con agua y jabón.
1. Drene el aceite del motor. Consulte
Para
cambiar el aceite del motor: en la página 17
.
2. Gire el filtro de aceite hacia la izquierda para
sacarlo.
3. Lubrique ligeramente la junta de goma del nuevo
filtro de aceite con aceite de motor nuevo.
4. Gire manualmente el filtro de aceite en el sentido
de las agujas del reloj hasta que la junta de
goma esté en su posición y, a continuación,
apriételo media vuelta más.
5. Llene el motor con aceite de motor nuevo.
Consulte
Para revisar el nivel de aceite del motor
en la página 16
.
6. Arranque el motor y déjelo funcionar en régimen
de ralentí durante 3minutos.
7. Detenga el motor y asegúrese de que no haya
fugas de aceite en el filtro de aceite.
1974 - 001 - 09.12.2022 17

8. Llene con aceite de motor para compensar el
aceite retenido en el nuevo filtro de aceite.
Para limpiar o reemplazar el filtro de
aire
ADVERTENCIA: Utilice una
protección respiratoria aprobada cuando
limpie o reemplace el filtro de aire.
Deseche correctamente los filtros de aire
usados. El polvo del filtro de aire es
peligroso para la salud.
ADVERTENCIA: No limpie el
filtro de aire con aire comprimido. Esto
provoca daños en el filtro de aire y
aumenta el riesgo de que respire el
polvo peligroso.
1. Gire las perillas (A) y quite la cubierta del filtro de
aire (B).
2. Retire el elemento filtrante de papel (C) y el
elemento filtrante de espuma (D).
A
C
D
B
3. Limpie la caja del filtro de aire con un cepillo.
4. Revise si los elementos filtrantes de aire
presentan daños.
PRECAUCIÓN: Si el filtro
de aire está dañado, siempre
reemplácelo, ya que, de lo contrario,
le entrará polvo al motor y lo dañará.
5. Reemplace el elemento filtrante de papel una
vez al año o cada 50horas. El elemento filtrante
de papel no se puede limpiar.
6. Limpie el elemento filtrante de espuma con
una solución de detergente y agua tibia hasta
eliminar toda la suciedad.
PRECAUCIÓN: No gire el
elemento filtrante de espuma.
7. Enjuague el elemento filtrante de espuma con
agua limpia.
8. Comprima el elemento filtrante de espuma
en un paño seco y limpio hasta que esté
completamente seco.
9. Instale el filtro de aire en la secuencia opuesta.
Asegúrese de que las lengüetas de la cubierta
del filtro de aire entren en las ranuras de la caja
del filtro de aire.
Para reemplazar el filtro de
combustible
1. Utilice un par de alicates de punta plana para
alejar las presillas de manguera (A) del filtro de
combustible (B).
C
A
B
2. Extraiga el filtro de combustible de los extremos
de las mangueras de combustible (C).
3. Presione el nuevo filtro de combustible contra los
extremos de las mangueras de combustible.
a) Si hay marcas para la dirección de
instalación en el filtro de combustible,
asegúrese de que está instalado en la
dirección correcta.
4. Presione las presillas de manguera contra el
filtro de combustible.
Para examinar y reemplazar la bujía
PRECAUCIÓN: No intente
arrancar el motor si se ha sacado el
cable de encendido o la bujía.
Nota: El motor tiene 2bujías.
1. Retire el sombrerete de bujía y limpie alrededor
de la bujía.
2. Retire la bujía con una llave para bujías.
3. Examine la bujía. Reemplácela si los electrodos
están quemados, dañados o sucios, o si el
aislamiento tiene grietas o daños.
18 1974 - 001 - 09.12.2022

4. Mida la distancia entre los electrodos y
asegúrese de que sea correcta. Consulte
Datos
técnicos en la página 22
.
a) Si es necesario, doble el electrodo lateral
para ajustar la distancia entre los electrodos.
5. Instale la bujía con la mano hasta que toque el
asiento de la bujía.
6. Apriete la bujía con la llave para bujías.
a) Apriete una bujía usada de ⅛ a ¼ de vuelta
más, y una bujía nueva ½ de vuelta más.
PRECAUCIÓN: Las bujías
que no se aprieten correctamente
pueden causar daños en el
motor.
7. Instale el sombrerete de la bujía.
Ajuste del carburador para
funcionamiento a mayor altitud
La altitud influye en el rendimiento y en las
emisiones del motor. Si el motor funciona siempre a
altitudes superiores a 1500m/5000ft, es necesario
ajustar el carburador. Deje que su concesionario de
servicio realice los ajustes necesarios.
PRECAUCIÓN: No haga
funcionar el motor en altitudes inferiores
si el carburador está ajustado para
altitudes elevadas. Esto causa daños en
el motor. Deje que su concesionario de
servicio ajuste el carburador según las
especificaciones de fábrica.
Sistema de control de emisiones
Este motor utiliza ajustes de carburador magro y
otros sistemas para disminuir las emisiones de
materiales peligrosos en los gases de escape. La
toma de aire, el sistema de combustible y el sistema
de escape son partes del sistema de control de
emisiones. Si se realizan modificaciones al sistema
de control de emisiones, las emisiones aumentan.
Si se realizan modificaciones en el mecanismo de
ajuste de velocidad o en el varillaje del regulador, el
motor no funciona según lo previsto. Esto también
puede causar un aumento de las emisiones.
Es necesario utilizar piezas de repuesto originales
para asegurarse de que el sistema de control de
emisiones funcione correctamente.
Un concesionario de servicio autorizado debe
examinar y reparar el motor si se produce 1 o más
de estos problemas:
• El motor no es fácil de arrancar o se detiene de
nuevo después de un arranque.
• El motor no funciona correctamente a régimen
de ralentí.
• Se producen fallos de encendido en el motor
durante el funcionamiento.
• El humo de escape es negro o el consumo de
combustible es elevado.
Solución de problemas
El motor no arranca
Causa Solución
La palanca del paso de combustible está ajustada en
la posición de APAGADO.
Mueva la palanca del paso de combustible a la posi-
ción de ENCENDIDO.
El estrangulador está abierto. Cierre el estrangulador.
El interruptor de ENCENDER/APAGAR está en la
posición de APAGADO.
Coloque el interruptor ENCENDER/APAGAR en la
posición de ENCENDIDO.
No hay combustible en el depósito de combustible. Carga de combustible.
Hay combustible de calidad insuficiente en el depósi-
to de combustible.
Vacíe el depósito de combustible y el carburador.
Consulte
Para preparar el motor para un almacena-
miento a largo plazo en la página 21
. Llene con
combustible limpio.
No se ha agregado ningún estabilizador de combusti-
ble o el depósito de combustible no se ha drenado
antes del almacenamiento.
1974 - 001 - 09.12.2022 19

Causa Solución
La bujía está dañada. Revise la distancia entre los electrodos o reemplace
la bujía.
La bujía está húmeda de combustible. Retire la bujía y déjela secar. Instale la bujía.
PRECAUCIÓN: Hable con un
concesionario de servicio autorizado si
el problema persiste.
La potencia del motor disminuye
Causa Solución
El filtro de aire está obstruido. Cambie el filtro de aire.
El depósito de combustible contiene gasolina defec-
tuosa.
Drene el depósito de combustible. Llene con gasoli-
na limpia.
No se ha agregado ningún estabilizador de combusti-
ble o el depósito de combustible no se ha drenado
antes del almacenamiento.
El régimen del motor es demasiado bajo. Aumente el régimen del motor.
PRECAUCIÓN: Hable con un
concesionario de servicio autorizado si
el problema persiste.
El motor emite ruidos inusuales
Causa Solución
El motor funciona con cargas
de trabajo elevadas.
No es necesario realizar ningún procedimiento.
El depósito de combustible
contiene gasolina defectuosa.
Drene el depósito de combustible. Llene con gasolina limpia de una marca
diferente. Hable con un concesionario de servicio autorizado si el problema
persiste.
PRECAUCIÓN: No siga operando
el motor si hay ruidos inusuales durante
las cargas de trabajo estándar. Esto
puede causar daños en el motor y anular
la garantía.
Transporte, almacenamiento y eliminación de residuos
Transporte
• Deje que el motor se enfríe durante un mínimo
de 15minutos antes de transportarlo.
• Mantenga el motor en una superficie nivelada
durante el transporte para evitar fugas de
combustible.
• Fije el producto que utiliza este motor de forma
segura durante el transporte para evitar lesiones
y daños al motor.
Para preparar el motor para un
almacenamiento a corto plazo
Las siguientes instrucciones son aplicables para un
período de almacenamiento de menos de 30días.
• Limpie el motor.
a) Detenga el motor y deje que se enfríe.
20 1974 - 001 - 09.12.2022
This manual suits for next models
2
Table of contents
Languages:
Other Husqvarna Engine manuals

Husqvarna
Husqvarna T 250 Instruction manual

Husqvarna
Husqvarna HH 389MPC User manual

Husqvarna
Husqvarna DMS 160 A User manual

Husqvarna
Husqvarna 3122 k User manual

Husqvarna
Husqvarna Tuff Torq K61 User manual

Husqvarna
Husqvarna HH 163MP User manual

Husqvarna
Husqvarna HS 139A Instruction manual

Husqvarna
Husqvarna Kohler SV470 Instruction manual