Husqvarna 325S25 User manual

Operator´s manual
Manual Del Propietario
Manual do proprietário
325S25
Please read the operator´s manual carefully and make sure you understand the instructions
before using the machine
Lea detenidamente el manual de instrucciones y asegúrese de entender su contenido antes
de utilizar la máquina.
Leia as instruções para o uso com toda a atenção e compreenda o seu conteúdo antes de
fazer uso da máquina.
GB 2-15
ES 16-29
PT 30-42

325S25
GB-2
SAFETY PRECAUTIONS
Warning labels bearing the mark on the product and in this
Manual refer to important safety matters. Please familiarize
yourself with them and observe them well.
If a warning label on the product becomes soiled or detached,
please order a replacement label from your dealer and attach it
in the requisite place.
PRECAUTIONS
In this Operator’s Manual, precautions that are considered to be
particularly important are indicated as follows.
WARNINGS IN THE MANUAL
WARNING
Failure to observe the precaution may result in the risk of death
or serious injury.
IMPORTANT
Failure to observe the precaution may result in damage or mal-
function of the product.
NOTE
Other additional explanations that may be of use when operat-
ing the product.
1. Parts location
Contents
1. Parts location ............................................ 2
2. Specication .............................................. 3
3. Symbols in the manual .............................. 3
4. Symbols on the machine ........................... 3
5. For safe operation ..................................... 4
6. Set up ....................................................... 7
7. Fuel ........................................................... 8
8. Chemical lling .......................................... 9
9. Operation .................................................. 9
10. Maintenance ........................................... 11
11. Storage ................................................... 13
12. Disposal .................................................. 13
13. Troubleshooting guide ............................. 14
(1) Primer
(2) Air cleaner cover
(3) Choke lever
(4) Fuel tank
(5) Starter knob
(6) Throttle lever
(7) Stop switch
(8) Spray rod
(9) Grip
(10) Pressure regulating dial
(11) Fluid drain cap
8
2
3
5
1
11
4
10
7
6
9

325S25
GB-3
Model name and number Husqvarna Back-Packed Motorized Sprayer
325S25
Purpose Spraying agricultural chemicals and cold water
for pest control, weeding, and growth control
Dry weight ∗ (kg) 9.8
External dimensions of main unit
(length x width x height) ∗∗ (mm) 335x470x640
Capacity of chemical uid tank (litres) 25
Capacity of fuel tank (litres) 0.6
Pump Type Plunger type
Speed (rpm) 1450
Spray output Normal (MPa) 0.5 - 3.5
Maximum (MPa) 3.5
Maximum water absorption (litres/min) 4.8
Motor transmission system Centrifugal clutch
Engine Type Single-cylinder air-cooled 2-cycle gasoline engine
Model number G26LS
Exhaust capacity (cc) 25.4
Fuel used Lubricating oil/gasoline mix
Lubricating oil used 2-cycle engine oil
Admixture ratio Gasoline 50 : Oil 1 (when using Husqvarna genuine oil)
Carburetor Diaphragm, rotary valve type
Ignition system Electronic controlled flywheel magnet type
Spark plugs CHAMPION RCJ-6Y
Starter system Recoil starter type
Stopping system Primary cable short circuit
Air cleaner Dry type
Standard accessories 1 spray rod, 1 rod, 1 cock, 1 grip, 1 joint,
1 hose, 1 plug wrench
* Whennozzle(supplied)isattached.
** Nozzleandbackbeltarenotincluded.
Duetoproductimprovements,thesespecicationsaresubjecttochangewithoutnotice.
2. Specication
3. Symbols in the manual
Never modify your machine.
We won’t warrant the machine, if you use the
remodeled power sprayer or if you don’t ob-
serve
the proper usage written in the manual.
(1) (2) (4) (5)
(1) Read owner’s manual before operating this ma-
chine.
(2) Wear head, eye and ear protection.
(3) Wear foot protection.
(4) Wear gloves.
(5) Warning / Attention
4. Symbols on the machine
For safe operation and maintenance, symbols are carved
The port to refuel the メMIX GASOLINEメ
Position: FUEL TANK CAP
The direction to close the choke
Position: AIR CLEANER COVER
The direction to open the choke
Position: AIR CLEANER COVER
(3)
in relief on the machine. According to these indications,
please be careful not to make a mistake.

325S25
GB-4
Before using this product, please read this Operator’s
Manual thoroughly to ensure correct operation. The fol-
lowing are precautions that should be observed in order
to use the product smoothly. Elsewhere in the Manual, the
warning mark is used to bring your attention to these
precautions.
BEFORE USING THE PRODUCT
• This product has been designed mainly for the purpose
of spraying pest control chemicals and weedkillers.
Please do not use it for any other purpose, as this may
cause unforeseen accidents.
• Since this product uses agricultural chemicals that
require careful operation, misuse can be dangerous.
Do not use this product when tired or otherwise in
poor physical condition, or when you may be unable
to judge correctly or operate accurately, such as after
taking cold relief medicines or drinking alcohol. Also,
children or persons who are unable to understand the
contents of this Manual should under no circumstances
be permitted to use the product.
• The engine exhaust gas contains toxic carbon mon-
oxide. Please do not use the product indoors, in vinyl
houses or tunnels, or in other poorly ventilated places.
• Do not use this product in the following cases.
1. When the product could fall over or in other situations
when it is difcult to hold or operate.
2. After sunset or at other times when eyesight is poor
and the safety of the spraying area is difcult to as-
certain.
3. In worsening weather (rain, fog, strong wind, lightning,
etc.)
• When using for the rst time, before commencing
actual spraying please receive guidance in operating
the product from a person with adequate experience.
• Fatigue reduces powers of concentration and increas-
es the riskof accidents. When planning work, please
allow ample time, setting a limit of 30-40 minutes for
single spraying sessions and breaks of 10-20 minutes
in between. Also, do not spray for more than 2 hours
in any one day.
• Please take good care of this Operator’s Manual and
refer to it for additional information from time to time.
• When selling or lending this product, it should be ac-
companied by this Operator’s Manual.
WARNING
• Check to see if the shock-absorbing rubber mount has
become cracked or otherwise damaged. Note that fail-
ing to replace this rubber mount when it has become
cracked or damaged may cause the engine to come
loose from its frame during use, thus resulting in pos-
sible serious bodily injury.
• If cracked, be sure to replace without delay.
WARNING
1. If you don’t observe the working time, or working man-
ner, Repetitive Stress Injury (RSI) could occur. If you
feel discomfort, redness and swelling of your ngers or
any other part of your body, see a doctor before get-
ting worse.
2. To avoid noise complaints, in general, operate product
between 8 a.m. and 5 p.m. on weekdays and 9 a.m.
to 5 p.m. on weekends.
5. For safe operation

325S25
GB-5
5. For safe operation
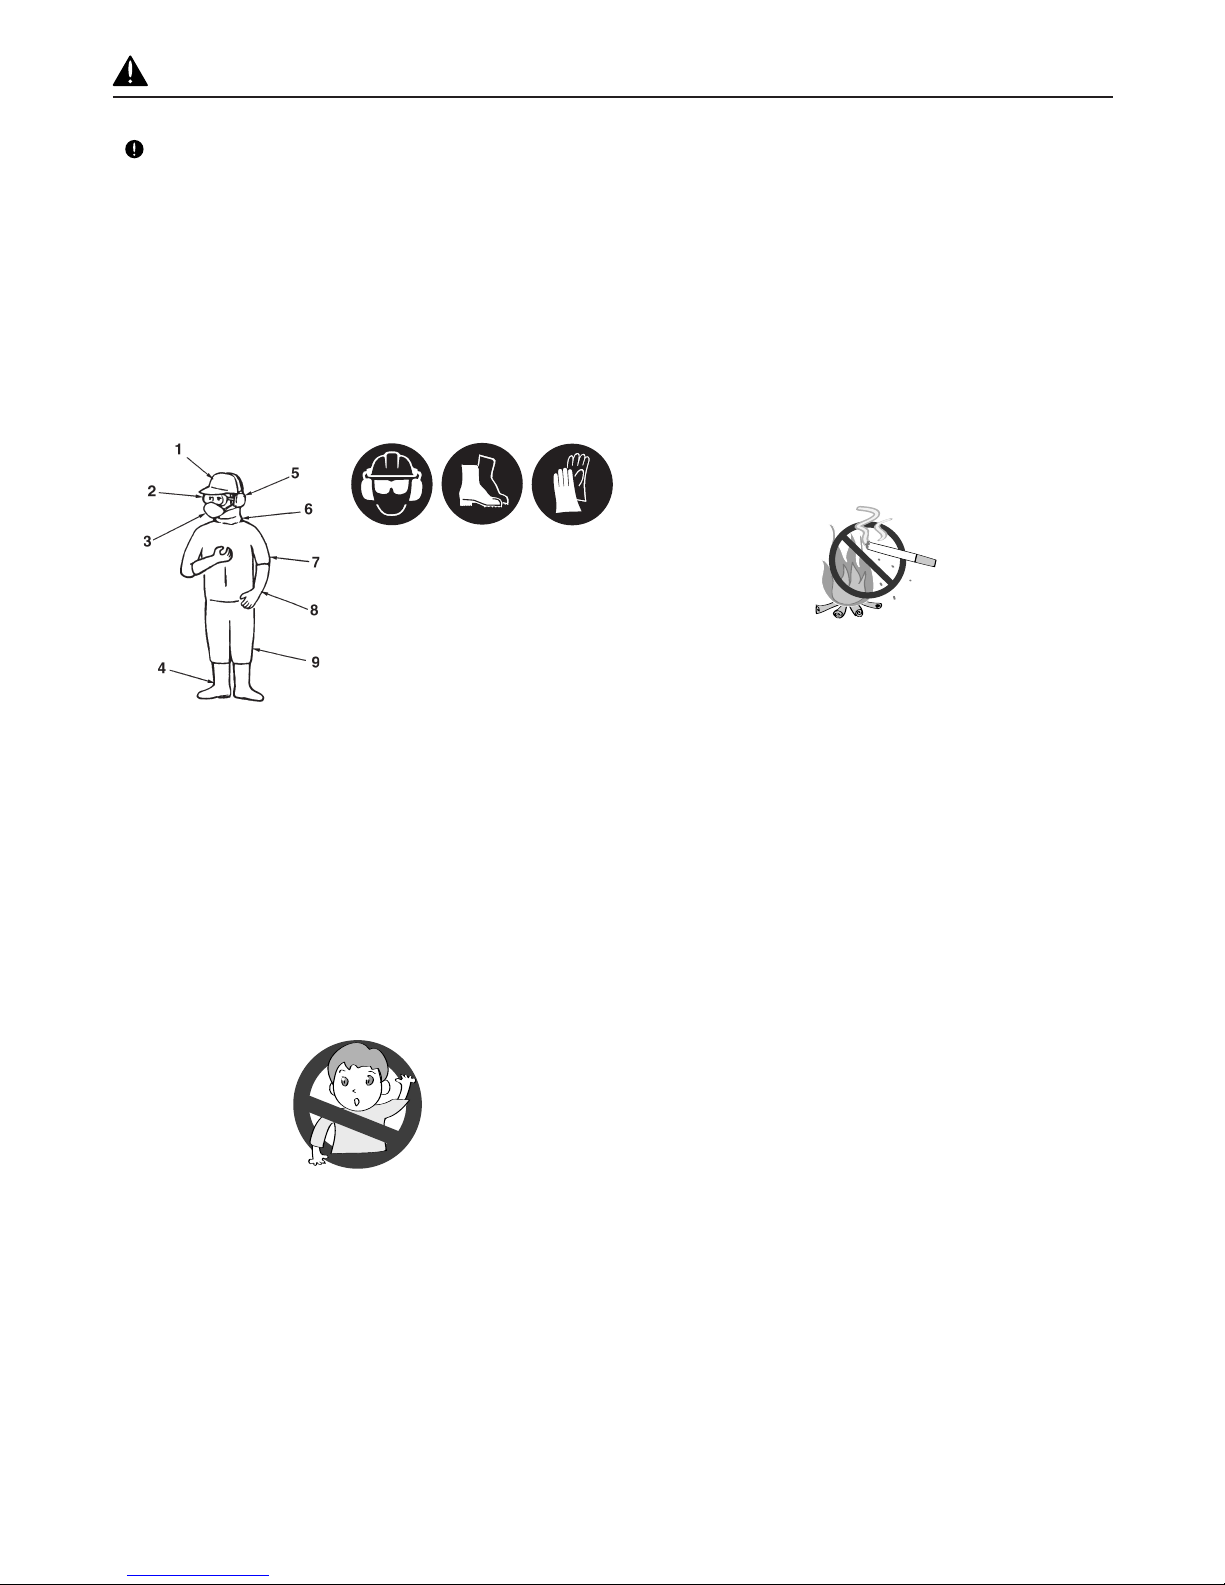
1. Protective headgear
2. Protective goggles
3. Protective mask
4. Rubber boots
5. Ear muffs
6. Neck covering
7. Protective clothing
8. Rubber gloves
9. Protective clothing
IMPORTANT
Check and follow the local regulations as to sound
level and hours of operations for the product.
PRECAUTIONS BEFORE SPRAYING
• Make sure you have the correct protective clothing,
headgear, rubber gloves and boots, a protective mask,
goggles, a towel, protective cream, etc., to prevent
chemicals from coming into contact with your skin or
entering your lungs. When spraying, please wear this
protective gear to prevent any risk of injury.
• Please store chemicals in a locked storage box, locker,
or other safe place out of the reach of children.
• Carefully read the instructions for using the chemicals,
and familiarize yourself with the level of toxicity, method
of use, etc.
• Please pay all due consideration to the area in which
you will be spraying, to ensure that you do not pollute
the water supply, rivers, lakes, ponds, etc., or cause
any damage to residents, passers-by, livestock, etc.
• Prepare yourself physically on the day before spraying,
by for example cutting down on alcoholic beverages
or late-night work.
Donotallowchildren,animals,etc.,toenterthechemi-
calsprayingarea.
• Before spraying, please prepare fully by inspecting
sprayer nozzles and checking for abnormalities such
as loose screws or spray hose connections, fuel leaks,
defective or broken uid gaskets, or damage to the
carrying band.
PRECAUTIONS WHEN TRANSPORTING CHEMICALS
• When transporting chemicals, please handle with care
to ensure that there is no spillage of chemicals from
torn bags, broken bottles, or loose stoppers.
• Do not carry chemicals in the same container as food.
PRECAUTIONS WHEN TRANSPORTING THE
SPRAYER
• Do not transport the sprayer while it has chemicals or
fuel in the tank, as these could leak out as a result of
impact during transportation.
• When transporting in a vehicle, please use a rope or
similar to x the sprayer rmly to the cargo trailer in
an upright position. Please do not transport by bicycle
or motorbike, as this is dangerous.
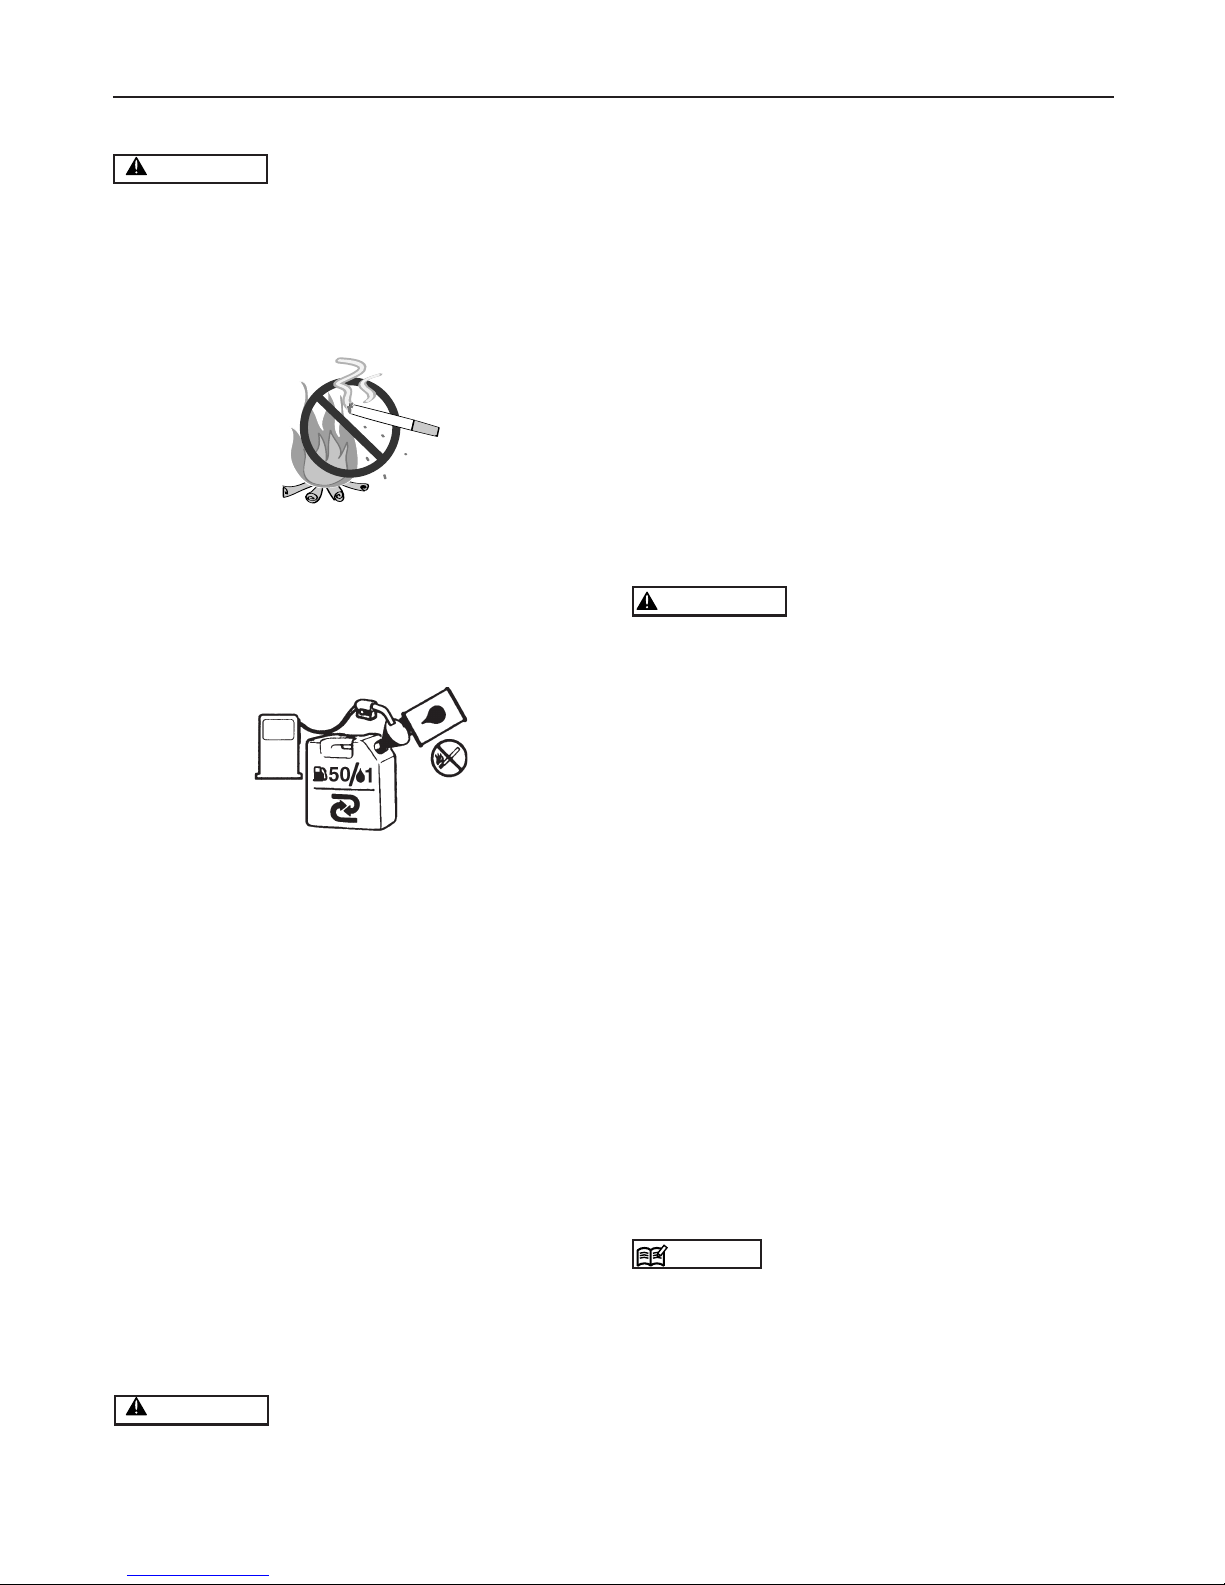
PRECAUTIONS CONCERNING FUEL
• The engine of this product is fueled by “mixed gasoline”
that includes highly combustible fuel. Do not refuel or
store fuel containers where there is any risk of com-
bustion from incinerators, burners, bonres, kitchen
stoves, electric sparks, welding sparks, etc.
• Smoking while spraying or refueling is dangerous.
Please avoid this at all costs.
• When refueling during use, always stop the engine and
make sure there are no naked ames in the vicinity
before relling.
• Any fuel spilt during refueling should be wiped off com-
pletely with a rag or similar before starting the engine.
• After refueling, seal the fuel container, tightly close the
fuel tank cap, and start the engine at least 3 meters
away.
PRECAUTIONS WHEN REFILLING CHEMICALS
• Before lling the tank with chemicals, please make sure
that the spray lever is completely at rest.
• After chemical relling, rmly tighten the tank cap. If
not fully tightened the cap may become loose during
spraying, with the risk of physical exposure to the
chemicals.
PRECAUTION WHEN STARTING THE ENGINE
• Please keep children, animals, etc. well away when
starting the engine and spraying.
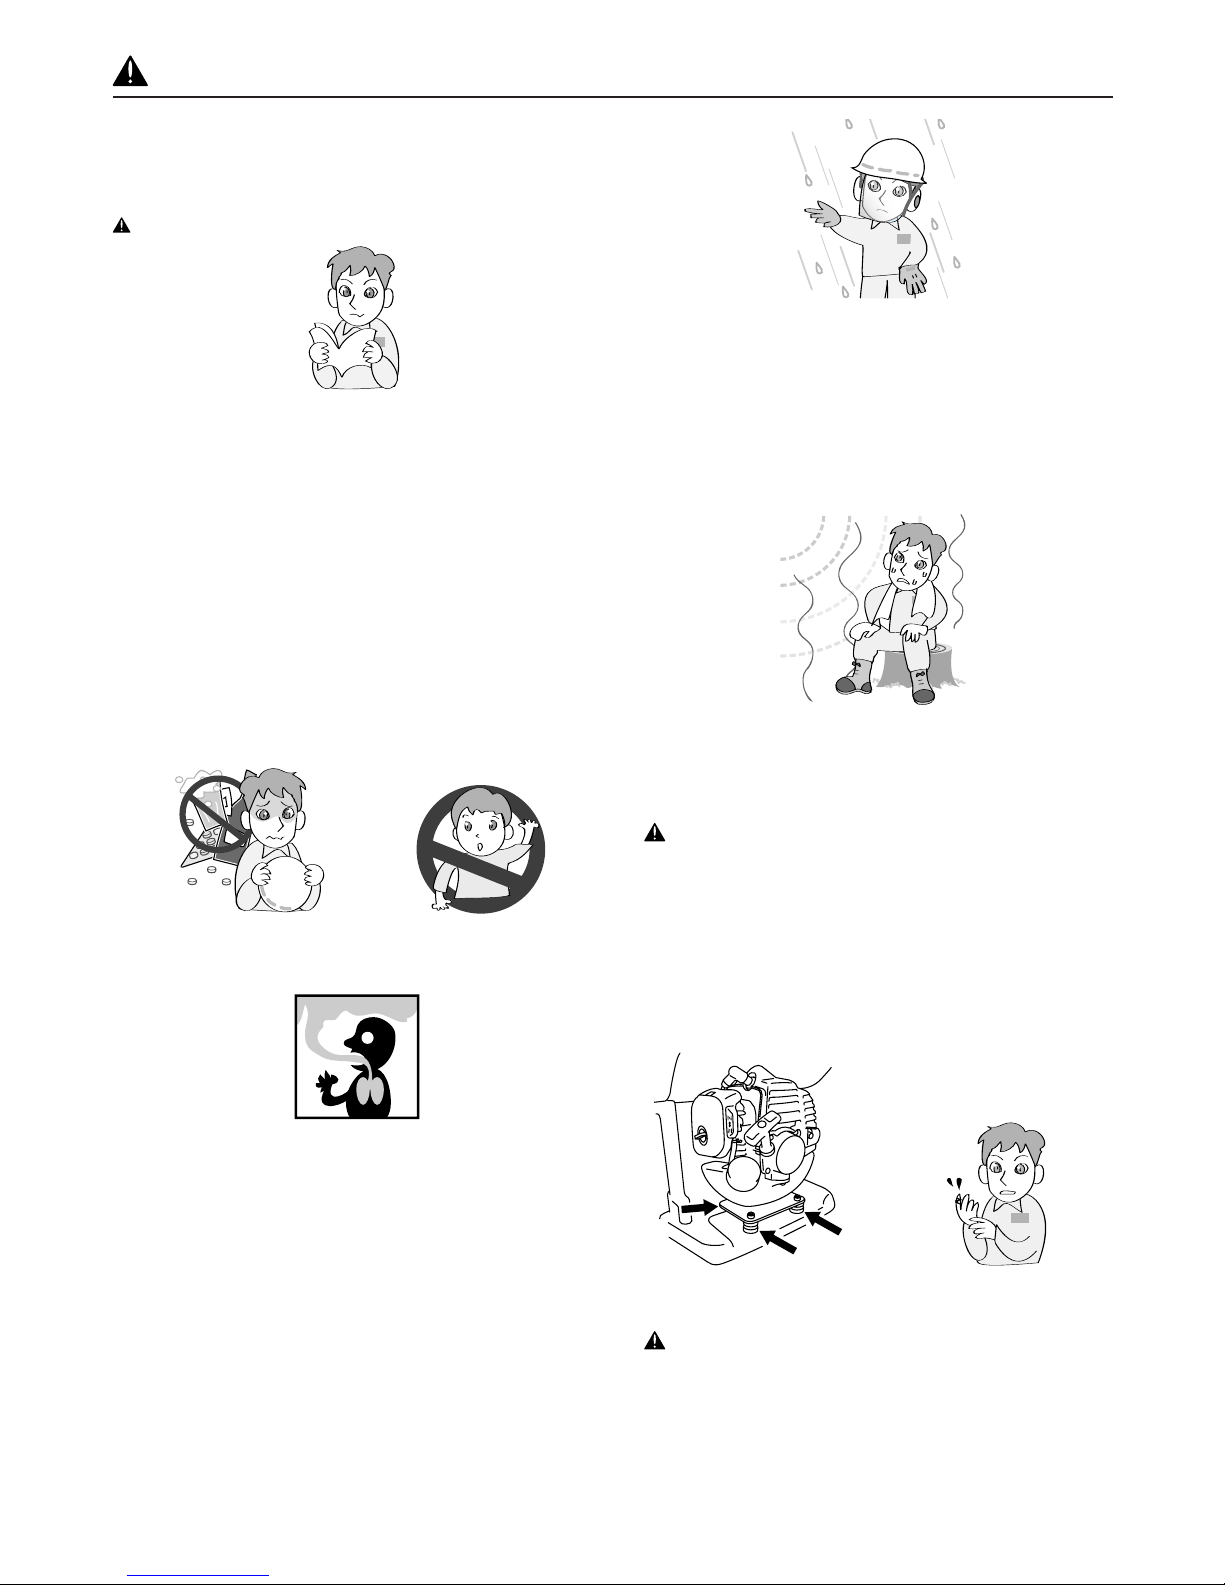
PRECAUTIONS WHEN SPRAYING
• Since protective clothing generally offers poor ventila-
tion and thus places stress on the body, there is a risk
of contracting heatstroke or other illness when operat-
ing for long periods under high temperatures. Please
avoid spraying on hot days, aiming instead for early
morning and late afternoon times when temperatures
are relatively cool and winds are low.
• When starting work, please pay all due consideration
to the spraying time, wind direction, etc., to ensure that
no noise disturbance or chemical hazard is caused to
nearby residents, passers-by, farm crops, and so on.
• While spraying please hold the grip rmly at all times
and be careful not to point the nozzle in the direction
of people or animals.

325S25
GB-6
5. For safe operation
• While spraying please be careful of the wind direction
and always stand on the upwind side, to avoid spraying
yourself with chemicals.
• Should you begin to feel even slightly unwell while
spraying, consult a doctor immediately. When doing
so, inform the doctor of the name of the chemical you
were using, the conditions of use, etc.
• If the sprayer is tilted the chemical may leak out
through the air holes in the cap. When spraying always
make sure you have a rm footing and maintain your
balance.
• Do not touch the spark plugs or plug cords while the
engine is running, as you may get an electric shock.
• Do not touch the mufer, spark plugs, or other metal
parts with your bare hands while the engine is running
or immediately after stopping the engine, as there is
the risk of burns due to high temperatures.
PRECAUTIONS AFTER SPRAYING
• Please seal unused chemicals and store them out of
the reach of children.
• Do not simply discard empty chemical containers,
but dispose of them safely by incinerating, burying, or
another similar method. In addition, please take every
care that the water used to clean spraying tools does
not create any hazard.
• Fully inspect and maintain protective clothing, masks,
gloves, and other protective gear in preparation for
the next session.
• After completing the work and tidying away chemicals
and spraying tools, you should immediately take a bath
or wash your hands, feet, face, etc. thoroughly with
soap, as well as washing your mouth out.
• You should change all clothes worn, including under-
wear, and wash them thoroughly. Clothes worn during
spraying should not be worn again the following day.
• After spraying, please limit your alcohol intake and
rest thoroughly by going to bed early. If you feel even
slightly unwell, please see a doctor as soon as pos-
sible.
OTHER PRECAUTIONS
• When engaged in spraying work over a protracted pe-
riod of time, please have your health checked regularly.
• Please carry out spraying in a planned fashion, keep-
ing a daily record of the date and time of spraying, the
chemicals used, the target pest, contents of the work,
duration of the work, and other details.
• Please keep the following points in mind when select-
ing or using protective gear.
A. Protective clothing. Choose clothing that is cool to
wear and offers good ventilation and waterproong.
In addition, wear items that enable you to carry out
spraying work in total comfort and safety.
B. Spraying hood. Use a hood with a brim that is water-
proof and covers your neck and shoulders.
C. Gloves. Use gloves that are difcult for chemicals to
penetrate and do not slip even if you perspire while
doing the work.
D. Rubber apron. When mixing chemicals, wear a long,
thick, and wide apron that cannot be penetrated by
chemical splashes.
E. Protective goggles, mask, etc. Select suitable protec-
tive goggles, mask, rubber boots, eye washer, and
protective cream, etc., paying attention to standards
and the recommendations of farm work safety promo-
tion organizations.
MAINTENANCE PRECAUTIONS
• In order to maintain the functions of the product,
regularly carry out the maintenance inspections listed
in this Manual. When maintenance or parts replace-
ment not indicated in this Manual are required, please
consult your product supplier or nearest Husqvarna
product dealer.
• Never keep the engine running while carrying out
inspections or maintenance.
• Do not modify the sprayer or dismantle the engine.
This could lead to breakdown and serious accidents
during operation.
• Do not touch the mufer or spark plugs with your bare
hands immediately after stopping the engine. There is
the risk of burns due to high temperature.
• For replacement parts, please use original Husqvarna
parts or brands designated by Husqvarna .
MAINTENANCE OF LABELS
1. Please keep warning labels clean and unmarked.
2. If warning labels become soiled or peel off, please
order from your supplier and replace with new ones.
3. When afxing new labels please wipe off all dirt and
moisture.

325S25
GB-7
g
a
b
c
d
e
f
h
Connecting the spray hose and nozzle
a. spray rod
b. cock
c. grip
d. joint
e. spray hose
f. connecting nut
g. spray outlet
h. rod
1. Connect the spray hose to the pump spray outlet and
rmly tighten the connecting nut.
2. Tightly screw the joint onto the hose.
3. Tightly screw the grip onto the joint.
4. Tightly screw the cock onto the grip.
5. Tightly screw the rod onto the cock.
6. Tightly screw the spray rod onto the rod.
6. Set up
Adjusting spray pressure
• 325S25 has a pressure regulating dial to change spray
pressure. Set the pressure at a level appropriate to the
spray conditions.
•
Set the pressure regulating dial as follows:
• Turn in a clockwise direction to increase the pressure.
• Turn in a counterclockwise direction to decrease the
pressure.
a
bc
a. Pressure regulating dial
b. Decreasing the pressure
c. Increasing the pressure

325S25
GB-8
FUEL
WARNING
• Gasoline is very flammable. Avoid smo king or
bringing any flame or sparks near fuel. Make sure
to stop the engine and allow it cool before refueling
the unit. Select outdoor bare ground for fueling
and move at least 3 m (10 ft) away from the fueling
point before starting the engine.
• The Husqvarna engines are lubricated by oil specially
formulated for air-cooled 2-cycle gasoline engine use.
If Husqvarna oil is not available, use an anti-oxidant
added quality oil expressly labeled for air-cooled
2-cycle engine use (JASO FC GRADE OIL or ISO
EGC GRADE).
• Do not use BIA or TCW (2-stroke water-cooling type)
mixed oil.
•
• RECOMMENDED MIXING RATIO
GASOLINE 50 : OIL 1 (when using Husqvarna
genuine oil)
• Exhaust emission are controlled by the funda-
mental engine parameters and components (eq.,
carburation, ignition timing and port timing) with-
out addition of any major hardware or the introduc-
tion of an inert material during com bustion.
• These engines are certied to operate on unleaded
gasoline.
• Make sure to use gasoline with a minimum octane
number of 89RON (USA/Canada: 87AL).
• If you use a gasoline of a lower octane value than pre-
scribed, there is a danger that the engine temperature
may rise and an engine problem such as piston seizing
may consequently occur.
• Unleaded gasoline is recommended to reduce the
contamination of the air for the sake of your health
and the environment.
• Poor quality gasolines or oils may damage sealing
rings, fuel lines or fuel tank of the engine.
HOW TO MIX FUEL
WARNING
• Pay attention to agitation.
1. Measure out the quantities of gasoline and oil to be
mixed.
2. Put some of the gasoline into a clean, approved fuel
container.
3. Pour in all of the oil and agitate well.
4. Pour in the rest of gasoline and agitate again for at least
one minute. As some oils may be difcult to agitate
depending on oil ingredients, sufcient agitation is nec-
essary for the engine to last long. Be careful that, if the
agitation is insufcient, there is an increased danger
of early piston seizing due to abnormally lean mixture.
5. Put a clear indication on the outside of the container to
avoid mixing up with gasoline or other containers.
6. Indicate the contents on outside of container for easy
identication.
FUELING THE UNIT
1. Untwist and remove the fuel cap. Rest the cap on a
dustless place.
2. Put fuel into the fuel tank to 80% of the full capacity.
3. Fasten the fuel cap securely and wipe up any fuel
spillage around the unit.
WARNING
1. Select bare ground for fueling.
2. Move at least 3 meters (10 feet ) away from the fueling
point before starting the engine.
3. Stop the engine before refueling the unit. At that time,
be sure to sufciently agitate the mixed gasoline in
the container.
FOR YOUR ENGINE LIFE, AVOID:
1. FUEL WITH NO OIL (RAW GASOLINE) It will cause
severe damage to the internal engine parts very
quickly.
2. GASOHOL - It can cause deterioration of rubber and/
or plastic parts and disruption of engine lubrication.
3. OIL FOR 4-CYCLE ENGINE USE It can cause spark
plug fouling, exhaust port blocking, or piston ring
sticking.
4. Mixed fuels which have been left unused for a period of
one month or more may clog the carbu retor and result
in the engine failing to operate properly.
5. In the case of storing the product for a long period of
time, clean the fuel tank after rendering it empty. Next,
activate the engine and empty the carburetor of the
composite fuel.
6. 6. In the case of scrapping the used mixed oil
container, scrap it only at an authorized repository site.
NOTE
• As for details of quality assurance, read the description
in the section Limited Warranty carefully. Moreover,
normal wear and change in product with no functional
inuence are not covered by the warranty. Also, be
careful that, if the usage in the instruction manual is
not observed as to the mixed gasoline, etc. described
therein, it may not be covered by the warranty.
7. Fuel

325S25
GB-9
WARNING
• Highly combustible. When refueling, switch the
engine off and keep well away from naked flames.
• After filling the tank with fuel, firmly tighten the cap.
ab
■ Starting engine
WARNING
• Before starting the engine, make sure that the spray
lever (spray valve) is completely returned. Starting
with the spray lever still pulled out is dangerous, as
chemical uid may spray out of the nozzle as soon as
the engine is started.
• To start the engine, place the sprayer on an even and
stable surface or platform. If the sprayer is unstable,
the reaction on starting etc. may cause it to fall.
IMPORTANT
• Do not allow the chemical uid or water in the tank to
run out while the engine is running. If the engine runs
empty it may cause breakage of the spray pump.
• Make sure that the gear oil is lled until the middle of
9. Operation
the check-window. If it is not enough, loose the upper
bolt and ll the gear oil. (SAE40CC)
(1)
(2)
(3)
1. Press the primer at the bottom of the carburetor a few
times with your nger until the fuel starts to ow through
the transparent pipe.
NOTE
• There is no need to operate the primer when restarting
immediately after stopping the engine, provided there
is fuel left in the fuel tank.
2. Lift the choke lever on the right of the air cleaner until
it is in the “closed” position, then open the throttle
lever on the main unit side about 1/3-1/2 from the
“slow” position.
8. Chemical lling
WARNING
• Chemical substances should be handled correctly,
observing the precautions marked on the container.
Some chemicals are extremely hazardous to humans
and animals, and handling errors can cause serious
poisoning or even fatal accidents.
• When not in use, chemical substance containers
should be stored separately from other containers out
of the reach of children.
• IMPORTANT
• Do not ll the chemical tank with undiluted uid. This
could cause the gasket and valves to lose their du-
rability.
■ Procedure for lling
1. Use a bucket or other suitable container and dilute the
chemical to the requisite strength.
2. Place the sprayer on an even and stable surface and
remove the chemical tank cap.
3. Fill the tank by passing chemical through the strainer.
4. When lling is complete, rmly tighten the cap.
a. strainer
• Chemical tank capacity: 25 litres
a. cap
b. fuel tank
a. air cleaner
b. choke lever
c. close
d. open
e. transparent pipe
f. primer
g. throttle lever
h. fast
i. slow
(1) bolt
(2) window
(3) drain bolt

325S25
GB-10
NOTE
• When restarting immediately after stopping the engine,
set the choke lever to “open” and the throttle lever to
“slow”.
3. Place the sprayer in a stable location, and pull the
starter knob with the right hand while holding the
chemical tank down with the left hand. The starter knob
should rst be pulled out lightly, then, when resistance
is felt, pulled more swiftly and vigorously.
IMPORTANT
• Do not pull the rope out completely or release the
knob so that the rope returns, as this can cause starter
malfunction.
4. Once the engine has started, gradually open the choke,
warm up at low speed for 1-2 minutes, then return the
throttle lever to the “slow” position.
IMPORTANT
• If the rope is pulled continuously with the choke closed,
the spark plugs may become ooded and the engine
may fail to start. If so, you should rst remove the
spark plugs and dry the electrodes, then repeat the
starting procedure.
■ Stopping engine
WARNING
• Stop the engine immediately in the event of an emer-
gency.
1. Lower the throttle lever fully and cool the engine down
for 1-2 minutes at low speed.
2. Hold down stop switch on the left side of the sprayer
frame until the engine has come to a complete stop .
IMPORTANT
• Except for an emergency, avoid stopping the engine
while pulling the throttle trigger.
■ Spraying
WARNING
• Please use correctly, observing the precautions in this
Manual (“For Safe Operation”, p5 to 7).
• Before lifting the sprayer onto your back, check that
the chemical tank and fuel tank caps are tightly closed.
• When spraying, do not point the nozzle at your face,
or at other people, animals, etc.
• If the sprayer is tilted too much, chemical uid or fuel
may leak out through the air holes in the cap. When
using, always try to maintain an upright posture.
IMPORTANT
• If the chemical tank becomes empty while spraying,
reduce the engine to low speed immediately. Empty
running of the engine may cause the spray pump to
break.
• Please avoid using multiple nozzles, jet nozzles,
or other nozzles that give a large spray volume, as
spraying efciency is sometimes impaired owing to
insufcient pressure.
■ Spraying procedure
1. Start the engine, and lift the sprayer onto your back.
2. Adjust the carrying band to a suitable length for car-
rying.
3. Increase the engine speed, and open the spray cock.
Chemical uid starts to spray out from the nozzle in
the form of mist.
4. When stopping work, close the spray cock fully and
reduce the engine speed.
c
a
b
b
■ Cleaning after completion of spraying
1. Loosen the uid drain cap , transfer the chemical uid
left inside the tank into a suitable container, and proc-
ess appropriately with all due consideration to safety.
2. Pour about 5 litres of clean water into the chemical
tank, spray through the nozzle for 2-3 minutes, and
drain the water left inside the tank.
a
a. Stop switch
a. Spray cock
b. Close
c. Open
a. Fluid drain cap
9. Operation
Whendisposingyourmachine,fueloroilforthemachine,
besuretoallowyourlocalregulations.
■ Disposal

325S25
GB-11
WARNING
• Make sure that the engine has stopped and is cool
before performing any service to the machine. Contact
with hot mufer may result in a personal injury.
• Do not modify the sprayer or dismantle the engine.
• When replacing parts please use Husqvarna original
parts or designated parts.
■ Air cleaner
• After every 25 hours of operation, please remove
the air cleaner cover and inspect the element. If it is
too dirty, wash it carefully in warm water containing a
neutral detergent, and return it to its original position
after drying it thoroughly.
• If the element is distorted or damaged, please replace
it with a new one.
•
a. Element
b. Air cleaner cover
IMPORTANT
• If the air cleaner element is blocked, the efciency
of the engine will be reduced. In addition, the engine
interior will suffer abnormal wear if operated without
the element or if continually operated with a distorted
or damaged element tted.
■ Fuel lter
Afterevery25hoursofoperation,emptythefueltank,
detachthefuellterfromthetank,andremovealldirt.If
thelteristooclogged,pleasereplaceitwithanewone.
•
a. Fuel lter
IMPORTANT
• If the fuel lter is clogged, the engine speed may be
limited or speed uctuations may occur.
• If the engine is operated without a fuel lter, dirt will ac-
cumulate in the carburetor and cause it to malfunction.
■ Spark plug
WARNING
• Do not touch the spark plug with your bare hands im-
mediately after operation, as there is the risk of burns
due to high temperature.
• After every 50 hours of operation, detach the spark
plug and remove dirt from the electrodes with a wire
brush or similar.
• The correct electrode gap is 0.6 to 0.7mm.
10. Maintenance
Every Every Every
25 50 100
System/components Procedure Before hours hours hours Note
use after after after
fuel leaks, fuel spillage wipe out ✔
fuel tank, air lter, fuel lter inspect/clean ✔ ✔ replace, if necessary
see adjusting replace carburetor
idle speed adjuster ✔
idling speed if necessary
clean and readjust GAP: 0.6 to 0.7 mm (.025 in)
spark plug ✔
plug gap replace, if necessary
cylinder ns, intake air cooling vent
clean ✔
mufer, cylinder exhaust port clean ✔
throttle lever, stop switch check operation ✔
screws/nuts/bolts tighten/replace ✔ ✔ except adjusting screws
gear oil replace ✔
ENGINE
PUMP

325S25
GB-12
• When replacing plugs, please use designated items.
CHAMPION(RCJ-6Y)
IMPORTANT
• If too much fuel is absorbed or poor quality oil is used,
the spark plug electrodes become dirty, making the
engine harder to start.
• Note that using any spark plug other than those
designated may result in the engine failing to operate
properly or in the engine becoming overheated and
damaged.
• To install the spark plug, rst turn the plug until it is
nger tight, then tighten it a quarter turn more with a
socket wrench.
Adjusting the engine
Although the engine is adjusted on leaving the factory,
after repeated use it may sometimes require readjustment
or maintenance. Please consult your original supplier
regarding inspections and maintenance other than those
shown below.
Idling speed
• If the engine stalls or the pump continues to move
when in idling position with the throttle lever completely
lowered, readjust the engine speed using the idle
speed adjuster on the left of the carburetor.
•
a. idle speed adjuster
b. increase speed
c. reduce speed
Turn the idling adjustment screw:
• counter-clockwise to reduce engine speed
• clockwise to increase engine speed
10. Maintenance
NOTE
• Warm up the engine before adjusting the idling speed.
Throttle wire play
Throttlewireplayshouldbe1to2mm.Aftercompletely
returningthethrottlelever,takethethrottlewireatthe
carburetor end in your ngers and give a light tug. If
theplayistoogreatortoosmall,readjusttheposition
ofthewireretainingnut.Loosenthelocknutandturn
thewireretainingnut clockwise(screwin)to increase
theplayandcounter-clockwise(unscrew)toreduceit.
Afteradjusting,pleasefastenthewireretainingnutby
tighteningthelocknut.
•
a. lock nut
b. wire retaining nut
c. wire sleeve
MUFFLER
WARNING
• Inspect periodically, the muffler for loose fasteners,
any damage or corrosion. If any sign of exhaust
leakage is found, stop using the machine and have
it repaired immediately.
• Note that failing to do so may result in the engine
catching on fire.
PROCEDURES TO BE PERFORMED AFTER EVERY
100 HOURS OF USE
1. Remove the mufer, insert a screwdriver into the vent,
and wipe away any carbon buildup. Wipe away any
carbon buildup on the mufer exhaust vent and cylinder
exhaust port at the same time.
2. Tighten all screws, bolts, and ttings.
3. Check to see if any oil or grease has worked its way in
between the clutch lining and drum, and if it has, wipe
it away using oil-free, lead-free gasoline.
TIGHTENING TORQUE: 14.7 to 21.6 N.m.
(150 to 220 kgf-cm)

325S25
GB-13
•
OIL
• After rst 20 hours of use, replace the gear oil. After
that, replace it after every 100 hours of use (SAE40CC,
100cc).
(1)
(2)
(3)
GREASE
• メ Open the upper lid of the grease cup and check
the grease amount. Fill it up if it is decreasing. (#3)
(1)
WARNING
• When draining fuel, please be careful not to spill it. If
fuel is spilt, wipe off thoroughly. In addition, please be
sure to close the storage container cap tightly.
IMPORTANT
• If fuel is left in the engine for protracted periods, the
inside of the carburetor may become clogged and
cause engine malfunction (faulty starting and insuf-
cient output).
• During storage, slightly loosen the cap of the chemi-
cal uid tank. If screwed too tightly, the gasket may
become distorted.
Oncompletionofallworkprocedures,whennotplanning
touseagainforaprotractedperiodpleasecarryoutthe
followingpre-storagecare,topreventtroublecausedby
time-lapsechanges.
11. Storage
12. Disposal
When disposing your machine, fuel or oil for the machine, be sure to allow your local regulations.
1. Clean the chemical uid tank and nozzle (see page 10).
2. Remove dirt from the sprayer, inspect it for any dam-
age or looseness, and, if any abnormality is found,
correct it thoroughly in preparation for the next time
you use the unit.
3. Drain the fuel tank.
4. Start the engine, and leave it in idling condition until all
the fuel inside the carburetor is spent and the engine
comes to a natural stop.
5. Remove the spark plug and put a few drops (1 to 2 cc)
of 2-cycle oil inside the engine. After pulling the starter
rope 2 or 3 times, return the spark plugs to their original
position and stop in compressed position.
6. After oiling the throttle lever and other metal parts with
anti-corrosive oil, cover the sprayer and store indoors
in a low-humidity location.
10. Maintenance
(1) Intake air
cooling vent
(1) bolt
(2) window
(3) drain bolt
(1) grease cup
INTAKE AIR COOLING VENT
WARNING
• Never touch the cylinder, muffler, or spark plugs
with your bare hands immediately after stopping
the engine. The engine can become very hot when
in operation, and doing so could result in severe
burns.
• When checking the machine to make sure that
it is okay before using it, check the area around
the muffler and remove any wood chips or leaves
which have attached themselves to the brushcut-
ter. Failing to do so could cause the muffler to
become overheated and that in turn could cause
the engine to catch on fire. Always make sure that
the muffler is clean and free of wood chips, leaves,
and other waste before use.
• Check the intake air cooling vent and the area
around the cylinder cooling fins after every 25
hours of use for blockage. Note that it is neces-
sary to remove the upper cover and the lower
cover in order to be able to view the upper part of
the cylinder.
IMPORTANT
• If waste gets stuck and causes blockage around the
intake air cooling vent or between the cylinder ns, it
may cause the engine to overheat, and that in turn may
cause mechanical failure on the part of the brushcutter.

325S25
GB-14
13. Troubleshooting guide
Case 1. Starting failure
CHECK PROBABLE CAUSES ACTION
fuel tank → incorrect fuel → drain it and use correct fuel
fuel lter → fuel lter is clogged → clean
carburetor adjustment screw → out of normal range → adjust to normal range
sparking (no spark) → spark plug is fouled/wet → clean/dry
→ plug gap is incorrect → correct (GAP: 0.6 to 0.7 mm)
spark plug → disconnected → retighten
Case 2. Engine starts but does not keep running/hard re-starting
CHECK PROBABLE CAUSES ACTION
fuel tank → incorrect fuel or staled fuel → drain it and use correct fuel
carburetor adjustment screw → out of normal range → adjust to normal range
mufer, cylinder (exhaust port) → carbon is built-up → wipe away
air cleaner → clogged with dust → wash
cylinder n, fan cover → clogged with dust → clean
When your unit seems to need further service, please consult with our Husqvarna service shop in your area.


325S25
ES-16
LOPRIMEROLASEGURIDAD
Las instrucciones contenidas en este manual marcadas con el
símbolo se reeren a puntos muy importantes, que deben
tenerse en cuenta para evitar posibles lesiones corporales
graves y, por ello, se le pide que lea todas las instrucciones
deteni da mente y las siga al pie de la letra.
ADVERTENCIASENELMANUAL
ADVERTENCIA
Esta marca indica instrucciones que deben seguirse para evitar
accidentes que puedan acarrear lesiones corporales graves o
la muerte.
IMPORTANTE
Esta marca indica instrucciones que deben seguirse o, de lo
contrario, pueden llevar a fallo mecánico, avería o daños.
NOTA
Esta marca indica sugerencias o directrices útiles a la hora de
utilizar el producto.
1. Ubicación de las piezas
(1) Cebador
(2) Cubierta del ltro de aire
(3) Palanca del estrangulador
(4) Tanque de combustible
(5) Arrancador
(6) Palanca de aceleración
(7) Interruptor de encendido
(8) Varilla rociadora
(9) Mango
(10) Dial de regulación de la presión
(11) Tapón de vaciado de uido
Índices
1. Ubicación de las piezas ............................. 16
2. Especicaciones ........................................ 17
3. Símbolos que aparecen en el manual ........ 17
4. Símbolos en la m quina ............................. 17
5. Para un funcionamiento seguro ................. 18
6. Montaje ..................................................... 19
7. Combustible .............................................. 20
8. Llenado de sustancias químcas ................. 23
9. Funcionamiento ......................................... 23
10. Mantenimiento ......................................... 25
11. Almacenamiento ...................................... 28
12. Eliminación .............................................. 28
13. Guía para la locali zación de averías ......... 29
8
2
3
5
1
11
4
10
7
6
9

325S25
ES-17
Nombre y número del modelo Pulverizador motorizado de mochila Husqvarna
325S25
Propósito
Pulverización de sustancias químcas agrícolas y agua fría para
control de pestes, desmalezamiento y control de crecimiento
Peso seco ∗ (kg) 9,8
Dimensiones externas de la unidad principal
(largo x ancho x alto) ∗∗ (mm) 335x470x640
Capacidad del depósito de soluciones químicas
(litros) 25
Capacidad del depósito de combustible (litros) 0,6
Bomba Tipo Tipo de pistón tubular
Velocidad (rpm) 1450
Potencia de pulverización
Normal (MPa) 0,5 - 3,5
M ximo (MPa) 3,5
M xima absorción de agua (litros/min) 4,8
Sistema de transmisión del motor Embrague centrífugo
Motor Tipo Motor a gasolina de 2 refrigerado por aire,
con un solo cilindro
Número de modelo G26LS
Capacidad de escape (cc) 25,4
Combustible usado Mezcla de aceite lubricante/gasolina
Aceite lubricante usado Aceite para motores de 2 tiempos
Proporción de mezcla
Gasoline 50 : Oil 1(al utilizar el aceite auténtico de Husqvarna)
Carburador Tipo diafragma, de v lvula giratoria
Sistema de encendido Tipo im n de volante de control electrónico
Bujías CHAMPION RCJ-6Y
Sistema de arranque Arrancador de retroceso
Sistema de parada Cortocircuito del cable primario
Filtro de aire Tipo seco
Accesorios incluidos 1 varilla rociadora, 1 varilla, 1 grifo, 1 mango, 1 union,
1 manguera, 1 llave
* Cuando la tobera (incluida) est instalada. ** La boquilla y el cinturon trasero no vienen incluidos.
Con el propósito de introducir mejoras, estas especicaciones est n sujetas a cambios sin previo aviso.
2. Especificaciones
3. Símbolos que aparecen
en el manual
(1) (2) (4) (5)
1. Lea el manual de usuario antes de accionar la má-
quina.
2. Antes de utilizar esta máquina, lea el manual
del operador.
3. Utilice botas antideslizantes y seguras.
4. Utilice siempre guantes protectores homologados.
5. Advertencia / Atención
4. Símbolos en la m uina
Para un uso y mantenimiento seguros se han grabado
en relieve los siguientes símbolos sobre la m uina. Con
respecto de estos símbolos, tenga cuidado de no cometer
ningún error.
Aviso de que es tiempo de reponer combus-
tible mezclado “MIX GASOLINE”
Posición: TAPA DEL DEP ITO DE COM-
BUSTIBLE
Dirección para cerrar el obturador
Posición: CUBIERTA DEL FILTRO DE AIRE
Dirección para abrir el obturador
Posición: CUBIERTA DEL FILTRO DE AIRE
(3)
No modifique nunca la máquina.
Lagarantíadelamáquinanoseráválida
sireformaelpulverizadorosinocumple
lasindicacionesincluidasenestemanual.
MOTOR
BOMBA

325S25
ES-18
Antes de usar el producto, lea detenidamente este
manual de instrucciones para garantizar una operación
correcta. Las siguientes precauciones deben observarse
a n usar el producto con suavidad. En el manual se ha
usado la marca de advertencia para llamar la atención
del usuario a estas notas de precaución.
ANTESDEUSARELPRODUCTO
• Este producto ha sido disendo principalmente para
el n de rociar sustancias quíicas para el control de
pestes y herbicidas. No lo use para ningún otro n, ya
que esto puede causar accidentes imprevistos.
• Debido a que este producto utiliza sustancias químicas
agríolas que requieren de un manejo cuidadoso, el
mal uso del mismo puede ser peligroso. No use este
producto cuando est cansado o en malas condiciones
físicas, o cuando no se sienta capaz de juzgar una
situación correctamente o de proceder con precisión,
como después de ingerir medicinas para el resfrío o
beber alcohol. Asimismo, a los ninos o a personas que
no sean capaces de comprender el contenido de este
manual no se les debe permitir el uso del producto
bajo ninguna circunstancia.
• El gas de escape del motor contiene monóxido de
carbono tóxico. No use el producto en interiores,
invernaderos de vinilo o túneles, ni en otros lugares
mal ventilados.
• No use este producto en los siguientes casos.
1. Cuando el producto pueda dares vuelta o en otras
situaciones en que sea difícil sostener u operar el
producto.
2. Después de la puesta del sol o en otras situaciones en
que la visibilidad no sea buena y sea difícil garantizar
la seguridad del rea a rociar.
3. Bajo condiciones de mal tiempo (lluvia, niebla, vientos
fuertes, rayos, etc.)
• Al usar el producto por primera vez, antes de iniciar
la pulverización, asegúrese de obtener la ayuda y
recomendaciones necesarias para operar el producto
de una persona con experiencia.
• La fatiga reduce el poder de concentración y aumenta
el riesgo de accidente. Al planicar el trabajo, aseg-
úrese de disponer de tiempo suciente, y je límites
de 30-40 minutos por sesión de pulverización y pausa
de 10-20 minutos entre medio. Asimismo, no rocíe
durante m s de 2 horas al día.
• Cuide debidamente este manual de instrucciones y
consúltelo cada vez que necesite información adi-
cional.
• Si vende o presta el producto, éste siempre deberá ir
acompando de este manual de instrucciones.
ADVERTENCIA
• Inspeccione la montura de goma amortiguadora para
determinar si est agrietada o danada de alguna otra
forma. Tenga presente que si no se reemplaza la
montura de goma si ésta se ha agrietado o danado,
el motor podr soltarse de su bastidor durante el uso
de la m quina, lo que a su vez puede causar graves
lesiones físicas.
• Si está agrietada, reemplace la montura de goma
inmediatamente.
5. Para un funcionamiento seguro

325S25
ES-19
5. Para un funcionamiento seguro
• 1.Elementos de protección para
la cabeza
• 2.Gafas protectoras
• 3.Máscara protectora
• 4. Botas de goma
• 5. Auriculares protectores para
los oídos
• 6. Protección para el cuello
• 7. Ropa protectora
• 8.Guantes de goma
• 9.Ropa protectora
ADVERTENCIA
1. Si no respeta el horario de trabajo o la manera de
trabajar, podrían desarrollarse lesiones por esfuerzo
repetitivo (RSI). Si siente incomodidad, rojez e hin-
chazón de los dedos o de cualquier otra parte del
cuerpo, consulte a un médico antes de que empeore.
2. Para evitar quejas por ruido, como norma general,
utilice el producto entre las 8 AM y las 5 PM los días
laborables y de 9 AM a 5 PM los nes de semana.
IMPORTANTE
Compruebeysigalasnormativaslocalesenlo
quesereerealniveldesonidoylashorasde
funcionamientodelproducto.
PRECAUCIONES PREVIAS A LA PULVERIZA-
CION
Asegúrese de contar con el equipo de protección adecua-
do: ropa especial, elementos de protección para la ca-
beza, guantes y botas de goma, una m scara protectora,
gafas, una toalla, crema protectora, etc., para evitar que
las sustancias químicas entren en contacto con su piel o
pulmones. Al rociar, use siempre el equipo de protección
para evitar cualquier riesgo de lesión.
• Almacene las sustancias químicas bajo llave en una
caja de almacenamiento, armario u otro lugar seguro,
fuera del alcance de los ninos.
• Lea detenidamente las instrucciones de uso de las
sustancias químicas, y familiarícese con el nivel de
toxicidad, método de uso, etc.
• Analice cuidadosamente el rea que va a rociar, asegur
ndose de no contaminar el suministro de agua, ríos,
lagos, lagunas, etc., ni de causar danos a los resi-
dentes, personas que pasan, ganado, etc.
• Prep rese físicamente el día anterior a la operación de
pulverización disminuyendo, por ejemplo, el consumo
de bebidas alcohólicas o el trabajo nocturno.
• No permita el ingreso de ninos, animales, etc., al rea
de pulverización de sustancias químicas.
• Antes de comenzar a rociar, inspeccione completa-
mente las toberas de pulverización y compruebe si
hay algúntipo de anormalidad como, por ejemplo,
tornillos sueltos o una conexión poco segura de la
manguera de pulverización, fugas de combustible,
empaquetaduras de líquidos defectuosas o rotas, o
danos en la cinta de transporte.
PRECAUCIONES AL TRANSPORTAR SUSTAN-
CIAS QUIMICAS
• Al transportar sustancias químicas, h galo con precau-
ción teniendo cuidado de no derramar las sustancias
debido a bolsas rotas, botellas quebradas o retenes
sueltos.
• No transporte las sustancias químicas en el mismo
recipiente que la comida.
PRECAUCIONES AL TRANSPORTAR EL PUL-
VERIZADOR
• No transporte el pulverizador mientras tenga sustan-
cias químicas o combustible en el depósito, ya que
podrían producirse fugas como resultado de impactos
durante el transporte.
• Al transportar el pulverizador en un vehículo, use una
cuerda o elemento similar para jar el pulverizador
rmemente en el compartimiento de carga en posición
vertical. No transporte el pulverizador en bicicleta o
motocicleta, pues es peligroso.
PRECAUCIONES AL RELATIVAS AL COMBUS-
TIBLE
• El motor de este producto utiliza “gasolina mezclada”
que incluye combustible altamente inamable. No re-
cargue ni almacene los contenedores de combustible
en lugares donde haya cualquier riesgo de combustión
-- cerca de incineradores, quemadores, hogueras,
cocinas, lugares donde se produzcan chispas eléctri-
cas o chispas de soldadura, etc.
• Fumar mientras se rocía o se recarga combustible es
peligroso. Evítelo a toda costa.
• Al recargar durante el uso del aparato, detenga
siempre el motor y asegúrese de que no haya llamas
expuestas en las cercanías del lugar de recarga.
• Usando un trapo u otro elemento similar, seque com-
pletamente todo resto de combustible derramado
durante la recarga antes de arrancar el motor.
• Después de recargar combustible, selle el contene-
dor de combustible, asegure rmemente la tapa del

325S25
ES-20
depósito de combustible, y arranque el motor a por lo
menos 3 metros de distancia.
PRECAUCIONES DURANTE LA RECARGA DE
SUSTANCIAS QUIMICAS
• Antes de cargar el depósito con sustancias químicas,
asegúrese de que la palanca de pulverización se en-
cuentre completamente en posición de reposo.
• Después de recargar sustancias químicas, apriete
rmemente la tapa del depósito. Si no es completa-
mente apretada, la tapa podr soltarse durante la
operación de pulverización, con el consiguiente riesgo
de exposición física a las sustancias químicas.
PRECAUCION AL ARRANCAR EL MOTOR
• Mantenga a ninos, animales, etc. bien alejados al
arrancar el motor y durante la operación de pulver-
ización.
PRECAUCIONES DURANTE LA OPERACION DE
PULVERIZACION
• Debido a que la ropa protectora en general ofrece mala
ventilación y por consiguiente ejerce una fuerte carga
sobre el cuerpo, existe el riesgo de sufrir insolación u
otra afección al usar el pulverizador por períodos pro-
longados bajo altas temperaturas. Evite rociar en días
calurosos; programe, en cambio, la pulverización para
temprano en la manana o para las últimas horas de la
tarde cuando las temperaturas son m s moderadas y
los vientos escasos.
• Al iniciar un trabajo, considere debidamente factores
tales como hora de pulverización, dirección del viento,
etc., para evitar molestias por ruido o situaciones con
riesgo de contaminación por sustancias químicas a los
vecinos, personas que pasan, cosechas, etc.
• Mientras rocía, sujete rmemente el mango en todo
momento y tenga cuidado de no apuntar la tobera
hacia personas o animales.
• Mientras rocía, considere la dirección del viento; p
rese siempre a favor del viento para evitar rociarse a
s mismo con las sustancias químicas.
• Si comienza a sentir aunque sólo sea un ligero mal-
estar mientras rocía, consulte inmediatamente a un
médico. Al hacerlo, infórmele al médico el nombre de
la sustancia química que estaba usando, describa las
condiciones de uso, etc.
• Si el pulverizador es inclinado, la sustancia química
podr salirse por los oricios de ventilación de la tapa.
Al rociar, asegúrese siempre de estar bien parado y
de mantener el equilibrio.
• No toque las bujías o los cables de las mismas mien-
tras el motor est en marcha; de lo contrario, usted
podría sufrir una descarga eléctrica.
• No toque el silenciador, bujías u otras piezas met
licas con las manos descubiertas mientras el motor
est en marcha o inmediatamente después de pararlo,
5. Para un funcionamiento seguro
ya que podría sufrir quemaduras debido a las altas
temperaturas.
PRECAUCIONES POSTERIORES A LA PULVER-
IZACION
• Selle las sustancias químicas sin uso y gu rdelas fuera
del alcance de los ninos.
• No simplemente deseche los envases de sustancias
químicas vacíos, sino que h galo en forma segura,
ya sea quem ndolos, enterr ndolos o por medio de
otro método similar. Asimismo, tome todas las pre-
cauciones para que el agua usada para lavar las her-
ramientas de pulverización no constituya un peligro.
• Inspeccione completamente y efectúe el mantenimien-
to de rigor de la ropa protectora, m scaras, guantes y
otros elementos de protección a modo de preparación
para la próxima sesión.
• Después de nalizar el trabajo y guardar las sustan-
cias químicas y herramientas de pulverización, tome
inmediatamente un bano o l vese las manos, pies,
cara, etc., con jabón, y enju guese también la boca.
• C mbiese toda la ropa que haya usado, incluyendo la
ropa interior, y l vela bien. La ropa usada durante la
operación de pulverización no debe volver a usarse
al día siguiente.
• Después de rociar, limite el consumo de alcohol y des-
canse debidamente yéndose a la cama temprano. Si
llegara a sentir aunque sea un ligero malestar, consulte
a un médico lo antes posible.
OTRAS PRECAUCIONES
• Si realiza trabajos de pulverización durante períodos
prolongados de tiempo, h gase ex menes de salud en
forma periódica.
• Efectúe el trabajo de pulverización en forma plani-
cada, llevando un registro diario de la fecha y hora
de pulverización, las sustancias químicas utilizadas,
la peste objetivo, contenido del trabajo, duración del
trabajo, y otros detalles.
• Al seleccionar o usar elementos de protección, con-
sidere las siguientes recomendaciones.
a. Ropa protectora. Seleccione una vestimenta que
sea fresca y que ofrezca buenas condiciones de
ventilación e impermeabilidad. Asimismo, seleccione
prendas que le permitan realizar el trabajo de pulver-
ización con total comodidad y seguridad.
b. Capucha de pulverización. Use una capucha con ala
que sea impermeable y que le cubra el cuello y los
hombros.
c. Guantes. Use guantes que dicultan la penetración
de las sustancias químicas y que no se pongan res-
baladizos si usted transpira mientras realiza el trabajo.
d. Delantal de goma. Al mezclar las sustancias químicas,
use un delantal largo, grueso y ancho que sea imper-
meable a las salpicaduras de las sustancias químicas.
e. Gafas protectoras, m scara, etc. Seleccione gafas
protectoras, m scara, botas de goma, gotas para los
ojos, crema protectora, etc. considerando las normas
y recomendaciones de las organizaciones que prom-
ueven la seguridad en el trabajo agrícola.
Table of contents
Languages:
Other Husqvarna Paint Sprayer manuals

Husqvarna
Husqvarna 321S15 User manual

Husqvarna
Husqvarna 362D28 User manual

Husqvarna
Husqvarna 323S15 User manual

Husqvarna
Husqvarna HS2 Owner's manual

Husqvarna
Husqvarna HDE4E Owner's manual

Husqvarna
Husqvarna HDE4P Owner's manual

Husqvarna
Husqvarna BP5 Owner's manual

Husqvarna
Husqvarna HS2 Owner's manual

Husqvarna
Husqvarna BP4E Owner's manual

Husqvarna
Husqvarna 321S15 User manual