Husqvarna 321SP User manual

321SP
EN Operator’s manual
ES Manual de funcionamiento
PT Manual do Operador
FR Manuel de l'opérateur
MY Manual pengendali
VN Sổ tay hướng dẫn vận hành
TH
AE
CN 操作手册
2-14
15-30
31-46
47-62
63-78
79-93
94-107
108-120
121-133
คู่มือการใช ้
งาน


CONTENTS
INTRODUCTION
INTRODUCTION……………..........……………2
SAFETY…………………………............………...3
ASSEMBLY……………………….............……….6
OPERATION………………………............…..….7
MAINTENANCE……………………...........……….9
1. Primer
2. Air filter cover
3. Choke lever
4. Fuel tank
5. Starter handle
6. Throttle lever
7. Stop switch
8. Spark plug
9. 3-nozzle spray lance
10. Single nozzle spray lance
11. Front handle
12. Rear handle
13. Chock valve
14. Pressure regulating dial
15. Front plate
16. Frame
17. Hose assembly
18. Operator manual
19. Assembly tools
20. Spare parts
21. Fuel oil mixing tank
Operator’s manual Intended use
Product description
Overview
The initial language of this operator’s manual is
English. Operator’s manuals in other languages are
translations from English.
This product has been designed mainly for the
purpose of spraying pest control chemicals and
weedkillers. Please do not use it for any other
purposes or tasks, as this may cause unforeseen
accidents.
This product is a portable sprayer with a combustion
engine. Check with your servicing dealer for more
information.
Note: National or local regulations may regulate the
use. Comply to given regulations.
TROUBLE SHOOTING……............…………….....12
TRANSPORTATION AND STORAGE….......…......13
TECHNICAL DATA……………………….................14
ACCESSORIES………………………..…...............14
2
17
13
9
10
11
12
6
16
5
3
4
2
14
7
15
818
19 20
100
200
300
400
21
1

Symbols on the product
Safety definitions
General safety instructions
Product liability
Read this manual before operating Primer
Low speed
High speed
Wear protective headgear, protective
goggles, ear muffs and protective mask
Wear rubber boots
Wear protective clothing
Wear rubber gloves
Electric shock
Hot surface
High pressure injection
SAFETY
The port to refuel the MIX GASO-LINE
Keep safe distance
The direction to close the choke
The direction to open the chok
The definitions below give the level of severity for
each signal word.
Note: Other symbols/decals on the product refer to
certification requirements for other commercial areas.
As referred to in the product liability laws, we are
not liable for damages that our product causes if:
• the product is incorrectly repaired.
• the product is repaired with parts that are not from
the manufacturer or not approved by the
manufacturer.
• the product has an accessory that is not from the
manufacturer or not approved by the manufacturer.
• the product is no repaired at an approved service
center or by an approved authority
•Use the product correctly. Injury or death is a
possible result of incorrect use. Only use the
product for the tasks found in this manual. Do not
use the product for other tasks.
• Read, understand and follow the instructions and
the symbols in this manual. If the operator does
not follow the instructions and the symbols, injury,
damage or death is a possible result.
• Do not discard this manual. Use the instructions to
assemble, to install attachments and accessories,
to operate and to maintain. Only use approved
attachments and accessories.
• It is not possible to give warning on every situation
that can occur during operation and maintenance
of the product. Always be careful and use your
common sense.
• Make sure that parts are not damaged before you
use the product. Follow the maintenance
schedule. Only do the maintenance work that
instructed in this manual. An approved service
center must do all other maintenance work.
• Do not operate the product or do maintenance on
the product if you are not sure of the situation.
Turn to the approved dealer, service agent or
service center for information.
WARNING: Injury to persons.
3
CAUTION: Damage to the product.
WARNING: Read the warning instructions
that follow before you use the product.
Note: This information makes the product easier to
use.

Safety instructions for operation
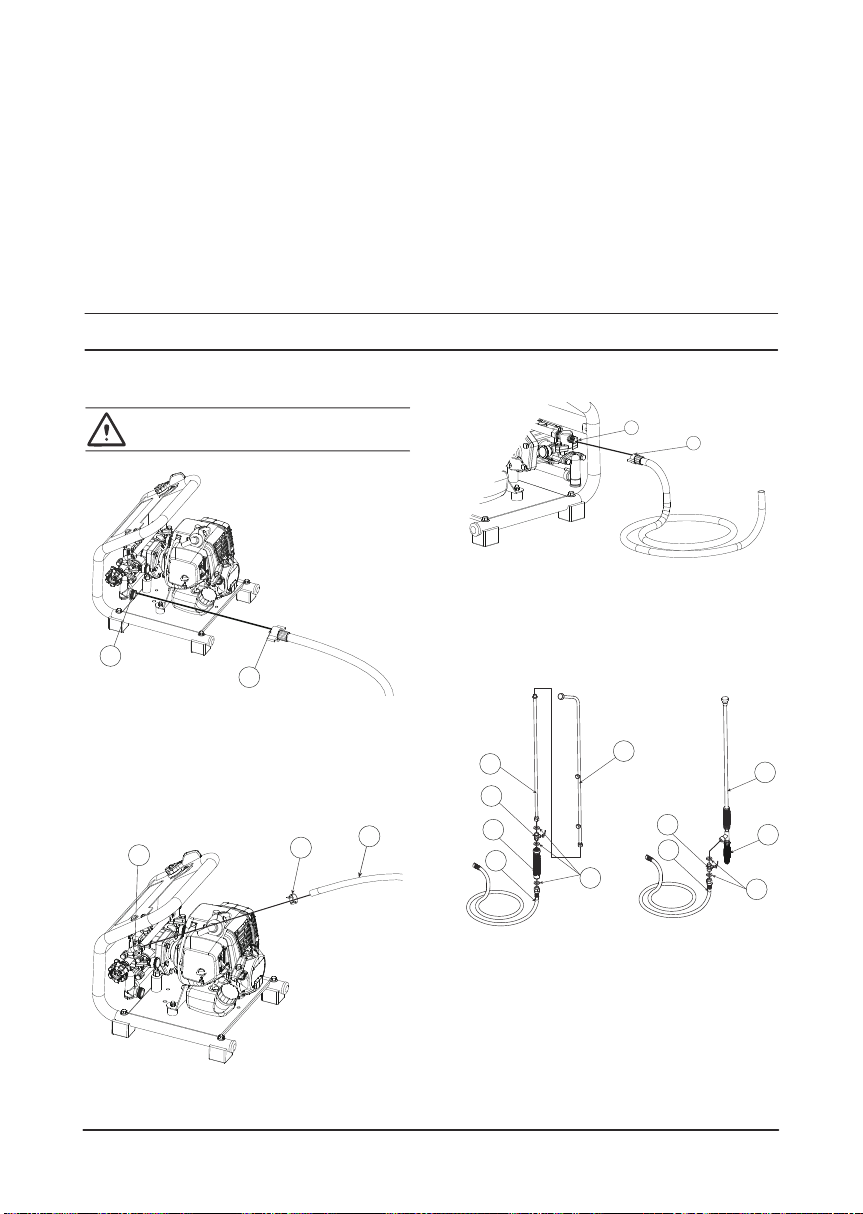
Chemical filling
• Make sure the product is fully assembled before
using it.
• Put the product on an even ground 3 m (10 ft) away
from the position where you filled the fuel tank
before starting the engine.
• The product can cause objects to eject, which can
cause damage to the eyes. Always use an
approved eye protection when you operate the
product.
• Be careful, a child can come near the product
without your knowledge during operation.
• Do not operate the product if there are persons in
the work area. Stop the product if a person goes
into the work area.
• Make sure that you are always in control of the
product.
• Do not use the product if you cannot receive aid in
case of an accident. Always make sure others
know you will operate the product before you start.
• Do not turn with the product before you make sure
that no persons or animals are in the safety area.
• Remove all unwanted materials from the work area
before you start.
• Do not use the product in bad weather like fog,
rain, strong winds, risk of lightning or other weather
conditions. Dangerous conditions such as slippery
surfaces can occur because of bad weather.
• Make sure that you can move freely and work in a
stable position.
• Make sure that you cannot fall when you use the
product. Do not tilt when you operate the product.
• Do not touch the bevel gear which is hot and can
cause injury after the engine stops.
• Stop the engine before you move the product.
• Chemical substances should be handled correctly,
or it can cause serious poisoning or even fatal
accidents. Always observing the warning symbols
on the container, since some chemicals are
extremely hazardous to humans and animals.
• Chemical substance containers should be stored
separately from other containers with obvious
warning symbols and out of the reach of children.
4
• Disconnect the spark plug cable before assembly,
storage or maintenance of the product.
• Do not use the product if it is changed from its
initial specification. Do not change any part of the
product without approval from the manufacturer.
Only use parts approved by the manufacturer.
Injury or death is a possible result of incorrect
maintenance.
• Do not breathe in the fumes from the engine.
Long-term inhalation of the engine exhaust fumes
is a health risk.
• Do not start the product indoors or near flammable
material. The exhaust fumes is hot and contain
spark which can start a fire. Not sufficient airflow
can cause injury or death because of asphyxiation
or carbon monoxide.
• When you use this product the engine makes an
electromagnetic field. The electromagnetic field
can cause damage to medical implants. Check
with your physician and medical implant
manufacturer before you use the product.
• Do not let a child or a person without knowledge of
the instructions operate the product.
• Make sure that you always monitor a person, with
decreased physical capacity or mental capacity,
that uses the product. A responsible adult must be
there at all times.
• Lock the product in an area that children and
unapproved persons cannot access.
• The product can eject objects and cause injuries.
Obey the safety instructions to decrease the risk of
injury or death.
• Do not leave the product when the engine is on.
• The operator of the product shall be responsible
for any accident occurs.
• Make sure that you are minimum 15 m (50 ft) away
from other persons or animals before you use the
product. Make sure that persons in the adjacent
area know that you will use the product.
• Refer to national or local laws. They can prevent or
decrease the operation of the product in some
conditions.
• Do not use the product if you are fatigued or
influenced by alcohol, drugs or medicine. They can
have effects on your vision, alertness, coordination
or judgment.

Personal protective equipment Fuel
Protective devices on the product
Check valve and throttle trigger
Stop switch
• Always use correct personal protective equipment
when you operate the product. The personal
protective equipment does not erase the risk of
injury but just decreases the grade of injury if an
accident occurs.
• Always use an approved eye protection while you
operate the product.
• Do not operate the product with bare feet or with
open shoes. Always use heavy-duty slip-resistant
boots.
• Use heavy, long pants.
• If it is necessary, use approved protective gloves.
• Use a helmet if it is possible that objects fall on
your head.
• Always use approved ear protection while you
operate the product. Noise for a long period can
cause noise-induced hearing loss.
• Make sure that you have a first aid kit nearby.
• Do not start the product if there is fuel or engine oil
on the product. Remove the unwanted fuel or oil
and let the product dry.
• If you spill fuel on your clothing, change clothing
immediately.
• Do not get fuel on your body, which can cause
injury. If you get fuel on your body, use a soap and
water to remove the fuel.
• Do not start the engine if you spill oil or fuel on the
product or on your body.
• Do not start the product if the engine has a leak.
Examine the engine for leaks regularly.
• Be careful with fuel. Fuel is flammable and the
fumes are explosive and can cause injuries or
death.
• Do not breathe in the fuel fumes, it can cause
injury. Make sure that there is a sufficient airflow.
• Do not smoke nor put warm objects near the fuel or
the engine.
• Do not add fuel when the engine is running. Make
sure the engine is cool before you refuel.
• Before you refuel, open the fuel tank cap slowly
and release the pressure carefully.
• Do not add fuel to the engine in an indoor area. Not
sufficient airflow can cause injury or death because
of asphyxiation or carbon monoxide.
• Tighten the fuel tank cap carefully or a fire can
occur.
• Move the product at a minimum of 3 m (10 ft) away
from the position where you filled the tank before a
start.
• Do not fill too much fuel in the fuel tank.
• Make sure that a leak cannot occur when you move
the product or fuel container.
• Do not put the product or a fuel container where
there is an open flame, spark or pilot light. Make
sure that there is no flame within the storage area.
• Only use approved containers when you move the
fuel or put the fuel into storage.
• Clean the product and empty the fuel tank before
long-term storage. Obey the local law on where to
dispose fuel.
• Remove the spark plug cable before you put the
product into storage to make sure that the engine
does not start accidentally.
• Make sure that you regularly do the maintenance to
the product.
• The life of the product increases.
• The risk of accidents decreases.
• Let an approved dealer or an approved service
center regularly examine the product to do
adjustments or repairs.
• Do not use a product with damaged protective
equipment. If the product is damaged, speak to an
approved service center.
• Before start the engine, make sure the check valve
is at the off position and the throttle trigger at the
turtle position. Start with the check valve pulled out
is dangerous, as chemical fluid may spray out of
the nozzle when the engine is started.
• Start the engine. Make sure that the engine stops
when you press the stop switch.
5
WARNING: Read the warning instructions
that follow before you use the product.

Safety instruction for maintenance
To connect inlet hose To connect outlet hose
To connect spray lance
To connect return hose
• In order to maintain the functions of the product,
regularly carry out the maintenance inspections
listed in this manual. Please consult approved
product supplier or nearest Husqvarna product
dealer if maintenance or parts replacement are
required but not listed in this Manual.
• Never keep the engine running while carrying out
inspections or maintenance.
6
WARNING: Only use approved inlet hose,
since other hose may damage the pump.
1. Attach the inlet hose to the pump inlet (A) by
tightening the wing nut (B). Tighten by hand only as
overtightening may damage hose fittings.
1. For 3-nozzle spray lance: Fasten the extended
lance (I) to the chock valve (H). Fasten the 3-nozzle
spray (J) to the extended lance (I). Ensure all
connections are secured. Tighten by hand only.
2. For single nozzle lance: Fasten the single nozzle
lance (K) to the chock valve (H). Ensure the
connection is secured. The single nozzle lance is
equipped with the flow adjustment. Tighten by hand
only.
1. Attach the spray hose to the pump outlet (F) by
tightening the wing nut (G). Tighten by hand only as
overtightening may damage hose fittings.
1.connect the return hose (E) to fitting (C) and
tighten by clamp (D).
• Do not modify the product or dismantle the engine.
This could lead to breakdown and serious
accidents during operation.
• Do not touch the muffler or spark plug with bare
hands immediately after stopping the engine,
since the high temperature can cause burns.
• Use original Husqvarna replacement parts or
brands designated by Husqvarna
ASSEMBLY
A
B
CDE
G
F
J
K
P
L
H
O
I
H
N
O
L

To use fuel
Gasoline
Two-cycle engine oil
To mix the fuel
To filling the fuel tank
OPERATION
• Always use new unleaded gasoline with a
minimum octane number of 90 RON (87 AKI) and
with less than 10% ethanol concentration (E10).
• Use gasoline with a higher octane number if you
frequently use the product at continuously high
engine speed.
• Always use a good quality unleaded gasoline/oil
mixture.
• Use only the two-cycle engine oil of high quality,
especially HUSQVARNA two-cycle engine oil. Use
only the oil of an air cooled engine.
• Mixture ratio 50:1 (2%).
7
WARNING: Read, and understand the safety
chapter before you operate.
CAUTION: This product has a two-cycle
engine. Use a mixture of gasoline and
two-cycle engine oil. Make sure to use the
correct quantity of oil in the mixture. Incorrect
ratio of gasoline and oil can cause damage to
the engine.
CAUTION: Do not use gasoline with an
octane number less than 90 RON (87 AKI).
This can cause damage to the product.
CAUTION: Do not use gasoline with more
than 10% ethanol concentration (E10). This
can cause damage to the product.
CAUTION: Do not use leaded gasoline. This
can cause damage to the product.
1. Add half of the gasoline.
2. Add all of the oil.
3. Shake the fuel mixture to mix.
4. Add the remaining half of gasoline.
5. Shake the fuel mixture again to mix.
6. Fill the fuel tank.
1. Make sure that the fuel mixture is correct and is
in a fuel container with an antispill valve.
2. If fuel is on the container, remove the unwanted
fuel and let the container dry.
Note: If there is a leakage from the single nozzle
lance (K) fittings, retighten the fittings with a
spanner or multigrip.
3. After the spray hose assembly is connected with
Note: Always use a clean fuel container when you
mix the fuel. Do not use fuel mixture made over 30
days.
the spray lance, inspect and ensure all connections
in the spray hose assembly such as the seals (L),
chock valve (H), handle (N), spray hose (O) and
rear handle (P) are tightly secured. Tighten by hand
only.
Gasoline, liter
Oil, liter
2% (50:1)
5
0.1
10
0.2
15
0.3
20
0.4
• Oil of low quality and high oil/fuel ratio can
decrease the lifetime of catalytic converters.
• Check with the approved dealer when you select
an oil.
• If Husqvarna two-stroke oil is not available, you
can use another two-stroke oil of good quality that
is intended for air cooled engines.
• Do not use the two-stroke oil for water-cooled
outboard engines. The two-stroke oil is sometimes
referred to as outboard oil.

To start and stop
Before you start the engine
To spray
Spray procedure
Cleaning after spraying
To start a cold engine
To start a warm engine
To stop the engine
• Do not wind the hoses to the product body in any
way, or hoses will be burnt or damaged
• Please use correctly, observing the precautions in
this manual.
• When spraying, do not point the nozzle at your
face, or at other people, animals, etc.
• If the chemical liquid runs out when spraying, put
the engine to low speed immediately. Empty
running of the engine may cause the spray pump
to break.
• Please avoid using multiple nozzles, jet nozzles, or
other nozzles that give a large spray volume, as
spraying efficiency is sometimes impaired owing to
insufficient pressure.
8
WARNING: Do not touch the cover or use a
product with damaged spark plug cap. It can
burn your skin and cause electrical shock if
the spark plug cap is damaged.
CAUTION: Do not pull all the starter rope out.
Hold the starter rope handle when it is fully
extended. Do not twist the starter rope
around your hand.
1. Examine the product for missing, damaged, loose
or worn parts.
2. Examine the nuts, screws and bolts.
3. Examine the air filter.
4. Examine the check valve and throttle trigger.
5. Examine the stop switch.
6. Examine the product for fuel leaks.
7. Examine the inlet hose, inlet filter, outlet hose,
return hose and spray lance for correct connection.
1. Set the chock valve to close position
2. Start the engine.
3. Increase the engine speed.
4. Open the chock valve (H).
5. Wait about 30 seconds or longer until the
chemical fluid starts to spray out from the nozzle in
the form of mist.
6. When stopping work, close the cock valve (H)
fully and reduce the engine speed.
1.Fill in about 5L of clean water into spray tank.
2.Spray through the nozzle for 2-3 minutes, and
drain the water left inside the tank.
1. Press the air purge ten times.
2. Move choke lever to the choke position.
3. Place the product to the even ground. Pull out
the starter rope slowly until you feel some
resistance. Pull the starter rope quickly and with
force. Keep doing it until you hear the engine start.
4. Set the choke lever to the run position, then pull
the starter rope until the engine starts.
5. Pull the throttle trigger slightly and run at low
speed for 60 seconds.
1. Press the air purge ten times.
2. Set the choke lever to the run position, then pull
the start rope until the engine starts.
• Press the stop switch to stop the engine.
Note: Start the engine and wait about 30 seconds to
empty air in the pump every time when using the
product.
3. Make sure that the area near the fuel tank cap is
clean.
4. Remove the fuel tank cap.
5. Shake the fuel container before you add the fuel
mixture to the fuel tank.
6. Put back the fuel tank cap.
b
b
a
H
a. open
b. close

To check the air cleaner
To check the fuel filter
To check the spark plug
To check the spray nozzle
To check the pump oil level
MAINTENANCE
• After every 25 hours of operation, please remove
the air cleaner cover and inspect the air cleaner. If
it is too dirty, wash it carefully in warm water
containing a neutral detergent, and put it back to
its original position after drying it thoroughly.
• If the air cleaner is distorted or damaged, please
replace it with a new one.
• If the air cleaner is blocked, the efficiency of the
engine will be reduced. In addition, the engine
interior will suffer abnormal wear if it is operated
without filter or if continually operated with a
distorted or damaged filter.
• After every 25 hours of operation, empty the fuel
tank, detach the fuel filter from the tank, and
remove all dirt. If the filter is too clogged, please
replace it with a new one.
• If the fuel filter is clogged, the engine speed may
be limited or speed fluctuations may occur.
• If the engine is operated without a fuel filter, dirt will
accumulate in the carburetor and cause it to
malfunction
TIGHTENING TORQUE: 14.7 to 21.6 N.m.
(150 to 220 kgf-cm)
• A clogged spray nozzle can cause the spray
pressure and flowrate to drop. All excessive
pressure will go back to the sprayer tank.
To correct the problem, immediately clean the spray
tip by following these instructions:
1. Stop engine & remove the unit from the
operators back.
2. Disconnect the spray rod from the spray hose
assembly.
3. To remove the nozzle cap, turn in anticlockwise
direction.
4. Inspect and clean the spray tip and metal strainer
for 3-nozzle spray rod from any foreign material
clogging or restricting the spray nozzle. Replace if
damaged.
5. Reinstall the nozzle cap and the spray rod with
the spray hose assembly tightly (hand tighten) .
• Oil level should be checked prior to each use.
1. Make sure the sprayer is on an even surface.
2. Verify the oil is showing as 1/3-1/2’s full (approx.
100ml) in the oil glass window.
• Do not touch the spark plug with your bare hands
immediately after operation, as there is the risk of
burns due to high temperature.
• After every 25 hours of operation, detach the spark
plug and remove dirt from the electrodes with a
wire brush or similar.
• The correct electrode gap is 0.6 to 0.7mm.
9
WARNING: Read and understand the safety
chapter before you clean, repair or do
maintenance on the product.
• When replacing plugs, please use designated
items.
• If too much fuel is absorbed or poor quality oil is
used, the spark plug electrodes become dirty,
making the engine harder to start.
• Note that using any spark plug other than those
designated may result in the engine failing to
operate properly or in the engine becoming
overheated and damaged.
• To install the spark plug, first turn the plug until it is
finger tight, then tighten it a quarter turn more with
a socket wrench.
0.6~0.7mm

To check the muffler
To check the cooling system
Maintenance schedule
To check the grease cups
To adjust engine speed
To replace gear oil
• When checking the product to make sure that it is
in good condition before using it, check the area
around the muffler and remove any staffs that
attached, in case the muffler is overheated or
even the engine catch on fire.
• Open the upper cap of the grease cup and check
the grease amount. Fill it up if it decreased.
• Although the engine is adjusted before leaving the
factory, it may require readjustment or
maintenance after repeated use. Please consult
the original supplier regarding inspections and
maintenance other than those shown below.
• If the engine stops or the pump continues to work
at idle speed with the throttle trigger at the turtle
position, readjust the engine speed with the idle
speed adjustment screw on the left of the
carburetor.
Turn the idle adjustment screw:
• Counter-clockwise to reduce engine speed
• Clockwise to increase engine speed
• After first 25 hours of use, replace the gear oil.
After that, replace it after every 100 hours of use
(SAE90, 100cc).
Perform the procedures after every 100 hours of
operation:
1. Remove the muffler, insert a screwdriver into the
vent, and wipe away any carbon buildup. Wipe
away any carbon buildup on the muffler exhaust
vent and cylinder exhaust port at the same time.
2. Tighten all screws, bolts, and fittings.
3. Check and wipe off if any oil or grease left in
between the clutch lining and drum with oil-free and
lead-free gasoline.
10
WARNING: Inspect periodically, the muffler
for loose fasteners, any damage or corrosion.
If any sign of exhaust leakage is found, stop
using the machine and have it repaired
immediately. Note that failing to do so may
result in the engine catching on fire.
WARNING: Never touch the cylinder, muffler,
or spark plug with your bare hands
immediately after stopping the engine. The
engine can become very hot when in
operation, and doing so could result in
severe burns.
Note: Do not attempt any oil maintenance on this
pump. The pump is pre-lubricated and sealed from
the factory. If refilling is required, see an authorized
dealer or service centre.
Note: Warm up the engine before adjusting the idle
speed.
Note: Make sure you obey the maintenance schedule. The intervals are calculated from daily use of the product.
The intervals are different if you do not use the product each day. Only do the maintenance work that is found in
this manual. Speak to an approved service center about other maintenance work not found in this manual.
• Check the intake air cooling vent and the area
around the cylinder cooling fins for blockage every
25 hours of use, in case of engine overheat or
even product failure. Note that it is necessary to
remove the upper cover and the lower cover in
order to be able to view the upper part of the
cylinder.

11
√
√
Maintenance procedure
Inspect the whole unit for damage,
leakage or spillage
Inspect all accessible fasteners Tighten or replace if necessary
Daily
Overall
Weekly Monthly Note
Inspect all screws/nuts/bolts
Check the hoses and fittings
Clean for any debris
Inspect and clean the fuel tank
Inspect and clean the fuel filter
Inspect and clean the air cleaner
Empty the fuel tank
Apply grease to the plunger
Clean or re-adjust the spark plug
gap
Make sure the gap is
0.6-0.7mm (.025in).
Replace if necessary
Inspect the muffler for damage.
Clean chemical filter
Check the spray nozzles
Check the level of the pump oil
Replace the gear oil
Check the grease cups
Clean the pump
Replace if necessary
Refill if necessary
Spray 5L of clean water to
clean the pump after use
Clean the muffler and the cylinder
exhaust port
Clean the cylinder fins and intake air
cooling fan
Check the operation of the throttle
lever and stop switch
Engine
Spray nozzles and chemical filter
Pump
Tighten or replace if necessary.
Adjusting screws are not
included.
√
√
√
√
√
√
√
√
√
√
√
√
√
√
√
√
√
√

Trouble shooting
TROUBLE SHOOTING
12
Problem Possible causes Remedy
Engine will not start
Electrode spark plug is wet or
fouled Clean or replace the spark plug
Replace the spark plug
Crank engine with choke open and full throttle to
clear excess fuel
Drain and replace with correct fuel/oil mixture
Refuel with correct fuel/oil mixture
Clean and lubricate air cleaner
Contact Service Centre or see authorized dealer
Drain and replace with correct fuel/oil mixture
Contact Service Centre or see authorized dealer
Operate properly - do not overload
Restart the engine
Clean spark plug or replace
Contact Service Centre or see authorized dealer
Refuel with correct fuel/oil mixture
Contact Service Centre or see authorized dealer
Attach stop wire to switch
Retighten engine and/or pump mount screws
Retighten the hose clip or replace if damaged
Fill the sprayer tank
Contact Service Centre or see authorized dealer
Clean the cock valve or replace
Adjust the pressure regulating dial
Contact service Centre or see authorized dealer
Cracked spark plug insulator
Engine flooded
Incorrect or stale fuel
No fuel in tank
Clogged air cleaner
Fuel line/passage clogged
Carbon build up in muffler
Use incorrect or stale fuel
Piston seizure
Machine is overworked
Switch is bumped
Shorting of spark plug
Piston scored
Fuel tank is empty
Carburetor or fuel tank clogged
Stop wire disconnected from the
switch
Overheated engine
Loose engine and/or pump
mounts
Leak at the tube connections
No chemical diluted liquid in the
sprayer tank
Valves inside the pump clogged
Cock valve blocked
Incorrect pressure setting too low
Insufficient power
Engine stops during
operation
Engine is difficult to
stop
Unit main body
Pump is no
spraying

Transportation
Storage
TRANSPORTATION AND STORAGE
13
WARNING: When draining fuel, please be
careful not to spill it. If fuel is spilt, wipe off
thoroughly. In addition, please be sure to
close the storage container cap tightly.
CAUTION: If fuel is left in the engine for
protracted periods, the inside of the
carburetor may become clogged and cause
engine faulty starting and insufficient output.
Contact Service Centre or see authorized dealer
Clean the nozzle
Clean the nozzle
Replace the clutch
Apply grease onto the plunger
Contact Service Centre or see authorized dealer
If running difficulties continue, contact your closest Authorized Dealer or Service Centre.
Adjust the pump speed and pressure regulating
dial
Contact Service Centre or see authorized dealer
Pump is worn out or damaged
Spray rod nozzle clogged
Clutch slipping
Lack of lubrication
Burst spray hose
Spray rod nozzle worn or
dam-aged
Pump speed or pressure setting
too low
Pump seals and/or vee-packing
seals worn or damaged
One way valve(s) inside the
pump clogged
Insufficient spray
pressure
• Keep equipment safe during transportation to
prevent damage and accidents.
• Keep the product and equipment in a dry and
frost-proof area.
• Empty the fuel and clean the product.
• Replace or repair damaged components.
• Use the correct protective cover on the product
that does not keep moisture.
• Keep the product tightly attached during transport.
• During storage, slightly loosen the cap of the
chemical fluid tank. If screwed too tightly, the
gasket may become distorted.
On completion of all work procedures with no plan
to use the product again for a protracted period,
please carry out the following pre-storage care to
prevent trouble caused by time-lapse changes.
1. Clean the chemical fluid tank and nozzle.
2. Remove dirt from the sprayer and check for any
damage or looseness. If any abnormality is found,
correct it thoroughly in preparation for future use of
the unit.
3. Drain the fuel tank.
4. Start the engine, and leave it at idle speed until
all the fuel inside the carburetor is consumed and
the engine comes to a natural stop.
5. Remove the spark plug and put a few drops (1 to
2 cc) of 2-cycle oil inside the engine. After pulling
the starter rope 2 or 3 times, return the spark plug
to its original position and stop in compressed
position.
6. After oiling the throttle trigger and other metal
parts with anti-corrosive oil, cover the product and
store indoors in a low-humidity location.

Technical data
Accessories
TECHNICAL DATA
ACCESSORIES
14
Pump
Type
Working Pressure (MPa)
Max. Pressure (MPa)
Max. Working Flowrate (LPM)
Type
Engine Displacement (cc)
Max. Power/Speed (kW/rpm)
Engine Operating Speed (rpm)
Idling Speed (rpm)
Fuel Type
Oil
Admixture ratio
Starter system
Spark plug
Plunger type
1.5-3.0
3.5
7
Single-cylinder air-cooled 2-stroke gasoline engine
25.4
0.75/7000
7000±500
3000±200
Gasoline/Oil Mixture
2-strok oil
25:1,40:1(Only Husqvarna genuine oil)
Easy starter
LD L7T
332*330*335
9.44 / 14.5
0.6
Engine
Inlet hose
Return hose
High pressure outlet hose
Length 2.5m, G1/2 14
Length 2.5m, dia. 8mm
Length 15m, M14*1.5
Net weight / Gross weight (kg)
External dimensions of main unit (mm) L*W*H:
Capacity of fuel tank (L)
Product model 321SP
Name Spec.

INTRODUCCIÓN……….......………………………15
SEGURIDAD…………….......……………………....16
MONTAJE…………………………......……………19
FUNCIONAMIENTO……………………......…..…..21
MANTENIMIENTO…………………………….....….23
1. Cebador
2. Cubierta del filtro de aire
3. Palanca del estrangulador
4. Depósito de combustible
5. Palanca del motor de arranque
6. Palanca del acelerador
7. Interruptor de parada
8. Bujía
9. Tubo de pulverización de tres boquillas
10. Tubo de pulverización de boquilla individual
11. Asa frontal
12. Asa trasera
13. Válvula de bloqueo
14. Regulador de presión con dial
15. Placa frontal
16. Chasis
17. Montaje de la manguera
18. Manual de funcionamiento
19. Herramientas de montaje
20. Piezas de repuesto
21. Depósito mezclador de aceite combustible
Manual de funcionamiento Uso previsto
Descripción del producto
Descripción general
El idioma original de este manual de funcionamiento
es el inglés. El manual de funcionamiento en otros
idiomas son traducciones del inglés.
Este producto ha sido diseñado principalmente para
pulverizar productos químicos de control de plagas y
herbicidas. Por favor, no lo utilice para otros
propósitos o tareas, ya que esto puede causar
accidentes imprevistos.
Este producto es un pulverizador portátil con motor
de combustión. Consulte con su distribuidor de
servicio para obtener más información.
Nota: Pueden existir normativas reguladoras
nacionales o locales que regulen el uso. Cumpla
con las regulaciones establecidas.
SOLUCIÓN DE PROBLEMAS…………………..27
TRANSPORTE Y ALMACENAMIENTO……….…29
ESPECIFICACIONES TÉCNICAS ……………….30
ACCESORIOS ………………….............……….….30
15
ÍNDICE
INTRODUCCIÓN
17
13
9
10
11
12
6
16
5
3
4
2
14
7
15
818
19 20
100
200
300
400
21
1

Símbolos en el producto
Definiciones de seguridad
Instrucciones generales de
seguridad
Responsabilidad del producto
Leer atentamente este manual antes de
operar Cebador
Velocidad baja
Velocidad alta
Utilizar casco de protección, gafas de
protección, orejeras y máscara de protección
Llevar botas de goma
Utilizar ropa de protección
Utilizar guantes de goma
Salto eléctrico
Superficie caliente
Inyección a alta presión
SEGURIDAD
La entrada para repostar la MEZCLA DE
GASOLINA
Mantener distancia de seguridad
La dirección para cerrar el estrangulador
La dirección para abrir el estrangulador
Las siguientes definiciones indican el nivel de
gravedad de cada palabra señalizada.
Nota: Otros símbolos/declaraciones en el producto se
refieren a los requisitos de certificación para otras áreas
comerciales.
De acuerdo con las leyes de responsabilidad del
producto, no somos responsables de los daños que
nuestro producto cause si:
• el producto se ha reparado incorrectamente.
• el producto se ha reparado con piezas que no son
del fabricante o que no están aprobadas por éste.
• el producto tiene un accesorio que no es del
fabricante o no está autorizado por el fabricante.
• el producto no se ha reparado en un centro de
servicio autorizado o por una autoridad aprobada.
• Utilice el producto correctamente. Las lesiones o
la muerte son un posible resultado del uso
incorrecto. Utilice el producto para las tareas que
se indican solo en este manual. No utilice el
producto para otro tipo de tareas.
• Lea, comprenda y siga las instrucciones y las
señalizaciones de este manual. Si el operador no
sigue las instrucciones y las señalizaciones,
pueden producirse lesiones, daños o la muerte.
• No deseche este manual. Utilice las instrucciones
para el montaje, para la instalación de
implementos y accesorios, para el manejo y para
el mantenimiento. • Utilice únicamente los
accesorios y complementos autorizados.
• Tenga en cuenta que no es posible mencionar
todas las situaciones peligrosas que pueden
ocurrir durante el funcionamiento y el
mantenimiento del producto. • Tenga siempre
cuidado y utilice el sentido común.
• Asegúrese de que las piezas no estén dañadas
antes de utilizar el producto. Siga el programa de
ADVERTENCIA: Lesión a personas.
16
PRECAUCIÓN: Daños al producto.
ADVERTENCIA: Lea las instrucciones de
advertencia que siguen antes de utilizar el
producto.
Nota: Esta información facilita el uso del producto.

Instrucciones de seguridad para el
funcionamiento
• Asegúrese de que el producto está
completamente montado antes de utilizarlo.
• Coloque el producto en un terreno llano a 3 m (10
pies) de distancia de la posición donde llenó el
depósito de combustible antes de poner en
marcha el motor.
• El producto puede hacer que salgan objetos, lo
que puede causar daños en los ojos. Utilice
siempre una protección ocular aprobada cuando
utilice el producto.
• Tenga cuidado, un niño puede acercarse al
producto sin que usted lo sepa durante el
funcionamiento.
• No opere el producto si hay personas en el área
de trabajo. Detenga el producto si una persona
entra en el área de trabajo.
• Asegúrese de tener siempre el control del
producto.
• No utilice el producto si no puede recibir ayuda en
caso de accidente. Asegúrese siempre de que los
demás sepan que va a utilizar el producto antes
de empezar.
• No gire con el producto antes de asegurarse de
que no hay personas o animales en la zona de
seguridad.
• Retire todos los materiales no deseados del área
de trabajo antes de empezar.
• No utilice el producto con mal tiempo cuando haya
niebla, lluvia, vientos fuertes, riesgo de rayos u
otras condiciones meteorológicas. Pueden
producirse condiciones peligrosas como
superficies resbaladizas debido al mal tiempo.
17
mantenimiento. Realice las tareas de
mantenimiento que se indican solamente en este
manual. Un centro de servicio autorizado debe
realizar todos los demás trabajos de
mantenimiento.
• No utilice el producto ni haga mantenimiento en él
si no está seguro de la situación. Diríjase al
distribuidor, agente de servicio o centro de servicio
autorizado para obtener información.
• Desconecte el cable de la bujía antes de montar,
almacenar o realizar el mantenimiento del
producto.
• No utilice el producto si se ha modificado con
respecto a su especificación inicial. No modifique
ninguna parte del producto sin la aprobación del
fabricante. Utilice sólo piezas aprobadas por el
fabricante. Las lesiones o la muerte son un
posible resultado del mantenimiento incorrecto.
• No respire los humos del motor. La inhalación
prolongada de los gases de escape del motor es
un riesgo para la salud.
• No ponga en marcha el producto en interiores o
cerca de materiales inflamables. Los gases de
escape están calientes y contienen chispas que
pueden provocar un incendio. Un flujo de aire
insuficiente puede causar lesiones o la muerte por
asfixia o monóxido de carbono.
• El motor genera un campo electromagnético al
utilizar este producto. El campo electromagnético
puede causar daños a los implantes médicos.
Consulte a su médico y al fabricante de implantes
médicos antes de utilizar el producto.
• No permita que niños o personas que no conozca
las instrucciones usen el producto.
• Asegúrese de supervisar siempre a una persona,
con capacidad física o mental disminuida, que
utilice el producto. Un adulto responsable debe
estar presente en todo momento.
• Asegúrese de que el producto esté en una zona a
la que no puedan acceder niños ni personas no
autorizadas.
• El producto puede expulsar objetos y causar
lesiones. Siga las instrucciones de seguridad para
disminuir el riesgo de lesiones o muerte.
• No deje el producto cuando el motor esté
encendido.
• El operador del producto será responsable de
cualquier accidente que ocurra.
• Asegúrese de estar a un mínimo de 15 m (50 pies)
de distancia de otras personas o animales antes
de utilizar el producto. • Asegúrese de que las
personas que se encuentran en la zona adyacente
saben que va a utilizar el producto.
• Consulte las leyes nacionales o locales. Pueden
impedir o disminuir el funcionamiento del producto
en algunas condiciones.
• No utilice el producto si está fatigado o bajo la
influencia del alcohol, las drogas o los
medicamentos. Pueden tener efectos sobre su
visión, estado de alerta, coordinación o juicio.

Equipo de protección personal
Dispositivos de protección en el
producto
Compruebe la válvula de retención y
el gatillo del acelerador.
Interruptor de parada
Fuel
Llenado químico
• Utilice siempre el equipo de protección personal
correcto cuando utilice el producto. El equipo de
protección personal no elimina el riesgo de
lesiones, sino que sólo disminuye el grado de las
mismas si se produce un accidente.
• Utilice siempre una protección ocular aprobada
mientras opera el producto.
• No utilice el producto con los pies descalzos o con
el calzado abierto. Utilice siempre botas
resistentes y antideslizantes.
• Utilice pantalones gruesos y largos.
• Si es necesario, utilice guantes de protección
homologados.
• Utilice un casco siempre que sea posible en caso
de que existan objetos que puedan caer sobre la
cabeza.
• Utilice siempre protección para los oídos aprobada
mientras maneja el producto. Un uso prolongado
• No ponga en marcha el producto si hay
combustible o aceite de motor sobre el producto.
Retire el combustible o el aceite no deseado y
deje que el producto se seque.
• Si se derrama combustible sobre la ropa,
cámbiese de ropa inmediatamente.
• No se manche el cuerpo con combustible, ya que
puede causar lesiones. Si se mancha el cuerpo
con combustible, utilice agua y jabón para eliminar
el combustible.
• No arranque el motor si derrama aceite o
combustible sobre el producto o sobre su cuerpo.
• Las sustancias químicas deben manipularse
correctamente, o pueden causar graves
intoxicaciones o incluso accidentes mortales.
Tenga en cuenta las señalizaciones de
advertencia en el envase, ya que algunas
sustancias químicas son extremadamente
peligrosas para los seres humanos y los
animales.
• Los envases de sustancias químicas deben
almacenarse separados de otros envases con
símbolos de advertencia evidentes y fuera del
alcance de los niños.
• Asegúrese de hacer mantenimiento del producto
con regularidad.
• La vida útil del producto aumenta.
• El riesgo de accidentes disminuye.
• Permita que un distribuidor autorizado o un centro
de servicio autorizado examine regularmente el
producto para realizar ajustes o reparaciones.
• No utilice un producto con el equipo de protección
dañado. • Si el producto está dañado, contacte
con un centro de servicio autorizado.
• Antes de arrancar el motor, asegúrese de que la
válvula de retención está en la posición de
apagado y el gatillo del acelerador en la posición
de tortuga. Arrancar con la válvula de retención
extraída es peligroso, ya que el líquido químico
puede salir por la boquilla al arrancar el motor.
• Arrancar el motor. Asegúrese de que el motor se
detenga cuando pulse el interruptor de parada.
18
ADVERTENCIA: Lea las instrucciones de
advertencia que siguen antes de utilizar el
producto.
• Asegúrese de que puede moverse libremente y
trabajar en una posición estable.
• Asegúrese de evitar caidas al utilizar el producto.
No se incline cuando utilice el producto.
• No toque el engranaje cónico que está caliente y
puede causar lesiones después de que el motor
se detenga.
• Detenga el motor antes de mover el producto.
con ruido intenso puede provocar la pérdida de
audición inducida por el ruido.
• Asegúrese de tener cerca un botiquín de primeros
auxilios.

Instrucciones de seguridad para el
mantenimiento
Conexión de la manguera de
entrada
• Para mantener las funciones del producto, realice
regularmente las inspecciones de mantenimiento
indicadas en este manual. Consulte con el
proveedor de productos autorizado o con el
distribuidor de productos Husqvarna más cercano
si es necesario realizar tareas de mantenimiento o
sustitución de piezas que no aparecen en este
manual.
• Nunca mantenga el motor en marcha mientras se
realizan las inspecciones o el mantenimiento.
• No modifique el producto ni desmonte el motor.
Esto podría provocar averías y accidentes graves
durante el funcionamiento.
• No toque el silenciador o la bujía con las manos
desprotegidas inmediatamente tras parar el motor,
ya que la alta temperatura puede causar
quemaduras.
• Utilice piezas de repuesto originales de Husqvarna
o de marcas asignadas por Husqvarna.
6
19
ADVERTENCIA: Sólo utilice mangueras de
entrada homologadas, ya que otras
mangueras pueden dañar la bomba.
MONTAJE
• No arranque el producto si el motor tiene una
fuga. Examine periódicamente el motor en busca
de fugas.
• Tenga cuidado con el combustible. El combustible
es inflamable y los humos son explosivos y
pueden causar lesiones o la muerte.
• No respire los vapores del combustible, puede
causar lesiones. Asegúrese de que haya una
corriente de aire suficiente.
• No fume ni ponga objetos calientes cerca del
combustible o del motor.
• No añada combustible cuando el motor esté en
marcha. Asegúrese de que el motor está frío antes
de repostar.
• Antes de repostar, abra lentamente el tapón del
depósito de combustible y libere la presión con
cuidado.
• No añada combustible al motor en una zona
interior. Un flujo de aire insuficiente puede causar
lesiones o la muerte por asfixia o monóxido de
carbono.
• Apriete el tapón del depósito de combustible con
cuidado o puede producirse un incendio.
• Aleje el producto a un mínimo de 3 m (10 pies) de
la posición donde llenó el depósito antes de un
arranque.
• No llene demasiado combustible en el depósito.
• Asegúrese de que no se producen fugas al mover
el producto o el depósito de combustible.
• No coloque el producto o el recipiente de
combustible donde haya una llama abierta, una
chispa o un chivato (de luz). Asegúrese de que no
haya ninguna llama dentro del área de
almacenamiento.
• Utilice únicamente recipientes homologados
cuando traslade el combustible o lo almacene.
• Limpie el producto y vacíe el depósito de
combustible antes de un almacenamiento
prolongado. Cumpla con la legislación local sobre
el lugar donde se debe desechar el combustible.
• Retire el cable de la bujía antes de almacenar el
producto para asegurarse de que el motor no se
ponga en marcha accidentalmente.
A
B
Table of contents
Languages:
Other Husqvarna Paint Sprayer manuals

Husqvarna
Husqvarna HDE4E Owner's manual

Husqvarna
Husqvarna 362D28 User manual

Husqvarna
Husqvarna HS2 Owner's manual

Husqvarna
Husqvarna BP4E Owner's manual

Husqvarna
Husqvarna 321S15 User manual

Husqvarna
Husqvarna 321S15 User manual

Husqvarna
Husqvarna BP4P User manual

Husqvarna
Husqvarna 325S25 User manual

Husqvarna
Husqvarna HDE4P Owner's manual

Husqvarna
Husqvarna BP5 Owner's manual