HUUM HIVE Mini 6 User manual

1
HIVE
ELECTRIC SAUNA HEATER 3-14
SAUNA ELEKTRIKERIS 15-26
ELEKTRISCHER SAUNAOFEN 27-38
POÊLE ÉLECTRIQUE 39-50
SAUNA SÄHKÖKIUKAAN 51-62
ELEKTRISKT BASTUAGGREGAT 63-74
PIEC ELEKTRYCZNYDO SAUNY 75-86
ЭЛЕКТРОКАМЕНКИ 87-98

2

3
HUUM HIVE
ELECTRIC SAUNA HEATER
Installation and operation manual
The set includes:
• electric heater
•
• installation and operation manual for the electric heater.
NB! The electric heater of HUUM HIVE requires a control panel and stones.
The product should be installed as a complete set.
This installation and operation manual is intended for use by the sauna owner or
maintenance person as well as the electrician responsible for the installation of the
heater. Before using the heater, please read the instructions carefully.
NB! The electrical work described in this manual may only be performed by a
This product has been designed to meet the requirements of standard

4
BEFORE INSTALLATION
to the following:
• Check before installing the electric heater that the maximum amperage of the
main fuse matches the heater parameters.
• Does the heater output (kW) match the volume (m³) of the sauna room? In case
there are any uninsulated brick, tile, glass or log walls in the sauna room, an
additional calculated volume of 1,5 m³ should be added to the sauna room for
each such square meter of the wall. The suitable output of the heater can be
found in
• Are minimal safety distances ensured at the installation site of the heater?
Minimal safety distances between the sauna room’s ceiling and walls in view of
installing the electric heater have been provided in and
NB! The manufacturer’s warranty is not valid, if the output of the heater does not
correspond to the calculated volume of the sauna room.
INSTALLATION
Positioning of the heater
The heater should be positioned in such a way that there is a safe distance between
• Check for minimal safety distances between the heater, sauna room’s
ceiling and walls.
• Place the heater in such a way that its location does not create dangerous
situations during use and the possibility of accidental contact with the heater
would be minimized.
•
Output
kW Room*
m3
Weight
mm A
mm B
mm Ø
mm H
mm
HIVE Mini 6 6 14 60 580 460 750
HIVE Mini 9 16 640 460 750
HIVE Mini 11 10,5 16 110 680 460 750
HIVE 12 800 560 750
HIVE 15 15 150 860 560 750
HIVE 18 18 180 560 750
*In case there are any uninsulated brick, tile, glass or log walls in the sauna room, an additional
volume of 1,5 m³ should be added to the sauna room for each such square meter of the wall.

5
Min. 1200 mm
A A
H
A
A
B
XY3
6 x 90
Positioning of the heater
Screw down the legs
that all four are equally supported and the heater is level.
Installing an electric heater inside the sauna bench
HUUM HIVE electric heater can also be partially mounted inside the sauna bench or
• At least 350 mm of the submerged heater should protrude from the sauna
•
HUUM HIVE electric heater.
is an accessory that you can
provided with the product.
The maximum permissible immersion of the heater has been provided in
min 350 mm
Installing HUUM HIVE electric heater inside the sauna bench

6
Connecting the heater to the power supply
NB!
power supply.
•
connection cable.
• The maximum current amperage in the cross-sectional area of the cable and
circuit breaker has been provided in
• It is recommended to connect the unit to the mains without an earth-leakage
Output
kW
Elements
kW
Circuit breaker
A
Power cable
mm
HIVE Mini 6 63 x 10
HIVE Mini 9 3 3 x 16
HIVE Mini 11 10,5 3 x 3,5 3 x 16
HIVE 12 5 x 4
HIVE 15 15 5 x 4
HIVE 18 18 3 5 x 6
ATTENTION! It is forbidden to use a non-heat-resistant cable with PVC isolation
as the power cable. When using the junction box in the sauna room, it should be
3/N ~400V
NL1 L2 L3 • Open the cover of the heater’s electrical box.
• Take the cable into the electrical box through the rubber
bushing.
•
to the circuit diagram.
• Close the cover.
• Fix the cable on the bushing with a cable strap.
Insulation resistance of the electric heater
prove to be temporarily lower than the standard. The reason for that is the moisture
seeped into the insulating layer during storage in the warehouse and transportation.

7
Laying of the heater stones
Quantity of stones:
• HUUM HIVE electric heater
• HIVE Mini electric heater
• HIVE with air tunnel needs
• HIVE Mini with air tunnel needs
• The stones with a are suitable for HUUM HIVE heater.
• We recommend the use of round stones which complement the design of the
heater and allow the steam water in the heater to move freely to the lower layers
of stones.
•
sauna heaters, are suitable as heater stones.
• We recommend avoiding decorative stones as they do not accumulate enough
heat and break easily. Broken pieces of stone inside the heater can block air
holes and damage heating elements.
NB!Thedefectsdueto the use of unsuitable stonesarenotcoveredby warranty.
• Before laying, we recommend washing the stones clean of dust under running
water.
Requirements for laying stones
• Use gloves to protect your hands when laying stones.
• Lay the stones one by one and don’t pour or throw them into the heater.
•
• Try to lay the stones as tightly as possible, but leave some room for air to circulate
in the heater.
• Lay the stones between the heating elements as well. This will help support the
heating elements and prevent them from coming into contact. Take care not to
push the stones too hard or bend the heating elements.
• Lay the outer surfaces of the heater tightly and make sure that the heating
elements are not visible through the stones. Ladling water directly onto the
heating elements shortens their lifespan and produces an excessively sharp
heat.
NB! If the heating elements are not properly surrounded by stones, the
not visible from between the stones!
• Check the condition of the stones once a year to remove broken pieces and
replace them, if necessary.

8
ATTENTION! TOO SPARSELY FILLED STONE CONTAINER CAUSES FIRE HAZARD!
1.
3. Heating elements are bent
4. Correctly laid stones
Safety railings
To prevent accidental contact with the hot heater it is recommended to install a safety
railing around the heater.
• You can build your own safety railing or use the special accessory HUUM HIVE
electric heater safety railing, which can be obtained from your HUUM
distributor.
• We recommend the use of materials with a low thermal capacity and poor
thermal conductivity (e.g. wood) as the material for the safety railing.
NB!
structures are complied with.
Controlling the heater
• This product has been designed to work with the HUUM UKU control system for
electric heaters or an equivalent control system designed to work with devices
• The output of the heater should remain in the interval determined by the control
panel’s producer.
• When installing the control panel, follow the installation and operation manual
provided by the manufacturer.
1. 2. 3. 4.

9
SAUNA ROOM
Wall materials and insulating of the sauna room
In a sauna with electric heating, all massive heat accumulating wall surfaces (glass and
concrete walls, brick, plaster, etc.) should be insulated to use the electric heater with
optimal output. This prevents heat loss in the sauna room and overheating of the heater.
1.
boards covered with a vapour barrier foil suit well).
without a vapour barrier. The joints are covered with foil tape.
3. 10mm ventilation gap (recommended) is left between the moisture barrier
and the lining board with spacers.
4.
Before installing the lining boards, check the power cables and
reinforcements in the walls that are necessary for e.g. installation of a
heater and a sauna bench.
5.
6. There is a minimum ventilation gap of 5 mm between the wall and ceiling
board.
7. Wooden sauna surfaces should be coated with sauna wax or oil to prevent
dirt being absorbed into the wood.
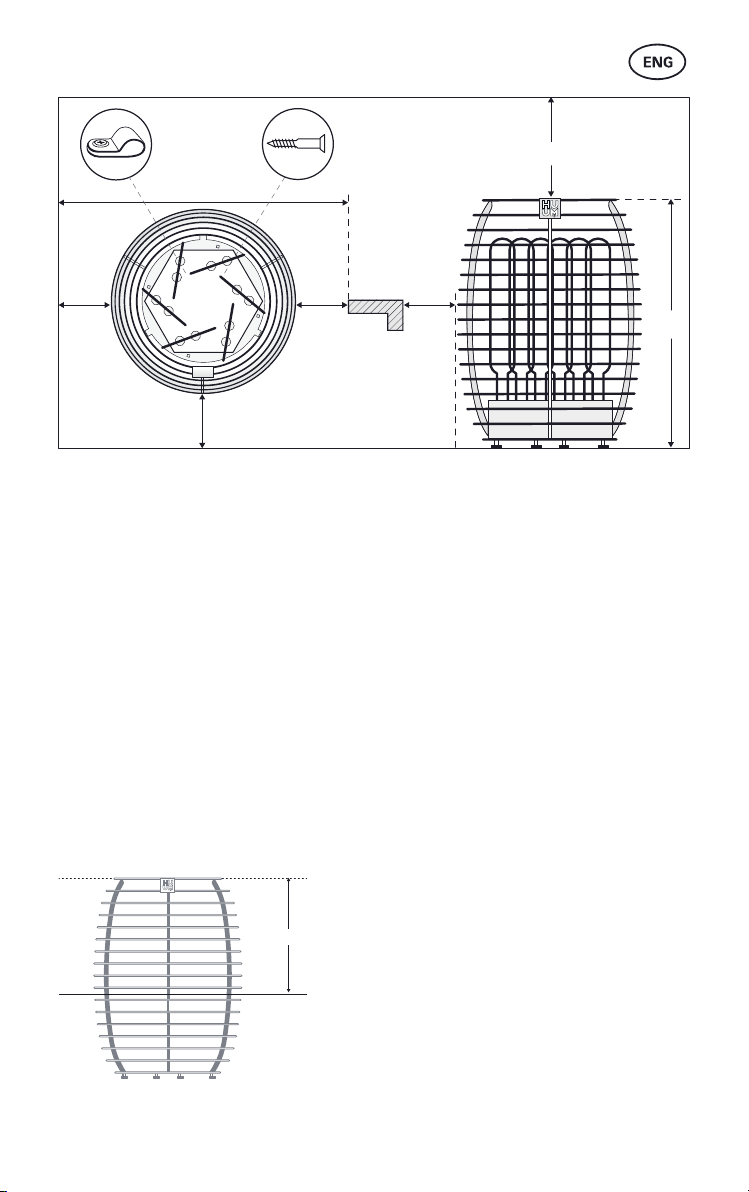
Ceiling of the sauna room
To optimize the heater’s output, the recommended height of the sauna room is
reducing the volume of the sauna room.
1. The minimum permissible height of the sauna room for HUUM HIVE electric
heater is
The distance between the top step of the sauna bench and the ceiling
should be between 1100 and 1300 mm.
3. The ceiling of the sauna room should be insulated in the same way as the
walls of the room.
ATTENTION!
Installing tiles directly on a wall or ceiling surface can cause dangerous
overheating of wall or ceiling materials.
ATTENTION!

10
Darkening of the sauna room walls
Over time, the wooden materials used in the sauna room may begin to darken due to
the high temperature. This is a natural process that does not pose a risk and is usually
caused by the darkening of the wood protection product used. The darkening process
ATTENTION! The highest allowed temperature for the wall and ceiling surfaces of
Floor of the sauna room
Due to large changes in temperature, the heater stones also crumble over time.
under and around the heater.
Ventilation of the sauna
six times an hour).
The ventilation system depends on whether the building has a natural air inlet and outlet
or forced ventilation.
Sauna ventilation consists of at least two, as a rule three parts:
• Supply air pipe.
• Exhaust air pipe.
• Drying pipe. In the absence of a drying pipe opening, the door may be left open
for ventilation after using the sauna.
In case of a sauna room with mechanical ventilation, there should be:
Supply air pipe
Exhaust air pipe
3. Drying pipe opening in the opposite wall of the heater under the ceiling.

11
In case of a gravity based ventilation sauna room, there should be:
Supply air pipe
Exhaust air pipe
3. Drying pipe opening in the opposite wall of the heater under the ceiling.
The supply air pipe
If the exhaust air pipe is located in the washroom, there should be a gap of at least
100mm under the door of the sauna room.
Use the drying pipe opening
water ladling sessions if there have been a lot of people in the room at once and there
is excessive humidity or lack of air. Keep the drying pipe opening closed while having
sauna.

12
USING INSTRUCTION
Using the heater
ATTENTION! Always check that there are no foreign objects on, above or near the
In order to use the heater, you will need to install a heater control system. The control
system is not included in the set. Be sure to read the instruction manual of the control
device of your choice before use.
Heating up the sauna room
and the stones. In order to remove these odours, the sauna room should be thoroughly
ventilated. In a properly insulated sauna room and with a heater of the right capacity,
it will take around one hour to reach the desired temperature. The stones are usually
heated to the correct water ladling temperature simultaneously with the sauna room.
Throwing water on heated stones
As the sauna room heats up, the air in the sauna becomes dry. You can raise the
humidity in the sauna room by ladling water onto hot stones. By choosing the frequency
and amount of water you ladle, you can adjust the humidity and the perceived heat of
the sauna to your personal preference.
• Try to throw water only on the heater stones and not on metal surfaces.
• Start water ladling only when the stones are fully heated and the water
evaporates completely.
• Use only clean and warm water for ladling.
• We recommend that you ladle about 80 ml of water on the stones at a time.
If you want more steam, wait for a few minutes and then ladle the same amount
again. This will allow the stones to dry out and heat up again in the meantime.
NB! Never ladle water when someone is in the immediate vicinity of the heater as
hot steam can cause burns.

13
WARNINGS AND NOTES
• The heater is designed to heat the sauna room to the temperature at which
the sauna is enjoyed. It may not be used for any other purpose.
• All maintenance work requiring special skills should be carried out by a
trained professional.
• Always disconnect the heater from the power source before carrying out
any maintenance!
• Before turning on the electric heater, always check the sauna room and heater.
•
•
• Do not touch a working heater, it causes burns.
• Ventilating the sauna room incorrectly may dry the wood too much and cause a
ventilation.
• Never make steam by using a water hose.
• Use sauna fragrances and oils only in the steam water. If poured directly onto
•
the board of the sauna room.
• In case of uninsulated saunas, e.g. various ready-made barrel and outdoor
saunas, the calculated volume of the sauna room should be multiplied by 1.5 to
determine the suitable heater output.
• Sauna doors should always open outward.
• Do not use the sauna for any other purpose than it is meant to be used.
•
• Sudden cooling after staying in the sauna room is not recommended for people
with poor health. If necessary, consult a doctor.
• Do not stay in the sauna for too long. Enjoy the steam as long as it is comfortable
for you.
• Keep this information in a secure place.

14
WARRANTY
General:
• The purchaser is obliged to review the user manual of the product and follow
the requirements stated therein.
• The warranty does not extend to failures due to non-compliance with the rules
of use provided for in the manual.
• The warranty is valid, if the product has a technical defect or fault caused by the
manufacturer.
• The warranty covers the replacement of the product or of parts with
manufacturing defects.
• The warranty period is 5 years from the date of purchase.
NB! The warranty is based on the presentation of the purchase receipt/invoice.
The right to submit a claim is valid on the condition that the product has been
used only for the intended purpose and conditions.
Warranty terms:
• NB! The warranty does not extend to heating elements of the electric
heaters, these are considered expendable parts.
• The warranty does not cover the defects caused by normal wear and tear of
the product.
• The warranty does not apply to heater stones.
Warranty does not cover the defects which are caused by:
•
•
• Failure to comply with the instructions for installation and operation of the
product and safety requirements.
Warranty does not apply:
• If the product has been repaired by an unauthorised person, if non-approved
parts have been added to the product, or if consumables not accepted by the
• If the set of product is not complete.
Find the most up-to-date content from our website: huum.eu

15
HUUM HIVE
SAUNA ELEKTRIKERIS
Paigaldus- ja kasutusjuhend
Tarnekomplekti kuulub:
•
•
• elektrikerise paigaldus– ja kasutusjuhend.
NB! HUUM HIVE elektrikeris vajab lisaks juhtsüsteemi ja kerisekive.
Toode peab olema paigaldatud komplektselt.
Käesolev paigaldus- ja kasutusjuhend on mõeldud sauna omanikule või hooldajale,
samuti kerise paigaldamise eest vastutavale elektrikule. Enne kerise kasutamist tutvu
hoolikalt kasutusjuhistega.
NB! Käesolevas juhendis kirjeldatud elektritöid tohib teostada vaid

16
ENNE PAIGALDAMIST
Enne kerise paigaldamist tutvu paigaldusjuhistega ja pööra tähelepanu alljärgnevale:
• Kontrolli enne elektrikerise paigaldamist, kas peakaitsme maksimaalne
voolutugevus on vastavuses kerise parameetritega.
• Kas kerise võimsus (kW) on vastavuses leiliruumi arvutusliku ruumalaga (m3)?
Kui leiliruumis on soojustamata tellistest, plaatidest, klaasist või palkidest seinu,
tuleb leiliruumi ruumalale liita 1,5 m3iga sellise seina ruutmeetri kohta.
Kerise sobiliku võimsuse leiad
• Kas kerise paigalduskohal on tagatud minimaalsed ohutuskaugused?
Leiliruumi lae ja seinte minimaalsed ohutuskaugused elektrikerise
paigutamisel on toodud ja
NB!
ruumalaga vastavuses!
PAIGALDAMINE
Kerise paigutamine
kerise välispindade vahel.
• Kontrolli minimaalseid ohutuskauguseid kerise ning leiliruumi lae ja
seinte vahel.
• Paigalda keris selliselt, et selle asukoht ei tekitaks kasutamise ajal ohtlikke
olukordi ning võimalus kogemata kerise vastu puutuda oleks võimalikult väike.
• Toitekaabli sisend asub kerise põhjakaanel.
kW Ruum*
m3
Kaal
mm A
mm B
mm Ø
mm H
mm
HIVE Mini 6 6 14 60 580 460 750
HIVE Mini 9 16 640 460 750
HIVE Mini 11 10,5 16 110 680 460 750
HIVE 12 800 560 750
HIVE 15 15 150 860 560 750
HIVE 18 18 180 560 750
*Kui leiliruumis on soojustamata tellistest, plaatidest, klaasist või palkidest seinu,
tuleb leiliruumi ruumalale liita 1,5 m3iga sellise seina ruutmeetri kohta.

17
Min. 1200 mm
A A
H
A
A
B
XY3
6 x 90
Kerise paigaldamine
Keera kerisele alla pakendis kaasas olevad jalad
kõik neli toetaksid võrdselt ning keris oleks loodis.
Elektrikerise paigaldamine saunalava sisse
HUUM HIVE elektrikerise võib paigaldada osaliselt saunalava või sauna põranda sisse.
• uputatud keris peab ulatuma lava pinnast välja min 350 mm
• uputusava lõikeservade katmiseks kasuta HUUM HIVE elektrikerise
uputuskraed
HUUM HIVE elektrikerise uputuskrae on lisatoode, mida saad küsida enda HUUM
toodete edasimüüjalt. Uputuskrae kasutusjuhend on tootega kaasas.
Kerise uputamise maksimaalne lubatud ulatus on ära toodud
min 350 mm
HUUM HIVE elektrikerise saunalavasse paigaldamine

18
Elektrivõrguga ühendamine
NB!
•
võrdväärset.
• Kaabli ristlõikepindala ja kaitsme maksimaalne voolutugevus on toodud
•
kW
kW
Kaitselüliti
A
Toitekaabel
mm
HIVE Mini 6 63 x 10
HIVE Mini 9 3 3 x 16
HIVE Mini 11 10,5 3 x 3,5 3 x 16
HIVE 12 5 x 4
HIVE 15 15 5 x 4
HIVE 18 18 3 5 x 6
TÄHELEPANU!
PVC-isolatsiooniga kaablit. Harutoosi kasutamisel leiliruumis peab see olema
3/N ~400V
NL1 L2 L3 • Ava kerise elektrikarbi kaas.
• Too kaabel elektrikarpi läbi kummist läbiviigu.
• Ühenda toitekaabel vastavalt elektriskeemile
klemmliistule.
• Sulge kaas.
• Fikseeri kaabel väljaviigule kaablivitsaga.
Elektrikerise isolatsioonitakistus
osutuda normist väiksemaks. Selle põhjuseks on kerise laos hoidmise ja transportimise
kuumutamise jooksul.

19
Kerisekivide ladumine
Kerisekivide kogused:
• elektrikeris vajab
• Õhutunneliga HIVE vajab
• Õhutunneliga HIVE Mini vajab
• HUUM HIVE keristele sobivad kivid läbimõõduga
• Soovitame kasutada ümaraid kive, mis täiendavad kerise disaini ja lasevad
leiliveel kerises segamatult alumiste kivikihtideni liikuda.
• Kerisekivideks sobivad looduslikud kivid (nt oliviindiabaas, oliviin), mida müüakse
spetsiaalselt keristes kasutamiseks.
• Me soovitame vältida dekoratiivkive, kuna need ei akumuleeri piisavalt soojust
ning purunevad kergesti. Murenenud kivitükid võivad kerise sees ummistada
NB!
garantii alla.
• Enne ladumist soovitame kivid voolava vee all tolmust puhtaks pesta.
Nõuded kivide ladumisel:
• Kasuta kivide ladumisel käte kaitsmiseks kindaid.
• Lao kive ükshaaval, ära vala ega viska neid kerise sisse.
• Alusta suurematest kividest asetades need põhja ja külgedele. Väiksemate
• Püüa kivid laduda võimalikult tihedalt, kuid nii, et kerises jääks veidi ruumi õhu
liikumiseks.
•
•
liiga terava leili.
NB!
• Kontrolli kerisekivide seisukorda kord aastas, eemalda murenenud kivitükid ning
vajadusel vaheta kivid välja.

20
TÄHELEPANU! LIIGA HÕREDALT TÄIDETUD KIVIRUUM TEKITAB TULEOHTU!
1. Liiga tihedalt täidetud
Poolikult täidetud
3.
4. Korrektselt laotud kivid
Kaitsepiirded
Et vähendada kuuma kerise vastu puutumise ohtu, on soovituslik kerise ümber
paigaldada kaitsepiire.
• Kaitsepiirde saab ehitada ise või kasutada spetsiaalset lisatoodet HUUM HIVE
elektrikerise kaitsepiire, mida saad küsida HUUM toodete edasimüüjalt.
• Kaitsepiirde materjalina soovitame kasutada väikese soojusmahutavuse ja halva
soojusjuhtivusega materjale (nt puit).
NB!
konstruktsioonide vahel.
Kerise juhtimine
• See toode on mõeldud kasutamiseks HUUM UKU elektrikeriste juhtimis-
• Kerise võimsus peab jääma juhtimisseadme tootja poolt määratud töövõimsuse
vahemikku.
•
asutusjuhendist.
1. 2. 3. 4.
This manual suits for next models
5
Table of contents
Languages:
Other HUUM Heater manuals
Popular Heater manuals by other brands

DeLonghi
DeLonghi 6507L Important instructions

Modine Manufacturing
Modine Manufacturing PTS Installation and service manual

Timberk
Timberk TFH S20PDO instruction manual

Modine Manufacturing
Modine Manufacturing IPT Series Installation and service manual

Lumme
Lumme LU-708 instruction manual

Rinnai
Rinnai RHFE-557FT manual