Hydor ETH 300-16 User manual

Heater for external canister lters
User’s Guide

2
Important safety instructions
WARNING -To guard against injury, basic safety precautions should be observed, including the following: read and follow all safety instructions
DANGER -To avoid possible electric shock, special care should be taken in the use of aquarium equipment. For each of the following situations, do not
attempt repairs yourself; return the appliance to an authorized service facility for service or discard the appliance.
1. A) If the appliance shows any sign of abnormal water leakage, immediately unplug from the power source.
B) Carefully examine the appliance after installation. It should not be plugged in if there is water on parts not intended to be wet.
C) Do not operate any appliance if it has a damaged cord or plug, or if it is malfunctioning or if it is dropped or damaged in any
manner. Inspect power cord insulation to be sure there are no cuts or exposed wire. If so, discard and order a new replacement.
D) To avoid the possibility of the appliance plug or receptacle getting wet, position aquarium stand and tank to one side of a wall mounted receptacle
to prevent water from dripping onto the receptacle or plug. A “drip loop”, shown in the Figure at right, should be arranged by the user for each
cord connecting an aquarium appliance to a receptacle.The“drip loop”is that part of the cord below the level of the receptacle or the connector if
an extension cord is used, to prevent water traveling along the cord and coming in contact with the receptacle. If the plug or receptacle does get
wet, DON’T unplug the cord. Disconnect the fuse or circuit breaker that supplies power to the appliance. Then unplug and examine for presence of
water in the receptacle.
2. Close supervision is necessary when any appliance is used by or near children.
3. To avoid injury, do not contact moving parts or hot parts such as heaters, reectors, lamp bulbs, etc.
4. Always unplug an appliance from an outlet when not in use, before putting on or taking o parts, and before cleaning. Never yank cord to pull plug
from outlet. Grasp the plug and pull to disconnect.

3
5. Do not use an appliance for other than intended use. The use of attachments not
recommended or sold by the appliance manufacturer may cause an unsafe condition.
6. Do notinstall orstoretheappliance whereitwill beexposedto the weatherorto temperatures
below freezing.
7. Make sure an appliance mounted on a tank is securely installed before operating it.
8. Read and observe all the important notices on the appliance.
9. If an extension cord is necessary, a cord with a proper rating should be used. A cord rated
for less amperes or watts than the appliance rating may over heat. Care should be taken to
arrange the cord so that it will not be tripped over or pulled.
Save these instructions
APPLIANCE
TANK
POWER
SUPPLY
CORD DRIP
LOOP

4
Assembly
g 1
Contents
English pag 6
Deutsch pag 9
Française pag 12
Español pag 15
Italiano pag 18
Nederlandse pag 21
Danske pag 24
日本 pag 27
Türk pag 30
Руссо pag 33
Polska pag 35
A
B
C
D
A

5
g 2 g 3 g 4 g 5

6English
Heater for external canister lters
HEATER is the rst aquarium heater that works outside of the aquarium tank.We would like to congratulate you on choosing HEATER, and invite you to
read the following instructions carefully, to better understand the characteristics that make HEATER a unique product.
Description
A. Tube connector
B. HEATER hanging eyelet
C. Water ow indicator
D. Temperature control knob
Installation
Caution: Before placing your hands in the tank, disconnect all electrical appliances. Be sure that the voltage of the mains corresponds to the voltage shown on the heater label.
HEATER must be installed outside of your tank by cutting the outlet tube of the external lter, and by connecting the two parts of the tube onto both sides of the HEATER -g.
2-. If the external lter is already installed, it is important to shut o the valve taps, to empty out all the water that it contains, before cutting the outlet tube.The presence of
air bubbles inside the heating unit can cause irreversible damages. Make sure that HEATER is installed in a vertical position and follow the ow direction of the water that is
indicated on the heater’s body with an arrow. -g. 3- Reactivate the aquarium’s water circulation and connect the new heating system to the mains. After the rst 24 hours of
operation it is advisable to check all connections are tight.
Temperature setting
To set the required temperature in your aquarium, turn the temperature control knob (D) until the indicator on the heater’s body shows the chosen value on the scale -g. 4-.
You can set the temperature required between 18°C and 34°C (65°F - 93°F). Should the water temperature of your aquarium turn out to be lower than the value set on the
graduated scale, HEATER will start heating automatically and the indicator will turn on.

7
English
Maintenance
Attention: always disconnect HEATER and all other electrical equipment in your aquarium from the electricity supply before putting your hands in the water.
WARNING: NEVER SOAK THE HEATER IN WATER.
HEATER does not require special maintenance, however a regular cleaning of the inside part of the heating tube will prevent the formation of limestone and algae
guaranteeing an optimal heating action. Before disconnecting the HEATER remember to empty out all the water from the tube to which it is connected. Clean the inside of
HEATER‘s tube by using a soft brush -g. 5-.
If problems are encountered
If the heater has been installed for 24 hours or more, and the temperature of the water is still lower than the set temperature (careful: many thermometers on the market do
not provide accurate readings), proceed as follows:
• Make sure that the temperature has been set to the correct value
• Make sure that the heater is plugged in and the water’s ow respects the indication of the arrow on the heater’s body
• Make sure that the dierence between the set temperature and the room temperature falls within the range given on the table -g. 6-
• Ensure that your aquarium tank has the same size as described in the HEATER package
• Make sure that there is water ow through the HEATER
• Make sure that the water circulation is adequate, and that there are no deposits or foreign bodies within the heater. Pull out the heater plug and remove any obstruction with a
brush -g. 5-
ATTENTION: do not use solvents or detergents of any kind to clean the heater, only warm water.

8English
Safety standards
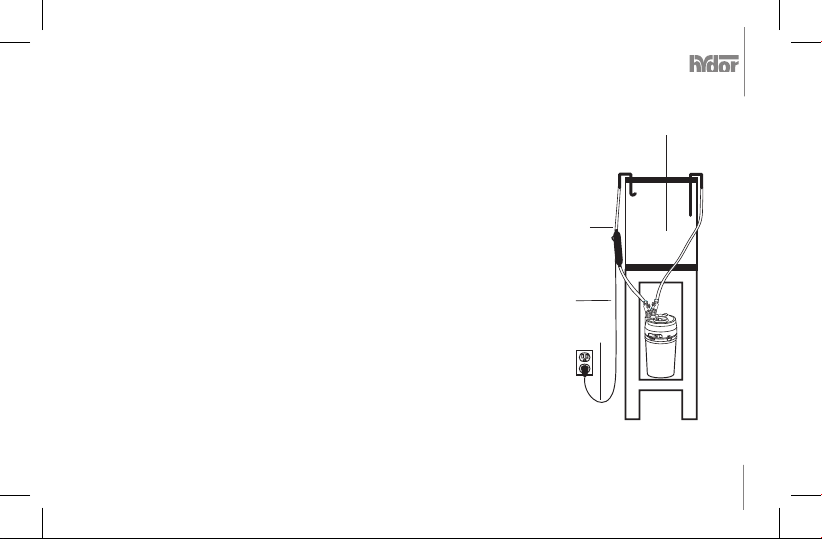
Caution: do not install the HEATER inside your aquarium
• This heater is only intended for indoor use.
• Be sure that the voltage of the mains corresponds to the voltage shown on the heater label.
• Do not use if either the cable or the heater is damaged.
• Never soak the HEATER in water.
• The device is not immersible.
• Disconnect power during cleaning.
• Do not immerse unit during cleaning.
• Do not let the power supply cord become wet.
• Do not disassemble unit during cleaning.
• After cleaning visually inspect the inner glass tube for cracks.
• The cable of this product cannot be replaced or repaired; if the cord is damaged, a new HEATER must be purchased.
• Thisapplianceisnot intended for use by young people or inrmpersonswithoutsupervision.Youngchildrenshould be supervisedtoensurethattheydo not play with yhe appliance.
Guarantee
This device is guaranteed for a period of 24 months from the day of purchase, against defects in material or manufacturing defects. Our guarantee does not apply to claims the cause
of which is due to installation and operation faults, lack of maintenance, misuse of the appliance, eects of frost, furring and lime deposits or amateur attempts at repair work.
The consumable materials and the parts subjected to wear and tear, that must be periodically replaced for normal maintenance of the device, are not included in our guarantee.
The certicate of guarantee must be completed by the retailer and is to be sent with the appliance in case of return, togHEATERer with the purchase receipt recording the day of
purchase.
European union disposal information
This symbol means that according to local laws and regulations your product should be disposed of separately from household waste. When this product reaches its end of
life, take it to a collection point designated by local authorities. Some collection points accept products for free. The separate collection and recycling of your product at the
time of disposal will help conserve natural resources and ensure that it is recycled in a manner that protects human health and the environment.

9
Deutsch
Heater for external canister lters
HEATER ist das erste und einzige Heizelement, das ausserhalb des Aquariums funktioniert. Damit Sie die einzigartigen Eigenschaften dieses Modells
voll ausnützen können, befolgen Sie bitte die nachstehenden Anweisungen. Wir beglückwünschen Sie zu Ihrer Wahl!
BESCHREIBUNG
A. Verbindungsstück
B. Befestigungshaken
C. Anzeiger Strömungsrichtung
D. Temperaturregler
INSTALLATION
Achtung: Vor jeglichem Eingri oder Wartungsarbeiten im Aquarium den Stromanschluss aller elektrischer Geräte abschalten. Kontrollieren Sie, dass die auf dem Produkt
angegebene Netzpannung mit Ihrem Stromnetz übereinstimmt. HEATER wird an der Aussenseite des Aquariums montiert. Schneiden Sie die Auslasseinheit des Aussenlters
durch und schliessen Sie die Kabel an dieVerbindungsstücke des Heizelements an -Abb. 2-. Ist bereits ein Aussenlter angeschlossen, vor dem Durchtrennen der Auslasseinheit
und Anschluss des HEATER-Heizelements Sperrventile schliessen und Schlauch entleeren. Das Entstehen von Luftblasen im Heizer kann zu irreparablen Schäden führen.
Vergewissern Sie sich, dass der HEATER in senkrechter Lage angebracht wird. Folgen Sie dabei der Strömungsrichtung desWassers, wie sie auf der Kunststoschale des Heizers
durch einen Pfeil gekennzeichnet ist. -Abb. 3- Schliessen Sie das neue Heizsystem an und setzen Sie dieWasserumwälzung wieder in Gang.Wir empfehlen, die Anschlüsse und
Verbindungen nach 24 Stunden zu überprüfen.
TEMPERATURREGULIERUNG
Um die gewünschte Temperatur (zwischen 18°C und 34°C - 65°F und 93°F) -Abb. 4- einzustellen, den Thermostatknopf (D) drehen, bis der Anzeiger auf dem Heizelement
mit der gewählten Temperatur übereinstimmt. Wenn die Temperatur im Aquarium unter den eingestellten Wert sinkt, schaltet das HEATER-Gerät sich automatisch ein;das
Aufheizen wird durch ein Funktionsled angezeigt.

10 Deutsch
WARTUNG
Achtung: vor allenWartungsarbeiten den Stromanschluss des HEATER-Geräts und aller anderen elektrischen Geräte, die sich eventuell im Aquarium benden, abschalten.
DAS HEATER-HEIZELEMENT DARF NIE IN WASSER EINGETAUCHT WERDEN!
Das Gerät erfordert keine besondereWartung. Wir empfehlen jedoch eine regelmässige Reinigung des Heizschlauches, um Kalkverkrustungen und Algenbildung vorzubeugen
und einen optimalen Wärmeaustausch während der Heizphase zu garantieren.
Den Verbindungsschlauch entleeren, das HEATER-Heizelement abnehmen und den Schlauch innen mit einer weichen Bürste reinigen -Abb. 5-.
WAS TUN, WENN...
Solltemehr als 24 Stunden nach der InstallationdieWassertemperaturerheblich unter dem gewünschtenWertliegen(Achtung:nicht alle im Handelbendlichen Thermometer
sind genau) oder das Wasser noch kalt sein, überprüfen Sie bitte, ob
• die Temperatur korrekt eingestellt ist
• das Gerät korrekt angeschlossen ist und Strom bekommt
• die Strömungsrichtung dem Pfeil auf dem Gerät entspricht
• die Dierenz zwischen eingestellter und Raumtemperatur innehalb der vorgegebenenWerte liegt -Abb. 6-
• die Wassermenge der auf der Verpackung angegeben Menge entspricht
• Wasser durch das HEATER-Gerät iesst
• eventuelle Unreinheiten oderVerkrustungen denWasserdurchuss behindern
• eventuelle Fremdkörper in das Heizelement gelangt sind; inn diesem Fall das Gerät vom Stromkreis abschalten und mit einer kleinen Bürste reinigen -Abb. 5-
Achtung: für die Wartung nur lauwarmes Wasser, keine Lösungs- oder Reinigungsmittel verwenden!

11
Deutsch
VORSICHTSMASSNAHMEN
Achtung! Das Gerät darf nicht über dem Wasser oder Aquarium benutzt oder installiert werden
• Dieses Gerät darf nur in geschlossenen Räumen eingesetzt werden
• Versichern Sie sich, dass Ihre Netzspannung mit der auf dem Produkt übereinstimmt!
• Schalten Sie das Gerät nicht ein, wenn Kabel oder Heizelement in irgendeinerWeise beschädigt sind, das Anschlusskabel kann weder ausgetauscht noch repariert werden
• Ist es beschädigt, muß das Gerät als Ganzes ausgetauscht werden
• Die Anschlußleitung dieses Gerätes kann nicht ersetzt werden. Bei Beschädigung der Leitung ist das Gerät zu entsorgen
• Das HEATER-Heizelement darf nie in Wasser eingetaucht werden!
GARANTIEBEDINGUNGEN
Wir garantieren für 24 Monate ab Kaufdatum für fehlerhaftes Material und Fabrikationsfehler. Von der Garantie ausgeschlossen sind Schäden, die auf Montage- oder
Behandlungsfehler, fehlende Wartung, Frostschäden, Kalkablagerungen oder unsachgemässe Reparationen zurückzuführen sind sowieVerbrauchs- und Verschleissmaterial, das zur
ordungsgemässenWartung und Reinigung in regelmässigen Abständen ausgetauscht werden muss. Im Garantiefall schicken Sie bitte das reklamierte Gerät mit der vom Händler
ausgefüllten Garantiekarte und der datierten Kaufquittung oder Rechnung ein.
EUROPÄISCHE UNION INFORMATION ZUR ENTSORGUNG
Dieses Symbol weist darauf hin, dass dieses Produkt entsprechend den geltenden gesetzlichenVorschriften und getrennt vom Hausmüll entsorgt werden muss. Geben Sie
dieses Produkt zur Entsorgung bei einer oziellen Sammelstelle ab. Bei einigen Sammelstellen können Produkte zur Entsorgung unentgeltlich abgegeben werden. Durch
getrenntes Sammeln und Recycling werden die Rohsto-Reserven geschont, und es ist sichergestellt, dass beim Recycling des Produkts alle Bestimmungen zum Schutz
von Gesundheit und Umwelt eingehalten werden.

12 Française
Heater for external canister lters
HEATER est le premier et seul chauage au monde qui puisse fonctionner hors de l’eau. Nous vous demandons de lire attentivement les instructions
suivantes an de mieux apprécier les caractéristiques qui rendent l’HEATER unique en son genre.
Description
A. Raccords
B. Point de xation
C. Indication du ux d’eau
D. Bouton de réglage de la température
Installation
Attention: Avant toute intervention dans l’aquarium, débrancher tous les appareils électriques immergés.Vérier que la tension indiquée sur le produit correspond bien à
celle de votre réseau électrique.
L’HEATER doit être installé à l’extérieur de votre aquarium sur le circuit d’un ltre extérieur. Coupez le tuyau de rejet du ltre et reliez les deux parties aux raccords de l’HEATER
-g. 2-. En cas de ltre extérieur déjà en fonction et avant de couper le tuyau de rejet pour installer HEATER , fermer les robinets et vider complètement l’eau contenue dans le
tuyau. La présence de bulles d’air à l’intérieur de l’unité chauante peut provoquer des dégâts irréparables. S’assurer que HEATER soit installé en position verticale. Respecter
le sens du ux d’air indiqué avec une èche sur le corps du réchaueur -g. 3-. Il est conseillé de re-vérier, 24 heures après l’installation, la bonne étanchéité des raccords
des tuyaux.
Reglage de temperature
Pour régler le chauage à la température désirée, tournez le bouton (D) jusqu’à ce que l’indicateur qui se trouve sur le corps de l’HEATER soit en face de la valeur choisie
sur l’échelle de température -g. 4-. Vous pouvez choisir une température allant de 18 °C à 34°C (65°F - 93°F). Si la température de votre aquarium est inférieure à celle
programmée, le chauage se met alors automatiquement en marche et le témoin de fonctionnement s’allume.

13
Française
Entretien
Attention: Avant toute intervention dans l’aquarium, débranchez du réseau tous les appareils électriques immergés.
NE PAS IMMERGER HEATER DANS L’EAU.
HEATER n’a pas besoind’entretienparticulier.Cependantil est conseillédenettoyerrégulièrement l’intérieur du tuyau chauant, an de prévenir la formation d’algueset dépôts
calcaires et garantir ainsi un parfait échange calorique.
Démonter HEATER après avoir vidé le tuyau sur lequel il est emboîté et nettoyer la cavité chauante à l’aide d’une brosse de nettoyage semi-rigide -g. 5-.
En cas de problemes
Si 24 heures (ou plus) après l’installationde l’HEATER, la températurede l’eau setrouvaittoujours inférieure à celle désirée(certains thermomètresse trouvant dans le commerce
ne sont pas précis), ou que l’eau était encore froide, il faudrait agir de la manière suivante:
• Vérier que la température soit correctement réglée
• Vérier que le cordon d’alimentation de l’appareil soit branché et qu’il y ait bien du courant
• Vérier que le ux d’eau suive bien la direction de la èche dessinée sur le corps de l’HEATER
• Vérier que la diérence entre la température choisie et la température ambiante ne dépasse pas les limites décrites dans le tableau -g. 6-
• Vérier que la capacité de l’aquarium soit la même de l’emballage
• Vérier que la circulation d’eau ne soit pas arrêtée
• Vérier qu’il y ait une bonne circulation d’eau, sans dépôts calcaires ni corps étrangers à l’intérieur de l’HEATER . Si cela se produisait, enlevez-les à l’aide d’une brosse, après avoir
débranché l’appareil -g. 5-
Attention: Ne pas utiliser de solvant ou de nettoyants, n’utiliser que de l’eau tiède.

14 Française
Normes de securite
Attention: ne pas installer HEATER à l’intérieur de l’aquarium
• L’appareil doit être utilisé exclusivement à l’intérieur des locaux
• Mettre l’installation hors tension avant toute intervention
• Vérier que le voltage indiqué sur l’étiquette de l’appareil corresponde bien à celui de votre réseau électrique
• N’installez pas l’HEATER si l’appareil ou le câble électrique semble détérioré
• Le câble électrique de cet appareil ne peut être remplacé ou réparé. En cas d’altération, l’appareil doit être mis au rebut et remplacé
• Ne pas immerger HEATER dans l’eau
Garantie
Cet appareil est garanti pour une période de 24 mois à partir de la date d’achat, contres tous vices de fabrication. Notre garantie se limite aux défauts de matériaux et de fabrication.
Ne tombent pas sous la garantie les réclamations dues à une installation ou une utilisation non conforme, manque d’entretien, eets de gel, dépôts calcaires, interventions ou
réparations non conformes. Ne tombent pas sous la garantie les matériaux de ltration et toutes les pièces soumises à usure normale, qui doivent être périodiquement remplacés
pour l’entretien et le nettoyage de cet appareil. Ce certicat de garantie doit être complété par le revendeur et devra accompagner l’appareil en cas de retour, avec un justicatif
prouvant la date d’achat.
Union européenne Informations sur l’élimination
Ce symbole signie que vous devez vous débarrasser de votre produit sans le mélanger avec les ordures ménagères, selon les normes et la législation de votre pays. Lorsque
ce produit n’est plus utilisable, portez-le dans un centre de traitement des déchets agréé par les autorités locales. Certains centres acceptent les produits gratuitement.
Le traitement et le recyclage séparé de votre produit lors de son élimination aideront à préserver les ressources naturelles et à protéger l’environnement et la santé des
êtres humains.

15
Español
Heater for external canister lters
HEATER Usted ha comprado el primer y único termocalentador exterior para acuarios que funciona fuera del agua. Felicitándonos con usted por la
elección que ha hecho, le pedimos lea atentamente las breves instrucciones que síguen a continuación, para poder apreciar mejor las características
que hacen de HEATER único en su género.
DESCRIPCIÓN
A. Racord de empalme al tubo
B. Enganche del HEATER
C. Indicación del ujo de agua
D. Mando de regulación de la temperatura
INSTALACIÓN
Atención: antes de cualquier operación o mantenimiento en el acuario, desenchufar de la red eléctrica todos los aparatos: Asegúrese que la tensión del producto se
corresponde a la de la red eléctrica. HEATER debe instalarse exteriormente a su acuario cortando el tubo de salida del ltro exterior y empalmado los tubos a los racords del
calentador -g. 2-.
Si el ltro exterior funciona, antes de cortar el tubo de salida y de empalmar HEATER, cerrar las llaves y sacar todo el agua que hay en el tubo. La presencia de burbujas de
aire en el interior de la unidad calentadora puede provocar daños irreparables. Cerciorarse de que HEATER sea instalado en posición vertical. Respetar la dirección del ujo del
agua indicada en el cuerpo del calentador mediante una echa. -g. 3- Restablecer la circulación del agua del acuario, enchufando a la red el nuevo sistema calentador. Es
aconsejable despues de 24 horas, vericar los empalmes y la jación de los racords.
REGULACIÓN DE LA TEMPERATURA
Para tener en el acuario la temperatura deseada, girar el mando de regulación (D) hasta que el indicador situado en el cuerpo del calentador se corresponda con el elegido en la
escala graduada -g. 4-. Se puede escoger una temperatura comprendida entre los 18°C y 34°C (65°F y 93°F). Si la temperatura de su acuario fuera inferior a aquella elegida,
HEATER comenzará automaticamente a calentar y se encenderá un chivato de funcionamiento.

16 Español
MANTENIMIENTO
Atención: antes de cualquiere intervención, desenchufar HEATER y todos los aparatos eléctricos sumergidos en el acuario.
No sumergir nunca HEATER en el agua. HEATER no necesita un mantenimiento especial. De todas maneras es aconsejable limpiar regularmente el interior del tubo calentador
para prevenir la formación de algas y depósitos calcáreos, garantizando un óptimo intercambio de calor durante el período de calentamiento. Sacar HEATER después de haber
vaciado el tubo al cual está empalmado, limpiar el interior del tubo calentador usando un cepillo blando -Fig. 5-.
SI HAY ALGÚN PROBLEMA
Si después de 24 horas o más después de la instalación del calentador, la temperatura del agua aún no es la deseada (atención: algunos de los termómetros que se comercializan
no son precisos), o si el agua aún está fria, actuar como sigue:
• asegúrese de que la temperatura elegida es la correcta
• compruebe que el calentador está enchufado
• verique que el ujo del agua respeta la dirección de la echa marcada en HEATER
• compruebe que la diferencia entre la temperatura elegida y la de la habitación esté comprendida en los limites de la tabla -Fig. 6-
• compruebe que el agua circula a través de HEATER
• compruebe que hay una buena circulación de agua en el tubo, que no hayan incrustaciones en el interior del calentador y que no hayan cuerpos extraños. En tal caso, limpiar con un
cepillo, después de haberlo desenchufado -g. 5-.
Atención: no usar disolventes ni detergentes de ningún tipo, solo agua tibia

17
Español
NORMAS DE SEGURIDAD
• Este aparato es de uso exclusivo en el interior de una habitación
• Asegurese que la tensión escrita en la etiqueta del producto se corresponde al de la red eléctrica
• Antes de enchufar el aparato a la red, asegurese que el enchufe, cable y el producto no están dañados
• Si el cable o el calentador están dañados, no utilizar el aparato
• El cable de este aparato no se puede sustituir ni reparar, si está dañado el aparato debe desecharse
• No sumergir nonca HEATER en el agua
GARANTIA
Esto aparato está garantizado por un periodo de 24 meses desde la fecha de compra, por defecto de materiales y fabricación. Nuestra garantía se limita a los defectos de material
y mano de obra. No quedan cubiertas por nuestra garantía las reclamaciones cuya causas puedan adjudicarse a defectos de montaje, de manejo, a un cuidado deciente, a efecto
de la congelación, a depositos calcáreos o intentos de reparación inapropriados. No quedan cubiertas por nuestra garantía los materiales de ltración y todas las piezas por su
normale desgaste que se deben sustituir periodicamente en el mantenimento normal y la limpieza del aparato. El certicado de garantía debe ser rellenado por el vendedor y deberá
acompañarse al aparato en caso de que se sustituya, junto al recibo o factura de compra.
UNIÓN EUROPEA INFORMACIÓN SOBRE EL DESECHO DE RESIDUOS
Este símbolo indica que, de acuerdo conla legislación local, la eliminación deeste producto debe realizarse deforma separada de la de los residuos domésticos. Cuando este
producto ya no pueda utilizarse, llévelo a uno de los puntos de recogida especicados por las autoridades locales. Algunos de estos puntos de recogida prestan el servicio
gratuitamente. La recogida selectiva y el reciclaje de su producto en el momento de desecharlo contribuirán a la conservación de los recursos naturales y garantizarán un
procesamiento de los residuos respetuoso con la salud de las personas y con el medio ambiente.

18 Italiano
Heater for external canister lters
HEATER è il primo ed unico termoriscaldatore che funziona fuori dell’acquario. Congratulandoci con Lei per la scelta fatta, Le chiediamo di leggere
attentamente le brevi istruzioni che seguono, per poter così apprezzare meglio le caratteristiche che rendono HEATER unico nel suo genere.
Descrizione
A. Raccordo di collegamento tubi
B. Occhiello di aggancio di HEATER
C. Indicazione della direzione del usso dell’acqua
D. Manopola di regolazione della temperatura
Installazione
Attenzione: prima di ogni intervento o manutenzione in acquario, scollegare dalla rete tutti gli apparecchi elettrici immersi.Vericare che la tensione riportata sul prodotto
corrisponda a quella della Vostra rete. HEATER deve essere installato esternamente al Vostro acquario tagliando il tubo di mandata del ltro esterno, e collegando i tubi ai
raccordi del riscaldatore -g. 2-. Nel caso si applichi HEATER ad un ltro esterno precedentemente in funzione, prima di tagliare il tubo di mandata assicurarsi di avere chiuso
i rubinetti e di avere rimosso tutta l’acqua in esso contenuta. La presenza di bolle d’aria all’interno dell’unità riscaldante può causare danni irreparabili. Assicurarsi che HEATER
venga installato in posizione verticale. Rispettare il senso del usso dell’acqua indicato sul corpo del riscaldatore con una freccia. -g. 3- Ripristinare il ricircolo dell’acquario,
collegando alla rete il nuovo sistema riscaldante. E’consigliabile dopo 24 ore vericare i collegamenti e il ssaggio dei raccordi.
Regolazione della temperatura
Per avere nell‘acquario la temperatura desiderata, ruotare la manopola di regolazione (D) nchè l‘indicatore situato sul corpo del riscaldatore si trova in corrispondenza del
valore prescelto sulla scala graduata -g. 4-. Si può impostare una temperatura compresa tra 18°C e 34°C (65°F - 93°F). Se la temperatura del Vostro acquario dovesse essere
inferiore a quella impostata, HEATER comincerà automaticamente a riscaldare e si accenderà una spia di funzionamento.

19
Italiano
Manutenzione
Attenzione: prima di qualunque intervento, scollegare dall‘alimentazione HEATER e tutti gli apparecchi elettrici immersi nell‘acquario.
ATTENZIONE: NON IMMERGERE MAI HEATER NELL’ACQUA.
HEATER non richiede una particolare manutenzione. Tuttavia una pulizia regolare dell’interno del tubo riscaldante previene dalla formazione di calcare e alghe, garantendo
così un ottimo scambio di calore durante la fase di riscaldamento. Rimuovere HEATER, dopo avere avuto cura di svuotare dall’acqua il tubo a cui è collegato, e pulire l’interno
utilizzando uno spazzolino morbido -g. 5-.
In caso di problemi...
Se dopo 24 ore o più dall‘installazione del riscaldatore la temperatura dell‘acqua non ha ancora raggiunto la temperatura impostata (attenzione: alcuni dei termometri in
commercio non sono precisi!), agire come segue:
• vericare di aver impostato correttamente la temperatura
• vericare che la spina sia inserita e che ci sia tensione
• vericare che il usso dell‘acqua rispetti l‘indicazione della freccia sul corpo di HEATER
• vericare che la dierenza tra la temperatura impostata e quella della stanza rientri nei limiti di tabella -g. 6-
• Vericare che la capacità dell’acquario sia la stessa citata sull’imballo
• vericare che ci sia passaggio di acqua attraverso HEATER
• vericare che ci sia un buon ricircolo di acqua, che non ci siano incrostazioni e sporcizie all‘interno del riscaldatore e che non siano entrati corpi estranei. In tal caso asportare con uno
spazzolino, dopo aver staccato le spine -g. 5-
Attenzione: non usare solventi o detergenti di alcun tipo, solo acqua tiepida.

20 Italiano
Norme di sicurezza
Attenzione: non utilizzare HEATER dentro l’acquario
• Questo apparecchio può essere usato esclusivamente all‘interno delle abitazioni
• Vericare che il voltaggio riportato sull‘etichetta del prodotto corrisponda a quello della Vostra rete
• Non utilizzare se il cavo o il riscaldatore dovessero in qualche modo risultare danneggiati
• Il cavo di questo prodotto non può essere sostituito o riparato; se il cavo è danneggiato, l‘apparecchio deve essere sostituito
• Non immergere mai HEATER nell’acqua
Garanzia
Questo apparecchioè garantito per un periodo di24 mesi dalla data di acquisto, da difetti di materiale edi fabbricazione. Non rientranonella copertura della nostra garanzia i reclami
le cui cause sono dovute ad errori di montaggio, di manovra e di mancanza di manutenzione, all’azione del gelo, a depositi calcarei o a tentativi non appropriati di riparazione. Non
rientrano nella copertura della garanzia anche i materialidi consumo e tutti i componentisoggetti ad usura che devonoessere sostituiti periodicamente per l’ordinaria manutenzione
e pulizia dell’apparecchio. Il certicato di garanzia deve essere compilato a cura del rivenditore e dovrà accompagnare l’apparecchio nel caso venga restituito, assieme allo scontrino
o ricevuta scale comprovante la data di acquisto.
Unione europea informazioni per l’eliminazione
Questo simbolo signica che, in base alle leggi e alle norme locali, il prodotto dovrebbe essere eliminato separatamente dai riuti casalinghi. Quando il prodotto diventa
inutilizzabile, portalo nel punto di raccolta stabilito dalle autorità locali. Alcuni punti di raccolta accettano i prodotti gratuitamente. La raccolta separata e il riciclaggio
del prodotto al momento dell’eliminazione aiutano a conservare le risorse naturali e assicurano che venga riciclato in maniera tale da salvaguardare la salute umana e
l’ambiente
This manual suits for next models
4
Table of contents
Languages:
Other Hydor Other manuals
Popular Other manuals by other brands

Xycom
Xycom 1341 user guide

Wilo
Wilo SiFire Installation and operating instructions

Hoshizaki
Hoshizaki KMD-900MRH Service manual

Beurer
Beurer LE 30 Instructions for use & installation

Flowmaster
Flowmaster AMERICAN THUNDER 817725 Installation instructions manual

Nilfisk-Advance
Nilfisk-Advance Advance Retriever 2060 Service manual