HydroCare Quadmaxx Instruction and safety manual

Installation,
Use and Care Manual
®

Parts Included
A.
Backing w/ Inlet and Outlet Pipe Manifolds
B.
4 Sleeves w/ Purification Media
C.
Media Removal Tool/ManifoldAdjuster
D.
Wall Mount Screws w/ Anchors
E.
Disconnect Clip
F.
1 set of Sleeve Bypass Caps
G.
Cap of Silicone Grease
Tools & Parts Needed
■
Level
■
#2 Phillips Screwdriver
■
Adapters from home pipe size and type to 1” Copper
■
If incoming water pressure is over 80 PSI, install a pressureregulator.
Installation Requirements
Install upside down or sideways. All of the arrows on the Sleeves must point in the same
direction from inlet to outlet which is the direction of the water flow.
The system should be located after connection for the outside hose bibs, sprinkler system(s),
and/or irrigation line(s). These lines should be left untreated. Do not use with water that is
microbiologically unsafe or of unknown quality without adequate disinfection before or after
the system.
Install in a location that is not susceptible to freezing temperatures as damage to the Sleeves
could occur. Install away from direct sunlight as prolonged exposure to light can weaken plastic
components.
The system needs to be mounted to a solid surface (Backing is drilled for 16 inches on center).
Wall anchors are provided if needed.
You may consider an optional Bypass Assembly with additional shutoff valves for convenience
when changing your HydroCare Patented PurificationMedia.
E F

1.
Temporarily remove the Media Removal Tool from the Quadmaxx® Backing.
2.
Use a level and pencil to locate your 4 wall mount locations. If using wall anchors, press the tip of the
anchors into drywall using a #2 Phillips Screwdriver. Drive anchor clockwise until anchor stops flush
with wall. Do not over tighten anchors. Place Backing over marked locations or inserted anchors and
insert wall mount screws. Tighten screws flush with the Backing. If using anchors, a “pop” sound
indicates correct installation.
Your system may require the insertion of the media. Open the tube and check. Follow the instructions
and then continue with attaching the filter tubes.
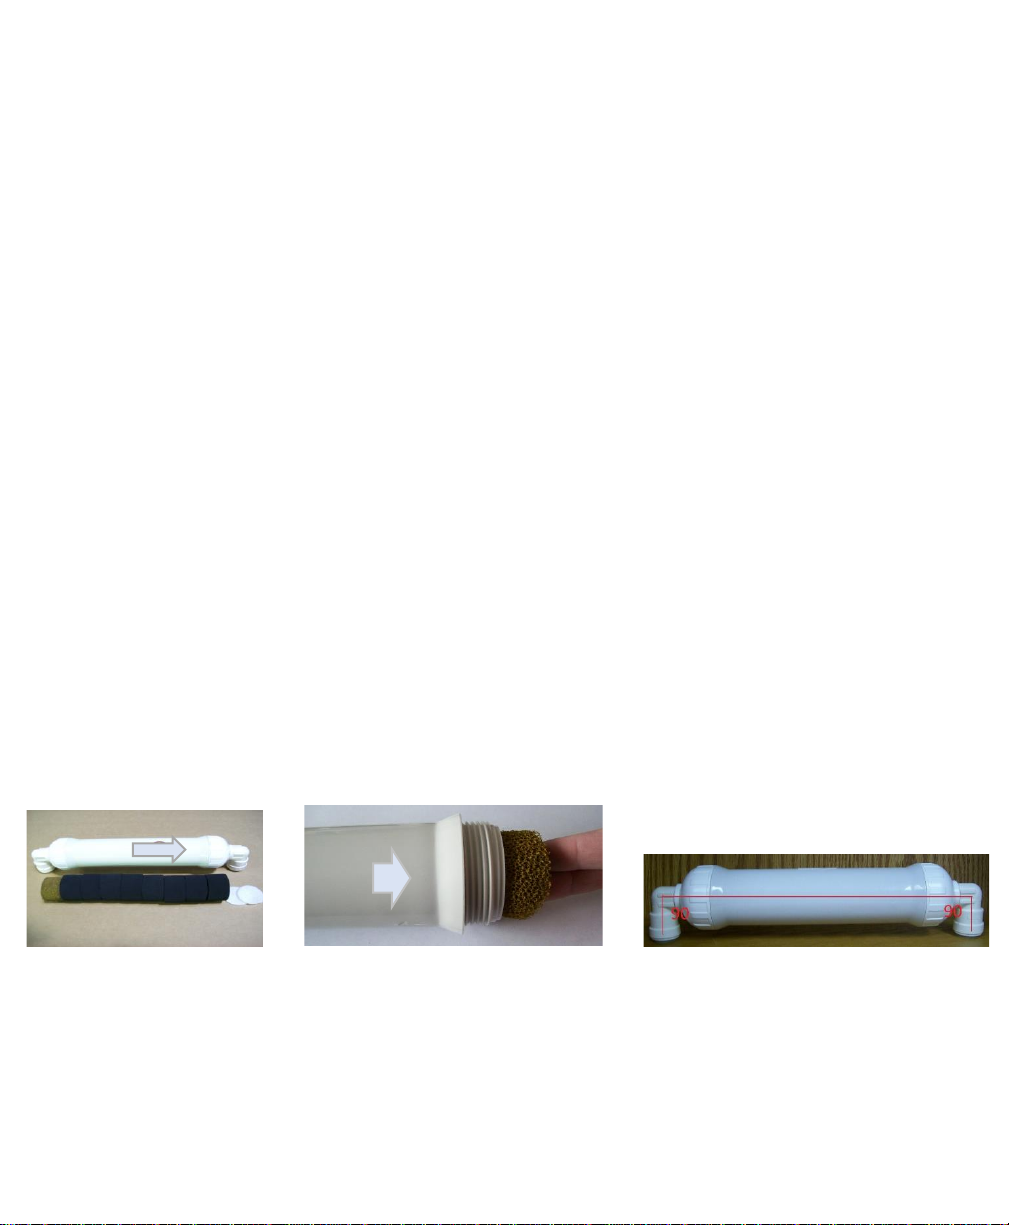
Unpack the new HydroCare Purification Media. One Media package is provided for each sleeve( Fig 5).
Using your fingers, insert the first pad, the gold colored piece into the outlet side of the Sleeve which
is the side with the arrow pointing away (See Figure 6). Using your fingers, put your (8) black colored
pieces into the sleeve one at a time pushing the pieces into the Sleeve as you go. Place the thick
micron pad next to the last black piece. The thin pad goes in last.
3.
Thread the Outlet End Cap back into place. Repeat for each Sleeve from step 5.
4.
Use remaining Silicone Grease to coat the outsides of the copper inlets and outlets.
5.
Make sure each Sleeve is squared up. Put each Sleeve on a flat service and look to see that the elbows line up
with each other (See Figure 7). Adjust the elbows by tightening or loosening each End Cap.
6.
Firmly press your Sleeves back onto your Quadmaxx Pipe Manifolds.
7Slowly turn your main water feed on until water returns to your open faucet and check for leaks.
NOTE: The media contains carbon fines (very fine black powder). After installation, flush the new media for 5 minutes
before using the water.
Figure 5 Figure 6 Figure 7
7.
Rotate Pipe Manifolds so the inlets and outlets are facing you and sit perpendicular with the Backing.
You can use the open end of the Media Removal Tool to make slight adjustments to the Manifolds
(See Figure 1).
8.
Store your set of Sleeve Bypass Caps in the two holesprovided.
9.
Use your fingers to coat the outsides of the copper Manifolds with the Silicone Grease
provided (See Figure 2).

10.
Remove all (8) plastic red caps from the ends of the Sleeves (Shown in Figure 4). They can be discarded.
11.
To ensure that both the inside of each elbow and the outside of the Manifolds are properly coated
with Silicone Grease, put the Sleeve on the Manifold one end at a time (See Figures 5 & 6). Remove
each end and put it back on 2 or 3 times. If needed, see Troubleshooting Guide on the following page
for instructions on removing the Sleeve.
12.
The elbows on each Sleeve are aligned when lines painted on each Sleeve match up by tightening
or loosening each end cap (See Figures 3 & 4). Make sure each Sleeve sits on a flat surface without
rocking. (See bottom of Figure 1).
13.
Using the arrows on the Sleeves to ensure the Media is lined up correctly with the direction of your water
flow, push each Sleeve onto the Manifold one at time sliding each elbow of the Sleeve on simultaneously.
Figure 1 Figure 2 Figure 3
Figure 4 Figure 5 Figure 6
Connection Instructions
1.
Installation of a water shut off valve at the unit is recommended for media replacement changes and
for emergency shut off water.
2.
Turn off your water supply. Turning off your water heater is recommended.
3.
Release water pressure by opening faucet.
4.
Attach water source to Manifold Inlet. Existing Inlet or outlet pipe size smaller or greater than 1” will require
an additional adapter.
5.
You may now turn your water on. Go slowly and check for leaks. Run water for 10 minutes or until
all gray or cloudy water is gone. You may get an occasional gray burst during the first 48 hours. The
water is safe to drink. Turn your water heater on.
Figure 7 Figure 8
Open
Side

Troubleshooting Guide
•Sleeve Bypass Caps are provided should you have a problem (ie. breakage or a
leak). The Caps may be put in place of a Sleeve so that you can still run your
system until you receive replacement parts (See Figure 7).
•To remove a Sleeve or a Bypass Cap from the Manifolds, first release pressure by
both opening a faucet and shutting off water at the house water supply shutoff
valve. Push the Sleeve or Bypass Caps further onto the Manifold to set the
disconnect fittings back into place. The disconnect fittings are part of the elbows.
Put your thumbs on the Sleeve or Bypass Caps, press your thumbs towards the
wall, wrap your fingers around the copper, and slide them towards your thumb
which will pull the disconnect fitting into the elbow. Finally, pull the Sleeve or
Bypass Caps off the Manifold. To remove a Sleeve, you must pull both sides at
once. A Disconnect Clip has been provided should you need assistance (Figure 8).
If your system leaks at fittings: Release pressure by both opening a faucet and
Remove Sleeve and check for burrs and/or dirt. Ensure the elbows are aligned and add additional
silicone to ensure a water tight seal.
After time, If you notice a bad taste or odor, this indicates that the media in the Media is
saturated, and needs to be changed. It is recommended to change every 6 months.
You can order your refills at www.hydrocareusa.com. Save 10% on auto refill subscription.
Contact : HydroCare USA 888 967 9283 or email info@hydrocareusa.com.
Quadmaxx® is tested and certified by WQA to NSF/ANSI 61 for materials safety only.
Quadmaxx® assembled in U.S.A
Table of contents
Other HydroCare Water Filtration System manuals
Popular Water Filtration System manuals by other brands

Prince Castle
Prince Castle 110 VOLT SERIES manual

AquaScape
AquaScape MicroSkim 99771 Instruction and maintenance

Culligan
Culligan HF-160 Installation and operating instructions

Hayward
Hayward SWIMCLEAR C3030EURO owner's manual

Schaffner
Schaffner FN6840-25-113-E0XXR User and installation manual

Katadyn
Katadyn Base Camp Water Microfilter manual