HydroTools Pool Cover Roller User manual

Hydrotools Pty. Ltd.
CN 107 829 603 BN 45 107 829 603
PO Box 2037, Crestmead, Queensland 4132 ustralia
57 Magnesium Drive, Crestmead, QLD 4132 ustralia. Telephone: (07) 3803 9090 Fax: (07) 3803 6258
Home Page: www.hydrotools.com.au Email: [email protected]
to suit above ground pools
Pool Cover Roller
INSTRUCTIONS
AG 200704 20/7/04 1:17 PM Page 1

Tube Set
Depending on the size of your pool, you will have been supplied with one of the following tube sets.
We recommend that our Pool Roller be slightl wider than our pool blanket. If our pool has a surround adjacent to
the pool coping, the crank handle requires a clearance of 100 mm.
Item H A50180V Tube Set
Extendable up to 5800 mm
• Three (3) 1440 x 38 mm diameter extruded aluminium tubes
• Two (2) 1440 x 41 mm diameter extruded aluminium tubes
• One (1) overcover and fittings
Begin tube assembly with small tubing plug.
End tube assembly with small tubing plug.
Suitable for pools up to 10200 m long.
Item H A50240V Tube Set
Extendable up to 7400 mm
• Three (3) 1670 x 38 mm diameter extruded aluminium tubes
• Two (2) 1670 x 41 mm diameter extruded aluminium tubes
• One (1) overcover and fittings
Begin tube assembly with small tubing plug.
End tube assembly with large tubing plug.
Suitable for pools up to 102000 m long.
Rubber bumper
Qty: 4
xle with crank handle
Qty. 1
Barrel with handle
Qty. 2
Top bracket
Qty. 2
Plastic bolt / nut
Qty. 2 Lock pin
Qty. 2
xle end
Qty. 1
Diagram 1
Preparation And Assembly
Check you have all the items and assemble as illustrated below:
Thank you for purchasing a Hydrotools Pool Roller (reel). Please follow the instructions carefully to protect your warranty
and enjoy years of hassle-free use
Please use your pool blanket and reel in the manner it was intended for:
• Your pool blanket is not a safety cover
• Remove the pool blanket and reel assembly from the pool completely before swimming.
• Do not store the pool blanket on the ground in direct sunlight, as it will shorten the life of the blanket and may
damage your lawn.
• lways cover your pool blanket with the overcover supplied, when it is stored on the reel.
Plastic grommet
Qty. 10 Phillips-head screw
driver bit Qty. 1
Stainless steel self-
drilling screws Qty. 20
EPDM domed washer
Qty. 10
Cord
Qty. 18000 mm
2
AG 200704 20/7/04 1:17 PM Page 2

Positioning The Pool oller
For circular pools — place the two (2) brackets at
the widest points of the pool.
For oval pools — place the brackets at the widest
points at either the shallow or deep end of the pool.
For keyhole, teardrop and other pools — place the
brackets at the widest points of the pool. See diagram 2.
On all above ground pools, ou’ll need to fasten the blanket so it unwinds in two directions. Refer to item 11.
Fitting The Blanket
Follow the instructions supplied with your pool blanket and fit it to the pool before you attach the blanket to the tube.
The blanket will be easier to remove from your pool if it has been trimmed to the shape of the inside of the pool.
Small gaps at the edges do not effect the function of the pool blanket. Some pool blankets are trimmed larger than the
size of the pool to prevent leaves and debris from entering the water. These can still be used with a storage reel, but
can be a little more difficult to operate, due to the extra drag caused by the excess material when rolling.
Assembling The Tube Set
ll tube sets consist of 6-sided, hexagonal-shaped aluminium
tube. There are two diameters of tube, 38 mm and 41 mm.
The smaller size fits inside the larger size.
We recommend that your pool reel be slightly wider
than your pool blanket. See diagram 2 for information on
positioning, so it rolls on more easily.
Permanent Mounting Option
The top bracket can be permanently secured to the pool
top rail. To use this method, remove the lock pin from
each bracket and secure the bracket to the pool top rail,
with the screws provided.
Assembly
You will use a series of pre-drilled holes, spaced approximately 38 mm and 190 mm from each end, to join the large
tube to the small tube. There are holes provided at each join. These will be secured with self-drilling stainless steel
screws and the Phillips-head screw driver bit. You can identify the end tubes by the large holes used to fasten them
into the crank handle.
1. Insert grey rubber bumpers to underside of top brackets, then position top brackets on the pool top rail where the
reel will operate. See diagram 4.
2. Loosely assemble the tubes together. Slide any excess width into the adjoining tubes, dividing it up as equally as
possible. Note: You must have a minimum of 230 mm overlap in each tube.
3. Using the tubes, measure the width across the pool from axle end to axle with handle.
4. djust the total length of the tube assembly to fit the span ensuring the minimum overlap of 230 mm. See diagram 4
Keyhole Oval Circular
Unfold Unfold Unfold Unfold Unfold Unfold
Diagram 2
End view
of small
tube
Pool
top rail
Pool
top rail
End view
of small
plug
Measure axle to axle, then...
Non-permanent assembly
Pool top rail
Lock pin
Pool top rail
Socket-style assembly
dd 38 mm to
this dimension
to fit
into barrel
Minimum
230 mm
overlap
Fasten tubes together
using six screws in a
staggered line, in each
tube end
Diagram 5
Diagram 4
Overhead view
Diagram 3
Teeth on small
plug must
engage slots
inside small
tube
3
AG 200704 20/7/04 1:17 PM Page 3

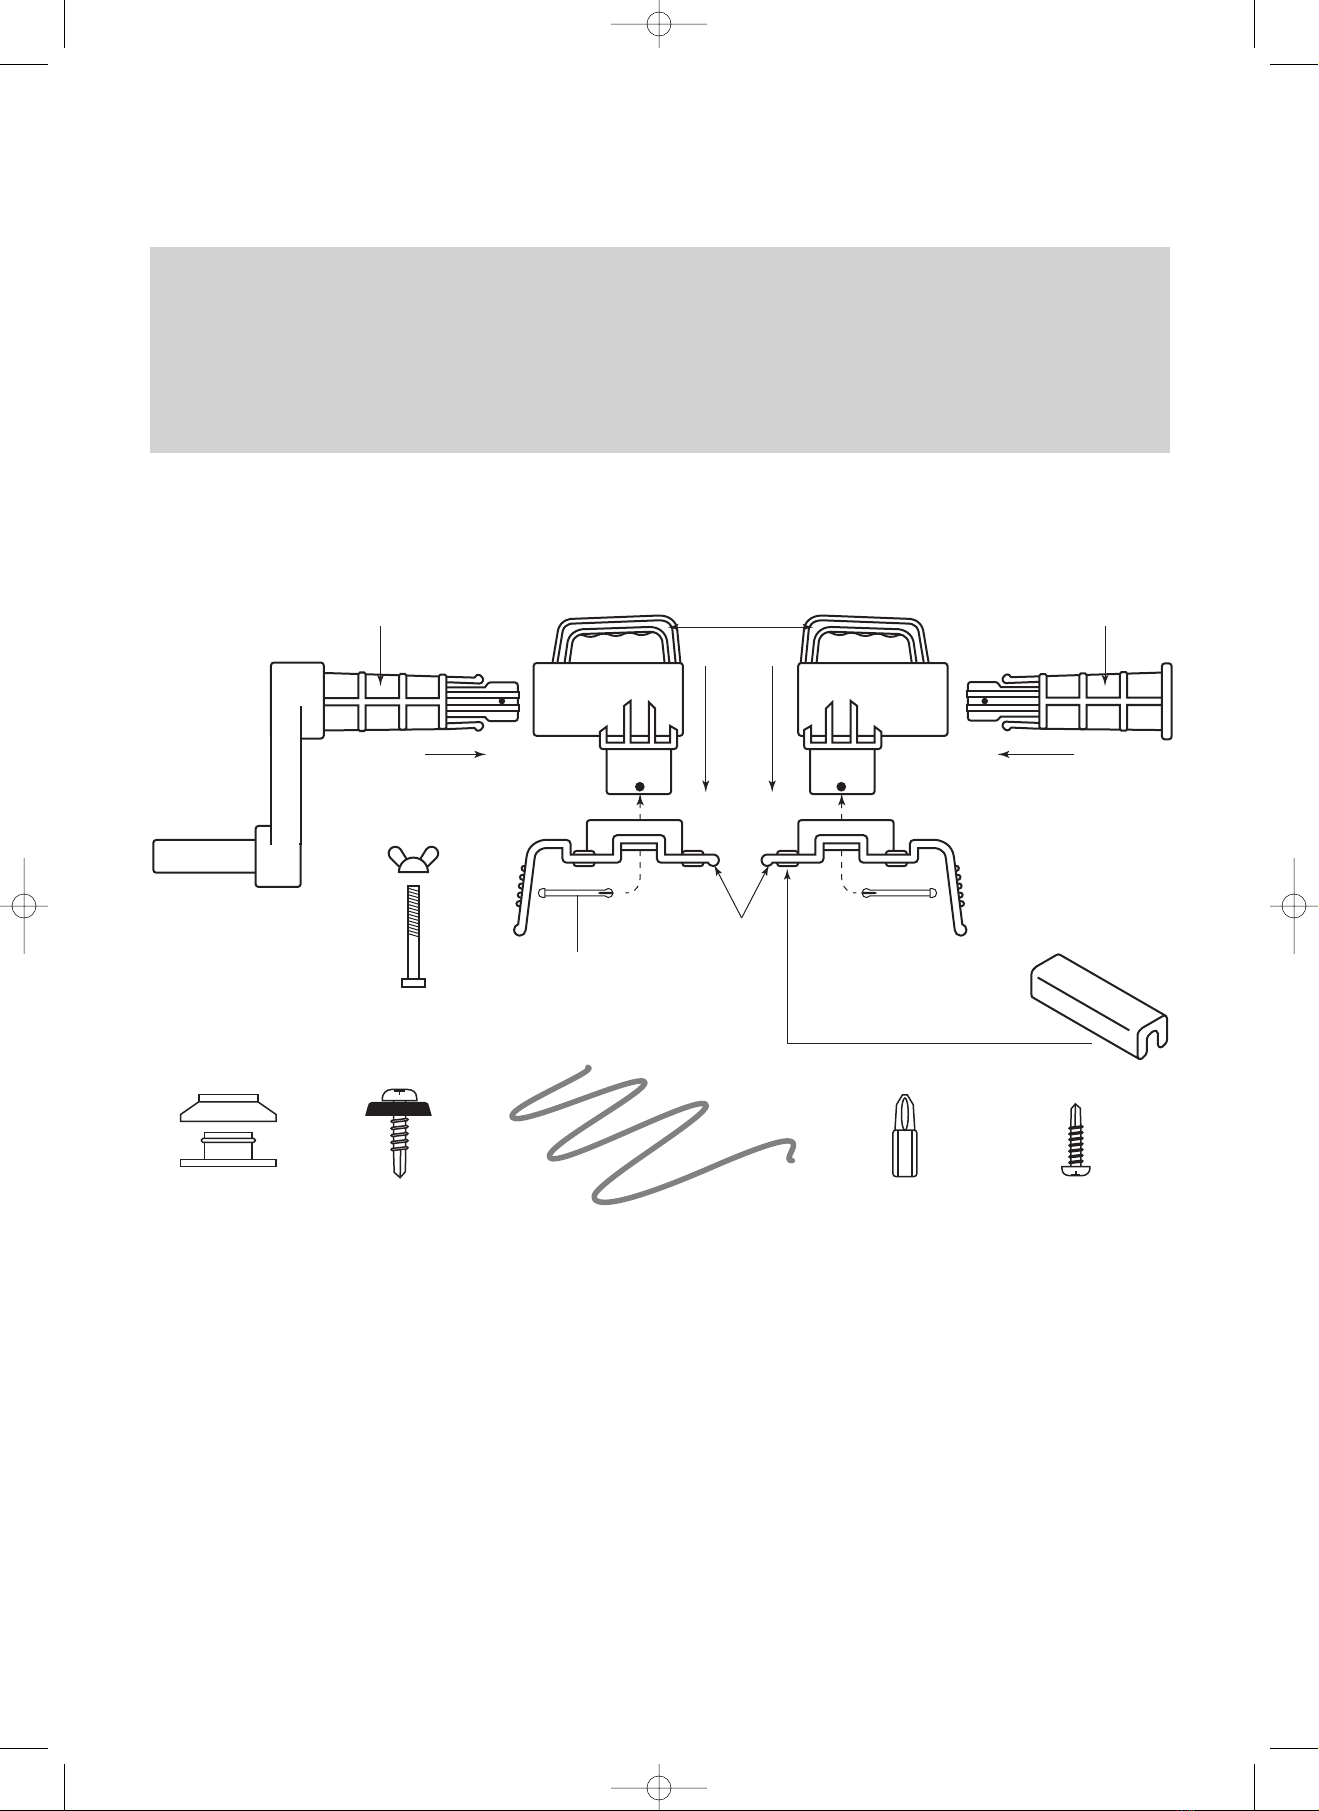
5. Lock the tubes together by rotating each adjoining tube in the opposite
direction, ensuring all small tubes are rotated clockwise. See diagram 5.
6. Secure each tube with just one self-drilling screw in each join.
7. ttach the tube assembly into the axle ends and check for fit. If it doesn’t fit, undo
just one screw in one join and adjust.
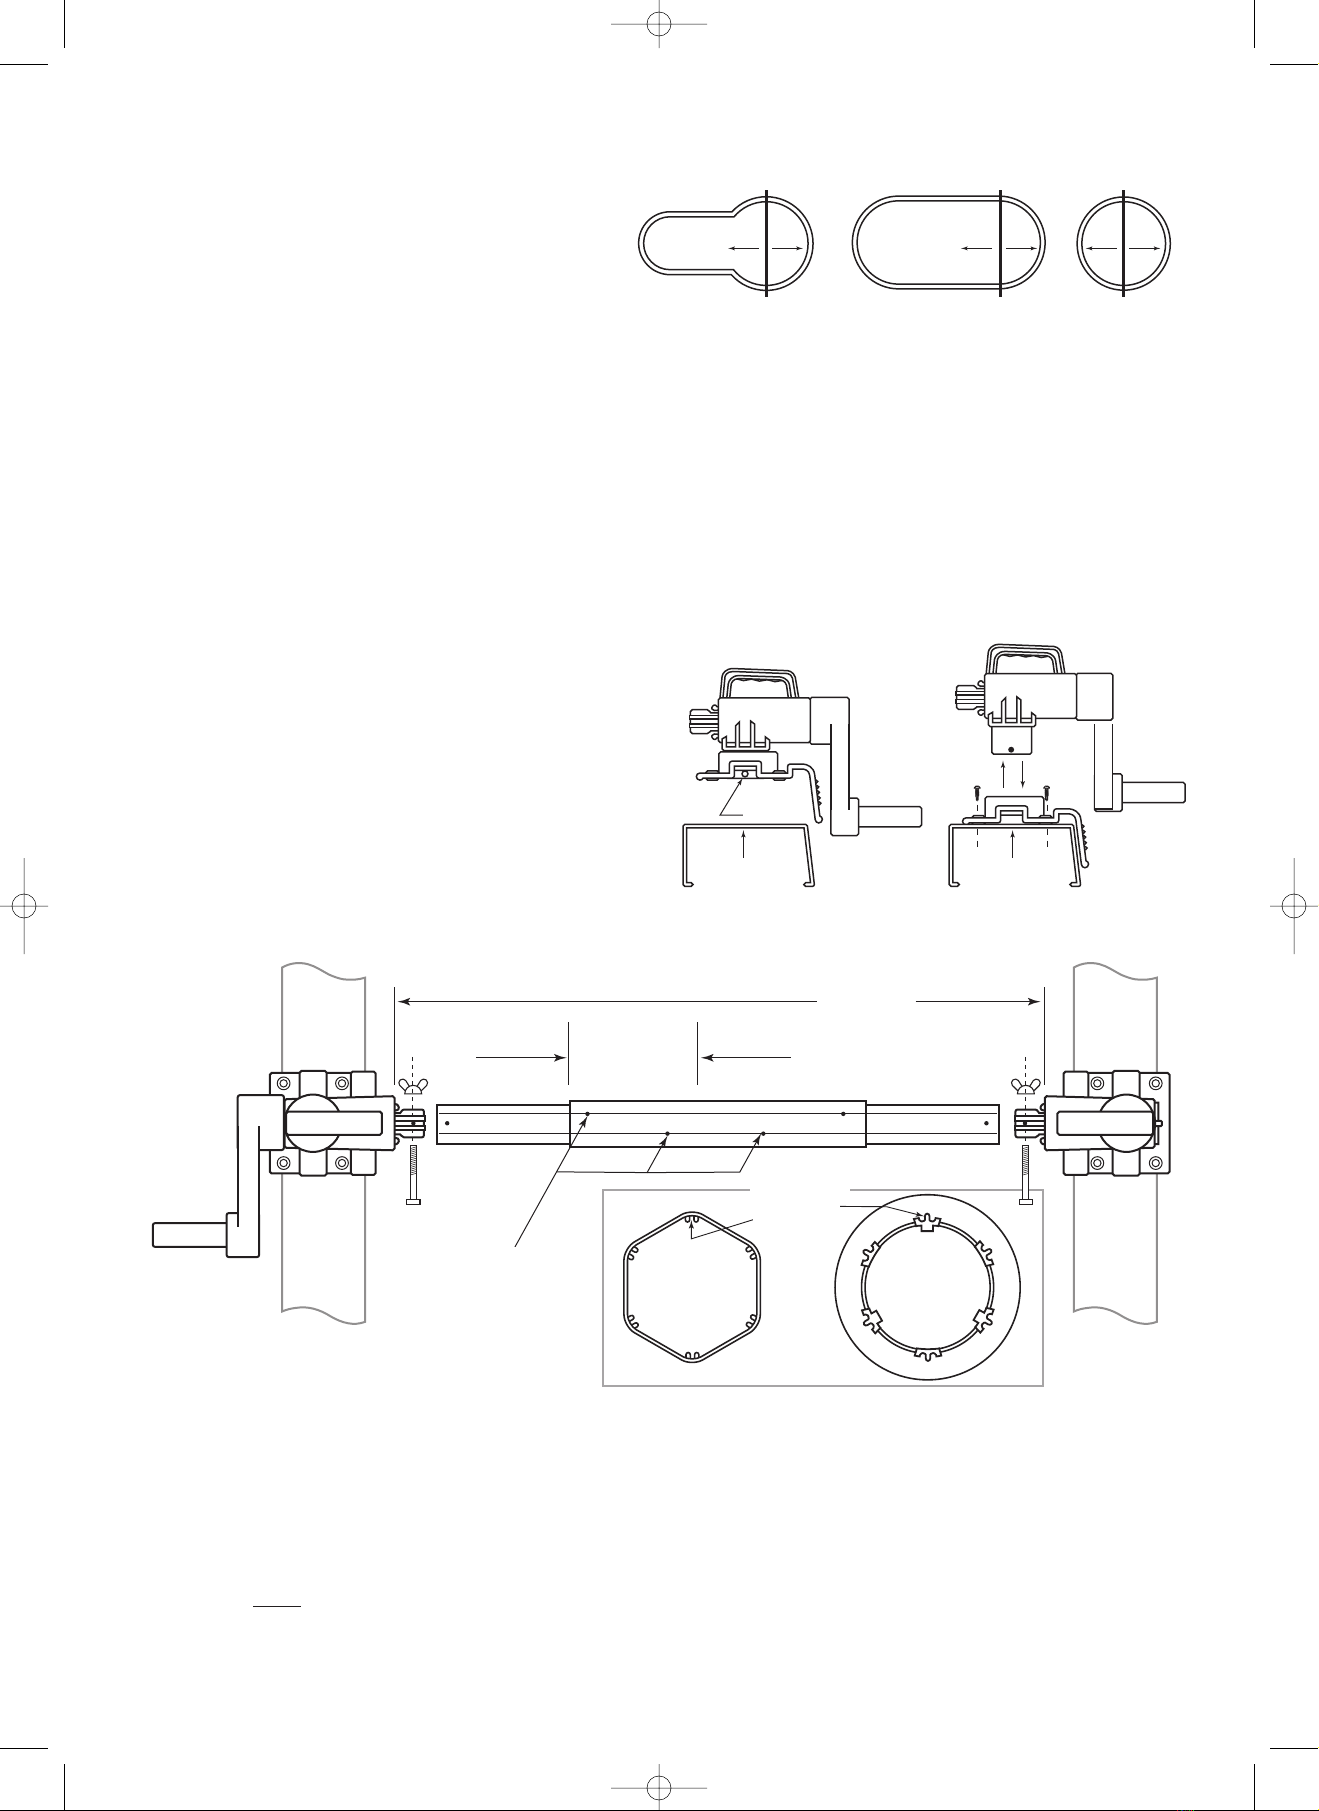
8. When the tube length is correct, drill and fasten the remaining screws at each end
of the overlapped tubes. You should have six (6) screws on each tube end where there is a join.
9. Put the tube assembly together with axle crank handle and axle ends by lining up the hole in the end of each tube
with the axle. Push the tube until it meets the plastic surface at each end and secure with plastic bolt and nut
provided.
10.Attach cords to tubes. Measure along the tube, 150 mm in from each edge of the pool
toward the middle. There are enough fasteners for up to ten (10) cords to attach the
blanket. These need only be placed 1000 mm apart but we have provided plenty of cord
so you can use ten (10) and they can be cut to a suitable length, up to 1000 mm. You
need to allow at least 400 mm more cord length than the distance between the blanket
and the tube. Mark the tube with cord positions evenly spaced. Fasten a self-drilling
screw through a domed washer at each mark on the flat of the tube to within 3 mm of
being tight. This is enough room to now slide the cord under the washer in a loop and
hold both pieces of cord, then screw until tight. See diagram 6.
11.Attach the cord to the blanket. The cords are fastened to the blanket using the plastic
grommets. For all above ground pools where the tube spans the pool, you will need two
grommets per cord, spaced 50 mm apart. See diagram 8. Using a hammer and a piece
of soft timber under the blanket fabric, punch a hole with the wad punch provided at
each grommet location. Push male grommet component through hole. Place female
component into position and tap gently together with a hammer.
Loop the cord through the double grommet and tie it off with a secure knot. djust the
length of the cord by loosening the screw on the tube a little, until you can move the
cord and then tighten it when the length is correct.
Variations in the length of the cord will effect how straight the blanket rolls up, so it is
important to adjust the length carefully. If you test roll the blanket onto the tube and
it rolls unevenly, unroll it, adjust the length of the cords and roll it again until the
blanket rolls evenly.
12.Fitting your overcover. The reel kit has been supplied with a protective cover to use
when the blanket has been rolled onto the tube. You will void the warranty of most pool blankets if you do not
cover it when stored on a reel. Follow the separate instructions for fitting the grommets and fastening cords to the
overcover. Be sure to cover the blanket every time it is rolled onto the tube.
Warranty
Your advanced reel system is warranted for a full 12 months, and pro rata for up to three years on the plastic
components against faulty workmanship. If you find a component is faulty, post it pre-paid to: Hydrotools P/L,
PO BOX 2037, Crestmead, Qld 4132 with a copy of your proof of purchase. replacement will be posted to you.
Frequently asked questions
The tube has a small dent in it, will this effect the performance of the reel?
Provided the tube remains straight, the performance will not be effected by a dent or mark on the tube.
Where do I position the reel when I have to fold a section of m blanket?
Position the reel at either the widest end or the opposite end to any section of the blanket that needs to be
folded when stored on the reel. The fold creates an extra thickness on one side that will cause the blanket to roll
unevenly and therefore this should be kept to a minimum.
Twist tubes to
remove
excess play
prior to
screwing
together
Diagram 7
Diagram 5
Diagram 8
Diagram 6
Cord and
washer and
screw
on tube
4
AG 200704 20/7/04 1:17 PM Page 4
Other HydroTools Swimming Pool Filter manuals
Popular Swimming Pool Filter manuals by other brands

BWT
BWT RTM HF S-500 Installation and operating instructions

ubbink
ubbink Pool Filter 300 manual

Pool Technologie
Pool Technologie UNO Instructions for use

XtremepowerUS
XtremepowerUS 90151 Owner's manual and safety instructions

Hayward
Hayward Perflex® Extended-Cycle Systems owner's manual

COMFORTPOOL
COMFORTPOOL FuzzyClean 7000 manual