Hyena TREK FX+ User manual

Assist system (Gen. 2)
25/32kmh / 20mph
ELECTRIC
BICYCLE
Owner’s manual
365
FX+/Dual Sport+
EN-GB

Welcome
WELCOME TO OUR BIKE FAMILY
Thank you for purchasing your new bicycle.
We believe in bicycles. We make high-quality bicycles that are built to last.
That is why each bicycle we make comes with a limited warranty.
We wish you many carefree and enjoyable rides with your new bicycle.
However, if you experience any problems with your bicycle, do not hesitate to contact your
local retailer. If the problem persists, please call our customer care team for a solution (see
last page for contact information).
www.trekbikes.com www.diamantrad.com

Important to read before the rst ride
Supplemental Product Information
The most important points for you to do
1. Even if you have ridden a bicycle for years, it is important for every person to read
the general ‘Bicycle Owner’s Manual’ and the specic ‘E-Bike Owner’s Manual’
carefully before you ride on the new e-bike.
• Both manuals contain detailed information and useful suggestions about your new
bicycle.
• Make sure that you understand the proper use, maintenance and disposal of the
components of the electrical system of your new e-bike.
2. Think about safety. Your safety and that of other road users is very important.
• Check your bicycle for normal operation, loose parts and defects before riding.
If you nd any problem, visit your authorised bike shop for repairs before riding.
• Be aware that other road users (cars, vans, motorcycles) do not expect that an e-bike
can ride faster than a normal bicycle. Riding faster also increases the risk of accidents.
Distances will close much faster and braking distances will become longer.
• Do not ride abusively. Only ride in the use conditions specied for your bicycle.
Please refer to the Use conditions table in the general Bicycle Owner’s Manual.
3. The electric system of your new bicycle needs special attention.
• Do not clean your e-bike with a high-pressure washer. Any electrical system is sensitive
to moisture. High-pressure water might enter connectors or other parts of the electric
system.
• Do not allow a Li-Ion battery (separately or integrated in the downtube) to suer any
mechanical or physical impacts or make any internal modications. In an extremely
rare case, a battery that has been severely impacted or otherwise mishandled could
potentially catch re. If you suspect damage to your battery, visit your local authorised
bike shop immediately for inspection.
4. Maintain the battery as instructed in this E-Bike Owner’s Manual.
Failure to follow these instructions may result in damage to your battery and may require
battery replacement:
• Only charge the battery with the included charger.
• Charge the battery indoors or in a garage at room temperature to avoid exposure to
rain or wind.
• When you do not use the e-bike for an extended period of time, charge the battery to
80% to meet the optimum storage condition. Check the charge level again after six
months. If the remaining charge of the battery is less than 30%, charge it again to 80%.
Once charging the battery is complete, unplug the battery from the charger and unplug
the charger from the wall socket.
• Your e-bike has a built-in Li-Ion battery. Any Li-Ion battery will self-discharge over time.
If the battery is left uncharged, then stored without charging, it may discharge to such
a low state that the battery can no longer be charged and must be replaced.

• Store the e-bike in a dry, well-ventilated location. Protect the battery against moisture
and water.
• The battery can be stored at temperatures between (minimum) -20°C (-4°F) and
(maximum) +50°C (122°F). For a long battery life, however, it is best to store the battery
at room temperature of approximately 20°C (68°F).
5. Be careful when transporting an e-bike.
• An e-bike is heavier than a normal bicycle. If transporting on a vehicle, be aware of
the maximum load capacity of the vehicle’s roof, towing hitch and/or the bicycle carrier.
Refer to the manuals of the vehicle and bicycle carrier for details.
• Always respect local laws about transportation of an e-bike.
Because Li-Ion batteries of this size and power are considered ‘Dangerous goods,
class 9’ when transporting, regulations may restrict the transport of separate Li-Ion
batteries in some places. Before booking your trip, make sure to check ahead with
your airline or carrier if it is allowed to travel with your complete e-bike.
6. Obey local regulations.
In most countries, the regulations for the use of an e-bike are the same as those for a
standard bicycle. However, there may be local dierences such as where you can ride,
minimum rider age or required equipment and registration.
It is the rider’s responsibility to know the local regulations that apply to an e-bike and
to obey them.
7. Visit your bike shop on a regular basis for maintenance of your new bicycle.
Your bike shop has the right knowledge and equipment to maintain your e-bike.
If you have questions about your new e-bike, ask your local authorised bike shop.
Limited warranty
Your bicycle is covered by a Limited Warranty.
Please visit our website for details.

This manual is applicable to the Hyena assist system only
This owner’s manual is primarily intended for the user to operate the e-bike.
Copyright © 2021 HYENA INC. All Rights Reserved.
Assist system
Owner’s Manual
ENGLISH
Trek FX+/Dual Sport +
Diamant 365

EN-GB - 1HYENA E-BIKE SYSTEMS
Content
1. Introduction.............................................................................................................. 2
1.1. Important notices ......................................................................................... 2
1.2. Safety instructions ....................................................................................... 2
1.3. Riding safety................................................................................................ 3
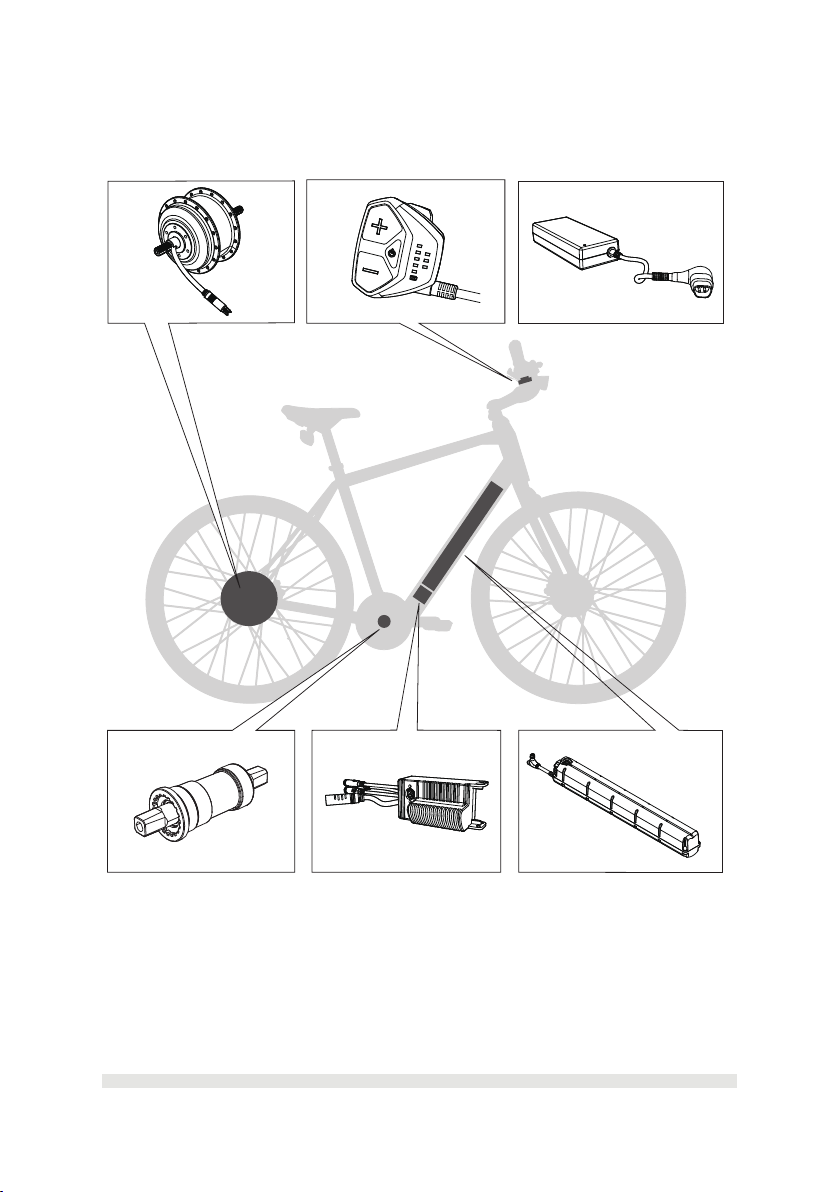
2. Assist system overview............................................................................................ 4
3. Drive unit instructions .............................................................................................. 5
3.1. Motor safety instructions.............................................................................. 5
3.2. Technical data of the hub motor .................................................................. 5
4. Battery handling instructions.................................................................................... 6
4.1. Battery safety instructions ........................................................................... 6
4.2. Technical data of the in-tube battery............................................................ 6
5. Assist system operation........................................................................................... 7
5.1. Console overview ........................................................................................ 7
5.2. Technical data of the console ...................................................................... 7
5.3. Turning on/o the assist system .................................................................. 8
5.4. Selecting an assist level .............................................................................. 8
5.5. Charge level indicator.................................................................................. 9
5.6. Walk assistance......................................................................................... 10
5.7. Turning on/o the lights (if part of the equipment) ......................................11
6. Range extender (optional) ..................................................................................... 12
6.1. Range extender overview.......................................................................... 12
6.2. Technical data of the range extender ........................................................ 12
6.3. Mounting the range extender kit ................................................................ 13
6.4. Installing the range extender battery ......................................................... 14
6.5. Removing the range extender battery ....................................................... 15
6.6. Mounting the bottle cage adapter .............................................................. 16
6.7. Removing the bottle cage adapter............................................................. 16
7. Charging instructions............................................................................................. 17
7.1. Charging safety instructions ...................................................................... 17
7.2. Technical data of the charger .................................................................... 19
7.3. Charging the battery .................................................................................. 19
8. Storage and transportation instructions................................................................. 22
8.1. Storage ...................................................................................................... 22
8.2. Charging the battery before and during storage........................................ 22
8.3. Transportation of an e-bike........................................................................ 22
9. Troubleshooting ..................................................................................................... 23
9.1. System issues ........................................................................................... 23
9.2. Battery & charging issues.......................................................................... 23
9.3. Other issues .............................................................................................. 24
10. Cleaning................................................................................................................. 25
11. Disposal ................................................................................................................. 25
Contact ............................................................................................................................. 27

EN-GB - 2HYENA E-BIKE SYSTEMS
1. Introduction
Thank you for choosing your new e-bike with the Hyena riding assist system.
We sincerely hope that you will enjoy your ride.
This owner’s manual is intended for the user to operate the product and contains details of
the assist system.
1.1. Important notices
⚠ WARNING
Please carefully read all of the safety warnings and instructions throughout the manual.
Failure to follow these warnings and instructions could result in severe injury or death.
• Users who are not professionally trained for bicycle assembly should not attempt to install,
disassemble or modify components.
• If you have any concerns about the operation of the assist system or its components, or
if you suspect damage to the battery, visit your local authorised retailer immediately for
an inspection.
• The term ‘battery’ in this manual also applies to the (optional) range extender battery and
can in some cases apply to both batteries with the range extender installed on the e-bike.
► About Warnings Symbols
As you read this manual, you will see grey warning boxes like this:
⚠ WARNING
Text in a grey box with the safety alert symbol will warn you about a situation or behaviour
that could cause severe injury or death.
► About Images
The e-bike shown in this manual may dier visually from your Hyena-equipped e-bike.
All information provided in this manual is still applicable to your e-bike.
1.2. Safety instructions
Instructions Pertaining to a Risk of Fire, Electric Shock or Injury to Persons
⚠ WARNINGS
When using e-bikes powered by the Hyena assist system, basic precautions should always
be followed, including the following:
• To reduce the risk of injury, close supervision is necessary when the e-bike is used near
children.
• Do not put ngers or hands into any e-bike component or touch the connector terminals
with bare hands.
• Do not use the e-bike if any exible power cord or output cable is frayed, has worn insulation
or shows any other signs of damage.
• Always check the charger, cables and power cord for any damage before charging the
battery.
• Only charge the battery using an original Hyena charger.
• Do not immerse the e-bike or any e-bike component in water.

EN-GB - 3HYENA E-BIKE SYSTEMS
⚠ WARNINGS, continued.
• Do not place the e-bike or any assist system component (like the charger) near hot or
ammable objects or materials.
• The assist system parts are not intended to be used at ambient temperatures lower than
-10°C (14°F) or over temperatures of 45°C (113°F).
• Use only genuine Hyena replacement parts. If you use anything other than genuine Hyena
replacement parts, you may compromise the safety, performance or warranty of your e-bike.
• Do not modify your assist system to increase the power or maximum speed of your assist
system.
1.3. Riding safety
• Make sure you are familiar with your new e-bike before riding it on roads with multiple
vehicle lanes and pedestrian footpaths.
• Do not start on the fastest setting right away. Start on the low assist setting for your rst
few rides.
• Do not focus on the console while riding. A distracted rider increases the risk of being
involved in an accident.
• Riding with the assist system turned o is like riding a normal, non-electric powered bicycle.
• The assist system is designed to provide riding support up to the speed limits in compliance
with local regulations (e.g. 25 km/h in the EU region and Australia, 32 km/h in New Zealand
and 20 mph in the USA/Canada region). Do not modify your assist system or t any other
equipment to increase the power or maximum speed of your assist system, this will render
the bike illegal and void the warranty.
⚠ WARNINGS
• When the assist system is switched on and an assist level is selected, the riding support
is activated as soon as you start pedalling. You should be seated on the e-bike and
engage at least one brake before starting to pedal.
• With the assist system switched on, do not put one foot on a pedal and throw the other
leg over the bicycle, as the e-bike could accelerate unexpectedly.
Failure to follow this warning may result in serious injury or death.

EN-GB - 4HYENA E-BIKE SYSTEMS
2. Assist system overview
The Hyena assist system includes the following system parts:
A. Rear hub motor, MRC-E250F
B. Console, CE-EL19A
C. Battery charger, 2A
A
DE F
B C
D. Torque & cadence sensor, ST-SQ-1
E. Electronic controller, DP-TR19A
F. In-tube battery, BP-TR19A

EN-GB - 5HYENA E-BIKE SYSTEMS
3. Drive unit instructions
Your e-bike is equipped with a 250-Watt electric motor, which forms the hub of the rear wheel
and also provides the electric riding assistance.
⚠ CAUTION
Do not dismantle the hub motor. The hub motor should only be serviced by a certied
mechanic using genuine replacement parts from Hyena.
3.1. Motor safety instructions
• Do not allow the motor to suer any mechanical or physical impacts or make any internal
modications.
• The motor can operate safely in rain and other adverse weather conditions.
However, do not immerse the rear wheel in water or clean it with pressurised water.
Also make sure your e-bike dries fully after riding in wet weather.
⚠ WARNINGS
• Do not change or modify any assist system components or any components that are
part of the bicycle drivetrain. Changing components could damage or overload the hub
motor, which could lead to serious injury or death.
• Do not obstruct pedals, cranks or wheels causing the motor to block. Incorrect operation
could damage or overload the hub motor and may lead to serious injury or death.
• The motor can heat up during riding. After riding, do not touch the metal housing of the
hub motor with bare hands or legs.
3.2. Technical data of the hub motor
Item Specication
Model number MRC-E250F
Rated voltage 36 V
Rated power
250 W
Max. torque at drive 40 Nm
Operating temperature -10°C (14°F) to 50°C (122°F)
Storage temperature -20°C (-4°F) to 70°C (158°F)
Protection rating IP54
Weight, approx. 2.2 kg (4.9 lbs)

EN-GB - 6HYENA E-BIKE SYSTEMS
⚠ CAUTION
The Hyena assist system is powered by a Lithium-Ion (Li-Ion) battery. Always read and
adhere to the instruction manual before handling or charging the battery or when using
the e-bike.
⚠ WARNINGS
• If your battery or charger exhibits any signs of damage, do not use the e-bike and take
it immediately to your local authorised retailer for inspection.
• Always turn o the assist system when not in use and/or when working on it.
• If the downtube has signs of visible damage, stop riding the e-bike immediately.
Riding the e-bike with a damaged battery could result in a re or explosion, which may
cause severe injury or death.
Item Specication
Rated voltage 36 V
Nominal capacity 7 Ah
Energy 250 Wh
Operating temperature -10°C (14°F) to 45°C (113°F).
Storage temperature
1 month -20°C (-4°F) to 50°C (122°F)
3 months -20°C (-4°F) to 40°C (104°F)
1 year -20°C (-4°F) to 20°C (68°F)
Permitted charging temperature range 0°C (32°F) to 45°C (113°F)
Protection rating IPX5
Weight, approx. 1.74 kg (3.84 lbs)
• Do not allow the internal battery to suer any mechanical or physical impacts or make
any internal modications.
• A battery may leak uid if damaged. Do not touch the battery uid. Contact with the uid
may cause burns or skin irritation. If you come in contact with battery uid, wash your
hands immediately with soap and water. If you get battery uid in your eye, ush your
eye immediately with water and seek assistance from your doctor.
• Store the e-bike in a dry and well-ventilated environment.
• To avoid a short circuit, keep the battery charging socket away from the contact of paper
clips, coins, keys, screws or other objects that can generate metallic attraction.
4. Battery handling instructions
Note
The term ‘battery’ in this manual also applies to the (optional) range extender battery and
can in some cases apply to both batteries with the range extender installed on the e-bike.
4.1. Battery safety instructions
4.2. Technical data of the in-tube battery

EN-GB - 7HYENA E-BIKE SYSTEMS
5. Assist system operation
IMPORTANT
Before you ride:
• Regardless of your experience level, you should read the ‘Introduction’ chapter of this
Owner’s Manual and carry out all important safety checks.
• The assist system can only be activated when the battery is suciently charged.
5.1. Console overview
You can control the assist system using the console, including switching on/o the assist
system, selecting the level of riding support, turning on/o the lights (if part of the equipment)
and using the walk assistance function.
A
BD
A. UP (+) button (Increase assist
lever and switching on/o lights
(if part of the equipment))
B. Power ON/OFF button
C. DOWN (-) button (Decrease assist
lever and walk assist)
D. Battery charge level indicator
E. Riding assist lever indicator
CE
5.2. Technical data of the console
Item Specication
Operating temperature -10°C (14°F) to 60°C (140°F)
Storage temperature -20°C (-4°F) to 70°C (158°F)
Protection rating IPX5
Weight, approx. <0.05 kg (0.11 lbs)

EN-GB - 8HYENA E-BIKE SYSTEMS
Notes
• Always turn o the assist system after riding or when parking the e-bike.
• If the e-bike is not used and no buttons are pressed, the assist system will automatically
turn o after six minutes to save power.
5.3. Turning on/o the assist system
• Single-press the power button to switch on the system.
• Press the power button longer than 2 seconds to switch o the system.
Riding with the assist system turned o is like riding a normal, non-electric powered bicycle.
< 0.5 sec ON > 2 secs OFF
5.4. Selecting an assist level
⚠ CAUTION
For safety reasons, always start riding at Level 0 or Level 1.
⚠ WARNING
When learning to ride an e-bike, start at the lowest assist level and gradually increase levels.
Once the assist system is switched on, the system will default start to Level 0.
Single press the UP (+)/DOWN (-) buttons to select the desired assist lever: Level 0 (0%,
no assist), Level 1 (max 140%), Level 2 (max 250%) to Level 3 (max 390%).
Level 0
Support O (0%)
Level 1
(max 140%)
Level 2
(max 250%)
Level 3
(max 390%)
Select the desired assist level using the UP (+) and DOWN (-) buttons.

EN-GB - 9HYENA E-BIKE SYSTEMS
Notes
• When the assist system is switched on and a assist lever is selected, the assist system
is activated as soon as you start pedalling.
• The assist support modes aect how much support the assist system delivers based on
your pedalling input.
• Generally, more support provides faster acceleration and easier climbing at the expense
of shorter range. Lower assist levels that provide less support result in longer battery run
times, longer range and more control in situations where traction is limited.
• If your e-bike is equipped with gears, change gears appropriately in addition to adjusting
assist modes to get the most use out of your battery.
• The e-bike drive output only provides support up to the maximum speed permitted by
local regulation (e.g. 25 km/h in the EU region, 20 mph in the USA/Canada region).
As soon as you reach this speed limit, the assist system will suspend the riding support,
and it reactivates automatically when your speed is below the speed limit.
⚠ WARNING
Do not use assist Level 2 or Level 3 when turning a sharp corner. This could cause the rider
to lose control of the e-bike and fall, which may cause severe injury or death.
5.5. Charge level indicator
Each illuminated green LED on the console represents approximately 20% capacity.
• 100% charged. Maximum range.
• 21–40% charged. Charge the battery.
• 10–20% charged. The battery is nearly empty. Charge the battery as soon as possible.
• < 9% charged. The LED ashes to warn the rider to charge the battery immediately.
≤ 9%
Flashing
10–21% 21–40% 41–60% 61–80% 81–100%
Notes
• When the (optional) range extender battery is connected, the charge level indicator shows
the combined charge level of the in-tube battery and range extender battery.
• At 4% charge, the riding support will stop. The remaining charge capacity is reserved to
power lights for up to two hours.

EN-GB - 10HYENA E-BIKE SYSTEMS
5.6. Walk assistance
The Walk-assist mode can help you push your e-bike more easily, for example, up a hill,
with a maximum speed of up to 3 km/h (2 mph). You can only enable the Walk-assist mode
when the system is switched on and you are pushing the e-bike.
• Press and hold the DOWN (-) button on the console for two seconds to activate the
Walk-assist mode.
• When Walk-assist mode is activated, the assist level indicators on the console will blink
in a waterfall pattern towards the front of the bike.
• To propel the e-bike forward at a slow speed, press and hold the UP (+) button.
• Release the UP (+) button to stop the Walk-assist function on your e-bike.
• Short press the DOWN (-) button to turn the Walk-assist mode o.
• The Walk-assist mode will turn o automatically if no buttons are pressed in 5 seconds.
⚠ WARNINGS
• The Walk-assist function may only be used when pushing the e-bike. Make sure you are
ready and standing steady before activating the Walk-assist function.
• Do not activate the Walk-assist function when you are riding the e-bike or if the wheels
are not in contact with the ground.
> 2 secs to active
< 0.5 secs to turn o Press and hold to start the Walk-assist
Activated

EN-GB - 11HYENA E-BIKE SYSTEMS
5.7. Turning on/o the lights (if part of the equipment)
With the system turned on, press and hold the UP (+) button for two seconds to turn the
lights on or o (if the front and rear lights are powered by the assist system).
• If the charge indicator is ashing (at < 9% charge), the battery is almost empty.
Charge the battery.
• At 4% charge, the riding support will stop. The remaining charge is reserved to power
lights (if part of the equipment) for up to two hours.
> 2 secs
Note
If your battery is empty, the lighting on your e-bike may not
work until the battery is recharged.

EN-GB - 12HYENA E-BIKE SYSTEMS
6. Range extender (optional)
Your e-bike system can be equipped with the (optional) range extender to extend your
travel range with riding assist.
With the range extender installed, the battery charge indicator on the console will show
the total capacity of the two batteries. The LEDs on the extender battery only show the
range extender capacity.
6.1. Range extender overview
6.2. Technical data of the range extender
⚠ CAUTION
To use the range extender battery, you shall follow the same rules stated in Chapter 4 –
Battery handling instructions.
Item Specication
Rated voltage 36 V
Nominal capacity 6.6 Ah
Energy 250 Wh
Operating temperature Charge: 0°C (32°F) to 45°C (113°F)
Discharge: -20°C (-4°F) to 60°C (140°F)
Storage temperature
1 month -20°C (-4°F) to 50°C (122°F)
3 months -20°C (-4°F) to 40°C (104°F)
1 year -20°C (-4°F) to 20°C (68°F)
Permitted charging temperature range 0°C (32°F) to 45°C (113°F)
Protection rating IPX5
Weight, approx. 1.49 kg (3.28 lbs)
C
A
B
DE
A. Range extender mounting plate
B. Range extender bottle cage adapter
C. Range extender battery (250 Wh)
D. Downtube cable (sold separately*)
E. M5x12 mm bolts and M5 washers
(2 pieces each)
*Trek part number downtube cable: 5255915

EN-GB - 13HYENA E-BIKE SYSTEMS
2. Connect the downtube cable with the range extender battery:
6.3. Mounting the range extender kit
Before the range extender battery can be used, the e-bike must be prepared by mounting
the range extender kit. Follow these steps to complete the installation:
1. Install the range extender mounting plate on the downtube:
Insert the range extender mounting plate
on the downtube. Apply the washers and
align the two M5x12 mm bolts with holes
on the mounting plate and downtube, then
tighten the two M5x12 mm bolts.
The nished mounting of the range extender
mounting plate.
⚠ CAUTION
Only use the supplied bolts. Bolts too short will not fully engage with the bike frame.
Bolts too long will leave the mount loose on the frame.
Remove the M3 bolt on the snap side on
the charge port of the battery.
Mount the downtube cable into the charging
port on the connector side of the battery and
secure it with the M3 bolt. Be sure that the
cable plug is facing away from the range
extender battery.
The nished connection of the downtube
cable with the range extender battery.
STEP 1
STEP 1 STEP 2
STEP 2
STEP 3

EN-GB - 14HYENA E-BIKE SYSTEMS
Align the upper range extender’s lock tab
with the top insertion at the mounting plate.
Be sure to insert in the right way, the
downtube cable will be face towards the
seat tube.
Next, turn the lower lock tab of the range
extender to the bottom insertion in the
mounting plate. It should snap in and lock
in place.
Make sure the range extender is attached
rmly to the mounting plate. Uncover the
charging socket cover on the downtube.
Plug the downtube cable into the charging
port on the downtube to connect the in-tube
battery with range extender battery.
STEP 1 STEP 2
STEP 3 STEP 4
Before the range extender battery can be used, it must be installed on the e-bike.
Follow these steps to install the range extender on the e-bike:
6.4. Installing the range extender battery
IMPORTANT
When the range extender battery is attached physically to the e-bike, it must also be attached
electrically to the bike.

EN-GB - 15HYENA E-BIKE SYSTEMS
Unplug the downtube cable. Pull the range extender lock tab in an
upwards direction to unlock it.
Turn the range extender from the bottom
insertion to loosen the lower lock tab from
the mounting plate.
Move the range extender upwards to
unhook it from the mounting plate.
Pick up the range extender towards you to
remove it from the mounting plate.
STEP 1 STEP 2
STEP 3 STEP 4
To remove the range extender from the e-bike, follow these steps:
STEP 5
6.5. Removing the range extender battery
This manual suits for next models
2
Table of contents