Hyskore 30278 User manual

Bench Top 360˚
Armorer’s Vise
Hyskore®
The vise rotates 360˚around a central axis and has an integral clutch
that allows it to lock up at any angle. Guns can be held in any position
for cleaning, scope mounting or maintenance. This means you can clean
with the muzzle angled down so that cleaning solvents and debris run
out the muzzle and not into the action or trigger group. If you have an
AR-15, remove the rear take down pin and grip the lower receiver in the
vise and the gun will be securely held while allowing full access to all
internal parts.
Always wear appropriate vision and hearing protection when using this product!
Guns, Scopes, Benches, Ammunition, Protective Gear, etc. are not included!
In the course of shipping, parts may end up missing or damaged,
Call us at 631.673.5975. 8:30a.m. - 5:00 p.m. Eastern Time. We will promptly send replacements.
# 30278

Page 2
Introduction
Sometimes it almost feels like it is necessary to have a third hand while working
on various guns. In addition, people who really know about guns always
recommend cleaning the gun from the breech with the barrel angled down. When
cleaning the gun from the breech end you avoid damage to the muzzle crown. In
addition, with the barrel angled down all the debris and gunk from the cleaning
process run out the end of the barrel and not back into the action and trigger
group. The HYSKORE®#30278 Bench Top Armorer’s Vise makes all of these
processes easy and convenient for the shooter. Some guns are relatively easy to
support during the cleaning process; however, guns like the AR type platform,
which are hinged at the forward take down pin are most easily serviced if they
are supported in a xture. The Armorer’s Vise allows you to set the gun at the
absolutely perfect angle for easy of cleaning and servicing.
As with all HYSKORE®products the vise is constructed from heavy duty welded
steel sections with a powder coat nish. All of the gun contact surfaces have a
generous foam pad to avoid damage to delicate nishes and surfaces. The clutch
assembly is made from sturdy Delrin that provides excellent function and long
service life.

Page 3
This is how the vise should look when you’ve
completed mounting it.
The bracket can be mounted ush to the edge of
the bench or it can be recessed from the edge, this
will depend on your preference. It is suggested
you assemble the vise, put a gun in it, and then
gauge the distance you feel is most appropriate for
the type of work you want to do.
Items You Need To Purchase
In order to assemble and mount this product you will need an
8or 10adjustable wrench and a power drill with a ½bit.
In addition, you will need to purchase some outside hardware
items. These were not included with the set because we have no
idea what type of bench or surface you will mount the vise to.
The recommended items to purchase are ½ hex bolts of a length
sufcient to penetrate both the vise and the bench top and allow
enough room for attaching hex nuts and washers (also must be
purchased). In the event that the wood beneath where you mount
the vise is solid you will need to purchase lag bolts to securely
anchor the vise.
In the event that you do not have a bench further on in this
instruction book there are suggestions on how to build one.
Place the vise mounting bracket on the bench top
and mark the centers of the 4 mounting holes.
Using the ½drill bit drill 4 holes.
1
32
Assembly & Mounting

Page 4
The vise has foam padded gun contact surfaces
to avoid damage to the gun. In addition, it has a
foam padded oor plate “B” that hooks onto the
vise guides so the gun does not make contact with
the internal surfaces of the vise.
The hook keeps it in position regardless of the
angle.
Assemble the vise half to the bracket. You will
note that the clutch has fascia teeth that allow it
to engage at any angle. When the knob “A” is
tightened and the clutch teeth are fully engaged it
will hold the vise in position.
The handle (A) has not been attached to the vise
to avoid damage in shipping and handling. You
will note that there are 3 hex nuts on the shaft.
Hex nuts #1 and #2 have been xed in place at
the factory to maintain the proper clearance so the
vise turns freely. Nut #3 is a jam nut that is used to
jam against the handle (A) so that it stays securely
in place.
Thread the handle onto the shaft. Make sure that
the #3 hex nut is in place rst. Please note that
the handle has a left hand thread, therefore, you
will be turning it counter clockwise. Using your
wrench hold the #3 nut in place and rotate the
handle counter clockwise so it solidly engages
against the nut and then tighten so the handle does
not come loose. You will now be able to use the
vise by rotating the handle.
You can use blue Locktite thread locker if the
handle becomes loose.
4 5
76
123
A
A
B

Page 5
These are the materials that you will need to construct a bench that has a 2 x 4top, with the top of the bench
36to 37 above the oor.
BILL OF MATERIALS
4 - 2X 4X 2Wood Glue
3 - 2 x 4 x 163Drywall Screws
2 - 2 x 4 x 191 5⁄8Drywall Screws
8 - 2 x 4 x 36
4 - 2 x 4 x 41
1 - 2 x 4 x 3⁄4Plywood
The vise can be rotated to the right (clockwise
facing it) or
To the left, depending on the conguration of your
gun; ie. If some part like the bolt handle get in
the way.
9
B1
8
How To Build A Simple Sturdy Bench

Page 6
The 2 x 4plywood top of the bench will be larger
than the frame underneath. Decide which side of
the bench you want to be the back and align the
plywood top so that it is even with the legs along
the back of the bench. This way should you wish
to attach vertical supports and then attach a peg
board or similar organization device it will be an
easy process.
Your bench is now complete.
There are 3 - 16cross braces under the top, as
pictured above. These should be both glued and
screwed into place.
Assemble the legs as pictured above. It is a good
idea to pre-drill all holes in the members that the
screws go through rst. Apply wood glue along
all surfaces that are to make contact. Glue and
screw the 2 x 4wood blocks at the bottom of
each set as shown. Before you nalize this step
please refer to B3.
The legs are not identical within each pair one
is a mirror image of the other. This is how the
partially assembled bench frame will appear
with the 41 and 19 2 x 4’s in place and the legs
properly oriented. Glue and screw.
B2 B3
B5
B4
41
41
19
41
41
16
16
19

30278 - 2
Page 7
WARRANTY AND DISCLAIMERS
HYSKORE®/Power Aisle, Inc. guarantees that its products are free from defects in material and workmanship for a period of 90 days
from the original date of purchase. This Warranty applies to non-commercial use only. Commercial use voids this warranty. In the event
of any defects in material or workmanship, HYSKORE®/Power Aisle, Inc.’s sole liability therefore shall be the replacement of any such
product(s) and/or components that are defective in material or workmanship. The replacement of any such product(s) and/or components
shall be HYSKORE®/Power Aisle, Inc.’s sole responsibility. This warranty specically excludes any and all consequential or accidental
damages. No other warranties or liabilities whatsoever are either expressed or implied. If any such warranties shall be imposed by law, not
withstanding this provision, then such warranties shall be the responsibility of HYSKORE®/Power Aisle, Inc.’s immediate buyer. There
shall be no warranties of merchantability, use of trade, or tness for a particular purpose. Alteration of any product, misuse, or exceeding
any stated product limitations voids this warranty. All returns, adjustments, etc. are the responsibility of the retailer/dealer that sold the
product. HYSKORE®/Power Aisle, Inc. handles return issues through it’s dealers. It should be obvious when using some of these products
that approved protective safety gear, including, but not limited to, eye and ear protection, should be utilized. Using the appropriate safety
gear is the sole responsibility of the person(s) using the product. It should also be obvious that certain products such as silica gel, etc. must
not be consumed, inhaled or taken internally. The user takes full responsibility for inappropriate or incorrect use of these items. In the event
an inadvertent event takes place, Material Safety Data Sheets (MSDS) are available on the HYSKORE®website. www.hyskore.com. We
do not sell guns, scopes, ammunition, cleaning accessories, etc. These accessories are used in many of our product pictures, as props to
illustrate how the products are used. As such, they are not included with any product. All photographs, drawings, copy, instructions, etc.
are the exclusive property of HYSKORE®/Power Aisle, Inc. All downloadable les are intended for the use of the end user of HYSKORE®/
Power Aisle, Inc.’s products and cannot be reproduced without the express written permission of HYSKORE®/Power Aisle, Inc.
• REPLACEMENT PARTS •
Visit our website: www.hyskore.com
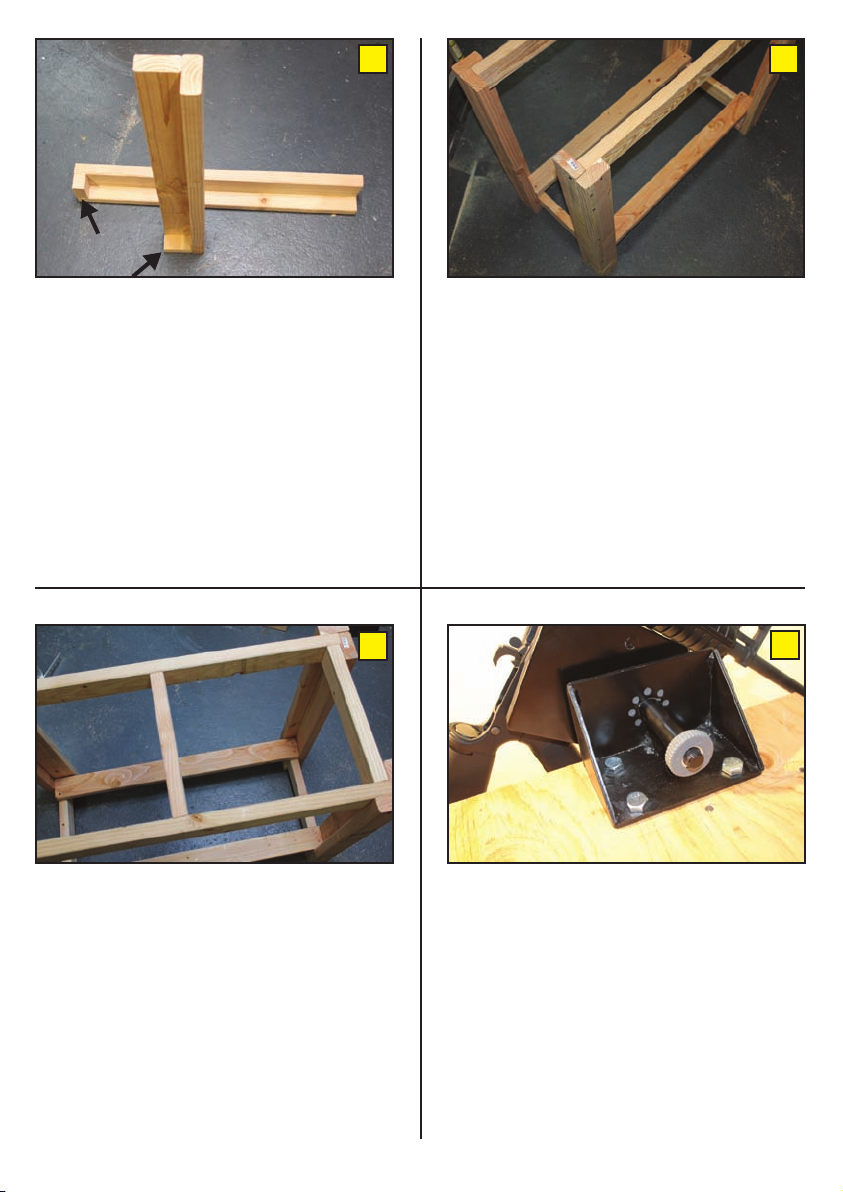
These are replacement parts for purchase. Pictures do not represent contents of set.
Parts List:
30278 - 1 Floor Plate for Vise ................................................................. $ 10.00
30100 - 4 Barrel Foam “V” Block Set (1 set)........................................... $ 17.50
30100 - 8 Hand Wheel (1 pc.)................................................................. $ 12.50
30182 - 3 Clutch Set ............................................................................... $ 10.00
30182 - 5 M-16 Lock Knob...................................................................... $ 15.00
30278 - 2 Left Hand M-12 Hex Nuts (2).................................................. $ 15.00
Send Check or Money Order with Phone Number to:
Power Aisle, Inc.
193 West Hills Rd.
Huntington Station, NY 11746
NYS Resident add 8.75% Sales Tax
** $10.00 Shipping & Handling to
Lower 48 States**
** $25.00 Shipping & Handling to
Alaska, Hawaii, Puerto Rico**
30278 - 1
30182 - 3
30100 - 4
30182 - 5
30100 - 8

Bench Top 360˚
Armorer’s Vise
Hyskore®
Guns, Scopes, Benches, Ammunition, Protective Gear, etc. are not included!
# 30278
Table of contents
Popular Tools manuals by other brands

Signode
Signode Josef Kihlberg JK20-680FN operating instructions

Balcrank
Balcrank PREMIUM 2110 Series Operation, installation, maintenance and repair guide

Cessna
Cessna 210B owner's manual

ixtur
ixtur MRP-46 Original user manual

Parkside
Parkside PDMH 4500 A2 operation and safety notes original operating instructions

BGS technic
BGS technic 5269 instruction manual