i-Life AMOUR User manual
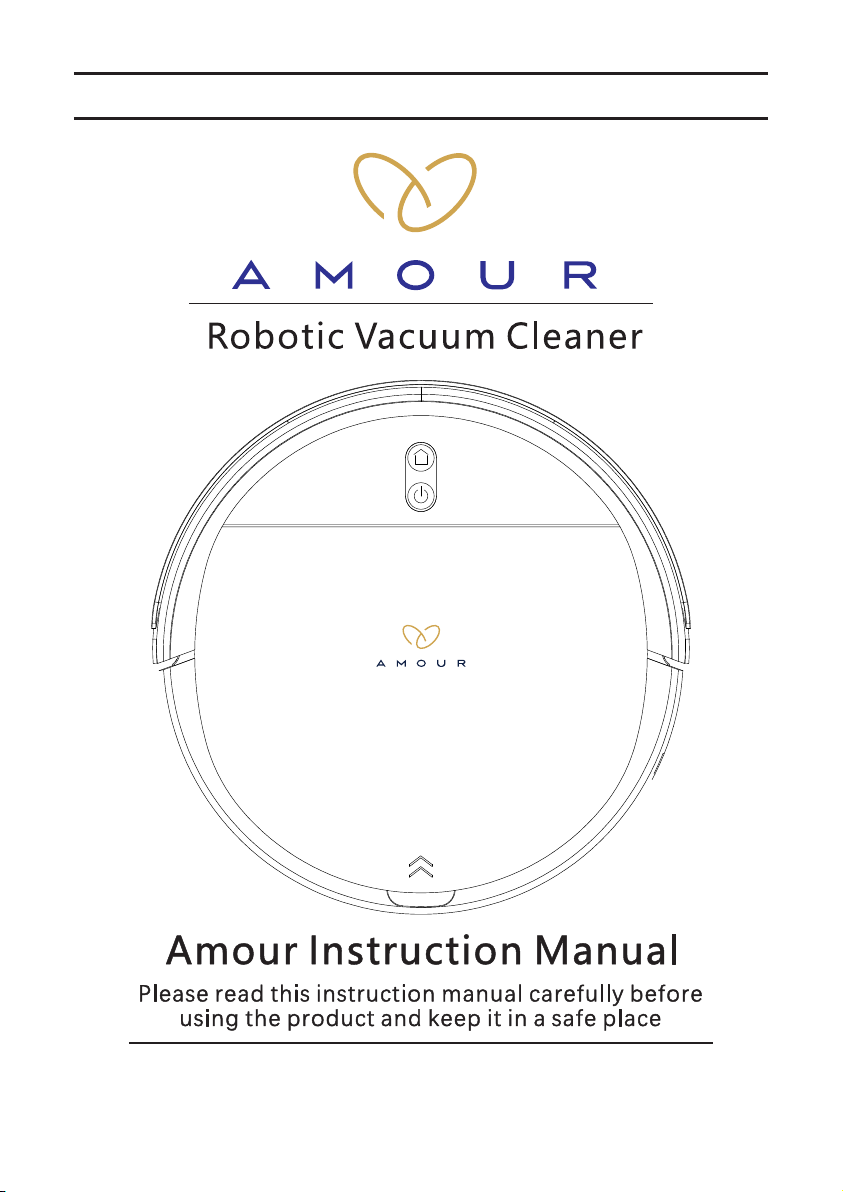
Thank you for purchasing THE ROBOT.
Please read through the instructions before use.
V7s
MULTI-FUNCTION ROBOTIC VACUUM CLEANER

ILIFE RETAIL PVT. LTD.
iLife Customer Service
For India Customer Care: +91-84 199 199 00
E-mail : [email protected]
Website : www.ilifeshop.in

Table of Contents
V7s
1. How to Get Started............................................................................. 1
2. Welcome to Use ................................................................................. 2
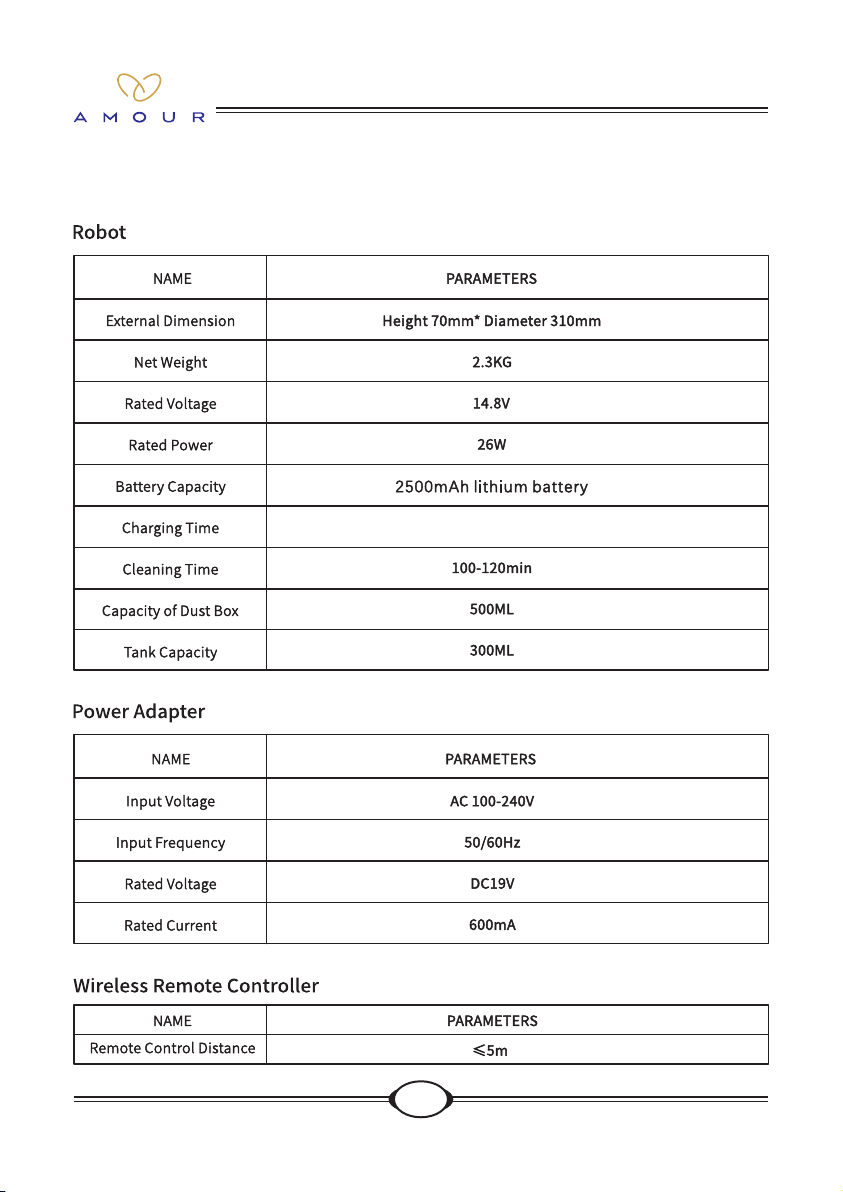
3. Product Parameter ............................................................................ 3
Robot ........................................................................................... 3
Power Adapter.............................................................................. 3
Wireless Remote Controller.......................................................... 3
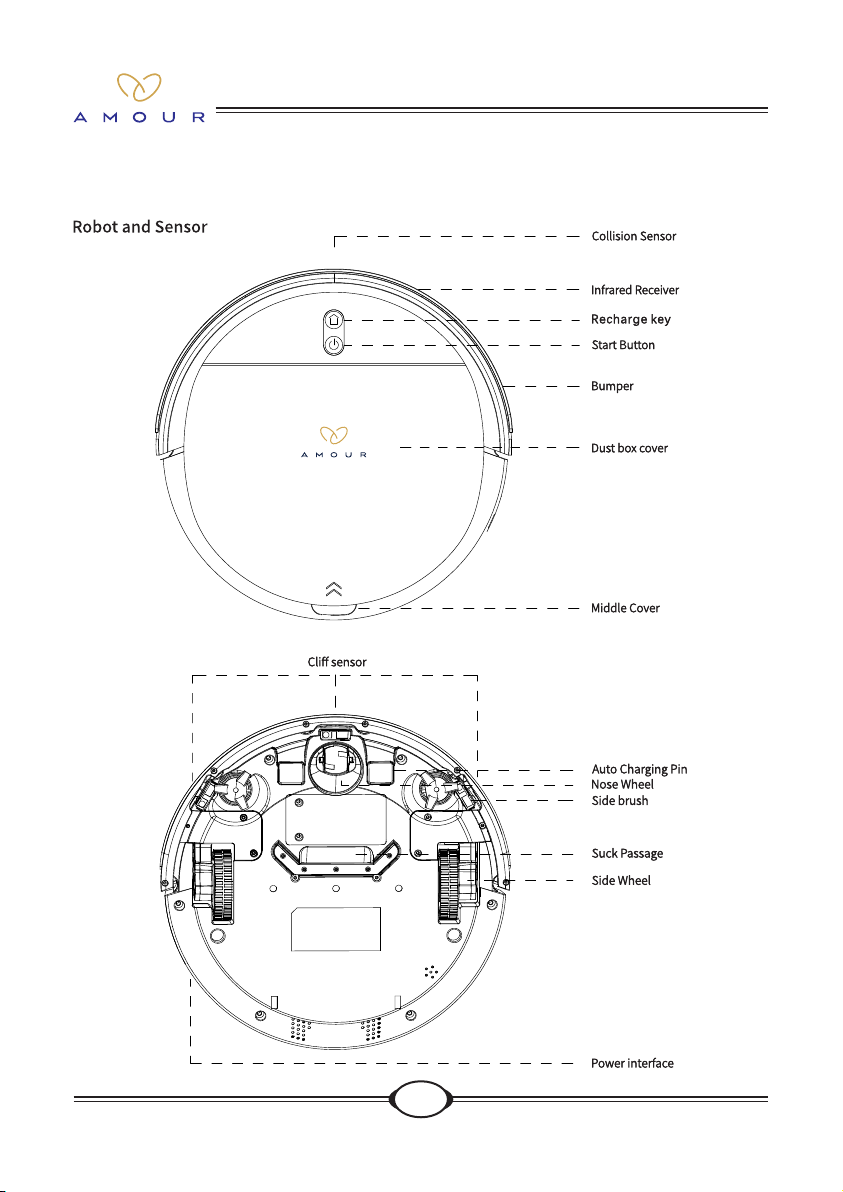
4. Product Introduction ......................................................................... 4
Robot and Sensor ........................................................................ 4
Cliff Sensor ................................................................................... 4
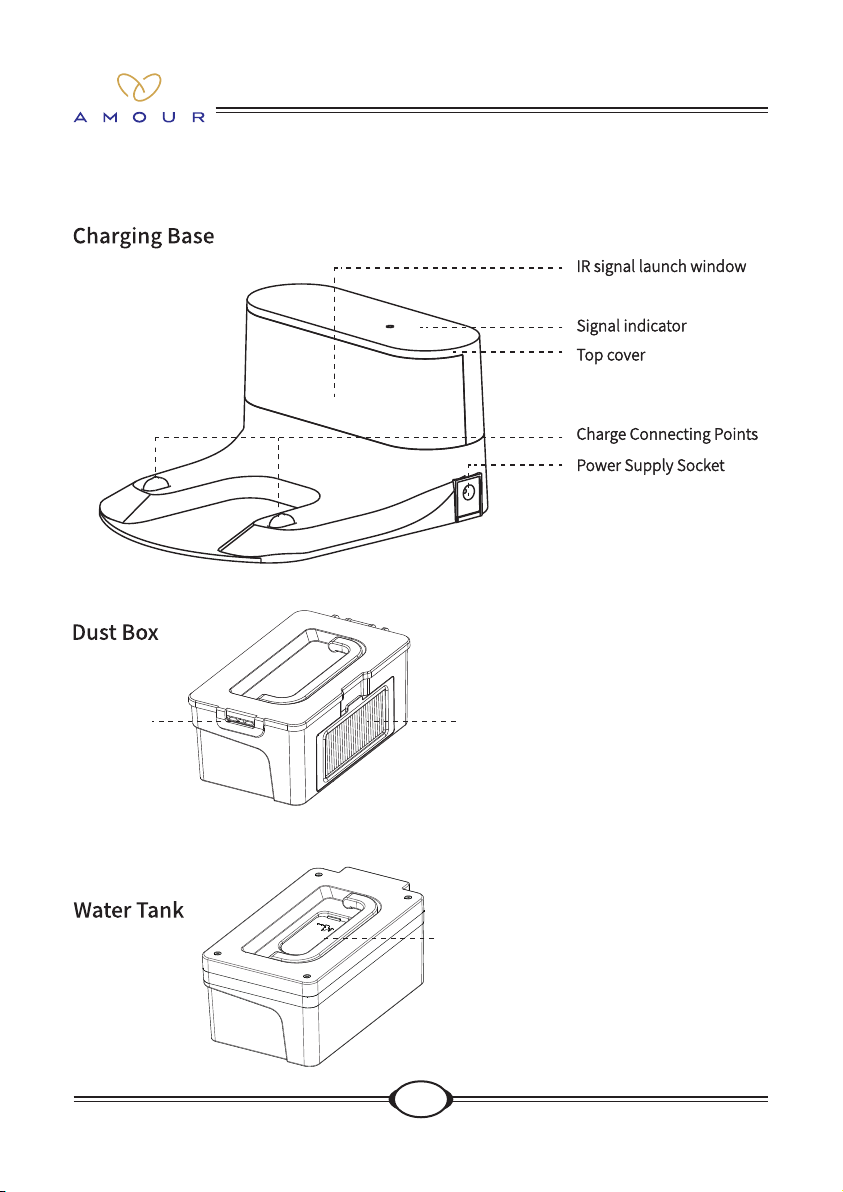
Charging Base ............................................................................. 5
Dust Box ....................................................................................... 5
Water Tank.................................................................................... 5
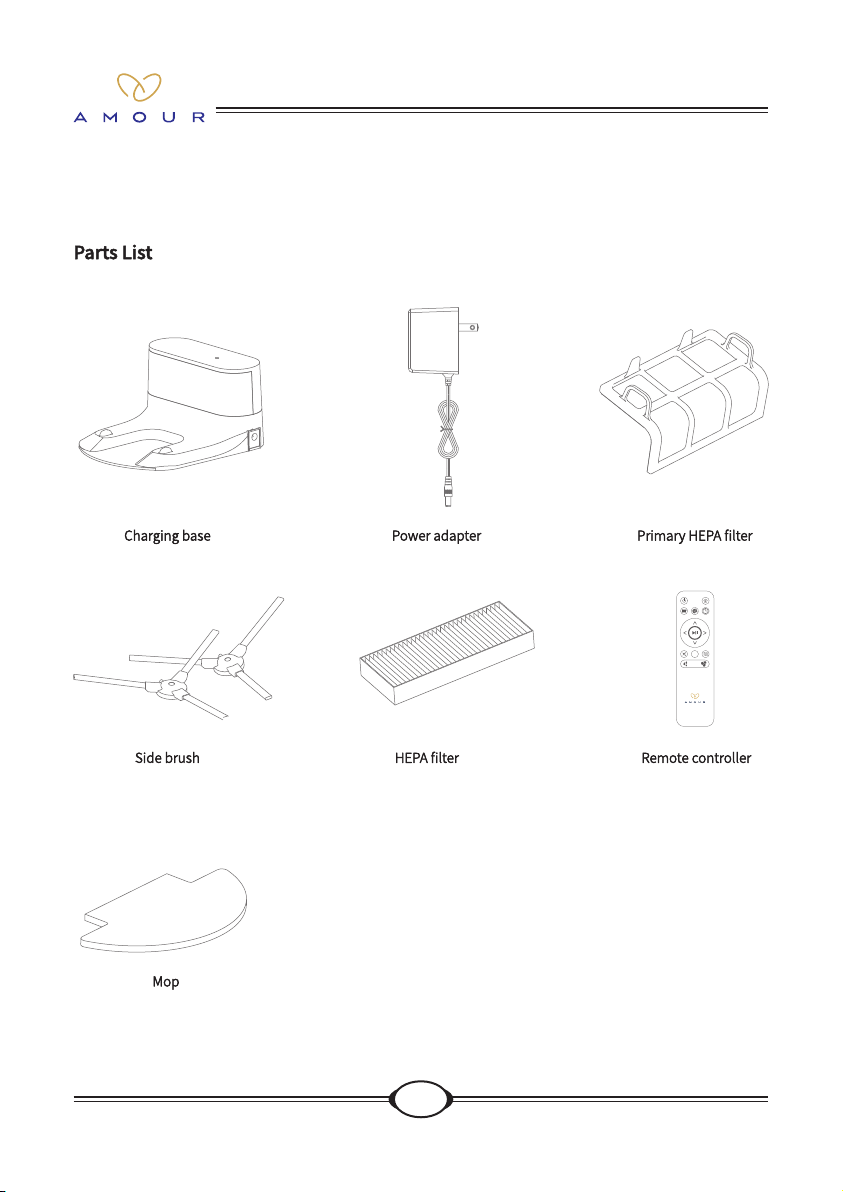
Parts List ...................................................................................... 6
(Charging Base, Power Adapter, Primary HEPA Filter,
Side Brush, HEPA Filter, Remote Controller, Mop)
5. Product Installation ........................................................................... 7
Charging Base Installing .............................................................. 7
Installation of Side Brushes .......................................................... 7
Starting up and Charging ............................................................. 7
6. Charging Operation........................................................................... 8
Automatic Charging ..................................................................... 8
Power Charging of Remote Controller.......................................... 8
Manual Charging.......................................................................... 8
7. Product Operation............................................................................. 9
Start Cleaning............................................................................... 9
Pause ........................................................................................... 9
8. Cleaning Mode .................................................................................. 10
Random Cleaning ........................................................................ 10
Max Cleaning ............................................................................... 10

V7s
Table of Contents
Spot Cleaning............................................................................... 10
Planned Cleaning......................................................................... 10
Scheduled Cleaning..................................................................... 10
Edge Cleaning.............................................................................. 10
9. Reservation Operation ...................................................................... 11
Fixed-time Reservation................................................................. 11
10. Operation of Remote Controller........................................................ 12
11. Water Tank Operation ........................................................................ 13
12. Mobile APP Operation ....................................................................... 14
APP Download ............................................................................. 14
Add Device ................................................................................... 14
Unbind Equipment ....................................................................... 14
13. Mobile APP Network Interfacing Operation ...................................... 15
14. Routine Maintenance ........................................................................ 16
Dust Box Cleaning........................................................................ 16
Charging Base ............................................................................. 16
Clean the Primary HEPA Filter....................................................... 16
Clean the Duster Cloth.................................................................. 16
Routine Maintenance ................................................................... 17
Battery Maintenance .................................................................... 17
Cliff Sensor ................................................................................... 17
Cleaning of the nose wheel........................................................... 17
15. Safety Information............................................................................. 18
16. Alarm Prompt..................................................................................... 19
Frequently Asked Questions ........................................................ 19
17. Hazardous Substances ..................................................................... 20
18. Product Warranty .............................................................................. 21

1
V7s
How to get started ......
1. Open the box & remove the safety rubber from the Robot of both sides.
2. Plug in the charging base.
3. For the rst charging process keep the robot from the charging base at least 2 feet
away.
4. With the help of remote press the home button so that the robot will automatically
go to the charging base.
5. Let the robot charge for at least 3-4 hours, when it is on charging yellow light will
blink and once fully charged green light would be displayed.
6. Fully charged press the clean button on the remote.
7. For further more features of the robot please read the user manual carefully.

2
V7s
Welcome to use
Thank you for choosing the sweeping robots of AMOUR
AMOUR V7s is a smart robot integrating with sweeping, mopping and suctioning
features. It can assist you to complete housekeeping work in a truly efcient and high-
quality manner. It is featured with ultrahigh suction for dust collection, and is also
equipped with multiple sensors and ultra-powerful obstacle navigation capability, and
thus it can easily adapt to your distinct home environment. The robot can automatically
recharge after cleaning without any human interference.
You may use a remote controller to control different modes - automatic cleaning,
scheduled cleaning, xed-point cleaning and other cleaning modes, and set times and
modes at any moment. Even if you are not home, it will clean your house without any
difculty and make your home healthy and clear.
Free yourself from trivial housework and enjoy your life from now on.
Wish you be happy to use it!
3
V7s
Product Parameter
180-240min180-240min180-240min
4
V7s
Product Introduction
5
V7s
Product Introduction
Hepa FilterHepa FilterHepa Filter
Filling TapFilling TapFilling Tap
LockLockLock
6
V7s
Product Introduction

7
V7s
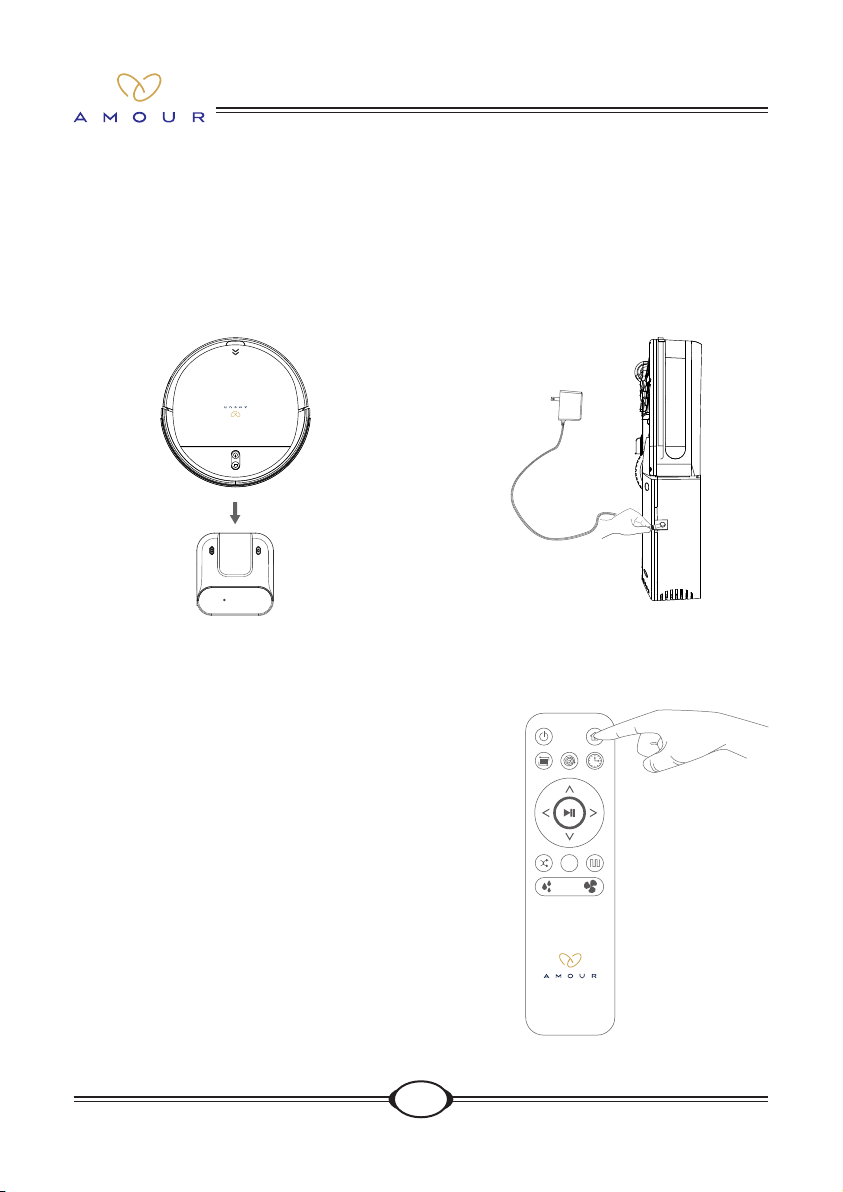
Product Installation
Starting up and charging
Long Press the start button on the robot for 3 seconds to turn on, and then press the recharge
button, the robot will be automatically charged on the charging base.
Tips:
1. If the robot is in low power and cannot be started on, please put the robot directly against the charging base.
2. When the adapter is charged, the robot doesn't accept instructions from the remote controller and the key
operations directed on the robot.
Charging Base Installing
Place the charging base against the wall on
the horizontal oor, and then connect it to the
power source.
Tips:
1. Remove all barriers within 1m on its left and right
and 2m at the front from the charging base.
2. The power cord on the oor may be dragged by
the robot and lead to displacement or power
failure of charging base.
3. The signal indicator on the charging base shall be
on constantly.
Installation of Side Brushes
Take out the side brushes from the packing
box and press them into the mounting holes
vigorously.
8
V7s
Charging Operation
Automatic Charging
Under the automatic cleaning mode, when
the product is low in electric quantity, it will
automatically search the charging base for
power charging.
Manual Charging
Connect the adapter to the power on the wall,
and connect the DC power output to the DC
socket of the robot.
P o w e r C h a r g i n g o f R e m o t e
Controller
Press the recharge key on the remote
controller in the selection mode, and the
machine will automatically nd the charging
base for charging.
Tips:
1. When the key indicator is blinking in orange
color, it indicates that power charging is
ongoing; upon complete power charging, the
key indicator lights up permanently in green
color.
2. During daily use, please place the robot on the
charging base and ensure that the charging base
is connected to the power source.
3. If the product is not to be used for a long period,
please fully charge the product, turn off the
power switch, and store the product in a dry and
well-ventilated place.
4. When setting the reservation mode, please do
not activate the manual charging mode, while
the automatic charging mode is recommended.
9
V7s
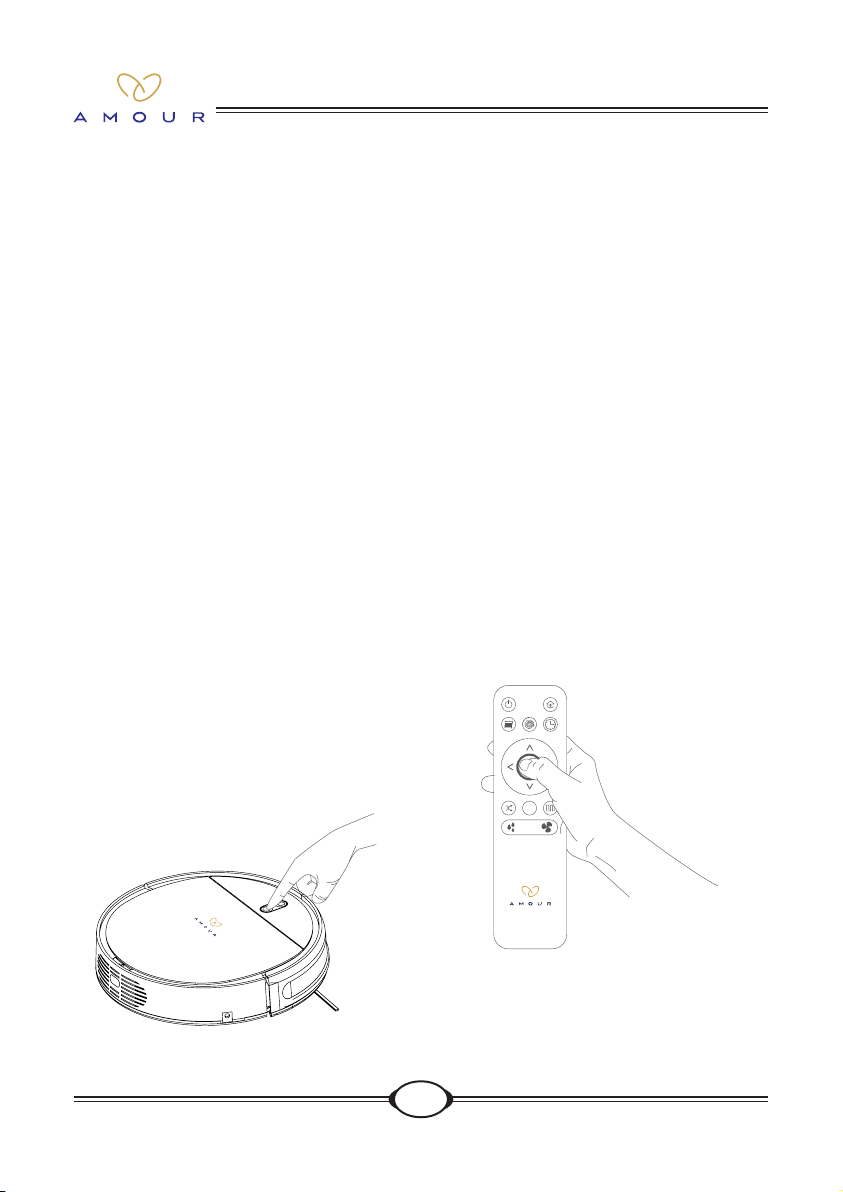
Product Operation
In order to adapt to different ground conditions and realize in-depth cleaning, the product in
congured with multiple cleaning modes, which are optional from the remote controller.
1. Use the remote controller to directly switch to any mode.
2. It is required to ensure that the robot's start key is lighted permanently in green color, such that
the robot is standby. If the robot is not awakened, quickly press the start key or start/pause key
on the remote controller to awaken it. If the robot does not wake up, it means that the robot is in
sleep or power off. When the robot is in sleep, please short press the start/pause button on the
remote control to wake it up. When the robot is powered off, please long press the start button
of robot for three seconds, and then robot will be turn on.
Start Cleaning
The automatic cleaning mode can be started,
by quickly pressing the robot's start key or the
start key on the remote controller.
Tips:
Before activating the modes, make sure that the start
key on the robot is lighted permanently in green
color, indicating that the robot is standby. If the
robot is not awakened, quickly press the start key or
start/pause key on the remote controller to awaken
it. If the robot does not wake up, it means that the
robot is in sleep or power off. When the robot is in
sleep, please short press the start/pause button on
the remote control to wake it up. When the robot is
powered off, please long press the start button of
robot for three seconds, and then robot will be turn
on.
Pause
Quickly press the start key on the robot or the
start/pause key on the remote controller, and
then the robot will pause.
Tips:
After standing by for 2 minutes, the robot enters the
hibernation status, and then the signal indicator of
start key will extinguish.
10
V7s
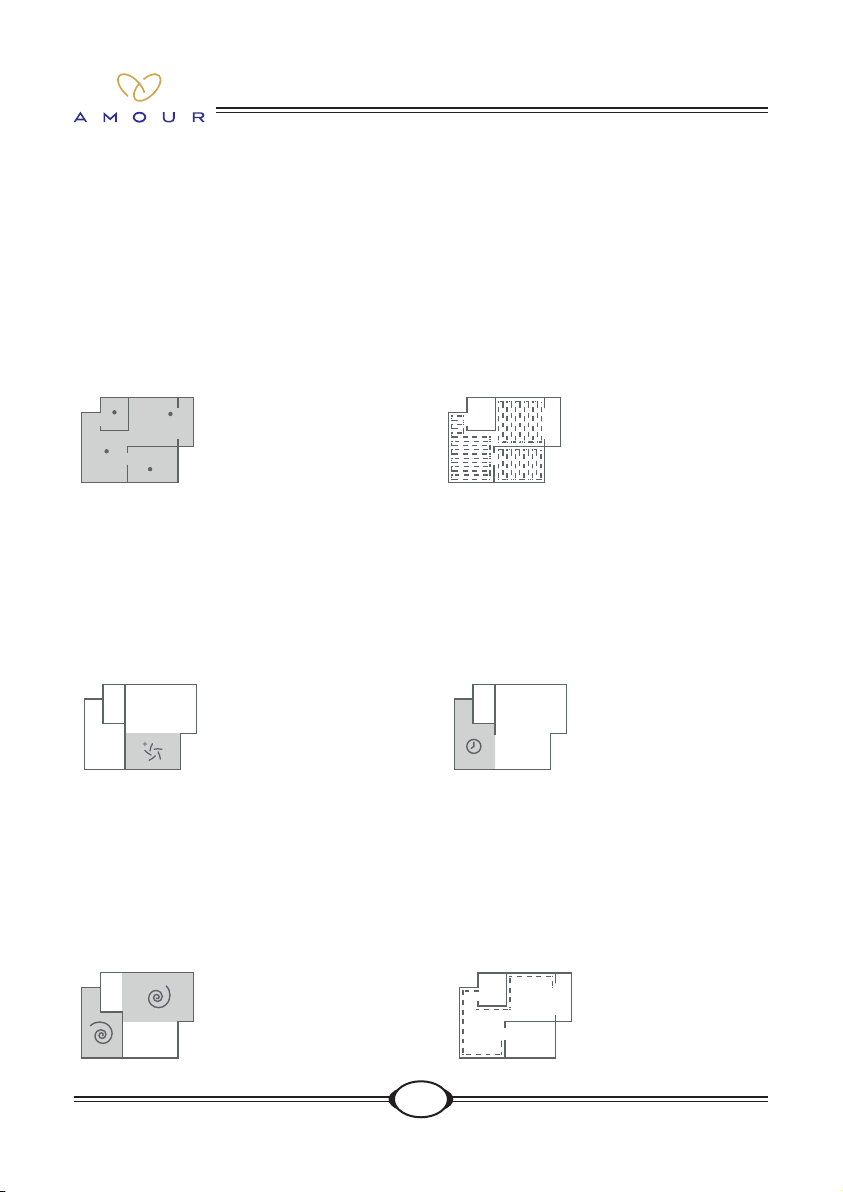
Random cleaning
On the remote controller, press the auto
cleaning key, and the robot will perform
automatic cleaning in the random cleaning
mode by comprehensively analyzing the
environment.
Planned Cleaning
Press the cleaning key, and the robot will
automatically enter the planned cleaning
mode to perform cleaning in a random, multi-
angle and retracing manner, with repeated
patrolling coverage.
Max cleaning
If any area in the house is heavily accumulated
with dust, please press the robust cleaning
key on the remote controller, the robot will
perform cleaning with intensied suction
pressure.
Spot Cleaning
If there is a "severe dusty area" in the house,
which is in need of repeated cleaning, please
press the spot cleaning key, and then the
robot will perform intensied cleaning in a
round trajectory.
Edge cleaning
When encountering a wall, the robot will
automatically enter the edge cleaning mode.
Under the edge cleaning mode, the robot will
operate along the side of the wall and will not
ignore any corners.
Scheduled Cleaning
Set the cleaning duration via the remote
controller. With successfully set reservation,
the robot can perform automatic cleaning at
the xed time on a daily basis.
Cleaning Mode
11
V7s
Reservation Operation
In order for easy cleaning, the product is congured with the "Schedule" feature, and the user can
send instructions to the robot via the remote controller. After the reservation, the robot will clean
automatically every day according to the set time.
Operation:
1. Aim the remote controller at the robot to set reservation (make sure the power switch on the
side is on).
2. Make sure the green light of the robot's start key is on and the robot is now awakened. If the
robot is not awakened, quickly press the start key or start/pause key on the remote controller to
awaken it. If the robot does not wake up, it means that the robot is in sleep or power off. When
the robot is in sleep, please short press the start/pause button on the remote control to wake it
up. When the robot is powered off, please long press the start button of robot for three seconds,
and then robot will be turn on.
Fixed-time Reservation
1. Hold the reservation key for three seconds to set reservation.
2. Hold the reservation key for three seconds to cancel reservation.
3. Upon the reservation, the time after one hour is the scheduled
cleaning time.
Tips:
If you long press the start button on the robot for 3 seconds and
then the robot will be turn off, the appointment will be cleared over
and you need to make a appointment again.
Examples:
If you make the reservation at 8:00 a.m., the robot begins to enter
the reservation mode and starts to work at 9:00 a.m. It will start
working at 9:00 a.m., every day; If you power off, the reservation
deems to be cancelled by default.
12
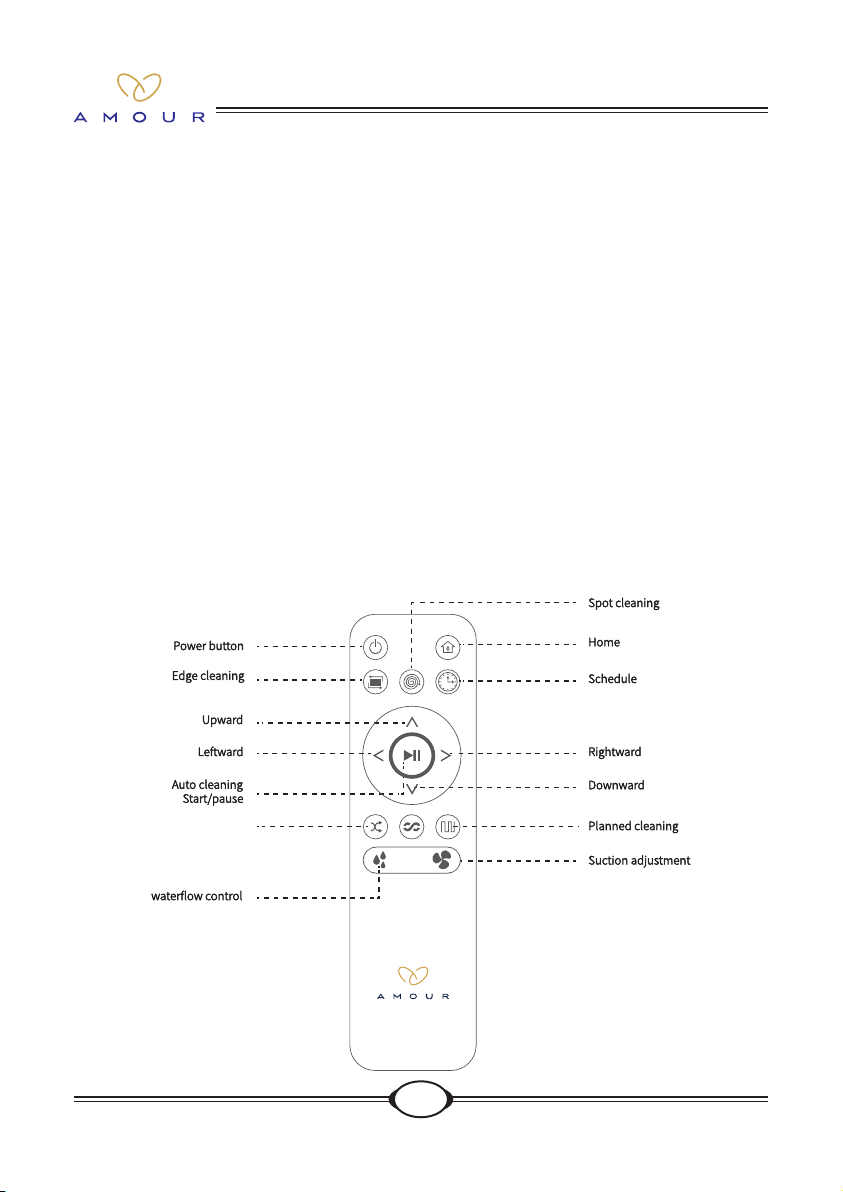
V7s
1. Power button: press the key to make the machine enter the sleeping mode.
2. Recharge key: press the key to make the machine automatically return to the charging base for
charging.
3. Edge cleaning key: press the key to enable the robot to perform cleaning around the
surrounding of a xed object. (e.g. a wall)
4. Spot cleaning key: press the key, and the robot will perform xed-point cleaning in a "spiral"
route.
5. Schedule key: press the reservation key for three seconds to enter the reservation mode.
6. Forward key: press the key to drive the machine forward in selection mode.
7. Backward key: press the key to drive the machine backward in selection mode.
8. Leftward key: press the key to drive the machine leftward in selection mode.
9. Rightward key: press the key to drive the machine rightward in selection mode.
10. Start/pause key: when the robot is in standby, press this key to activate cleaning; when the
robot is operating, press this key to suspend cleaning; when the robot is hibernating, press this
key to awaken the robot.
11. Waterow control key: three levels of water volume can be optional by pressing the water
volume adjustment key.
12. Suction adjustment key: three levels of cleaning suction can be optional by pressing the level
adjustment key.
Operation of Remote Controller
Random CleaningRandom CleaningRandom Cleaning

13
V7s
After cleaning, the dust box can be replaced with tank assembly if mopping is required.
1. Paste the water seepage cloth Push through the two xing corners of the water
seepage cloth along the lower end of the duster cloth, paste the water seepage
cloth securely, and mount the water seepage cloth bracket to the base of the robot
in alignment.
2. Feed water Open the rubber plug of the water lling nozzle, slowly ll water into the
water tank, and secure the rubber plug after the water tank is lled.
3. Install the tank assembly Open the middle cover of the robot, withdraw the dust
box, and simply place the lled water tank into the empty slot.
4. Mop the oor Activate any cleaning mode on demand, and then the robot will
perform the cleaning operation.
Tips:
1. During the robot's mopping process, if the operation is suspended due to rell water or clean
the duster cloth, the robot will reschedule the planned route upon restart, to re-clean the
cleaned area. In order to achieve better cleaning performance, it is recommended to use the
robot in a single room when mopping.
2. If a second room needs to be cleaned, it will be recommended to manually mode the robot to
the second room and rell the water tank or clean the duster cloth as appropriate.
3. If multiple rooms need to be cleaned, refer to the above Paragraph 2 before cleaning please.
4. Please do not use the water tank assembly on any blanket. Upon cleaning operation using the
duster cloth feature, please fold the edge of the blanket to avoid that foreign matters on the
duster cloth may pollute the blanket.
5. When cleaning, please pay attention to water lling or clearance timely, and open the tank
plug during water lling.
6. When charging, please remove the tank assembly.
Water Tank Operation
14
V7s
The product can be operated remotely via mobile APP, and please operate in accordance
with the following instructions or by reference to the product guide described on the
APP interface.
APP Download
Search “Velway Smart” in the APP store, or scan the following QR code to download the
Velway Smart APP.
Tips:
If the downloading fails, please try the following downloading approaches.
1. Contact the customer-service personnel of the sweeping robot, and ask for the APP
installation package.
2. Search the |Velway Smart| in major mobile APP online stores, and directly
download and install it.
Mobile APP Operation
Add Device
Ensure the robot is powered on, open the “My Home” page of the Velway Smart APP,
click “ Add Equipment” in the group of all equipment, and then you can nd the robot in
the list of “My home - All Equipment” after successful addition.
Unbind equipment
APP unbinding
1. Click the “Velway Sweeping Robot” on the “My Home - All Equipment” page of
Velway Smart APP;
2. Click “ Unbind Equipment” on the displayed “Equipment Details” page, to simply
complete the unbinding.
Manual unbinding
Hold the key on the middle side of the product for three seconds to unbind WIFI, and
then the equipment unbind is complete

15
V7s
1. Ensure that the mobile is connected to an available WIFI network in your house, and
the signal of the network shall be satisfactory.
2. Power on the product, hold the start key for 2S before a beeping sound and the
voice of "Network Interfacing", and then the network interfacing status is valid. Now
please open your mobile APP for connection.
Tips:
If network interfacing fails, please restart the product and reinitiate the network interfacing
procedure.
Mobile APP Network Interfacing Operation

16
V7s
Dust Box Cleaning
1. Gently press the nger position of the dust
box cover.
2. The dust box cover will bounce off. Hold
the button placement with hand and
gently force it apart upwards.
3. Open the box cover.
4. Take out the lter screen.
5. Turn the dust box and pour out the garbage.
Tips:
Remove HEPA and relevant assemblies in the dust
box, and use clear water to rinse the dust box.
Clean the Primary HEPA lter
1. The primary HEPA lter may be cleaned
with the electric blower or brush.
2. After cleaning the dust on the primary
HEPA lter, install the primary HEPA lter
into the dust box again.
3. Put the dust box back into the equipment.
Tips:
If the dust box is not installed or it is not installed in
place, the garbage cannot enter the dust box.
Routine Maintenance
Clean the Duster Cloth
Directly tear down the duster cloth from the
duster cloth bracket, and clean it using daily
detergents.
Tips:
1. It is recommended to replace the duster cloth
every 3-6 months, in order to ensure sound
cleaning performance.
2. If the duster cloth is not on the bracket, please do
not mount the bracket onto the sweeper robot
for cleaning, in order to avoid damaging the
magic tape.
Charging Base
Wipe the electrode slices of the charging base
with the soft dry cloth.
Tips:
It suggests being cleaned every month.
Table of contents
Other i-Life Vacuum Cleaner manuals

i-Life
i-Life ILIFE-T10s User manual

i-Life
i-Life V3s Pro User manual

i-Life
i-Life X5 User manual

i-Life
i-Life V7 User manual

i-Life
i-Life H50 User manual

i-Life
i-Life V5x User manual

i-Life
i-Life Shinebot W400 Installation guide

i-Life
i-Life A4 User manual

i-Life
i-Life Shinebot W400s User manual

i-Life
i-Life V7 User manual


