i-Life Beetles User manual
User ManualUser Manual
2.1、
2.2、
2.3、
2.4、
2.5、
2.6、
3.1、
3.2、
1
2
2
3
3
4
4
5
6
6
7
7
7
8
8
8
9
9
9
9
10
10
10
Table of Contents
Table of Contents
1. Safety Instructions
2.Product Introduction
Robot anatomy
Cleaning the dust bin and filters
Watertank
Remote Control
Charging base
Light Indications
3. Product Operating
Attention
Auick-operating
3.2.1 Charging preparation
3.2.2 Turn on the robot
3.2.3 Charging robot
3.2.4 Cleaning start
3.2.5 Stop working
3.3 Work mode
3.3.1 Auto cleaning
3.3.2 Spot cleaning
3.3.3 time programmed cleaning
3.3.4 Auto self-charging
3.3.5 Classic mode
3.3.6 MAX mode
19
18
2.1、
2.2、
2.3、
2.4、
2.5、
2.6、
3.1、
3.2、
1
2
2
3
3
4
4
5
6
6
7
7
7
8
8
8
9
9
9
9
10
10
10
Table of Contents
Table of Contents
1. Safety Instructions
2.Product Introduction
Robot anatomy
Cleaning the dust bin and filters
Watertank
Remote Control
Charging base
Light Indications
3. Product Operating
Attention
Auick-operating
3.2.1 Charging preparation
3.2.2 Turn on the robot
3.2.3 Charging robot
3.2.4 Cleaning start
3.2.5 Stop working
3.3 Work mode
3.3.1 Auto cleaning
3.3.2 Spot cleaning
3.3.3 time programmed cleaning
3.3.4 Auto self-charging
3.3.5 Classic mode
3.3.6 MAX mode
PAGE 1
3.4、
5.1、
11
11
12
12
13
13
13
13
13
14
14
14
15
16
16
17
18
19
为了让您更好、更安全地使用我们的产品,请您在使用本产品前,仔细阅
读以下说明:
Catalog
3.4.1 Time setting
Reservation setting
3.4.2 Timing reservation
3.4.3 Cancel the reservation setting
3.5 Instructions of Watertank
3.5.1 Filled water
3.5.2 Sticking Mop clothes
3.5.3 Install watertank components
3.5.4 Mopping floor
4. Product Maintaining
4.1 Cleaning Side brush and Cloth
4.2 Cleaning Dust bin and filters
4.3 Cleaning cliff sensors
5. Troubleshooting
Error code sheet
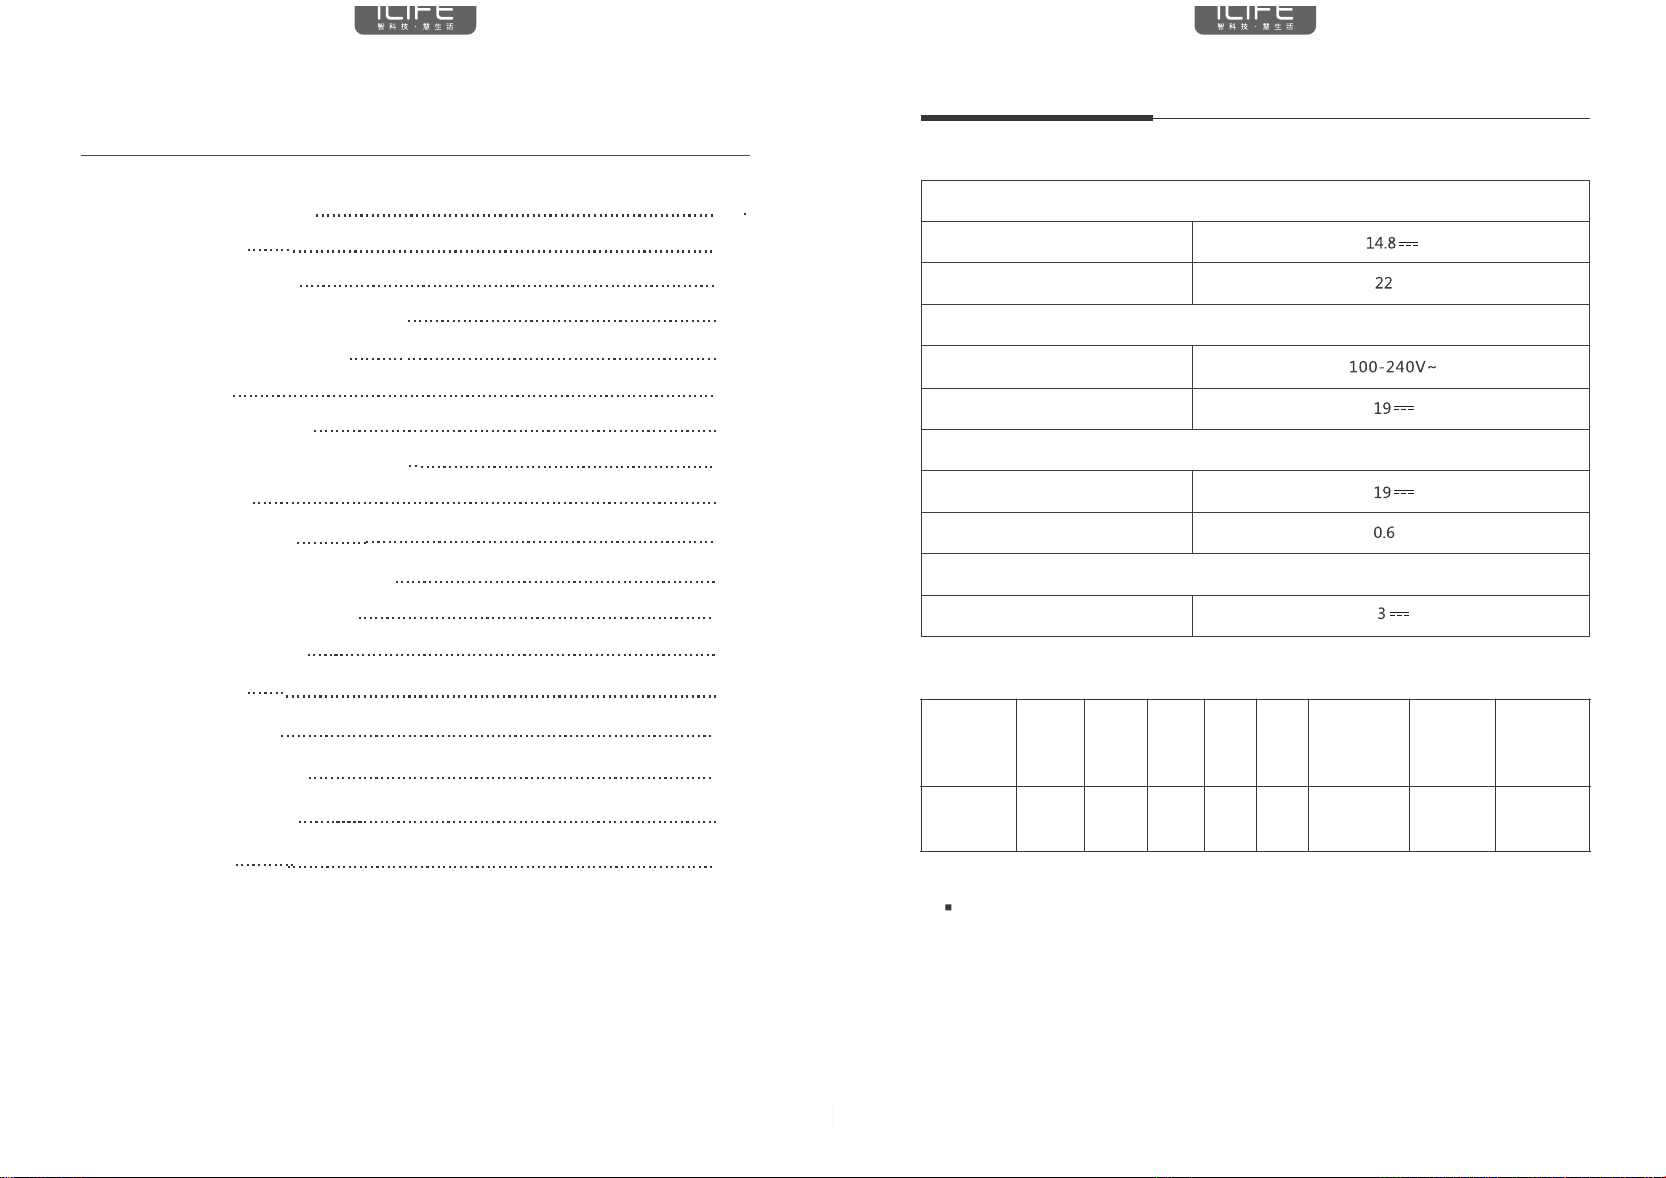
6. Product Specifications
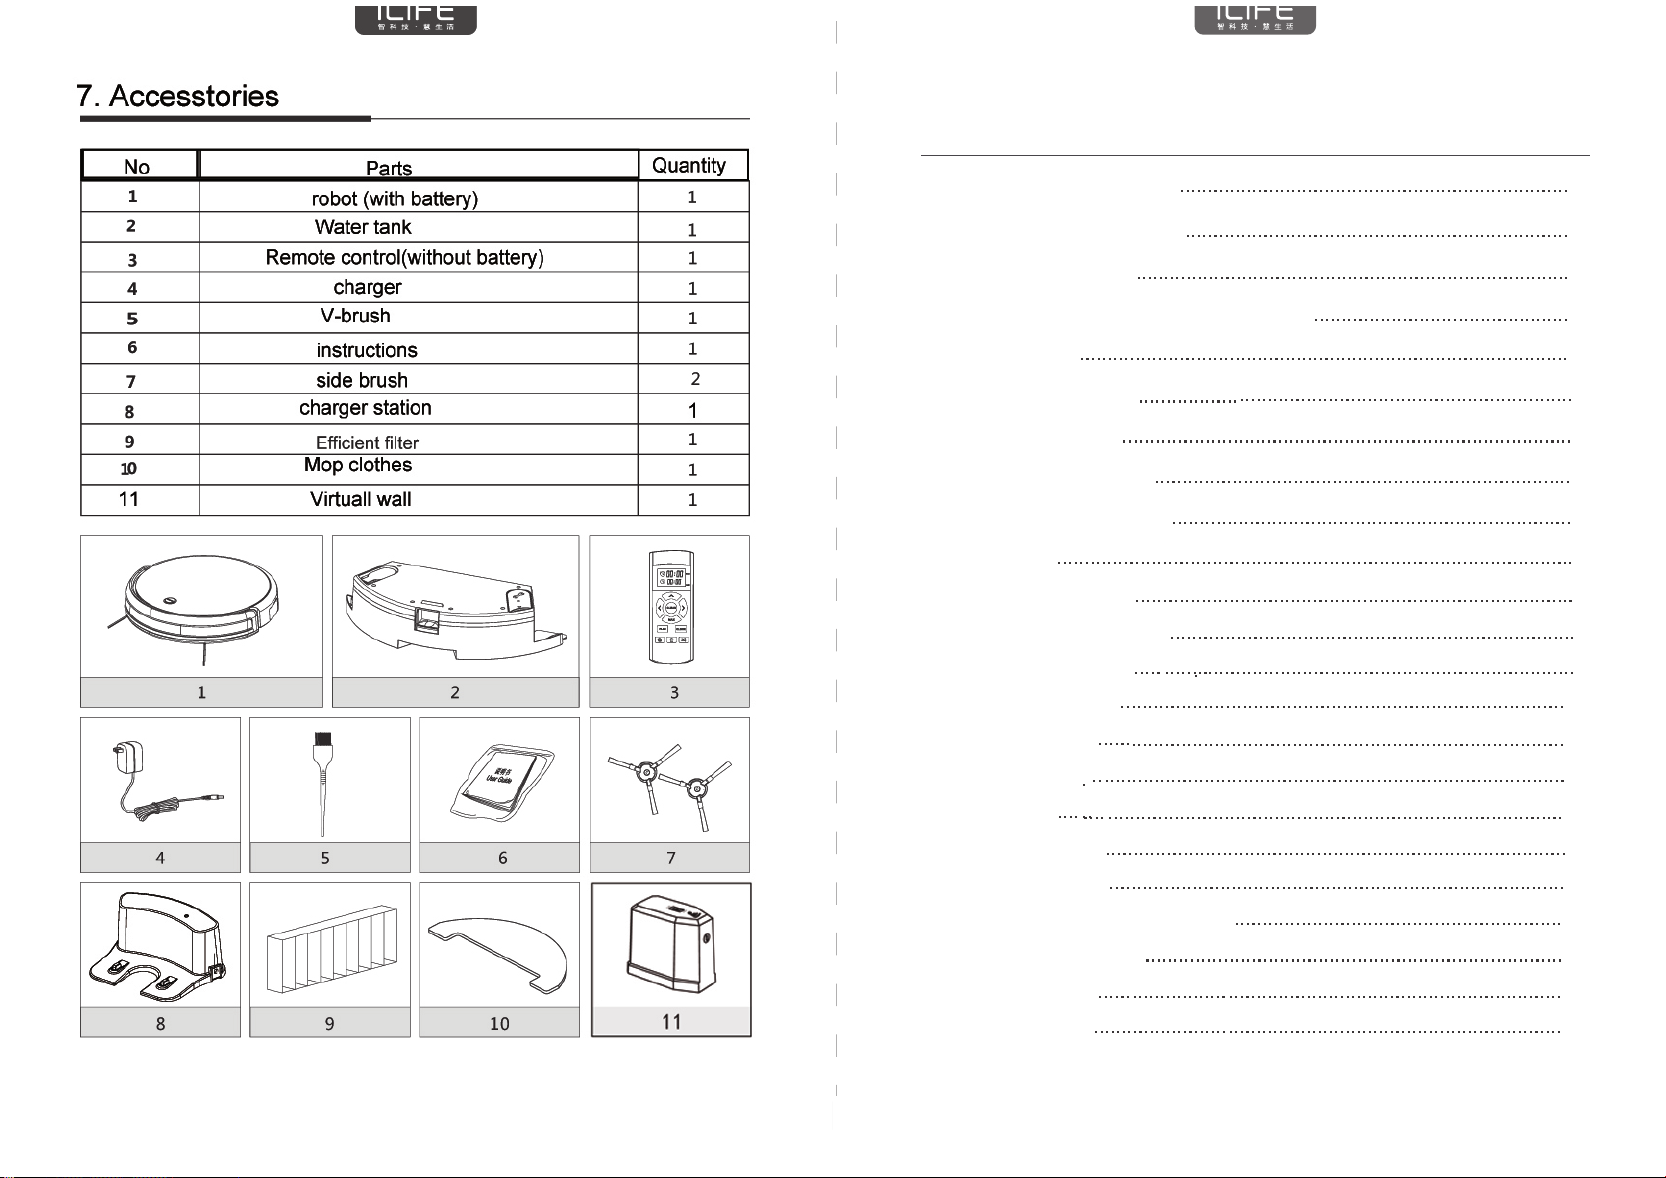
7. Product accesstories
8. Sales service
Safety Instructions
Before using this product, please read the following safety instructions
and follow all normal safety precautions.
Before using this product, ensure the power switch is ON.
If the product is not used for long time, please turn off the switch on
bottom of the main body.
1. Only the certified technician may disassemble the product. Users are not allowed to
disassemble or repair the product.
2. Only use the adapter provided by the factory. Using other un-matched adapter may
cause electric shock, fire or product damage.
3. Do not touch the power cord, plug or adapter when your hands are wet.
4. Do not make clothes or part of a body drawn into the product’s wheels.
5. Do not make this product close to cigarette, lighter, match or any flammables.
6. If the product is needed to clean, clean it after charging is stopped.
7. Do not over-bend the power cord or pressure the power cord with heavy or sharp
objects.
8. This product is used only indoors, do not use it outdoors.
9. Do not sit on top of this product or attach an object on the top of it.
10. Do not use this product in wet or moist environment (any environment with liquid).
11. Before use, collect the floor environment(remove all the fragile objects and cords,
clothings papers and drapes, etc that may get caught in the product).
12. Do no place this product where it is easy to drop off (tables, chairs, etc).
13. Turn off the power switch when you don’t need to use this product for a long time.
14. Before use, check whether adapter and outlet are properly connected.
15. To avoid tripping, inform all the people in the house when this product is working.
16. The product may not be able to pass through steps over 10mm.
17. Use this product in temperature from -10°to 40°(centigrade degree) and do not place
this product in high-temperature environment.
18. The battery must be removed from the product before it is scrapped.
19. The product must be disconnected from the supply mains when removing the battery.
20. The battery is to be disposed of safety.
WARNING
NOTE: please ensure there is people's instruct when children,
disabled/mentally challenged person use it.
1.
PAGE 16
5.1
PAGE 17
310mm 76mm 2.5kg 14.8 22w 0.4L 0.3L 2600mAh
5.Troubleshooting 6.Product Specifications
Error code sheet
When the machine appears some common failure, the red light breathing,
while sound warning prompt short tone. (Prompt beep number )
No Tone cause of issue Solution
Drive wheel or side brush is abnormal
Under the sensor or buffer against
crash plate abnormalities
The host is trapped
Roller brush exception
Check the drive wheel or side brush
Clean the sensor underneath,
lightly dampen the bump plate,
check for foreign matter and clean it
Move the host to an empty
place and reboot
Check the roller brush
Notes: If the above method does not solve the problem, try the following:
1. Reopen the power switch on the side of the main unit and restart the machine.
2, if re-boot can not solve the problem, please send the machine to the after-sales
service center maintenance.
Robot anatomy
Operating Voltage V
rated power W
Rated input voltage
V
Rated output voltage
Rated output voltage
V
VVV
VV
Rated output current A
input voltage V
diameter
Model
6series
height Net
weight
Vol.
power
Dust bin
Water tank
battery
17
PAGE 16
5.1
PAGE 17
310mm 76mm 2.5kg 14.8 22w 0.4L 0.3L 2600mAh
5.Troubleshooting 6.Product Specifications
Error code sheet
When the machine appears some common failure, the red light breathing,
while sound warning prompt short tone. (Prompt beep number )
No Tone cause of issue Solution
Drive wheel or side brush is abnormal
Under the sensor or buffer against
crash plate abnormalities
The host is trapped
Roller brush exception
Check the drive wheel or side brush
Clean the sensor underneath,
lightly dampen the bump plate,
check for foreign matter and clean it
Move the host to an empty
place and reboot
Check the roller brush
Notes: If the above method does not solve the problem, try the following:
1. Reopen the power switch on the side of the main unit and restart the machine.
2, if re-boot can not solve the problem, please send the machine to the after-sales
service center maintenance.
Robot anatomy
Operating Voltage V
rated power W
Rated input voltage
V
Rated output voltage
Rated output voltage
V
VVV
VV
Rated output current A
input voltage V
diameter
Model
6series
height Net
weight
Vol.
power
Dust bin
Water tank
battery
16
PAGE 1
3.4、
5.1、
11
11
12
12
13
13
13
13
13
14
14
14
15
16
16
17
18
19
为了让您更好、更安全地使用我们的产品,请您在使用本产品前,仔细阅
读以下说明:
Catalog
3.4.1 Time setting
Reservation setting
3.4.2 Timing reservation
3.4.3 Cancel the reservation setting
3.5 Instructions of Watertank
3.5.1 Filled water
3.5.2 Sticking Mop clothes
3.5.3 Install watertank components
3.5.4 Mopping floor
4. Product Maintaining
4.1 Cleaning Side brush and Cloth
4.2 Cleaning Dust bin and filters
4.3 Cleaning cliff sensors
5. Troubleshooting
Error code sheet
6. Product Specifications
7. Product accesstories
8. Sales service
Safety Instructions
Before using this product, please read the following safety instructions
and follow all normal safety precautions.
Before using this product, ensure the power switch is ON.
If the product is not used for long time, please turn off the switch on
bottom of the main body.
1. Only the certified technician may disassemble the product. Users are not allowed to
disassemble or repair the product.
2. Only use the adapter provided by the factory. Using other un-matched adapter may
cause electric shock, fire or product damage.
3. Do not touch the power cord, plug or adapter when your hands are wet.
4. Do not make clothes or part of a body drawn into the product’s wheels.
5. Do not make this product close to cigarette, lighter, match or any flammables.
6. If the product is needed to clean, clean it after charging is stopped.
7. Do not over-bend the power cord or pressure the power cord with heavy or sharp
objects.
8. This product is used only indoors, do not use it outdoors.
9. Do not sit on top of this product or attach an object on the top of it.
10. Do not use this product in wet or moist environment (any environment with liquid).
11. Before use, collect the floor environment(remove all the fragile objects and cords,
clothings papers and drapes, etc that may get caught in the product).
12. Do no place this product where it is easy to drop off (tables, chairs, etc).
13. Turn off the power switch when you don’t need to use this product for a long time.
14. Before use, check whether adapter and outlet are properly connected.
15. To avoid tripping, inform all the people in the house when this product is working.
16. The product may not be able to pass through steps over 10mm.
17. Use this product in temperature from -10°to 40°(centigrade degree) and do not place
this product in high-temperature environment.
18. The battery must be removed from the product before it is scrapped.
19. The product must be disconnected from the supply mains when removing the battery.
20. The battery is to be disposed of safety.
WARNING
NOTE: please ensure there is people's instruct when children,
disabled/mentally challenged person use it.
1.
1
PAGE 3PAGE 2
2.1
2.3
2.Product Introduction
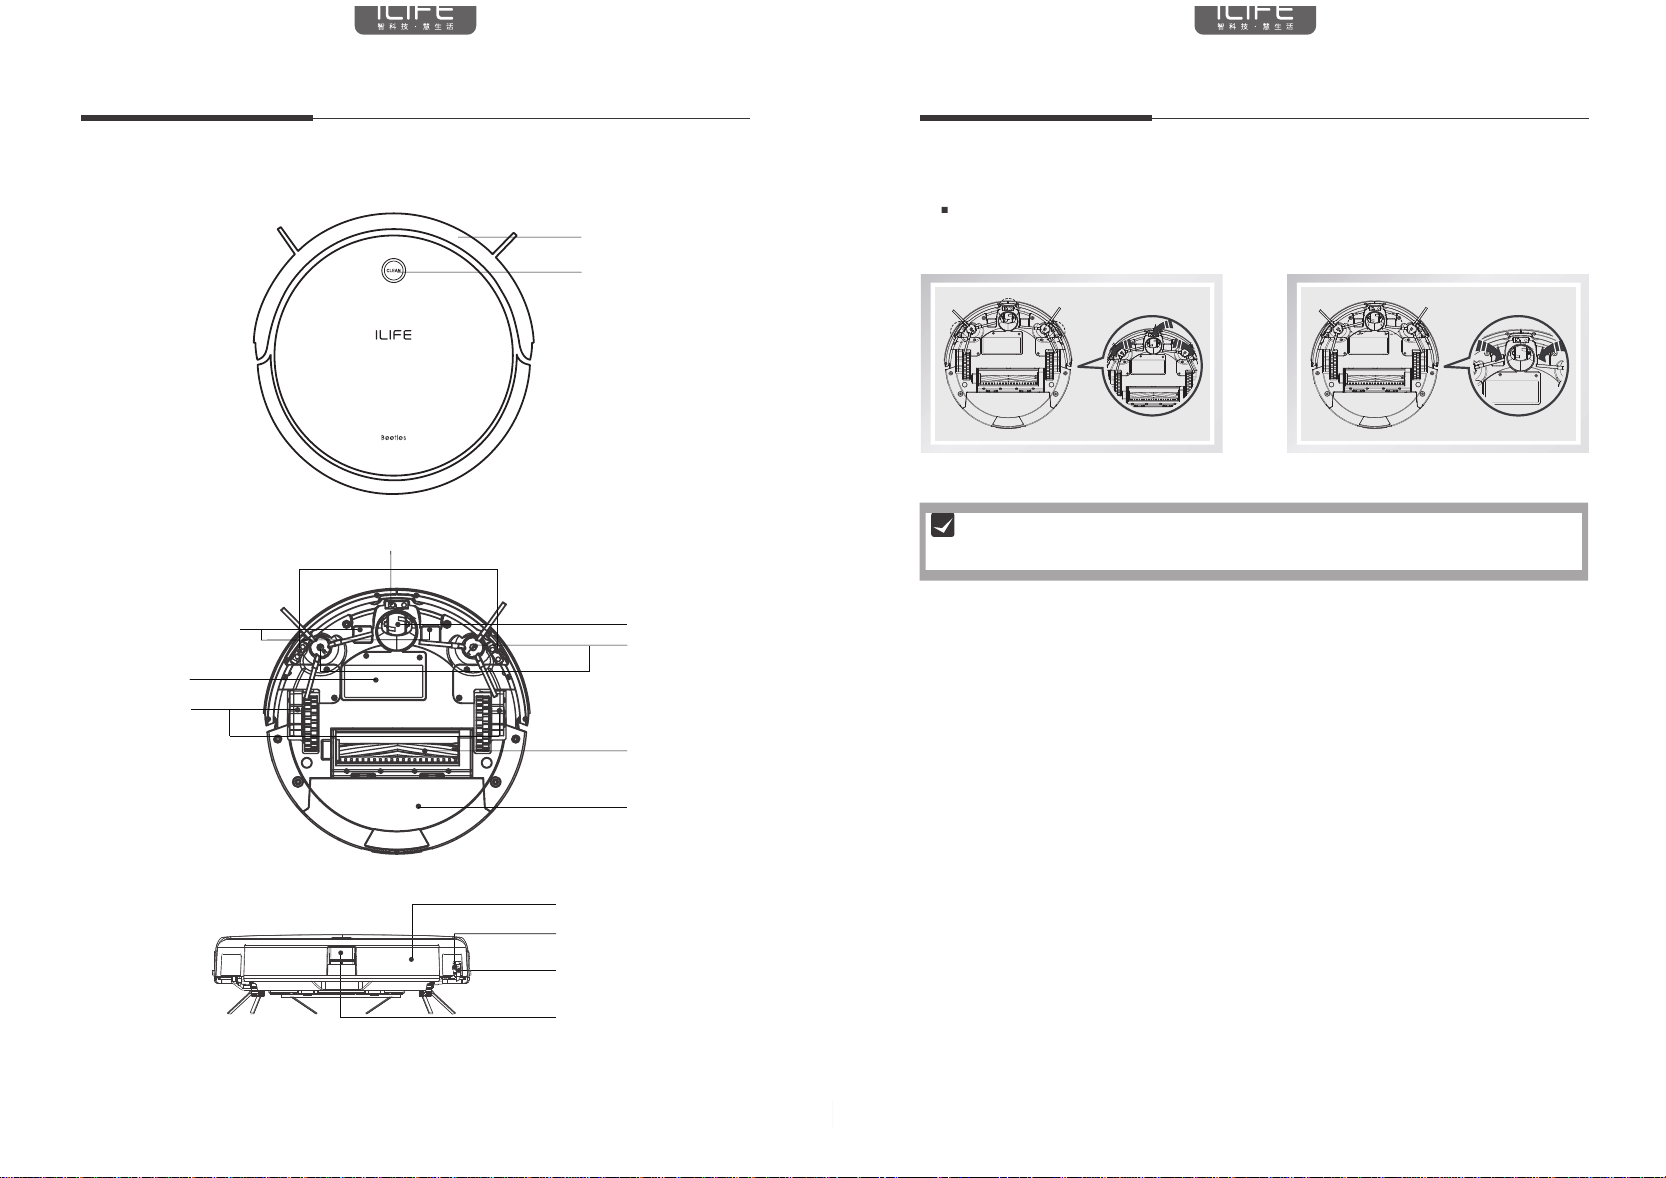
Robot anatomy
Bumper
CLEAN Button
Cliff Sensors
Auto Charging Pins Nose Wheel
Side Brush
Battery Cover
Turbo Brush
Wheel Module
Dust Bin/Water Tank
Dust Bin/Water Tank
Power Supply Socket
Power Switch
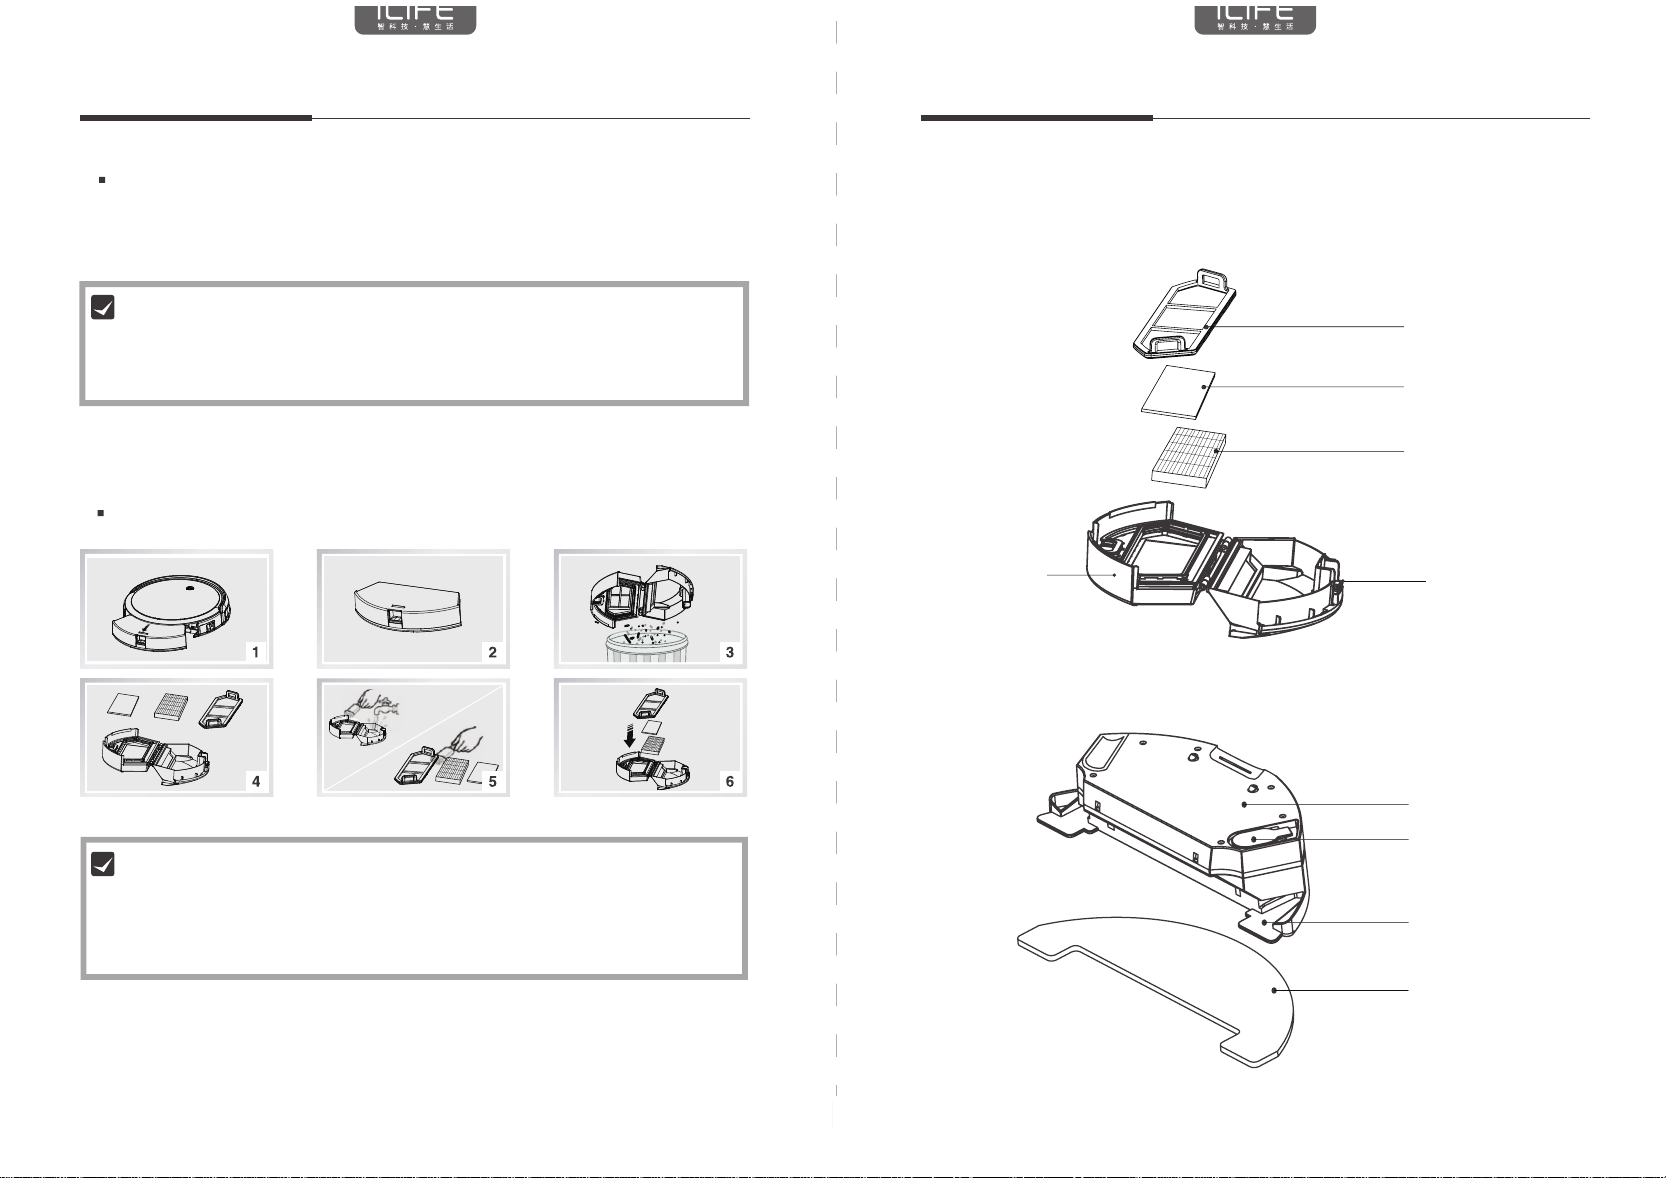
2.2 Dust bin
Primary Filter
Efficient filter
Fine filter cotton
Dust bin cover Dust bin keyDust bin key
Dust bin key
Watertank
Watertank box
Water input hole
Mop clothes stent
Mop clothes
Product Introduction
2.
2
PAGE 14 PAGE 15
4.Product Maintaining 4.Product Maintaining
4.1 Cleaning Side brush and Cloth
4.2 Cleaning Dust bin and filters
4.3 Cleaning cliff sensors
4.Product Maintaining
Clean the side brushes, roller brushes, and rags as they become dirty; replace them
if the side brushes, roller brushes, and wipes are damaged. Note: the left and right
brush specifications inconsistency, distinguish between the L side and R side,
you need about the corresponding.
Notes:Roller brush removal method: press the bottom of the host roll cover
plate on the buckle, you can remove the roller brush to clean; wiping disassembly
method: hand gently pull the cloth to pull, install, will Wipe the bottom of the machine
at the bottom of the paste can be cured.
After each use, please clean the dust box, filter, and clean. The specific operation is as follows:
After removing the dust box, please check whether there is any foreign matter
in the suction port, please clean it. Primary filters are replaceable accessories,
use 15-30 days of water rinse once, and placed in a cool ventilated place dry, not squeeze.
High-efficiency filter can be cleaned by patting, not recommended for direct washing.
Notes:
Clean the sensor and the charging pole with a cleaning tool or a soft cloth,
as shown in the following figure:
Charging seat on the charging pole piece of foreign body also need to promptly clean up.
Notes:
15
PAGE 14 PAGE 15
4.Product Maintaining 4.Product Maintaining
4.1 Cleaning Side brush and Cloth
4.2 Cleaning Dust bin and filters
4.3 Cleaning cliff sensors
4.Product Maintaining
Clean the side brushes, roller brushes, and rags as they become dirty; replace them
if the side brushes, roller brushes, and wipes are damaged. Note: the left and right
brush specifications inconsistency, distinguish between the L side and R side,
you need about the corresponding.
Notes:Roller brush removal method: press the bottom of the host roll cover
plate on the buckle, you can remove the roller brush to clean; wiping disassembly
method: hand gently pull the cloth to pull, install, will Wipe the bottom of the machine
at the bottom of the paste can be cured.
After each use, please clean the dust box, filter, and clean. The specific operation is as follows:
After removing the dust box, please check whether there is any foreign matter
in the suction port, please clean it. Primary filters are replaceable accessories,
use 15-30 days of water rinse once, and placed in a cool ventilated place dry, not squeeze.
High-efficiency filter can be cleaned by patting, not recommended for direct washing.
Notes:
Clean the sensor and the charging pole with a cleaning tool or a soft cloth,
as shown in the following figure:
Charging seat on the charging pole piece of foreign body also need to promptly clean up.
Notes:
14
PAGE 3PAGE 2
2.1
2.3
2.Product Introduction
Robot anatomy
Bumper
CLEAN Button
Cliff Sensors
Auto Charging Pins Nose Wheel
Side Brush
Battery Cover
Turbo Brush
Wheel Module
Dust Bin/Water Tank
Dust Bin/Water Tank
Power Supply Socket
Power Switch
2.2 Dust bin
Primary Filter
Efficient filter
Fine filter cotton
Dust bin cover Dust bin keyDust bin key
Dust bin key
Watertank
Watertank box
Water input hole
Mop clothes stent
Mop clothes
Product Introduction
2.
3
PAGE 5PAGE 4
2. Product components 2. Product components
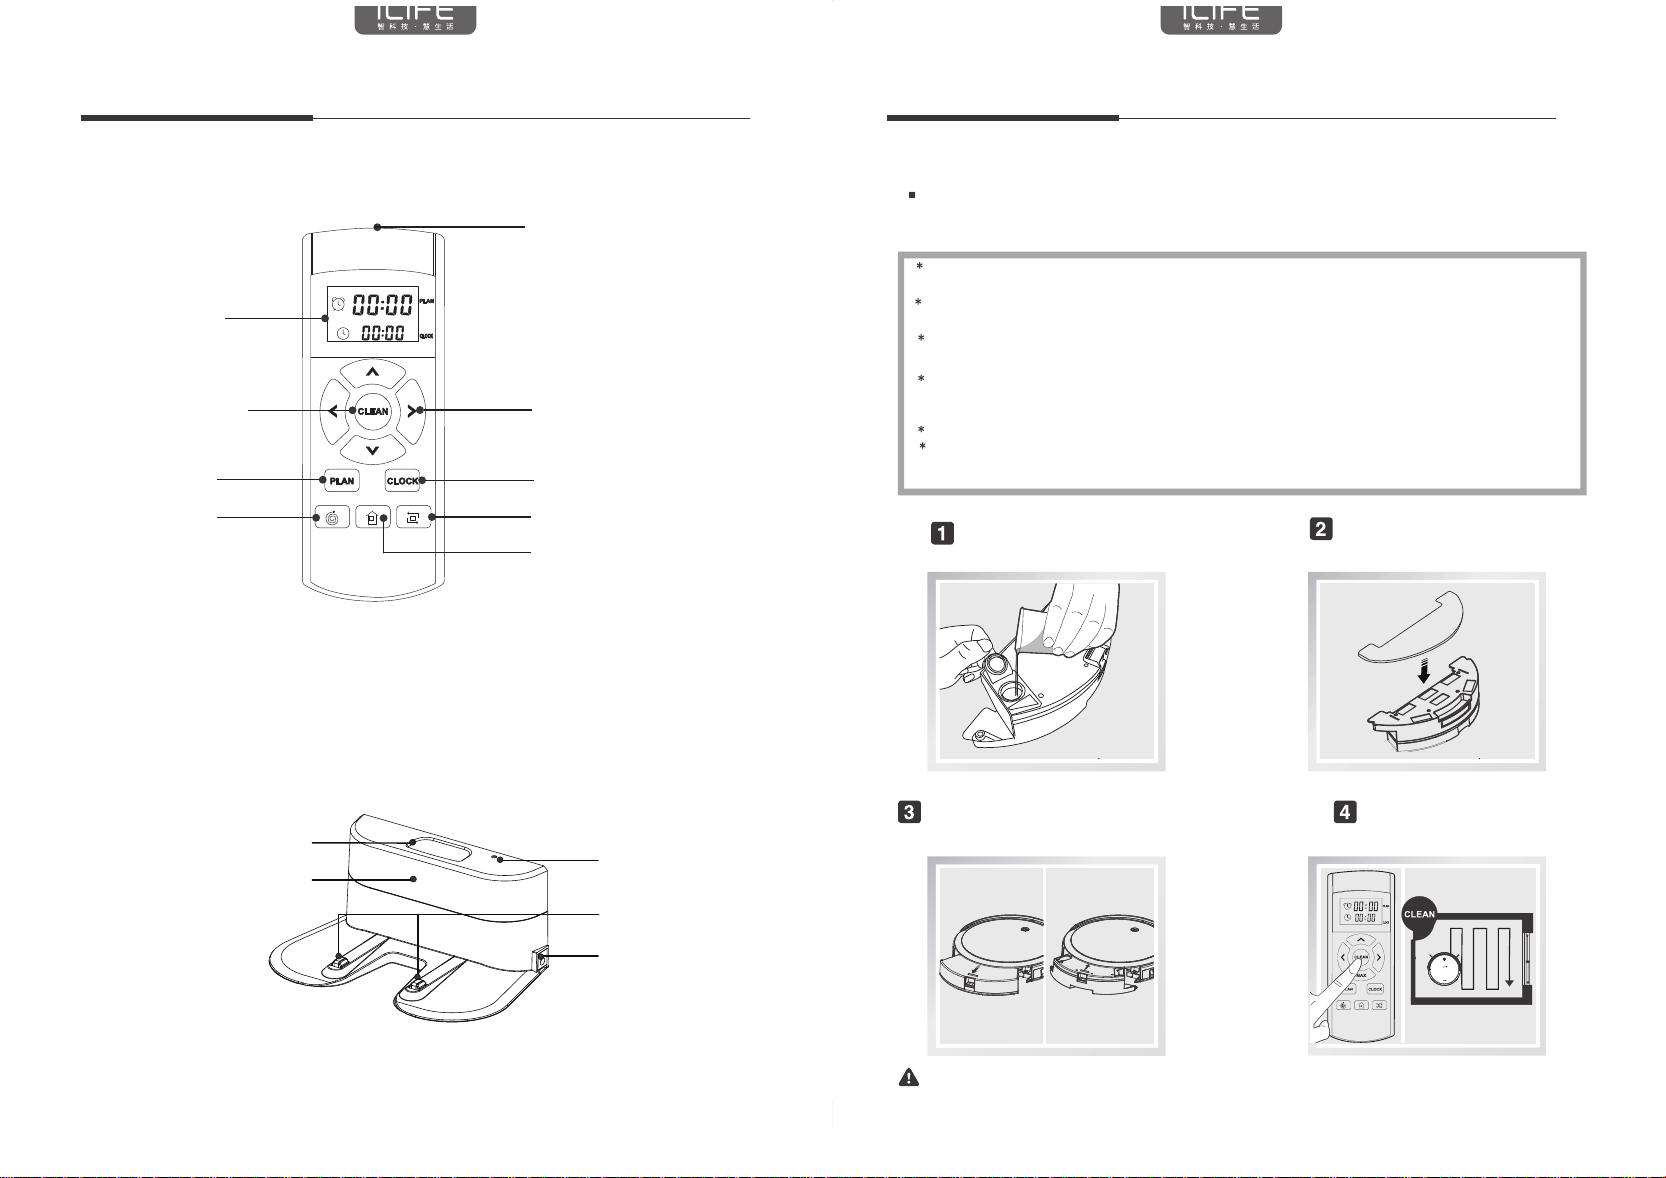
Remote control
Time Setting Button/Clock Button
Auto Charge Button/Home Button
Dual IR Signal Transmitter
LCD Display
CLEAN/Standby Button Direction Button
Schedule Button
Spot Clean Button Edge Clean Button
2.4
Charging base
Transparent Cover
Signal Light
Charge Connecting Point
Power Supply Socket
Housing
2.5
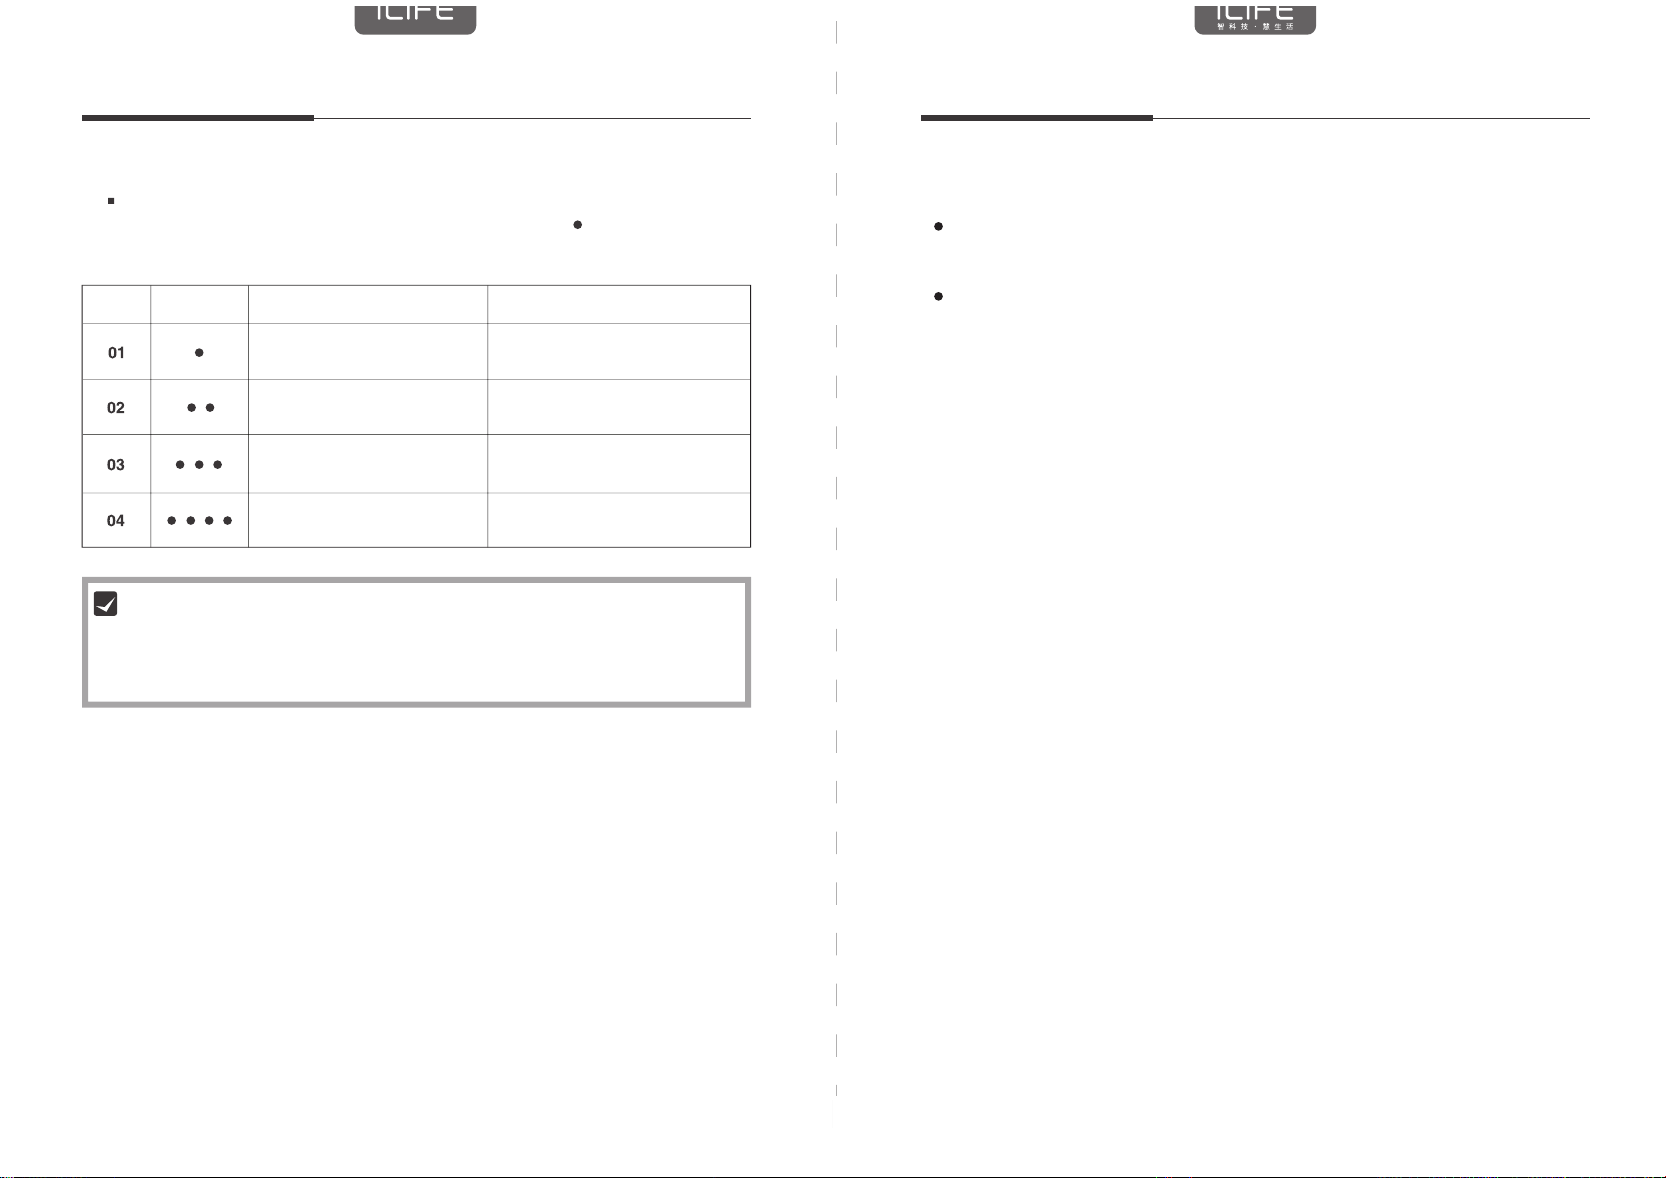
Light Indications
2.6
Robot status
Charging
Lights status
Orange lights flash
Charging finished
In selected mode
When robot in error
Low battery
In cleaning mode
Green lights turn solid
Green lights flash
Red lights flash
Orange lights turn solid
Green lights turn solid
4
PAGE 12 PAGE 13
3.Product Operating 3.Product Operating
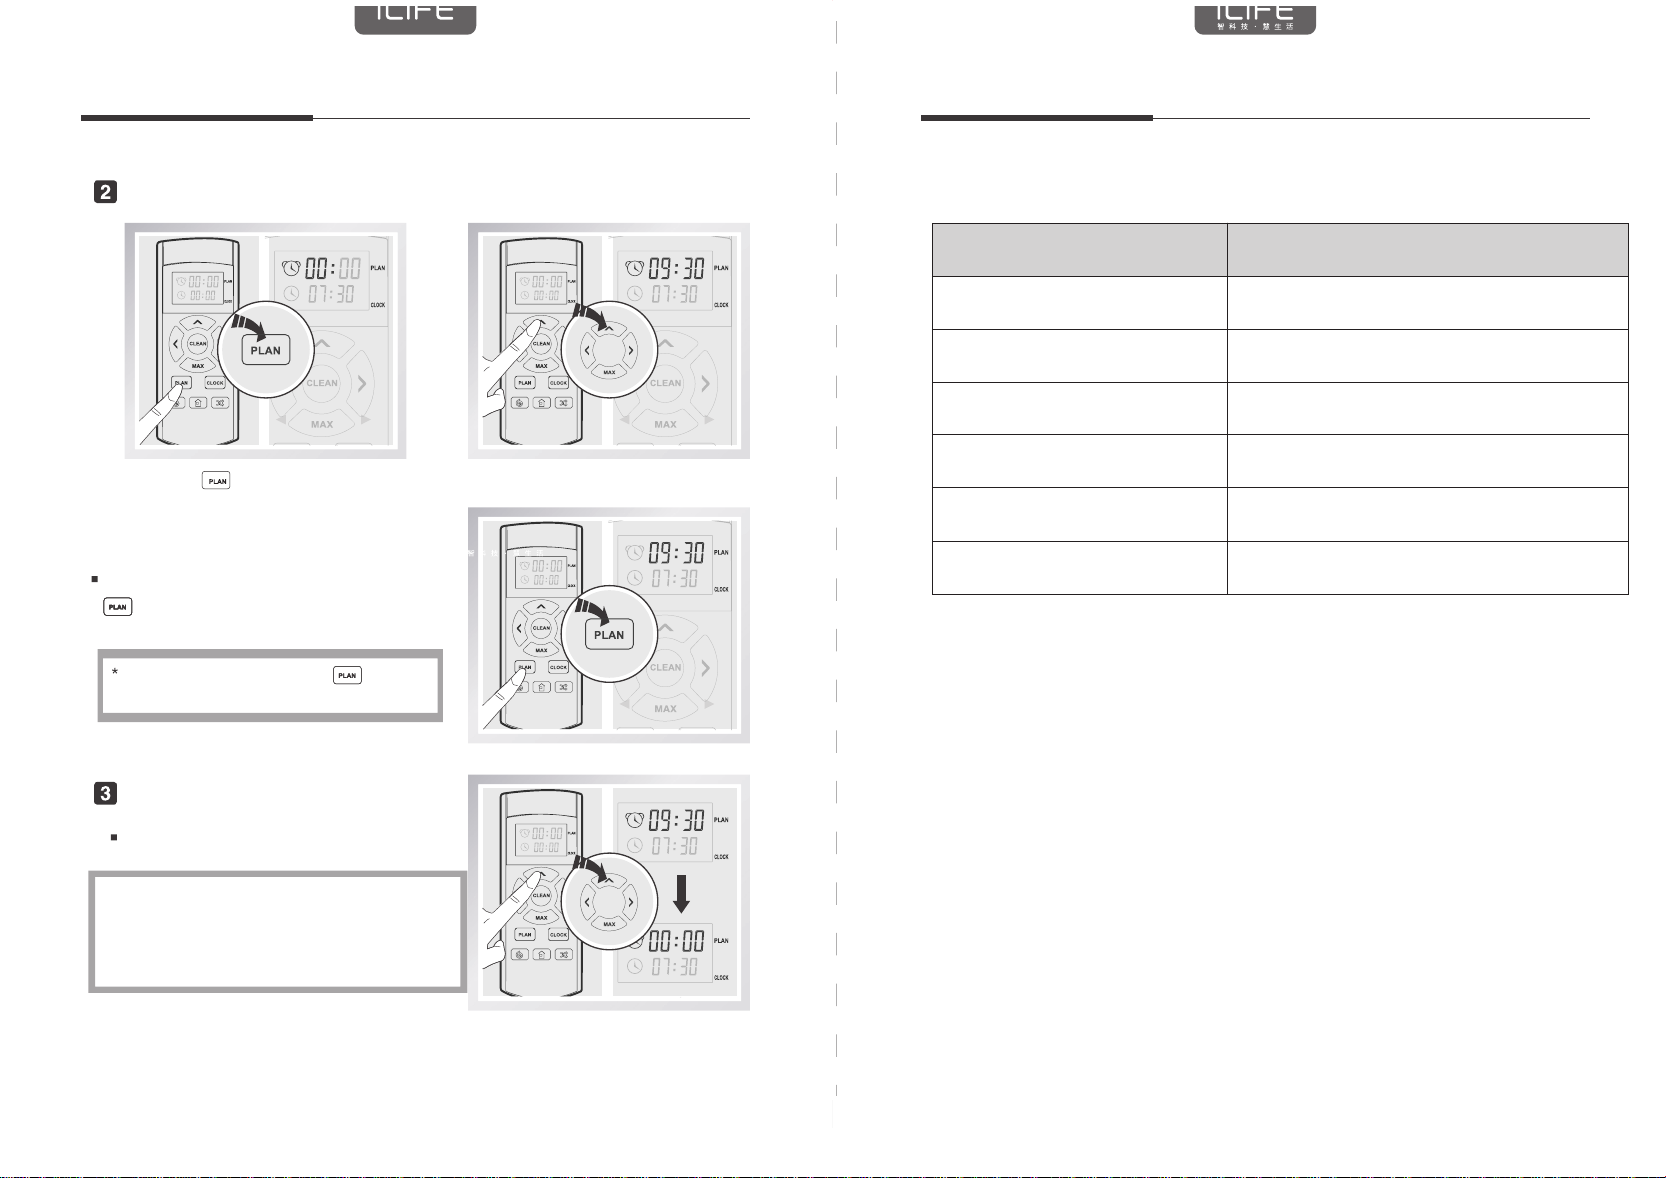
Timing reservation
Cancel the reservation setting
3.5 Instructions of watertank
Filled water Sticking mop clothes
Install watertank components Mopping floor
Short key , the remote control screen
hours area (as, the first two characters) flashes.
Use the arrow keys to adjust the appointment time.
After the reservation time is adjusted, press the key
to save, the host will automatically clean
at the appointed time every day
If you do not press the key
to save, the current time setting is unsuccessful.
The remote control display screen can
be scheduled to "00 :: 00", canceled successfully.
When you set the current time and appointment time,
all operations will be prompted to confirm;
if there is no tone, it means that the setting is invalid.
When replacing the remote control battery, reset the
current time and the appointment time.
This product is equipped with water tank components, cleaning work is completed,
if the mopping up demand, the dust box can be replaced with water tank components.
For the cleaning method, please refer to maintenance section in this manual.
Do not use the water tank assembly on the carpet. When cleaning with the cloth, fold
the edge of the carpet so that foreign matter on the cloth does not stain the carpet.
Cleaning, please keep an eye out, add water or clean up in time, add water to remove
the water tank.
Normal operation of the machine with water tanks, such as artificial stop, need to
remove the water tank placed separately to avoid a lot of water stains on the floor.
Work is completed, the timely cleaning of dirty rags; if there is residual water tank,
you need to take out a separate place, until the water is finished, put away for the
next use of storage.
When charging, be sure to remove the tank assembly.
Need to vacuum, let the machine stop working, remove the water tank after removing
the cloth rack, into the trash, you can start again. (Recommendation: first after
the mopping of the vacuum)
Note: put into the water tank, should keep the machine flat state, prohibit the machine side or upside down!
13
PAGE 12 PAGE 13
3.Product Operating 3.Product Operating
Timing reservation
Cancel the reservation setting
3.5 Instructions of watertank
Filled water Sticking mop clothes
Install watertank components Mopping floor
Short key , the remote control screen
hours area (as, the first two characters) flashes.
Use the arrow keys to adjust the appointment time.
After the reservation time is adjusted, press the key
to save, the host will automatically clean
at the appointed time every day
If you do not press the key
to save, the current time setting is unsuccessful.
The remote control display screen can
be scheduled to "00 :: 00", canceled successfully.
When you set the current time and appointment time,
all operations will be prompted to confirm;
if there is no tone, it means that the setting is invalid.
When replacing the remote control battery, reset the
current time and the appointment time.
This product is equipped with water tank components, cleaning work is completed,
if the mopping up demand, the dust box can be replaced with water tank components.
For the cleaning method, please refer to maintenance section in this manual.
Do not use the water tank assembly on the carpet. When cleaning with the cloth, fold
the edge of the carpet so that foreign matter on the cloth does not stain the carpet.
Cleaning, please keep an eye out, add water or clean up in time, add water to remove
the water tank.
Normal operation of the machine with water tanks, such as artificial stop, need to
remove the water tank placed separately to avoid a lot of water stains on the floor.
Work is completed, the timely cleaning of dirty rags; if there is residual water tank,
you need to take out a separate place, until the water is finished, put away for the
next use of storage.
When charging, be sure to remove the tank assembly.
Need to vacuum, let the machine stop working, remove the water tank after removing
the cloth rack, into the trash, you can start again. (Recommendation: first after
the mopping of the vacuum)
Note: put into the water tank, should keep the machine flat state, prohibit the machine side or upside down!
12
PAGE 5PAGE 4
2. Product components 2. Product components
Remote control
Time Setting Button/Clock Button
Auto Charge Button/Home Button
Dual IR Signal Transmitter
LCD Display
CLEAN/Standby Button Direction Button
Schedule Button
Spot Clean Button Edge Clean Button
2.4
Charging base
Transparent Cover
Signal Light
Charge Connecting Point
Power Supply Socket
Housing
2.5
Light Indications
2.6
Robot status
Charging
Lights status
Orange lights flash
Charging finished
In selected mode
When robot in error
Low battery
In cleaning mode
Green lights turn solid
Green lights flash
Red lights flash
Orange lights turn solid
Green lights turn solid
5
PAGE 7PAGE 6
。
3.Product Operating 3.Product Operating
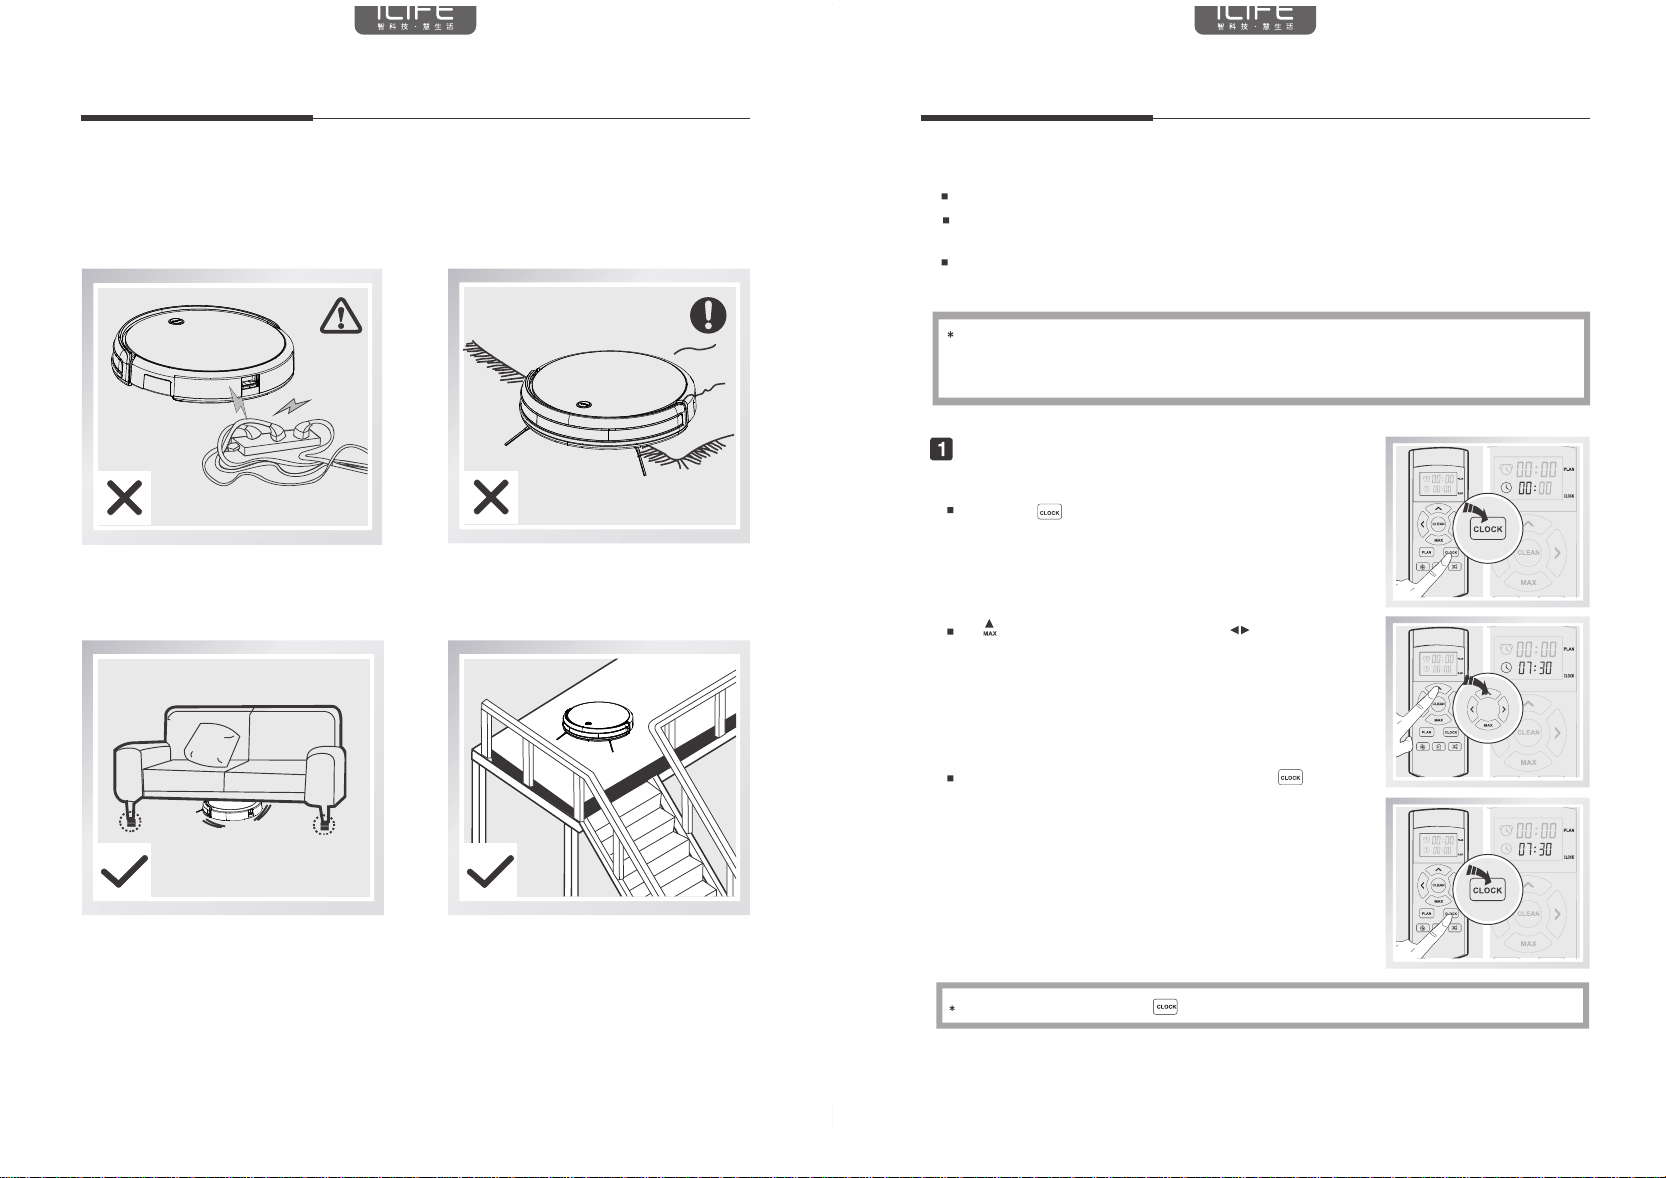
3.1、 Attention 3.2、 Auick-operating
Before starting the work, please refer to the following guidelines to check the cleaning area.
The power cord and other debris from the ground
may catch or entangle the product.
Be sure to remove it before use.
Roll up the carpet tassel or work on a short rug
Home bottom of the gap may be less than
8CM stuck products, for cleaning,
please boost furniture
Layers should be placed on the edge of
the compound layer to ensure safe operation
of the product
Charging preparation
Connect the power supply, then the indicator on the charging stand will be on.
Connect the adapter to charging stand
Do not place objects such as mirrors and other strong surface, do not charge the signal
on the seat near the source of interference (such as television, refrigerator, etc.),
and do not place the battery, ;
Turn on robot
Turn on the side power switch,
"I" for the boot, "O" for shutdown.
The host end work, it is recommended
not to shut down; keep the host in the
charging state, so that its better for
the next work.
Warm Tip: Before charging the machine, make sure that the main power switch is on,
otherwise the machine can not be charged effectively.
6
PAGE 10
PAGE 11
3.Product Operating3.Product Operating 3.Product Operating
Host in the cleaning process, can perceive their
own lack of electricity, automatically start the
"return charge" mode, automatically find the charging
base for charging.
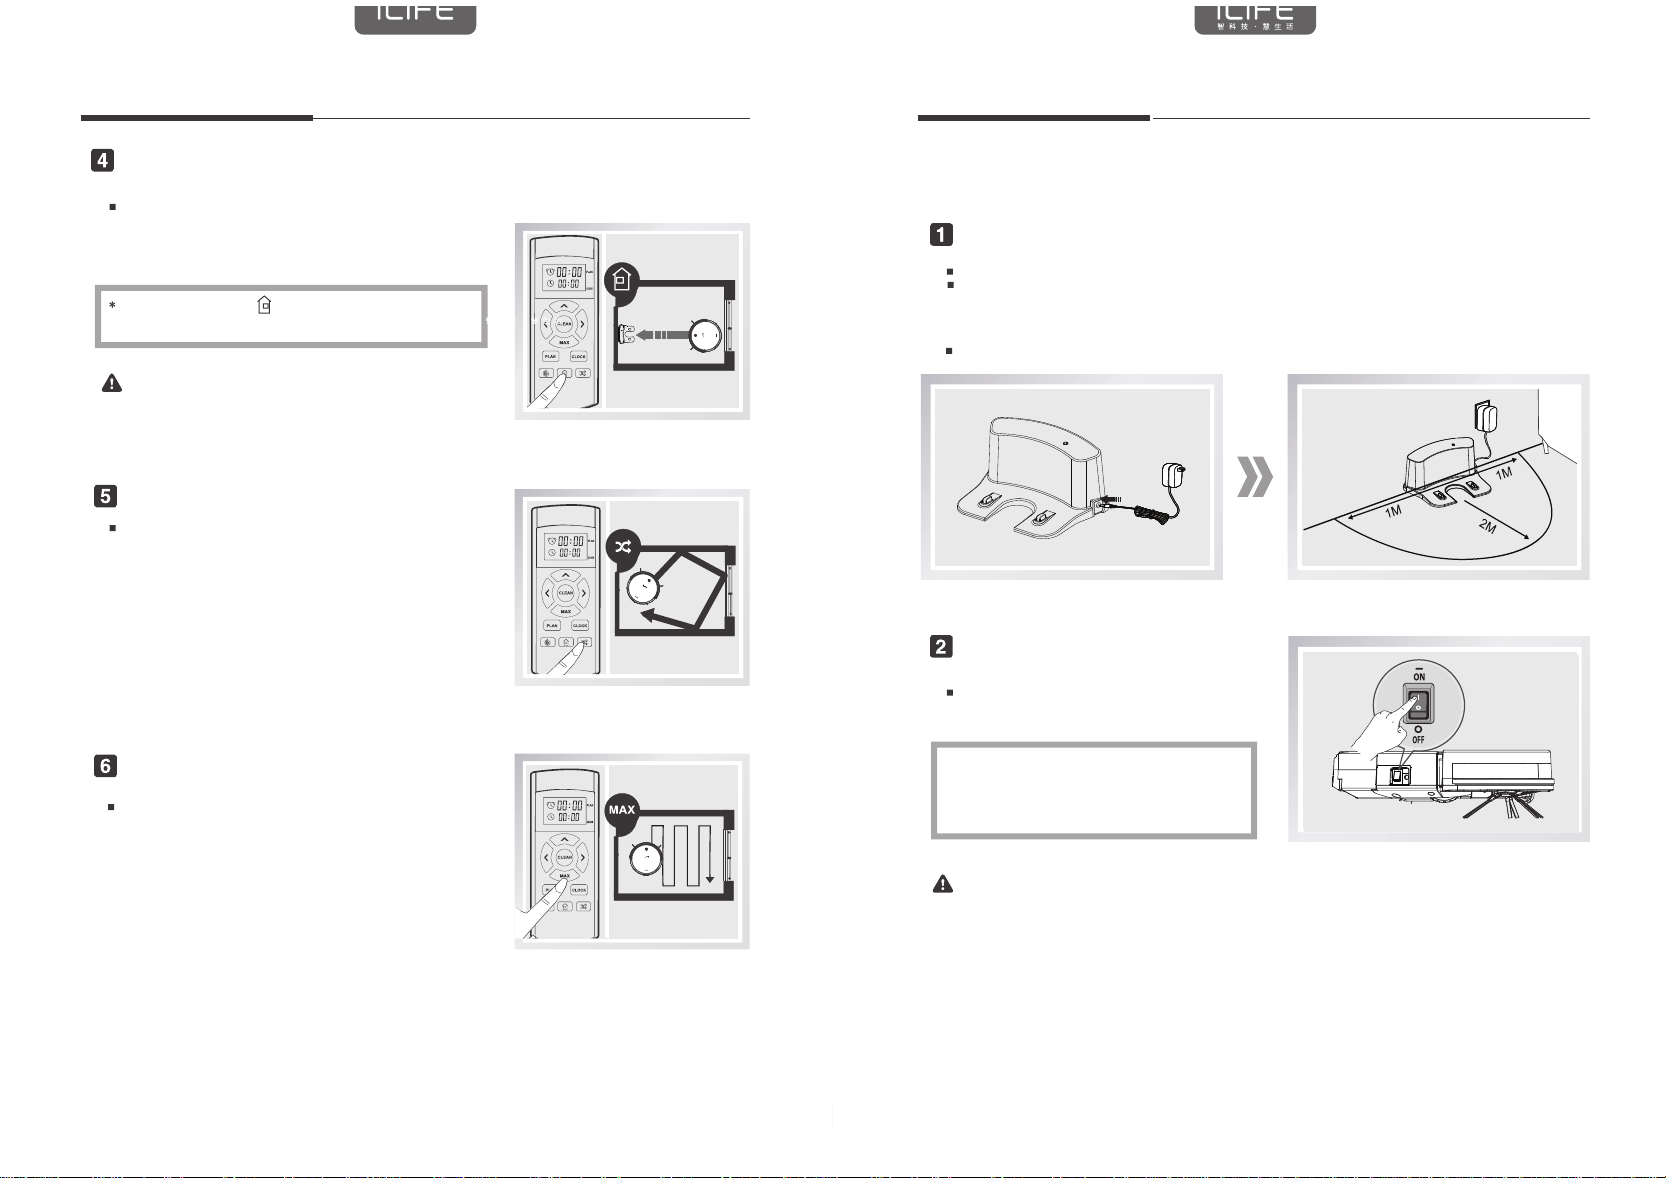
Auto self-charging
You can also use the
setting on the remote
control to instruct the host to start the "Charge Back" mode.
Note: Please keep the cradle in the power state, otherwise,
the machine will not be able to find the cradle to charge.
Classic mode
The most common cleaning mode, the host automatically
clean, after the obstacles to change the direction of autonomy.
MAX mode
Applicable to the overall ground is dirty, more dust
in the case. Press the remote control MAX button to
enhance the host suction, the depth of strong suction.
3.4 Time programmed cleaning
Making an appointment with the remote control To facilitate cleaning, the product has a "reservation" function.
Time settings and reservation settings, require the remote control to issue instructions
to the host.
After the reservation is successful, the host will automatically perform the cleaning work
every day according to the set time.
Before setting the current time and the reservation time, make sure that
the host CLEAN key is on and the host is awakened. If the host is not woken up,
briefly press the CLEAN button on the main unit or the CLEAN key on the remote
control to wake it up.
Time setting
Short key the remote control screen hours area
By Adjust the size of the digital, by switching
the clock, minutes, set the current time.
When the time adjustment is finished,press
to save the current time setting.
If you do not press the key to save, the current time setting is unsuccessful.
(as the first two characters) flashes.
11
PAGE 10
PAGE 11
3.Product Operating3.Product Operating 3.Product Operating
Host in the cleaning process, can perceive their
own lack of electricity, automatically start the
"return charge" mode, automatically find the charging
base for charging.
Auto self-charging
You can also use the
setting on the remote
control to instruct the host to start the "Charge Back" mode.
Note: Please keep the cradle in the power state, otherwise,
the machine will not be able to find the cradle to charge.
Classic mode
The most common cleaning mode, the host automatically
clean, after the obstacles to change the direction of autonomy.
MAX mode
Applicable to the overall ground is dirty, more dust
in the case. Press the remote control MAX button to
enhance the host suction, the depth of strong suction.
3.4 Time programmed cleaning
Making an appointment with the remote control To facilitate cleaning, the product has a "reservation" function.
Time settings and reservation settings, require the remote control to issue instructions
to the host.
After the reservation is successful, the host will automatically perform the cleaning work
every day according to the set time.
Before setting the current time and the reservation time, make sure that
the host CLEAN key is on and the host is awakened. If the host is not woken up,
briefly press the CLEAN button on the main unit or the CLEAN key on the remote
control to wake it up.
Time setting
Short key the remote control screen hours area
By Adjust the size of the digital, by switching
the clock, minutes, set the current time.
When the time adjustment is finished,press
to save the current time setting.
If you do not press the key to save, the current time setting is unsuccessful.
(as the first two characters) flashes.
10
PAGE 7PAGE 6
。
3.Product Operating 3.Product Operating
3.1、 Attention 3.2、 Auick-operating
Before starting the work, please refer to the following guidelines to check the cleaning area.
The power cord and other debris from the ground
may catch or entangle the product.
Be sure to remove it before use.
Roll up the carpet tassel or work on a short rug
Home bottom of the gap may be less than
8CM stuck products, for cleaning,
please boost furniture
Layers should be placed on the edge of
the compound layer to ensure safe operation
of the product
Charging preparation
Connect the power supply, then the indicator on the charging stand will be on.
Connect the adapter to charging stand
Do not place objects such as mirrors and other strong surface, do not charge the signal
on the seat near the source of interference (such as television, refrigerator, etc.),
and do not place the battery, ;
Turn on robot
Turn on the side power switch,
"I" for the boot, "O" for shutdown.
The host end work, it is recommended
not to shut down; keep the host in the
charging state, so that its better for
the next work.
Warm Tip: Before charging the machine, make sure that the main power switch is on,
otherwise the machine can not be charged effectively.
7
PAGE 9PAGE 8
A.
B.
C.
D.
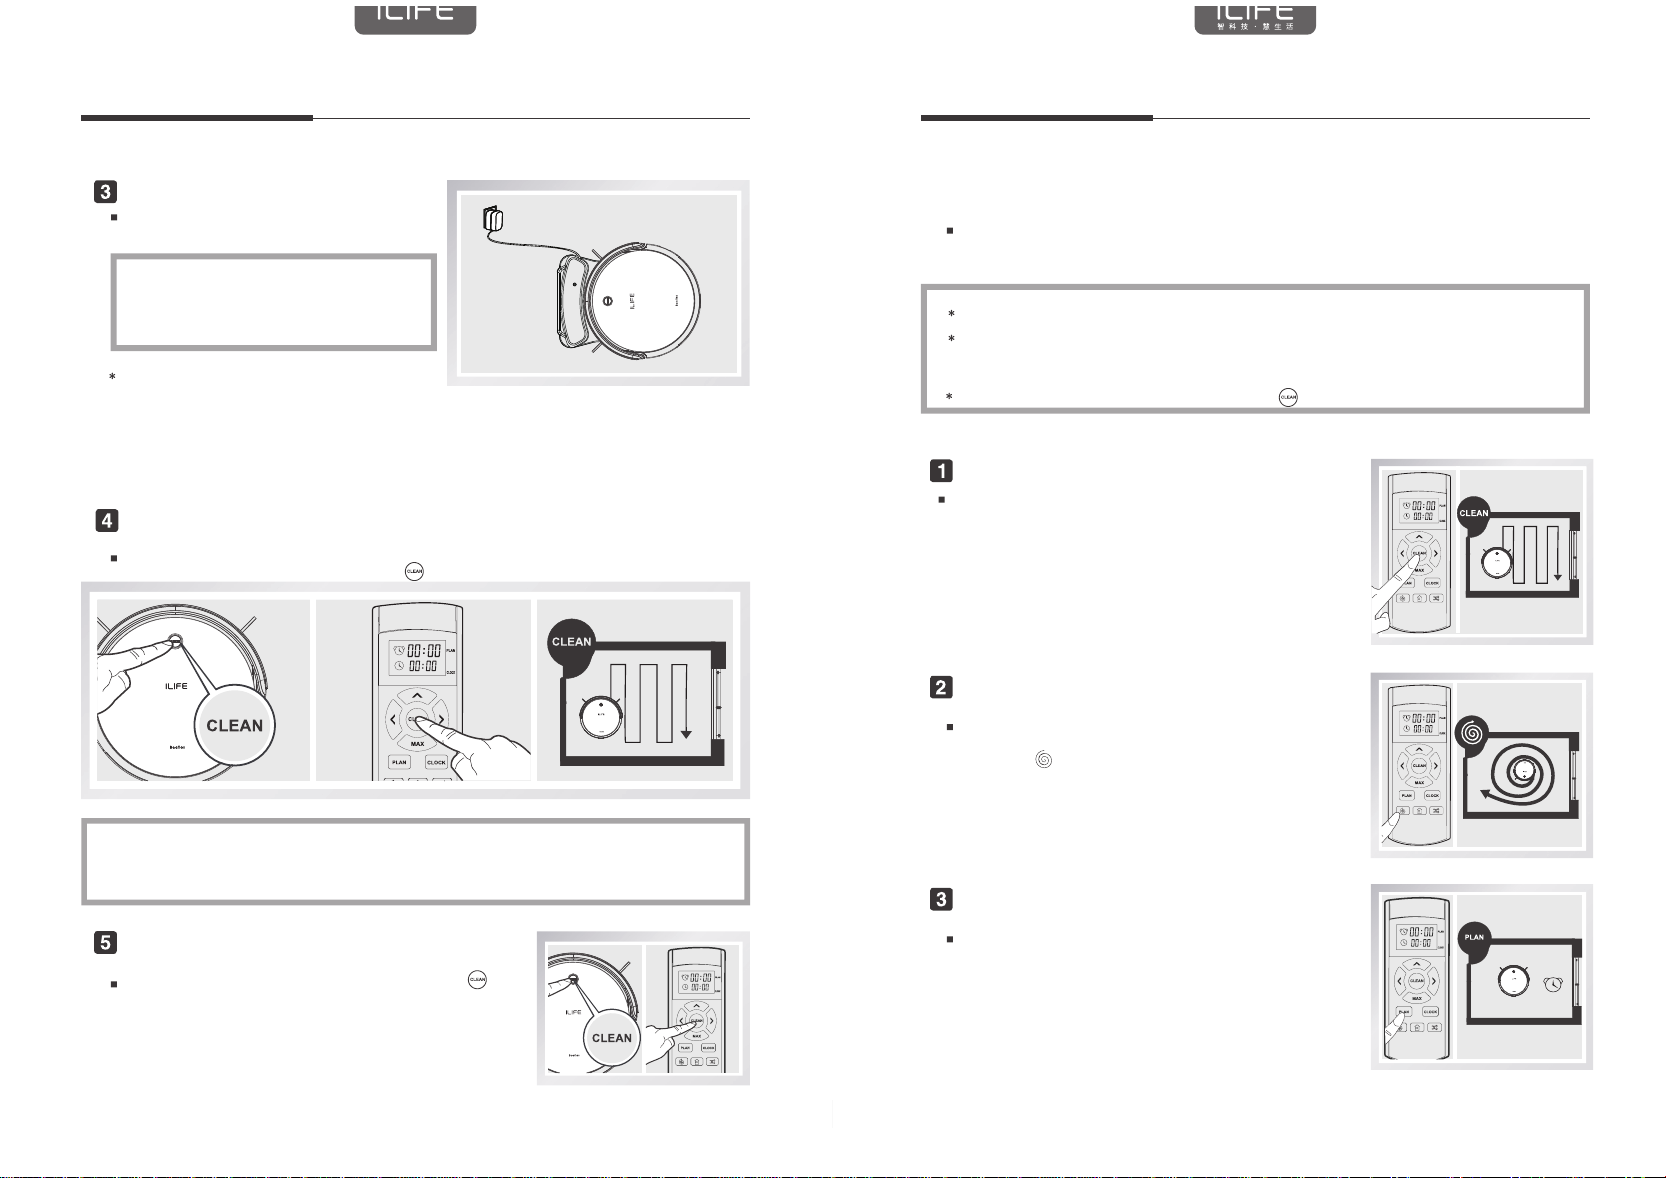
3.Product Operating3.Product Operating 3.Product Operating
Charging robot
Cleaning start
Stop working
3.3 Work mode
Auto cleaning
Spot cleaning
Time programmed cleaning
Put the host into the charging stand,
pay attention to align the charging pole piece
CLEAN button orange light flashing or 3-line lights
gradually superimposed, charging; CLEAN key long green
light or 3 lines long bright, the charge is complete.
Tips:
When charging for the first time, please charge continuously for 12 hours;
For daily use, store the machine in a cradle and ensure that the cradle is plugged in
If you do not use the machine for a long time, please fully charged the machine,
turn off the power switch, stored in dry and ventilated place;
Do not use the manual charging mode when setting the reserved operating mode.
It is recommended to use the auto charging mode.
The Auto Sweep mode can be activated by either the CLEAN button on the main unit
or by the remote controller Sweep key
Before starting this mode, make sure that the host CLEAN key is lit and the host is woken up.
If the host is not woken up, briefly press the CLEAN button or the remote control button (clean)
to wake it up. If you need to select another mode, refer to the [Mode Selection] section.
Press the CLEAN key or the remote control key
on the panel to stop the work.
In order to adapt to different ground conditions, to achieve the depth of cleaning,
this product has a variety of cleaning mode, according to the need to choose through
the remote control.
Use the remote control to switch directly to any mode.
Before starting the following modes, make sure that the host CLEAN key is on and
the host is woken up. If the host is not woken up, briefly press the CLEAN button
on the main unit or the CLEAN key on the remote control to wake it up.
After starting the following modes, press the button to terminate the mode.
In the automatic cleaning mode, the machine will
automatically clean the room, and according to different
ground conditions to adjust. Press the CLEAN button on
the main unit or remote control to enter the Auto Sweep mode.
For more concentrated ground garbage environment,
the host in the designated area for centralized cleaning.
Press the key on the remote control or the
SPOT key on the display to begin the key sweep.
You can reserve machine cleaning time on demand.
Once set, the machine will leave the charging station
at the set time to start the cleaning work,
the cleaning machine will automatically return to the
charging station after charging.
8
PAGE 9PAGE 8
A.
B.
C.
D.
3.Product Operating3.Product Operating 3.Product Operating
Charging robot
Cleaning start
Stop working
3.3 Work mode
Auto cleaning
Spot cleaning
Time programmed cleaning
Put the host into the charging stand,
pay attention to align the charging pole piece
CLEAN button orange light flashing or 3-line lights
gradually superimposed, charging; CLEAN key long green
light or 3 lines long bright, the charge is complete.
Tips:
When charging for the first time, please charge continuously for 12 hours;
For daily use, store the machine in a cradle and ensure that the cradle is plugged in
If you do not use the machine for a long time, please fully charged the machine,
turn off the power switch, stored in dry and ventilated place;
Do not use the manual charging mode when setting the reserved operating mode.
It is recommended to use the auto charging mode.
The Auto Sweep mode can be activated by either the CLEAN button on the main unit
or by the remote controller Sweep key
Before starting this mode, make sure that the host CLEAN key is lit and the host is woken up.
If the host is not woken up, briefly press the CLEAN button or the remote control button (clean)
to wake it up. If you need to select another mode, refer to the [Mode Selection] section.
Press the CLEAN key or the remote control key
on the panel to stop the work.
In order to adapt to different ground conditions, to achieve the depth of cleaning,
this product has a variety of cleaning mode, according to the need to choose through
the remote control.
Use the remote control to switch directly to any mode.
Before starting the following modes, make sure that the host CLEAN key is on and
the host is woken up. If the host is not woken up, briefly press the CLEAN button
on the main unit or the CLEAN key on the remote control to wake it up.
After starting the following modes, press the button to terminate the mode.
In the automatic cleaning mode, the machine will
automatically clean the room, and according to different
ground conditions to adjust. Press the CLEAN button on
the main unit or remote control to enter the Auto Sweep mode.
For more concentrated ground garbage environment,
the host in the designated area for centralized cleaning.
Press the key on the remote control or the
SPOT key on the display to begin the key sweep.
You can reserve machine cleaning time on demand.
Once set, the machine will leave the charging station
at the set time to start the cleaning work,
the cleaning machine will automatically return to the
charging station after charging.
9
Table of contents
Other i-Life Vacuum Cleaner manuals


