i-Life Shinebot W400s User manual

For more details, please
visit www.iliferobot.com
User Guide
Floor Washing Robot


Thank you for choosing Shinebot W400s Floor Washing Robot!
You’ve joined millions of people to get cleaning done robotically.
This user manual helps you to keep your robot performing at its
best. Please take a few moments to read through it.
You may also connect with us on Facebook and Twitter to enjoy
exclusive benefits:
- Get model-specific customer support, including Q&A,
maintenance tips, demo videos, live chat and more;
- Get the most recent product updates including new product
launches, exclusive discounts and special promotions.
You may find us on:
Facebook: https://www.facebook.com/iliferobotics
Twitter: https://twitter.com/iliferobotics
If you have any questions, please contact our customer service for
assistance or visit www.iliferobot.com for more information.
Enjoy automated home cleaning performed by Shinebot W400s.
ILIFE Innovation
ILIFE Customer Service
1-800-631-9676 (Toll free for USA & Canada)
Mon-Fri: 9:00A.M. - 5:00P.M.CST
suppor[email protected]

Contents
1. Important SafetyInstructions .........................................................1
2. Important Tips ..............................................................................................3
2.1 How to start ....................................................................................................3
2.2 How to perform the best ............................................................................3
3. In the Box .........................................................................................................5
4. Product Anatomy .......................................................................................6
4.1 Main body ........................................................................................................6
4.2 Display panel ..................................................................................................6
4.3 Major components ........................................................................................7
4.4 Remote control ...............................................................................................9
4.5 Charging dock ................................................................................................9
5. Installation ....................................................................................................10
5.1 Install the charging dock ...........................................................................10
5.2 Install the main brush .................................................................................11
5.3 Add water and cleanser ............................................................................11
5.4 Install the water tank ..................................................................................12
6. Start Cleaning ............................................................................................13
6.1 Place the robot ..............................................................................................13
6.2 Select cleaning mode ..................................................................................13

Contents
7. Maintenance ................................................................................................16
7.1 Clean the dirty water tank .......................................................................16
7.2 Clean the main brush .................................................................................17
7.3 Clean the filter ..............................................................................................18
7.4 Clean the water tank openings ...............................................................18
7.5 Clean the nose wheel .................................................................................19
8. Troubleshooting ........................................................................................20
9. Product specifications ........................................................................21

Do not use outdoors.
Do not pull or carry by power cord, use power cord as a handle, close a
door on power cord, or pull power cord around sharp edges or corners.
Do not run appliance over power cord. Keep power cord away from
heated surfaces.
Do not use with damaged power cord or plug. If appliance is not working
as it should, or it has been dropped, damaged, left outdoors, or dropped
into water, return it to a service center.
Do not leave appliance when plugged in. Unplug from outlet when not in
use and before servicing.
Do not allow device to be used as a toy. Close attention is necessary
when used by or near children.
Use only as described in this manual. Use only manufacturer's
recommended attachments.
Do not unplug by pulling on power cord. To unplug, grasp the plug, not
the power cord.
Do not handle plug or appliance with wet hands.
Do not put any objects into openings. Keep free of dust, lint, hair and
anything that may reduce air flow.
Keep hair, loose clothing, fingers, and all parts of body away from
openings and moving parts.
Turn off all controls before unplugging.
Do not use the robot to wash flammable or combustible liquids, such as
gasoline, or use in areas where they may be present.
When using electrical appliance, basic precautions should always be
followed, including the following:
Read all instructions before using this appliance.
WARNING - To reduce the risk of fire, electric shock, or injury.
ImportantSafetyInstructions
For more details, please visit www.iliferobot.com1

ImportantSafetyInstructions
For more details, please visit www.iliferobot.com 2
EN
Do not allow robot to clean anything that is burning or smoking, such as
cigarettes, matches, or hot ashes.
Do not use without water tank in place.
Exhausted batteries should be immediately removed from product and
properly disposed of.
Always insert batteries correctly with regard to polarity (+ and - ) marked
on the battery and the product.
This product is intended to work in environment between 10oC and 50oC.
This product is intended for household use only. It is not intended for
commercial use.
Intended use
Roll up carpet tassels and make sure that curtains and tablecloths are not
in contact with the floor.
If there are any raised floors such as steps or stairs, test if the appliance
can detect the height difference to prevent it from falling.
Do not allow hair, clothes or fingers near openings or mechanical parts of
the appliance.
Do not put any objects in the main brush holder. To ensure smooth rotation
of the main brush, remove dust, batting and any hair from around it.
Stop the appliance promptly if error occurs during cleaning. Before using
the appliance, remove all power cords and small objects from on the floor.
Tips and tricks
CAUTION- To reduce the risk of injury from moving parts, unplug
before servicing.
For more details, please visit www.iliferobot.com3
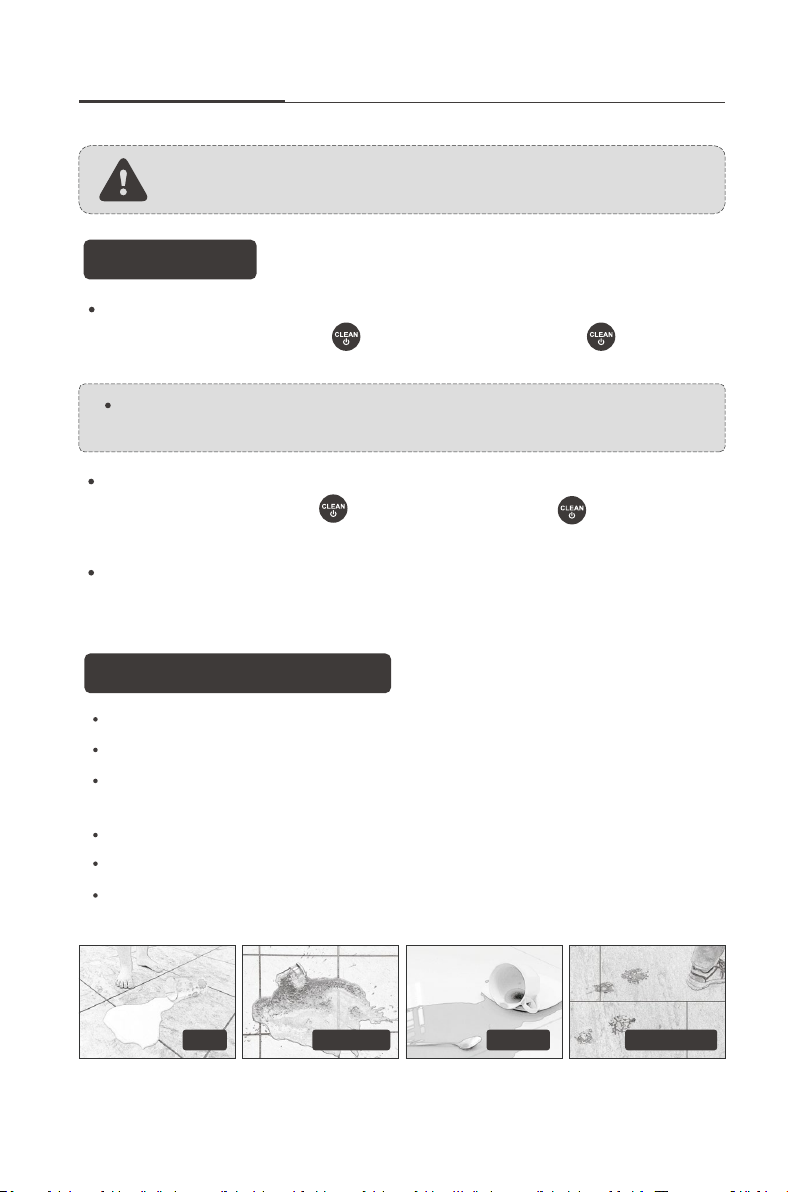
How to perform the best
The robotisskilledatcleaningup differenttypesofstains,likemilk,
ketchup,coffeeandfootprints.
ChoosetheSpotmodeforareaswithstubbornstains.
Emptythedirtywatertankaftereachuse,andcleanthewatertank
outletsandinletsregularly.
Removethemain brushandrinsewithwateronceaweek.
Fill up the clean water tank before each use for better performance.
Cleanbothventsandremovethedustanddebrisregularly.
Important Tips
Shinebot contains electronic parts. DO NOT immerse the robot’s
main body in water.
Howtostart
Turn on/off
Pause/Resume
Clean
To turn the robot on, press for 1s. To turn it off, press for 3s.
Release the button after a sound alert.
To pause the robot, press while it's cleaning. Press again to resume
the cleaning cycle.
Install the main brush before use. Fill the clean water tank with clean water
and DO NOT add any detergents.
Milk Ketchup Coffee Footprints
The robot will automatically enter sleep mode if no command is
received within 3 minutes.
For more details, please visit www.iliferobot.com 4
EN
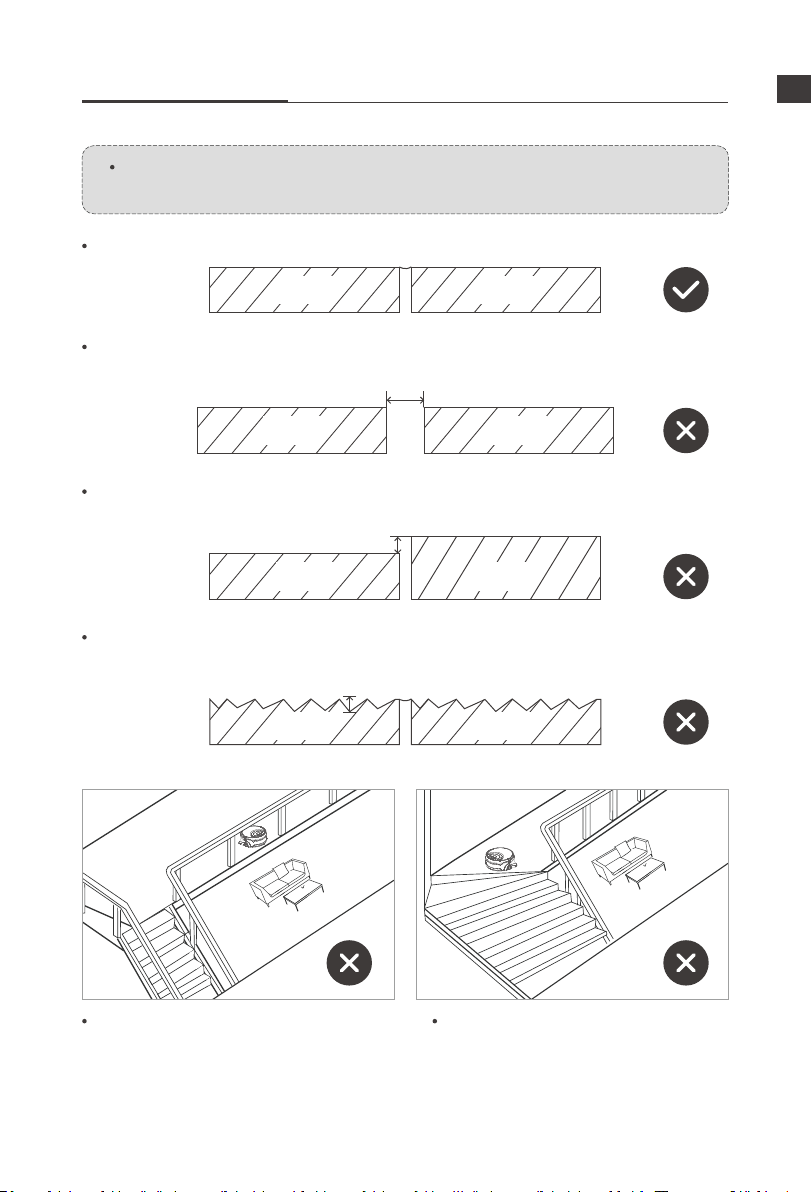
The robot performs well on tile floor with small gaps.
The robot does not work properly on tile floors with gaps wider than 10mm.
The robot does not work properly on tile floors if the height difference
between tiles is higher than 3mm.
The robot does not work properly on uneven tile floors
(more than 2mm in height).
The robot works on a variety of hard floor surfaces, such as porcelain
tiles, vinyl flooring, and laminated floors.
Important Tips
Tile Tile
>3mm
Tile Tile
>10mm
Tile Tile
Don't use the robot on the upper floor
if there is a risk of it falling down.
Don't use the robot on stairs to
reduce the risk of it falling down.
Tile Tile
>2mm
For more details, please visit www.iliferobot.com5
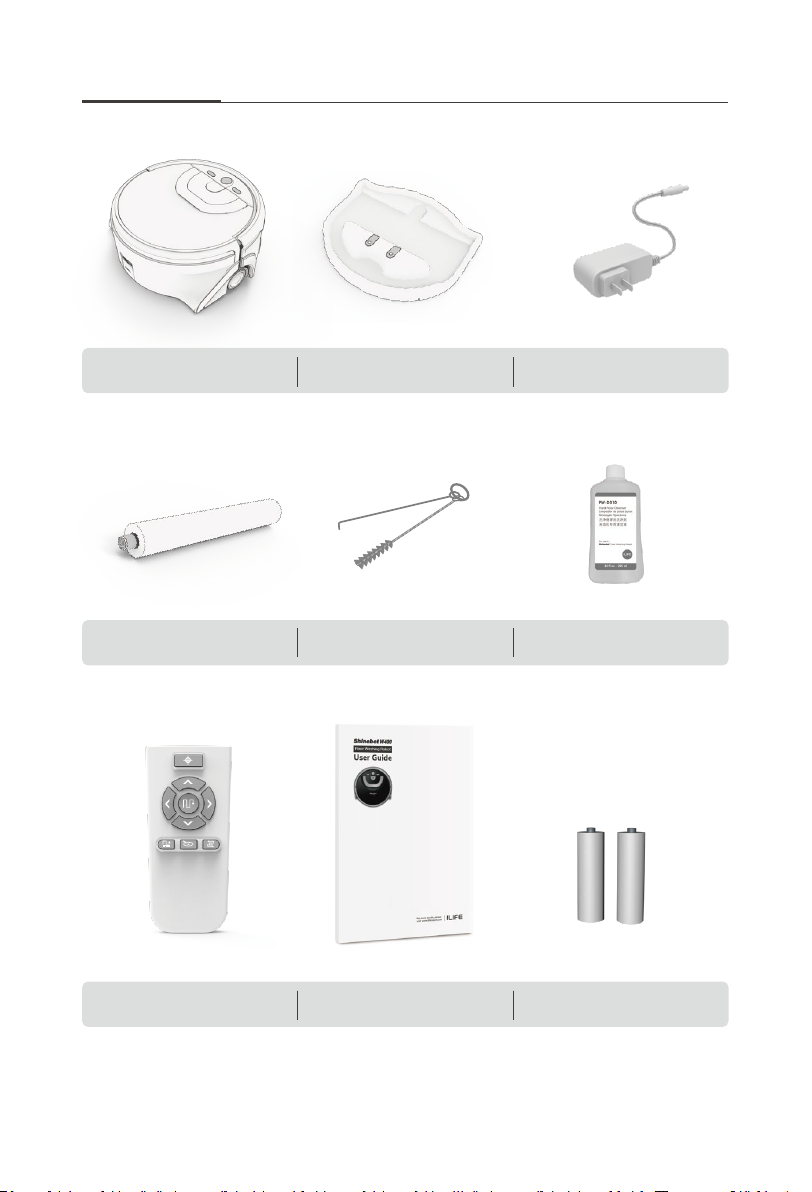
In the Box
Robot main body
(include a main brush) Charging dock Adapter
Main brush Cleaning tool Hard floor cleanser
AAA battery ( X2 )Remote control User guide

Voice alertCleaning modes
Start/Stop clean
Main body
Display panel
Product Anatomy
Area mode
Path mode
Spot mode
Edge mode
Water tank alert
Battery level
Water tank release button
Handle
Bumper
Dirty water outlet
Side wheel
For more details, please visit www.iliferobot.com 6
EN
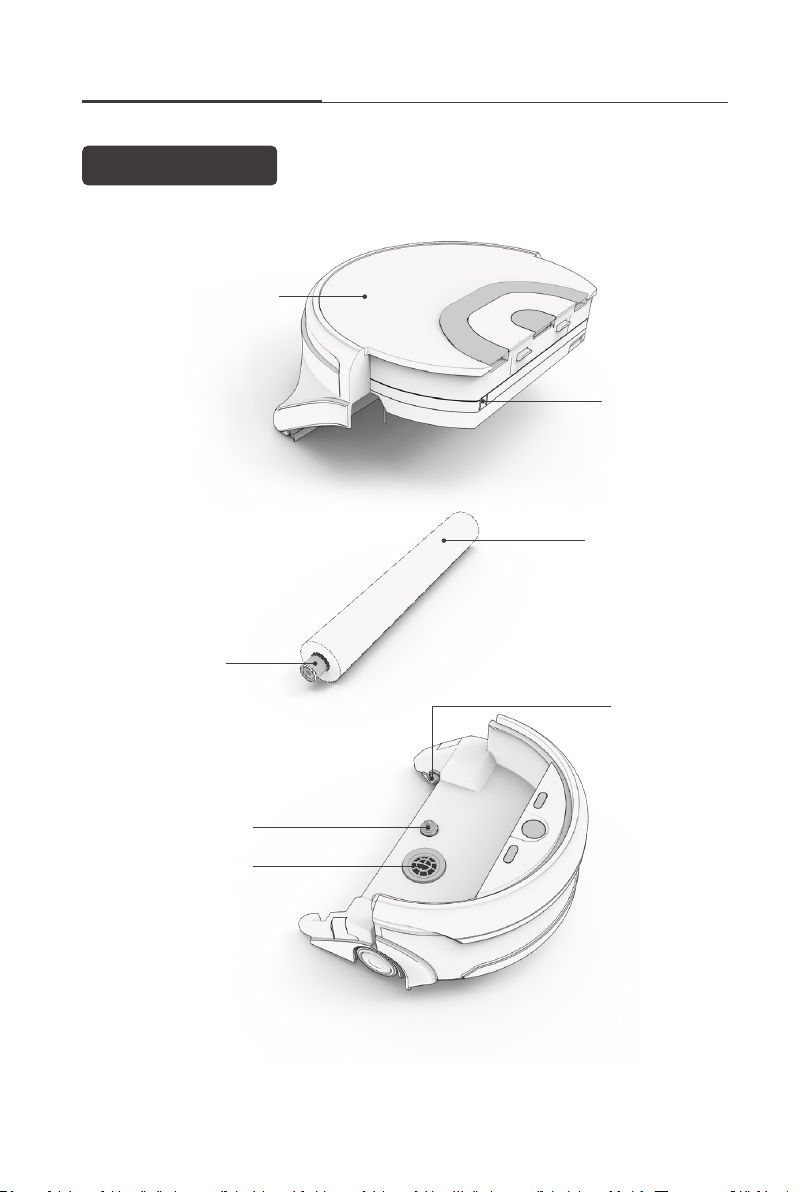
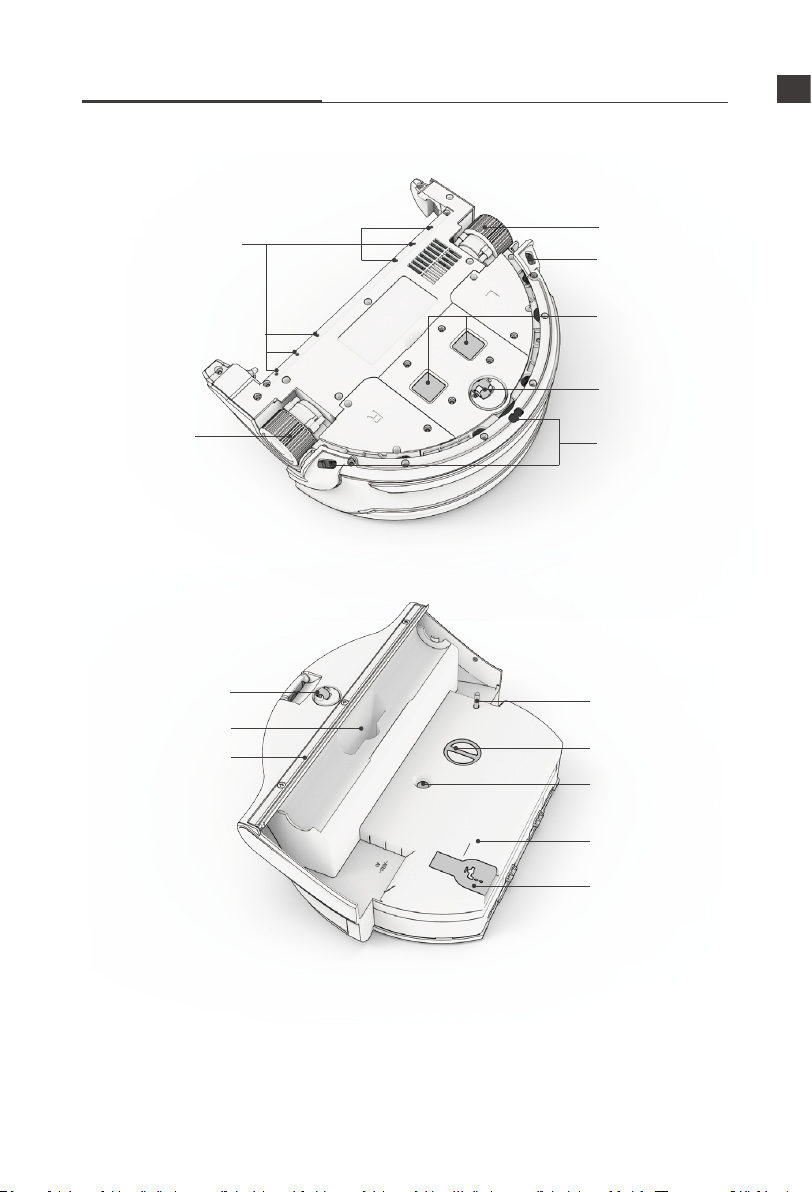
Integrated water tank
Dirty water
level detector
Main brush
Main brush
soft cap
Main brush
gearwheel
Clean water inlet
Fan-coil inlet
Host machine
Product Anatomy
For more details, please visit www.iliferobot.com7
For more details, please visit www.iliferobot.com 8
Product Anatomy
Lock button
Fan-coil outlet
Clean water
outlet
Clean water
inlet cap
Rear wheel
Suction passage
Scraper
Sprinkler nozzles
Drop sensors
Nose wheel
Charging pins
Drop sensor
Side wheel
Side wheel
EN
Minimum water
level
MIN

For more details, please visit www.iliferobot.com9
Up/Down/Left/Right
Direction can only be
changed when the robot
is on standby. Long press
to activate the robot
and move it forward.
The robot will follow the
direction that the remote
control points at and start
cleaning.
Charging dock
Product Anatomy
Adapter wire brackets
Power socket
Charging ports
Spot mode
Up
Left / Right
Starting point
Path mode
Edge mode
Area mode
Remote control
Down

For more details, please visit www.iliferobot.com 10
EN
Installation
Please check icon on the display panel if needed, and recharge if it
goes low.
Battery condition
Install the charging dock
Working time Recharge
immediately
Green light
>30 mins
Orange light
<30 mins
Red light
2
2
3
1
1
Step 1
Shinebot W400 is not a self-charging robot. Please take it to the dock
manually for recharging after each use.
Turn the charging dock
upside down.
Plug in the power cord. Secure wires around the
cable channel.
Step 2
Put the charging dock somewhere level, dry and safe, and manually take
the robot back to the charging dock to recharge.
Voice alert: Charging will start soon.
Note: Do not put the main brush on the metal chips of the charging
dock. The brushes may have residual moisture and cause damage.
Put charging dock and the robot
in right direction.
Take the robot back to
charging dock.

For more details, please visit www.iliferobot.com11
Installation
Open the clean water tank cap and fill up the tank with clean water.
After filling up the water, erect the water tank to ensure that the water
volume exceeds the minimum water level.
Press down on the water tank release button, pull the handle up to
detach the tank. Turn the integrated water tank upside down.
2
3
1
1
2
Install the main brush
Add water and cleanser
Press down on the capped end into the other end of the main body.
It's recommended to properly dampen the main brush
before installation for better cleaning performance.
Insert the recessed end of the main brush into the gearwheel.
Add the specific Shinebot cleanser (if necessary).
4
MIN
MIN
Minimum water level
Note: 1. Do not use distilled or purified water.
2. Do not add any detergents.

For more details, please visit www.iliferobot.com 12
EN
Installation
Click
1Align the bottom of the
integrated water tank
with the main body
and push forward.
3Press down, and
a “click” will be
heard if installed
properly.
2Align the ends and
move the water
tank to insert it
into themain body.
Align
Align
Instructions
The Shinebot Hard Floor Cleanser
Cleanser to water dilution ratio is 1:100.
Add a bottle cap of cleanser in the clean
water tank before each cleaning.
This concentrated cleanser is available
to all kinds of hard floors that are
sealed well.
The Shinebot
Hard Floor Cleanser
≈ 6ml
(Bottle cap capacity:6ml)
Install the water tank
Attention: Using excessive cleanser
can damage the Shinebot, which
should be avoided.
Attention: Please keep it out of reach from children. If the ingestion
happens to somebody, drink 2 cups of or more water or milk and visit the
doctor immediately, do not induce vomiting.

For more details, please visit www.iliferobot.com13
Start Cleaning
Select cleaning mode
The robot will continue to clean using the last used cleaning mode if
no new command is received.
Tap the MODE button to
switch cleaning modes.
Press the button on the remote
control to switch modes directly.
The robot has 4 cleaning modes. Choose the mode you need by pressing the
MODE button on the display panel or corresponding buttons on the remote
control.
Press button to start cleaning.
Take the robot out of the charging dock to the cleaning starting spot, and
place the robot at least 1.6 ft away from the wall.
Place the robot
AB
or
>1.6 ft
>1.6 ft
>1.6 ft
For more details, please visit www.iliferobot.com 14
EN
Start Cleaning
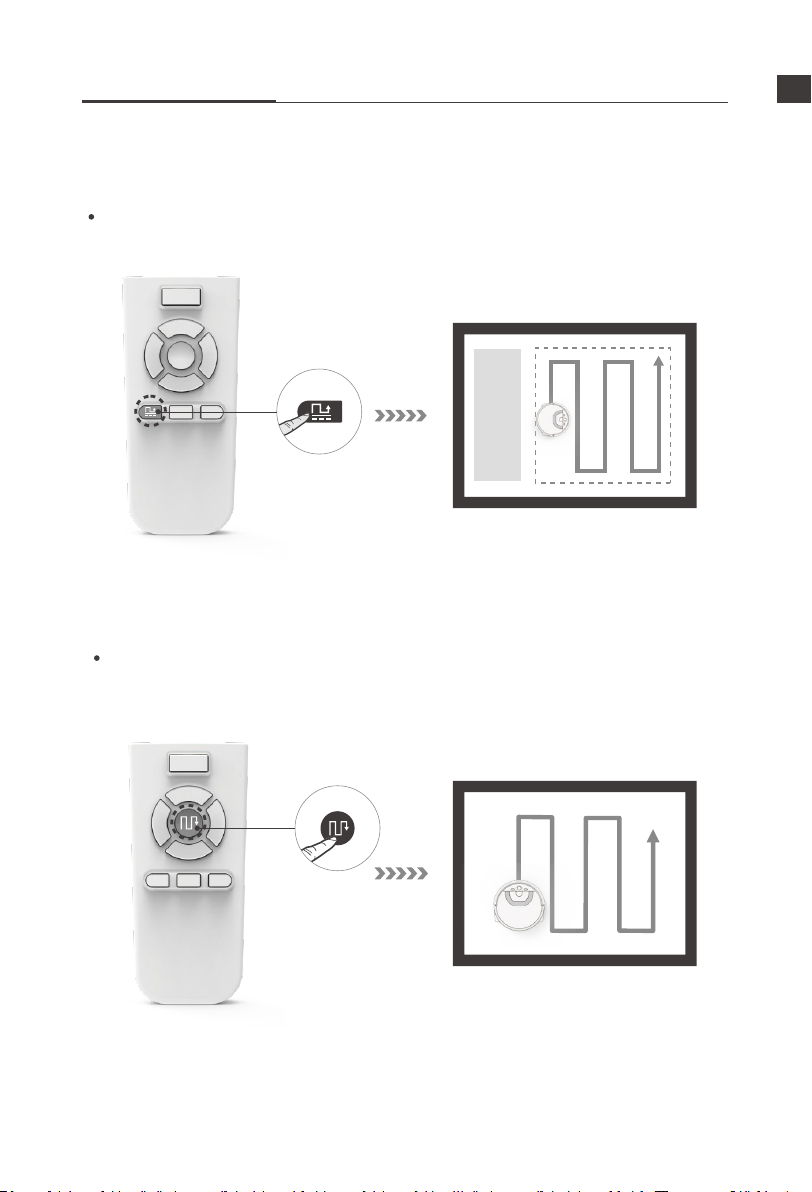
Area mode
Path mode
The robot cleans only the area ahead of its starting point within 270 sq.ft.
This mode is intended to avoid the areas you don’t want cleaned.
For large space cleaning. The robot cleans in a methodical path from the
starting spot. After the cleaning cycle, the robot will return to the starting
spot.
16.4 ft
16.4 ft
Forbidden Area
For more details, please visit www.iliferobot.com15
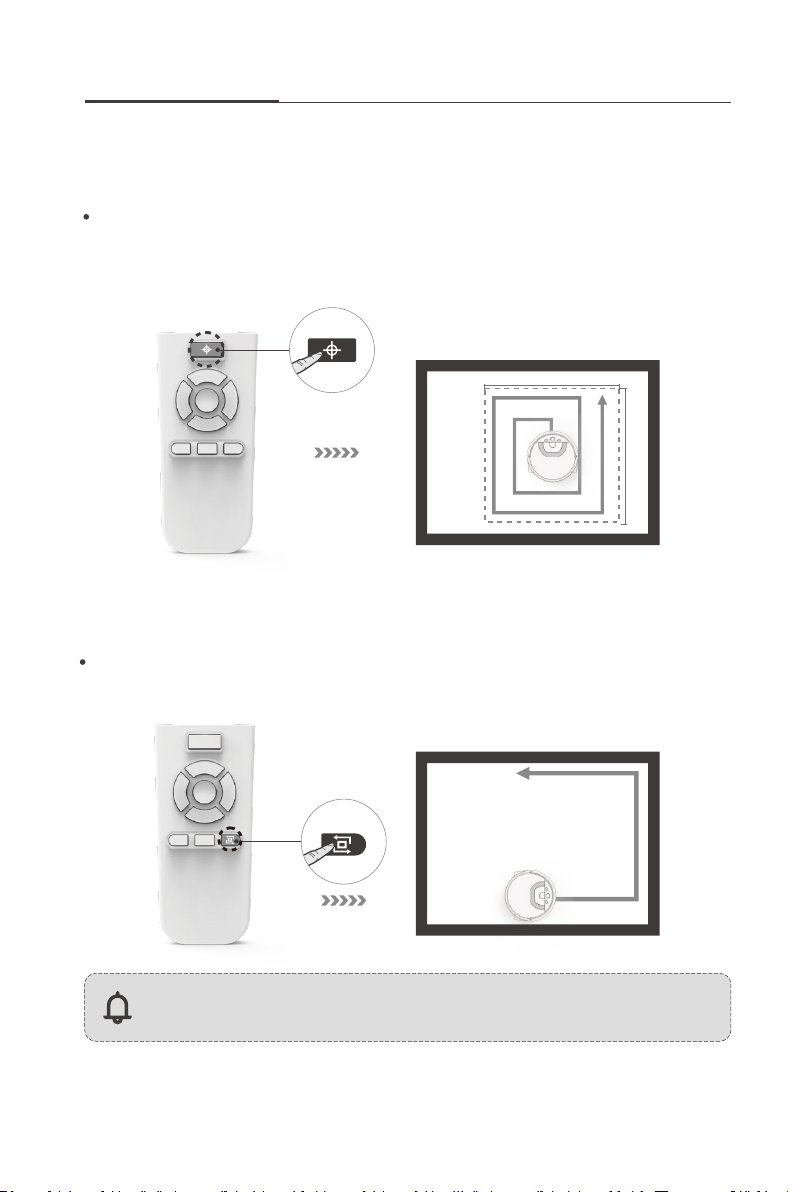
The robot automatically increases suction power and water flow to clean
stubborn stains. It cleans at a square spiral route from the starting point,
and it will take the same route back to the starting spot after two rounds
of cleaning.
On the Edge mode, the robot will automatically detect and clean along
edges and around corners.
Start Cleaning
Spot mode
Edge mode
Note: Before starting Edge mode, put the robot near the walls and
remove the obstacles nearby, such as chairs, tables, etc.
2.6 ft
2.6 ft
Table of contents
Other i-Life Vacuum Cleaner manuals

i-Life
i-Life X5 User manual

i-Life
i-Life H50 User manual

i-Life
i-Life V8s User manual

i-Life
i-Life Beetles User manual

i-Life
i-Life V3s Pro User manual

i-Life
i-Life V5x User manual

i-Life
i-Life Shinebot W400 Installation guide

i-Life
i-Life V7s User manual

i-Life
i-Life ILIFE-T10s User manual

i-Life
i-Life V3s Pro User manual


