i4Technology BugHunter Professional CR-01 User manual

Field indicator BugHunter™Professional CR-01
Produced In English Language specifically for British American Innovations ltd
www.ba-detect.com
User manual
INTK.411153.005 RE
CONTENTS
Device description and operation.
1
Technical specifications.
2
Device components
3
Structure and functioning.
4
Operation procedure.
5
Package contents
6
Maintenance.
7
Packing certificate.
8
Acceptance Certificate.
9
Manufacturer warranty.

The User Manual includes key features, operating instructions (intended use, maintenance, repair, storage and
transportation) of field indicator BugHunter™ Professional CR-01 (hereinafter - device).
It is a portable device designed to detect radio-transmitting equipment such as wireless «bugs», wireless
microphones, wireless spy cameras, walkie-talkie, cellphones and cellphone jammers in close area.
The advantages of BugHunter™ Professional CR-01 in comparison to the similar devices:
1. Exact match of stated parameters.
2. Slim size. Unique feature!
3. Touch screen control.
4. Entire frequency range coverage, allows "bugs" detection from 50 to 3000 MHz
5. Equally high sensitivity throughout claimed frequency range. Unique feature!
6. Extended dynamic range.
7. Both analog and digital wireless "bug" detection (short pulses)!
8. Automatic adjustment of background radiation levels.
9. Extended operating temperature range.
10. Design and manufacturing made in Russia using high-quality components set.
11. Can operate in three modes: analog signal search, digital signal search and a guarding mode.
12. Switching audio modes: acoustic indication, acoustic feedback, mute.
13. Advanced power saving features (increased duration of work).
14. Low battery indicator.
15. Self-diagnosis.
16. Possible detection of cellular phones signal jammers and other radio frequencies.
Attention! In order to ensure a long, successful and safe operation of the acquired device, carefully read this
manual.
Following the rules, restrictions and guidelines will prolong the device life and will help to use it most effectively.
Violation of storage and exploitation rules will lead to premature termination of the manufacturer’s warranty.
After storing the product in a cold place or winter transportation the device should be kept at room temperature for
two hours before you turn it on.

1. Device description and operation
1.1. Technical features
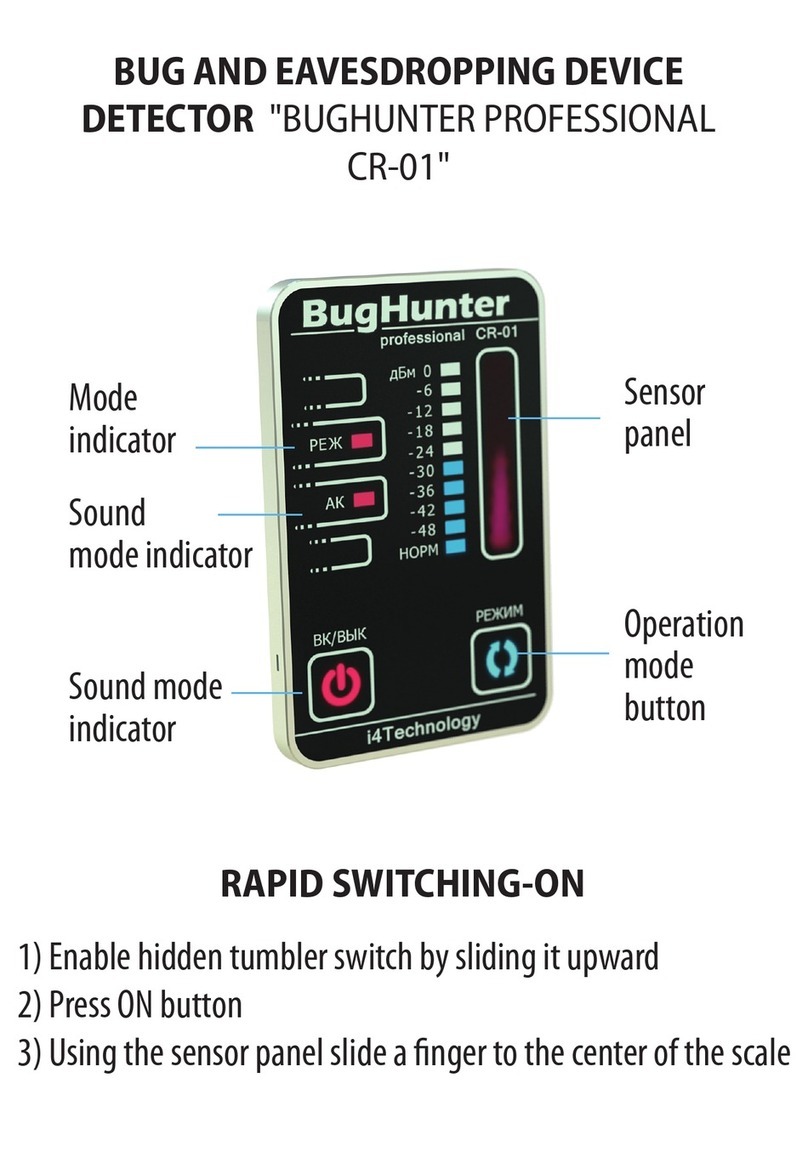
Appearance of the device is shown on Picture 1.
Picture 1. Appearance of the device
Size dimensions, mm, no more than ………………………………………………...…...…77 х47 х5
Device weight with batteries, kg, no more than …………………………………….……………. 0,025
AC supply voltage (Li-Pol battery), V, ………..……from 3,2 to 4,2
Power consumption, W, no more than ………………………………………………. 0, 16
Frequency range, MHz …………….....…………….……………………………………... 10-3500
Sensitivity, mV / m, not less than ……………………………………………………..….……….…… 50
Dynamic range, dB, up to ………..…………………………………………………..…………….. 70
Modes of operation: ……………………………………………………….……. search, guarding, feedback
Detection range of radio transmitter powered 5 mW, in a quiet radio, m, at least …………..…………… 5
Detection range of cell phone operating in passive mode, m, not less than: …………………….………… 50
The device can operate in the following climatic conditions:
- Surrounding air temperature, °C ... ... ... ... ... ... ... ... ... ... ... ... ...... ... ... ... .... from -10 to +80
- Relative humidity,% (no condensation) ... ... ... ... ... ... ... ... ... ... ... ... ... ... ... 10 to 85

2. Device components
Appearance and parts location can be seen on Picture 2.
Picture 2. Main components location
The product consists of a body (item 1), made of aluminum alloy, with installed electronic modules that are
covered with a safety film. The front panel of the device (item 2) is a keyboard with touch-sensitive buttons and
a touch panel.
The following controls and indicators are located on the front panel:
- ON / OFF button - "ON / OFF" (item 3);
- Operating modes selection button - "MODE" (item 4);
- ON power indicator- "MODE" (item 5);
- Acoustic mode indicator –"AK" (item 6);
- Signal strength indicator scale (item 7);

- Touch panel of sensitivity regulation (item 8).
On the side surface of the body frame are located following items:
- microUSB jack (item 9) for connecting the charger (AC adapter and cable are included in the package
supplied);
- Charging indicator (item 10);
- Power switcher (item 11).
3. Structure and functioning.
3.1 The device runs under command of microcontroller with embedded software.
Before using the device put power switcher (item 11) into “ON”position (up).
3.2 The keyboard (item 2) has the following functions:
- Turning ON/OFF the device (press and hold the button "ON / OFF" not less than 3 seconds). When you turn on the
device it performs a self-test, a beep sounds, all the LEDs lights are up. By the end of the self-test "MODE" and
"BAT" LEDs remain on, signaling that the device is ready to operate.
- The sensitivity of the device is regulated upwards by moving your finger up the touch panel.
- The sensitivity of the device is regulated downwards by moving your finger down the touch panel.
- The device’s sensitivity automatically readjusts to the surrounding radiation level by double clicking the
touch panel.
3.3 Current sensitivity level of the device is displayed by smooth light of LEDs going up or down on the touch
panel. The higher is LED point on the touch panel, the higher is the sensitivity.
3.4 Operating modes of the device are switched by pressing "MODE" button:
a) When the "MODE" LED is on - the device is in constant search of analog signal.
b) When the "MODE" LED is flashing - the device is in search of pulse (digital) transmitters (digital
eavesdropping devices, cell phones).
c) When the "MODE" is off and "AK" LED lights up for short time period and then goes off - the device is in
guarding mode (detects only when new sources of signal appear). This operating mode allows to keep the device in
optimal sensitivity mode and significantly saves battery life.
3.5 Switching into functioning modes with additional audible alarm notification can be performed by pressing
"MODE" button (more than 3 seconds) and:
a) if LED "AK" is flashing –signal level alarm is enabled (frequency of acoustic signals depends on signal
strength).
b) if LED "AK" is steady –the device is in "feedback mode" (allows to detect wireless microphones in area up
to 0.5 m).
c) if LED"AK" is off - sound notification is disabled.
3.6 When the device is on, then, by briefly pressing "ON / OFF" button you can see level of battery charge on
the LED scale (item 7). If all 10 LEDS are on it means the charge is 100%, if 9 out of 10 LEDs are on –90 % and
etc.
3.7 The blinking red light of the button ON/OFF (item3) backlight indicates the low battery charge.
NOTE: If you do not use the device for a long time, please put the power switch (item 11) to the OFF position
(down) in order to save battery charge.
4. Operation procedure:
4.1 Turn on the device by pressing "ON / OFF" button. The device will automatically adjust the sensitivity to
the level of surrounding radiation.
4.2 Start monitoring the room, keeping the device at 0.3-0.5 m distance from the tested surfaces. If the device
displays the highest signal level (full LED scale glows), adjust the sensitivity by clicking the touch panel. Repeat

this action until you find the place with the maximum radiation.
4.3 Scan the detected place with maximum radiation for wireless «bugs», if you want, you can manually adjust
device sensitivity by sliding your finger up or down the touch panel.
4.4 If during scanning for a constant signal, all (or part) of the LEDs quickly turn on and off, please switch
operating mode to search of pulse signal.
4.5 In case of detection of a place with a maximum level of unknown radiation, the device can be switched into
feedback mode. If you hear a characteristic whistle out of the device, it means that a wireless microphone (bug) is
transmitting at the moment.
4.6 The "Guard" mode should be used when there is no unknown radiation around. It can take some (about 5
sec.) time for the device to automatically adjust the background radiation. After the adjustment process, the device
switches into “Guard” mode - "AK" indicator will light up for a short time period. If an unknown radiation is
detected, the device will alarm with a steady signal, when the radiation is over it returns to guard mode.
4.7 If necessary, recharge the built-in battery of the device via cable and AC adapter supplied. After charging is
over the red light will be off (item 10). In addition, the charging process is dynamically visualized with a backlight
of the touch-panel.
4.8. Some recommendations on device usage:
- Before starting the searching process, switch off any radio-emitting devices if possible (Wi-Fi, cell phone in
active mode, computers and other household and office equipment). It simplifies the process by eliminating extra
noise, and allows using higher level of sensitivity.
- In the "search" mode, the level of sensitivity of the device should be adjusted and you should go near the
suspicious object. It is desirable to scan with the help of the device places where most likely "eavesdropping"
devices could be installed.
- The most likely locations of eavesdropping and spying devices are: cavities and crevices in baseboards and
walls, behind radiators, remote places in the cabinets, moldings, ceiling cavity, ventilation shafts, pieces of
furniture, household items, flowers, board panel of the car, seat, etc.
- If the device detects a signal, it will alarm you with a sound and show it on the LED scale. The closer device
is to the transmitter, more glowing LED scale is.
- While scanning, it is preferably to use two different search modes: detection of usual analog wireless "bugs"
and digital ones.
- Usually, the "Guard" mode should be turned on if you need to have a constant control of the situation, for
example, during negotiations. The device keeps scanning the area in this mode. It will alarm you if any wireless
“bug” or hidden transmitting cell phone is disclosed.
- "Feedback" mode is used to search for hidden microphones (wireless "bugs"), operating in analog mode.
This allows the wireless "bug" to capture the sound emitted by the device, and broadcast it. The radio signal is
detected and its strength is increased by the device. As the result, the circle closes up and the device produces a
characteristic "whistle." “Feedback” mode is the most accurate method of "bugs" detection; it essentially reduces the
search time.
5. Package contents
Package contents of the device can be seen in Table 1. Table 1
№
Item name
Quantity
Notes
1
Field indicator BugHunter™ Professional CR-
01 INTK.411153.005
1
2
microUSB cable
1
4
AC adapter
1
5
Packing box
1
6
User manual BA English Manual
1

6. MAINTENANCE
Maintenance requires only charging of the battery as well as cleaning the surface of the device.
7. PACKAGING, STORAGE AND TRANSPORTATION
Each device is packed in individual package according to the supply package as indicated in Table 1.
Device moving in the package is not allowed.
Packed devices are placed into shipping containers - a corrugated fiberboard box (State Standard 22637).
Packaged devices can be transported by vehicle or railway in covered trucks or containers, by air in pressurized
compartments.
During transportation packed packages should be protected from precipitation and direct sunrays.
Transportation conditions:
- Surrounding air temperature: from -50 up to 50 С
- Relative humidity up to 95 % at 25 С
- Atmospheric pressure from 84 up to 107 kPa (630 - 800 mmHg)
- Shock acceleration peak value is up to 147 m/s2 (15 g), with a duration of shock acceleration 10 ... 15 ms
The requirements on warning signs must be strictly obeyed when loading and transportation
8. ACCEPTANCE CERTIFICATE
Field indicator BugHunter™ Professional CR-01 INTK. 411153.005 RE
Serial number ____________________
Manufacture date ____________________
Manufactured and accepted in accordance with the applicable technical documentation and validated.
Quality Department stamp ___________________
9. MANUFACTURER WARRANTY
9.1 i4Technology ™ - Russian vendor and manufacturer of innovative electronics is distinguished by the high
quality and durability products. A unique multi-level quality control system is implemented at the plant.
The manufacturer uses only high-quality, expensive hardware components of world-famous vendors from
Europe, USA and Japan.
9.2 The manufacturer guarantees that the product conforms to the applied requirements under the operating,
storage and transportation conditions specified in the operational documentation
9.3 Effective device duration period —not less than 5 years
9.4 Manufacturer warranty –2 years from the date of purchase.
9.5 If the device fails during the warranty period, the supplier (manufacturer or companies providing
maintenance services) should replace or repair it at its own expense.
9.6 Customer loses the right to obtain warranty service in the following cases:
- After warranty term expiration;
- Violation of the operation, transportation and storage instructions;
- Mechanical damages causing device failure after the purchase;
- Manufacturer sealing is broken.
9.7 Repair and maintenance of the devices with an expired warranty period is covered at the customer’s
expense.

Manufacturer reserves the right to amend or change the characteristics of the
device, improving its consumer properties.
Manufacturer's technical support:
© Copyright I4 technology –Sold exclusively to BA-Detect for the vertical channels of B2B covert surveillance
resellers in Western Europe and North America.
Questions concerning the exchange after-sales service should be applied to the distributor that completed a sale.
Distributor contacts are specified in its warranty card.

Other manuals for BugHunter Professional CR-01
1
Table of contents
Other i4Technology Security Sensor manuals

i4Technology
i4Technology Bughunter dVideo User manual

i4Technology
i4Technology BugHunter Professional BH-03 Expert User manual

i4Technology
i4Technology BugHunter Professional BH-03 Expert User manual

i4Technology
i4Technology BugHunter Professional BH-02 Rapid User manual

i4Technology
i4Technology Bughunter dVideo BDV-01 User manual

i4Technology
i4Technology BugHunter Professional BH-04 User manual

i4Technology
i4Technology BugHunter Professional CR-01 User manual

i4Technology
i4Technology Bughunter TM DVIDEO NANO User manual