IB Connect PRISMA User manual

Work and close
PRISMA
Trabajar y cerrar
MANUAL DE USUARIO / USER MANUAL /
MANUEL D’INSTALLATION / MONTAGEANLEITUNG
ES
EN
FR
DE

Manual de Usuario ......................................03-08
User manual ......................................09-14
Manuel d’installation
......................................15-20
Montageanleitung
......................................21-26
índice /
table of contents
características técnicas /
technical specifications
Tipos de conexiones
•Alimentación eléctrica: conector rápido.
• Salidas de corriente: Tomas eléctricas.
• Voz y Datos: RJ45
•Conexiones multimedia.
Eléctrico
Tensión nominal: 230V a.c monofásico.
Intensidad nominal: 16 Amp
Frecuencia: 50/60Hz.
Connection types
• Power supply: rapid connect.
• Output current: Schuko socket.
• Voice and Data: RJ45
• Multimedia connections.
Electricity
Nominal voltage: 230 V a.c. monophase.
Nominal current: 16 amps.
Frequency: 50/60 Hz.
ES
EN
FR
DE
Anschlüsse
• Stromeingang: GST18 Buchse
• Stromausgang: Steckdose in Ländernorm
• Voice und Daten: RJ45 / CAT6
• Multimediaanschlüsse.
Stromversorgung
Nennspannung: 230V Wechselstrom,
einphasig
Nennstrom: max. 16A
Stromfrequenz: 50/60 Hz
spécifications techniques /
technische Spezifikationen
table des matières /
Inhaltsverzeichnis
Types de connexions
•Alimentation électrique : connecteur rapide.
• Sorties de courant : prises électriques.
• Voix et Données : RJ45
•Connexions multimédia
Électrique
Tension nominale : 230V monophasé
Intensité nominale : 16 Amp.
Fréquence : 50/60Hz.

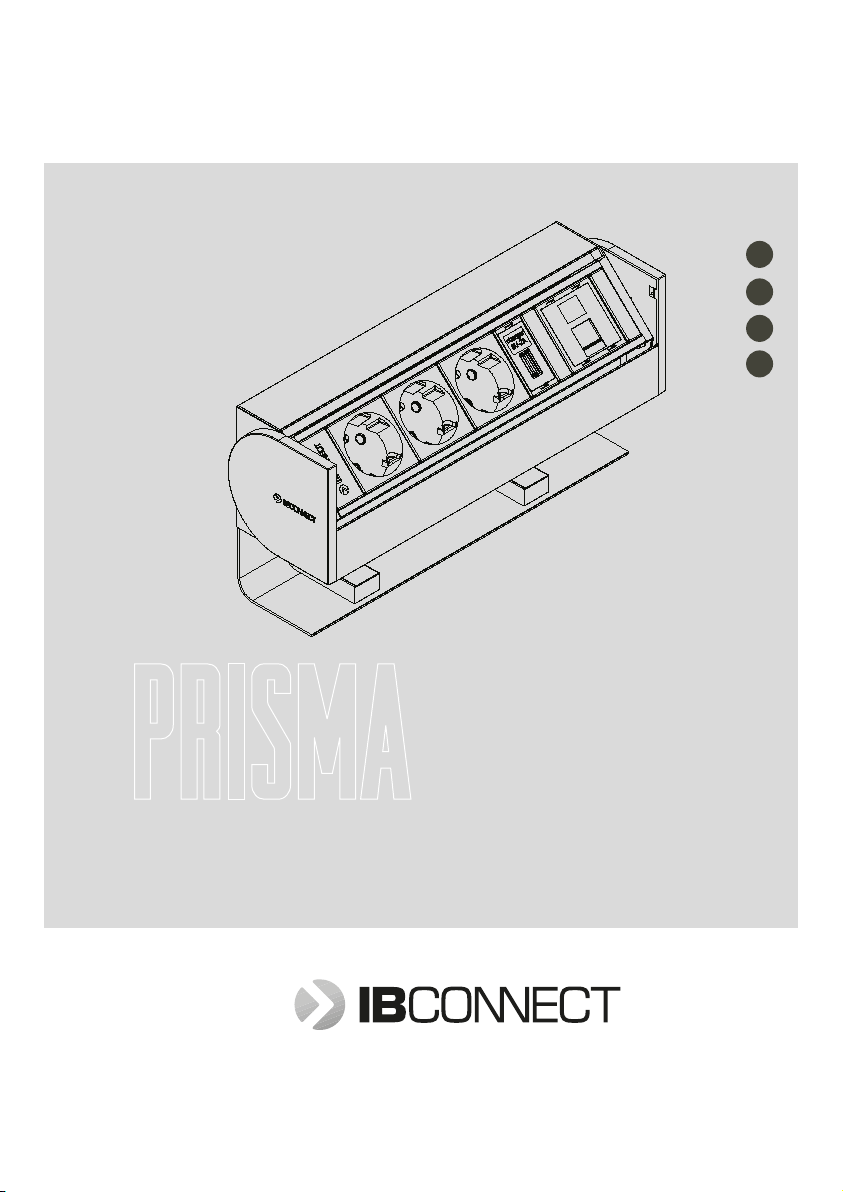
antes de comenzar before starting
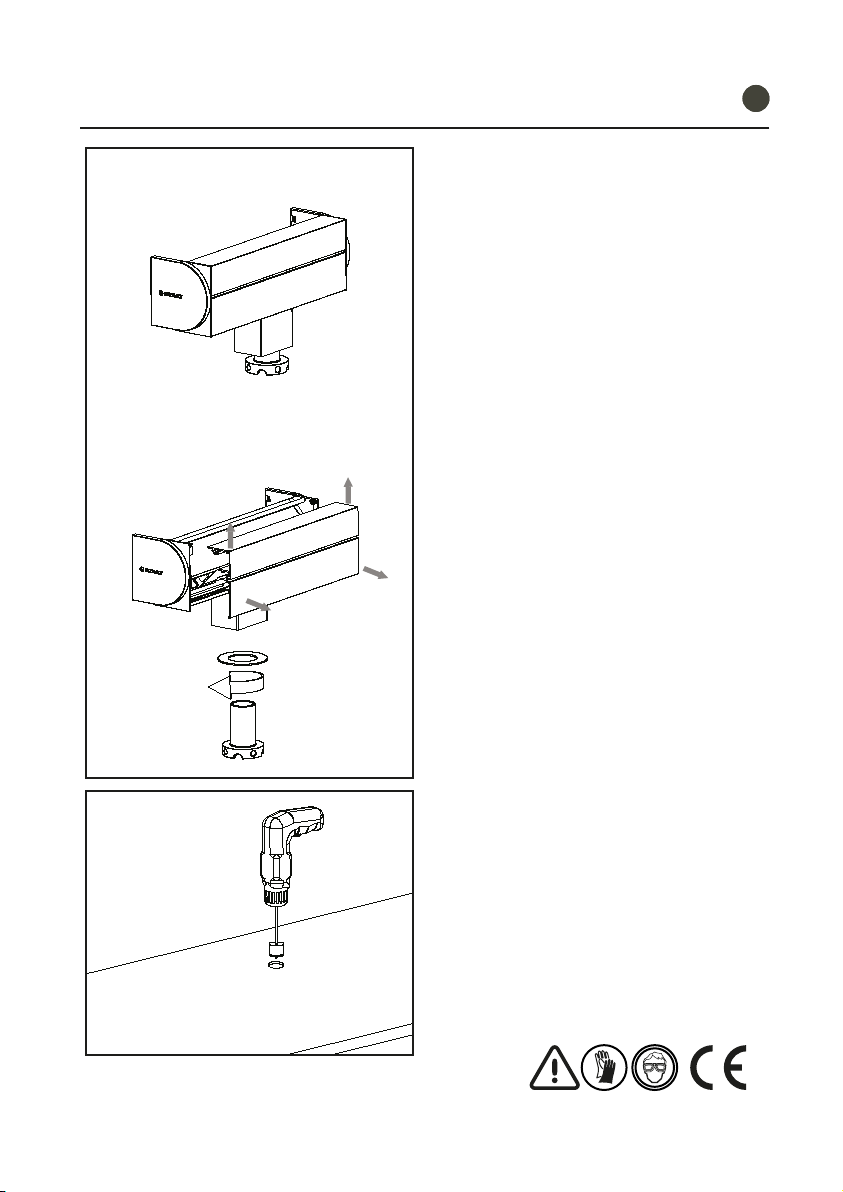
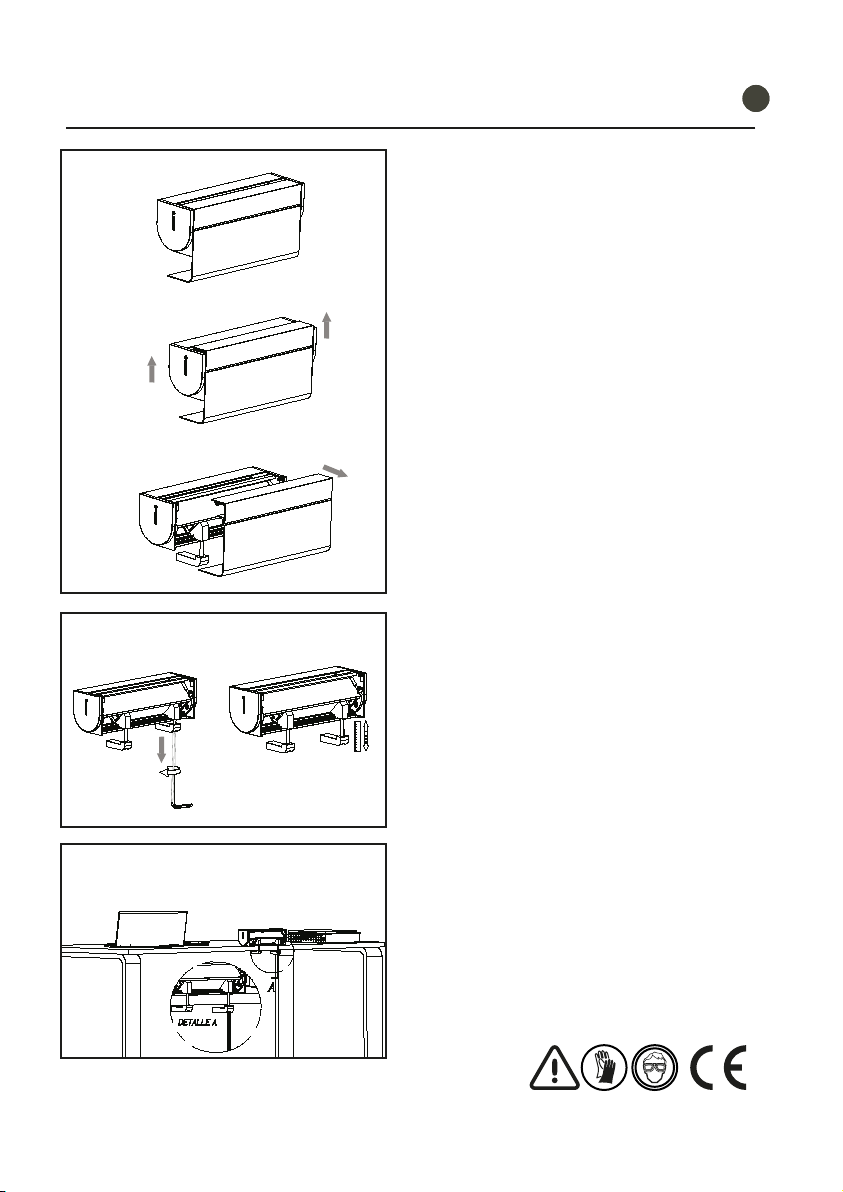
Instalador :
•
Este producto debe ser instalado por un
especialista cualificado.
La instalación tiene que estar protegida con un
magnetotérmico para proporcionar la protección
contra sobrecarga, cortocircuitos y derivación
a tierra. El no obedecer esta norma, puede ser
peligroso.
No desmontar el producto.
Este producto debe utilizarse exclusivamente
en instalaciones interiores.
i
bconnect no se hace responsablede los daños
que pueda causar por un mal uso del producto.
Ser vicio de Asistencia Técnica IB Connect:
Teléfono: +34 948 753 282
e-mail: [email protected]
Para cualquier consulta, visite:
www .ib-connect.com
Installer :
This product must be installed by a qualified
specialist.
The inst allation must be protected with a
differentialto provideprotectionagainstoverload,
short-circuits and earth bypass.
It may be dangerous if this rule is not complied
with.
This product is only for use in internal facilities.
IB Connect T echnical Suppor t Ser vice:
Telephone: +34 948 753 282
e-mail: [email protected]
For any query, visit:
www .ib-connect.com
Installateur:
Ce produit doit être installé par un spécialiste
qualifié.
L’installationdoitêtreprotégéepar un disjoncteur
magnétothermiqueafin de fournirune protection
contre les surcharges, les courts-circuits, et les
courants de fuite. Le non-respect de cette règle
peut être dangereux.
Ne pas démonter le produit.
Ce produit est prévu pour une utilisation
exclusivement intérieure.
ibconnect n’est responsable d’aucun dommage
résultant de la mauvaise utilisation du produit.
Ser vice d’Assistance Tec hnique
IBConnect :
Téléphone : +34 948 753 282
e-mail: [email protected]
Pour plus de renseignements, visitez :
www.ib-connect.com
Die Einheit darf nur durch eine qualifizierte
Elektrofachkraft installiert werden.
Die Einheit sollte durch einen
Überspannungsschutz und durch einen
Leitungsschutzschalter gesichert werden, um
alle Gefahren auszuschließen.
Die Einheit darf nur in trockenen Innenräumen
betrieben werden.
IB Connect Technical Support Service:
Telephone: +34 948 753 282
e-mail: [email protected]
For any query, visit:
Bei Rückfragen wenden Sie sich bitte an:
www.ib-connect.com
Avant de commencer
Hinweise fürden Installateur
FR DE
EN
ES

INSTALACIÓN DE PRISMA EN SOBRE DE MESA
Presentamos el producto en la mesa donde lo
vamos a instalar y con la misma llave allen Nº6
regulamos las fijaciones hasta que el producto
queda completamente fijado a la mesa. Fig.3
Una vez que hemos soltado la tapa trasera, ya
podemos acceder a las fijaciones de Prisma.
Con la ayuda de una llave allen del Nº6
regulamos la altura de las fijaciones al grosor
de mesa donde vamos a instalar el producto.
Fig.2
Una vez que se ha desenclabado la tapa del
resto del producto, tiramos hacia atras hasta
soltar completamente la tapa del resto del
producto. FIG1. C
Soltar tapa trasera :
Desde la base ejercer fuerza hacia arriba hasta
escuchar dos click tal y como se muestra en la
FIG .1 B
0
5
10
15
20
25
30
35
40
45
50
55
manual de usuario ESES
01
03
02
A
B
C
clic
clic

3-4
Hay que asegurarse que el producto quede
bien fijado a la mesa. Fig.4
Una vez fijado en la mesa y realizadas las
conexiones hay que volver a colocar la tapa
trasera, para ello la presentamos tal y como se
muestra en la Fig.5 A.
Colocamosla tapa alineadacon la parte superior
de prisma Fig.5 B.
Una vez que tenemos la tapa alineada
presionamos ligeramente hacia abajo en los
laterales de prisma hastaescuchar un click.
Fig.5 C.
INSTALACIÓN TERMINADA
El producto queda totalmente instalado tal y
como se muestra en la Fig.6
abrir el producto:
presionar sin soltar hasta abajo
cerrar el producto:
presionar y soltar, retorno automático
manual de usuario ES
04
05
A
B
C
clic
click

07
08
PASO 4..
Verificamos que las dimensiones que hemos
marcado coinciden con .Fiig07
PASO 5.
Una vez hemos verificado que las dimensiones
son correctas, procederemos acortar el
perímetro marcado.Para ello recomendamos
realizar el corte con una sierra mecánica.Fiig08
manual de usuario
75
+0
-0,2
35+0
-0,2
D 6 mm.
D 6 mm.
PASAR LOS CABLES
Pasamos los cables de alimentacion y datos
por el agujero que hemos realizado en la mesa
con la sierra ypresentamos el producto encima
de la mesa. Fig 10.
Una vez que hemos retirado la tapatrasera ya
podemos acceder alas fijaciones del producto.
Con una llave allen soltamos por completo los
tornillos de las fijaciones. Fig 09.
09
10
ESES

5 - 6
manual de usuario
11
12
FIJANDO EL PRODUCTO
Una vez pasados los cables ypresentado el
productoen la mesa nos disponemos afijarlo.
Presentamos los tornillos por debajo de la mesa
introduciendolos en los orificios que habiamos
realizado con taladro yhaciendolos coincidir
con los sistemas de fijación del producto.
Una vez que los tornillos coinciden con los
sistemas de ficación solo nos queda apretar
los tornillos con una llave allen.
PASO 2
Ejercemos presiónhacia abajo aambos lados
del producto hastaescuchar dos click.Esto
indica que la tapaha quedado correctamente
colocada.Fig 12 C.
COLOCANDO TAPA TRASERA
Una vez que hemos terminado de fijar el producto
en la mesa, solo nos queda volver acolocar la
tap a trasera.
Para cualquier consultasobre el producto
ponerse en contacto con:
13 El producto esta instalado correctamente.
A
B
C
PASO 1
Presentamos la tapatrasera tal ycomo se
muestra en la Fig 12. A y B
click
click
ESES

manual de usuario
14
15
PRISMA CON SOPORTE. DESMONTAR TAPA
TRASERA
Lo primero que tenemos que hacer para poder
acceder alos conectores multimedia es retirar
la tapa trasera del producto. Fig 14 A.
PAS0 1
Para poder retirar la tapatrasera del producto
tenemos que ejercer fuerza hacia arriba en el
canto inferior de la tapa. Fig. 14 B.
PASO 2
Una vez que hemos desanclado la tapatrasera
solo nos queda retirarla hacia atras. Fig 14 B.
REALIZAR AGUJERO PARA EL SOPORTE
Realizar un agujero pasante con una corona
de 30mm Ø tal y como se muestra en la
Fig 15.
A
B
SOLTANDO EL SOPORTE
Una vez que hemos retirado la tapa trasera
nos disponemos asoltar el soporte. Fig 14 B.
PAS0 1
Soltar la pieza principal del soporte (1) para ello
la hacemos girar en sentido de las agujas del
reloj hastaque quede completamente suelta.
Fig. 14 B.
PASO 2
quitamos la arandela (2). Fig 14 B.
1
2
ESES

7-8
manual de usuario
16
FIJANDO EL PRODUCTO
Una vez realizado el orificio lo primero que
tenemos que hacer es pasar los cables tal y
como se muestra en la Fig.16A
PASO 2
Colocamos el prisma bien asentado sobre la
mesa ypor debajo comenzamos apretando el
tornillo de fijación en el sentido contrario alas
agujas del reloj hastaque quede firmemente
sujeto. Fig17.C
Para cualquier consultasobre el producto
ponerse en contacto con:
18
El producto esta instalado correctamente.
A
B
C
PASO 1
Por la parte inferior de la mesa introducimos
elos cables por la arandela que anteriormente
habiam os quitado yseguidamente los
introducimos por el hueco del tornillo de sujeción
del soporte.Fig 17. B
17
PASO 3
Para terminar hayque colocar un conector
rápido oenchufe en el extremo del cable. Fig18

user manual
01
03
02
A
B
C
click
click
0
5
10
15
20
25
30
35
40
45
50
55
INSTALLATION OF PRISMA ON TABLE LEAF
(PRISMA MODEL).
Present the PRISMA against the table and,
using the same no. 6 ALLEN key, adjust the
fixings until the product is completely secured.
Fig.3
After releasing the back cover,you can access
the PRISMA fixings. With the help of a no. 6
ALLEN key, adjust the height of fixings to suit
the thickness of table on which you will be
installing the product. Fig.2
FIRST YOU NEED TO LOOSEN THE BACK
COVER TO ACCESS THE PRISMA FIXING
SYSTEM.
Press upward from the base until you hear two
clicks, as shown in FIG .1 B
After you have released the cover from itsfixings,
push it back to completely separate it from the
rest of the product. FIG1. C
ESEN

9 - 10
user manual
04
05
06
A
B
C
click
click
Ensure that the PRISMA is properly secured to
the table. Fig.4
Once it is properly secured and the electrical
and/or multimedia connections are in place, it is
necessary to replace the rear cover in itsposition.
To do so, present it as shown in Fig.5 A.
Place the back cover in line with the top of the
PRISMA Fig.5 B.
After aligning the back cover,press downwards
lightly on itsends until you hear aclick. Fig.5 C.
Finished installation.
The product is fully installed and ready for use,
as shown in
Fig.6
Opening the product:
press down and hold.
Closing the product:
press and Automatic return.

07
08
Ensure that the dimensions marked on the table
match those on the .Fiig07
After checking the measurements, cut the
perimeter marked out on the table. We
recommend using an electric jigsaw.
user manual
75
+0
-0,2
35+0
-0,2
D 6 mm.
D 6 mm.
After releasing the back cover,you can access
the PRISMA SURFACE fixings. With the help
of ano. 6ALLEN key,loosen the screws on the
fixings completely
09
10
Pass the power and/or multimedia cables
through the hole cut into the table and present
the product for installation. Fig 10
ESEN

11 -12
user manual
11
12
13
A
B
C
click
click
Insert the screws under the table in the through-
holes you have drilled, lining them up with the
PRISMA SURFACE fixings. Using the same no.
6ALLEN key,tighten the screws until the product
is completely secured.
For any enquiries about the product, please
contact:
The product is fully installed and ready for use,
as shown in Figure 13.
Once it is properly secured and the electrical
and/or multimedia connections are in place, it is
necessary to replace the rear cover in itsposition.
To do so, present it as shown in Fig.12 A.
Place the back cover in line with the top of the
PRISMA Fig.12 B.
After aligning the back cover,press downwards
lightly on itsends until you hear aclick. Fig.12
C.

user manual
14
15
PRISMA WITH SUPPORT.REMOVING REAR
COVER.
The first thing we have to do to be able to access
the media connectors is removing the back
cover of the product. Pic.14A.
To be able to remove the back cover of the
product, we have to exert upward force in the
bottom edge of the back cover. Pic. 14B.
PERFORM HOLE FOR THE SUPPORT
Make a through hole with a crown-driller of
30mm Ø as shown in the picture 15
A
B
SUPPORT MOUNTING
Once we have removed the back cover we are
ready to mount the support into the desk. Pic.15B.
STEP 1
Loosen the main part of the support (1). Turn it
clockwise till it is disassembled. Pic.14B.
STEP 2
Remove the washer (2). Pic.14B.
1
2
ESEN

13 -14
user manual
16
SETTING THE PRODUCT
Once the hole has been made, we pass the
cables across the hole as shown in picture 16A.
For any questions kindly get in touch with:
18
The product is installed correctly.
A
B
C
STEP 1
Weintroduce the cables through the washer
we had taken out previously at the bottom of
the table and then we introduce the support
through the access of the fastening screw.
Pic.17.
STEP 2
With the product well positioned on the desk,
tighten the set screw counterclockwise until it
is securely fastened
17
STEP 3
Assembling a rapid connector on the of power
cable as shown in the picture 18

Manuel d´ installation
01
03
02
INSTALLATION DE PRISMA EN «PLATEAU »DE
TABLE (MODÈLE PRISMA).
Nous positionnons PRISMA sur la table et, au
moyen de la même clé Allen n°6, nous réglons
les fixations jusqu’à ce que le produit soit
complètement fixé. Figure 03.
Après avoir retiré le panneau arrière, nous
pouvons accéder aux fixations de PRISMA. Au
moyen d’une clé Allen N°6 nous réglons la
hauteur des fixations selon l’épaisseur de la
table sur laquelle le produit sera installé. Figure
02.
Une fois le panneau séparé de ses fixations,
nous le tirons en arrière jusqu’à le séparer
intégralement du reste du produit. Figure 01C.
A
B
C
En premier lieu il faut relâcher le panneau arrière
afin d’accéder au système de fixation de
PRISMA.
En partant de la base, tirez vers le haut jusqu’à
entendre deux « clics », comme le montre la
figure 01B.
click
click
0
5
10
15
20
25
30
35
40
45
50
55
ESFR

15-16
Manuel d´ installation
04
05
Assurez-vous que PRISMA soit correctement
fixé à la table. Figure 04.
Une fois correctement fixé et les connexions
électriques et/ou multimédia réalisées, il faut
replacer le panneau arrière ;pour cela il faut le
positionner tel que montré dans la figure 05A.
Nous plaçons le panneau arrière en alignement
avec la partie supérieure de PRISMA. Figure
05B.
Après avoir aligné le panneau arrière, nous
réalisons une légère pression vers le bas au
niveau des extrémités jusqu’à entendre un «clic
». Figure 05C.
06
INSTALLATION TERMINÉE.
Le produit est complètement installé et prêt à
être utilisé, tel que le montre la figure 06
A
B
C
click
click
isé, tel que le montre la figure
06.
Ouvrir le produit :Appuyer sans
relâcher jusqu’en bas.
Fermer le produit : Appuyer et relâcher.
Retour automatique.

07
08
PASO 1.
Assurez-vous que les mesures marquées sur
la table coïncident avec celles du gabarit. Figure
07.
Une fois les mesures vérifiées, nous procédons
àla découpe du périmètre dessiné sur la table.
Nous recommandons l'usage d'une scie
électrique. Figure 08.
Manuel d´ installation
75
+0
-0,2
35+0
-0,2
D 6 mm.
D 6 mm.
Après avoir retiré le panneau arrière, nous
pouvons accéder aux fixations de PRISMA
SURFACE. Au moyen d’une clé Allen N°6 nous
retirons les vis des fixations. Figure 09.
En premier lieu il faut relâcher le panneau arrière
afin d’accéder au système de fixation de
PRISMA SURFACE. Figure 09A.
09
10
Nous passons les câbles d’alimentation et/ou
multimédia par la découpe réalisée sur la table
et positionnons le produit pour son installation.
Figure 11.
ESFR

17 - 18
Manuel d´ installation
11
12
FIXATION DU PRODUIT.
Nous passons les vis par-dessous la table par
les trous de passage que nous avons réalisés,
en les faisant coïncider avec les fixations du
PRISMA SURFACE. Au moyen de la même clé
Allen n°6, nous serrons les vis jusqu’à ce que
le produit soit complètement fixé. Figure 11.
Nous plaçons le panneau arrière en alignement
avec la partie supérieure de PRISMA SURFACE
et réalisons une légère pression vers le bas au
niveau des extrémités jusqu’à entendre un «
clic ». Figures 12B et 12C.
REPOSITIONNEMENT DU PANNEAU
ARRIÈRE
Une fois le produit complètement fixé il faut
remettre le panneau arrière, pour cela il faut le
positionner tel que montré dans la figure 12A.
Para cualquier consultasobre el producto
ponerse en contacto con:
13 Le produit est complètement installé et prêt à
être utilisé, tel que le montre la figure 13.
A
B
C
click
click
ESES

Manuel d´ installation
14
15
INSTALLATION DE PRISMA AVEC SUPPORT
(MODÈLE PRISMA SUPPORT).
DÉMONTAGE DU PANNEAU ARRIÈRE
La première étape àréaliser pour pouvoir
accéder aux connecteurs multimédia est de
retirer le panneau arrière du produit. Fig. 14A.
Pour retirer le panneau arrière du produit il nous
faut tirer vers le haut en partant du bord inférieur
du panneau. Fig. 14B.
Une fois le panneau arrière détaché il ne nous
reste plus qu’à le tirer en arrière. Fig. 14B..
RÉALISATION DU TROU POUR LE SUPPORT
Faites un trou de passage au moyen d’une
couronne de 30mm Ø, comme indiqué sur la
Fig. 15.
A
B
RETRAIT DU SUPPORT
Une fois le panneau arrière retiré, nous nous
préparons à libérer le support. Fig. 14B.
Relâchez la pièce principale du support (1),
pour cela nous la faisons tourner dans le sens
des aiguilles d’une montre jusqu’à ce qu’elle
soit complètement libre. Fig. 14B.
On retire la rondelle (2). Fig. 14B.
1
2
ESFR
Table of contents
Languages:
Other IB Connect Accessories manuals
Popular Accessories manuals by other brands

Carel
Carel rTM SE SI WS01F01M00 Guide

Williams-Sonoma
Williams-Sonoma JERICHO RECTANGLE Assembly instructions

Quest Engineering
Quest Engineering IQ Series Operation and maintenance manual

XD COLLECTION
XD COLLECTION P324.64 Series manual

JRI
JRI LoRa Spy operating instructions

Insignia
Insignia NS-BC48SS7 Quick setup guide

Axor
Axor Axor Massaud Freestanding Towel Holder... Specification sheet

Pepperl+Fuchs
Pepperl+Fuchs LVL-Z121 manual

Omron
Omron Sti F3SJ-AM P Series instruction sheet

Reliable Controls
Reliable Controls SS-L-BL-CO2-H user guide

Baumer
Baumer SmartReflect FNDR 14G6903/S14/IO quick start guide

C&C
C&C VS-812 user manual