iBeam TE-DVR-15 User manual

TE-DVR-15 User Manual
iBeamUSA.com
MetraDealer.com
techsupport@metra-autosound.com
� TECH SUPPORT
l ::: J 800-253-8324

1
Table of Contents
TE-DVR-15 picture and function
.............................................................................................. 2
Accessories
………................................................................................... 2
Beginning to use the car DVR
Charge the battery
...................................................................................... 3
TF card
…………….................................................................... 3
Power on / off DVR
.…………………............................................................ 4
Basic operations
Switching mode
…………….................................................................... 4
Menu and system settings
……………………......................................................... 4
Recording mode
...................................................................................... 5
G-sensor
………………….......................….................................. 5
Photography
...................................................................................... 5
USB MODE
………………................................................................ 5
Technical specifications
………………............................................................... 6
2
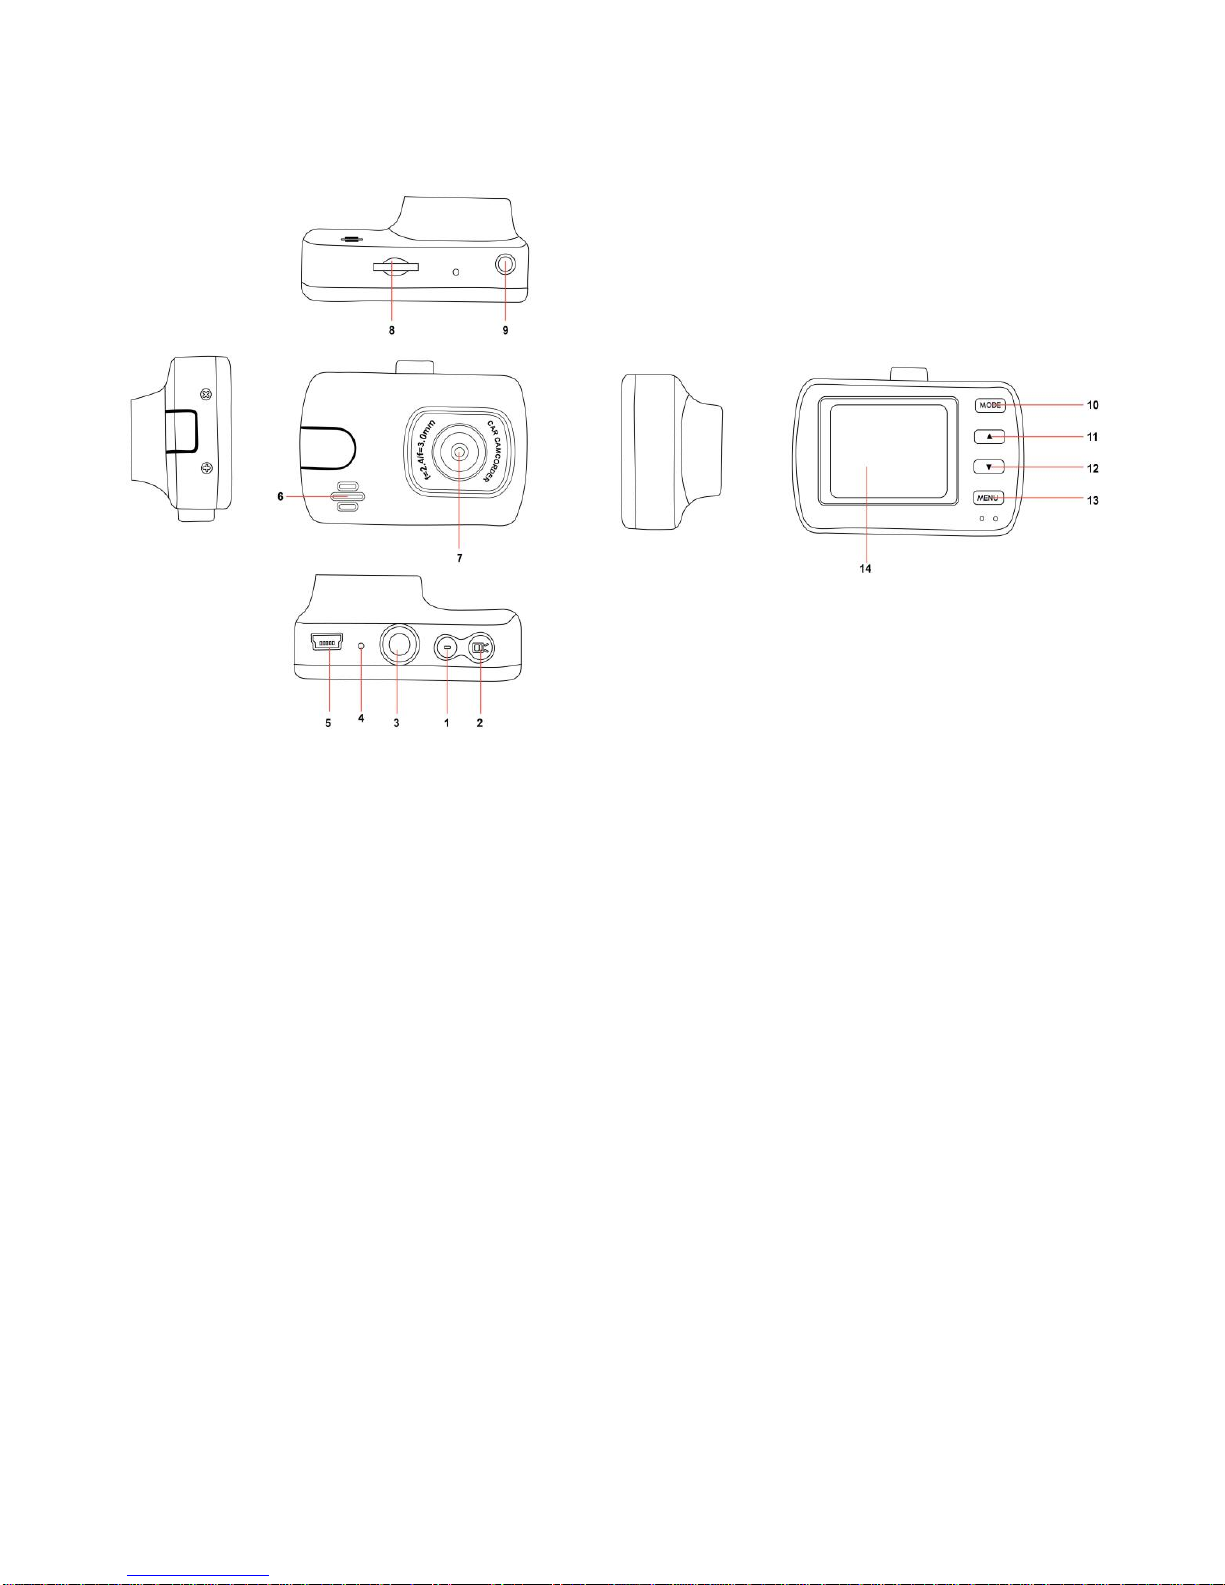
TE-DVR-15
3, Bracket slot
6, MIC
9, AV out
12, Down Button
2, REC key
5, USB interface
8, TF Card slot
11, Up Button
14, Screen
1, Power Button
4, Reset hole
7, Lens
10, Mode Button
13, Menu Button
Accessory
User manual USB cable Car charger Bracket

3
I Beginning to use the car DVR
Charging the battery
There are two ways to charge the battery,
1. By connecting with PC: USB data wire connects it with PC.
2. By connecting with vehicle 12v power source: connect the vehicle
charger with the product.
Note: Fully charging the battery takes about 120 minutes
TF card
•The larger the TF card capacity, the more time can be recorded before data is
overwritten. Please use a Genuine Class 6 or above TF card, and this device can
support a maximum of 32 GB.
•The installation and removing of the TF card
1. Insert the TF card in the TF card slot according to the marked direction until it
softly clicks.
2. When removing the TF card, push in the TF card and gently release to
eject it.
Notes:
1. Make sure the switch on the TF card is set open.
2. Make sure the TF card is facing the right way, if it is inserted incorrectly, it
may damage the device and TF card.
3. When you insert the TF card into the camera, it will set the TF card as the
storage location, and any existing data previously stored on the TF card may
not be read.
4. If the TF card is incompatible with the device, please try again or an alternate
Genuine Class 6 or above TF card.

4
Powering on / off the DVR
1. Manually turning on / off the device: A long press of the POWER button and the
startup logo will be shown on the display. Another long press on the Power button
will turn off the device. The press duration required is approximately 3 seconds.
2.Automatic operation
If the device is connected to a switched power outlet, when the car is started, the
device starts video recorder mode automatically after a delay time. When the
engine is switch off, the device keeps recording 10 seconds automatically.
Note:
When the power supply is from the built-in battery, the device can record in motion
detection mode and switch off automatically when the battery is low.
Reset
When the device has an abnormal situation due to improper
operation, press the reset button, then power the device back on. After startup it will
return to normal.
II Basic operations
Switching mode
This machine has four operating modes: video, photo and clip playback, and
photo view. Press the MODE button to switch.
Menu and system settings
In the photo or video mode, press MENU button twice to enter the "System Settings"
option, Press the Up / Down buttons to select the desired setting item; Press OK button
to confirm the setting, press the Menu key again to exit the menu.

5
n
Recording mode
When the car engine starts, the device will start recording automatically and the blue
light will flash during this time. When the engine stops, it will save the video and shut
off. The video segment will be saved on the TF card, when the card is full, it will
overwrite the previous videos. Recording segment time can be
set in the menu, and the options are 1/3/5 minutes.
G-sensor
The device is equipped with a built-in G-sensor, if the car is impacted heavily, it will
lock the video file and keep them as a special video beginning with EVE, which will
never be overwritten unless you delete it manually. At the same time there will be a
lock icon at the above right.
Photography
With the device powered on, a short Mode button press will enter the photography
mode, and the icon at top left corner is changed from video camera to camera. A short
press of the Mode button twice to return to recording mode.
USB MODE
The device supports USB direct read. Use the USB cable to connect the device to your
computer to read the existing video.

Technical
Specifications
Screen 1.5inch
Lens GC1024
View angle 120 degree
Minimum
illumination
1Lux
Video mode Loop recording/Motion detection
Video format AVI
Recording
video M-JPEG
Recording
resolution
1920x1080P(24fps)1440x1080/1280×720/848x480/640×480
/320×2 40(30fps)
Picture 4032×3024, 3648×2736, 3264×2448, 2592×1944,
2048×1536, 1920×1080, 1280×960, 640×480
Seamless
recording Yes
Auto-record Support
G-sensor Yes
Manual lock Yes
Language English/ Chinese
Video segment
time 1 minutes/3minutes/5minutes
Audio
recording Yes
Firmware
version Show the firmware version and published time
Night vision Yes
Memory card TF card
Card storage 1GB--32GB
USB
connector USB2.0
Operating
system Windows 2000, Windows XP, Windows 7
Battery 3.7V Lithium polymer batteries
Storage
temperature -10℃~70℃
Operation
temperature -10℃~60℃
6

IMPORTANT
If you are having difficulties with the installation
of this product, please call our Tech Support line
at 1-800-253-TECH. Before doing so, look over
the instructions a second time, and make sure
the installation was performed exactly as the
instructions are stated. Please have the vehicle
apart and ready to perform troubleshooting
steps before calling.
When connecting with power cable, please make sure not to mistake the positive and
negative pole, otherwise the fuse will blow immediately for security protection. If it happens,
please replace the blown fuse with a new one with same specification, after connecting
properly to the right pole. Don’t randomly increase the current rating of the fuse, and NEVER
use metal wire as a substitute.
KNOWLEDGE IS POWER
Enhance your installation and fabrication skills by
enrolling in the most recognized and respected
mobile electronics school in our industry.
Log onto www.installerinstitute.com or call
800-354-6782 for more information and take steps
toward a better tomorrow.
Metra recommends MECP
certified technicians
Version 1.0
Table of contents
Other iBeam DVR manuals


