ICC RONER 20 User manual

RONER 20
Perfect low-temperature
cooking
INSTRUCTIONS MANUAL
1

INDEX:
1. INTRODUCTION………………………………………3
2) PARTS OF THE RONER20…………………..……4
3) FASTENING AND MOUNTING…………………6
4) START-UP AND MODES………………………….7
5) WIFI AND APP CONFIGURATION………….12
6) MAINTENANCE AND CLEANING…………..13
7) FREQUENTLY ASKED QUESTIONS /
TROUBLESHOOTING………………………………..14
8) GENERAL AND SAFETY INFORMATION…16
9) TECHNICAL SPECIFICATIONS………………..20
10) WARRANT………………………………………….21
2

1) INTRODUCTION
It has been 20 years since the birth of the RONER®.
Developed together with Joan Roca from Celler de Can
Roca among others, it has become the world’s
benchmark for what is generically known as sous vide or
low-temperature cooking.
We have poured all our experience into this new
RONER-20,combining Power, Precision, Reliability,
Functionality and Design, the characteristics that every
professional or hobbyist expects from the best
immersion thermostat.
3
Roner® is a registered trademark
by ICC-International Cooking Concepts

2) PARTS OF THE RONER 20
A) Power cord
B) Height-adjustable
double-clip
C) Water outlet cover
4
Water outlet direction

D) Configuration display
E) Operation warning led
F) Maximum water level limit
G) Minimum water level limit
5

3) FASTENING AND MOUNTING
6
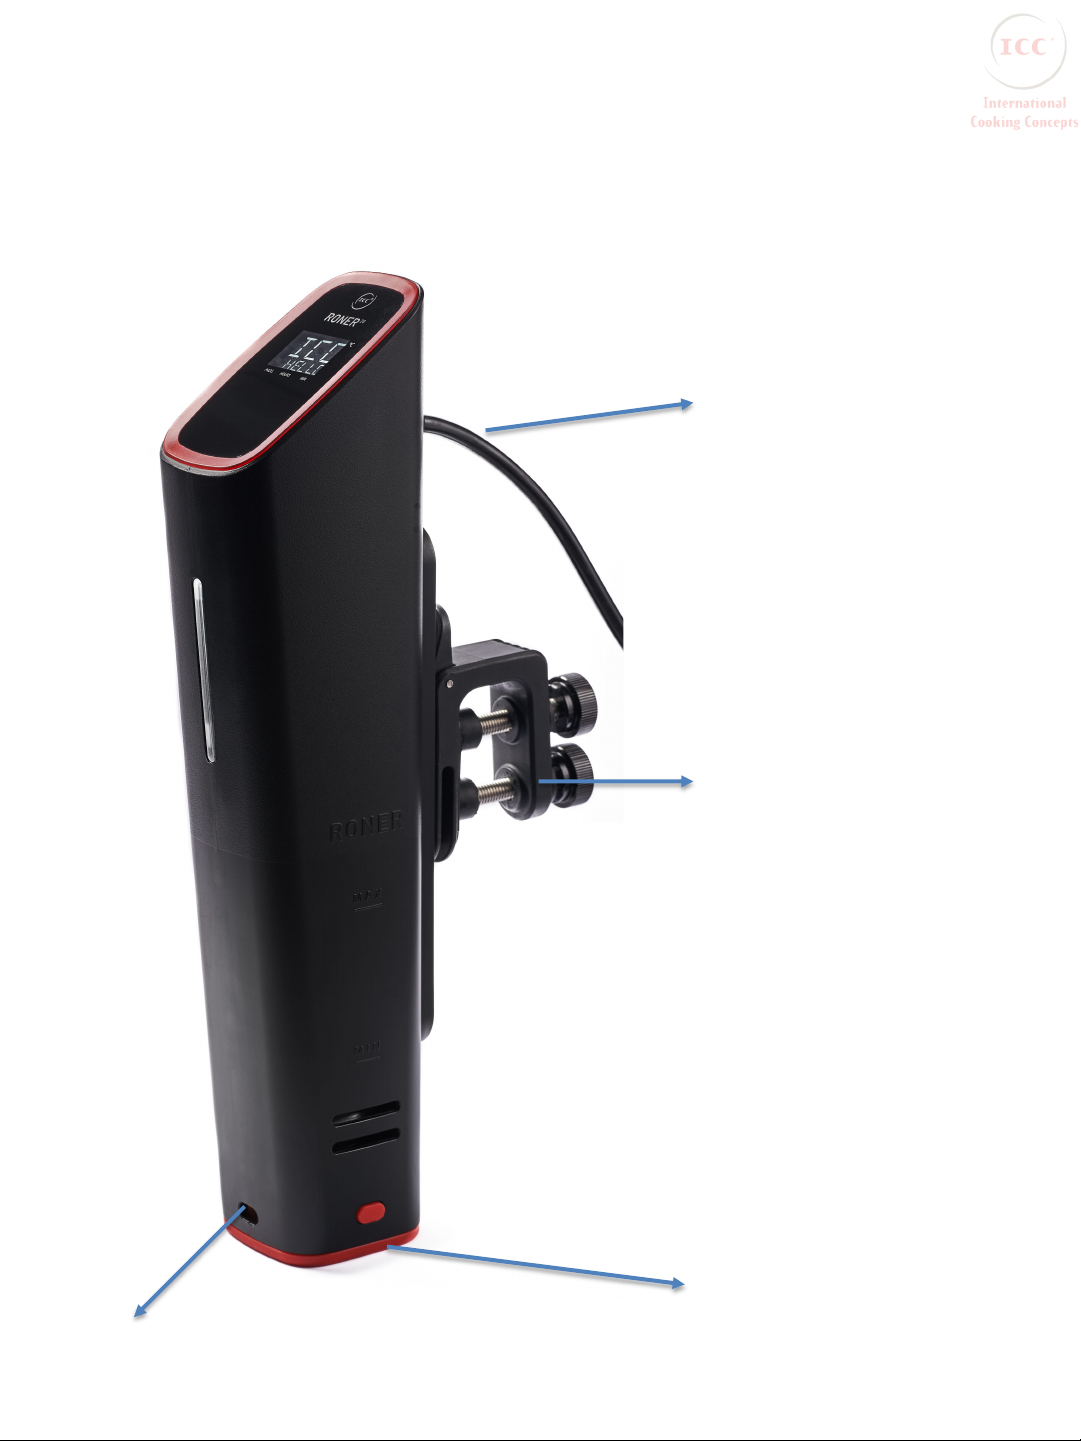
Firmly secure the Roner20 by holding it to the side of the
container.
Observe the direction in which the water flows out of the
lower part of the Roner20, to place it in the best position
ensuring maximum water circulation and therefore better
temperature stability. Squeezing the movable part of the clip
and raising or lowering the body of the Roner20, will allow you
to adjust it comfortably.
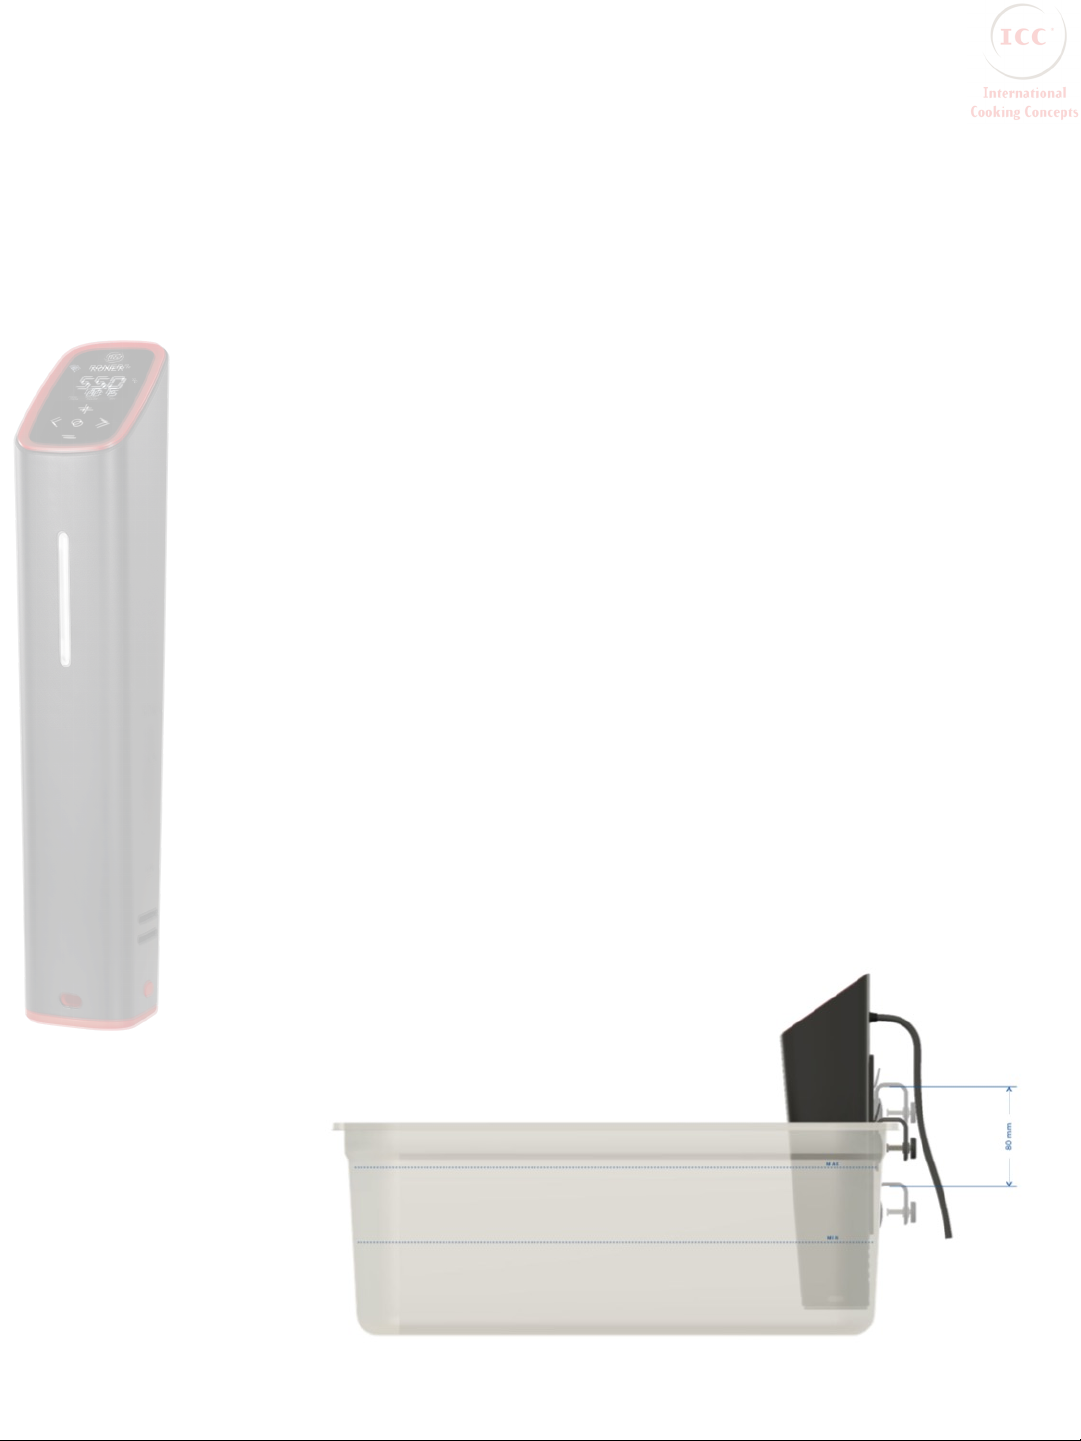
If you drop it below the minimum level, 3 beeps will sound and
“error” will be displayed on the screen. You can add more
water or, holding the movable part of the clip, lower the body
until the minimum signal is covered with water.
It is important to understand that the choice of the container
where the cooking is to be carried out influences the efficiency
of the RONER20 itself. In fact, the choice of the pot can impact
the stability in the temperature of the water and affect the
electrical consumption of the process. Therefore, the more
thermally insulating said container is, the greater temperature
stability and lower energy consumption will be attained!
For a long-period cooking, we recommend
covering the container well.

4) START-UP AND WORKING MODES
7

Plug the Roner20 into a power outlet.
The “Start / Stop / Enter” icon (hereinafter “Enter”) and the
front led will be on and in standby mode (This mode is
identified by the word “manual” in an off tone on the
screen) Press the “Enter” icon during 3 seconds to enter
work mode. You will hear a beep for each press.
And the "manual" message will change to a livelier tone.
4.1 MANUAL MODE:
Temperature setting.
Press "Enter" and the temperature digits will flash.
Adjust the degrees with "+" or "-" and press ">" to move to
the next parameter.
* Press and hold "+" or "-" to start fast mode both up and
down.
Setting time.
Press "+" or "-" to set the hour and press ">" to move to the
minutes.
With “+” “-” set the minutes and press “Enter”.
The Roner20 will start up. While the water is heating up, the
front led will blink red.
The timer will begin a countdown when it reaches the pre-
set temperature, emitting two beeps and turning the red
Led, from blinking to steady.
When you reset the temperature either up or down, you
need to wait a while to reach and stabilize the bath water
temperature to start the timer.
8

Countdown reset:
As a new feature of the Roner20. We have introduced a new
function that restarts the timer.
It serves both in manual mode and in automatic mode.
This occurs when the Roner20 reaches its temperature but
we do not have the product ready.
To restart the countdown, press “<“ for 2 seconds and the
Roner20 will emit 1 beep and the countdown will restart ...!
The unit will stop automatically when the time is up.
The message “END” will appear on the screen, it will emit
two beeps and the LED will turn white.
Press and hold the “Enter” icon for 3 seconds to stop the
device and / or exit the mode.
It will also stop, for safety, in case the water evaporates
below the minimum fill mark, showing the message “ERR” on
the screen.
9

4.2 PROGRAMS AND CONFIGURATION FOR
AUTOMATIC MODE:
Press any arrow "<” or “>" to scroll through the different
options until you reach "PROGR"
Press "Enter”
Select Hours with "+/-"
Press ">" and select the minutes with "+/-"
Press ">" and select temperature with "+/-"
Press ">" and select the program with "+/-"
*Programs range from 0 to 9
To exit, press "Enter" for 3 seconds.
4.3 AUTOMATIC MODE:
Select “AUTO” mode from the initial screen, press “Enter” to
enter.
Press ">" to move through the different programs previously
configured. (See point 4.2)
Press "Enter" to select any desired program.
To exit, press "Enter" for 3 seconds.
10

4.4 CONFIGURATION:
From the initial screen, press ">" until you reach "CONFIG"
Press "Enter”
TEMP: * The temperature will always be expressed in Celsius.
Press ">”
ALERT: ON / OFF You can select whether the Roner20 beeps,
when it receives alerts, when cooking starts and ends.
Press ">”
SOUND: ON / OFF You can select whether the Roner20 makes
sounds when the buttons are pressed.
Press ">”
WI-FI: ON / OFF / SE (Searching = Searching)
Go to the desired mode with "+/-" and press "Enter" to
to select.
ON = wi-fi on. The lit icon is displayed.
OFF = wi-fi off. The icon is not displayed.
SE = searching network. Flashing on icon.
SE mode is required to connect the Roner20 with the mobile
app the first time. Once they are configured, you must have
the WI-FI in the ON position for the application to detect the
Roner20 and be able to operate through it.
11

5) WIFI AND APP CONFIGURATION
5.1 Register at ICC (www.cookingconcepts.com) and
download the instructions for the mobile application.
Install the application on the mobile with the corresponding
Android / IOS QR code, which you will also find in the quick
guide.
5.2 Register in the app from the mobile and log in.
5.3 Go to CONFIG mode on the Roner20 from the home
screen and press Start / Stop.
5.4 Using the arrows scroll to the Wifi option.
5.5 Select the option Wifi: SE, (searching) and follow the
instructions of the application that has been downloaded
from the ICC page.
5.6 This way you will be able to connect your mobile phone
to the Roner20 through the application therefore, from that
point on you will only need to have the ON option activated
in the wifi section of the Roner20. You can register and
command several Roner20s with the same application, you
just have to configure them with different names.
12
* The application is under development; you can skip this step.

6) MANTENIMIENTO Y LIMPIEZA
When you finish working, always remove the Roner20 from its
container to prevent moisture from entering it.
Before cleaning, turn off and unplug the Roner20.
Make sure the Roner20 is stored at room temperature.
If you remove the water pump cover, remember to put it back
to function normally. Check for any signs of damage, including
pulled cord or physical damage to the system or heaters.
After prolonged use and depending on the hardness and quality
of the water, it may acquire limescale deposits on the heater
and the casing. To remove this lime, it is suggested to leave it in
operation at 70°C with a mixture of water and white vinegar,
from 2% to 5% depending on the state of incrustation for 30
minutes.
(* Caution: in case of splashing vinegar in the eyes, rinse quickly
and thoroughly with water. If the eye is still red, painful, has
tears and is sensitive to light, medical advice is required).
Let cool slightly, remove the bottom cover and clean with a
brush.
When it comes to internal machinery problems, the technical
service work should only be performed by certified personnel.
Technical service: contact ICC.
13

7) FREQUENTLY ASKED QUESTIONS / TROUBLESHOOTING
*Roner20 is designed to be used with water only. The products to be cooked are
usually vacuum packed or cooked in suitable containers such as glass jars.
Always keep the water very clean.
-Noise:
Under normal operating conditions, the Roner20 makes very
little noise, the little noise it makes is due to the engine and
propeller that expels the water.
-Noise sucking:
Your pump has formed a vortex of water as when it is
emptying a sink or bathtub. Add more water or gently stir the
water with a spoon. There is no single way to eliminate the
formation of a vortex due to the rotation of the pump, but it
will usually go away on its own.
- Damage to food:
It is advisable to always pack the food you will be cooking -
specifically eggs -to avoid hitting the container or among
themselves. We recommend the use of a superbag for such
purposes.
-The system does not turn on:
Check the power plug
14

-Alarma de bajo nivel de agua:
Agregue más agua, el nivel del agua puede disminuir a causa
de la evaporación durante la cocción. O sumerja el Roner20
entre las líneas de Max iMin.
-The low water alarm comes on after a few seconds of
operation:
Add more water.
-The pump generates "waves":
Sometimes these waves will cause the water level at the
sensors to fluctuate up and down. Waves sometimes lower
the water level just below the sensor and cause a low water
alarm. This is normal and you just need to add more water.
-The temperature reading does not match an external
thermometer:
The Roner20 is calibrated to a platinum primary scientific
standard that is much more accurate than common
thermometers.
-The error code ERR will appear in the following situation
with an alarm sound:
1. There is no water in the tank.
2. Water below the minimum level.
3. Device in short-circuit situation.
15

8.1 Place the cooking container on a heat resistant surface to
avoid damage. Be careful with surfaces that are not resistant
to certain temperatures, cooking with Roner20 can reach up
to 95°C, therefore do not put it on a surface sensitive to
these temperatures, or do it with a protection underneath!
8.2 Do not use extension cords. Never operate with a
damaged cord or plug. Use only grounded electrical outlets.
8.3 Do not immerse the system beyond the "max" engraving
mark
Unplug it from the outlet when not in use and before the
cleaning process.
8.4 Risk of burns: the cooking container, parts of the Roner20
and food bags become hot when in use. Use oven mitts or
tongs when handling. Allow system to cool before handling.
8.5 This system is an indoor appliance and is not a toy.
8) GENERAL AND SAFETY INFORMATION
16

17
8.6 Do not disassemble it. Observe all warning labels. Do
not remove the warning labels.
8.7 Do not use this appliance for other than its intended
use. (Like lab work or heating a hot tub)
8.8 Securely lock the product by holding it to the side of
your cookware. Place the container on a flat surface to
avoid spills and tipping. Do not place the unit on a stove
or in an oven.
8.9 Do not use deionized water (DI water) as it is
corrosive and will cause material damage to the Roner20.
Do not confuse with distilled water.
8.10 Before plugging it into a socket, check if its voltage
corresponds to the rating label on the appliance.
8.11 Do not allow children to use and play with this
appliance. Keep the appliance and its cord out of the
reach of children.
8.12 Never use a damaged appliance. If it has been
damaged, take it to an authorized service center to have
it checked and repaired. Consult with ICC.
8.13 If the power cord is damaged, it must be replaced by
the manufacturer, its service agent or a similarly qualified
person to avoid a hazard.

8.14 Do not let excess cord hang over edge of table or
counter or touch hot surface.
8.15 Turn off the appliance and disconnect it from the
power supply before changing accessories or
approaching moving parts in use.
8.16 When the appliances operate under abnormal
network disturbance, it may lose performance and may
need to be unplugged to restore normal operation.
8.17 This device can be used by children from 8 years of
age if they have been given supervision or instructions on
how to use the device in a safe way and if they
understand the dangers involved. Children should not
perform user cleaning and maintenance unless they are
over 8 years old and supervised. Keep the appliance and
the cord out of the reach of children under 8 years of
age.
The device can be used by people with reduced physical,
sensory or mental abilities, or lack of experience and
knowledge if they have been given supervision or
instructions on using the device in a safe way and if they
understand the danger involved.
8.18 Children must not play with the appliance.
18

8.19 If the appliance is dropped into the water tank by
careless operation, please unplug it first, then take it
out of the tank, clean the water on the surface of the
appliance, and put it in a ventilated place. You must
wait and make sure that it is completely dry before
using it again.
19

11) TECHNICAL SPECIFICATIONS
Power rate: 120V, 60HZ, 1,200W
Dimensions: 33.7cm x 61cm x 92cm
Temperature range: Temp. Environment up to 95 ° C
Weight: 1.2kg
Time: Up to 99 hours and 59 minutes.
Temperature stability: ±0.1°C
at 40°C-70 °C; 0.1°C -0.2°C when below 40°C and 0.2°C
-0.5°C when above 90°C.
Circulation pump: 5 liters per minute.
Do not dispose of the device in normal household waste.
Dispose of the device at a registered waste disposal
company or through your community waste disposal facility.
Take into account current regulations. When in doubt,
consult your waste disposal facility.
20
Table of contents
Other ICC Kitchen Appliance manuals
Popular Kitchen Appliance manuals by other brands

Nostalgia Electrics
Nostalgia Electrics FTW200 Instructions and recipes

Kitchen Living
Kitchen Living 8822-14 user manual

emerio
emerio Pizzarette instruction manual

XO Appliance
XO Appliance XOU15BCGO Series manual

Steba
Steba SV 50 Instructions for use

Indesit
Indesit KP 648 MS Instructions for use and installation