Ice VAC WD 20 User manual

PROFESSIONAL VACUUM CLEANERS
ORIGINAL INSTRUCTION DOC. 10068727 - Ver. AA - 02-2017
USE AND MAINTENANCE MANUAL
VAC WD 20-40-60


3
SYMBOLS USED IN THE MANUAL .......................4
PURPOSE AND CONTENT OF THE MANUAL ......4
TARGET GROUP.....................................................4
STORING THE USE AND MAINTENANCE
MANUAL..................................................................4
ON DELIVERY OF THE APPLIANCE .....................4
INTRODUCTORY COMMENT .................................4
IDENTIFICATION DATA...........................................5
TECHNICAL DESCRIPTION ...................................5
INTENDED USE.......................................................5
SAFETY ...................................................................5
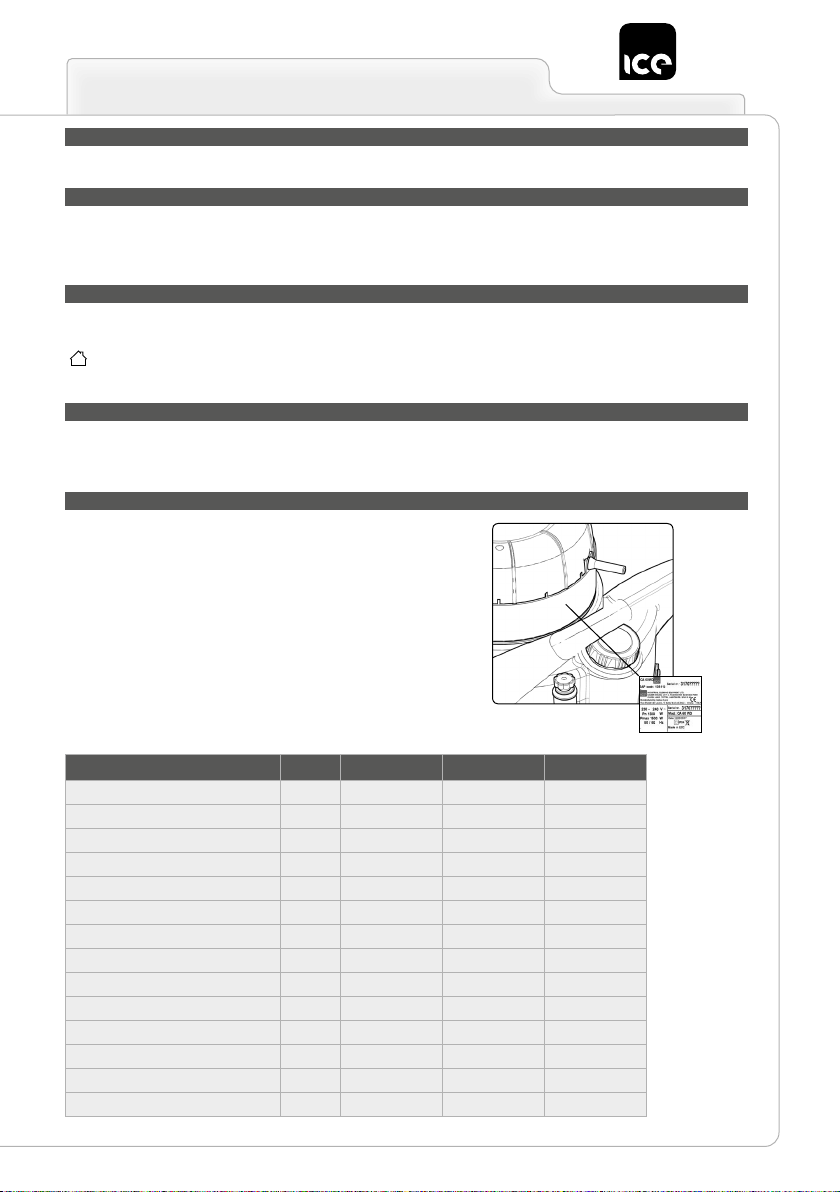
SERIAL NUMBER PLATE .......................................5
TECHNICAL DATA ..................................................5
PREPARATION OF THE APPLIANCE..................14
HANDLING THE PACKED APPLIANCE..................................14
HOW TO UNPACK THE APPLIANCE .....................................14
HOW TO TRANSPORT THE APPLIANCE..............................14
LOCATION OF THE MAIN COMPONENTS OF THE
APPLIANCE.............................................................................15
LOCATION OF THE HEAD UNIT COMPONENTS..................15
LOCATION OF THE TANK UNIT COMPONENTS (VAC WD 20
AND VAC WD 40 VERSIONS) ................................................15
LOCATION OF THE TANK UNIT COMPONENTS (VAC WD 60
VERSIONS) .............................................................................15
APPLIANCE SAFETY..............................................................16
PREPARING TO WORK ........................................16
INSERTING THE PAPER COLLECTION BAG-FILTER
(OPTIONAL) ............................................................................16
INSERTING THE NYLON FILTER (OPTIONAL) .....................17
INSERTING THE CARTRIDGE FILTER (OPTIONAL) ............17
FRONT SQUEEGEE OPTIONAL FIXING KIT (ONLY FOR TOP
VAC WD 60 VERSIONS) .........................................................18
PREPARING TO WORK..........................................................18
WORK ....................................................................19
VACUUM CLEANERS .............................................................19
WET VACUUM CLEANER.......................................................19
WET VACUUM CLEANERS WITH OPTIONAL FRONT
SQUEEGEE KIT (VAC WD 60 VERSIONS) ............................20
AT THE END OF WORK........................................21
MAINTENANCE.....................................................21
RECOMMENDED MAINTENANCE OPERATIONS ................21
CONTROLLING AND CLEANING THE COLLECTION TANK.22
CONTROLLING AND CLEANING THE VACUUM
CONTENTS
ACCESSORIES UNIT..............................................................23
FRONT SQUEEGEE OPTIONAL CONTROL AND CLEANING
KIT (VAC WD 60 VERSIONS) .................................................23
CONTROLLING AND CLEANING THE FABRIC FILTER........24
CONTROLLING AND CLEANING THE SPONGE FILTER .....25
CONTROLLING AND CLEANING THE FLOAT.......................25
CONTROLLING AND CLEANING THE CARTRIDGE FILTER
(OPTIONAL) ............................................................................26
CONTROLLING AND CLEANING THE NYLON FILTER
(OPTIONAL) ............................................................................26
CONTROL AND OPERATION ...............................27
DISPOSAL .............................................................28

4
Warning symbol:
Carefully read the sections marked with this symbol and observe the indications, for the safety of the operator and the appliance.
Information symbol:
Provides the operator with additional information for improving the use of the appliance.
Covered place symbol:
the operations preceded by this symbol must always be carried out in a dry, covered area.
Protective gloves symbol:
Indicates that the operator should always wear protective gloves, to avoid the risk of serious injury to his hands from chemical
agents.
Open book symbol with an "i":
Indicates the need to consult the instruction manual.
The descriptions contained in this document are not binding. The company therefore reserves the right to make any modications at any time
to elements, details, or accessory supply, as considered necessary for reasons of improvement or manufacturing/commercial requirements.
The reproduction, even partial, of the text and drawings contained in this document is prohibited by law.
The company reserves the right to make any technical and/or supply modications. The images are shown as a reference only, and
are not binding as to the actual design and/or equipment.
Open book symbol:
Tells the operator to read the manual before using the appliance.
Protective gloves symbol:
Indicates that the operator should always wear protective gloves, to avoid the risk of serious injury to his hands from sharp objects.
Disposal symbol:
carefully read the sections marked with this symbol for disposing of the appliance.
SYMBOLS USED IN THE MANUAL
PURPOSE AND CONTENT OF THE MANUAL
TARGET GROUP
STORING THE USE AND MAINTENANCE MANUAL
ON DELIVERY OF THE APPLIANCE
The aim of this manual is to provide customers with all the information needed to use the appliance in the safest, most appropriate and most
autonomous way. It includes information concerning technical aspects, safety, operation, appliance downtime, maintenance, spare parts and
scrapping. Operators and qualied technicians must read the instructions in this manual carefully before carrying out any operation on the
appliance. If in doubt about the correct interpretation of instructions, contact your nearest Customer Service Centre to obtain the necessary
clarications.
This manual is aimed at operators and qualied technicians responsible for appliance maintenance. Operators must not perform operations
that should be carried out by qualied technicians. ICE cannot be held liable for damages resulting from failure to comply with this prohibition.
The Use and Maintenance Manual must be stored in its special pouch close to the appliance, protected from liquids and anything else that
could compromise its legibility.
When the machine is delivered to the customer, an immediate check must be performed to ensure all the material mentioned in the shipping
documents has been received, in addition to verifying that the equipment has not been damaged during transportation. If this is the case, the
carrier must ascertain the extent of the damage at once, informing our customer service ofce. It is only by prompt action of this type that the
missing material can be obtained, and compensation for damage successfully claimed.
INTRODUCTORY COMMENT
Any type of equipment can only work properly and effectively if used correctly and kept in full working order by performing the maintenance
operations described in the attached documentation. You should therefore read this instruction manual carefully, consulting it again if issues
arise while using the machine. If necessary, remember that our assistance service (organised in collaboration with our dealers) is always
available for advice or direct intervention.

5
TECHNICAL DESCRIPTION
INTENDED USE
SAFETY
SERIAL NUMBER PLATE
The VAC WD 20-40-60 is a vacuum cleaner and a wet vacuum cleaner which uses the vacuum created in the collection tank by the fan,
operated by the electric motor, to pick up dust and dry solid elements measuring up to 2cm at an ambient temperature, or else liquids, using
accessories in contact with the oor and furnishings. The vacuum hose channels the air into the collection tank, where the dust and solid
residues are trapped by lters. The appliance must only be used for this purpose.
This appliance is designed and built to be used by a qualied operator to clean (by vacuuming solid, dry elements) smooth, compact ooring
in the commercial, residential and industrial sectors, in proven safety conditions.
The appliance is only suitable for use in indoor - or at least covered - areas. The appliance is not suitable for use in the rain, or under
jets of water. IT IS FORBIDDEN to use the appliance for picking up dangerous dusts or inammable liquids in places with an explosive
atmosphere. In addition, it is not suitable as a means of transport for people or objects.
Operator cooperation is paramount for accident prevention. No accident prevention programme can be effective without the full co-operation
of the operator who is directly responsible for machine operation. The majority of occupational accidents that happen both in the workplace or
whilst moving are caused by failure to respect the most basic safety rules. An attentive, careful operator is most effective guarantee against
accidents and is fundamental in order to implement any prevention programme.
The serial number plate is located at the rear of the vacuum
cleaner, and indicates the general characteristics of the appliance,
in particular the appliance's serial number. The serial number is a
very important piece of information and should always be provided
together with any request for assistance or to purchase spare parts.
IDENTIFICATION DATA
For technical assistance or to request replacement parts, always give the model, the version and serial number written on the serial number
plate.
TECHNICAL DATA U/M VAC WD 20 VAC WD 40 VAC WD 60
Power supply voltage V 230 230 230
Frequency Hz 50 50 50
Rated power W 1000 1000 1000
Type of vacuum cleaner Wet & Dry Wet & Dry Wet & Dry
Vacuum kPa 21 21 21
Air ow rate m3/h 194 194 194
Collection tank useful capacity l 30 60 80
Barrel material Polyethylene Polyethylene Polyethylene
Length of power supply cable m 10 10 10
Dry weight kg 15 16 23
Dimensions (length x width x height) cm 45 x 42 x 64 45 x 42 x 77 52 x 48 x 92
Accessories diameter mm 37 37 40
Sound pressure level (ISO 11201) dB (A) 70 70 70
Uncertainty Kpa dB (A) 1,5 1,5 1,5

6
Before using the appliance for the rst time, read and
comply with these safety warnings. Keep these safety
warnings for consultation in the future or to hand them
over to successive owners.
• Before commissioning, read the appliance's user manual.
• The warning plates on the appliance provide important
instructions for its safe use.
• Always comply with both the directions on the instructions, as
well as current safety standards.
• Keep the packing lm out of the reach of children. Risk of
asphyxiation!
DANGER: Indicates an imminent danger that could cause
serious injury or death.
WARNING: Indicates a probable dangerous situation that
could cause serious injury or death.
CAUTION: Indicates a probable dangerous situation that
could cause minor injuries.
ATTENTION: Indicates a probable dangerous situation that
could damage objects.
SAFETY WARNINGS FOR WET/DRY VACUUM CLEANER
DANGER LEVELS

7
DANGER:
• To reduce the risk of re, electric shocks or injury, please
read and comply with all the safety instructions and warning
indications carefully. This vacuum cleaner has been designed
to be safe when it is used for cleaning in the manner specied.
If damage to electrical or mechanical components is found, the
vacuum cleaner and/or the accessory must be repaired at the
relative authorised service centre or else at the manufacturer
before use, in order to prevent further damage to the appliance
or physical injury to the user.
• Before connecting the appliance to the electricity socket, make
sure the electrical information on the plate corresponds to that
of the mains supply. The appliance must only be powered
with alternating current and voltage equal to that shown
on the serial number plate.
• The power supply cable outlet must have an earth connection
in compliance with the regulatory standards.
• Before using, check for any damage on the connection cable
and on the power plug. If the cable is damaged, immediately
contact a specialist technician for restoring normal operations.
• Connect the appliance only to an electrical connection installed
by an electrical installer in conformity with IEC 60364-1.
• Never touch the power plug with wet hands.
• Make sure that the cable to the mains or the extension cable
have not been damaged by having been walked on, crushed,
pulled or the like. Protect the cable from heat and from contact
with oils or sharp edges.
• Regularly check that the cable connecting to the mains is
not damaged, for example with signs of ageing or cracks.
If any damage is encountered, the cable must be replaced
by a specialized ICE technician, or a technician with similar
qualications, prior to using the machine again.
CONNECTION TO THE ELECTRICITY GRID

8
• Protection against splashes of water and the mechanical
strength need to be ensured also after any replacement of the
joints of the power cable or the extension cable.
• Do not clean the appliance with a hose or a jet of high pressure
water (risk of short-circuit or other electrical faults).
ATTENTION:
• The procedure causes short-term reduction in voltage.
• In unfavourable grid conditions the other appliances could be
damaged.
• This damage could occur if the grid impedance is less than
0.15Ω.
DANGER:
• Never use with a damaged cable or plug. When removing
from an electrical socket, pull the plug and not the cable. Do
not handle the plug or the vacuum cleaner with wet hands.
Deactivate all the controls before connecting or disconnecting
from the electrical socket.
• Do not pull or transport the appliance by the cable, do not use
the cable as a handle, do not close a door on the cable, and
do not pull the cable around sharp edges or corners. Do not
pass the vacuum cleaner over the cable. Keep the cable away
from hot surfaces.
• Be careful when cleaning on stairs.
• The appliance must not be used or kept outdoors, in damp
conditions or directly exposed to rain.
• The storage temperature must be between -25°C and +55°C.
• Conditions of use: ambient temperature between 0°C and
40°C with a relative humidity between 30 and 95%. The
vacuum cleaner has been developed only for dry cleaning
USO - EMPLOYMENT

9
and it should not be used or kept outdoors in moist conditions.
• Before using, make sure the appliance and the work equipment
and in particular the extension cable are in a good condition. If
there is any damage, immediately pull out the power plug from
the mains socket, the appliance should not be used.
• When the appliance is used in dangerous situations (for
example lling stations) the relative safety regulations must
be followed. It is forbidden to use the appliance in areas with
a high risk of explosion.
• Certain substances can form explosive vapours and mixtures
together with intake air.
• Never vacuum the following substances:
♦ Explosive or inammable gases, liquids and powders
(reactive powders).
♦Reactive metal powders (for example aluminium,
magnesium, zinc) together with strongly alkaline
detergents and acids.
♦Acids and alkalines in their purest state.
♦Organic solutions (for example gasoline, paint
thinners, acetone or gasoline).
WARNING:
• Keep hair, loose clothing, ngers and all body parts away from
openings and from moving parts. Do not put objects into the
openings or use the appliance with the opening blocked. Keep
the openings free of dust, fur, cloths, hair, and everything else
that can reduce the air ow.
• This appliance is not suitable for vacuuming dangerous
powders.
• Do not use to vacuum ammable or combustible liquids like
gasoline, or use in areas where they may be present.
• Do not vacuum anything that is burning or smouldering, like
cigarettes, matches or glowing embers.

10
• The appliance can be used by children over 8 years of age
and by people with limited physical, sensorial or mental,
or by people who have no experience or the required
knowledge, as long as they are supervised or after they
have been given instruction regarding using the appliance
safely and they understand the dangers involved in using
it. Children should not play with the appliance. Children
should not clean or carry out maintenance operations
without the supervision of an adult.
• Children must be supervised to make sure they do not play
with the appliance.
• Children should not do any cleaning or maintenance that is
the responsibility of the user without supervision.
• This appliance should only be used in closed areas.
• Never leave the appliance unattended when it is connected
to the mains socket. Take the plug out of the socket when not
used and before any maintenance.
• Burning or smouldering objects.
• It is forbidden to vacuum persons or animals with this appliance.
• In low temperatures, the appliances should not be used
outdoors.
CAUTION:
• When the appliance is operating do not bring it close to delicate
organs like ears, mouth, eyes, etc.
• Do not use the appliance without lters. The dry vacuum
cleaner must always have a bag lter tted. The wet vacuum
cleaner should always have a cartridge lter, a wet lter and
the oat system tted when operating BOTH WET AND DRY.
Please note that when using a dry lter during wet vacuuming
the lling factor of the container can vary.
• Regularly clean the water level limitation device and check it
for the signs of damage.

11
• The device must only be kept in closed areas.
• If the vacuum cleaner is not working properly or it has fallen,
been damaged, left outside or has fallen in water, take it to a
service centre or back to the retailer.
• Always use the appliance in compliance with its intended use,
taking into consideration local conditions and looking out for
the presence of others, especially children, when working.
• Never leave the appliance unattended until it has been
switched off and the plug has been taken out of the mains
socket.
• Always wear suitable protective gloves when working with the
appliance.
• The appliance should only be used by people trained in its use
and who have shown that they know how to use the appliance
and have been expressly authorised to do so.
• Do not place any liquid containers on the appliance.
• In the event of a re, use a powder extinguisher. Do not use
water.
• If foam forms or liquid leaks, immediately switch off the
appliance.
WARNING:
• Before transporting, close all the locking hooks of the vacuum
head.
• Do not tip over the appliance if there is any liquid in the dirt
collection tank.
• When transporting the appliance, the engine should be
switched off, and make sure that the appliance is in a stable
and secure position.
TRANSPORT

12
DANGER:
• Before cleaning and carrying out maintenance on the
appliance and before replacing any components, switch off
the appliance and pull out the power plug from the mains
socket.
• Repairs should only be carried out by authorised service
centres or by personnel who are experts in this eld and who
are familiar with all the current safety norms.
• Observe the safety check as per local provisions for
commercial appliances.
MAINTENANCE
CAUTION:
Only use accessories and spare parts that have been authorised
by the manufacturer. Original accessories and spare parts ensure
the appliance can be used safely and without any fault.
ACCESSORIES AND SPARE PARTS
CAUTION:
Only use the materials
expressly recommended
by the manufacturer as
cable extensions (contact
an authorised retailer) or
else high quality models.
When using an extension,
respect its minimum
cross-section.
CABLE LENGTH
CABLE SECTION
<16A <25A
Up to 20m 1.5mm22.5mm2
From 20m to 50m 2.5mm24.0mm2
EXTENSION CABLES

13
DANGER:
The appliance has been designed only for vacuuming dry solid
material and it should not be used for other purposes.
WARNING:
The appliance is not suitable for vacuuming powders that are
damaging to health.
DRY VACUUM CLEANER
DANGER:
• The water level limitation device should be cleaned regularly
and regularly checked for breaks and wear.
• If foam forms or liquid leaks, immediately switch off the
appliance!
• Unless otherwise stated in the instructions, liquid substances
can be vacuumed only up to a temperature of 45°C.
WARNING:
This appliance is not suitable for vacuuming powders that are
damaging to health unless expressly stated. Observe the
technical warnings set out in the user manual.
ATTENTION:
• Protect the appliance against frost.
• This appliance is not suitable for vacuuming coolants and
lubricants unless expressly stated.
VACUUM CLEANER FOR LIQUIDS

14
PREPARATION OF THE APPLIANCE
Since the packaging elements (plastic bags, staples, etc.) are a
potential source of danger, they should not be left within the reach of
children, disabled persons, etc.
Gross weight of device, including packaging, is:
The dimensions of the package are as follows: ATTENTION:
HANDLING THE PACKED APPLIANCE
The procedure for removing the device from its packaging is the
following:
1. Open the outer box.
ATTENTION: You are advised to always wear protective
gloves, to avoid the risk of serious injury to your hands.
2. Remove the accessories from the box and carefully lay them on
the ground.
HOW TO UNPACK THE APPLIANCE
3. Take out the vacuum head carton.
4. Remove the vacuum hose from the collection tank.
5. Remove the appliance from the box using the handle, being
careful not to damage either during the operation.
ATTENTION: it is recommended that all the packaging
components be kept for any future transportation of the
appliance.
The procedure for the safe handling of the device is the following:
1. Take all necessary steps to ensure that the device is in a safe
condition (see “MACHINE SAFETY ”).
2. Remove the vacuum hose (1) (Fig.2) from the vacuum nozzle (2)
on the collection tank; before pulling the vacuum hose press the
button (3) for unlocking the catch (Fig.1).
3. Insert the appliance into the protective bag, taking care not to
damage either during this operation.
4. Insert the appliance into the carton, taking care not to damage
either during this operation.
Remember to place at the bottom of the carton the block for the
wheels of the appliance, position around the collection tank the
blocks for preventing damage during transportation.
HOW TO TRANSPORT THE APPLIANCE
5. Insert the accessories support and the head block inside the
carton.
6. Place the accessories in the carton.
7. Close the carton.
ATTENTION: When transporting the appliance on vehicles,
secure it according to the directives in force so that it cannot
slide or tip over.
ATTENTION: You are advised to always wear protective
gloves, to avoid the risk of serious injury to your hands.
ATTENTION: Move the packaged product in accordance with
legal legislation requirements regarding accident prevention,
the size and the mass of the packaging itself.
3
2
1
1 2
U/M
VAC WD 20 kg 18
VAC WD 40 kg 18
VAC WD 60 kg 26
U/M A B C
VAC WD 20 cm 45 47 77
VAC WD 40 cm 45 47 92
VAC WD 60 cm 52 64 104

15
The basic components of the appliance are as follows:
1. Collection tank unit.
2. Fabric lter kit.
3. Vacuum head unit.
The components of the vacuum head assembly are as follows:
1. Main switch.
2. Handle bar for vacuum head lifting.
3. Power supply cable.
4. Float.
5. Sponge lter.
The components of the collection tank are as follows:
1. Rear wheels.
2. Front pivoting wheels.
3. Vacuum nozzle.
4. Vacuum hose coupling/uncoupling button.
5. Flexible hose housing.
6. Collection tank.
7. Vacuum head coupling/uncoupling hinges.
8. Accessories support.
The components of the collection tank are as follows:
1. Rear wheels.
2. Front wheels.
3. Vacuum nozzle.
4. Vacuum hose coupling/uncoupling button.
5. Flexible hose housing.
LOCATION OF THE MAIN COMPONENTS OF THE APPLIANCE
LOCATION OF THE HEAD UNIT COMPONENTS
LOCATION OF THE TANK UNIT COMPONENTS (VAC WD 20 AND VAC WD 40 VERSIONS)
LOCATION OF THE TANK UNIT COMPONENTS (VAC WD 60 VERSIONS)
6. Collection tank.
7. Vacuum head coupling/uncoupling hinges.
8. Rapid liquid drainage pipe.
9. Rapid drainage pipe cap.
10. Collection tank drainage cap.
11. Accessory-holder pocket.
12. Transportation handle.
2 1
1
2
2
4
1
6
5 3
8
1
11 8
9
10
6
6 12
3
2
3
3
7
7
1
1
1
1 1
2
2
2 2
5
5
4
4

16
The stages for making the appliance safe, thereby making it possible
to carry out operations safely, are as follows:
1. Make sure that the main switch (1) is in the rest position, if not,
disable it by setting the switch to “0” (Fig.1).
2. Make sure that the plug (2) on the power cable (3) has been
taken out of the mains supply socket (4), and if not, disconnect
it (Fig.2).
3. Wind the power cable under the appliance’s lifting handle.
APPLIANCE SAFETY
ATTENTION: You are advised to always wear protective
gloves, to avoid the risk of serious injury to your hands.
ATTENTION: To prevent any damage to the mains socket,
pull out the plug (2) from the mains socket (4) by pulling the
plug (2) directly instead of the power cable (3).
PREPARING TO WORK
To insert the paper collection bag-lter inside the collection tank,
proceed as follows:
1. Take all necessary steps to ensure that the device is in a safe
condition (see MACHINE SAFETY’”).
ATTENTION: You are advised to always wear protective
gloves, to avoid the risk of serious injury to your hands.
INSERTING THE PAPER COLLECTION BAG-FILTER (OPTIONAL)
2. Free the vacuum head unit from the collection tank by releasing
the hooks (1) on the side of the collection tank ( Fig. 1).
3. Using the handle (2) on the vacuum head unit (Fig.2), remove the
vacuum head from the collection tank.
4. Lay the head gently on the oor.
5. Insert the paper collection bag-lter inside the collection tank (3)
(Fig.4), making sure to insert the lter into the vacuum nozzle
(4) (Fig.3) correctly, being careful not to damage the cardboard
support (5) in the bag itself (Fig.4).
6. Using the handle (2), on the vacuum tank lid, place the vacuum
tank lid on the collection tank (Fig.5).
7. Secure the vacuum head to the collection tank using the hooks
(1) on the side of the collection tank ( Fig. 6).
ATTENTION: The paper collection bag-lter should only be
used for collecting solid waste.
ATTENTION: When using the paper collection bag-lter do
not vacuum waste that could cut it, burning embers that could
set it on re, or liquid solutions that could dissolve it.
ATTENTION: The paper collection bag-lter cannot be used if
the fabric lter is also used.
1
1
2
OFF
4
2
1
4 5
3
2
3
1
1
5
2
2
6
3 4

17
To insert the nylon lter in the collection tank, proceed as follows:
1. Take all necessary steps to ensure that the device is in a safe
condition (see MACHINE SAFETY’”).
ATTENTION: You are advised to always wear protective
gloves, to avoid the risk of serious injury to your hands.
2. Free the vacuum head from the collection tank by releasing the
hooks (1) on the side of the collection tank ( Fig. 1).
3. Using the handle (2) on the vacuum head unit (Fig.2), remove the
vacuum head unit from the collection tank.
INSERTING THE NYLON FILTER (OPTIONAL)
4. Lay the head gently on the oor.
5. Insert the nylon lter in the tank and x it in place by having it
adhere to the edge of the tank opening.
6. Using the handle (2), on the vacuum tank lid, place the vacuum
tank lid on the collection tank (Fig.3).
7. Secure the vacuum head to the collection tank using the hooks
(1) on the side of the collection tank ( Fig. 4).
ATTENTION: the nylon lter must only be used together with
the lter/oat kit or the permanent fabric lter.
To insert the cartridge lter, proceed as follows:
1. Take all necessary steps to ensure that the device is in a safe
condition (see MACHINE SAFETY’”).
ATTENTION: You are advised to always wear protective
gloves, to avoid the risk of serious injury to your hands.
2. Free the vacuum head from the collection tank by releasing the
hooks (1) on the side of the collection tank ( Fig. 1).
INSERTING THE CARTRIDGE FILTER (OPTIONAL)
3. Using the handle (2) on the vacuum head unit (Fig.2), remove the
vacuum head unit from the collection tank.
4. Lay the head gently on the oor.
5. Insert the cartridge lter (3) into the oat support (4) (Fig.3).
6. Using the handle (2), on the vacuum tank lid, place the vacuum
tank lid on the collection tank (Fig.4).
7. Secure the vacuum head to the collection tank using the hooks
(1) on the side of the collection tank ( Fig. 5).
1 2
2 1
1 32 4
1
3
42
2
1
1 3 42
5

18
To x the front squeegee to the squeegee support, proceed as
follows:
1. Take all necessary steps to ensure that the device is in a safe
condition (see MACHINE SAFETY’”).
ATTENTION: You are advised to always wear protective
gloves, to avoid the risk of serious injury to your hands.
ATTENTION: Check that the front squeegee support is
secured to the collection tank, and if not read the assembly
instructions supplied with the “FRONT SQUEEGEE” kit.
FRONT SQUEEGEE OPTIONAL FIXING KIT (ONLY FOR TOP VAC WD 60 VERSIONS)
2. Take hold of the front squeegee unit (1) (Fig.1).
3. Insert rst the right-hand pin (2) of the squeegee in the right-hand
slot (3) of the squeegee connection (Fig.2).
ATTENTION: This operation can be simplied by rst
loosening the hand-wheel (4) on the pin (Fig.3).
4. Repeat the same operation for the left pin.
5. Then tighten the hand-wheels (4) to lock the squeegee in place
(Fig.4).
6. Insert the vacuum hose (5) of the squeegee into the relative joint
(6) of the vacuum nozzle (Fig.5).
7. Insert the vacuum hose from the vacuum nozzle (7) on the
collection tank, before pulling the vacuum hose press the button
(8) for unlocking the catch (Fig.6).
Before beginning to work, it is necessary to:
1. Before using, the appliance must be in order and safe to use
with the work equipment, especially the power cable and the
extension cable. If everything is not in order, the appliance must
not be used.
2. Take all necessary steps to ensure that the device is in a safe
condition (see “MACHINE SAFETY ”).
3. Free the vacuum head from the collection tank by releasing the
hooks (1) on the side of the collection tank (Fig.1).
PREPARING TO WORK
4. Using the handle (2) on the vacuum head unit (Fig.2), remove the
vacuum head unit from the collection tank.
5. Lay the head gently on the oor.
6. Make sure that the sponge lter (3) has been correctly positioned
above the lter cage (4) (Fig.3).
7. Depending on the type of work that needs to be done, select the
type of lter to insert.
8. Using the handle (2), on the vacuum tank lid, place the vacuum
tank lid on the collection tank (Fig.4).
1
5
6
4
2
3
4
1
5
32
6
4
7 8
1
2 23
4
1 2 43

19
9. Secure the vacuum head to the collection tank using the hooks
(1) on the side of the collection tank ( Fig. 5).
10. Insert the vacuum hose (5) from the vacuum nozzle (6) on the
collection tank, before inserting the vacuum hose press the
button (7) for unlocking the catch (Fig.6).
11. Select the most suitable accessory for the task at hand (see the
chapter “CHOOSING AND USING THE ACCESSORY”).
12. Insert the selected accessory into the vacuum hose.
ATTENTION: Never use the appliance without the lters
supplied with the machine.
WORK
To start working, proceed as follows:
1. Carry out all the checks in the section “PREPARING TO WORK”.
2. Insert the plug (1) of the power supply cable (2) in the mains
supply socket (3) (Fig.1).
3. Switch on the machine by positioning the main switch (4) to the
work position “I” (Fig. 2).
VACUUM CLEANERS
4. Proceed with the vacuuming.
ATTENTION: If, when working, the intensity of the vacuum
should drop, read the chapter “CONTROL AND OPERATION”.
To start working, proceed as follows:
1. Make all the checks listed in “PREPARING TO WORK”.
2. Free the vacuum head from the collection tank by releasing the
hooks (1) on the side of the collection tank, turn the levers as
shown by the arrow in the picture (Fig.1).
3. Using the handle (2) on the vacuum head unit, remove the
vacuum head unit from the collection tank (Fig.2).
4. Lay the head gently on the oor.
5. Remove the fabric lter (3) (Fig.3).
WET VACUUM CLEANER
ATTENTION: there must be no solid waste residue inside the
collection tank.
6. Using the handle (2) on the vacuum head unit, place the vacuum
head unit above the collection tank (Fig.4).
ATTENTION: Place the machine's power supply cable in the
rear part of the tank.
1
5 6
6
5
7
4
ON
3
1
2
21
1
2 2
3
1 2 43

20
To start working, proceed as follows:
1. Make all the checks listed in “PREPARING TO WORK”.
2. Free the vacuum head from the collection tank by releasing the
hooks (1) on the side of the collection tank, turn the levers as
shown by the arrow in the picture (Fig.1).
3. Using the handle (2) on the vacuum head unit, remove the
vacuum head unit from the collection tank (Fig.2).
4. Lay the head gently on the oor.
5. Remove the fabric lter (3) (Fig.3).
WET VACUUM CLEANERS WITH OPTIONAL FRONT SQUEEGEE KIT (VAC WD 60 VERSIONS)
ATTENTION: there must be no solid waste residue inside the
collection tank.
6. Using the handle (2) on the vacuum head unit, place the vacuum
head unit above the collection tank (Fig.4).
ATTENTION: Place the machine's power supply cable in the
rear part of the tank.
7. Secure the vacuum head to the collection tank using the hooks
(1) on the side of the collection tank, turn the levers as shown by
the arrow in the picture (Fig.5).
8. Insert the plug (4) of the power supply cable (5) in the mains
supply socket (6) (Fig.6).
9. Switch on the machine by positioning the main switch (7) to the
work position “I” (Fig. 7).
10. Proceed with the vacuuming.
ATTENTION: If, when working, the intensity of the vacuum
should drop, read the chapter “CONTROL AND OPERATION”.
The machine is tted with a mechanical device (oat) under the
vacuum lid. When the collection tank is full, this device shuts off the
air to the vacuum motor to protect it; you will recognise this condition
by the deeper noise made by the motor. When you hear this sound,
you must empty the collection tank (read “CONTROLLING AND
CLEANING THE COLLECTION TANK”).
7. Secure the vacuum head to the collection tank using the hooks
(1) on the side of the collection tank, turn the levers as shown by
the arrow in the picture (Fig.5).
8. Insert the plug (4) of the power supply cable (5) in the mains
supply socket (6) (Fig.6).
9. Switch on the machine by positioning the main switch (7) to the
work position “I” (Fig. 7).
10. Bring the front squeegee into contact with the ground by lightly
pressing downwards on the squeegee command pedal (8) then
moving it to the left just enough to release it from the catch
(Fig.8).
11. Proceed with the vacuuming.
ATTENTION: If, when working, the intensity of the vacuum
should drop, read the chapter “CONTROL AND OPERATION”.
The machine is tted with a mechanical device (oat) under the
vacuum lid. When the collection tank is full, this device shuts off the
air to the vacuum motor to protect it; you will recognise this condition
by the deeper noise made by the motor. When you hear this sound,
you must empty the collection tank (read “CONTROLLING AND
CLEANING THE COLLECTION TANK”).
1
2 2
3
1 2 43
1
5
7
ON
6
4
576
1
8
5 8
7
ON
6
4
5
76
This manual suits for next models
2
Table of contents
Other Ice Vacuum Cleaner manuals