icklebubba Orb User manual

Orb Highchair
Orb+ Highchair
User Guide


Warnings 01
Care and Maintenance 02
Getting to Know your Orb Highchair 03
Highchair Installation 05
Highchair Function 08
Disassembly 10
Infant Inlay 11
Warranty 12
EN14988-2 / AS4684-2009 / ASTM F404
Contents

01
WARNINGS!
IMPORTANT!
KEEP FOR FUTURE REFERENCE
WARNING! DO NOT LEAVE THE CHILD UNATTENDED WHILST USING THE HIGHCHAIR.
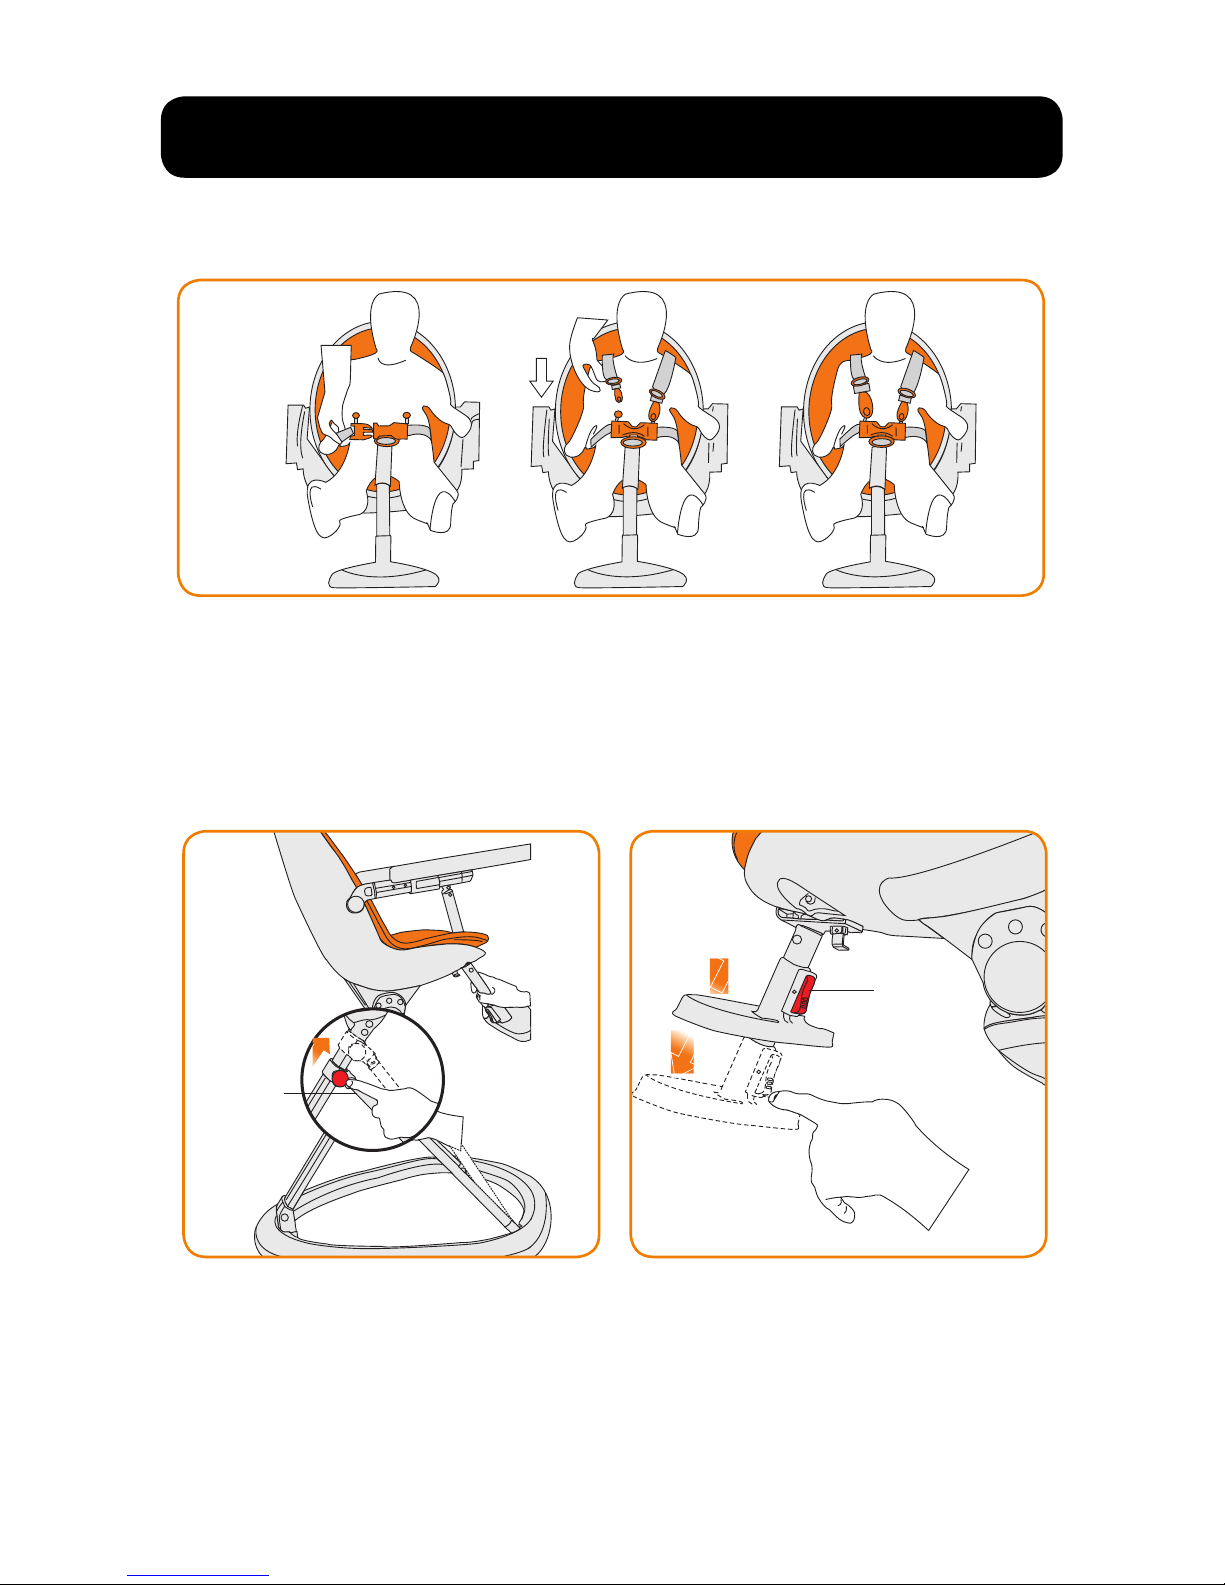
WARNING! MAKE SURE THE HARNESS IS CORRECTLY FITTED.
WARNING! BE AWARE TO THE RISK OF OPEN FIRE AND OTHER SOURCES OF
STRONG HEAT, SUCH AS ELECTRIC FIRES, GAS FIRES ETC. IN THE VICINITY OF THE
HIGHCHAIR.
• Always keep your child in view whilst using the highchair.
• Do not use the highchair, unless all components are correctly fitted and
adjusted.
• Prevent serious injury or death from falls or sliding out.
• A child must be secured in the highchair at all times by the restraining
system, correctly fixed and adjusted, in both the reclining and upright
position.
• The tray is not designed to hold a child in the chair.
• It is recommended that the highchair be used in the upright position only
by children capable of sitting upright unaided (around 6 months) and up
to 36 months, in any case for a weight up to 15kg.
• Make sure that you are fully aware how to use the highchair before using
it for your child.
• The highchair opening, closing and adjustment operations are to be car-
ried out by adults.
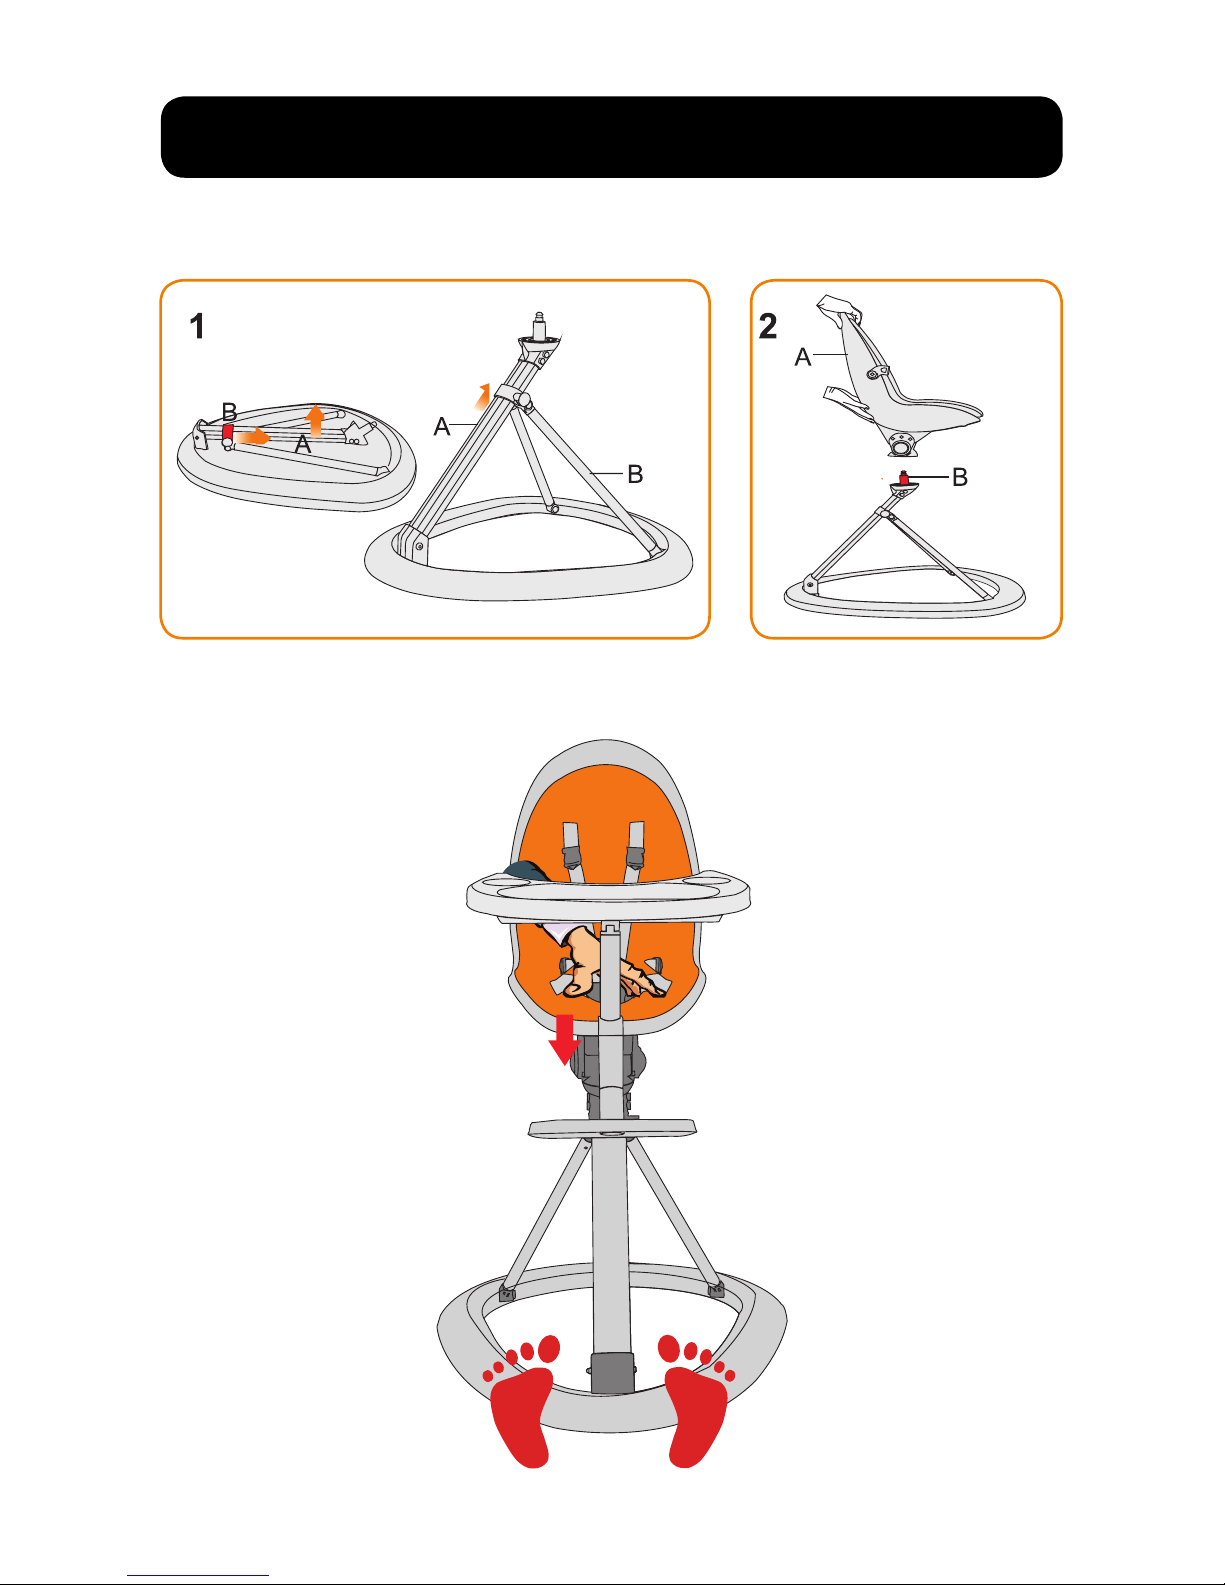
• Always make sure that the highchair is in a fully upright position before
placing the child in the seat unit. Ensure all closing devices are hooked.
• During the assembly and/or disassembly, make sure that there is enough
distance away from babies or young children to avoid risk of injury.
• During the adjustment, make sure that the movable parts of the highchair
do not come in to contact with the child’s body.
• Before use, make sure that all safety mechanisms are correctly coupled.
In detail, make sure that the highchair is locked into position.
• Do not use the highchair in the closed position: this position is used only
to store the highchair in small spaces.
• Do not over hang weights or bags to the tray. They may unbalance the
highchair.
• Regularly inspect the safety devices to verify that they work correctly.
• Do not use the highchair if any problems and/or anomalies are detected.
• Regularly inspect all components for any signs of wear and tear.
• Always use the highchair on a flat and stable surface. Never position it
close to stairs or steps.
• Do not let other babies play unattended close to the highchair.
• Do not allow children to climb up or on to the highchair.
• Do not use the highchair if any part is broken, torn or missing.

02
CARE AND MAINTENANCE
• Never move the highchair whilst the baby is inside it.
• This highchair is only intended for use of one baby at time.
• When the highchair is not being used, store out of reach of babies and
young children.
• Make sure that all possible hazard sources (i.e. electric cables and wires)
are kept out of reach of the baby.
• When the highchair is in use, do not place near to windows or walls where
ropes, curtains or anything else may be used by the baby to climb or may
cause suocation or strangling.
• Never use the highchair next to windows or walls to also avoid the risk of
unbalance to the highchair as a result of the baby using their feet to push
or pull, causing the highchair to fall.
• When positioning the highchair close to a table, pay attention not to
tangle the legs of the baby. Care should also be taken if adjusting any
components whilst the highchair is being used to avoid injury.
• If the highchair has been exposed to sunlight for a long period of time, it
should be left to cool before placing your baby in the seat, as prolonged
exposure to the sun will cause it absorb heat which could cause injury to
the baby’s skin.
• Prolonged exposure to the sun should be avoided as it can cause colour
changes to the materials and fabrics.
• Do not use spare parts or accessories that are not supplied or approved
by the manufacturer.
• The manufacturer declines all liability for any damages to objects or peo-
ple as a result from improper use of the product.
• In order to improve its products, the manufacturer reserves the right to
update and/or modify any technical aesthetic detail without any prior
notice.
• If your child is too young to sit up unaided, the highchair must be used in
the recline position at all times.
• The highchair can be cleaned using a sponge and lukewarm water with
a light detergent. It is also possible to use a non aggressive disinfecting
agent.
• Particularly strong stains can be removed using a non abrasive cleaning
cream.
• Never clean the highchair with abrasive products based on ammoniac or
bleaching solutions, or alcoholic detergents.
• Never force mechanisms or moving parts. If you are in doubt, check the
instructions.
• Moving parts can be lubricated with silicone oil.

03
GETTING TO KNOW YOUR HIGHCHAIR
Safety Harness
Seat
Seat Pad
Food Tray
Tray Tube
Seat Clip
Footrest Tube
Seat Dismount Button
Footrest
Front Leg
Food Tray/Footrest Hook
Recline Button
Height Adjustment Button
Rear Leg
Base

04
GETTING TO KNOW YOUR HIGHCHAIR
Tray Plug
Tray Socket
Revolving Button
Scroll Blocks
Footrest Adaptor
Tray Clip
Tray Shelf
Tray Adjustment Lever

05
PART 1 : HIGHCHAIR INSTALLATION
Step 1: Base Assembly Step 2: Seat Installation
1. Raise tube A, pull tube B along A until you
hear a “click”.
2. Insert seat unit (A)
into the axle of the base
until the two round
plastic joints close
completely. Please pull
on the seat unit (A) as
test to ensure it is fitted
correctly.
When installing the seat unit,
please press down firmly.
On disassembly, please
step on the base.

06
Step 3: Food Tray and Harness Installation
3.1 Insert D into E whilst keeping the crotch strap pulled taut upwards.
3.2 Insert A onto the small bar on part B, press A into B until they lock
together. Check they are locked in properly by pulling on the footrest
tube.
3.2 Insert plastic plug D into socket C and repeat on the other side.
3.1
3.2
C
DBA

07
PART 2 : HIGHCHAIR FUNCTION
Function 1: Using the Harness
Function 2: Height Adjustment Function 3: Footrest Adjustment
CBA
D
E
(A) Slot waist clip into crotch strap buckle until you hear a “click”.
(B) Clip shoulder harness connector on to the waist harness bracket.
(C) Adjust length of waist, crotch and shoulder harness to desired position,
ensuring your baby is safely strapped in to the highchair.
Pull height adjustment button (D)
outwards. Slide the rear leg up or down
until your desired position is reached.
Ensure the height adjustment button is
fully clicked into place before placing
your baby into the highchair.
Press down on footrest adapter (E)
and slide the footrest to the desired
position.
1
2 3

08
Function 5: Seat Recline Function 6: Food Tray Adjustment
Function 4: Seat Rotation
F
G
H
The direction of the seat can be rotated 360 degrees and locked into to 2 positions.
Firmly press down the revolving button (F) and rotate the chair, release revolve
button on desired position. Ensure the seat unit is clicked into place.
Press recline buttons (G) on both sides
simultaneously and adjust the seat to
desired angle, then release the button
until it locks.
Pull tray adjustment levers (H)
outwards and adjust food tray as
necessary.
4
5 6

09
PART 3 : DISASSEMBLY
Step 1: Seat Disassembly
Step 2: Folding the base
A
B
A
Press seat dismount button (A) and remove the seat. Step onto the base
of the highchair whilst removing the seat unit as shown on page 5.
Pull height adjustment button (A) outwards. Slide the rear leg (B) down
until flat.
1
2

10
Step 3: Food Tray Disassembly
Step 4: Footrest Disassembly
A
A
(A) Press tray plugs on both sides simultaneously and pull the food tray
outwards from the tray sockets.
(A) Pull footrest hook downwards and release the food tray/footrest from
the seat unit.
3
4

11
PART 4: INFANT INLAY
If you have purchased the Orb+ Highchair, please follow the instructions
below for safe use of the supplied infant inlay.
Step 2: Adjusting the inlay
Step 1: Fitting the inlay
As your baby grows, the infant inlay evolves to suit their needs. When
necessary, the neck and crotch cushions can be removed by unfastening
the velcro fixings, leaving behind the soft cushioned base.
Unfasten the harness and place
the infant inlay on the seat of the
highchair.
Feed the shoulder straps of the
harness through the slots located
between the neck support of the
inlay, ensuring the straps and
buckles are not twisted.
The main body of the inlay sits
between the two straps of the waist
harness, with the crotch cushion
placed behind the crotch strap.
Once the infant inlay has been
placed correctly in the seat, secure
your child into the harness as de-
scribed on Page 7.

We guarantee that this product was manufactured in accordance with the
current European safety requirements and quality standards which are
applicable to this product, and that this product is free from defects in
workmanship and material at the time of purchase. During the production
process the product was subjected to various quality checks. If this prod-
uct, despite our best eorts shows a material/manufacturing fault within the
warranty period of 2 years, (with normal use as described in the user
instructions) we will comply with the warranty terms and conditions.
In this case please contact your reseller.
THE WARRANTY IS NOT VALID IN THE FOLLOWING CASES:
1. In the case of a use or purpose other than described in the manual.
2. If the product is submitted for repair through a dealer that is not authorised
by us.
3. If the product is not supplied to the manufacturer with the original pur-
chase receipt (via the reseller).
4. If repairs were carried out by third parties or a dealer that is not authorised
by us.
5. If the defect is the result of improper or careless use or maintenance, negli-
gence or impact damage to the highchair materials and/or frame.
6. If the parts show normal wear and tear that may be expected from daily
use of a product.
The warranty becomes eective from the date the product was purchased.
Warranty Term:
The warranty period applies for a period of 2 years.
The warranty only applies for the first owner and is not transferrable.
Register online within 28 days of purchase for a free extended 4 year warranty.
IMPORTANT
Please retain your proof of purchase and keep it with this instruction booklet
incase it is needed for future reference.
WARRANTY
12

This manual suits for next models
1
Table of contents