Icom FP-561 User manual

Information provided by this
product includes navigation-aid
data.
Consult nautical charts in addi-
tion to the data when making a
decision on navigation.
MARINEPLOTTER/SOUNDER
fp-561
COMBINE
Electronic charts are not legal
replacements for paper charts.
Always carry and consult current
official charts frequently.
FP-561
MARINE PLOTTER/SOUNDER
INSTRUCTION MANUAL

Qty.
qSelf-tapping screws (M 6 ×30)········································4
wSpring washers (M 6) ······················································4
eFlat washers (M 6)···························································4
rConnector covers·····························································2
tHorse band (HAS-40)······················································2
yExtention pipe (2273 PIPE)·············································1
uGPS antenna···································································1
iPower cable (OPC-786)···················································1
INTRODUCTION
Thank you very much for purchasing the FP-561.
The FP-561 is an advanced navigation and fishfind-
ing system of compact design into which a marine
navigator with a built-in GPS receiver and a
fishfinder are integrated.
Connecting the PD-200, a DGPS beacon receiver,
to this system will permit the GPS to pinpoint the
ship location more accurately.
Please read this instruction manual carefully to en-
sure correct and efficient use of the product.
SUPPLIED ACCESSORIES
●Instruction manual
Cartgraphy supplied by
NAVIONICS Seamless chart start from
$99 and span the globe with high
detail and 16 zoom levels.
Ask your nearest NAVIONICS dealer
for more details.
i
Versions of the FP-561 which display “CE”on the serial
number seal, comply with the essential requirements of
the 89/336/EEC directive for Electromagnetic Compati-
bility.
w
q
e
r
y
i
u
t

TABLE OF CONTENTS
INTRODUCTION . . . . . . . . . . . . . . . . . . . . . . . . . . . . . . . . . . . . . . . . . . . . . . . . . . . . . . . . . . . . . . . . . . . . . . . . . . . . . . . . .i
SUPPLIED ACCESSORIES . . . . . . . . . . . . . . . . . . . . . . . . . . . . . . . . . . . . . . . . . . . . . . . . . . . . . . . . . . . . . . . . . . . . . . . .i
TABLE OF CONTENTS . . . . . . . . . . . . . . . . . . . . . . . . . . . . . . . . . . . . . . . . . . . . . . . . . . . . . . . . . . . . . . . . . . . . . . . . . . .ii
1 SAFETY NOTICES . . . . . . . . . . . . . . . . . . . . . . . . . . . . . . . . . . . . . . . . . . . . . . . . . . . . . . . . . . . . . . . . . . . . . . . . . . . .1
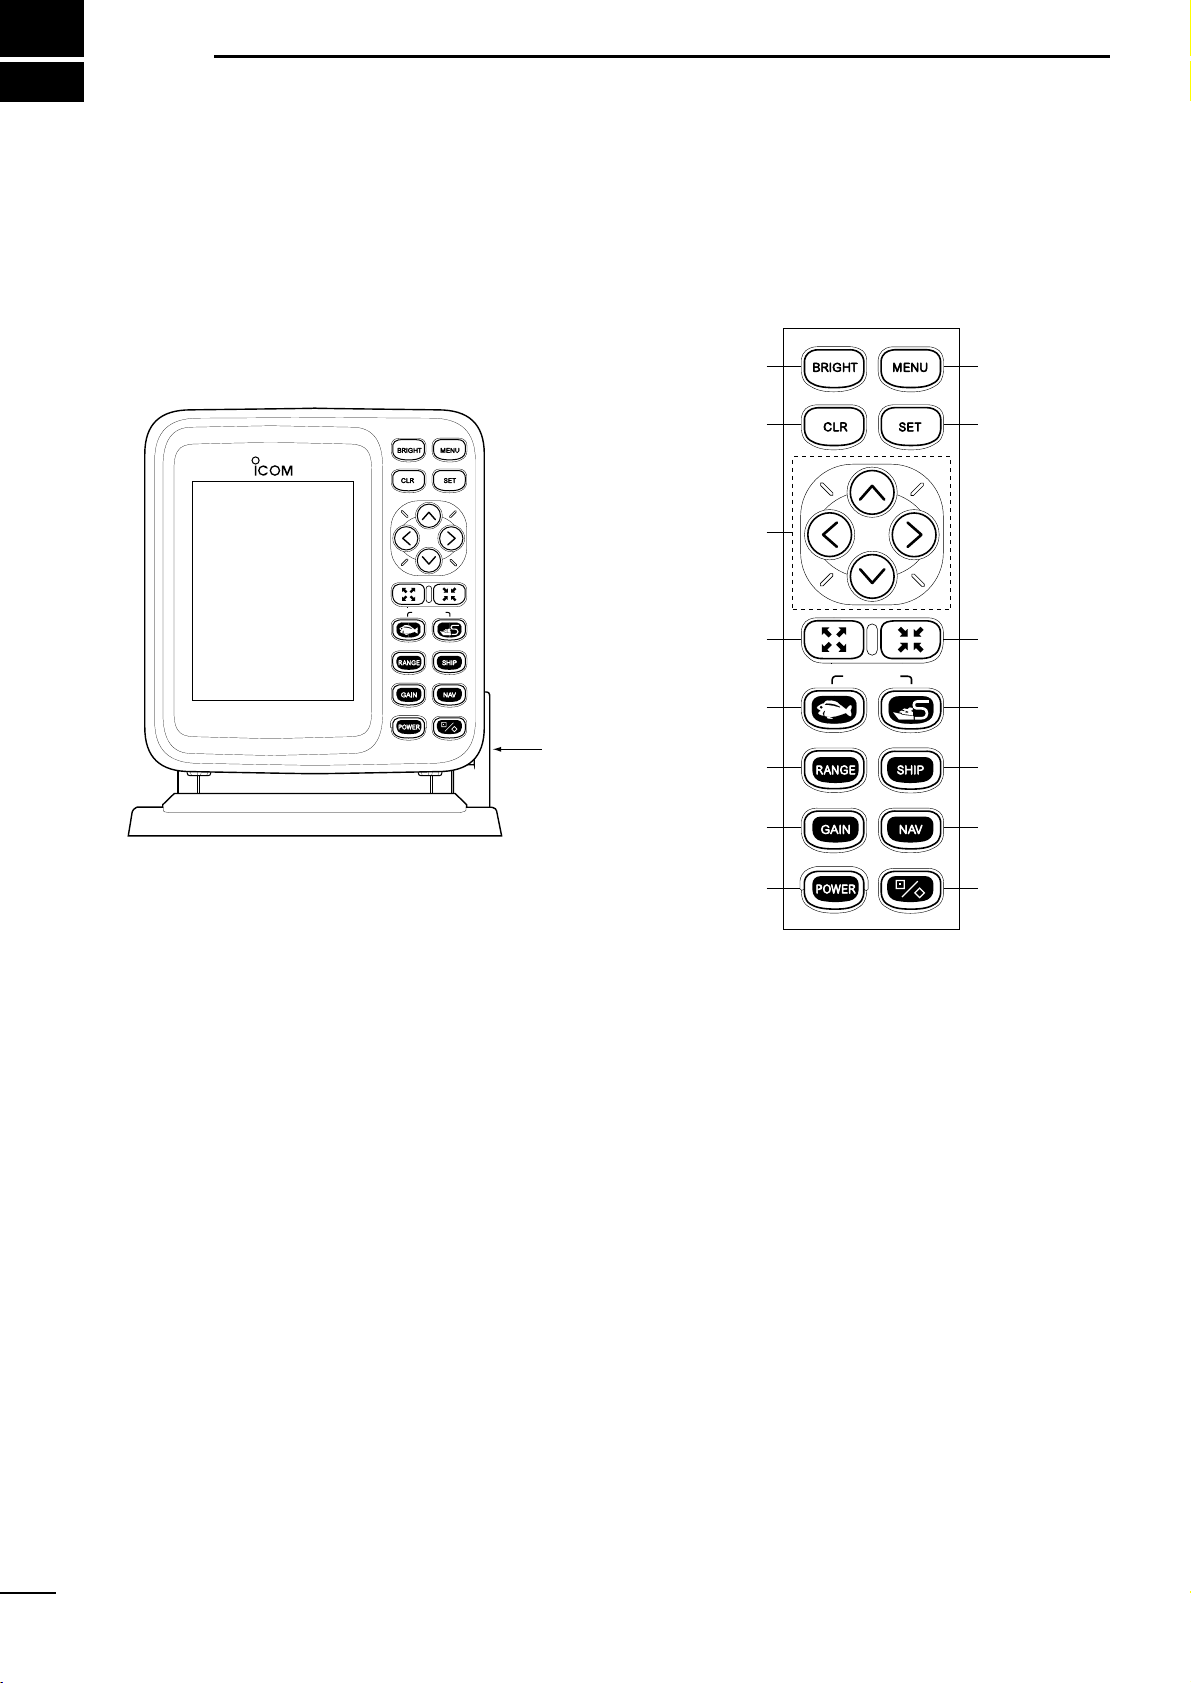
2 PARTS AND FUNCTIONS . . . . . . . . . . . . . . . . . . . . . . . . . . . . . . . . . . . . . . . . . . . . . . . . . . . . . . . . . . . . . . . . . . . . . . . .
3 BASIC OPERATION . . . . . . . . . . . . . . . . . . . . . . . . . . . . . . . . . . . . . . . . . . . . . . . . . . . . . . . . . . . . . . . . . . . . . . . . . . . 5
3-1 Powering on or off the system . . . . . . . . . . . . . . . . . . . . . . . . . . . . . . . . . . . . . . . . . . . . . . . . . . . . . . . . . . . . . . . . 5
3-2 Adjusting the LCD brightness and contrast . . . . . . . . . . . . . . . . . . . . . . . . . . . . . . . . . . . . . . . . . . . . . . . . . . . . . . 5
3-3 Alarm sound . . . . . . . . . . . . . . . . . . . . . . . . . . . . . . . . . . . . . . . . . . . . . . . . . . . . . . . . . . . . . . . . . . . . . . . . . . . . . 5
4 AVAILABLE OPERATION MODES AND SCREENS . . . . . . . . . . . . . . . . . . . . . . . . . . . . . . . . . . . . . . . . . . . . . . . . . . . 6
4-1 How to change operation modes . . . . . . . . . . . . . . . . . . . . . . . . . . . . . . . . . . . . . . . . . . . . . . . . . . . . . . . . . . . . . . 6
4-2 Menu operation . . . . . . . . . . . . . . . . . . . . . . . . . . . . . . . . . . . . . . . . . . . . . . . . . . . . . . . . . . . . . . . . . . . . . . . . . . . 7
4-3 Electronic Chart card . . . . . . . . . . . . . . . . . . . . . . . . . . . . . . . . . . . . . . . . . . . . . . . . . . . . . . . . . . . . . . . . . . . . . . . 8
|How to insert a Electronic Chart card . . . . . . . . . . . . . . . . . . . . . . . . . . . . . . . . . . . . . . . . . . . . . . . . . . . . . . . . . . 8
Plotter Mode . . . . . . . . . . . . . . . . . . . . . . . . . . . . . . . . . . . . . . . . . . . . . . . . . . . . . . . . . . . . . . . . . . . . . . . . . . . . . . . . . . 10
Sounder Mode . . . . . . . . . . . . . . . . . . . . . . . . . . . . . . . . . . . . . . . . . . . . . . . . . . . . . . . . . . . . . . . . . . . . . . . . . . . . . . . . 42
Combination Mode . . . . . . . . . . . . . . . . . . . . . . . . . . . . . . . . . . . . . . . . . . . . . . . . . . . . . . . . . . . . . . . . . . . . . . . . . . . 61
5 INITIAL SETTING AFTER INSTALLATION . . . . . . . . . . . . . . . . . . . . . . . . . . . . . . . . . . . . . . . . . . . . . . . . . . . . . . . . . 62
5-1 Initial setting on the SET MODE screen . . . . . . . . . . . . . . . . . . . . . . . . . . . . . . . . . . . . . . . . . . . . . . . . . . . . . . . 62
5-2 Initial setting on each submenu screen . . . . . . . . . . . . . . . . . . . . . . . . . . . . . . . . . . . . . . . . . . . . . . . . . . . . . . . . 62
|Operation flow on the SET MODE screen . . . . . . . . . . . . . . . . . . . . . . . . . . . . . . . . . . . . . . . . . . . . . . . . . . . . . . 62
5-3 UNIT (Setting units of measure) . . . . . . . . . . . . . . . . . . . . . . . . . . . . . . . . . . . . . . . . . . . . . . . . . . . . . . . . . . . . . 63
|Setting the units of depth, water temperature, distance and ship speed . . . . . . . . . . . . . . . . . . . . . . . . . . . . . . . 63
5-4 SETTING (Correcting Plotter and Sounder parameters) . . . . . . . . . . . . . . . . . . . . . . . . . . . . . . . . . . . . . . . . . . . 63
(AUTO GAIN, FRAFT ADJUST, TEMPERATURE ADJUST, DATUM, BEARING, COMPASS INDICATION, TIME
REFERENCE, OFFSET TIME, SPEED DATA, SPEED ADJUST, NMEA OUT, BOD OUT)
5-5 RANGE SELECTION (Registering depth ranges) . . . . . . . . . . . . . . . . . . . . . . . . . . . . . . . . . . . . . . . . . . . . . . . . 67
5-6 ALL RESET (Restoring the original settings) . . . . . . . . . . . . . . . . . . . . . . . . . . . . . . . . . . . . . . . . . . . . . . . . . . . 67
6 INSTALLATION PROCEDURE . . . . . . . . . . . . . . . . . . . . . . . . . . . . . . . . . . . . . . . . . . . . . . . . . . . . . . . . . . . . . . . . . . 68
6-1 Overall connection diagram . . . . . . . . . . . . . . . . . . . . . . . . . . . . . . . . . . . . . . . . . . . . . . . . . . . . . . . . . . . . . . . . . 68
6-2 Installation procedure . . . . . . . . . . . . . . . . . . . . . . . . . . . . . . . . . . . . . . . . . . . . . . . . . . . . . . . . . . . . . . . . . . . . . 68
ÅInstallation place of the main unit . . . . . . . . . . . . . . . . . . . . . . . . . . . . . . . . . . . . . . . . . . . . . . . . . . . . . . . . . . . . 68
ıInstalling the main unit . . . . . . . . . . . . . . . . . . . . . . . . . . . . . . . . . . . . . . . . . . . . . . . . . . . . . . . . . . . . . . . . . . . . . 69
ÇConnecting the power cable . . . . . . . . . . . . . . . . . . . . . . . . . . . . . . . . . . . . . . . . . . . . . . . . . . . . . . . . . . . . . . . . 70
ÎConnecting a ground cable . . . . . . . . . . . . . . . . . . . . . . . . . . . . . . . . . . . . . . . . . . . . . . . . . . . . . . . . . . . . . . . . . 70
6-3 Measures against noises from the generator . . . . . . . . . . . . . . . . . . . . . . . . . . . . . . . . . . . . . . . . . . . . . . . . . . . 70
6-4 Mounting the GPS antenna . . . . . . . . . . . . . . . . . . . . . . . . . . . . . . . . . . . . . . . . . . . . . . . . . . . . . . . . . . . . . . . . . 71
6-5 Installing an optional transducer . . . . . . . . . . . . . . . . . . . . . . . . . . . . . . . . . . . . . . . . . . . . . . . . . . . . . . . . . . . . . 72
ÅOptional transducers and accessories . . . . . . . . . . . . . . . . . . . . . . . . . . . . . . . . . . . . . . . . . . . . . . . . . . . . . . . . 72
ıInstallation position . . . . . . . . . . . . . . . . . . . . . . . . . . . . . . . . . . . . . . . . . . . . . . . . . . . . . . . . . . . . . . . . . . . . . . . 72
6-6 Connecting an external navigator . . . . . . . . . . . . . . . . . . . . . . . . . . . . . . . . . . . . . . . . . . . . . . . . . . . . . . . . . . . . 73
6-7 DGPS . . . . . . . . . . . . . . . . . . . . . . . . . . . . . . . . . . . . . . . . . . . . . . . . . . . . . . . . . . . . . . . . . . . . . . . . . . . . . . . . . 73
7 MAINTENANCE . . . . . . . . . . . . . . . . . . . . . . . . . . . . . . . . . . . . . . . . . . . . . . . . . . . . . . . . . . . . . . . . . . . . . . . . . . . . . 74
7-1 Maintenance and inspection . . . . . . . . . . . . . . . . . . . . . . . . . . . . . . . . . . . . . . . . . . . . . . . . . . . . . . . . . . . . . . . . 74
7-2 Replacing the fuse . . . . . . . . . . . . . . . . . . . . . . . . . . . . . . . . . . . . . . . . . . . . . . . . . . . . . . . . . . . . . . . . . . . . . . . . 74
8 SPECIFICATIONS . . . . . . . . . . . . . . . . . . . . . . . . . . . . . . . . . . . . . . . . . . . . . . . . . . . . . . . . . . . . . . . . . . . . . . . . . . . . 75
9 DATUM (GEODETIC REFERENCE) CODE . . . . . . . . . . . . . . . . . . . . . . . . . . . . . . . . . . . . . . . . . . . . . . . . . . . . . . . . . 78
ii

1
1SAFETY NOTICES
Be sure to read the following safety notices to ensure safe use of the product.
¡The safety notices are for preventing personal injury
and property damage.
¡Observe the following safety notices to ensure safe
and proper used of the product.
¡After you finish reading this manual, store it in a safe
place for future reference.
Each of the following warning notices indicates that neglecting the suggested procedure
or practice may result in death or serious personal injury.
¡Be sure turn off the power by pressing the power key
or disconnect the power cable from the battery
immediately when the product produces smoke or
smells of something burning.
Failure to do so may cause a fire or electric shock.
After making sure that smoking ceases, contact your
dealer or our service personnel for inspection.
¡Do not install the product in areas where it is
exposed to flammable gases.
Doing so may cause a fire or an explosion.
¡Supply the product with the specified voltage or use
the specified power supply.
Otherwise, a malfunction or fire may result.
¡Use the specified fuse.
Otherwise, a malfunction or fire may result.
¡Do not remove the cover and touch internal parts of
the product.
Doing so may cause death due to a high voltage inside
the product.
Servicing and adjustment of the product must be per-
formed by competent persons.
¡Be sure to electrically ground the product to the hull.
Failure to do so may cause electric shock or leak.
¡Be careful to prevent foreign objects from entering
the product.
Foreign objects including metal chips, wire scraps and
liquids inside the product may cause a shortcircuit, fire or
malfunction.
¡A through-the-hull type echo sounding transducer
must be installed by a shipbuilder or an expert
installer.
Otherwise, the ship could be waterlogged.
RWARNING
Each of the following caution notices indicates that neglecting the suggested procedure
or practice may result in personal injury or property damage.
¡Navigation-aid data among other information provid-
ed by the product is not intended for navigational
use by itself.
For detailed and latest information for navigation, consult
nautical charts and Notices to Mariners.
¡Always hold the plug when removing the power
cable from the power supply.
Pulling the power cable may cause damage to the power
cable and a fire or electric shock.
¡Do not install the product, antenna and transducer in
areas other than specified.
Doing so may cause an accident or a malfunction.
¡Do not expose the product to water.
Doing so may cause a malfunction or fire.
¡Never modify or attempt to repair the product by
yourself.
Doing so could cause a malfunction or fire.
Only competent persons are allowed to modify or repair
the product.
¡Do not scrape, tailor, strain, twist, or put a heavy
object on, the power cable.
Doing so may damage the cable, resulting in a fire or
electric shock.
¡Do not touch the power cable with wet hands.
Doing so may cause electric shock.
¡Observe the polarity when plugging the product to
the power supply.
Reverse connection will cause a malfunction or fire.
RCAUTION

2
1
SAFETY NOTICES
Each of the following caution notices indicates that neglecting the suggested procedure
or practice may result in personal injury or property damage.
Data card handling precautions:
¡Do not put data cards into such a pocket or poly bag that
is electrically charged.
¡Do not leave data cards in an area exposed to direct sun-
light or seawater.
¡Be careful to prevent dust or dirt from entering the con-
nector of data cards (keep the card slot free of dirt).
¡Do not bend data cards or put a heavy object on them.
¡Do not throw or drop data cards.
¡Be sure to power off the product before inserting or
removing a data card to or from the card slot.
RCAUTION
Other precautions
¡Do not install the product close to speakers, power trans-
formers or other equipment that produces a magnetic
field.
¡When starting the engine of the ship involves a rapid fall
in supply voltage to the product, be sure to start the
engine before powering on the product.
¡Avoid using organic solvents such as thinner or benzene
to clean the product.
These solvents will cause damage to the product sur-
face.
To clan the product or antenna, wipe it using a soft cloth
damped with a water-diluted detergent.
¡The product contains a lithium battery (having a life of
approx. five years) which retains GPS positioning data.
If this backup battery is completely dead, the GPS
almanac data is lost and it will take a long time to acquire
navigational satellites. Registered navigational marks
and routes are also lost.
If these symptoms appear, contact your dealer or our
local sales office.
¡The LCD is of high-density type having an effective pixel
percentage of at least 99.99%; it may have an ineffective
pixel or “always active”pixel percentage of max. 0.01%
under normal conditions.
¡The LCD is a consumable component and has a life
expectancy of approx. 10,000 operation hours. When
the service life expires, the LCD screen will darken, flick-
er or provide no display.
At the first sign of these symptoms, the LCD should be
replaced. Consult your dealer or our service personnel.

2PARTS AND FUNCTIONS
3
|Main unit
MARINEPLOTTER/SOUNDER
FP-561
COMBINE
!5
!0
!4
!3
!2
oi
t
r
e
w
q
u
y
!1
Tilting lever
COMBINE
|Operation panel

4
2
PARTS AND FUNCTIONS
FUNCTION
Press to power on or off the product (☞P. 5).
Each time this key is pressed, the power is turned on and off alternately.
Use to set the image sensitivity (☞P. 52) on the fishfinder screen.
Use to set the depth range (☞P. 52) or depth shift (☞P. 53), or to enter auto
operation (☞P. 53).
Use to select the fishfinder mode (☞Pgs. 6 & 44).
Using the [SOUNDER]-[PLOTTER] key combination causes the system to
enter the Combination mode.
Use to zoom in the coastline screen image (☞P. 18).
This key can be used to zoom in the bottom rock screen image and the marker
zoom-in screen image.
Use to activate and move the cross hair cursor (☞P. 18) and fishfinder
markers.
These keys can also be used to select a menu item or change settings.
* To move the cross hair cursor:
Using the [UP]-[LEFT] or [UP]-[RIGHT] key combination allows you to move
the cross hair cursor to the upper left of right.
Using the [DOWN]-[LEFT] or [DOWN]-[RIGHT] key combination allows you to
move the cross hair cursor to the lower left or right.
Use to delete marks or abort setting on various screens.
Use to adjust the brightness and contract (☞P. 5) of screen display.
Use to select the menu screen (☞P. 7).
Use to execute operations or save settings.
Use to zoom out the coastline screen image (☞P. 18).
This key can also be used to zoom out the bottom rock screen image and the
marker zoom-in screen image.
Use to select the plotter mode (☞Pgs. 6 & 12).
Using the [PLOTTER]-[SOUNDER] key combination causes the system to
enter the Combination mode.
Use to center the current ship position on a screen (☞P. 19).
Pressing this key causes the cross hair cursor to disappear from the screen.
Use to select either of the destination navigation or the route navigation
(☞Pgs. 28 & 29).
Use to edit or register marks (☞P. 26).
POWER
GAIN
RANGE
CLR
BRIGHT
MENU
SET
SHIP
NAV
[POWER] key
[GAIN] key
[RANGE] key
[SOUNDER] key
[ZOOM-IN] key
[CLR] key
[BRIGHT] key
[MENU] key
[SET] key
[ZOOM-OUT] key
[PLOTTER] key
[SHIP] key
[NAV] key
[MARK] key
q
w
e
r
t
y
u
i
o
!0
!1
!2
!3
!4
!5
[UP] key
[DOWN] key
[LEFT] key
[RIGHT] key
KEY

5
3-1 Powering on or off the
system After installing the system, be sure to perform initial setting according to the
instructions in Chapter 5 “Initial Setting after Installation”(☞P. 62 ff.).
qPress the [POWER] key.
The system will sound an electronic beep, display the opening screen for
approx. ten seconds and then enter the screen where you left off.
wTo power off the system, press the [POWER] key again.
3BASIC OPERATION
MARINEPLOTTER
/SOUNDER
fp- 561
WARNING:
This electronic chart is an aid to
navigation designed to facilitate the use
of authorized government charts, not to
replace them. Only official government
charts and notices to mariners contain all
of the current information needed for the
safety of navigation, and the captain is
responsible for their prudent use.
Opening screen
8
GPS 48°21.417N 125°26.643W
57.6FT315°T 10.2KT 58°F
RANGE 32
After approx. 10 seconds
8
GPS 48°21.417N 125°26.643W
57.6FT
CONT
BRIGHT
CLR
SET
SET
CANC
ADJ SEL
ADJADJ
The LCD can be adjusted in brightness and contrast according to the envi-
ronment of the installation site.
qPress the [BRIGHT] key.
A level bar indicating the LCD brightness and contrast will appear at the lower
left of the screen.
wPress the [LEFT] or [RIGHT] key to select setting item “Brightness”or
“Contrast”.
The selected item is highlighted in blue.
ePress [UP] or [DOWN] key to set the selected item.
rPress the [SET] key to save the setting.
3-2 Adjusting the LCD
brightness and contrast
3-3 Alarm sound The system produces an alarm sound when key operation is erroneous or
invalid.
You will hear an alarm sound when
¡pressing an inoperative key,
¡performing erroneous key operation,
¡pressing an invalid key in plotter mode,
¡pressing an invalid key in sounder mode,
¡pressing an invalid key in combination mode, or
¡pressing an invalid key on a menu screen.
Note that an electronic beep sound is heard when the power is turned on or cor-
rect key operation is done.

6
4
AVAILABLE OPERATION MODES AND SCREENS
4-1 How to change operation
modes Three operation modes are available for this system: the plotter mode,
sounder mode and combination mode.
To change the operation mode, proceed as follows.
qWhen the system is in plotter mode:
Press the [SOUNDER] key. The system will enter the fishfinder mode.
wWhen the system is in fishfinder mode:
Press the [PLOTTER] key. The system will enter the plotter mode.
eWhen the system in plotter or fishfinder mode:
Press the [SOUNDER] and [PLOTTER] keys simultaneously. The system will
enter the combination mode.
rWhen the system is in combination mode:
Press the [SOUNDER] or [PLOTTER] key. The system will enter the mode cor-
responding to the key pressed.
In combination mode, only the combination screen is available. This screen con-
sists of the following two screens.
Standard screen of fishfinder mode
Coastline screen of plotter mode
When the combination mode is canceled, the display will move to the standard
screen of the fishfinder mode or the coastline screen of the plotter mode.
¡Plotter mode
¡Combination
¡Sounder mode
Coastline screen Navigation monitor screen
LON
LAT
60゜
90゜
30゜
15゜R
30゜0゜
60゜
90゜
DEVIATION
0.03 NM
124゜23.165W
48゜50.705N
NE
W
NW NE
Standard screen
Standard + A scope screen
Combination mode
Dual screen Standard + Bottom lock screen Standard +
Marker zoom-in screen
FT
43.4
315
°T
10
.
2KT 58°F
W P 1 TIME 12:34
D/D 10.45NM TTG 1:17
C/D 325°T ETA 13:51
D/FD 15.22NM TTFD 2:34
GPS 48°21.417N 125°26.643W
31.5
H
AUTO
FT
43.4
315
°T
10
.
2KT 58°F
20
40
60
80
0
100
H
2
1
3
4
5
0
3
4
2
1
5
GPS 48°21.417N 125°26.643W
19.5
FT
43.4
315
°T
10
.
2KT 58°F
20
40
60
80
0
100
0
10
5
H
FT
57.6
315
°T
10
.
2KT 58°F
GPS 48°21.417N 125°26.643W
20
40
60
80
0
100
LH
FT
43.4
315
°T
10
.
2KT 58°F
GPS 48°21.417N 125°26.643W
20
40
60
80
0
100
20
40
60
80
0
100
AUTO
H
FT
57.6
315
°T
10
.
2KT 58°F
GPS 48°21.417N 125°26.643W
20
40
60
80
0
100
8
GPS 48°21.417N 125°26.643W
RANGE 32
FT
57.6
0°
T
10
.
2KT 58°F
1
0
2
TO WP 1
4.6NM 320°
8
GPS 48°21.417N 125°26.643W
RANGE 32
FT
43.4
0°
T
10
.
2KT 58°F
1
0
2
TO WP 1
4.6NM 320°
H
0
20
40
60
80
100

7
4AVAILABLE OPERATION MODES AND SCREENS
4-2 Menu operation Menu screens allows you to select and execute various functions of the sys-
tem or to change various settings.
For available menu screens and the menu structure, see page 9.
The following summarizes the menu operation flow.
qPress the [MENU] key.
The Main Menu screen will appear.
The currently selected menu item (a submenu) is highlighted in yellow.
wSelect the desired submenu (e.g., Plotter Menu) using the [UP] or [DOWN] key
and press the [SET] key.
The selected submenu (e.g., Plotter Menu) screen will appear.
On the submenu screen, the currently selected menu item (setting item) is high-
lighted in yellow.
eSelect the desired setting item using the [UP] or [DOWN] key and press the
[SET] key.
The selected setting item turns blue and the corresponding setting field is high-
lighted in yellow.
* While any setting item is highlighted in blue, you cannot move to other submenu
screens.
rSelect the desired setting option in the setting field using the [LEFT] or [RIGHT]
key and press the [SET] key.
Alternatively, select the desired digit using the [LEFT] or [RIGHT] key and enter
or change the value using the [UP] or [DOWN] key; then press the [SET] key.
tRepeat step rabove for each setting item.
yRepeat steps eto tabove for each submenu.
uWhen you finish setting, press the [CLR] momentarily to close the Main Menu
screen.
For detailed description of setting on each submenu screen, see the appropriate
section.
MAIN MENU
POSITIONING MENU
PLOTTER MENU
ALARM MENU
SOUNDER MENU
PLOTTER MENU
TRK ERASE
ROUTE ENTER/EDIT→
MARK ENTER/ERASE→
GPS 48°21.417N 125°26.643W
¡Main Menu screen ¡Plotter Menu screen
Press to select a submenu.
Press to open the submenu.
Press to return to the previous
screen.
Use to select a setting option or digit.
Use to change the value of the digit.
Press to confirm and save the setting.
Press to clear or cancel the setting and return to
the item selection step.
When pressing this key during the item selection
step, you will returns to the previous screen.
SCREEN SETTING
TRK COLOR WHIT OFF
HEADING ON OFF
FRONT WIDE ON OFF
OVER ZOOM ON OFF
TRK STEP 30S 1.00NM
GPS 48°21.417N 125°26.643W
CLR
ENT
SET
CANC
SEL
CLR
ENT
SET
CANC
SEL
CLR
SET
SET
CANC
ADJ SEL 43.4FT
43.4FT
CLR
SET
SET
CANC
ADJ
SEL
20
40
60
80
0
100
20
40
60
80
0
100

Card cover
ERC card
(Insert an ERC card with its face directed
to the same direction as the display)
Card slot located at the bottom
FP-560
MARINEPLOTTER/SOUNDER
fp-561
Card slot
COMBINE
8
4
AVAILABLE OPERATION MODES AND SCREENS
4-3 Electronic Chart card
|How to insert a Electronic Chart
card
Be sure to power off the system before inserting or removing a Electronic
Chart card into or from the card slot.
Insert a NAVIONICS®Electronic Chart card carefully into the card slot with the
card face (on which “”is marked) directed to the same direction as the display.
Forcing a Electronic Chart card into the slot will cause damage to the card socket
in the slot.
If the system fails to operate normally even through an Electronic Chart card has
been inserted, remove the card once and then reinsert it.
NAVIONICS®Electronic Chart
(MicrochartsTM)
FP-561

9
4AVAILABLE OPERATION MODES AND SCREENS
ROUTE ENTER/EDIT
MARK ENTER/ERASE
DGPS
POSITIONING INFO
CLR
ENT
SET
CANC
SEL
Press the
[MENU] key.
SOUNDER MENU
DSP SPEED 5 STOP
STC 1
I.R ON OFF
N.R 1 OFF
FREQUENCY L H
PLOTTER MENU
TRK ERASE
HEADING ON OFF
ROUTE ENTER/EDIT→
MARK ENTER/ERASE→
TRK COLOR WHIT OFF
TRK STEP 30S 1.00 NM
FRONT WIDE ON OFF
OVER ZOOM ON OFF
POSITIONING MENU
POS CORR GOTOCURSUR
AVERAGING 1 OFF
POSITIONING INFO→
DGPS→
LON E0.000
LAT N0.000
ALARM MENU
DEPTH 1m OFF
SHALLOW 1m OFF
FISH DEPTH 1m OFF
ALARM ZONE 0.01NM OFF
MAIN MENU
POSITIONING MENU
PLOTTER MENU
ALARM MENU
SOUNDER MENU
GPS 48°21.417N 125°26.643W
POS EQUIP GPS NMEA
SCREEN MENU
WIDTH 1m
SCREEN SETTING
LAND YELL CSLN
BKG COLOR BLUE
SEA BLUE
NAME WHIT OFF
D CON 5m LBLU OFF
D CON 10m LBLU OFF
D CON 20m LBLU OFF
LIGHT RED OFF
GRID BLUE OFF
DISP MAPS WHIT OFF
DISP MODE 1 2
FT
43.4
20
40
60
80
0
100
•Menu operation flow

10
4
rPLOTTER MODEqTABLE OF CONTENTS
!!!!!!!!!!!!!!!!!!!!!!!!!!!!!!!!!!!!!!!!!!!!!!!!!!
PLOTTER MODE
!!!!!!!!!!!!!!!!!!!!!!!!!!!!!!!!!!!!!!!!!!!!!!!!!!
(1) AVAILABLE SCREENS AND INDICATIONS.................................................................................................................... 12
(1)-1 How to access screens·········································································································································· 12
(1)-2 Coastline screen···················································································································································· 13
(1)-3 Navigation monitor screen····································································································································· 15
(1)-4 Positioning Information screen······························································································································· 16
(2) COASTLINE DATA MANIPULATION................................................................................................................................17
(2)-1 Zooming in or out coastline images······················································································································· 17
Å16 reduced scales·················································································································································· 17
ıShip-centering mode ············································································································································· 17
ÇCursor-centering mode·········································································································································· 17
(2)-2 Ship-centering mode ············································································································································· 18
|Manual operation····································································································································· 18
(2)-3 Displaying the latitude and longitude lines············································································································· 18
(2)-4 Measuring the distance and azimuth between two points····················································································· 19
ÅMeasurement between the ship mark and the cursor position·············································································· 19
ıMeasurement between two points specified with the cursor ················································································· 19
(3) ROUTE REGISTRATION AND EDIT ................................................................................................................................20
(3)-1 Registering and editing navigation routes·············································································································· 20
ÅRegistering navigation routes································································································································20
ıEditing navigation routes ······································································································································· 21
|Extending a navigation route ··················································································································· 21
|Clearing turning points····························································································································· 21
(3)-2 Clearing a route····················································································································································· 22
(3)-3 Character list·························································································································································· 23
(4) MARK MANIPULATION.................................................................................................................................................... 24
(4)-1 Registering marks·················································································································································· 24
ÅRegistration of marks from the Plotter Menu screen ····························································································· 24
ıRegistration of the current ship position mark on the coastline screen ································································· 25
ÇRegistration of marks located at any position on the coastline screen·································································· 25
(4)-2 Clearing marks ······················································································································································ 26
ÅClearing marks on the coastline screen ················································································································ 26
ıClearing marks from the Plotter Menu screen······································································································· 26
(5) ROUTE NAVIGATION SETTING....................................................................................................................................... 27
(5)-1 Setting route navigation········································································································································· 27
|Changing the monitor range···················································································································· 27
(5)-2 Canceling route navigation···································································································································· 27

11
4rPLOTTER MODEqTABLE OF CONTENTS
(6) DESTINATION NAVIGATION SETTING ........................................................................................................................... 28
(6)-1 Setting destination navigation································································································································28
ÅSetting destination navigation using existing registered marks ············································································· 28
ıSetting destination navigation using a newly registered mark··············································································· 28
(6)-2 Canceling destination navigation··························································································································· 28
(7) TRACK MANIPULATION .................................................................................................................................................. 29
(7)-1 Setting the track color············································································································································ 29
(7)-2 Changing the tracking interval ······························································································································· 29
(7)-3 Clearing the track··················································································································································· 30
(7)-4 Setting the heading vector······································································································································30
(7)-5 Setting the front wide function ································································································································30
(7)-6 Setting the over zoom function·······························································································································30
(8) DATA COLOR SETTING ................................................................................................................................................... 31
(8)-1 Setting colors of data on screen···························································································································· 31
ÅSpecifying the color of land···································································································································· 31
ıSpecifying the color of sea····································································································································· 31
ÇSpecifying the color of place-names······················································································································ 32
ÎSpecifying the color of depth contours··················································································································· 32
´Specifying the color of lights·································································································································· 32
ÏSpecifying the color of map border························································································································ 33
˝Specifying the display mode·································································································································· 33
(9) SELECTION OF POSITIONING DEVICE......................................................................................................................... 34
(10) CORRECTION OF SHIP POSITIONING ERROR............................................................................................................. 35
(10)-1 Correcting a ship positioning error························································································································· 35
(10)-2 Correction using the cross hair cursor··················································································································· 35
(10)-3 Correction with latitude/longitude entry ················································································································· 35
(11) AVERAGING...................................................................................................................................................................... 36
(12) DGPS................................................................................................................................................................................. 37
(12)-1 DGPS····································································································································································· 37
(12)-2 Using the DGPS ···················································································································································· 37
(12)-3 Setting the beacon station····································································································································· 37
(12)-4 Setting the baud rate of the beacon station··········································································································· 38
(13) ACCESS TO POSITIONING INFORMATION SCREEN ................................................................................................... 38
(14) DOP AS A POSITIONING PRECISION INDICATOR ....................................................................................................... 38
(15) ALARM FUNCTION .......................................................................................................................................................... 39
(15)-1 Available alarms····················································································································································· 39
(15)-2 Setting the alarm zone··········································································································································· 40

12
1
rPLOTTER MODEqAVAILABLE SCREENS AND INDICATIONS
(1)-1 How to access screens In plotter mode, the following two screens are available.
Pressing the [PLOTTER] key in plotter mode allows selection between the coast-
line screen and the navigation monitor screen.
This screen indicates various naviga-
tional data including coastlines, track
and marks.
This screen indicates easy-to-under-
stand graphical and text information
helpful for navigation.
This screen shows GPS/DGPS infor-
mation.
Screen No. and name Description
Coastline screen
Navigation monitor screen
Positioning Information screen
80.0FT0°T 12KT 54.3°F
RANGE 32
2
0
1
8
DGPS34
゚
18
.
000N135
゚
01
.
000E
TO WP 1
23.00
NM
30°
34°21.362N 28°
135°06.950E 18.05
NM
1:32
80.0FT0°T 12KT 54.3°F
LON
LAT
60゜
90゜
30゜
345°
15゜R
30゜ 0゜
60゜
90゜
14:25
01:05
15:30
TIME
TTG
ETA 15:30TTFD
W P
No. 1
D/D
C/D
D/FD
10.45NM
10.45NM
DEVIATION
0.03
NM
134°01.000E
34°18.000N
NE
WNW NE
0
10
20
30
40
POSITIONING INFO
SAT# S/N BRG ELV
DOP
DGPS INFOMATION
RD-200
Rev.1.1
FREQUENCY 283.5
kHz
BAUD RATE 200
S/N 00
1.50
BACK
12 50 0 81
15 45 90 79
02 40 180 56
16 52 270 63
20 60 45 30
22 30 135 10
10 56 225 25
09 63 315 44
DGPS34
゚
18
.
000N135
゚
01
.
000E
CLR
80.0FT
The Positioning Information screen can be accessed from the Positioning
Menu screen. (☞P. 38)

13
1rPLOTTER MODEqAVAILABLE SCREENS AND INDICATIONS
This field shows the current scale to which the coast line image is displayed. The
coastline image can be zoomed in or out to a total of 16 scales (☞P. 17).
This field shows the positioning device in use.
This field shows the current ship position in latitude/longitude.
White characters in the field mean that the positioning is done normally.
Red characters in the field suggest that the system fails to pinpoint the current ship
position due to a positioning error or the like.
The field is blank if no data is received for 10 seconds or more due to a connection
error.
The cross hair cursor appears on the screen when the [UP]/[DOWN] or
[LEFT]/[RIGHT] key is pressed.
This mark shows the current ship position. The ship is currently located at the cen-
ter of this mark.
This mark changes to “\”when the ship slows down to 3 knots (or equivalent in
km/h or Ml/h) or less.
This field shows the current depth of water.
(1)-2 Coastline screen
2
0
1
8
DGPS34
゚
18
.
000N135
゚
01
.
000E
0°T 12KT 54.3°F
ARRV
ALRM
FISH
ALRM
RANGE 32
TO WP 1
23.00
NM
30°
34°21.362N 28°
135°06.950E 18.05
NM
1:32
80.0FT
n
m
,
.
⁄11
⁄22
⁄3
⁄0
v
b
zxc
zReduced scale
xPositioning device
cShip position
vCross hair cursor
bShip position mark
nDepth
Indication
Positioning device in use
DGPS
DGPS+GPS
GPS
GPS
EXT
External NMEA

14
1
rPLOTTER MODEqAVAILABLE SCREENS AND INDICATIONS
mWater temperature
,Speed
.Azimuth
⁄0 Monitor
⁄1 Cursor position
⁄2 Latitude/longitude lines
⁄3 Alarm indication
This field shows the current water temperature.
If no water temperature sensor is installed, the field is blank.
This field shows the current ship speed.
If no speed data is found, the field is blank.
This field shows the current azimuth of the bow (at which the ship is navigated).
“T”or “M”indicates ture or magnetic bearing, respectively. See p. 64 for settings.
This field shows the destination No., the destination azimuth relative to the current
ship position, the distance from the ship to the destination, and the deviation out of
course. The deviation out of course is indicated graphically.
This field shows the intersection position of the cross hair cursor (in latitude/longi-
tude) and the azimuth and distance of the intersection relative to the current ship
position. Aligning the intersection of the cross hair cursor with the mark yields the
position data of the mark.
The latitude and longitude lines can be displayed by operation on the Screen
Setting screen (☞P. 18).
Alarms that can be displayed in this field include shoal alarm, depth alarm or fish
alarm for the fishfinder mode, and arrival alarm or range alarm for the plotter mode.

15
1rPLOTTER MODEqAVAILABLE SCREENS AND INDICATIONS
(1)-3 Navigation monitor screen
zMonitor
xAlarm indication
cAzimuth deviation
vDistance deviation
bCompass
nShip position
This field shows navigation data including the destination No., the destination
azimuth, the distance to the destination, and the time to arrive the destination.
Alarms that can be displayed in this field include shoal alarm, depth alarm or fish
alarm for the fishfinder mode, and arrival alarm or range alarm for the plotter mode.
This field shows the current ship azimuth graphically (with a green line) and numer-
ically on the assumption that the destination azimuth is zero degree.
Note that, although the deviation of the ship azimuth from the destination azimuth
exceeds 90 degrees, the reading remains 90 degrees.
This field shows the deviation out of course in distance graphically and numerical-
ly.
When alarm limits are set with the alarm function, they are displayed with red lines
on the screen.
This field shows the direction to which the ship is being navigated.
This field shows the current ship position in latitude/longitude.
60゜
90゜
30゜
15゜R
30゜ 0゜
60゜
90゜
NE
W
NW NE
0°T 12KT 54.3°F
ARRV
ALRM
FISH
ALRM
80.0FT
345°
14:25
01:05
15:30
TIME
TTG
ETA 15:30TTFD
No. 1
10.45NM
10.45NM
W P
D/D
C/D
D/FD
LON
LAT
DEVIATION
0.03
NM
134°01.000E
34°18.000N
z
x
c
v
n
b

16
1
rPLOTTER MODEqAVAILABLE SCREENS AND INDICATIONS
zSatellite
xDOP
cDGPS information
This field shows and locates the navigational satellites that the system is being
tracked.
This field shows the geometrical arrangement of the navigational satellites and the
ship in the form of DOP (Dilution Of Precision) ranging from 0.00 to 99.99 (☞P. 38).
The lower this value is, the better the geometrical arrangement is for the system to
receive signals from the satellites.
This field shows DGPS positioning information.
(1)-4 Positioning Information screen
0
10
20
30
40
DGPS34
゚
18
.
000N135
゚
01
.
000E
POSITIONING INFO
SAT# S/N BRG ELV
DOP
DGPS INFOMATION
RD-200
Rev.1.1
FREQUENCY 283.5
kHz
BAUD RATE 200
S/N 00
1.50
BACK
12 50 0 81
15 45 90 79
02 40 180 56
16 52 270 63
20 60 45 30
22 30 135 10
10 56 225 25
09 63 315 44
CLR
80.0FT
z
x
c

17
2rPLOTTER MODEqCOASTLINE DATA MANIPULATION
Å16 reduced scales
ıShip-centering mode
(2)-1 Zooming in or out coastline images
The coastline image on the screen can be zoomed in or out to 0.125/256 NM
per dot to 4096/256 NM per dot (/to ⁄5). See p. 30 for over zoom function.
The zooming center may be the ship position or the cross hair cursor position.
In this mode, the coastline image is zoomed in or out while the current ship
mark is centered on the screen.
When the cross hair cursor is not active, pressing the [ZOOM-IN] or [ZOOM-OUT]
key causes zooming operation to be done in this mode.
In this mode, the coastline image is zoomed in or out while the cross hair cur-
sor position is centered on the screen.
qPress [UP]/[DOWN] or [LEFT]/[RIGHT] key to activate the cross hair cursor on
the screen.
wUsing the [UP]/[DOWN] or [LEFT]/[RIGHT] key, move the cross hair cursor to the
desired position on the screen.
Using the [UP]-[LEFT] or [UP]-[RIGHT] key combination allows you to move the
cross hair cursor to the upper left of right.
Using the [DOWN]-[LEFT] or [DOWN]-[RIGHT] key combination allows you to
move the cross hair cursor to the lower left or right.
* When the cross hair cursor reaches a screen edge, the coastline image is
scrolled.
eUse the [ZOOM-IN] or [ZOOM-OUT] key to enlarge or reduce the image to the
desired scale in cursor-centering mode.
* When you press the [SHIP] key in cursor-centering mode, the cross hair cursor
disappears and the system goes to the ship-centering mode.
ÇCursor-centering mode
8
DGPS34
゚
18
.
000N135
゚
01
.
000E
10
DGPS34
゚
18
.
000N135
゚
01
.
000E
10
DGPS34
゚
18
.
000N135
゚
01
.
000E
Press the [ZOOM-IN] key
to zoom in the image in
ship-centering mode.
Press the [ZOOM-OUT] key
to zoom out the image in
ship-centering mode.
The cross hair cursor is
not displayed.
80.0FT0°T 12KT 54.3°F
RANGE 128
80.0FT0°T 12KT 54.3°F
RANGE 32
80.0FT0°T 12KT 54.3°F
RANGE 128
Press the [ZOOM-IN] key
to zoom in the image in
cursor-centering mode.
Press the [ZOOM-OUT] key
to zoom out the image in
cursor-centering mode.
The cross hair cursor is
activated.
80.0FT0°T 12KT 54.3°F
RANGE 128
80.0FT0°T 12KT 54.3°F
RANGE 32
80.0FT0°T 12KT 54.3°F
RANGE 128
8
DGPS34
゚
18
.
000N135
゚
01
.
000E
10
DGPS34
゚
18
.
000N135
゚
01
.
000E
10
DGPS34
゚
18
.
000N135
゚
01
.
000E
Other manuals for FP-561
2
Table of contents
Other Icom Marine Equipment manuals
Popular Marine Equipment manuals by other brands

Humminbird
Humminbird Trolling Motor 360 Imaging installation guide

Bennett
Bennett BOLT Control BCI8000 Installation and quick start manual

System Sensor
System Sensor B200S Installation and maintenance instructions

E2S
E2S SONFL1H Series Instructions/service manual

KEPO
KEPO KPT-G2212 specification

Fusion
Fusion MS-RA210 Quick start manual

Raymarine
Raymarine Autohelm ST3000 Operation and installation

Sealite
Sealite Atlantic-2600 Installation & service manual

urmet domus
urmet domus 1043 Installation

Raymarine
Raymarine SmartPilot ST7002 operating guide

Garmin
Garmin GPSMAP 76 series installation instructions

Raymarine
Raymarine FLUXGATE COMPASS installation guide