Page 3For technical questions, please call 1-888-866-5797.Item
Operation
Read the ENTIRE IMPORTANT SAFETY INFORMATION section at the beginning of this document
including all text under subheadings therein before set up or use of this product.
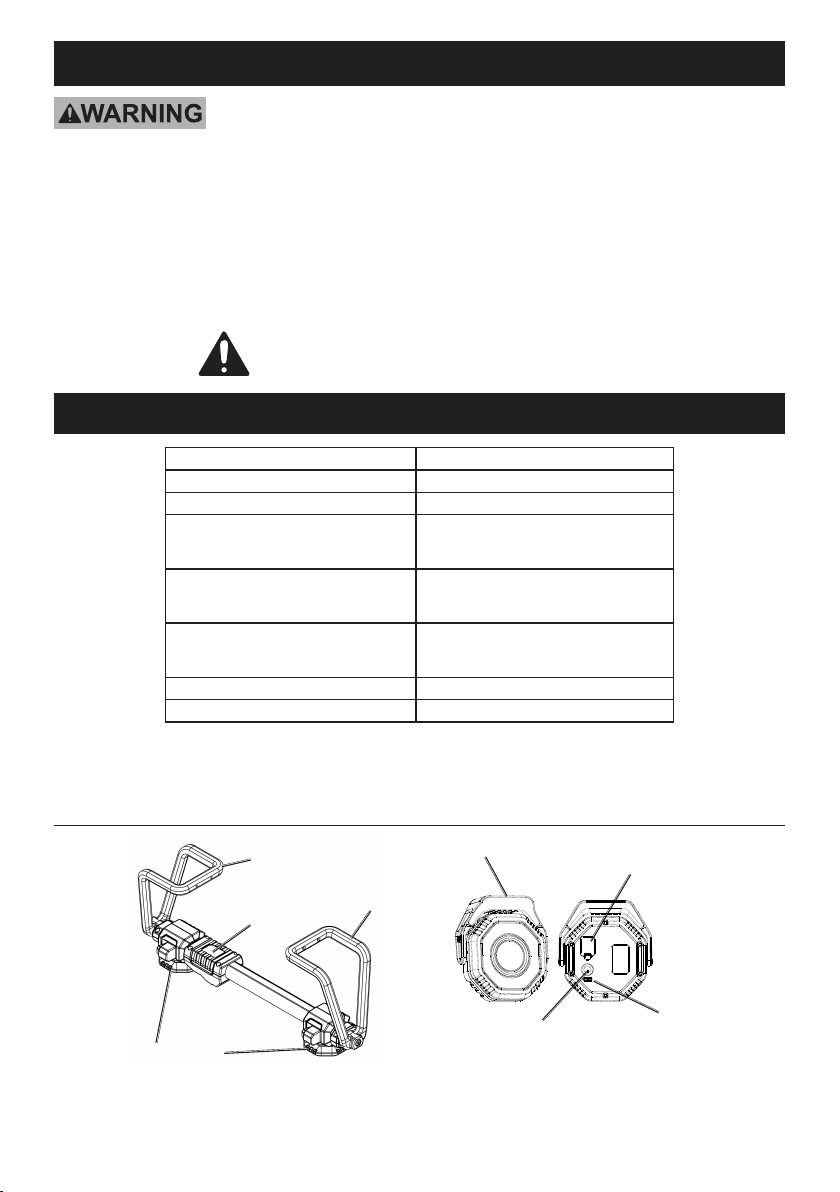
1. Temporarily remove the Light(s) (if
attached) from their Mounts.
2. Place the Fixed Clamp over and onto the vehicle's
hood in the desired location and hold it in place.
3. Release the red Telescopic Clamp Lock and
extend the Telescopic Clamp until a few inches
short of the opposite side of the vehicle's hood.
Note: Arrow on red Telescopic Clamp Lock
points towards the Telescopic Clamp.
4. Lock the red Telescopic Clamp Lock
by firmly pressing it back down .
5. Pull firmly on the spring loaded Telescopic Clamp
to stretch it past and over the vehicle's hood,
and slowly release the Telescopic Clamp to allow
it to firmly clamp onto the vehicle's hood.
Note: The spring tension within the Telescopic Clamp
is very strong! It may take some effort to pull it out.
6. Mount the Light's Magnetic Base to one of the
Light Mounts. Alternatively, the Light's Magnetic
Base can be placed on any ferrous surface.
7. Press and hold the red button on the Light Mount
and slide the Light and Mount(s) into the desired
position along the bar. Release the button.
8. Press the Power Button on the back of
the Light for low, again for medium, again
for high and again to turn it off.
9. When the Light is on, the three LED's indicate
Battery Level. Charge the battery when all
indicator LEDs are off and Light will not turn on.
10. When finished using the Underhood Floodlight
System, turn off Light(s), release the Telescopic
Clamp Lock, extend the Telescopic Clamp, and
remove the entire assembly from the vehicle's
hood. Store indoors away from children.
Charging Instructions
Read the ENTIRE IMPORTANT SAFETY INFORMATION section at the beginning of this document
including all text under subheadings therein before set up or use of this product.
1. Turn off Light and remove Charging Jack
Cover. Plug the USB Charging Cable (not
included) into the Charging Jack.
2. Plug the other end of the USB Charging
Cable into a powered USB port.
3. LEDs will blink green during charging. When
charging is done, LEDs will stay green.
4. Unplug the USB Charging Cable and
replace Cover on Charging Jack.
NOTICE: Do not leave the Battery in a discharged
state. Charge the Battery every 3 months if the
Light is not in use. This will keep the Battery
from wearing down and add to its life.
Battery Removal
1. Contains Li-Ion battery. Battery must be
recycled or disposed of properly.
2. Turn Light off. Remove six screws and cover.
3. Remove four screws from internal
cover. Remove internal cover.
4. Cut battery wires and remove battery.
Record Product’s Serial Number Here:
Note: If product has no serial number, record month and year of purchase instead.
Note: Replacement parts are not available for this item. Refer to UPC 193175453907.
Do not open the housing, there are no user-serviceable parts inside.