ICP DAS USA VPD-173X User manual

VPD-173X/173X-64 Quick Start, version 1.0 Last Revised: Jun. 2018 - 1 -
VPD-173X/173X-64
Quick Start
1Shipping package
This shipping package contains the following items:
VPD-173X/VPD-173X-64 x 1 Quick Start x 1 Screw Driver x 1 Panel Mounting kit x 1
2Appearance
LED Indicator
Serial Port
USB
Rotary
Switch
Reset Button
XV-Board (optional)
Ethernet

VPD-173X/173X-64 Quick Start, version 1.0 Last Revised: Jun. 2018 - 2 -
3Pin Assignment
Pin
Description
COM2
Tx
The pin of transmitted data of the RS-232
Rx
The pin of received data of the RS-232
GND
Ground pin
D-
The negative data line of the RS-485 network
D+
The positive data line of the RS-485 network
COM1
Tx
The pin of transmitted data of the RS-232
Rx
The pin of received data of the RS-232
GND
Ground pin
D-
The negative data line of the RS-485 network
D+
The positive data line of the RS-485 network
Power
F.G.
Frame Ground. F.G. is connected to the inside EMI or ESD
suppression circuits. Make sure that F.G. is connected to the Earth
P.GND
Connected to the power supply’s ground pin
PWR
DC input Voltage (range: +12 V ~ +48 V)
The definition of the rotary switch:
No
Mode
Description
0
Run &
Update
(Ethernet)
This is a special run mode which is used in the
development stage. The TouchPAD device can be
updated by a PC from the remote side through Ethernet.
1
Ethernet
Force
Update
While the application run on the TouchPAD device
seriously crashes, use this mode to update a new
application to the TouchPAD device through Ethernet.
2
Run Only
Run the program.
9
USB Force
Update
Update a new application to the TouchPAD device
through USB.
COM2
COM1
Power
F.G
.
P.GND
PWR

VPD-173X/173X-64 Quick Start, version 1.0 Last Revised: Jun. 2018 - 3 -
4First Use of the VPD-173X
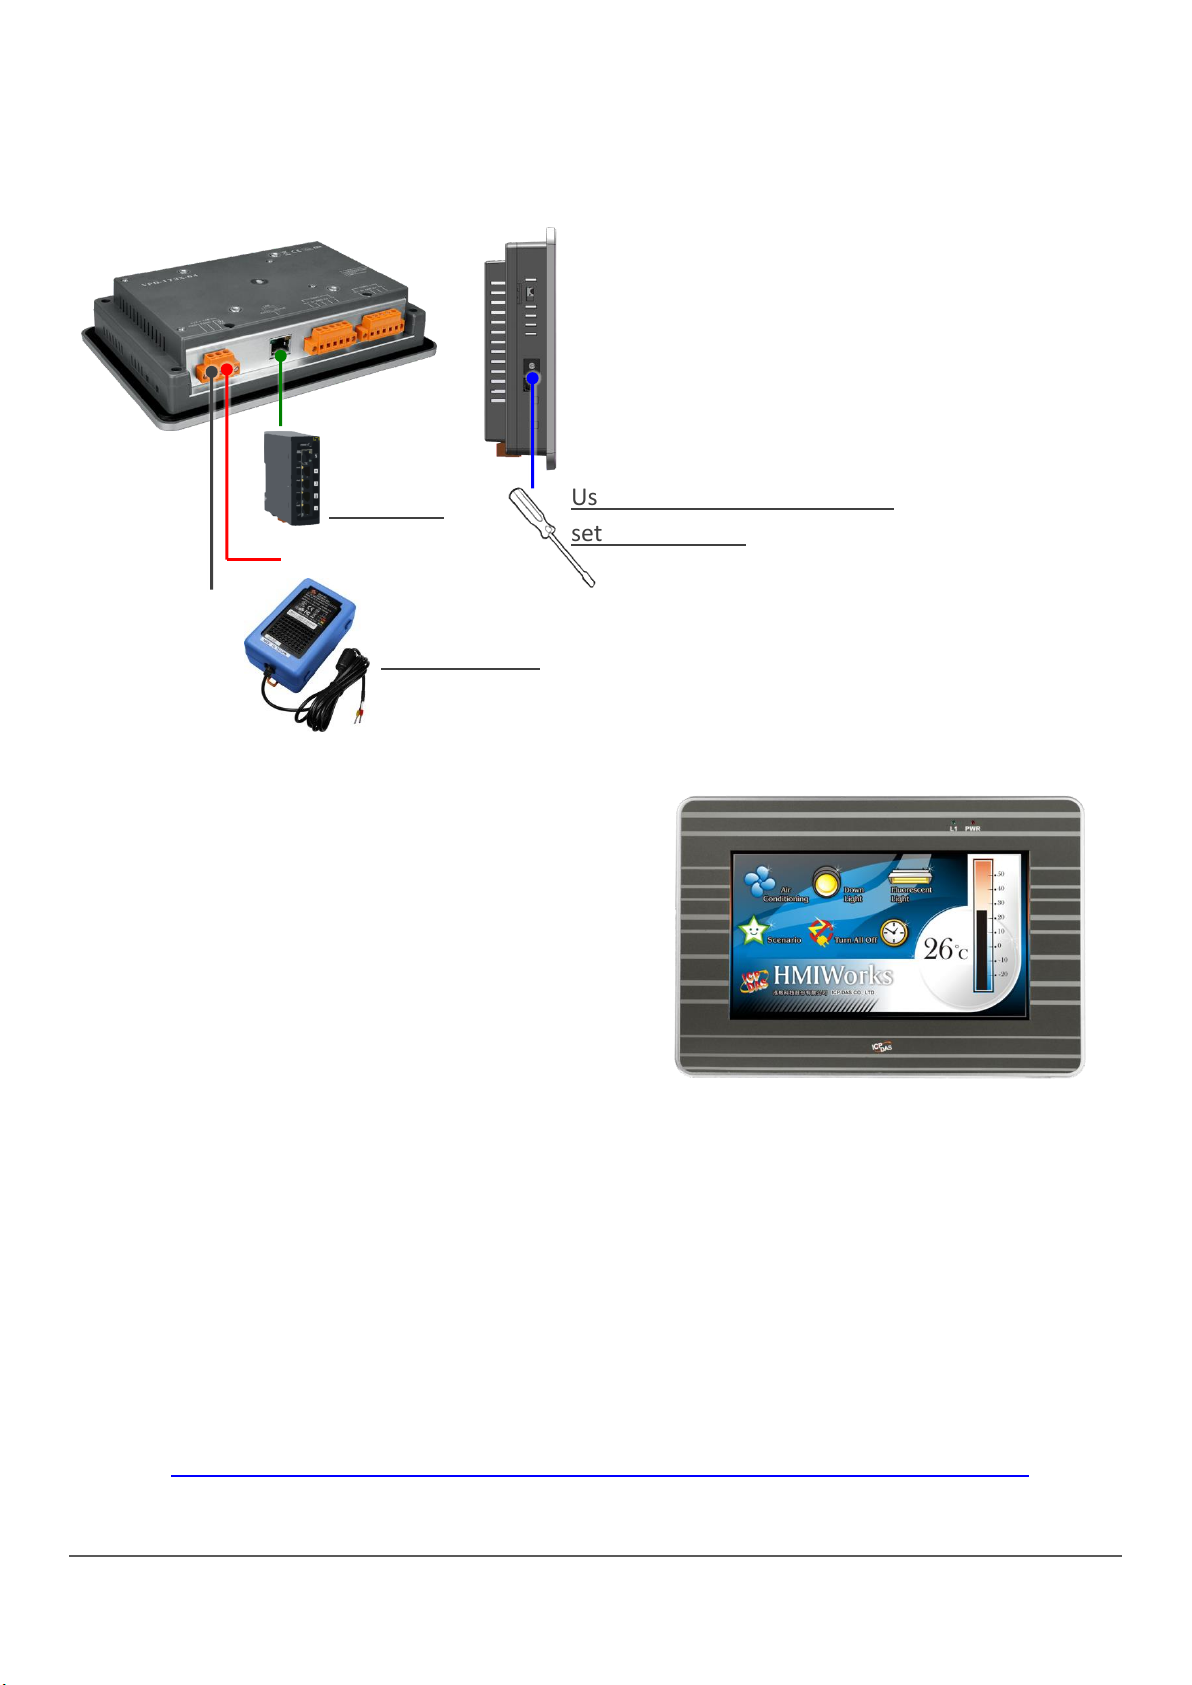
1. Connect wires as the figure. External Power
can be removed if you have a PoE Switch providing
power through an Ethernet cable to the TouchPAD.
And set the rotary switch to zero (At this point, the
power is not yet supplied).
2. Supply power to the VPD-173X/173X-64, wait
for several seconds and then you can see the
default program run on it.
3. Try to touch on the icons on the bottom-right
corner of the screen of the VPD-173X/173X-64
and you can find that VPD-173X/173X-64
switches to the setting pages.
5Creating First Project
To create your first project of the VPD-173X/173X-64, install the free development tool,
HMIWorks and then refer to
<<TouchPAD_programming_quide.pdf>>
, which can be found on
the FTP:
http://ftp.icpdas.com/pub/cd/touchpad/document/english/programming_guide/
Use a flat-head screwdriver to
set rotary switch
GND
VDC (+12~+48V)
PoE Switch
External Power

VPD-173X/173X-64 Quick Start, version 1.0 Last Revised: Jun. 2018 - 4 -
6Hardware Installation
The panel mounting of VPD-173X/173X-64
7Related Information
VPD-173X/173X-64 Product Page:
http://www.icpdas.com/root/product/solutions/hmi_touch_monitor/touchpad/vpd-173n.html
Documents, such as the user manuals, the API references, etc.:
ftp://ftp.icpdas.com/pub/cd/touchpad/document/english/
Free Development Software, HMIWorks v2.10.24 or above:
ftp://ftp.icpdas.com/pub/cd/touchpad/setup/
Insert the panel mounting
clips into the upper and
lower ventilation holes.
Screw the panel
mounting clips to the
panel. (Mounting Screw:
M4 x 30L)

VPD-173X/173X-64 Quick Start, version 1.0 Last Revised: Jun. 2018 - 5 -
VPD-173X/173X-64
快速入門指南
1檢查配件
產品包裝內應包含下列配件:
VPD-173X/173X-64 x 1 入門指南(本文件) x 1 螺絲刀 x 1 面板安裝組件 x 1
2外觀
LED 指示燈
重啟按鈕
序列埠
旋轉
開關
USB
I/O 擴充卡
XV-Board (選購品)
乙太網路孔

VPD-173X/173X-64 Quick Start, version 1.0 Last Revised: Jun. 2018 - 6 -
3腳位定義
序列埠腳位定義:
Pin
說明
COM2
Tx
RS-232 的傳送資料腳位
Rx
RS-232 的接收資料腳位
GND
接地端
D-
RS-485 網路的負訊號線
D+
RS-485 網路的正訊號線
COM1
Tx
RS-232 的傳送資料腳位
Rx
RS-232 的接收資料腳位
GND
接地端
D-
RS-485 網路的負訊號線
D+
RS-485 網路的正訊號線
Power
F.G.
機架接地,F.G. (連接到內部的 EMI 或ESD 保護電路),請接到大地。
P.GND
連到電源的接地端
PWR
直流電壓輸入 (範圍:+12 V ~+48 V)
旋轉開關 (Rotary Switch) 的配置模式定義:
項次
模式
說明
0
Run & Update (Ethernet)
執行/更新程式,用於程式開發階段
(能執行程式,也能進行更新)。
1
Ethernet Force Update
強制更新,當 TouchPAD 上的程式嚴
重毀損時可用此模式透過 Ethernet 更
新。
2
Run Only
執行程式。
9
USB Force Update
透過 USB 更新程式。
F.G
.
P.GND
PWR
COM2
COM1
Power

VPD-173X/173X-64 Quick Start, version 1.0 Last Revised: Jun. 2018 - 7 -
4第一次使用 VPD-173X
1. 如左圖所示,將電源和接地線連接完成。或
是若有 RJ-45 的乙太網路接孔,可以準備一條網
路線,透過乙太網路供電(PoE)。然後將旋轉開
關(Rotary Switch) 轉到 0 (此時尚未供電)。
2. 開始供電給 VPD-173X/173X-64,等待約數秒的開
機時間,接著可以看到 VPD-173X/173X-64 執行
出貨預附的程式如圖所示。
3. 試著按一下 VPD-173X/173X-64 螢幕上面的圖示,
VPD-173X/173X-64 會切到其他的頁面。
5建立第一個軟體專案
在建立 VPD-173X/173X-64 的第一個專案之前,請先安裝免費的開發軟體 HMIWorks。然
後參考
<<TouchPAD_programming_guide.p
df>>這份文件,一步一步地完成。該份文件可以
在FTP 上找到:
http://ftp.icpdas.com/pub/cd/touchpad/document/chinese/programming_guide/
使用一字起子來
配置旋轉開關
GND
VDC (+12 ~ +48V)
PoE Switch
外部供電器

VPD-173X/173X-64 Quick Start, version 1.0 Last Revised: Jun. 2018 - 8 -
6硬體安裝
VPD-173X/173X-64 的面板安裝(Panel Mounting)
參考資訊
VPD-173X/173X-64 產品網頁:
http://www.icpdas.com/root/product/solutions/hmi_touch_monitor/touchpad/vpd-173n_tc.html
相關文件,如使用手冊、API 函數手冊…等:
http://ftp.icpdas.com/pub/cd/touchpad/document/chinese/
免費開發軟體,HMIWorks 版本 2.10.24 或以上版本:
ftp://ftp.icpdas.com/pub/cd/touchpad/setup/
於上下方的通風口,插
入面板固定鋁夾
使用 M4 x 30L 螺絲
釘,鎖緊固定面板及
鋁夾
Other manuals for VPD-173X
1
This manual suits for next models
1
Table of contents
Other ICP DAS USA Home Automation manuals