ICS Nav6plus User manual

1DY3OXV8VHU*XLGH
MAN 3008.00
Issue 1.2
ICS Electronics Limited.
Unit V, Rudford Industrial Estate
Ford, Arundel, West Sussex
BN18 0BD
United Kingdom
Tel: +44 (0)1903 731101
Fax: +44 (0)1903 731105
E-Mail: sales@icselectronics.co.uk
support@icselectronics.co.uk
Website: www.icselectronics.co.uk
The technical data, information and illustrations contained in this publication
were to the best of our knowledge correct at the time of going to print. We
reserve the right to change specifications, equipment, installation and
maintenance instructions without notice as part of our policy of continuous
product development and improvement. No part of this publication may be
reproduced, stored in a retrieval system or transmitted in any form, electronic
or otherwise without permission from ICS Electronics Ltd. No liability can be
accepted for any inaccuracies or omissions in the publication, although every
care has been taken to make it as complete and accurate as possible.
Copyright 2001, ICS Electronics Limited. All rights reserved.

Nav6 Plus Navtex System User Guide
2
Important Information
This equipment is not approved for use by SOLAS convention
vessels within the Global Maritime Distress and Safety System
(GMDSS)
It is intended for use by leisure craft and other non-SOLAS
vessels wishing to participate within GMDSS
Safety Warnings
Do not use the sensor as a grab-handle
This instrument is for use as an aid to sailors and should not
lead to a reduction in the level of good seamanship required at
all times
Reception of messages cannot always be guaranteed as this
depends on local radio propagation
The correct magnetic variation must be input at the navigation
instruments (e.g. GPS, electronic compass) for the accurate
display of COG, set, waypoint bearing and heading.

Nav6 Plus Navtex System User Guide
3
&RQWHQWV
Quick Start..........................................................................................5
Introduction.........................................................................................5
How To Operate Your Nav6...............................................................8
NAVTEX Mode.................................................................................10
Navigate Mode.................................................................................13
Setup Mode......................................................................................15
Installation Of Sensor Unit................................................................26
Installation Of Display Unit...............................................................27
Testing The Nav6 After Installation..................................................34
Maintenance and Trouble Shooting.................................................35
Warranty...........................................................................................36
Glossary...........................................................................................37
Packing List And Options.................................................................37
Specification.....................................................................................37
Appendix I: NAVTEX Station Database...........................................39
Appendix II: Message Type Indicators.............................................41
Appendix III: NMEA Sentences Supported......................................42
Appendix IV: Nav6 Menu Structure..................................................43

Nav6 Plus Navtex System User Guide
4
Congratulations on purchasing this superb ICS Electronics Ltd
product. It is not only an excellent NAVTEX receiver, but a first class
instrument repeater. It may be the only display you will ever need at
your navigation position. We hope that it gives you many years of
reliable and trustworthy service. Please take the time to read this
manual carefully as it contains some essential information regarding
the operation and maintenance of the product and a useful
background to the NAVTEX system.
We recommend that you regularly visit the ICS website
www.icselectronics.co.uk for information on updates, the availability
of software enhancements and further options.
The IMO and various national coastguards also operate informative
websites that you may wish to visit; see
www.icselectronics.co.uk/links.

Nav6 Plus Navtex System User Guide
5
48,&.67$57
You will find this product extremely easy to operate. Please don’t be
intimidated by the comprehensive nature of this manual. In reality,
receiving your first Navtex messages just could not be simpler.
•Follow the installation guidelines that begin on page 26
•Re-check the cable connections
•Apply power
•If you have not connected a GPS navigation receiver, make sure
that you set the date and time on the start up screen which will
appear
•Sit back and wait for your first Navtex message! If you are within
range of a Navtex transmitter, you should not need to wait for
more than four hours.
•If you then want to get the best from the system: Read the rest of
the manual!
,1752'8&7,21
:KDW,V1$97(;"
NAVTEX is a worldwide system for the broadcast and automatic
reception of maritime safety information (MSI) in English by means
of a narrow-band direct-printing telegraphy. NAVTEX provides
shipping with navigational and meteorological warnings and urgent
information automatically from a dedicated receiver.
NAVTEX is a component of the IMO/IHO worldwide Navigational
Warning Service (WWNWS) as defined by IMO Assembly resolution
A.706(17). It is included within the Global Maritime Distress and
Safety System (GMDSS). Since 1 August 1993, NAVTEX receiving
capability has become mandatory equipment for certain vessels
under the provisions of the International Convention for the Safety of
Life at Sea (SOLAS).
NAVTEX broadcast information is available to all seafarers, free of
charge.
+RZ'RHV1$97(;:RUN"
NAVTEX transmissions can be sent on several frequencies from
stations situated worldwide. The power of each transmission is
regulated so as to avoid the possibility of interference between

Nav6 Plus Navtex System User Guide
6
transmitters. Each station is allocated a 10-minute time slot every 4
hours so that many stations can share the same frequency.
The Nav6 receiver stores all messages received from all stations.
Nav6 users can set-up filtering to display only specific message
types from selected stations. Users can choose to display
information from just the single station that serves the sea area
around their position, or from a number of stations.
'LVSOD\8QLW)HDWXUHV
•The Display Unit uses a high resolution (480 x 320 pixels) backlit
LCD designed to display NAVTEX messages in a choice of text
sizes.
•The display unit contains a large non-volatile memory used to
store NAVTEX messages, the NAVTEX station database, all of
the user settings, filter options and LCD contrast and backlight
levels. All messages and settings are retained during power
down.
•Several messages can be displayed at once (depending upon
the length of the message) and messages can be scrolled up
and down the screen with a single keypress.
•Messages can be filtered and sorted using a number of user
selectable criteria.
•The Nav6 can act as an instrument repeater and is capable of
displaying data in a choice of formats.
•Audible and visible alarms can be set up to indicate receipt of
SAR and/or New Messages.
•A sleep mode allows long standby periods with minimum power
consumption, such as when the vessel is left in a marina with
main batteries being trickle charged from the shore.
6HQVRU8QLW)HDWXUHV
•The Sensor Unit contains a short whip antenna and dual receiver
that can receive on both 490kHz and 518kHz.
•The sensor communicates with the display unit via a serial
interface. Multiple sensors and displays can be connected
together should an extended system be required.
:KDW&DQ \1DY'R"
•The Nav6 stores all correctly framed NAVTEX messages that it
receives in non-volatile memory, regardless of station, message

Nav6 Plus Navtex System User Guide
7
type or error rate. The messages to be displayed on the LCD
can be selected from the total set of stored messages by
applying various filter settings.
•Messages from certain stations can be forced to be always, or
never displayed, or can be displayed only when that station is
the nearest or only when that station is within range. This
requires that GPS data is available from the NMEA input.
•All messages are retained during power down and are still
available next time the unit is powered up.
+RZ'R,*HW7KH RVW2XW2I \1DY"
•Use the filter settings to display only the stations and message
types of interest. There are five filter presets that you can
configure to switch the display quickly between different sets of
filtered information; for example: Weather, Navigational
Warnings, New Messages, Nearest Station, All Stations In
Range. Remember that you can change the presets at any time.
•Set the LCD contrast and brightness. There are three built in
preset values for ‘day’, ‘night’and ‘sleep’operations. The day
and night presets are user adjustable.
•Set the text size in NAVTEX mode to suit your needs. Three
sizes are available; small, medium and large, the larger the text
the fewer the number of NAVTEX message lines that can be
displayed.
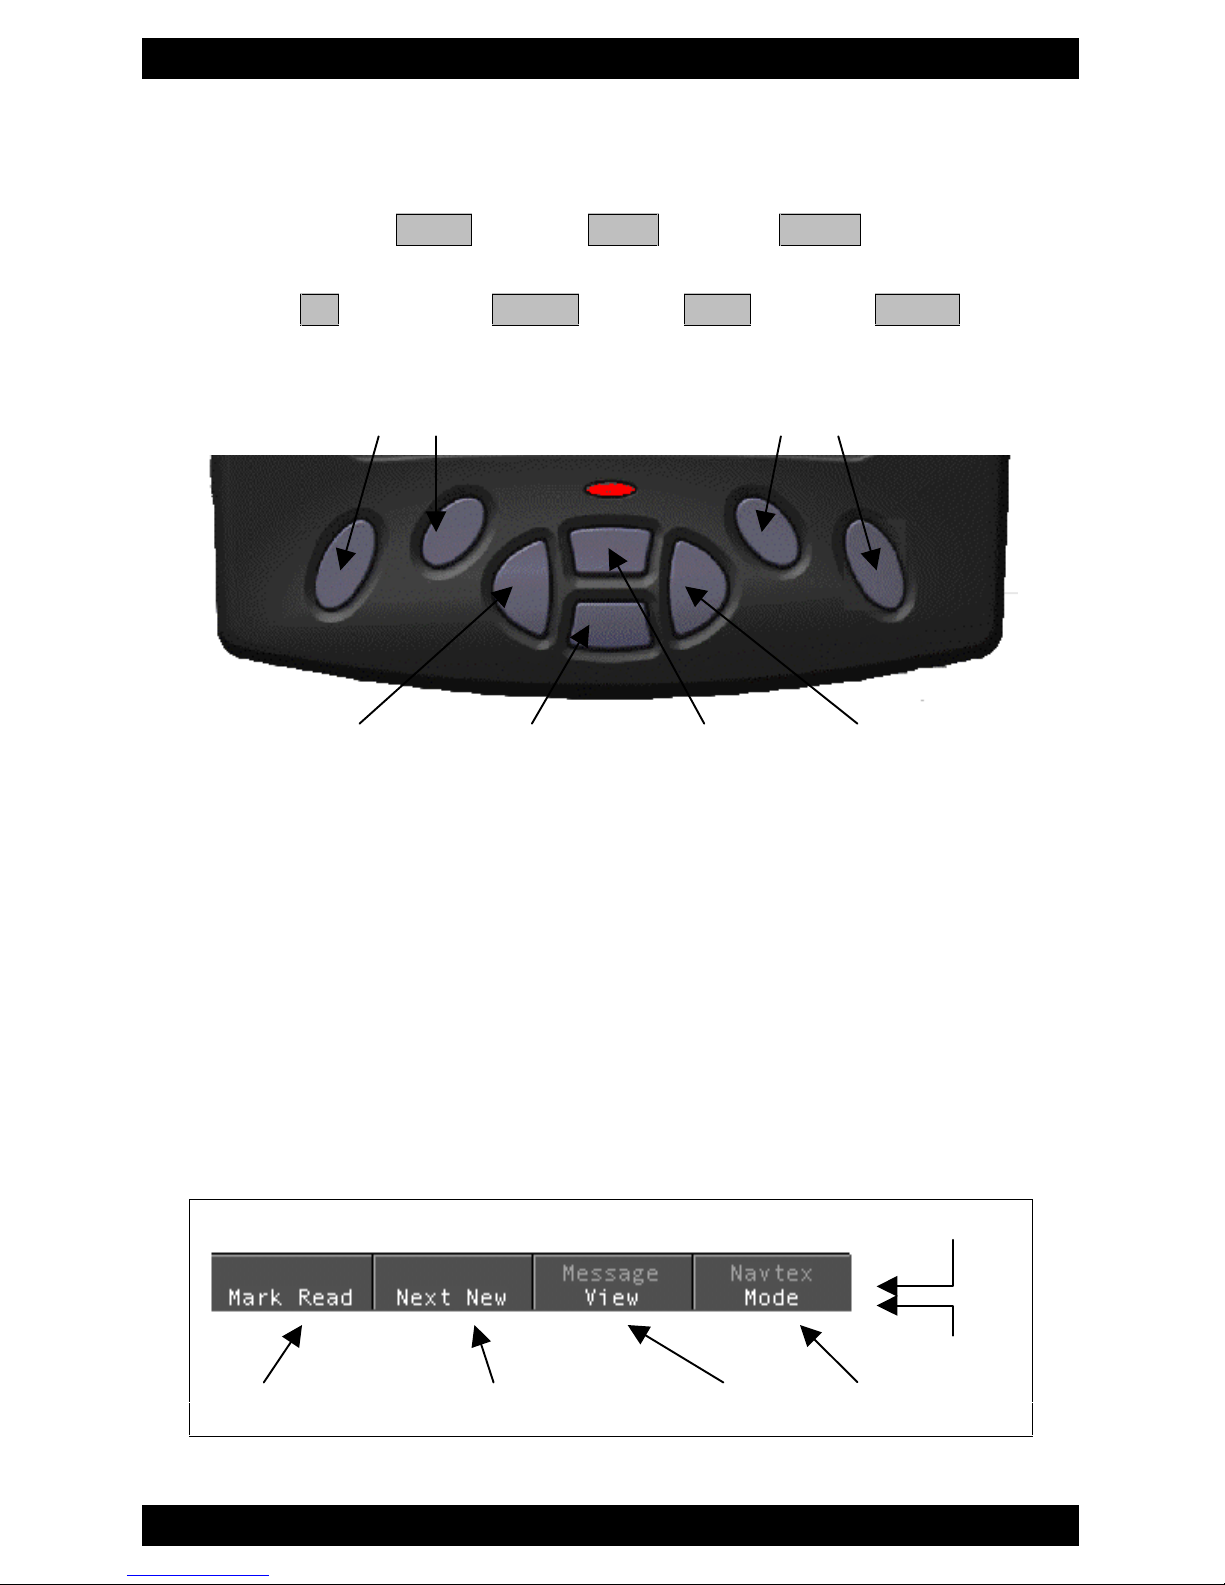
•Always mark messages as ‘read’when you have read them; this
way new messages are easily spotted when received (the ‘NEW’
icon will be showing at the top of the screen). You can also set
the display to produce an audible alarm and/or flash the red LED
to indicate when a new message is received.
•Change the function of the LED to suit your needs.
•Change the function of the buzzer to suit your needs
•Set up the time and date after power on. When NMEA date /
time data is available this is done automatically.
•Keep the station database up to date by using the built-in editing
facility.
•Set the menu language. Note that this only changes the menu,
options and soft-key text –it does not translate the NAVTEX
messages!

Nav6 Plus Navtex System User Guide
8
+2:7223(5$7(<2851$9
Throughout this document, softkey presses shall be indicated by:
PAGE VIEW MODE
And the four dedicated movement keys indicated by:
UP DOWN LEFT RIGHT
.H\ERDUG/D\RXW
Softkeys Softkeys
Left Down Up Right
The Nav6 has eight keys. The centre four of these are a ‘screen
navigation’pad (left, right, up and down). The four keys situated on
either side of the navigation pad are soft-keys. Their function is
context sensitive. The current function of each of the four soft-keys is
shown on the soft-key menu area at the bottom of the display.
/('DQG%X]]HU
The function of the red LED and buzzer can be changed to suit your
needs –see the general setup pages.
6RIWNH\ HQX$UHD
The operation of the Softkeys is indicated in the Softkey Menu Area
at the bottom of the display Current State
Action
Function Page or Function View Mode
Softkey Softkey Softkey Softkey

Nav6 Plus Navtex System User Guide
9
The upper line of grey text shows the current softkey setting and the
lower line of white text shows the softkey action.
The MODE softkey switches between the three operating modes of
the Nav6: In addition, holding down the MODE softkey for longer
than 2 seconds resets the LCD contrast and backlight to 50% and
selects the LCD setup page.
NAVTEX Mode allows the display of NAVTEX messages and
associated NAVTEX status information. This is only available if a
sensor is (or has been) connected to the display.
Navigate Mode allows the display of NMEA data. This is only
available if a source of NMEA 0183 data is connected to the unit.
Setup Mode allows various changes to be made to the operation of
the unit in NAVTEX and Navigate Modes, as well as controlling the
LCD, operation of the LED and audible alarms etc.

Nav6 Plus Navtex System User Guide
10
1$97(;02'(
In NAVTEX mode, the display
consists of a large area dedicated
to displaying NAVTEX messages,
with a status bar at the top, and
descriptions of the softkey functions
at the bottom.
It is possible to scroll up and down
the messages line by line, using the
UP and DOWN keys. Additionally,
you can step through the display,
message by message using the
LEFT and RIGHT keys.
At the top of the display is a status bar:
The status information is displayed as a series of icons. The
meaning of the icons is as follows:
Message at the top of the display
An alarm is active
NMEA GPS data active
490 kHz reception available
518 kHz reception available
Receiving message now
Signal Carrier, but no message
Sensor communication fault
SAR message received
NEW message received
UTC Time
At the bottom of the screen is the soft-key menu area:

Nav6 Plus Navtex System User Guide
11
Four different ‘views’can be selected by pressing the VIEW softkey:
Message View
Print View
Sort View
Filter View
1$97(; RGH HVVDJH9LHZ
The NEXT NEW softkey can be used to move the next new
message to the top of the NAVTEX display where it can be marked
as read by pressing MARK READ.
1$97(; RGH3ULQW9LHZ
The NEXT NEW softkey can be used to move the next new
message to the top of the NAVTEX display where pressing PRINT
will print it. Note: the ‘Print View’is not displayed unless the manual
print setting is enabled on the Setup Mode, NAVTEX View, Options
Page.
1$97(; RGH6RUW9LHZ
The NAVTEX message display can be sorted in one of three ways
by pressing the CRITERIA softkey:
Sort by Station
Sort by Type
Sort by Date
The sort can be further organised in ascending or descending order
by pressing the ORDER softkey.
Sort by Station orders the messages in the alphabetical order of
their station letters.
Sort by Type orders the messages in the alphabetical order of their
message identifier letter.
Sort by Date orders the messages by the date and time that they
were first received. For sort by date to work properly, the correct time
and date must be set using general setup page at start-up or GPS
time data must be available on the NMEA input

Nav6 Plus Navtex System User Guide
12
1$97(; RGH)LOWHU9LHZ
Use the filter view to select which message types from which
stations you wish to see displayed on the NAVTEX display.
(Tip: even if you have de-selected messages from a particular
station and/or message type, the system will still receive and store
those messages. You will be able to view those messages by re-
selecting them in Filter View.).
5 different sets of filter settings can be programmed into the unit.
Using the filter presets allows quick selection of 5 different filter
settings. Once a preset is selected, the filter settings for that preset
may be changed as required. The filter settings for the current
selected preset will be applied when NAVTEX messages are next
viewed. Press the PRESET softkey to select a preset.
(Tip: Set up the 5 filter presets for the stations and message types
that you use most. For example:
Preset 1 - all message types from nearest station;
Preset 2 - meteorological warnings from nearest station,
Preset 3 - navigational warnings from nearest station;
Preset 4 - new messages of all message types from nearest station;
Preset 5 – new messages of all message types from stations in
range)
There is a stations and types filter page for each selected receive
frequency. Use the PAGE softkey to select one of the four possible
filter pages: 518 Stations, 518 Types, 490 Stations, or 490 Types.
The picture shows the 518 Types
filter page; the 490 Types filter
page is similar.
Each of the message types can be
selected as either ON, OFF or
NEW.
Use the UP and DOWN keys to
select the message type setting
that you wish to edit. Use the LEFT
and RIGHT keys to change the
setting.

Nav6 Plus Navtex System User Guide
13
Set each message type filter to one of the following:
Setting Notes
On Message type always displayed
Off Message type never displayed
New Message type only displayed when new. Messages
marked as read will not appear.
The picture shows the 518 Stations
filter page; the 490 Stations filter
page is similar. Use the UP and
DOWN keys to select the station
filter setting that you wish to edit.
Use the LEFT and RIGHT keys to
change the setting.
The ‘Auto Station Filter’setting can
be either NEAREST or IN RANGE.
The setting is active only when you
have a GPS receiver connected to
the NMEA input and it applies only
to stations set to AUTO. To display
messages from the nearest station
to your current position, set the
auto station filter to NEAREST. To
display messages from all stations
in range of your current position,
set the auto station filter to IN-RANGE. An asterisk appears next to
all stations for which messages will be displayed.
Set the filter for each station to one of the following:
Setting Notes
On Messages from station always displayed
Off Messages from station never displayed
Auto Messages from station displayed only when nearest or in
range depending upon setting.
1$9,*$7(02'(
There are four Navigate data display views that can be selected from
within the Navigate Mode using the VIEW softkey: Position View,
Combined View, Waypoint View and Log View.
Note: The correct magnetic variation must be input at the
navigation instruments (e.g. GPS, electronic compass) for the
accurate display of COG, set, waypoint bearing and heading.

Nav6 Plus Navtex System User Guide
14
Position View Combined View
Waypoint View Log View
The display units can be changed in the Navigate Setup page.
3RVLWLRQ&RPELQHGDQG:D\SRLQW9LHZV
The UP, DOWN, LEFT and RIGHT keys have no function.
Data fields that are not available on the NMEA input are indicated by
a series of dashes (e.g. ---.--).

Nav6 Plus Navtex System User Guide
15
/RJ9LHZ
The UP and DOWN keys allow the log to be scrolled forwards and
backwards in time. The LEFT and RIGHT keys scroll other LOG
data into view.
(Tip: consider the Log View to be a large piece of paper. The LCD
allowing a smaller view which can be moved up, down, left and right
displaying a portion of the paper at any one time)
The Log View columns are Position, COG, SOG, Heading, Water
Speed, Wind Direction, Wind Speed, Depth and Distance.
6(78302'(
Setup Mode consists of 3 ‘Views’that can be selected with the VIEW
softkey. Each View has a number of ‘Pages’that can be selected
with the PAGE softkey.
General View NAVTEX View Navigate View
LCD Page Options Page Options Page
Options Page 490 Names Page Monitor Page
518 Names Page
Monitor Page
6HWXS RGH*HQHUDO9LHZ/&'3DJH
The General View LCD Page shows
a checker board pattern that can be
used to set up the LCD.
LCD contrast is adjusted with the
LEFT and RIGHT keys.
LCD brightness is adjusted with the
UP and DOWN keys.
There is a readout of the LCD
backlight temperature towards the
bottom of the display. This is internal
case temperature, and gives only an
approximation to ambient
temperature.
Tip: If the LCD is unreadable due to
poor contrast, hold down the MODE
softkey (in any screen) to display the
LCD page and reset the LCD
contrast and backlight to 50%. The LCD should now be readable.
Adjust the contrast as required.

Nav6 Plus Navtex System User Guide
16
6HWXS RGH*HQHUDO9LHZ2SWLRQV3DJH
Option Setting Notes
Year YYYY Year, e.g. 2001
Month MM Month, e.g. 03
Day DD Day, e.g. 15
Hour HH 24 hour clock
Minute mm Minutes
Keyclick OFF No beep on key press
ON Beep on key press
New Message OFF New message alert off
Alert ON Audible alarm for new messages
Antenna Alarm OFF Antenna alarm off
Timed Antenna alarms repeated 5 times or until
cancelled
Repeated Antenna alarms repeated until cancelled
SAR Alarm OFF SAR alarm off
Timed SAR alarms repeated 5 times or until
cancelled
Repeat SAR alarms repeated until cancelled
Language English English language menus
French French language menus
LED Function OFF LED always off
ON LED as power indicator
RX LED as receive indicator
SAR LED as SAR indicator
NEW LED as New Message indicator
Defaults shown in BOLD
The General View Options Page
shows general settings for the
display such as Date, Time, Sound
and Miscellaneous settings. Use the
UP and DOWN keys to select the
setting that you wish to edit. Use the
LEFT and RIGHT keys to change
the setting.
Notes:
•Date and time will be taken from
NMEA input data if available.
•There is no battery backup so
date and time will be incorrect
when power is switched on
unless NMEA data is available
or the date and time are

Nav6 Plus Navtex System User Guide
17
manually set. The date and time
is used to time stamp all
incoming NAVTEX messages
so that they can be sorted by
date and time.
6HWXS RGH1$97(;9LHZ
2SWLRQV3DJH
The NAVTEX View Options Page
shows general settings for NAVTEX
operation such as Antenna, Display,
Sound and Print settings. Use the
UP and DOWN keys to select the
setting that you wish to edit. Use the
LEFT and RIGHT keys to change
the setting
Option Setting Notes
Antenna Type Switchable Reported by sensor, cannot be changed
Dual
Firmware
Version X.X Reported by sensor, cannot be changed
Hardware
Revision XReported by sensor, cannot be changed
Frequency None No receiver selected. Tip: useful when
using the display only as a NMEA
instrument repeater
490 kHz 490 kHz only operation
518 kHz 518 kHz only operation
Both 490 and 518 kHz operation –only available
if antenna Type is ‘Dual’
Antenna Mode Master Set to master if this is the main display.
This display will control the sensor over the
sensor data link. Only one display may be
set to master.
Slave Set to slave if this is a repeater unit. Slave
units do not control the sensor and can
only monitor the sensor data link. There
can be multiple slave displays in a system
Font Small Display NAVTEX messages using small
font
Medium Display NAVTEX messages using medium
font
Large Display NAVTEX messages using large
font

Nav6 Plus Navtex System User Guide
18
Option Setting Notes
Error
Threshold XX % Percentage character error rate above
which messages are not displayed. Note
that this setting does not stop messages
with an error rate above the threshold from
being stored in memory
Alphabet Latin Latin alphabet used for NAVTEX
messages.
Cyrillic Latin alphabet with third shift Cyrillic used
for NAVTEX messages
Age Limit None,
1, 2, 3, 5
Days, 1, 2,
3, 4, 8, 12
Weeks
Maximum age of NAVTEX messages to be
displayed. NAVTEX messages older than
the age limit are not displayed
New Message Off New message alert off
Alert On Audible alarm for new messages
Antenna Alarm Off Antenna alarm off
Timed Antenna alarms repeated 5 times or until
cancelled
Repeat Antenna alarms repeated until cancelled
SAR Alarm Off SAR alarm off
Timed SAR alarms repeated 5 times or until
cancelled
Repeat SAR alarms repeated until cancelled
Auto Print Off Auto printing off
On Auto printing on. New messages will be
printed when received. The print filter
settings can be used to filter which
messages are printed based upon
message type and station
Manual Print Off Manual printing off. The NAVTEX Mode,
Print View is hidden
On Manual printing on. The NAVTEX Mode,
Print View is enabled
Output Format Data Formatted for PC. Messages printed in raw
format as received.
Printer Formatted for printing. Messages printed
with print header.
Defaults shown in BOLD
6HWXS RGH1$97(;9LHZ2SWLRQV3DJH3ULQW6HWXS
Press the PRINT SETUP softkey from within the Setup Mode,
NAVTEX View, Options Page to display the print filter setup pages.
Press the EXIT softkey to leave the print filter setup.
Note: The print filter setup pages are available only when Auto Print

Nav6 Plus Navtex System User Guide
19
is enabled.
Use the print filter setup pages to select which message types from
which stations you wish to have automatically printed when received.
The print filtering is independent of the filtering used for the display.
It does not affect the storage of messages for display on the
NAVTEX screens.
The NAVTEX auto print facility acts like a GMDSS paper NAVTEX
printer:
•Poor quality messages (error rates over 33%) are not printed.
•All new messages are printed when first received.
•Only messages not excluded by the print filtering are printed.
•Message repeats are printed each time they are received until
they have been received with good quality (error rate of less
than 4%).
•Once a good quality message has been received, repeats are
not printed during the next 70 hours. After 70 hours the
message is treated as a new message and printed again.
There is a stations and types filter page for each selected receive
frequency. Use the PAGE softkey to select one of the four possible
filter pages: 518 Stations, 518 Types, 490 Stations, or 490 Types.
The picture shows the 490 Types filter page; the 518 Types filter
page is similar.
Each of the message types can be
selected as either ON or OFF.
Note message types A, B, D and L
cannot be turned OFF as the
NAVTEX standard defines these
as important message types.
Use the UP and DOWN keys to
select the message type setting
that you wish to edit. Use the LEFT
and RIGHT keys to change the
setting.

Nav6 Plus Navtex System User Guide
20
The picture shows the 518 Stations
filter page; the 490 Stations filter
page is similar. Use the UP and
DOWN keys to select the station
filter setting that you wish to edit.
Use the LEFT and RIGHT keys to
change the setting.
The ‘Auto Station Filter’setting can
be either NEAREST or IN RANGE.
The setting is active only when you
have a GPS receiver connected to
the NMEA input and it applies only to
stations set to AUTO. To print
messages from the nearest station
to your current position, set the auto
station filter to NEAREST. To print
messages from all stations in range
of your current position, set the auto
station filter to IN-RANGE. An asterisk appears next to all stations for
which messages will be printed.
Set the filter for each station to one of the following:
Setting Notes
On Messages from station always printed
Off Messages from station never printed
Auto Messages from station printed only when nearest or in
range depending upon setting.
6HWXS RGH1$97(;9LHZ
DQG1DPHV3DJHV
The station names setup pages
determine the names of stations
displayed on station filter pages and
in NAVTEX message headers.
The picture shows the ‘518 Names’
page; the ‘490 Names’page is
similar.
Use the UP and DOWN keys to
select the setting that you wish to
edit. Use the LEFT and RIGHT keys
to change the setting.
The Station Name Selection setting
Other manuals for Nav6plus
2
Table of contents
Other ICS Marine GPS System manuals
Popular Marine GPS System manuals by other brands

Pivotel
Pivotel COBHAM Explorer 325 Quick user guide

Thales
Thales VesseLINK VF350BM installation guide

Garmin
Garmin GPSMAP 1222 TOUCH installation instructions

Blue Sky Network
Blue Sky Network SKYLINK user guide

Addvalue Innovation
Addvalue Innovation Fleet One installation manual

Thuraya
Thuraya XT-PRO user guide