iDevices Air Quality Sensor User manual
idevices Air Quality Sensor
Installation and operating instructions
www.idevices.de
2
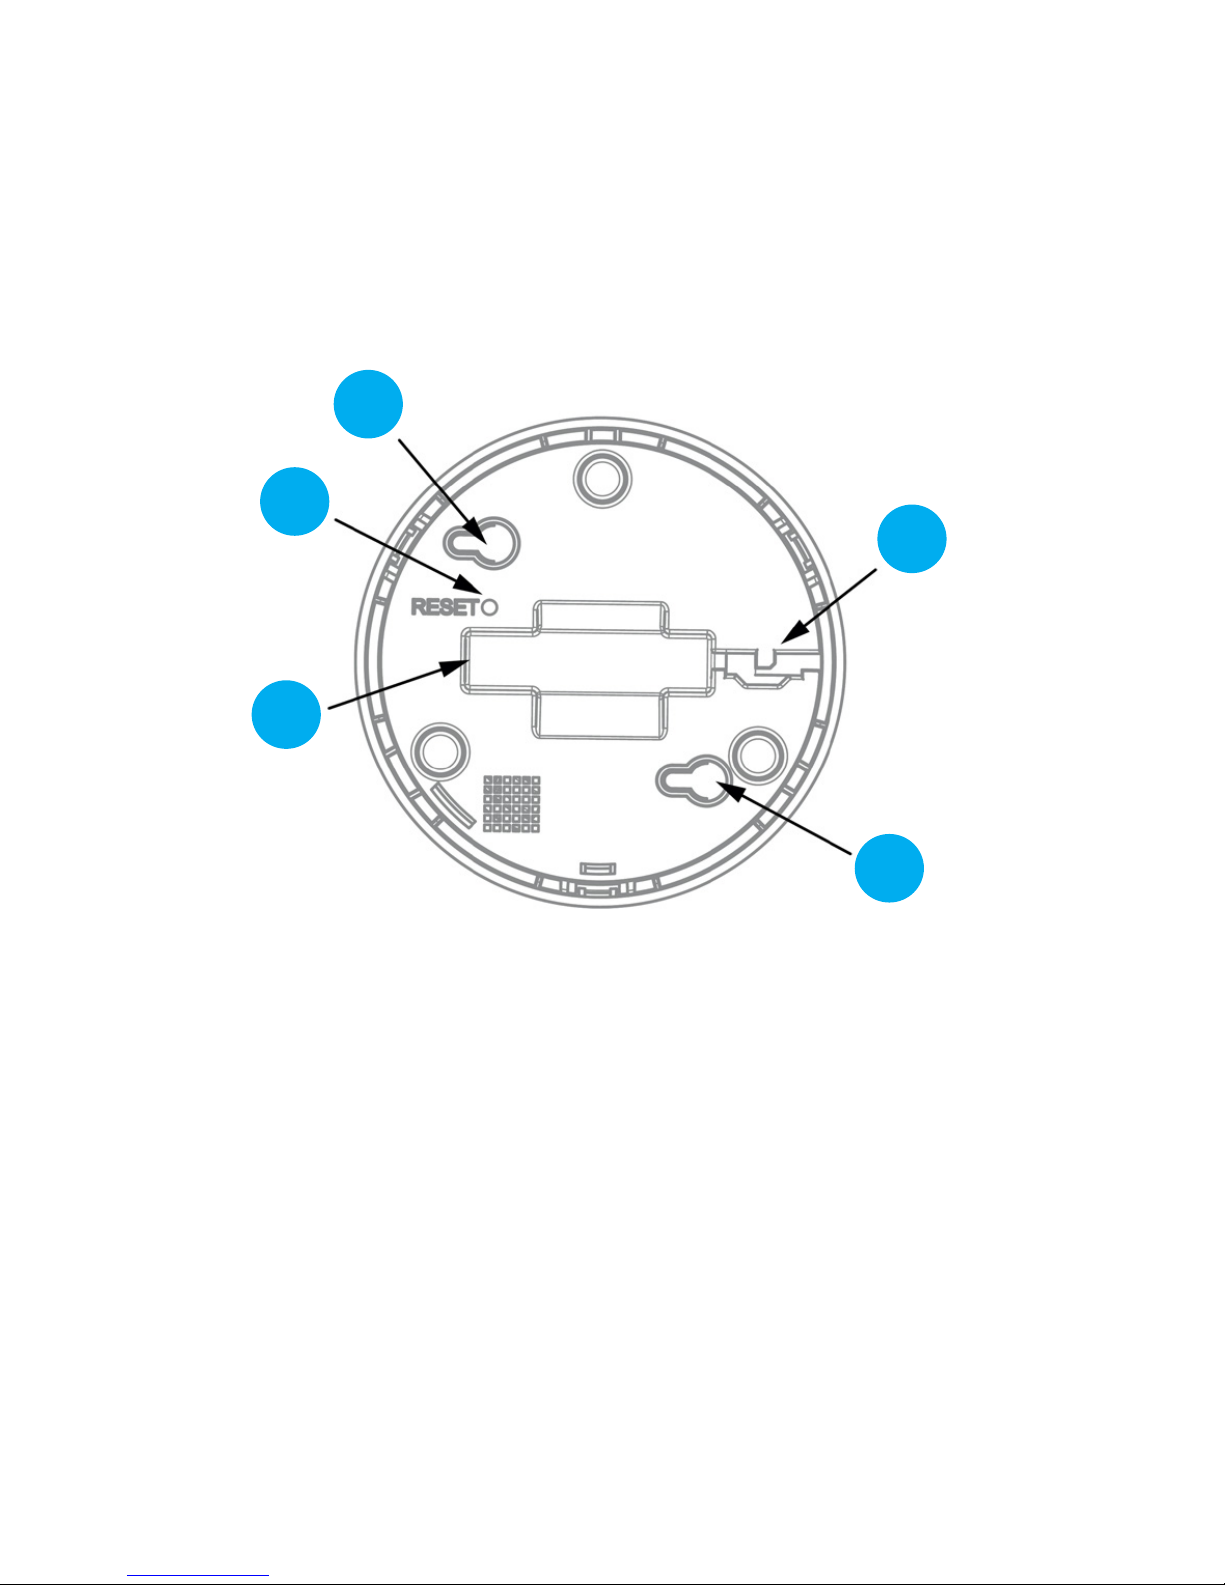
Bottom side
1. Reset button (resets the device to original settings)
2. Power connection (micro USB port 500 mA)
3. Strain relief (protects the power connection)
4. Holes for wall mounting of the device
1
4
3
2
4

3
1 Table of Contents
1 Box Contents................................................................4
2 Explanatory Notes for Installation and Operating
Instructions...................................................................4
3 Danger Warnings .........................................................4
4 Function and Device Overview ....................................6
5 General System Information ........................................6
6 Implementation.............................................................7
7 Errors / Technical Support..........................................12
8 Setting up the App on your Mobile Device .................13
9 Restore Factory Settings............................................36
10 Maintenance and Cleaning ........................................36
11 General Information on Wireless Operation...............37
12 Conformity..................................................................37
13 Technical Data............................................................38
14 Disposal and Recycling Instructions ..........................38
15 Imprint .......................................................................39

4
1 Box Contents
• 1 piece of idevices Air Quality Sensor
• 1 piece of USB cable
• 1 piece of power adapter
• App und cloud account
2 Explanatory Notes for Installation and
Operating Instructions
Read these instructions carefully before using your idevices Air Quality Sensor.
Keep this manual for future reference. If you give your idevices Air Quality Sensor
to other people for use, you must hand over these instructions and delete your data in
the idevices cloud.
3 Danger Warnings
• Do not open the idevices Air Quality Sensor. It is not intended that changes (mo-
dications) are made to the device. Unauthorised conversion is not permitted.
The guarantee is forfeited if damages are caused due to incorrect handling or
improper use by disregarding this operating manual.
• The idevices Air Quality Sensor contains no user-serviceable parts. In case of
error or default, please contact our Serviceteam.
• Only use the enclosed power adapter to connect the sensor to the power supply
system.
• Operate the device including the power supply indoors only.
• Operate the device in a dry, dust-free environment only, do not expose it to mois-
ture, vibration, constant sun or other heat radiation, cold and mechanical stress.
• Install the power cable in a non-obstructive manner and do not tense it tight.
• The device is not a toy. Do not allow children to play with it. Do not leave the
packaging material lying around carelessly. Plastic lms or bags as well as other

5
packaging parts etc. can be dangerous for children.
• Place the idevices Air Quality Sensor out of the reach of animals.
• We accept no liability for damages to property or personal injury caused by
improper handling or non-observance of the danger warnings. In such event any
warranty claim expires. For consequential damages we do not accept liability.
• Any use other than described in this operating manual is not intended and will
result in exclusion of warranty and liability.
• The idevices Air Quality Sensor is not designed to protect living things from
damage caused by ingredients in the air. In particular, the device is not a gas
sensor and therefore not suitable to warn against hazardous or life-threatening
gas concentrations.
• idevices GmbH assumes no liability for damage caused by data which are
determined or displayed incorrectly.

6
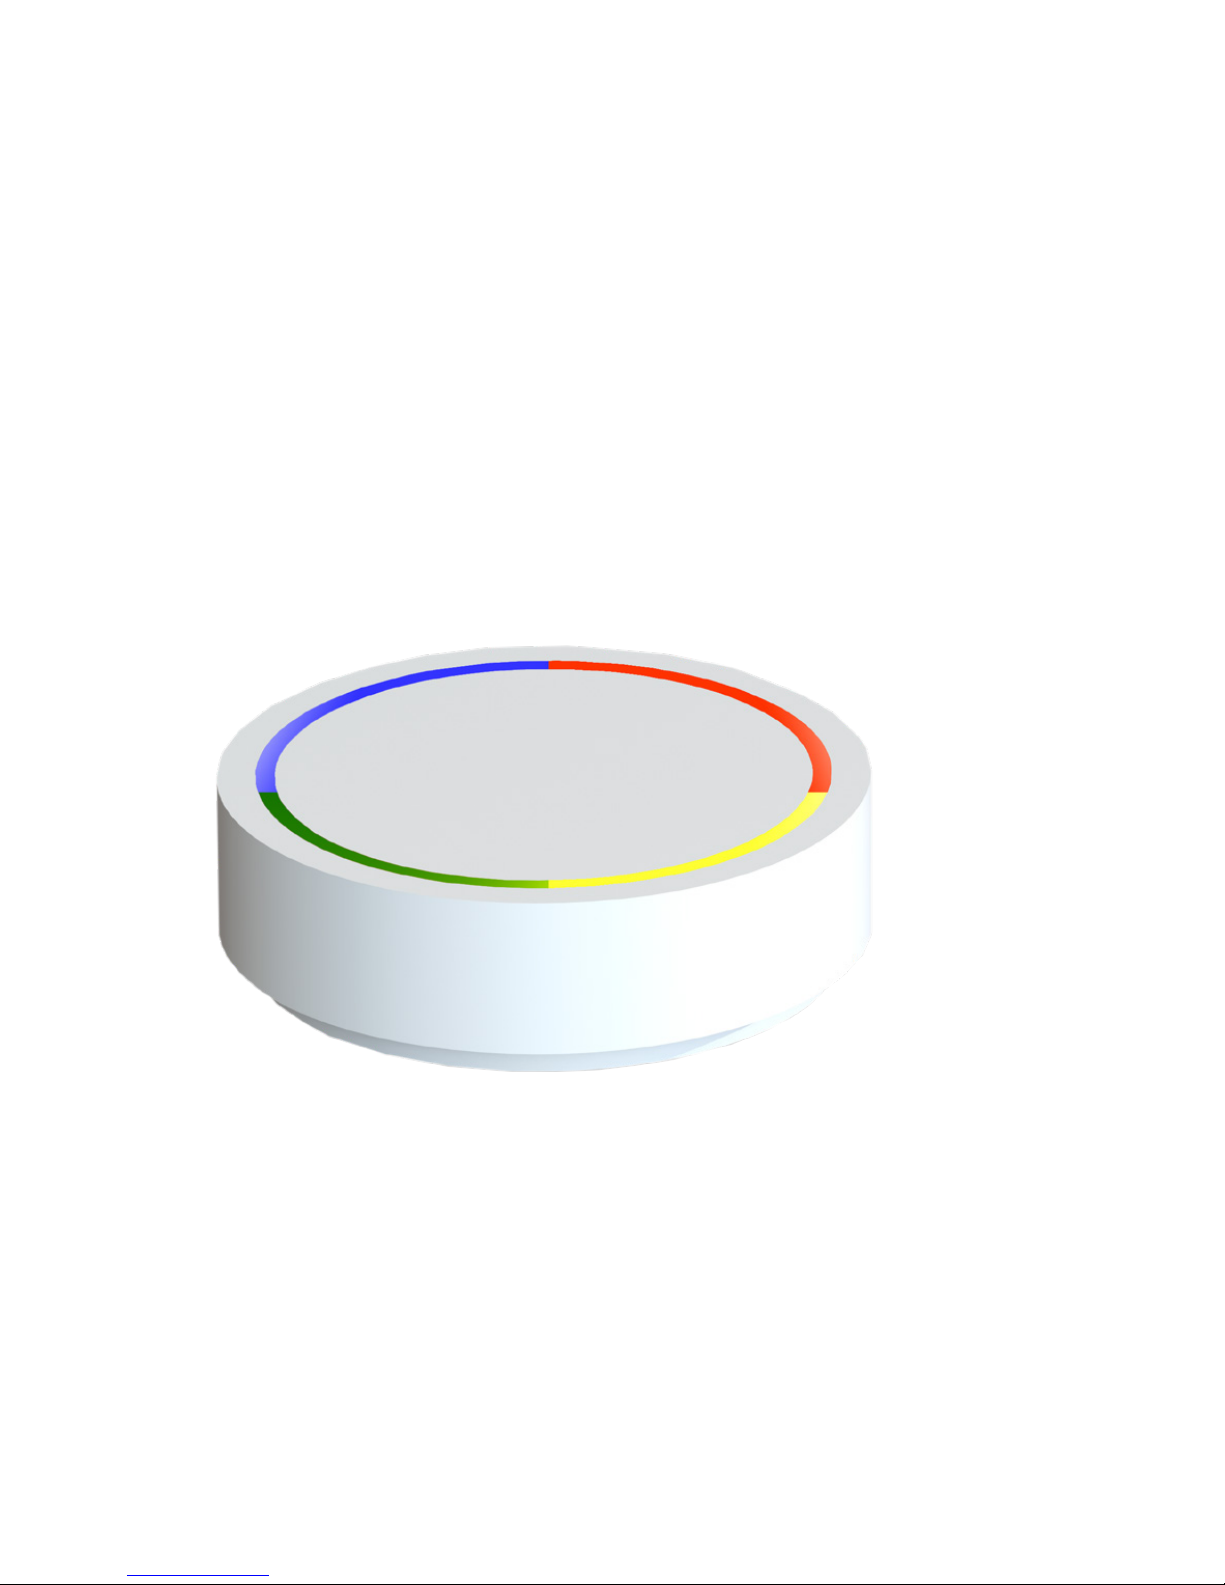
4 Function and Device Overview
The idevices Air Quality Sensor determines an index value (Indoor Air Quality Index
- IAQ) from the concentration of certain ingredients in indoor air. From the Indoor Air
Quality Index the proportion of the total volatile organic compounds (TVOC) and the
CO2 content in the air will be calculated. Furthermore, the idevices Air Quality Sensor
measures temperature, humidity and air pressure. The measured data may be sent
to the idevices cloud via a suitably congured WiFi with Internet access. The data on
IAQ, temperature, humidity and barometric pressure can be viewed using the idevices
app. Based on the criteria of the Air Quality Index, the air quality may be symbolised by
the colours red, yellow and green.
5 General Systen Information
The idevices Air Quality Sensor takes up to one hour to calibrate after implementation.
Therefore, measured data may deviate from correct data during the rst few hours
after initial implementation.

7
6 Implementation
Please read this section completely before starting implementation process.
6.1 Connect Sensor to WiFi
1. Make sure your WiFi is working and it is congured to allow new devices to
be connected. If necessary, look up the operating instructions of your WiFi
access point or your WiFi router.
2. Connect the idevices Air Quality Sensor to the power socket with the supplied
USB cable and AC adapter, and push the cable into the strain relief on the
bottom of the sensor.
3. After a short while the sensor pulses blue. Meanwhile, the sensor operates
its own WiFi.
4. On your iOS or Android compatible device, open the WiFi settings menu.
5. Select the WiFi of the sensor. It is called „Air Quality Sensor“, followed by the
12-digit serial number „XXXXXXXXXXXX“ of the sensor. If you are asked for
a password, please enter „12345678“.
6. Now the browser of your iOS or Android compatible device opens the page
for conguring the idevices Air Quality Sensor. If this is not the case, please
open the browser of your iOS or Android compatible device and go to
http://192.168.4.1.
7. Select your language.

8

9

10
8. Öffnen Sie über die Pfeiltaste die Auswahlliste. Wählen Sie dann das WLAN
Use the arrow key to open the selection list. Then select a WiFi that will
connect the sensor to the Internet. If you are asked for a password, please
enter your WiFi password.
Then press „CONNECT“. If your WiFi is not listed, please select „Custom“
and enter the SSID of your WiFi as well as your WiFi password manually if
necessary. Then press „CONNECT“.
9. Now the sensor tries to connect to the internet. The sensor pulses green.
After successful connection, the sensor briey ashes blue and then green
again. Your sensor is now ready for use and shows the colour of the Indoor
Air Quality Index (red, yellow or green) from now on.
10. You may need to reset the WiFi settings of your iOS or Android compatible
device to the previous settings. To do this, return to the WiFi settings menu
of your iOS or Android compatible device and reconnect to the original WiFi
network.

11
6.2 Positioning of Sensor und Installation
6.2.1 General Information
Always make sure you install the power in a non-obstructive manner.
Furthermore, the cable must not be stretched tight. Never pull the cable of
the sensor.
6.2.2 Use as a Desktop Device
The idevices Air Quality Sensor can be placed on a table or on at, horizontal,
suitable surface. In any case, make sure that the sensor cannot fall down
accidentally.
6.2.3 Screw Mounting
You can mount the idevices Air Quality Sensor to a smooth surface using
the holes on the bottom side, to mount to a wall for example. For instance,
crosshead screws 3.0 mm × 30 mm with at head and 5 mm standard dowel
S5 are suitable for this purpose. Before you start to drill holes, make sure you
are not interfere with any cables etc.

12
7 Errors / Technical Support
Error Reasion Solution
The sensor
pulses blue
There is no
connection to the
Internet.
Connect the sensor to the
Internet (see chapter 6).
The settings of your wireless
access point or router may
prevent the integration of new
devices. Read, if necessary,
the operating instructions of
your WiFi access point or
your WiFi router.
The sensor
does not
light up
The sensor is not
connected to the
power supply.
The LED
brightness is set
too low
Check the power supply of
the sensor.
Check the set brightness of
the sensor in the idevices
app.

13
8 Setting up the App on your Mobile Device
8.1 System Requirements
• Operating System: iOS from vol. 9.0 or Android from vol. 4.3
• Internet connection via WiFi
Note: Please note that, a data update of the sensor requires a stable internet connec-
tion. Make sure you establish the Internet connection via your WiFi, as data updates
via mobile connection of your device may lead to additional costs from your provider.
8.2 Scope of Function
The idevices Air Quality Sensor shows all important indicators of air quality in your
room via the app.
You can download the app for free from the Apple App Store or Google Play Store for
your iOS or Android compatible device (see chapter 8.3).
The Indoor Air Quality Sensor App offers you the following features:
• Conguration of your idevices Air Quality Sensor
• Add and manage multiple idevices Air Quality Sensors
• Analysis of the air quality of your room and display in the app
• Compare the air quality of several rooms
• Analysis of historical data of TVOC, IAQ, CO2content, air pressure, room
temperature and humidity
• Display, explanation and evaluation of TVOC, CO2content, IAQ, air pressure,
room temperature and humidity

14
8.3 Installation
8.3.1 Download the App
The Indoor Air Quality Sensor App can be found for free in the Apple App Store or
Google Play Store. To download the app, go to the Apple App Store or Google Play
Store and search for „Indoor Air Quality Sensor“. Download the app now and install it
on your device.
Scan the following QR code with your mobile device to go directly to the appropriate
Apple App Store or Google Play Store for your device.

15
8.3.2 Registration
Before you create a new account, you may use our test account if you have any
doubts about sharing your data in order to familiarise yourself with the app for your
idevices Air Quality Sensor.
• Password: idevices!1
Before you can use the app for your idevices Air Quality Sensor, please create an
account or register with your Facebook or Google account.
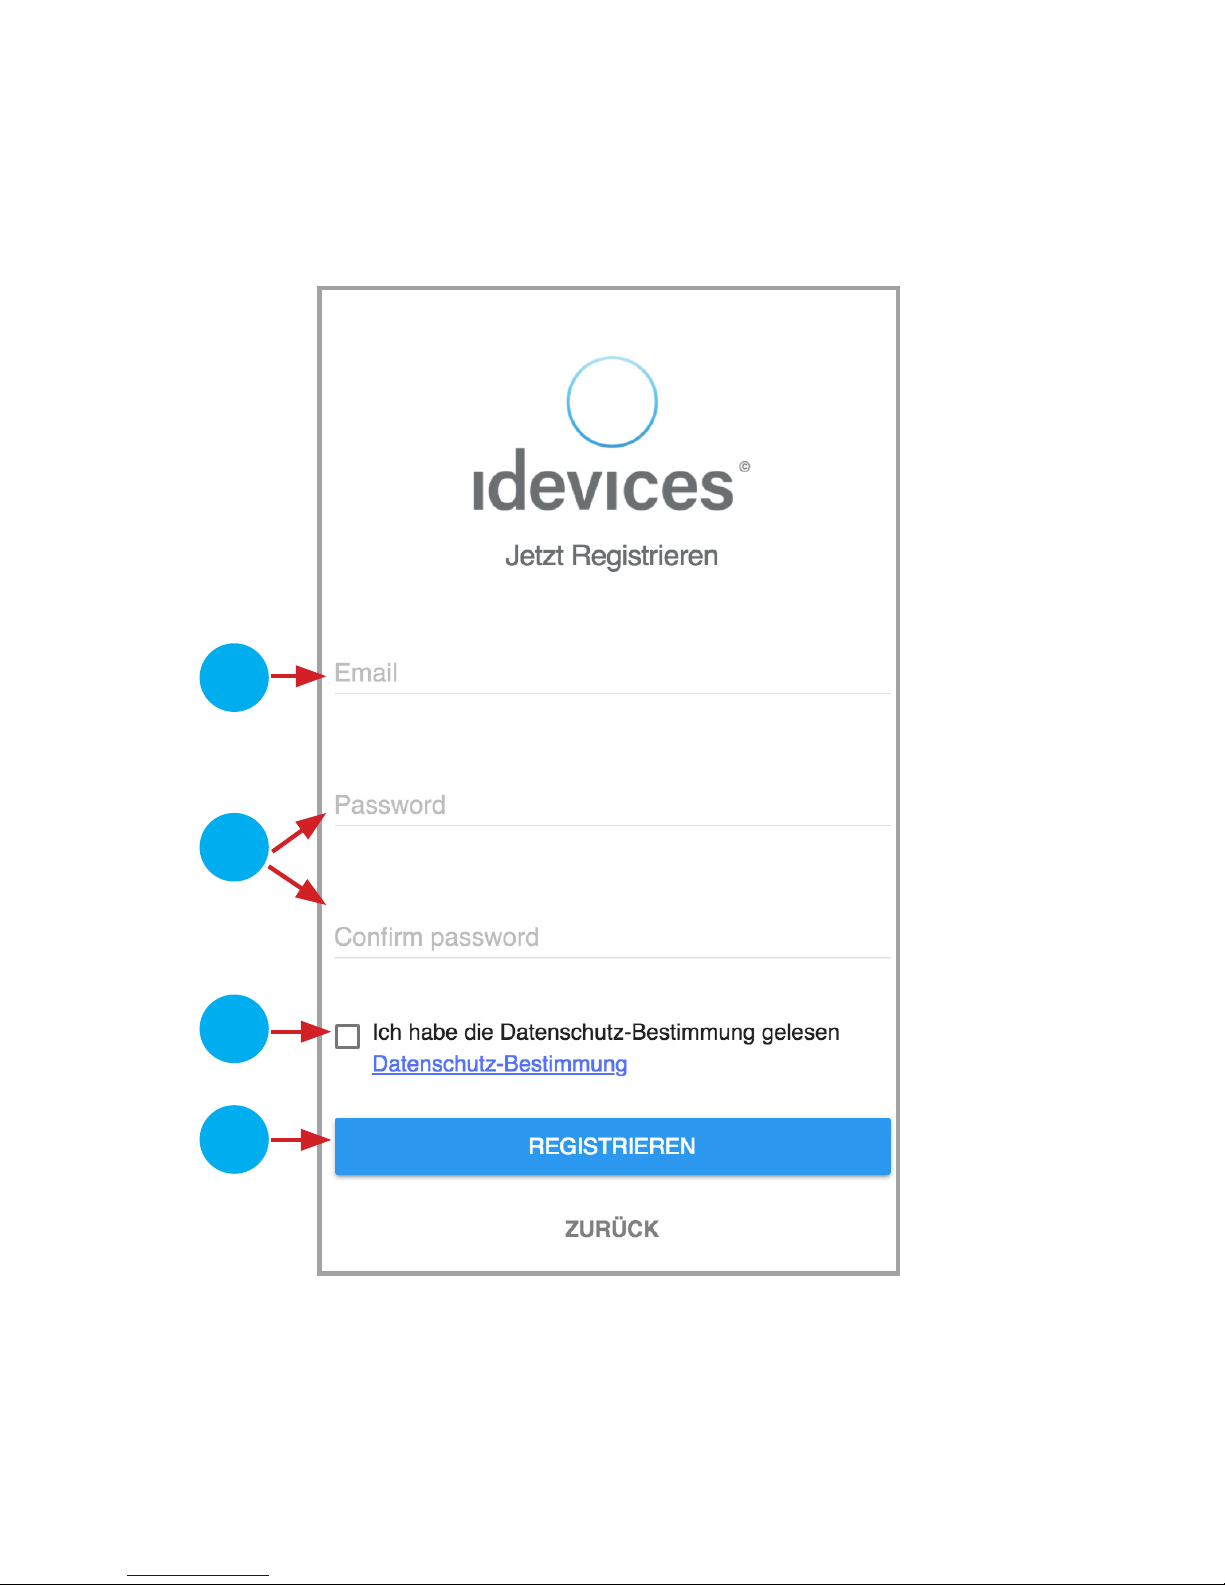
1. Enter your email when registering.
2. Enter your password and conrm it by repeatedly entering in the appropriate
eld.
3. Carefully read the Privacy Policy and conrm that you have read and agree
to the Privacy Policy.
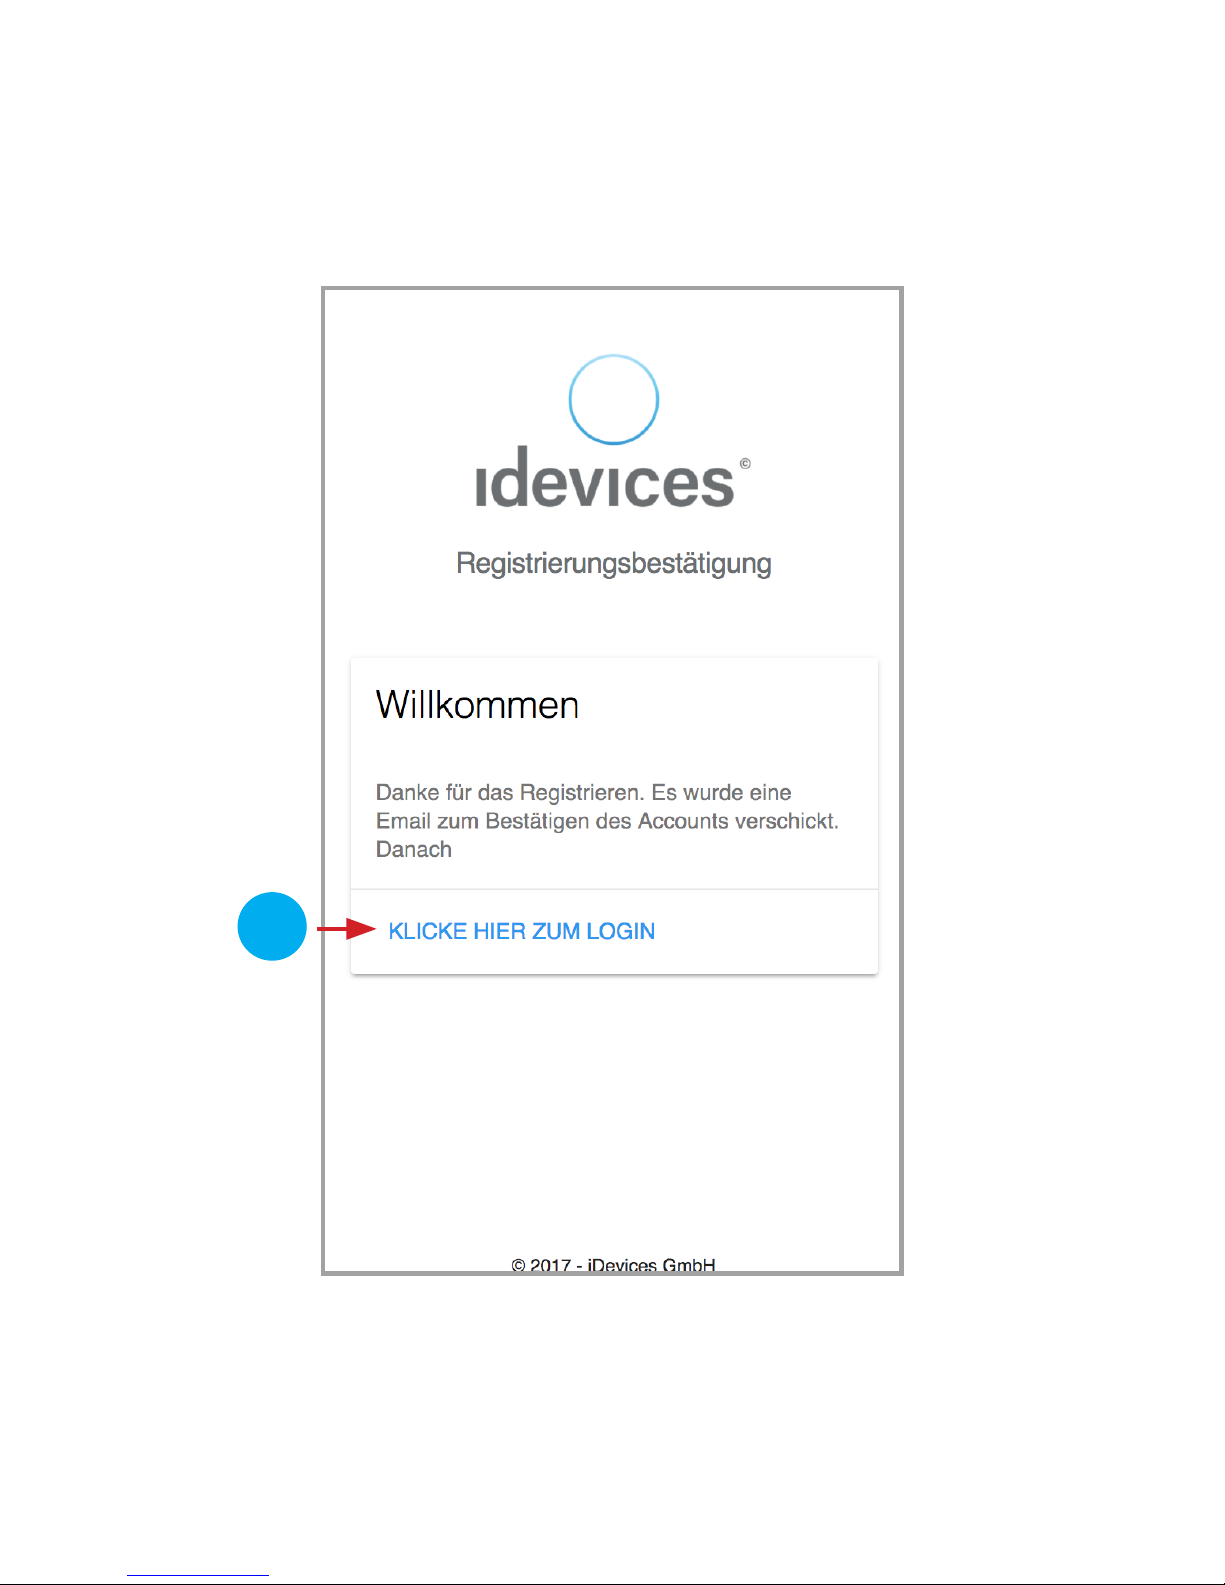
4. Conrm your entries by clicking „register“. You will shortly revice a conrma-
tion email in which you can conrm your account.
5. After conrming your account, you may log in to the app.
16
1
2
3
4
17
5

18
This page is blank for technical printing reasons.

19
8.3.3 Setting up your rst idevices Air Quality Sensor
To add your idevices Air Quality Sensor, please follow these instructions:
1. Name your device rst. In order to do this enter a device name of your
choice.
2. Then congure the room type of the device by selecting it from the drop-down
menu (selection list).
3. Insert the 12-digit serial number of your idevices Air Quality Sensor, which
can be found on the bottom of the device, and on the side label of the box.
4. If you want to set up your device in a different time zone than „Europe Berlin“
(for example England), you can set the time zone of your idevices Air Quality
Sensor here.
5. Conrm your entries by clicking on „Save“ to complete the setup of your
idevices Air Quality Sensor.
6. Do you want to add another idevices Air Quality Sensor? Open the menu on
the top left site and click on „New sensor“. Repeat these instructions.

20
4
1
2
3
5
Table of contents
Other iDevices Accessories manuals


