Tronic QI TPBQ 10000 A1 User manual
Qi®POWER BANK
TPBQ 10000 A1
IAN 376215_2101
QI®POWER BANK
Operation and Safety Notes
QI®-POWERBANK
Bedienungs- und Sicherheitshinweise

GB/IE/NI
Operation and Safety Notes Page 5
DE/AT/CH
Bedienungs- und Sicherheitshinweise Seite 30
2
4
3
7
8
9
1
5
6
A
B
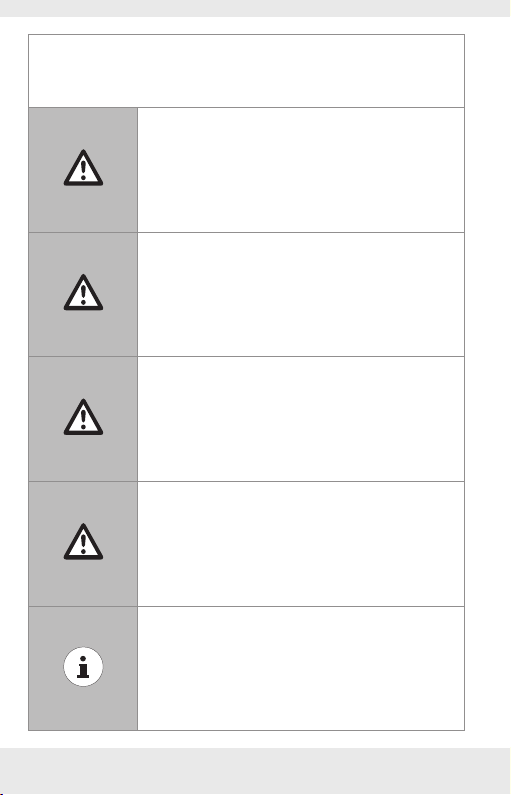
QC3.0 enabled or
conventional power
supply not included.
QC3.0-fähiges oder
konventionelles Netzteil
nicht enthalten.
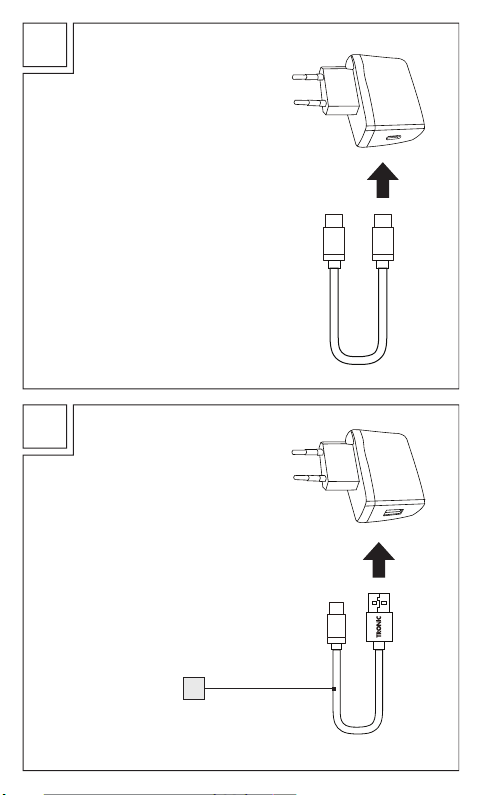
PD enabled power supply
and USB Type C to Type C
cable not included.
PD-fähiges Netzteil und USB-
Typ-C auf Typ-C-Kabel nicht
im Lieferumfang enthalten.
7

GB/IE/NI 5
Warnings and symbols used........................Page 6
Introduction .........................................................Page 9
Intended use.........................................................Page 9
Trademark notice..................................................Page 9
Scope of delivery.................................................Page 10
Parts description...................................................Page 10
Technical specifications .......................................Page 11
Safety notices .....................................................Page 12
Before use ............................................................Page 15
Operation and use............................................Page 16
Charging the power bank ...................................Page 16
Checking the battery status.................................Page 17
Qi wireless charging............................................Page 17
Charging mobile devices with the power bank
via the USB output ports......................................Page 19
Charging mobile devices wirelessly and
via USB simultaneously........................................Page 21
Troubleshooting.................................................Page 22
Cleaning and care .............................................Page 24
Storage during non-use..................................Page 25
Disposal.................................................................Page 25
Simplified EU declaration
of conformity.......................................................Page 26
Simplified UKCA declaration of
conformity (in Great Britain only)..............Page 27
Warranty and service .....................................Page 28
Warranty ..............................................................Page 28
Warranty claim procedure..................................Page 29
Service..................................................................Page 29
GB/IE/NI 6
Warnings and symbols used
These instructions for use contain the following warnings:
DANGER! This symbol with the signal word
“DANGER“ indicates a hazard with a high
level of risk which, if not avoided, will result in
serious injury or death.
WARNING! This symbol with the signal
word “WARNING“ indicates a hazard with
a medium level of risk which, if not avoided,
could result in serious injury or death.
CAUTION! This symbol with the signal word
“CAUTION“ indicates a hazard with a low
level of risk which, if not avoided, could result
in minor or moderate injury.
ATTENTION! This symbol with the signal
word “ATTENTION“ indicates a possible
property damage.
NOTE: This symbol with the signal
word “NOTE“ provides additional useful
information.
GB/IE/NI 7
WARNING! EXPLOSION HAZARD!
A warning with this symbol and word
“WARNING! EXPLOSION HAZARD”
indicates the potential threat of explosion.
Failure to observe this warning may result in
serious or fatal injuries and potential property
damage. Follow the instructions in this
warning to prevent serious injuries, a danger
to life or property damage!
This symbol means that the operating
instructions must be observed before using
the product.
Direct current / voltage
Technology to optimize charging time.
The equipment complies Quick Charge 3.0
specifications and agreements issued by
Qualcomm Technologies, Inc.

GB/IE/NI 8
“Qi“ and the Qi logo mark are trademark of
the Wireless Power Consortium (WPC)
PD: Power Delivery (PD), introducted by
the USB Implementers Forum, Inc., is a
specification for handling higher power
and allows a range of devices to charge
quickly over a USB connection. It operates
by facilitating a conversation between two
devices so they can determine how much
power can be pulled from the charger.
CE mark indicates conformity with relevant EU
directives applicable for this product.
UKCA mark indicates conformity with relevant
Great Britain regulations applicable for this
product.
(The UKCA mark logo is valid in Great Britain
only.)

GB/IE/NI 9
Qi®POWER BANK
PIntroduction
We congratulate you on the purchase of your new product.
You have chosen a high quality product. The instructions for
use are part of the product. They contain important information
concerning safety, use and disposal. Before using the product,
please familiarise yourself with all of the safety information and
instructions for use. Only use the product as described and for
the specified applications. If you pass the product on to anyone
else, please ensure that you also pass on all the documentation
with it.
Intended use
This QI®POWER BANK (hereinafter referred to as “product”)
is an Information Technology device which is solely intended
to be used to charge mobile devices which have Qi wireless
charging technology. Devices that do not support Qi wireless
technology can be charged through a USB port.
This product is not intended for commercial use. Manufacturer is
not liable for damages, which result from non-intended use.
Trademark notice
‒ USB®is a registered trademark of USB Implementers Forum,
Inc.
‒ “Qi“ and the Qi logo mark are trademark of the Wireless
Power Consortium (WPC).
‒ The TRONIC trademark and trade name is the property of
their respective owners.
‒ The Smart Fast Charge trademark and trade name is the
property of their respective owners.

GB/IE/NI 10
‒ Qualcomm is a trademark of Qualcomm Incorporated,
registered in the United States and other countries.
Qualcomm Quick Charge is a trademark of Qualcomm
Incorporated. All Qualcomm Incorporated trademarks are
used under license.
‒ Any other names and products may be trademarks or
registered trademarks of their respective owners.
Scope of delivery
1 Qi®Power bank
1 USB type A to USB type C cable
1 Instructions for use
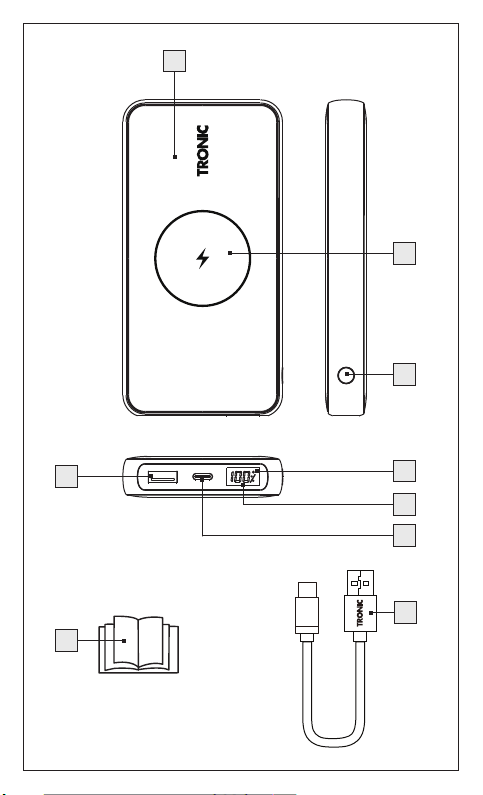
Parts description
Please refer to the fold out page.
1Qi Power bank
2Qi charging surface
3On/Off button
4Qi status indicator
5LED display for battery capacity
6USB Type C (PD) input and output port
7USB Type A to Type C cable
8Instructions for use
9USB Type A (QC3.0) output port

GB/IE/NI 11
Technical specifications
Built-in rechargeable battery: 3.7 V , 10,000 mAh,
37Wh (Lithium polymer)
USB type C input and output
voltage / current (PD): 5 V , 3 A /
9 V , 2 A/
12 V ,1.5 A
USB type A output voltage /
current (QC3.0): 5 V , 3 A /
9 V , 2 A /
12 V , 1.5 A
Wireless charging power: 10 W max
Wireless charging distance: ≤ 5 mm
Charging efficiency: up to 86%
Frequency band: 136.60-147.60 kHz
Transmitted maximum radio
frequency power (H-field):
-10.62 dBuA/m at 10m
distance
Maximum output power: 15 W*
Maximum output current: 3 A*
Minimum output current: approx. 100 mA
Operating temperature: 5 – 35 °C
Storage temperature: 0 – 45 °C
Humidity (no condensation): 10 –70 %
Dimensions: approx.
137 x 69 x 18 mm
Weight: approx. 245 g
*If all outputs are used at the same time, the sum of the output
current must not exceed 3 A (5V 3A, 15W).

GB/IE/NI 12
Notes on Qi technology:
This product with Qi wireless charging is designed to comply
with the Qi (Wireless Power Consortium) standard, but no
guarantees are given for its compatibility with all products that
comply with the standard.
Safety notices
Please familiarise yourself with all instructions for use and safety
notices before using the product for the first time. When passing
this product on to third parties, please be sure to include all
documentation.
Check the product for visible external damage before use.
Do not use the product if damaged or dropped.
This product may be used by children age 8 years and
up, as well as by persons with physical, sensory or mental
impairments or lacking experience and/or knowledge,
provided they are supervised or instructed in the safe use
of the product and understand the associated risks. Do not
allow children to play with the product. Never allow children
to clean or maintain this product unsupervised.
DANGER! Packaging materials are not a toy. Keep all
packaging materials out of the reach of children. Suffocation
hazard!
Always use the product on flat and smooth surface. The
product could be damaged if it falls.
Do not expose the product to direct sunlight or high
temperatures. It may otherwise overheat and be damaged
beyond repair.
Do not operate the product near heat sources such as
radiators or other devices producing heat.
Do not operate the product near open flames.

GB/IE/NI 13
The product is not designed for use in rooms with high
temperatures or humidity (i.e bathrooms) or those in which a
great amount of dust is generated.
Do not expose the product to dripping water or splashing
water and do not place containers filled with liquids such as
vases or open drinks on top of or beside the product.
Do not expose the product to extremely high temperatures.
This applies in particular if you are thinking about storing
the product in your car. Over a prolonged period of time,
the car and the glove compartment could become extremely
hot. Remove electric and electronic devices from the car.
Do not use the product immediately after it has brought
from a cold room to a warm room. Allow the product to
acclimatise before you switch it on.
WARNING! Never open the product casing. This
product has no internal parts requiring maintenance.
Do not independently convert or modify the product.
Repairs to the product must be performed by authorised
specialised companies or customer service. Improper repairs
may place the user in considerable danger. They will also
void the warranty.
WARNING! Metal objects between the charger and
device to be charged will get hot and can burn you. Remove
foreign objects from the charger before charging device.
WARNING! EXPLOSION HAZARD! Improper
handling of lithium polymer batteries can result in fire,
explosions, hazardous substances leaking, or other
dangerous situations! Do not throw the product into the fire,
as this could lead to the built-in battery exploding.
Observe the usage restrictions and prohibitions of use
for battery-operated products in situations which may be
hazardous such as at petrol stations, airports, hospitals, etc.
WARNING! During charging process, please be
noticed that the product must not be covered. Otherwise the
product can be heated.

GB/IE/NI 14
The product should never be charged at a PC or notebook,
because due to the high power consumption, the PC or
notebook could be damaged.
NOTE:
Do not attach a metal object to the Qi charging surface 2.
Do not charge your device when the Qi charging surface
2is covered with a towel, layer of dust, etc.
Do not allow the Qi charging surface 2to get wet from
water, beverages, etc.
Do not use the Qi charging surface 2if it is malfunctioning.
Immediately switch the product off and remove the charging
cable from the product if you smell burning or see smoke.
Have the product examined by a qualified technician before
using it again.
Do not subject the Qi charging surface 2with a strong
forces or impact. Failure to do so may result in damage,
injury and/or malfunction.
Do not place magnetic recording media inside the charging
area during charging. The magnetism generated may erase
the data on credit cards. It may also cause wristwatches and
other precision instruments to malfunction.
During charging and immediately after charging, the Qi
charging surface 2and mobile device will be warm. This is
normal and not a malfunction. If there is an unusual heating,
check the Qi charging surface 2and mobile device.
Always place only one mobile device to charge on the Qi
charging surface 2. Only one device can be charged at a
time.
Compatibility with all Qi devices cannot be guaranteed.
Do not attach an anti-slip mat or stickers to the Qi charging
surface. The presence of an anti-slip mat or stickers between
the mobile device to be charged and the Qi charging
surface 2that may prevent charging start.

GB/IE/NI 15
If a cover or decorative accessory that does not comply
with the Qi wireless power standard has been attached to
the supported device, it may not be possible for the device
to be charged depending on the material, thickness, etc. of
the cover or accessory. In such cases, remove the attached
cover or accessory.
If charging does not start even after the supported device
has been placed in the charging area, place the device near
the center of the charging area.
Before starting with wireless charging, read the instructions
provided with the mobile device as well.
If you use a USB power supply for charging the power
bank, the socket used must always be easily accessible so
that the USB power supply can be quickly removed from
the socket in the case of emergency. Please also refer to the
manufacturer‘s instruction manual.
ATTENTION! Two Qi charging devices and/or power
banks must never be placed on top of each other with the
charging surface. A device defect is the possible consequence.
PBefore use
NOTE: Remove all packaging materials from the product.
Please also check the content of delivery inside the
packaging to see if there are any damages. If you notice
any damage or missing parts, please contact the dealer who
sold this product.

GB/IE/NI 16
POperation and use
Charging the power bank
The built-in rechargeable battery must be fully charged before
using the product.
To charge the power bank 1only use power supplies
with an output voltage and current matching the rated input
voltage and current as stated in “Technical specifications” of
this user manual.
ATTENTION! The power bank should not be charged
from a PC or notebook.
In order to get the fastest charging speed, charge the power
bank 1via the PD port 6using a USB Type C to Type
C cable (not included) and a USB Power Delivery (PD)
enabled power charger (not included).
Connect the USB Type C plugs of your Type C to Type C
cable (not included) to the PD port 6of the power bank
1and the PD port of your USB PD enable power charger
(not included) (see fig. A).
Alternatively, you could charge the power bank 1via USB
Type C port 6using the included USB Type-A to Type C
cable 7with a conventional USB charger but the charging
time will be longer. Connect the USB Type C plug of the USB
cable 7with the PD port 6and connect the USB Type
A plug of the USB cable 7to the USB power supply (not
included) (see fig. B).
NOTE: The Qi wireless charging function of the power
bank is disabled when the power bank is being charged.

GB/IE/NI 17
During the charging process, the LED display for battery
capacity 5flashes and shows you the appropriate charge
level of the internal battery in percentage.
NOTE: This is approx percentage of power bank capacity
but not actual measurement.
ATTENTION! Do not connect any device to the power
bank for charging while the power bank itself is charging.
Remove the charging cable from the power bank when it is fully
charged.
Checking the battery status
You can check the battery status on the LED display for battery
capacity 5of the power bank 1at anytime.
Briefly press the On/off button 3. The LED display for
battery capacity 5shows the approximate charge status of
the internal battery for approx. 30 seconds.
Qi wireless charging
Put your Qi compatible device to be charged on the centre
of the Qi charging surface 2of the power bank 1.
Slightly adjust the charging position of the device to be
charged so that its charging surface is facing down to the
centre of the Qi charging surface 2of the power bank 1.
Briefly press the On/off button 3to switch on the power
bank 1. The wireless charging will then start automatically.
When Qi charging is active, Qi status indicator 4flashes
blue*. The LED display for battery capacity 5shows the
current charge status of the internal battery throughout the
wireless charging process.

GB/IE/NI 18
If wireless charging does not start, move your device to be
charged more accurately to the centre of the Qi charging
surface 2until the Qi status indicator 4starts flashing.
While in idle status (standby mode), the Qi status indicator
4will light blue*. The Qi status indicator 4will go off if
no Qi compatible device is detected and idle for approx. 30
seconds.
When the charging process has finished (i.e. the mobile
device is fully charged) the Qi status indicator 4will light
blue or flash blue in colour*.
The Qi status indicator 4will go off when errors are
detected on the Qi charging surface 2*. In this case,
remove your device and make sure that there are no
unwanted metallic objects between your device and the Qi
charging surface 2and then try again.
To stop the wireless charging, take your device away from
the Qi charging surface 2. The Qi status indicator 4will
light blue (standby mode)*. If no Qi compatible device is
detected for approx. 30 seconds, the Qi status indicator 4
will go off.
To switch off the power bank 1during the standby mode,
press the On/off button 3twice. The Qi status indicator 4
and LED display for battery capacity 5will then go off.
*NOTE:
1) Qi status indicator 4may change back to blue colour
(standby mode) when wireless charging has finished if the
mobile device closed the wireless communication between
the Qi charging surface 2and the mobile device.
2) All devices to be charged wirelessly must comply with Qi
Standard.

GB/IE/NI 19
3) The different modes of the Qi status indicator are
summarized below:
Qi wireless charging
status Qi status indicator 4
Starting process (boot
phase), standby or searching
for a Qi charging device
Light blue
Charging Flash blue
Fully charged
Light blue or flash blue
(depending on the mobile
devices being charged)
Fault/Error condition Indicator off
No Qi compatible device
detected Indicator on
Charging mobile devices with the
power bank via the USB output ports
You can charge up to two devices at the same time using the
USB ports of the power bank 1. If all outputs are used at the
same time, the sum of the output current must not exceed 3.0 A.
To charge your QuickCharge 3.0 enabled device, connect
the USB type A plug of the USB cable 7or the original
charging cable of the device to be charged to the USB
type A (QC3.0) output 9. Then connect the USB Type C
plug of the USB cable 7to the Type C input of device to
be charged. The charging process will start automatically.

GB/IE/NI 20
NOTE: You could also charge your conventional USB
devices from the USB Type A output port 9of the power bank
1using the included USB cable 7or a USB Type A to micro
USB cable (not included).
To charge your USB Power Delivery (PD) enabled device,
connect the USB Type C plugs of your USB Type C to Type
C cable (not included) to the PD port 6of the power
bank 1and the PD port of the device to be charged. The
charging process will start automatically.
In case if the charging process does not begin immediately,
press the On/off button 3briefly to begin the charging
process. The current battery status of the power bank 1is
displayed during the charging process by the LED display
for battery capacity 5.
To end the charging process, disconnect the USB charging
cable from the mobile device and the power bank 1. The
power bank 1and the LED display for battery capacity 5
will switch off after approx. 30 seconds.
To switch off the power bank 1after your mobile device is
disconnected: press the On/off button 3twice. The power
bank 1and the LED display for battery capacity 5will
switch off.
*NOTE:
1) I f you use all the USB ports, a voltage of 5 V will output at
all the outputs. The maximum output current must not exceed
3 A for all outputs. If all USB outputs are used, fast charge
mode will not be activated.
Other manuals for QI TPBQ 10000 A1
1
This manual suits for next models
1
Table of contents
Languages:
Other Tronic Accessories manuals

Tronic
Tronic TPB 10000 A1 User manual

Tronic
Tronic 3538672010 User manual

Tronic
Tronic TPB 10000 A1 User manual

Tronic
Tronic QI TPBQS 10000 A1 User manual

Tronic
Tronic TPB 5000 A1 User manual

Tronic
Tronic QI TPBQ 10000 A1 User manual

Tronic
Tronic TPB 10000 A1 How to use

Tronic
Tronic TPB 10000 A1 User manual
Popular Accessories manuals by other brands


Smartlink
Smartlink LUX-TWR Installation and setup guide

SmartDHOME
SmartDHOME EcoDHOME Gas sensor installation manual

Alecto
Alecto ADB-19 Installation

Paramount Fitness
Paramount Fitness Ultra UV 004-422-2025-00 Installation & operation manual

LEEC
LEEC SL2 operating instructions

Panasonic
Panasonic MA4SD05X Specification sheet


