SKY-WATCHER Star Adventurer 2i User manual

Copyright © Sky-Watcher
200430V1
INSTRUCTION MANUAL
Star Adventurer 2i

2
Sky-Watcher Star Adventurer 2i is user-friendly and provides various combinations
to satisfy all your needs for astrophotography and time-lapse photography. It is a high
precision, portable and stable celestial tracking platform for sidereal, solar, lunar tracking
or other customized speeds with automatic DSLR shutter release control. It also support
unguided dithering option for easily removing hot pixels, cold pixels and even satellite/
airplane trails and may also improve pattern noise problem during the stacking process.
Moreover, its built-in Wi-Fi allows users to easily customize their favorite settings through
free Star Adventurer mini Console App both for Android and iOS platforms. All the
customized parameters will be stored in preprogrammed functions selected by friendly
Mode Dial which allows you to use your favorite settings without initiating the Wi-Fi
communication.
To prevent damage to your Sky-Watcher product or injury to yourself or to others, read
the following safety precautions entirely before using this equipment. Keep these safety
instructions available to all users of the product.
To prevent possible injury, pay special attention to all warnings before using this Sky-Watcher
product.
Sky-Watcher reserves the right to change the specication of the hardware and software
described in this manual at any time and without prior notice.
Sky-Watcher cannot be held liable for any damage resulting from inappropriate use of
this product.
While every effort has been made to ensure that the information in this manual is
accurate and complete, we greatly appreciate if you nd any errors, to report them to
Sky-Watcher.1
Thank you for purchasing this Sky-Watcher product
For your Safety
Notice
Do not look at the Sun through the Polar Scope. Viewing the Sun or other strong
light sources through the Polar Scope could cause permanent visual impairment
Do not use in the presence of ammable gas. Do not use electronic equipment in the
presence of ammable gas, as this could result in explosion or re
Keep out of reach of children. Failure to do so could result in injury. Moreover, note
that small parts constitute a choking hazard. Consult a physician immediately when a
child swallows any part of this equipment
Do not disassemble. Touching the product's internal parts could result in injury. In
the event of malfunction, remove the batteries and take the product to a Sky-Watcher
authorized service center
WARNING:
•
•
•
•
•
•
•

3
Features........................................................................................................................................4
Introduction....................................................................................................................................5
The Sky-Watcher Star Adventurer 2i Body....................................................................5
The Optional Accessories................................................................................................6
Preparation....................................................................................................................................8
Setup Tripod...........................................................................................................8
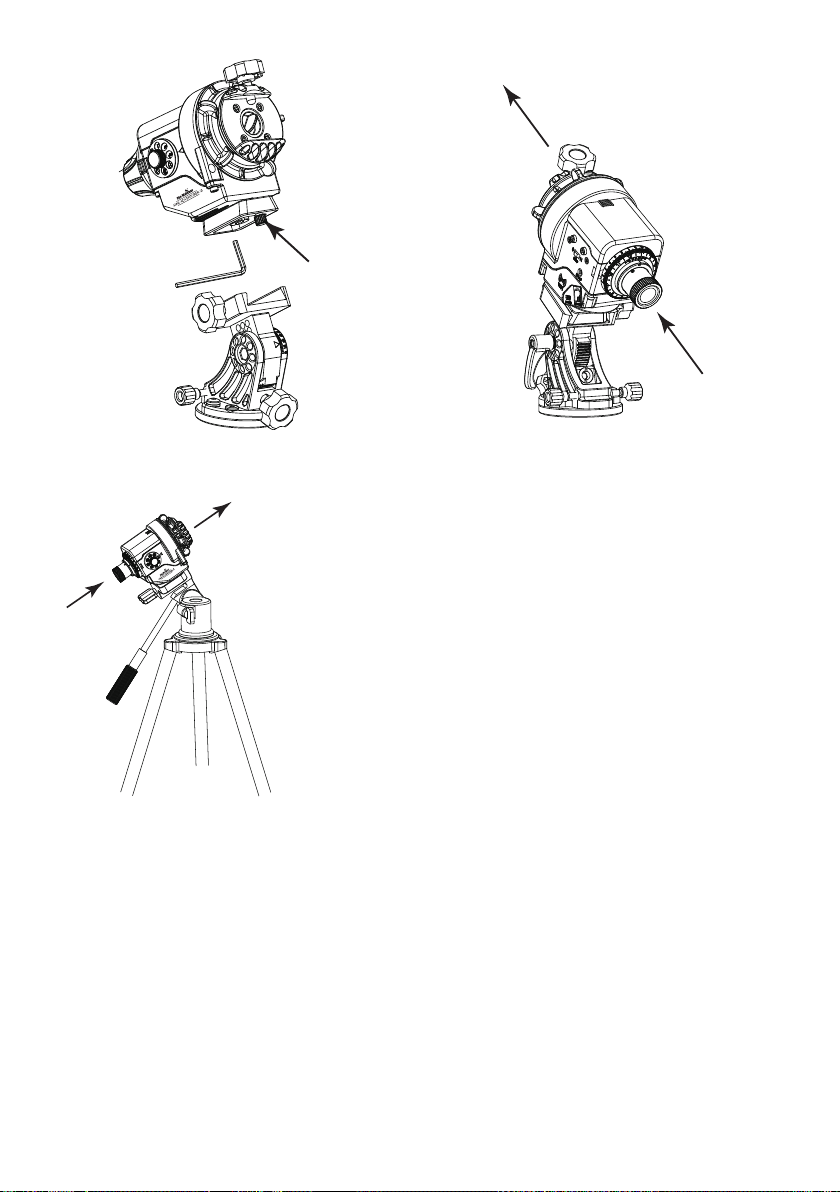
Mount Star Adventurer 2i.................................................................................................8
Mount The Imaging Equipment ....................................................................................10
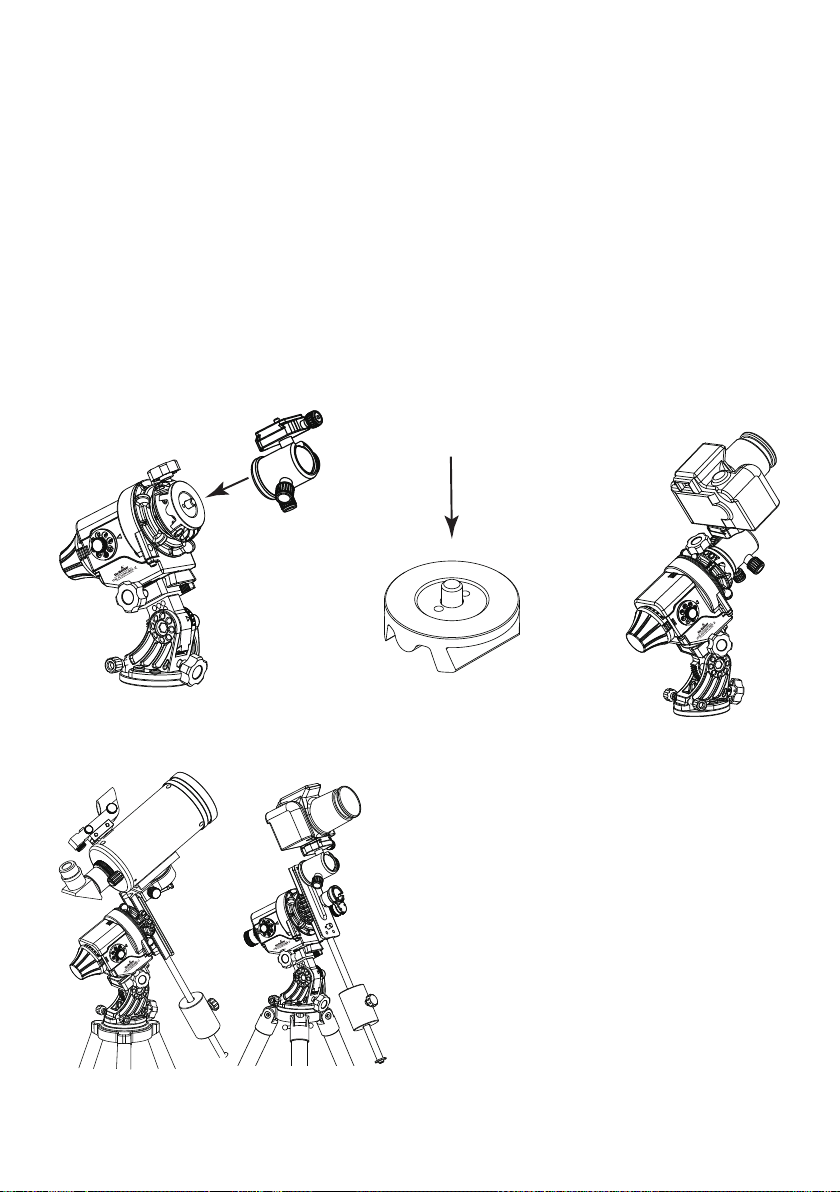
For Astrophotography.....................................................................................10
For Time-Lapse Photography........................................................................12
Provide Power Source....................................................................................13
Start Using Star Adventurer 2i......................................................................................................14
Overview.........................................................................................................................14
LED Status Indicators ....................................................................................................16
Basic Operation In APP mode ......................................................................................17
Astrophotography and Astro Time-Lapse ...................................................................18
Astrophotography............................................................................................18
Astro Time-Lapse............................................................................................20
Polar Alignment...............................................................................................................21
Polar Alignment in the Northern Hemisphere...............................................21
Polar Alignment in the Southern Hemisphere..............................................24
Using Star Adventurer mini Console in APP mode.....................................................26
Using the Star Adventurer mini Console For Astrophotograhy..................27
Using the Star Adventurer mini Console For Astro Time-Lapse................29
Using the Star Adventurer mini Console For Time-Lapse Photography...31
Manual Control with the Star Adventurer mini Console..............................34
Settings with the Star Adventurer mini Console..........................................35
Wi-Fi Network..................................................................................................36
Six Preprogrammed Function Modes...........................................................................37
Appendix I : Calibrate The Polar Scope......................................................................................38
Appendix Ⅱ: Fine-Tuning Mounting Assembly..........................................................................41
Appendix Ⅲ: Equatorial Wedge...................................................................................................42
Appendix Ⅳ: How to Restore Factory Settings..........................................................................43
Appendix Ⅴ: Firmware Upgrade Procedure...............................................................................45
Appendix Ⅵ : Specication...........................................................................................................46
CONTENT

4
• High precision, portable and stable celestial tracking system
• Built-in Wi-Fi with free App for Android and iOS platforms
• Multi-language support
• Solar, lunar, sidereal and customized tracking speeds for astrophotography
• Supports unguided dithering option for easily removing hot/cold pixels
• Maximum payload up to 5 kg (11 lb)
• Supports star-scape photography
• Supports standard short exposure time-lapse photography
• Supports long exposure time-lapse photography
• User-friendly Mode Dial with preprogrammed functions
• Built-in Polar Scope with illuminator for precise polar alignment
• Provides DSLR shutter control for multiple brands
• Lifetime free rmware upgrade
• Supports single axis auto-guiding
• Built-in motor protection and status indication
• Uses AAx4 batteries
• Supports external USB power
• Low power consumption
• Fits standard 3/8 and 1/4 inch tripod/quick release brackets
• Expandable with a range of optional accessories
Features:

5
The Sky-Watcher Star Adventurer 2i Body
1:Mode Dial
2:Mode Index
3:Polar Scope Cap
4:Battery Case Cover
5:Polar Scope Cover
6:Quick Polaris Finder
7:Mini USB Port
8:RJ-12 6-pins Auto-guider Interface
9:DSLR Shutter Control Port
10:3-Position Slide Switch
11:Right Button and LED Indication
12:Left Button and LED Indication
13:Clutch Knob
14:Mounting Platform
15:Locking Knob
16:Knurled Ring of Polar Scope
17:Polar Scope
18:Date Graduation Circle
19:Time Meridian Indicator
20:AAx4 Battery Case
21:Time Graduation Circle
22:Time Meridian Indicator Calibration Screw
23:Polar Scope Calibration Screw
24:Worm Gear Meshing Adjustment Screw
25:Socket for 3/8" Thread Screw
26:1/4” to 3/8” Convert Screw Adapter
Introduction:
1
26
3
4
5
14
13
12 11
10
9
8
7
15
24 25 26
21
22
23
16
20
19
18
17

6
The Optional Accessories: (The default included accessories may vary. Please
refer to local dealers for details).
Fine-Tuning Mounting Assembly - To mount a telescope with
¼” thread screw on the Star Adventurer 2i. Allows pointing and
ne-tuning pointing in two directions.
3/8” Ball Head Adapter - To mount a standard camera ball-head
with 3/8” thread screw on the Star Adventurer 2i.
Equatorial Wedge - To adjust the latitude of the Star Adventurer
2i for polar alignment. Oers higher accuracy and stability than a
standard photo tripod head.
Counterweight - To balance the telescope or camera loading
with 1kg counterweight.
1/4" to 3/8" Convert Screw Adapter - To convert the default
socket for 3/8" thread screw to the socket for 1/4" thread screw
in order to mount the Star Adventurer 2i to a standard quick
release plate of the tripod with 1/4" thread screw.
Polar Scope Illuminator - To provide lighting source for Polar
Scope. Also compatible with Sky-Watcher EQ3, EQ5 and EQ8.

7
DSLR Shutter Control Cable - To connect the DSLR Shutter
Control Port of Star Adventurer 2i to your DSLR's external
shutter control port. This allows Star Adventurer 2i to directly
control the DSLR's shutter release with preprogrammed shutter
interval. You can order an optional cable for your camera from
your local resellers. The Following list shows the cables that we
oer as optional items.
Sky-Watcher
Cable model Camera interface Compatible Remote
controller interface Compatible Camera
AP-R1C
(CANON C1)
Canon remote
control terminal (E3
type)
Canon
RS-60E3 Canon EOS 100D, 300D/350D, 400D/450D,
500D/550D, 600D/650D, 700D, 60D/60Da, 70D
AP-R3C
(CANON C3)
Canon remote
control terminal (N3
type)
Canon
RS-80N3, TC-80N3 Canon EOS 5D/6D/7D, 10D/20D/30D/40D/50D,
1V, 1D, 1Ds Mark III, 5D Mark III
AP-R1N
(NIKON N1)
Nikon Ten-pin
remote terminal
Nikon MC-22, MC-30, MC-
36 Nikon D1/D2/D3/D4 D200/D300/D700/D800
AP-R2N
(NIKON N2)
Nikon Remote cord
connector Nikon MC-DC1 Nikon D70S, D80
AP-R3N
(NIKON N3)
Nikon Accessory
terminal Nikon MC-DC2 Nikon D90, D600, D3000/D3100/D3200/D3300,
D5000/D5100/D5200/D5300, D7000/D7100
AP-R1S
(SONY S1)
Sony REMOTE
terminal Sony RM-S1AM, RM-L1AM Sony a100, a200, a300, a350, a450, a550,
a560, a700, a850, a900
AP-R3L
(OLYMPUS
OP12)
Olympus
Multi-connector RM-UC1
Olympus E-P1/E-P2, E-PL2/E-PL3, E510/E520/
E550/E620, E400/ E410/E420,
SP-570UZ/SP-590UZ

8
Preparation :
Without Tilt-head: take a standard photo tripod or video
tripod with a 3/8” connection screw. Spread the legs and
secure the tripod legs at the desired height to provide
a stable support for your Star Adventuer 2i. Assemble
Equatorial Wedge to the tripod as Fig 1.
With Tilt-head/Ball-head: Take a standard photo
tripod or video tripod with Tilt-head or Ball-head. Spread
the legs and secure the tripod legs at the desired height
to provide a stable support for your Star Adventurer 2i
as Fig 2.
With Equatorial Wedge: Make sure the 1/4" to 3/8" Convert Screw Adapter is not in
the 3/8" threaded socket at the bottom side of the Star Adventurer 2i. If it is, use a Slot
Screwdriver to remove it. Mount the Star Adventurer 2i on the (optional) Equatorial
Wedge (Fig 3). Make sure the Stopper is facing forward. Then point the Polar Scope to
the direction of the North Pole (For Northern Hemisphere observing) or South Pole (For
Southern Hemisphere observing) (Fig 4). Lastly, complete the Polar Alignment process
(Please see Polar Alignment session for reference).
Setup Tripod:
Mount Star Adventurer 2i:

9
With Tilt-head/ Ball-head: Make sure the 1/4" to 3/8"
Convert Screw Adapter is in the 3/8" threaded socket at
the bottom of the Star Adventurer 2i. If it is not, use an
Slot Screwdriver to install it. Mount the Star Adventurer
2i to the quick release plate on the tripod. Then point the
Polar Scope to the direction of the North Pole (For Northern
Hemisphere observing) or South Pole (For Southern
Hemisphere observing) (Fig 5). Then complete the polar
alignment process (Please see Polar Alignment session for
reference).
Please DO NOT move the tripod or change the angle of Equatorial Wedge or tilt-head
in order to keep the polar alignment. IF you did, please redo the polar alignment
process.
North/South Pole
Stopper
North/South Pole

10
Mount The Imaging Equipment:
Star Adventurer 2i + Fine-Tuning Mounting
Assembly + Polar Scope Illuminator + 1kg
Counterweight + Telescope
Or
Star Adventurer 2i + Fine-Tuning Mounting
Assembly + Polar Scope Illuminator
Camera + Ball Head + Shutter Control
Cable + 1kg Counterweight
Now you can mount your imaging equipment according to your need, including the Shutter
Control Cable, as the following gures show. You can contact Sky-Watcher authorized
dealers to acquire the optional accessories as needed. During mounting, please DO NOT move
the tripod or change the angle of the Equatorial Wedge or tilt-head in order to keep the polar
alignment.
Star Adventurer 2i +3/8” Ball Head Adapter + Ball head + Camera + Shutter Control
Cable:
Note: Make sure the locking bolt of the Mounting Platform has locked on the indentation
on the side of the 3/8" Ball Head Adapter for better locking and support.
For Astrophotography:
3/8” Ball Head Adapter

11
Star Adventurer 2i + Dovetail + Dual Ball Heads +Dual Cameras + Shutter Control
Cable:
Star Adventurer 2i + Fine-Tuning Mounting
Assembly + Ball-Head + Camera+ Telescope
(+ Auto-guider):
Take the Dovetail from the Fine-Tuning
Mounting Assembly to mount two Ball
Heads
Ball Head

12
For Time-Lapse Photography:
Horizontal Rotation Time-Lapse Photography:
Vertical Rotation Time-Lapse Photography:
(For reference only: you can assemble very different configurations to create more
interesting time-lapse photography)

13
Provide Power Source:
Star Adventurer 2i allows two power source options. One is inserting 4 AA type batteries;
the other is providing DC 5V through USB port (type mini-B).
insert 4 AA batteries
plug in USB power

14
Star Adventurer 2i is the next generation of Star Adventurer. It's a compact and versatile
camera tracking platform that lets you make truly unique photographs and time-lapse
videos. While keeping previous high-accuracy tracking and the friendly Mode Dial with
preprogrammed functions, it also adds Wi-Fi capability to allow users easily configure
their favorite photographic settings through free Star Adventurer mini Console App.
Besides previous Astrophotography and Regular-Exposure Time-lapse modes, It also
adds Long-Exposure Time-lapse and patented Astro Time-lapse. Moreover, It supports
unguided dithering option in Astrophotography mode for easily removing hot/cold pixels,
satellite/airplane trails and may also improve pattern noise problem during the stacking
process.
Star Adventurer 2i has a fully App controlled mode (APP) and six preprogrammed function
modes ( , , , , RT and LT). The APP mode let users fully control Wi-Fi settings
and photographic settings including exposure time, frame period, number of pictures taken,
tracking speed, dithering range and swing range through Wi-Fi and Star Adventurer
mini Console App. All the successful executed settings in APP mode will be stored into
corresponding preprogrammed function modes. Next time users can directly select any of
the six preprogrammed function modes without initiating the Wi-Fi communication. Star
Adventurer 2i will automatically execute the corresponding preprogrammed function with
customized settings.
Following is the basic description. For more details, please read each section carefully
to understand how to control Star Adventurer 2i using the free control app or the
preprogrammed function modes.
Mode Dial : For power control and mode selection. While powering off the Star
Adventurer 2i , please wait until LEDs completely o
Mode Dial Functional Description
OFF Turn o Power
Astrophotography mode with celestial tracking
Astrophotography mode with solar tracking
Astrophotography mode with lunar tracking
Astro Time-lapse mode
RT Regular-Exposure Time-lapse mode
LT Long-Exposure Time-lapse mode
APP Star Adventurer mini Console App mode
Start Using Star Adventurer 2i
Overview:
Mode Index
Mode Dial

15
3-Position Slide Switch: For selection of rotation
direction in six preprogrammed function modes
(, , , , RT and LT). This function has no
eect in APP mode.
Buttons: The Right / Left buttons are used for
rotating in higher speed (about 12X celestial
tracking speed) in six preprogrammed function
modes ( , , , , RT and LT) . The slewing
function has no effect in APP mode. In APP
mode, buttons are ONLY used to enable Wi-Fi if it
is disabled .
Snap : This is a 2.5mm 3-segment stereo jack for
connecting to a camera’s shutter control port to
control camera shutter interval.
Auto-Guider: Star Adventurer 2i also contains
auto-guiding interface to accept single axis
(RA axis) auto-guiding signal to provide more
accurate celestial tracking for better quality of
astrophotography. The RJ-12 6-pin outlet is for
connecting an auto-guider. It is compatible with
any auto-guider with a ST-4 type interface. This
function only works in Astrophotography Mode with
Dithering disabled and the tracking speed is not
faster than 2 times of sidereal speed. For other
modes, the auto-guiding signal has no eect.
USB Port: Star Adventurer 2i contains a USB port
(Type Mini-B) to support external USB power and
to support control commands for rmware upgrade
or App control. For rmware upgrade, please refer
to "Appendix Ⅴ:Firmware Upgrade procedure "
for details For APP control please refer to " Using
Star Adventurer mini Console in APP mode" for
details.
Slide Switch
Buttons
Shutter Control Port
USB
auto guide

16
LED Status Indicators
Button LEDs:
Both of Mode Dial LED and Button LEDs Repeatedly Blink 3 times: Indicate the Star
Adventurer 2i is ready for rmware update or rmware update is in progress.
Now is time to learn more about Star Adventurer 2i in each of following sections.
Mode Dial LED O: The Power is O.
Mode Dial LED Solid On: Power is on and system is
normal.
Mode Dial LED Slow Blink: Low Battery Level. The red
LED blinks 2 times per second when the battery level is
lower than 4.6V, or USB power is lower than 4.4V.
Mode Dial LEDs Fast Blink: The red LED blinks
3 times per second to indicate motor speed errors
exceeding 5% and/or motor stalls that last over 5
seconds. Speed errors can be caused by overloading
the mount and by low battery levels. To correct a speed
error reduce the load or supply new batteries. Motor
stalls are usually due to obstructions of the mount so
that it cannot rotate. In the case of motor stalls, remove
the cause of the block then restart your task.
For six preprogrammed function modes ( , , , , RT and LT):
Button LEDs Solid On: Motor status is normal
For APP mode:
Button LEDs O: Wi-Fi is turned o.
Button LEDs Blinking: Wi-Fi is activated and ready for
connection.
Button LEDs Solid On: Wi-Fi is connected and Star
Adventurer mini Console is connected and running
Mode Dial LED:
Mode Dial LED
Buttons

17
Basic Operations in APP mode:
Installing the Star Adventurer mini console:
The Star Adventurer mini Console is available at the
Android “Play Store” for your Android device and at the
“App Store” for your iOS device. Go to your particular
store, search for “Star Adventurer mini Console”,
then download and install. The app performs the same
way for both operating systems. Detailed use of the
app is provided in the relevant sections.
Turn on Wi-Fi: Turn Mode Dial to APP mode to enable
Wi-Fi and allow device to accept commands from App.
Connect to Wi-Fi: Once Wi-Fi is activated and ready
for connection, go to the “Settings > Wi-Fi” for your
phone, then search for and join the Wi-Fi access point
“SynScanWiFi_xxxxxx”
Start the Star Adventurer mini Console: Once Wi-
Fi is connected you can run the Star Adventurer mini
Console to access its many features. See specific
details in the relevant sections
Turn Off Wi-Fi : Turn Mode Dial to any mode other
than APP mode will disable the Wi-Fi
Reconnecting the Wi-Fi: Built-in Wi-Fi may be disabled due to timeout or after task started
according to users' setting. Timeout happens when the Wi-Fi trac is absent for certain
period. The default timeout is disabled but you can set it to other values using the Star
Adventurer mini Console. The Wi-Fi may also be disabled after the task started when
user enable the "Wi-Fi O on Run". To resume Wi-Fi, press the Right/Left Button briey
until the Button LEDs starting ashing. Re-connect to Wi-Fi as described above.
Following we will start to explain the most popular function of Star Adventurer 2i,
Astrophotography and explain how Star Adventurer 2i makes this challenge job
become easier.

18
Astrophotography
Astrophotography refers to photography of the night time sky. It has become far more
familiar to us due to the incredible images recorded by the Hubble Space Telescope and
shared by NASA with the public over the past two decades. But astrophotography didn’t
start with the Hubble Space Telescope. In fact, it started more than 100 years ago and has
been done in large part since that time by amateur astronomers.
With Star Adventurer 2i, astrophotography is now something you can do, too. You won’t
be able to produce photographs that have the same image scale as those taken by the
Hubble, but you will be able to make beautiful portraits of constellations and large regions
of the Milky Way galaxy showing star clouds, star clusters, and light and dark nebulae.
You’ll be able to record time-lapse videos of auroras, and the stages of a lunar eclipse.
First, however, there are two challenges to overcome that you don’t encounter in typical,
terrestrial types of photography. One is the need to use long exposures (e.g., greater than
30 seconds) to record dim night sky objects. The second is the need to have the camera
follow the sky as the exposure is taking place.
The Milky Way Galaxy revealed through a
long exposure astro-photo with precision
tracking
Unfortunately, you can’t just set your camera
to AUTO, aim it at the night sky and take a
picture. The night sky is far too dim for that
to work, and any attempts you make will
produce seriously underexposed results. But,
you can overcome this challenge by selecting
BULB mode on your camera and using Star
Adventurer 2i’s SNAP cable connection
to create much longer exposures – like a
minute or two – or ten! With a suciently long
exposure, your camera will collect enough light
to reveal hidden details that are much too faint
for our eyes to see. But then, quite literally,
you’ll see the second problem!
Astrophotography and Astro Time-Lapse
The Need For Long Exposures

19
The Need For Tracking
In your now, nicely exposed photo, the stars don’t
look like stars anymore. they look like little lines and
arcs of variable lengths! The problem here is called
trailing, and it becomes more noticeable as the
focal length of your lens and/or your exposure time
increases.
You might think that trailing is due to the movement
of the stars, but it’s not. It’s due to the movement of
your camera as it records those distant stars over
the course of that exposure. Your camera is moving
because it is sitting on a tripod that is sitting on the
Earth, and the Earth is rotating. This motion causes
the stars, which appear to be xed in space from our
perspective, to appear to move relative to us, and
more importantly, to our camera.
Star Adventurer 2i overcomes this challenge by
moving your camera to precisely oset the eects of
Earth’s rotation while a suciently long exposure of
the night sky is being made. Star Adventurer 2i’s
tracking capability keeps a specic area of the sky
impinging upon the same part of the camera sensor
throughout the exposure. So a star will fall on the
same set of pixels from the beginning through the
end of the exposure. The result is a well-exposed
photo of the night sky with pin point star images.
With Star Adventurer 2i, two of the biggest
challenges in doing astrophotography are simplied
and automated for you. Star Adventurer 2i’s
camera control features enable you to take
exposures in excess of 30s each. Star Adventurer
2i’s tracking ability keeps your camera on target to
produce pin point star images. As your skill level
in astrophotography progresses you can set Star
Adventurer 2i up to take multiple images of your
subject, then use advanced processing techniques
like stacking to make truly remarkable celestial
portraits.
An equatorial mount rotates to
prevent star trailing in your photo
by precisely countering Earth’s
Rotation Milky Way Galaxy revealed
through a long exposure astrophoto
with precision tracking

20
Astro Time-Lapse photography faces the same challenges as astrophotography in
general. Namely, due to the dimness of the subject (the night sky), longer exposures are
required to record sufficient detail, and tracking is needed to prevent star trailing during
those exposures. But there are some dierences as well.
For astrophotography, the region of sky that is being photographed moves over the course
of the exposure sequence. We generally repeat the process to obtain a sequence of
images, all of the same subject, and all framed identically. This means that our camera
is pointing in a dierent direction at the end of the sequence compared to where it was
pointing at the beginning. This occurs because our subject has moved and the camera has
moved along with it.
In Astro Time-Lapse we take multiple images as well, and the camera moves with each
exposure. But, unlike in astrophotography, Star Adventurer 2i returns the camera to the
starting point after each exposure is completed.
Now, when the frames are sequenced into a video, you see the night sky moving about a
xed terrestrial reference point. By nding locations with beautiful foreground settings you
can produce breathtaking videos of the sky moving over your location. [Visit our YouTube
channel to see some examples].
Astro Time-Lapse
Special Requirements For Astrophotography and Astro Time-Lapse
In order to track the movement of the night sky the camera has to be continuously moved
to oset the rotation of the Earth in order to hold the subject perfectly steady on the sensor.
The rotation of the camera needs to take place about an axis that is parallel to Earth’s
rotational axis, and therefore, the two axes must be aligned in order for tracking to work
correctly.
Table of contents
Other SKY-WATCHER Accessories manuals

SKY-WATCHER
SKY-WATCHER EQ5 User manual

SKY-WATCHER
SKY-WATCHER synguider User manual

SKY-WATCHER
SKY-WATCHER STAR ADVENTURER GTi User manual

SKY-WATCHER
SKY-WATCHER star adventurer mini User manual

SKY-WATCHER
SKY-WATCHER EQ6 User manual

SKY-WATCHER
SKY-WATCHER DOB SynScan Operating instructions

SKY-WATCHER
SKY-WATCHER EQ1 User manual

SKY-WATCHER
SKY-WATCHER SynGuider II User manual