iFIT PRO-FORM PRO R10 User manual


6
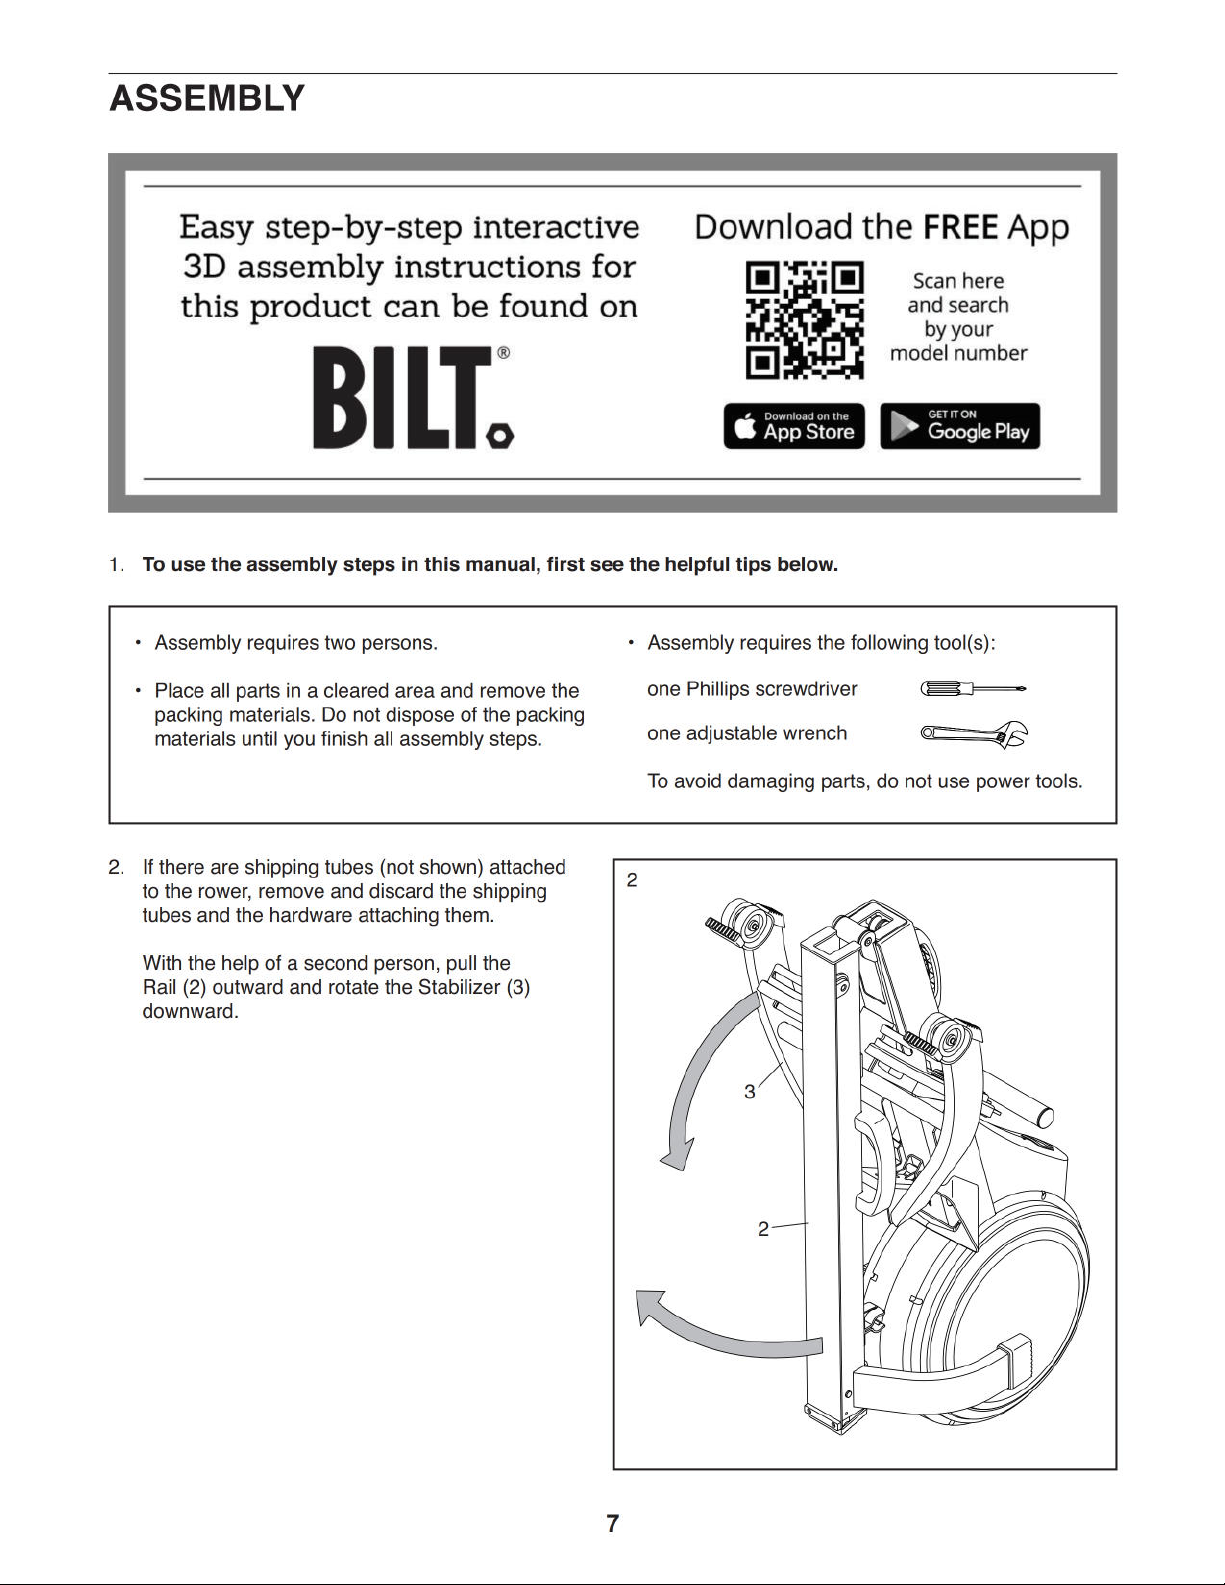
PART IDENTIFICATION CHART
Use the drawings below to identify the small parts needed for assembly. The number in parentheses below each
drawing is the key number of the part, from the PART LIST near the end of this manual. The number following the
key number is the quantity needed for assembly. Note: If a part is not in the hardware kit, check to see if it
has been preassembled. Extra parts may be included.
M8 x 35mm Screw
(82)–4
M10 x 14mm
Screw (61)–2
M4 x 12mm
Screw (105)–4
M4 x 19mm
Screw (69)–2
M4 x 16mm
Screw (68)–2
M4 x 8mm
Screw (104)–2

9
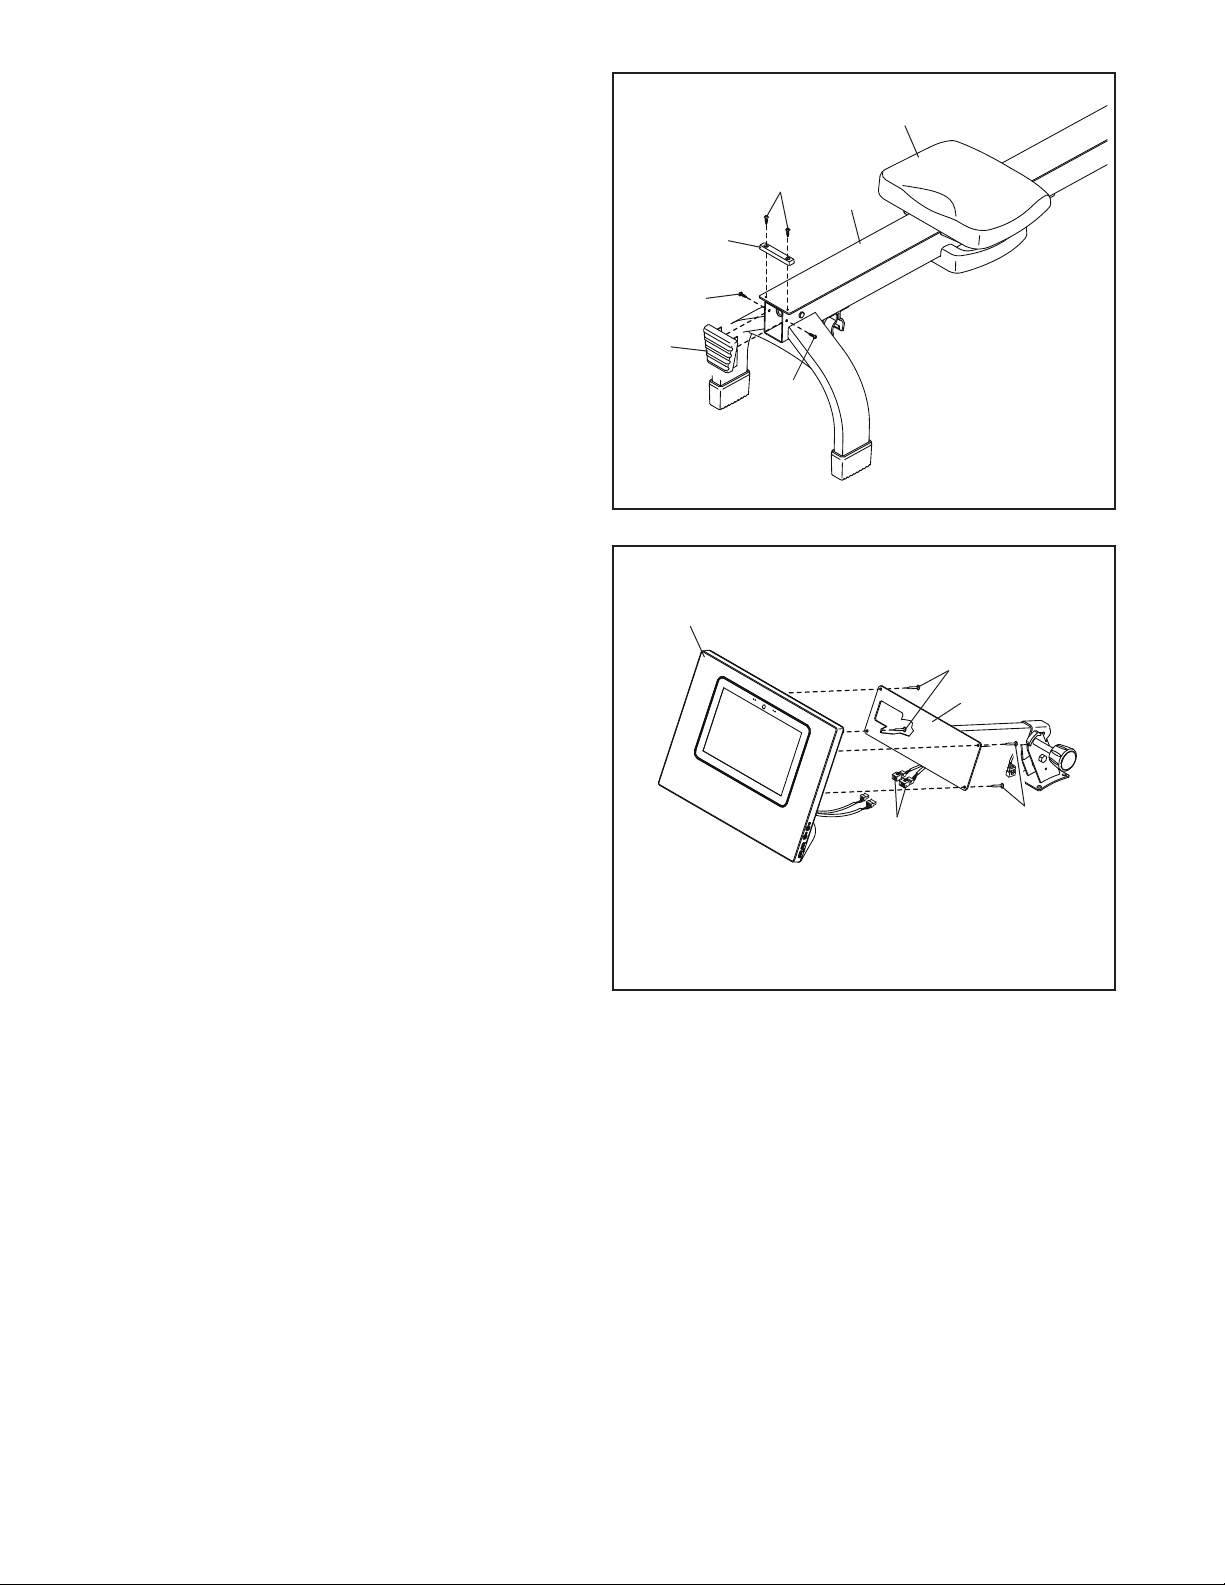
5. Slide the Seat (23) to the front of the Rail (2).
Next, attach the Rear Stop (87) to the Rail (2)
with two M4 x 8mm Screws (104).
Then, attach the Rail Cap (38) to the Rail (2)
with two M4 x 19mm Screws (69).
2
5
6
38
69
69
87
23
104
105
84
76
75
Avoid pinching
the wires
6. While a second person holds the Console (75)
near the Neck (76), connect the wires on the
Console to the matching connectors on the
Upright Wire (84) in the Neck. Tip: The wire
connectors should slide together easily and
snap into place with an audible click. If they
do not, turn one connector and try again.
Insert the excess wire into the Neck (76) or into
the Console (75).
Tip: Avoid pinching the wires. Attach
the Console (75) to the Neck (76) with four
M4 x 12mm Screws (105); start all the Screws,
and then tighten them.
105

10
7. While a second person holds the Console (75)
and the Upright (77) near the Frame (1), con-
nect the Upright Wire (84) to the Main Wire
(109). Tip: The wire connectors should slide
together easily and snap into place with an
audible click. If they do not, turn one connec-
tor and try again.
Tip: Avoid pinching the wires. Attach
the Upright (77) to the Frame (1) with four
M8 x 35mm Screws (82); start all the Screws,
and then tighten them.
7
82
77
1
84
75
Avoid
pinching
the wires
109
8. Hold the Neck (76) with one hand, and loosen
and remove the Knob (78) from the Upright (77)
with your other hand.
Next, identify the Right and Left Upright Covers
(80, 81), and orient them as shown.
Press the Right and Left Upright Covers
(80, 81) together around the Upright (77), and
attach them to the Upright with two M4 x 16mm
Screws (68).
Then, insert the Knob (78) into the Right Upright
Cover (80) and tighten it into the Upright (77).
881
80
77
76
68
68
78
11
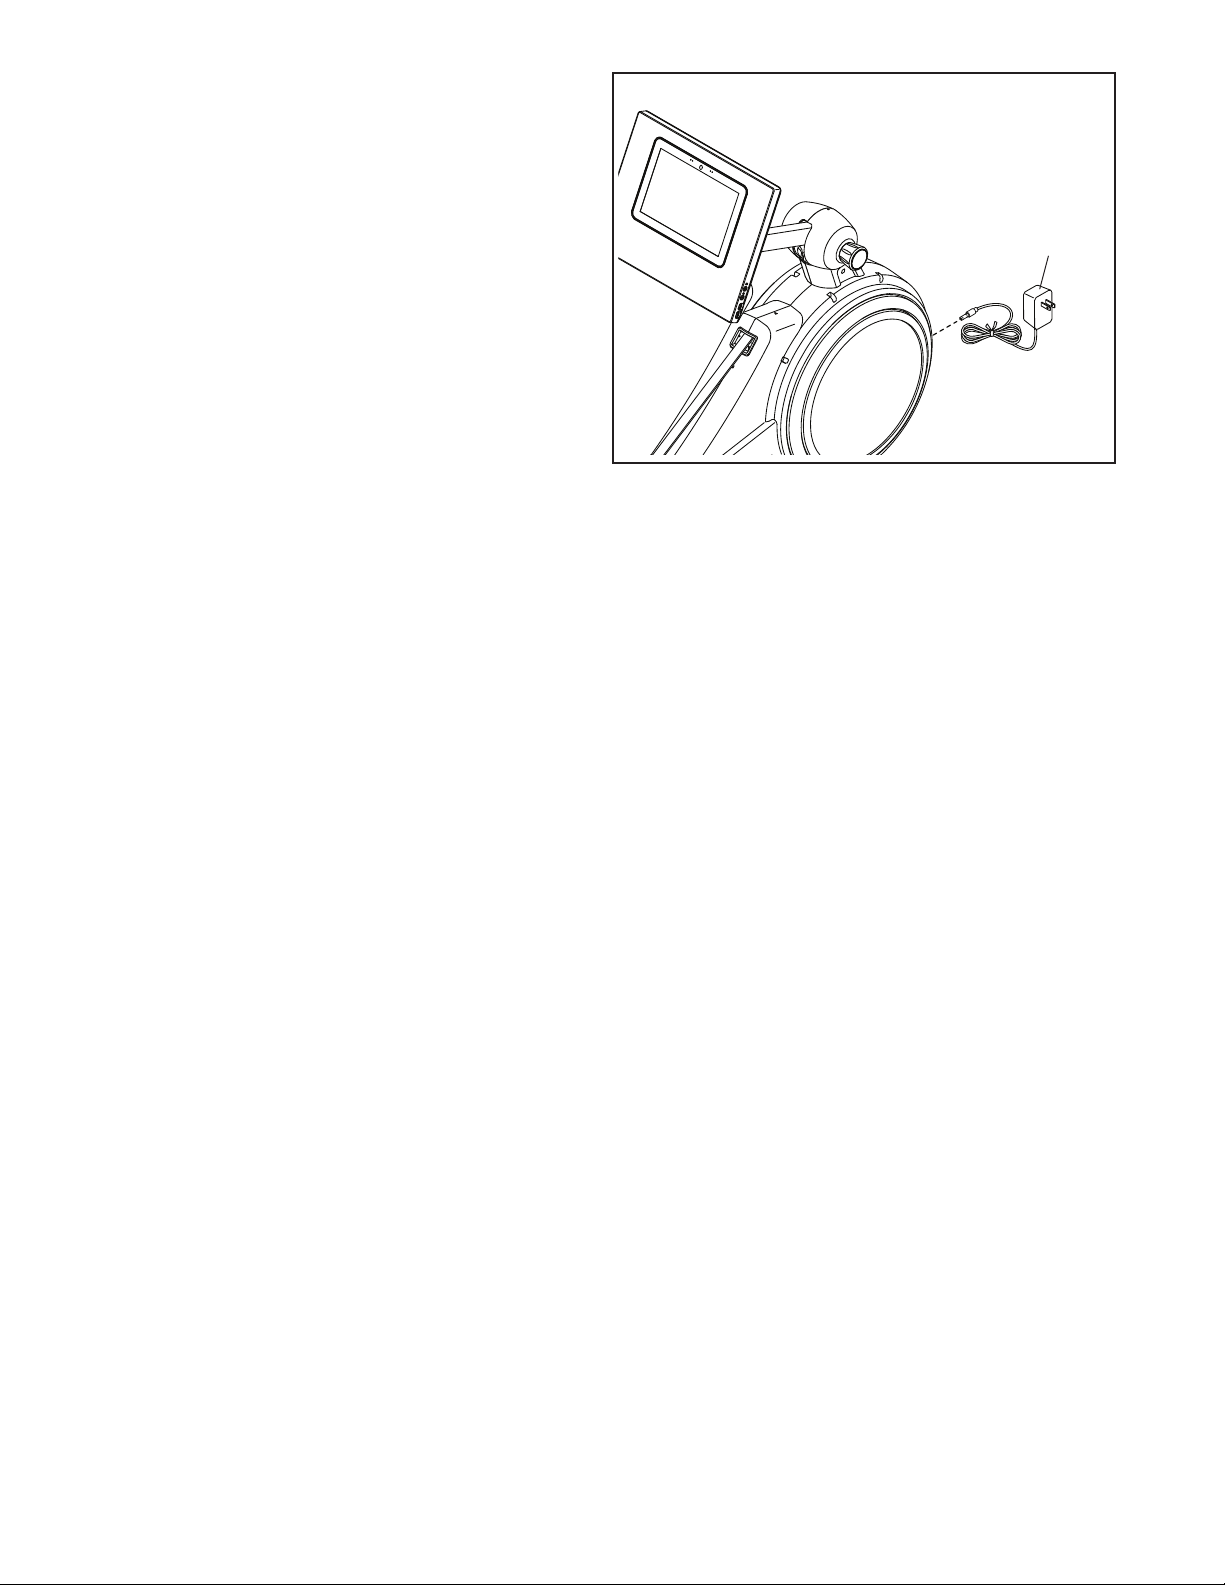
108
9. Plug the Power Adapter (108) into the receptacle
on the front of the rower.
Note: To plug the Power Adapter (108) into an
outlet, see HOW TO PLUG IN THE POWER
ADAPTER on page 12.
10. Make sure that all parts are properly tightened. Extra parts may be included. Place a mat beneath the
rower to protect the floor.
To register your product and activate your warranty today, go to my.proform.com.
9
12
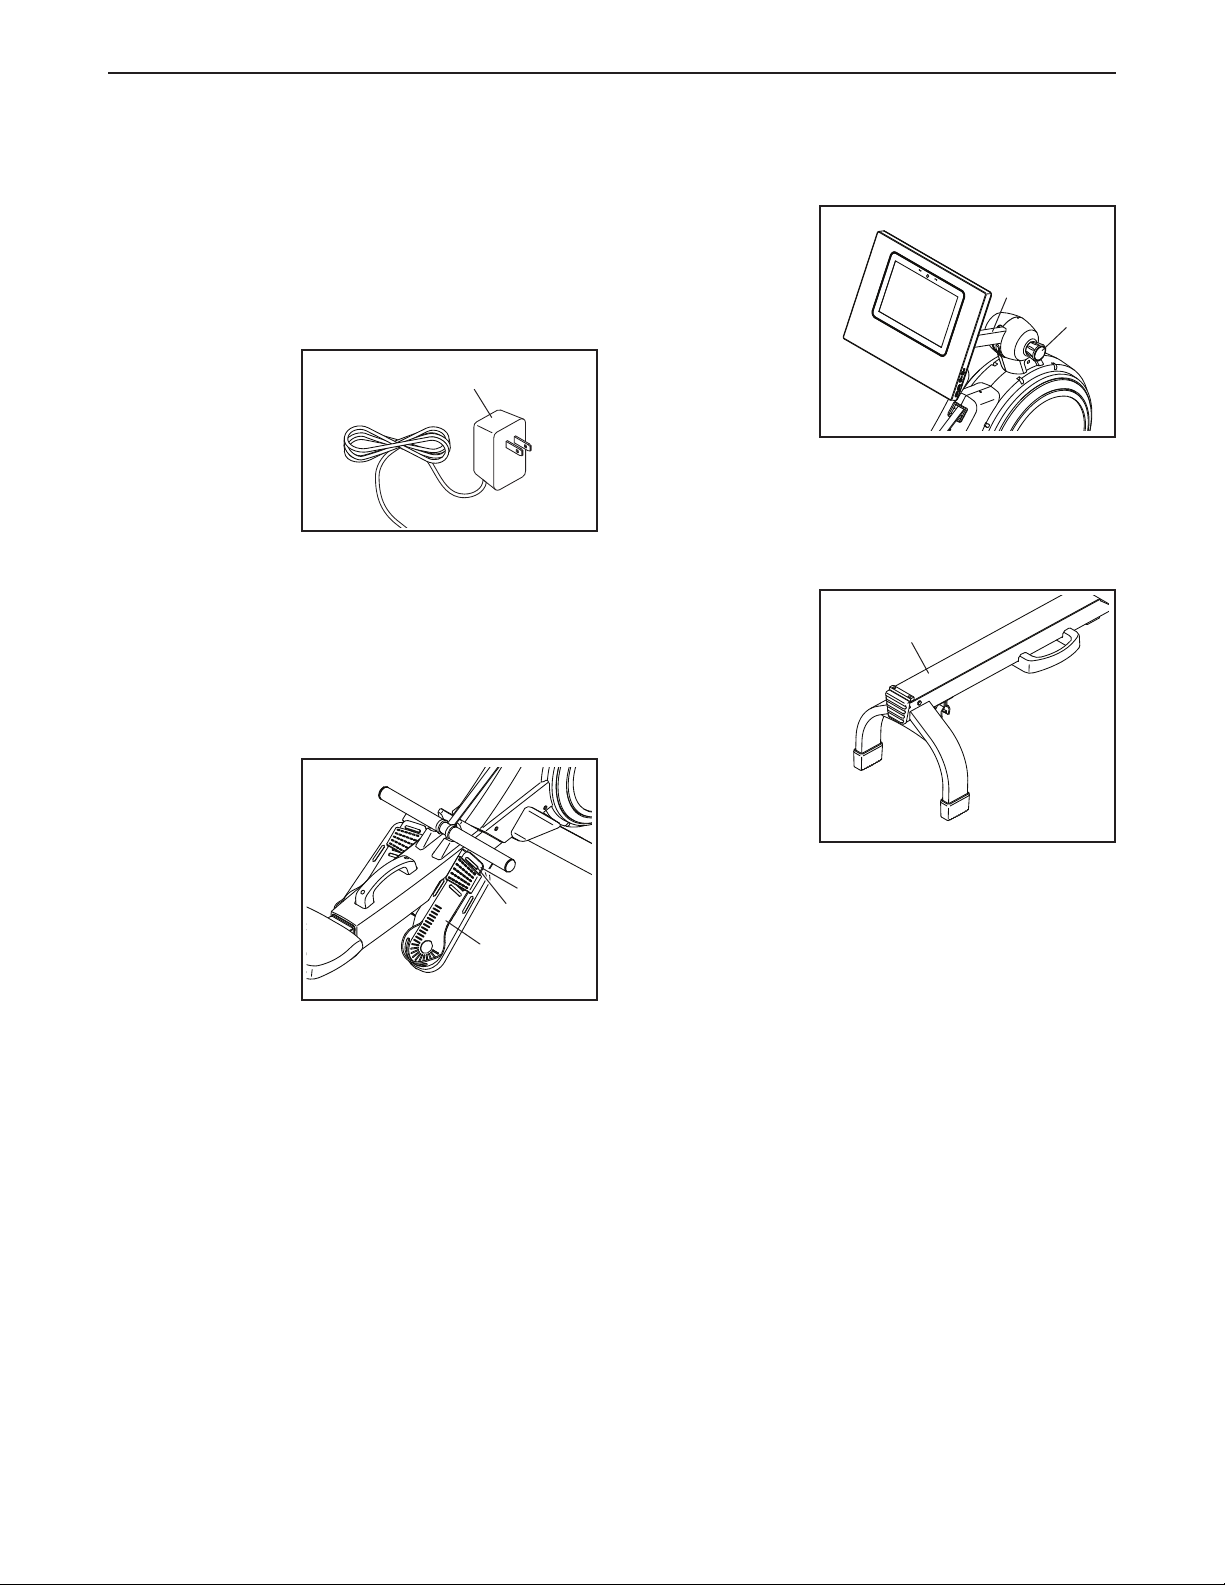
HOW TO PLUG IN THE POWER ADAPTER
IMPORTANT: If the rower has been exposed to cold
temperatures, allow it to warm to room temperature
before you plug in the Power Adapter (A). If you do
not do this, you may damage the console displays
or other electronic components.
Plug the Power
Adapter (A) into
the receptacle
on the front of
the rower. Then,
plug the Power
Adapter into
an appropriate
outlet that is
properly installed in accordance with all local codes
and ordinances.
HOW TO ADJUST THE FOOT PADS
First, sit on the seat and place your feet in the Foot
Pads (B).
Next, press the
Footrest Bracket
(C), slide the
Foot Pad (B)
to the desired
position, and
then release the
Footrest Bracket
so that the Tab
(D) engages a
slot in the Foot
Pad. Then,
tighten the strap over your foot. Adjust the other foot
pad in the same way. Make sure that both foot pads
are in the same position.
HOW TO ADJUST THE CONSOLE VIEWING ANGLE
To adjust the
console to the
desired viewing
angle, hold the
Neck (E), loosen
the Knob (F),
raise or lower the
Neck, and then
tighten the Knob;
do not hold
or pull on the
console.
HOW TO MOVE THE ROWER IN THE UNFOLDED
POSITION
Take any neces-
sary measures
to protect your
floor. Stand
behind the rower
and lift the Rail
(G) until the
rower will roll on
the wheels. Then,
carefully move
the rower to the
desired location,
and lower the Rail to the floor. Do not hold or pull on
the console when moving the rower.
A
B
D
C
F
E
G
HOW TO USE THE ROWER

13
HOW TO MOVE THE ROWER IN THE FOLDED
POSITION
Take any necessary measures to protect your floor.
See HOW TO FOLD AND STORE THE ROWER at the
right, and fold the rower. Then, hold the Frame Handle
(H), place your foot on a Stabilizer Foot (I), and tip the
rower until it will roll on the wheels. Carefully move the
rower to the desired location, and then tip it into the
storage position. Do not hold or pull on the console
when moving the rower.
HOW TO FOLD AND STORE THE ROWER
The rower can be stored in a folded position to con-
serve space. Store the rower in a location where
children cannot tip it. Unplug the power adapter
when storing the rower for extended periods of time.
To store the rower, first slide the Seat (J) to the rear of
the Rail (G).
Next, hold and lift the Frame Handle (H) and the Rail
Handle (K), and tip the rower forward onto the Shields
(L, M) and the Storage Feet (N) (see the drawing on
page 14).
H
I
J
G
K
H
O
N
L, M

14
Then, pull the Rail Handle (K) inward until the Folding
Clamp (O) engages the bar on the Stabilizer (P).
To unfold the rower, first place your foot on a Stabilizer
Foot (I) and pull the Rail Handle (K) outward to disen-
gage the Folding Clamp (O).
Then, hold the Rail Handle (K) and the Frame
Handle (H), pull the Rail Handle outward, and lower the
Rail (G) to the floor.
HOW TO ROW ON THE ROWER
Sit on the seat, place your feet in the footrests, and
adjust the straps to fit your feet. Then, hold the row bar
with an overhand grip.
Correct rowing form consists of three phases:
1. The first phase is the CATCH. Slide the seat
forward until your knees are almost touching your
chest. Pull the row bar until your hands are directly
above your feet.
2. The second phase is the DRIVE. Push backward
with your legs. Lean back slightly at the hips (not
at the waist), keeping your back straight. As you
straighten your legs, pull the row bar toward your
chest. Keep your elbows outward.
3. The third phase is the FINISH. Your legs should
be nearly straight. Continue to pull the row bar until
your hands are even with your chest.
After the finish phase, extend your arms forward and
pull the seat forward using your legs. Repeat this
sequence, moving through all three phases with a
smooth, fluid motion. Remember to breathe normally
as you row; never hold your breath.
H
I
I
O
G
P
K
15
HOW TO USE THE CONSOLE
FEATURES OF THE CONSOLE
The advanced console offers an array of features
designed to make your workouts more effective and
enjoyable.
The console features wireless technology that enables
the console to connect to iFIT. With iFIT, you can
access a large and varied workout library, create your
own workouts, track your workout results, and access
many other features.
In addition, the console offers a selection of featured
workouts. Each workout automatically controls the
resistance of the row bar as it guides you through an
effective exercise session.
When you use the manual mode of the console, you
can change the resistance of the row bar with the
touch of a button.
While you exercise, the console will display continuous
exercise feedback. You can even measure your heart
rate using a compatible heart rate monitor.
To turn on and turn off the console, see page 16.
To learn how to use the touch screen, see
page 16. To set up the console, see page 16.
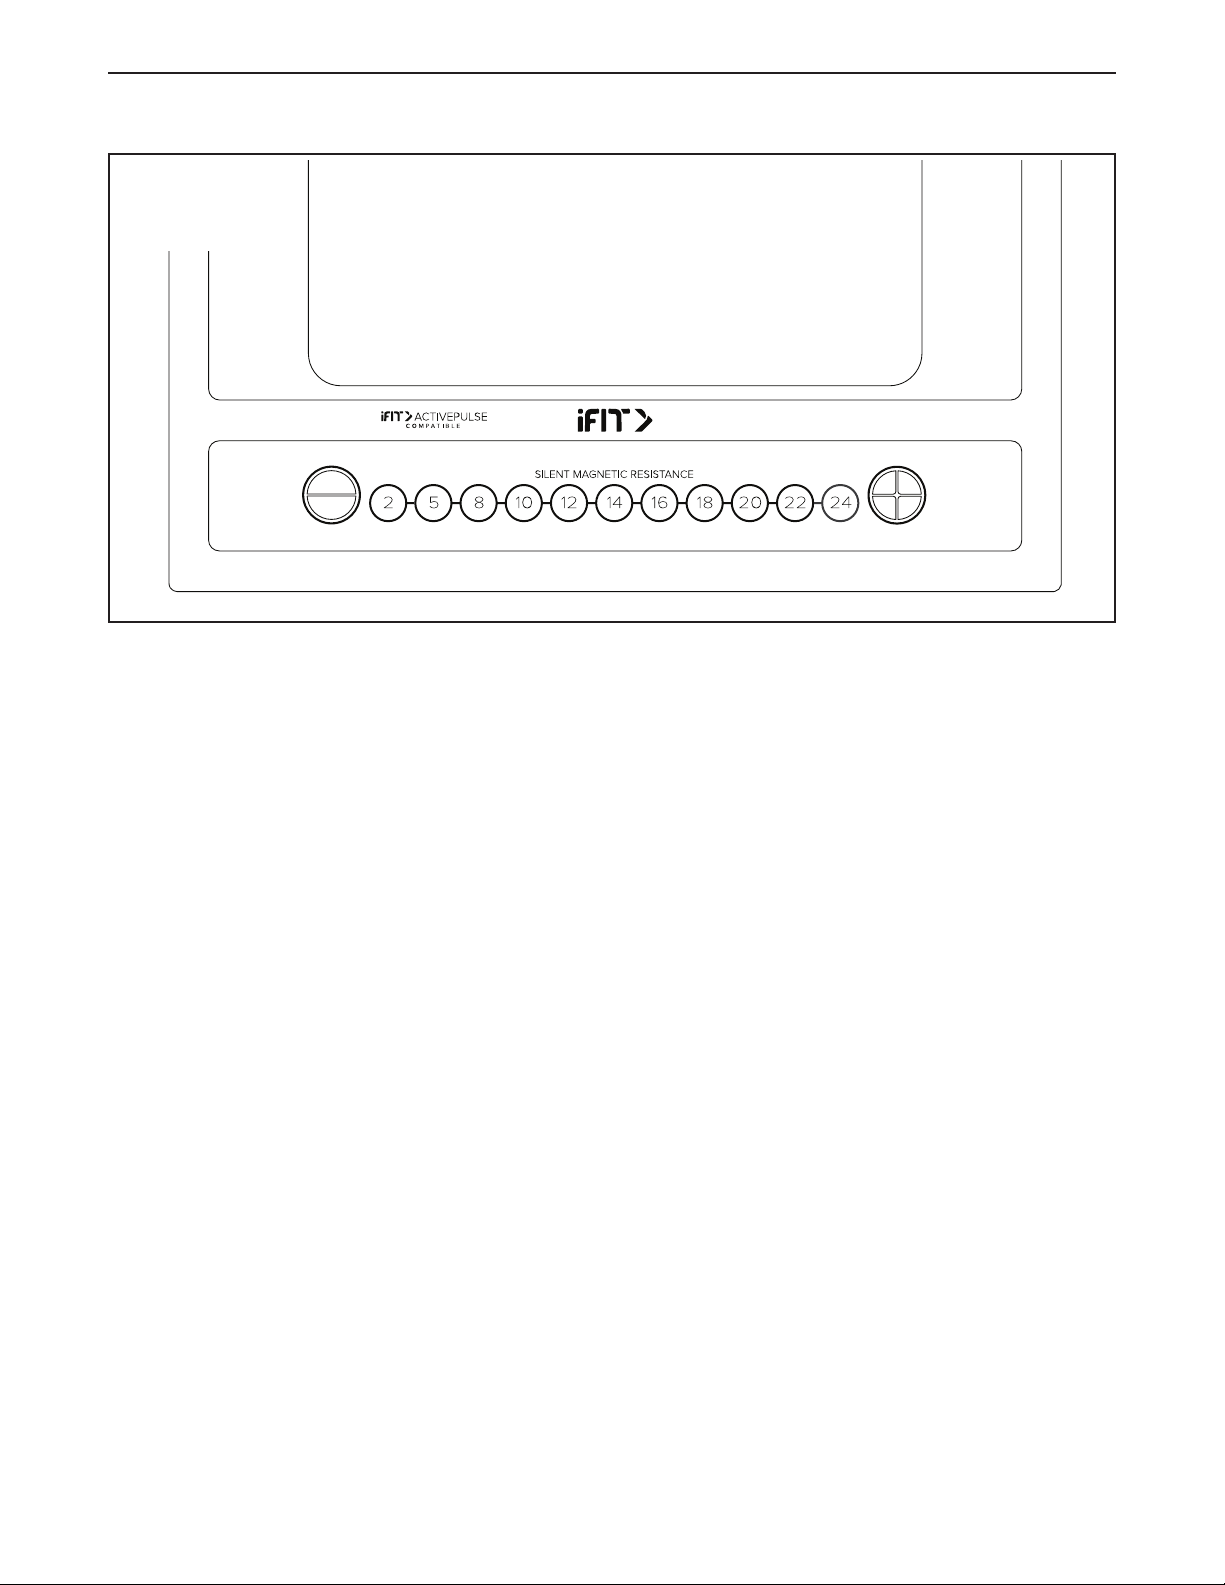
CONSOLE
DIAGRAM

16
HOW TO TURN ON THE CONSOLE
The included power adapter must be used to operate
the rower. See HOW TO PLUG IN THE POWER
ADAPTER on page 12. When the power adapter
is plugged in, simply touch the screen to activate the
console or press any button on the console to turn on
the console.
HOW TO TURN OFF THE CONSOLE
If the row bar does not move for several seconds, the
console will pause.
If the row bar does not move for several minutes, the
screen is not touched, and the buttons are not pressed,
the console will turn off.
When you are finished exercising, unplug the power
adapter. IMPORTANT: If you do not do this, the
electrical components on the rower may wear
prematurely.
HOW TO USE THE TOUCH SCREEN
The console features a tablet with a full-color touch
screen. The following information will help you use the
touch screen:
• The console functions similarly to other tablets. You
can slide or flick your finger against the screen to
move certain images on the screen, such as the
displays in a workout.
• To type information into a text box, first touch the text
box to view the keyboard. To use numbers or other
characters on the keyboard, touch ?123. To view
more characters, touch ~[<. Touch ?123 again to
return to the number keyboard. To return to the letter
keyboard, touch ABC. To use a capital character,
touch the shift button (upward-facing arrow symbol).
To use multiple capital characters, touch the shift
button again. To return to the lowercase keyboard,
touch the shift button a third time. To clear the last
character, touch the clear button (backward-facing
arrow with an X symbol).
HOW TO SET UP THE CONSOLE
Before you use the rower for the first time, set up the
console.
1. Connect to your wireless network.
To use iFIT workouts and to use several other
features of the console, the console must be
connected to a wireless network. Follow the
prompts on the screen to connect the console to
your wireless network.
2. Customize settings.
Follow the prompts on the screen to set your time
zone and other settings. Note: To change these
settings later, see HOW TO CHANGE CONSOLE
SETTINGS on page 23.
3. Log into or create an iFIT account.
Follow the prompts on the screen to log into your
iFIT account or to create an iFIT account.
4. Check for firmware updates.
First, touch the menu button (three horizontal lines
symbol), touch Settings, touch Maintenance, and
then touch Update. The console will check for firm-
ware updates. For more information, see HOW TO
CHANGE CONSOLE SETTINGS on page 23.
Firmware updates are always designed to
improve your exercise experience. As a result,
new settings and features may not be described
in this manual. Take time to explore the console
to learn how new settings and features work.
Also, some settings and features described in this
manual may no longer be enabled.
The console is now ready for you to begin working out.
The following pages explain the workouts and other
features that the console offers.
To use the manual mode, see page 17. To use a
featured workout, see page 18. To create a draw-
your-own-map workout, see page 20. To use an
iFIT workout, see page 21. To change console
settings, see page 23. To connect to a wireless
network, see page 24.
Note: If there is a sheet of plastic on the screen,
remove the plastic.

17
HOW TO USE THE MANUAL MODE
1. Touch the screen or press any button on the
console to turn on the console.
See HOW TO TURN ON THE CONSOLE on
page 16. Note: It may take a few moments for
the console to be ready for use.
2. Select the home screen.
When you turn on the console, the home screen
will appear on the screen after the console
boots up.
If you are in a workout, touch the screen and fol-
low the prompts to end the workout and return to
the home screen. If you are in the settings menus,
touch the back button (arrow symbol) to return to
the home screen.
3. Adjust the resistance to the desired level.
Touch Manual Start and begin rowing.
To change the resistance of the row bar, press the
numbered Silent Magnetic Resistance buttons on
the console, press the Silent Magnetic Resistance
increase and decrease buttons on the console, or
touch the resistance sliders on the screen.
Note: After you press a button, it will take a
moment for the row bar to reach the selected
resistance level.
Note: To view the resistance sliders on the screen,
touch the screen in any open space and then touch
the controls options to enable this feature.
4. Follow your progress.
The console offers several display modes. The
display mode that you select will determine which
workout information is shown.
Drag upward on the screen to enter the fullscreen
display mode. Drag downward on the screen to
view the workout information displays.
Touch the various workout information displays
to view more options. Touch the more button
(+ symbol) to view statistics or charts. Touch the
screen in any open space to view even more dis-
play mode options.
If desired, adjust the volume level by pressing the
volume increase and decrease buttons on the side
of the console.
To pause the workout, touch the screen and touch
the pause option or simply stop rowing. To con-
tinue the workout, touch the start option or simply
resume rowing.
To end the workout session, touch the screen,
touch the pause option, and then follow the
prompts on the screen to end the workout and
return to the home screen.
5. Wear a compatible heart rate monitor and
measure your heart rate if desired.
You can wear a compatible heart rate monitor to
measure your heart rate. Note: The console is
compatible with all Bluetooth®Smart heart rate
monitors.
A compatible heart rate monitor is included with
some models. If a heart rate monitor is included,
see THE HEART RATE MONITOR in this manual
to learn how to use it.
If this model does not include a compatible
heart rate monitor, see page 22 for informa-
tion about ordering one.
The console will connect to your compatible heart
rate monitor automatically. When your heartbeat is
detected, your heart rate will be shown.
6. When you are finished exercising, turn off the
console.
See HOW TO TURN OFF THE CONSOLE on
page 16.

18
HOW TO USE A FEATURED WORKOUT
To use a featured workout, the console must be con-
nected to a wireless network (see HOW TO CONNECT
TO A WIRELESS NETWORK on page 24).
1. Touch the screen or press any button on the
console to turn on the console.
See HOW TO TURN ON THE CONSOLE on
page 16. Note: It may take a few moments for
the console to be ready for use.
2. Select the home screen or the workout library.
When you turn on the console, the home screen
will appear on the screen after the console
boots up.
If you are in a workout, touch the screen and fol-
low the prompts to end the workout and return to
the home screen. If you are in the settings menus,
touch the back button (arrow symbol) to return to
the home screen.
Touch the buttons at the bottom of the screen to
select either the home screen (Home button) or the
workout library (Browse button).
3. Select a workout.
To select a workout from the home screen or the
workout library, simply touch the desired workout
button on the screen. Slide or flick the screen to
scroll upward or downward if necessary.
The featured workouts on your console will change
periodically. To save one of the featured workouts
for future use, you can add it as a favorite by touch-
ing the favorites button (heart symbol). You must
be logged into your iFIT account to save a featured
workout (see step 3 on page 21).
To draw your own map for a workout, see HOW TO
CREATE A DRAW-YOUR-OWN-MAP WORKOUT
on page 20.
When you select a workout, the screen will show
an overview of the workout that includes details
such as the duration and distance of the workout
and the approximate number of calories you will
burn during the workout.
4. Start the workout.
Touch Start Workout to start the workout.
During some workouts, an iFIT coach will guide
you through an immersive video workout. Touch
the screen in any open space to view and select
music, trainer voice, and volume options for the
workout.
During some workouts, the screen will show a map
of the route and a marker indicating your prog-
ress. Touch the buttons on the screen to select the
desired map options.
During some workouts, you may be prompted to
maintain a target speed. As you exercise, keep
your rowing speed near the target speed.
During the workout, the resistance of the row bar
will automatically increase or decrease.
If the resistance level is too high or too low, you
can manually override the setting by pressing the
Silent Magnetic Resistance buttons (see step 3 on
page 17).
To return to the programmed resistance settings of
the workout, touch Follow Trainer.
If the smart adjust feature is enabled, the con-
sole will scale the intensity level of the workout
automatically based on your manual overrides of
the resistance. To enable the smart adjust feature,
touch the screen in any open space and then touch
the smart adjust toggle.

19
IMPORTANT: The calorie goal shown in the
workout description is an estimate of the
number of calories that you will burn during
the workout. The actual number of calories that
you burn will depend on various factors, such
as your weight. In addition, if you manually
change the resistance level during the work-
out, the number of calories you burn will be
affected.
If the active pulse feature is enabled, the con-
sole will scale the intensity level of the workout
automatically based on your heart rate when you
wear a compatible heart rate monitor (see step 6).
To enable the active pulse feature, see HOW TO
CHANGE CONSOLE SETTINGS on page 23.
To follow your progress with the display modes,
see step 4 on page 17.
To pause the workout, touch the screen and touch
the pause option or simply stop rowing. To con-
tinue the workout, touch the start option or simply
resume rowing.
To end the workout session, touch the screen,
touch the pause option, and then follow the
prompts on the screen to end the workout and
return to the home screen.
When the workout ends, a workout summary will
appear on the screen. If desired, you can select
options such as adding the workout to your sched-
ule (see HOW TO USE AN IFIT WORKOUT on
page 21) or adding the workout to your favor-
ites list. Then, touch Finish to return to the home
screen.
5. Wear headphones if desired.
To connect your headphones to the console, first
turn on your headphones, place them in pairing
mode, and place them near the console. Then,
touch the screen in any open space, touch the
option to connect your headphones, and select
your headphones from the list on the screen.
When your headphones and the console pair
successfully, the audio from the console will play
through your headphones.
6. Wear a compatible heart rate monitor and
measure your heart rate if desired.
See step 5 on page 17.
7. When you are finished exercising, turn off the
console.
See HOW TO TURN OFF THE CONSOLE on
page 16.

20
HOW TO CREATE A DRAW-YOUR-OWN-MAP
WORKOUT
1. Touch the screen or press any button on the
console to turn on the console.
See HOW TO TURN ON THE CONSOLE on
page 16. Note: It may take a few moments for
the console to be ready for use.
2. Select a draw-your-own-map workout.
When you turn on the console, the home screen
will appear on the screen after the console
boots up.
If you are in a workout, touch the screen and fol-
low the prompts to end the workout and return to
the home screen. If you are in the settings menus,
touch the back button (arrow symbol) to return to
the home screen.
To select a draw-your-own-map workout, touch the
Create button at the bottom of the screen.
3. Draw your map.
Navigate to the area on the map where you want
to draw your workout by typing in the search box
or by sliding your fingers on the screen. Touch
the screen to add the start point for your workout.
Then, touch the screen to add the end point for
your workout.
If you want to start and end your workout at the
same point, touch Close Loop or Out & Back in the
map options. You can also select whether you want
your workout to snap to the road.
If you make a mistake, touch Undo in the map
options.
The screen will display the elevation and distance
statistics for your workout.
4. Save your workout.
Touch the options on the screen to save your
workout. If desired, enter a title and description for
your workout.
5. Start the workout.
Touch Start Workout to start the workout. The
workout will function in the same way as a featured
workout (see page 18).
6. Wear a compatible heart rate monitor and
measure your heart rate if desired.
See step 5 on page 17.
7. When you are finished exercising, turn off the
console.
See HOW TO TURN OFF THE CONSOLE on
page 16.
This manual suits for next models
1
Table of contents
Other iFIT Fitness Equipment manuals

iFIT
iFIT PRO-FORM 1350 User manual

iFIT
iFIT EXIF12.0 User manual

iFIT
iFIT NordicTrack AIRGLIDE 7i User manual

iFIT
iFIT WEIDER PLATINUM WEBE60020.0 User manual

iFIT
iFIT EXIF09.0 User manual

iFIT
iFIT WEIDER PRO 8500 User manual

iFIT
iFIT WEIDER 2980 X User manual

iFIT
iFIT IFBE13520 User manual

iFIT
iFIT WEIDERBLACK WBBE14908.0 User manual

iFIT
iFIT IFMC07540 User manual

Popular Fitness Equipment manuals by other brands

Inflight Fitness
Inflight Fitness Liberator Assembly instructions

ESCALADE
ESCALADE Mizerak 25120 Assembly instructions and rules

LPG
LPG Huber 360 FIIT Operator's manual

HUDSON STEEL
HUDSON STEEL BS017 owner's manual

Janssen Fritsen
Janssen Fritsen Lausanne Assembly and user's manual

Bkool
Bkool GO user manual


