ifrogz Golite 2.0 User manual

Warranty Registration
Your iFrogz Golite 2.0 comes with a one-year
manufacturer’s warranty. In order to activate the
warranty, you must register your Golite 2.0 as well
as keep your purchase receipt. If you purchased
your Golite 2.0 from iFrogz.com, iFrogz® has
already registered it and has a copy of your proof
of purchase. iFrogz is a ZAGG Inc brand.
NEED MORE HELP? PLEASE SEE OUR FAQ
SECTION AT:
www.ifrogz.com/faq
Golite 2.0 Instructions
Introduction
Your Golite 2.0 is the simplest, most convenient
solution to mobile power available. With its 3000mAh
capacity, and built-in LED flashlight, it’s the bright way
to keep your mobile life powered. To get the most from
your Golite 2.0, read and follow these instructions.
Keep these instructions for future reference.
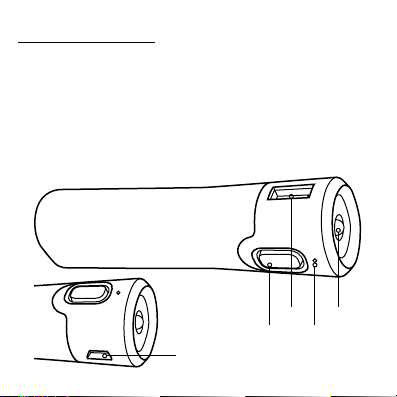
Flashlight
LED
USB
Power Button
Micro USB

Charging Your Golite 2.0
Your Golite 2.0 is charged and ready to go. When
you’ve used it to charge your devices, follow these
steps to recharge it:
1.Connect the included micro USB cable into
the micro USB port on your Golite 2.0.
2.Connect the USB end of the cable into your
preferred USB charging device (your comput-
er, a wall outlet adapter, etc.).
3.The LED next to the flashlight will light accord-
ing to its available power to indicate your Go-
lite 2.0 is charging (see Checking the Battery
Level for an explanation of power levels and
their corresponding LED colors). When this
LED turns off, your Golite 2.0 is fully charged.
a. It typically takes three to four hours to
charge your Golite 2.0.
4.Disconnect the charging cable and take your
Golite 2.0 with you on all your adventures.

Charging Your Devices
Your Golite 2.0 delivers fast 2.1A power to all your
favorite devices via a universal USB outlet. This
makes charging your devices quick and
simple. To charge your device while on the go:
1.Connect a USB cable to the USB port on the
Golite 2.0.
2.Connect the charging cable to your device in
the appropriate port.
3.Press the Power button to turn your Golite on
and then continue on your adventures while
the Golite 2.0 quickly charges your device.
Checking the Battery Level
Your Golite 2.0 features an LED that indicates how
much power it has left in it. To check the remaining
battery level:

1.Press the power button once.
2.The LED will light according to how much
charge is left.
Green indicates you have between 51-100%
charge remaining.
Yellow indicates you have between 26-50%
charge remaining.
Red indicates you have less than 25% charge
remaining.
Using the Flashlight
Your Golite 2.0 features a built-in LED flashlight
that’s powerful enough to brighten any situation. To
use the flashlight:
1.Press the power button twice quickly. This
is similar to double clicking with your
computer mouse.

2.Turn the flashlight off by pressing the power
button again twice quickly.
NOTE: The flashlight draws its power from the Golite’s
battery. Using the flashlight will diminish the Golite’s stored
power.
Care and Maintenance
Your Golite 2.0 is a durable backup battery. But
since it is meant to keep you powered on all your
adventures, chances are it will be exposed to a little
dirt and grime. Here’s how you can best take care
of it.
• If your Golite 2.0 is dirty, wipe it clean with
a damp cloth. Avoid getting water on your
Golite 2.0.
• When charging your device, make sure the
Golite is on a flat surface away from edges
where it could fall.

• Don’t set your Golite upright to charge
or to charge your devices. Lay it on a flat,
stable surface so it doesn’t fall over and get
scratched or otherwise damaged.
• If your Golite does fall, check it thoroughly for
damage before charging it or your
device, and before turning on the flashlight.
Questions?
For more help please see our FAQ at: www.ifrogz.com/faq
To reach a trained customer service representative, please use
one of the following:
ifrogz.com/support
1-855-4iFrogz (443-7649)
00-1-801-823-3411 for international customers
©2005 - 2014 ZAGG Inc All Rights Reserved.
NASDAQ: ZAGG | MADE IN CHINA
iFrogz® and ZAGG® are trademarks or registered trademarks
owned by ZAGG Intellectual Property Holding Co., Inc.

Changes or modifications not expressly approved by the party
responsible for compliance could void the user’s authority to
operate the equipment.
This equipment has been tested and found to comply with the
limits for a Class B digital device, pursuant to Part 15 of the FCC
Rules. These limits are designed to provide reasonable protection
against harmful interference in a residential installation. This
equipment generates, uses and can radiate radio frequency
energy and, if not installed and used in accordance with the
instructions, may cause harmful interference to radio communi-
cations. However, there is no guarantee that interference will not
occur in a particular installation.
If this equipment does cause harmful interference to radio or
television reception, which can be determined by turning the
equipment off and on, the user is encouraged to try to correct the
interference by one or more of the following measures:
·Reorient or relocate the receiving antenna.
·Increase the separation between the equipment and receiver.
·Connect the equipment into an outlet on a circuit different
from that to which the receiver is connected.
·Consult the dealer or an experienced radio/TV technician
for help.

Enregistrement de la garantie
Votre Golite 2.0 d’iFrogz est livré avec une garantie du fabricant
d’un an. Pour activer la garantie, vous devez enregistrer votre
Golite 2.0 et garder votre reçu d’achat. Si vous avez acheté votre
Golite 2.0 directement d’iFrogz.com, iFrogz ® l’a déjà enregistré
et a une copie de votre preuve d’achat. iFrogz est une marque de
ZAGG Inc.
BESOIN D’AIDE? VEUILLEZ CONSULTER NOTRE SECTION FAQ À:
www.ifrogz.com/faq
Instructions pour
Golite 2.0
Introduction
Votre Golite 2.0 est la solution la plus simple, la plus
pratique disponible pour une source d’énergie mobile.
Avec sa capacité de 3000mAh et sa lampe de poche
LED intégrée, c’est la façon brillante de garder votre
vie mobile pleine d’énergie. Pour tirer le maximum de
votre Golite 2.0, veuillez lire et suivre ces instructions.
Conservez ces instructions pour référence future.
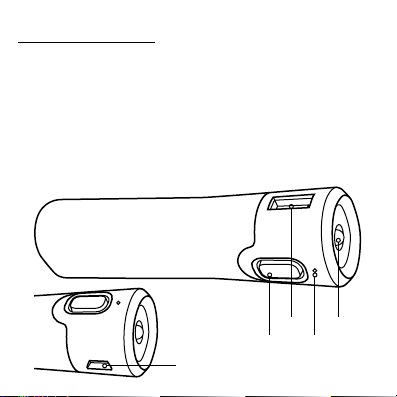
Flashlight
LED
USB
Power Button
Micro USB
Table of contents
Languages:


