IHEAR MAX User manual

HIGH DEFINITION HEARING DEVICE
User Guide
iHear Loud & Clear®

2
3
Read the User Guide before using the iHEARMAX™.
Infrequent use of a hearing device does not permit a
user to attain full benet from it. Hearing device will not restore
normal hearing and will not prevent or improve a hearing
impairment resulting from organic conditions.
This icon means a video is available online.
The iHEARMAX is a behind the ear hearing aid intended for adults
with mild to severe hearing loss who need hearing enhancement
and is not to be worn by individuals under the age of 18. The
Food and Drug Administration has determined that it is in your
best health interest to have a medical evaluation by a physician
(preferably a physician who specializes in diseases of the ear)
before purchasing a hearing aid. The purpose of a medical
evaluation is to assure that all medically treatable conditions that
may aect hearing are identied and treated before a hearing aid
is purchased. Following the medical evaluation, the physician
can give you a written statement (medical clearance) that states
that your hearing health has been evaluated and that you may be
considered a candidate for a hearing aid. The physician may refer
you to an audiologist or a hearing aid dispenser, for a hearing aid
evaluation. You may also send (by mail, fax, or e-mail) the signed
medical clearance to iHear Medical for the purpose of purchasing
a hearing aid. Federal law restricts the sale of hearing aids to
those individuals who have obtained a medical evaluation from a
physician. Federal law also permits a fully informed adult to sign
a medical waiver statement declining the medical evaluation. The
exercise of such a waiver is not in your best health interest and its
use is discouraged. iHear Medical will not sell a hearing device to
you unless you either (1) obtain a signed medical clearance, or (2)
review and accept the medical waiver statement.
IMPORTANT NOTICE

3
CONTRAINDICATIONS FOR USE
The following conditions contraindicate the use of a
hearing device. If you know or suspect you have the
following conditions, you must consult with a physician who will
need to provide medical clearance before using a hearing device.
• Visible deformity of the ear
• Current ear infection
• History of active drainage from the ear within the past 90 days
• Sudden or rapid progression of hearing loss within the past 90
days in one or both ears
• Acute or chronic dizziness
• Visible evidence of signicant cerumen (ear wax) accumulation
or a foreign body in the ear canal
• Pain or discomfort in the ear
• Individuals with poor dexterity, poor vision or signicant
dementia
• Fluctuating hearing sensitivity
• Sudden onset or rapid worsening of tinnitus within the past 90
days
• History of conductive or mixed hearing loss or ear surgery
DISCLAIMERS
• The use of a hearing device will not restore normal hearing. All
it can do is improve your existing hearing ability.
• The use of a hearing device will not cause further hearing loss,
nor will it stop the progression of any further hearing loss.
• At rst you may notice sounds in your environment that you
have not heard in a while which may be disturbing. Soon your
brain will adapt to the sounds around you.
• For some, full adaptation to amplication can take up to 3
months of consistent wear.
• Optimal listening distance, even for someone who hears nor-
mally, is about 3-10 feet. It’s especially important to remember
this while adapting to amplication.
If you have any questions regarding the use of this product,
please contact your hearing health professional, or iHear Medical
customer support at 1-844-iHEAR-44 (1-844-443-2744).

5
4WHAT IS INCLUDED
Important Notice: Red marking refers to right ear device.
Blue marking refers to left ear device.
➀iHEARMAX Device
➁ 1x iHEARMAX Battery Pack
(6 Batteries / 2 months supply)
➂ 1Pack Cleaning Wipe (2x)
➃ MAX Tip Set ➀
➁ ➂
STANDARD TIP SET (9mm Tip attached to device)
PETITE TIP SET (8mm Tip attached to device)
8Vmm 10Vmm 8mm 9mm 10mm 11mm
4mm 8Vmm 7mm 8mm 9mm 10mm
➃

5
WHAT IS INCLUDED
Important Notice: Red marking refers to right ear device.
Blue marking refers to left ear device.
The iHEARMAX Programming Kit
(Purchased Separately)
8Vmm 10Vmm 8mm 9mm 10mm 11mm
4mm 8Vmm 7mm 8mm 9mm 10mm
Includes the iHearTest kit and the Programming Cable to
program your iHEARMAX hearing device. It also includes a
carrying case and travel bag.
IMPORTANT
The iHearUSB module and the Programming Cable are
required to program your iHEARMAX device(s).
AiHearTest
BiHearUSB
CEarphone & Eartips
DTravel Case
E Programming Cable
F Carrying Case
A
D E F
B C

7
PAGE
Important Notice .......................................................2
Contraindications & Disclaimers ...............................3
What is Included........................................................4
iHEARMAX Programming Kit....................................5
Table of Contents ......................................................6
The iHEARMAX Device.............................................7
Preparing your iHEARMAX for use ...........................8
Tip Sizing & Selection................................................9
Removing the iHEARMAX from your ear................10
iHEARMAX Tip Selection Guide .............................11
iHEARMAX Clear Wire............................................12
Replacing the Clear Wire.........................................13
Attaching the Clear Wire .........................................13
Changing the Sound Prole ....................................14
Turning the iHEARMAX O and On ........................15
Customizing Your iHEARMAX ................................16
Create an iHear Account or Sign in.........................17
Installing the iHTUNER Application ........................18
Launching the iHTUNER.........................................19
Care & Maintenance................................................20
Troubleshooting Guide ............................................22
Technical Specications..........................................23
Warranty ..................................................................26
Information & Explanation of Symbols ....................26
Table of Contents

7
SIZING
The iHEARMAX Device
RIGHT DEVICELEFT DEVICE
Battery Door
➆
➈2
➈2
➇1
1 RED DOT for Right device and BLUE DOT for Left Device
2 The Programming Slit is the input connection for the Programming Cable
➂
➁
➀
➃➄➅
iHEARMAX Device
➀Connector
➁ Socket
➂Battery Door
➃Clear Wire
(Speaker Assembly)
➄Speaker
➅Tip
➆Button
➇Dot
➈Programming Slit

9
8Preparing your iHEARMAX for Use
1) Remove the tab from the battery.
2) Open the battery door by gently swinging it into the
open position.
3) Insert the new battery with the positive (+) side up.
4) Close the battery door.
Inserting the Battery Battery door
You will hear the startup melody when the iHEARMAX is
turned ON and placed in your ear within a few seconds.

9
SIZING
Tip Sizing & Selection
Inserting the Tip into your ear(s)
1) Gently INSERT the Tip (attached to the speaker)
into your ear.
2) TUCK the device behind your ear.
3) PUSH the Tip gently into your ear to ensure snug
and comfortable t.
Selecting the correct MAX Tip size for your ear(s)
Correct Tip size should feel snug but comfortable in
the ear and no whistling (feedback).
u Start with the Tip that's already attached to the device.
u Too tight? Go down a size. Too loose? Go up a size.
u Your left and right ears may require dierent Tip sizes.
Tip should be securely attached to the speaker.
CLICK
Speaker
Preparing your iHEARMAX for Use
1) Remove the tab from the battery.
2) Open the battery door by gently swinging it into the
open position.
3) Insert the new battery with the positive (+) side up.
4) Close the battery door.
Battery door

10
11
7mm 8mm 9mm 10mm 11mm 4mm 8Vmm 10Vmm
Best for Moderate or Severe Hearing
Losses (up to 70dB, iHearTest Scores
of 2 and 3).
1) GRAB the Clear Wire
2) PULL AWAY from your ear
Make sure that the Tip comes out with the device.
Connecting the Tip to the Speaker
You will feel a light click as the Tip locks in.
Removing the Tip from the Speaker
PINCH the Tip and PULL
Removing the iHEARMAX from
yourt ear
CLICK
Speaker

11
SIZING
iHEARMAX Tip Selection Guide
7mm 8mm 9mm 10mm 11mm 4mm 8Vmm 10Vmm
STANDARD TIPS VENTED TIPS
Best for Moderate or Severe Hearing
Losses (up to 70dB, iHearTest Scores
of 2 and 3).
For Mild to Moderate Hearing Losses
(up to 50dB, iHear Test Score 4).
Eliminates feeling plugged up
(occlusion effect) by open style
venting
u With Standard Tips, you may feel a little plugged up
but should feel comfortable.
u With Vented Tips, it should feel secure and
comfortable.
u Dampening the outside of the Tips with water may
facilitate insertion into the ear.
u Your Left and right ear may require dierent Tip
sizes.
u Feeling too plugged up? Try a vented Tip for mild to
moderate loss.*
*Determine your size rst using Standard Tips
before switching to a Vented Tip.
Replace Tips once a month for optimum
performance and hygiene.
Connecting the Tip to the Speaker
You will feel a light click as the Tip locks in.
Removing the Tip from the Speaker
PINCH the Tip and PULL
13
12
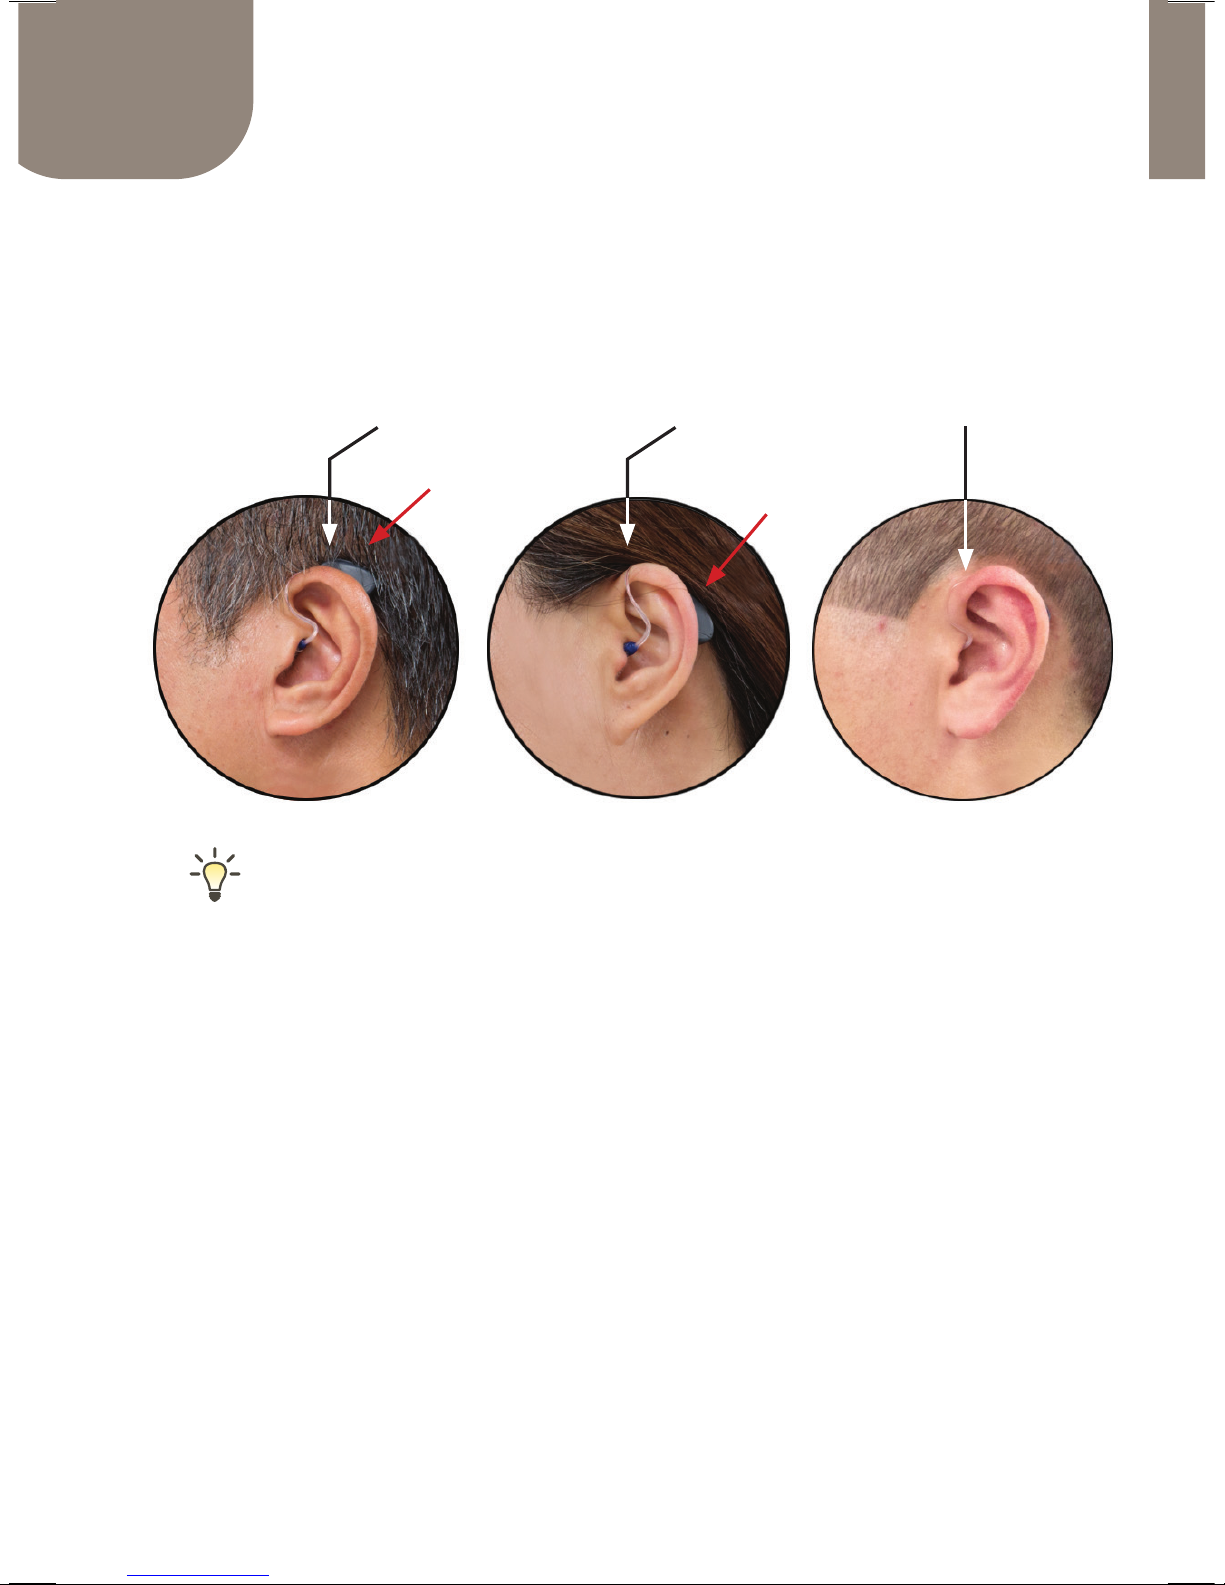
TOO SHORT TOO LONG CORRECT
Verify the correct length of the Clear Wire by
checking your ear. First insert the Tip in your
ear, then tuck the device behind your ear.
iHEARMAX Clear Wire
up & visible loose &
too low
1) TOO SHORT Clear Wire feels tight and the device is
pulled up and visible over the ear.
2) TOO LONG Clear Wire feels loose and the device
dangles behind the ear.
3) CORRECT Clear Wire is ush to the side of the ear and
the device is securely hidden behind the ear.
If the Clear Wire is too long or too short, please contact
iHear Customer Support with a photo of the device in your
ear for evaluation by our Professional Support. If the size
is incorrect for your ear, Customer Support will arrange to
exchange for the correct size.
13
CARE & MAINTENANCE
Replacing the Clear Wire
iHEARMAX Clear Wire
1) TOO SHORT Clear Wire feels tight and the device is
pulled up and visible over the ear.
2) TOO LONG Clear Wire feels loose and the device
dangles behind the ear.
3) CORRECT Clear Wire is ush to the side of the ear and
the device is securely hidden behind the ear.
If the Clear Wire is too long or too short, please contact
iHear Customer Support with a photo of the device in your
ear for evaluation by our Professional Support. If the size
is incorrect for your ear, Customer Support will arrange to
exchange for the correct size.
Removing the Clear Wire
HOLD the Clear Wire and PULL
away from the device.
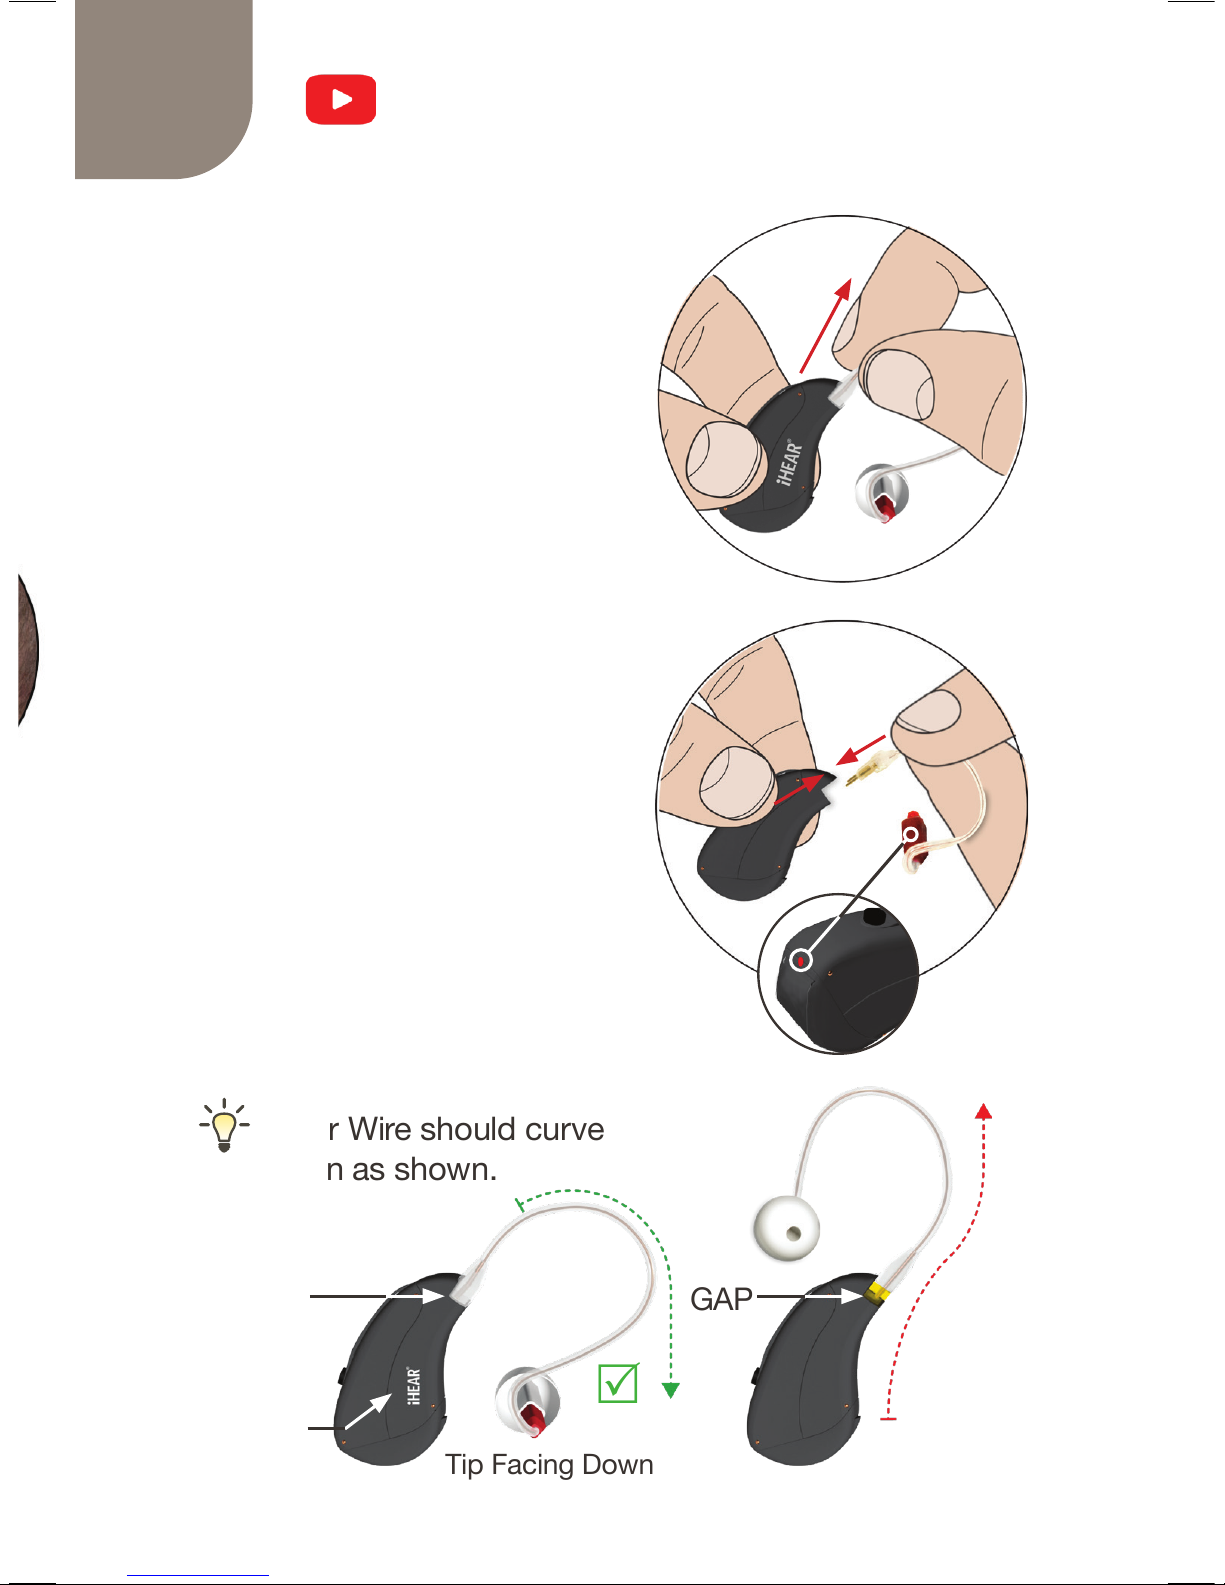
Attaching the Clear Wire
u PUSH the Clear Wire
connector rmly into the
device socket.
v Make sure the Speaker
color matches the Dot color
on the device. Attach the
Right/Left connectors to the
corresponding Right/Left
sockets.
Clear Wire should curve
down as shown.
NO GAP
Logo Up
Tip Facing Down
GAP
RQ
v
u

14
15
Changing the Sound Prole
Use the button on the back of
the device to adjust volume
and cycle through four (4)
sound proles for dierent
environments.
Each push cycles to the next
sound prole.
SOUND PROFILE BEEPS
OTHER BEEPS
1
2
3
4
MAIN PROFILE
CLEAR SPEECH
VOLUME UP
PUSH BUTTON
PUSH BUTTON
PUSH BUTTON
PUSH BUTTON
ACTION PROFILES DESCRIPTION
# OF
BEEPS
LOW BAT INDICATOR 4 LOW-PITCH BEEPS WHEN
BATTERY IS LOW
You will hear dierent beeps to help you
identify the changes in our settings
STARTUP MELODY WHEN YOU
INSERT THE BATTERY
DEVICE START UP
#1
#2
#3
#4
Beeps & Push Button Control
VOLUME DOWN /
TELEPHONE USE
Button

15
CARE & MAINTENANCE
Turning the iHEARMAX OFF & ON
When the battery door is open, the device is OFF.
iHEARMAX is OFF
When the battery door is closed the device is ON.
iHEARMAX is ON
Turning the device OFF when not in use is
important to prolong battery life.

17
16 Customizing Your iHEARMAX
At this point you should be familiar with:
1) Inserting or removing the Battery
2) Inserting or removing the Tips
3) Inserting and Removing iHEARMAX from
your ear
4) Turning your iHEARMAX ON and OFF
So far you have just been using the device with the
factory settings. Selecting the correct Tip size is
important. Before you start programming your device
ensure that it ts in your ear comfortably - not too loose
or too tight, and does not produce whistling (feedback)
sound.
Programming your iHEARMAX for best results
To optimize your hearing experience you
will need to customize the iHEARMAX
device based on your preference. The
next few pages will guide you through
the download, installation and launch
of the iHTUNER software application. The iHTUNER
allows you to program your iHEARMAX device(s).

17
SOFTWARE SETUP
Create an iHear Account or Sign in
In order to use iHear Medical products or services,
please create an account. (Skip if you already have an
iHear account and proceed to Sign in.)
Go to: www.ihearmedical.com
Click on My iHear Account
To set up a new account Click on Create an Account
Fill in the required information then Click Sign Up.
Once you’ve created an account you will receive
notication by email to activate your account.
Go to: www.ihearmedical.com/signin Sign In to your
account.

18
19
To Install the iHTUNER Application
Click DOWNLOAD then complete the installer setup
wizard. Follow the step-by-step procedures to complete
the iHTUNER installation and product activation.
Installing the iHTUNER Application
The iHTUNER application allows you to program your
iHEARMAX device(s) based on your personal preference.
You may launch the iHTUNER from the iHear Dashboard.
The dashboard is the launch site for all iHear software
application.
Go to iHTUNER and Click
on LAUNCH APPLICATION.
If iHTUNER is not yet
installed on your computer,
you will be prompted to
download and install the
application.

19
SOFTWARE SETUP
Launching the
iHTUNER Application
LEFT EAR ONLY LEFT & RIGHT RIGHT EAR ONLY
If you have just nished installing the software,
The iHTUNER application should launch
automatically. If you need to re-launch the
application, follow these instructions:
1. Sign in to your account at www.ihearmedical.com/signin
2. Click on the LAUNCH APPLICATION button for iHTUNER
-OR-
Locate the iH TUNER application on your computer by searching
for the application by name and CLICK on the iHTUNER.
Click on either the LEFT EAR ONLY, LEFT & RIGHT or
RIGHT EAR ONLY
Follow the iH TUNER's step-by-step instructions to
complete your device programming.
Installing the iHTUNER Application

20
21
Care and Maintenance
Use the Carrying Case to store your device and supplies.
Replace Tips once a month for optimum
performance and hygiene.
Clean the iHEARMAX daily using the Cleaning Wipe.
IMPORTANT
DO NOT USE isopropyl alcohol or alcohol-based products to clean
the iHEARMAX. This may damage the device and void the warranty.
Carrying Case
Table of contents
Other IHEAR Hearing Aid manuals


 Operation manual")


