manuals.online logo
Brands
  1. Home
  2. •
  3. Brands
  4. •
  5. IHP
  6. •
  7. Accessories
  8. •
  9. IHP UZY6 User manual

IHP UZY6 User manual

1
NOTE: DIAGRAMS & ILLUSTRATIONS ARE NOT TO SCALE.
KIT CONTENTS
1 ea. UZY6 Blower Assembly
1 ea. Mill-pack
1 ea. Instruction Sheet
TOOLS NEEDED
Robertson (square) or Phillips (star) screwdriver
INSTALLATION INSTRUCTIONS FOR INSTALLING UZY6 REPLACEMENT BLOWER KIT
FOR USE WITH WOOD-BURNING FIREPLACES LISTED IN TABLE 1
WARNING
The blower must be plugged directly into a properly
grounded three-prong receptacle, 120 VAC, 60 Hz,
single phase. Do not cut or remove the grounding prong
from this plug.
Installation must be in accordance with National Elec-
trical Code, ANSI/NFPA 70 - latest edition. In Canada,
the current CSA C22.1 Canadian Electrical Code - latest
edition.
UZY6 REPLACEMENT BLOWER KIT
Cat. No. Model Where Used
PR-UZY6 UZY6 Ladera™, BIS®Nova, Brentwood™ LV,
BIS Ultima CF
Table 1
Figure 1
GENERAL INFORMATION
The UZY6 blower kit is a replacementpart kit for the standard air-circulating
blower provided with the fireplace.
If you encounter any problems, need clarification of these instructions or
are not qualified to properly install this kit, contact your local distributor
or dealer.
Read this instruction sheet in its entirety before beginning the installation.
ALL WARNINGS AND PRECAUTIONS IN THE INSTALLATION AND
OPERATION MANUAL PROVIDED WITH THE APPLIANCE APPLY TO
THESE INSTRUCTIONS.
SHUT DOWN THE APPLIANCE AND ALLOW IT TO COMPLETELY COOL
BEFORE PROCEEDING.
UZY6 BLOWER KIT
P/N 506019-80
Rev. B, 07/2013
HEARTH PRODUCTS
KITS AND ACCESSORIES
INSTALLATION INSTRUCTIONS
Step 1. Remove the andirons, using a square or phillips screwdriver.
Then remove front and bottom refractories.
Step 2. Unscrew the access plate located in the firebox floor (12 screws).
Remove the access plate and the high heat cement used to seal
it.
Step 3. Unplug the blower from the electric receptacle located on the
right side of the fireplace.
Step 4. Unscrew the blower using a Robertson (square) or Phillips
(star) screwdriver. The location of the two screws depends on
the version of the blower installed (see Figure 1). They can be
at each end of the support bracket close to the floor (Version B)
or on top of the support bracket near the left side (Version A).
See figure 1.
Step 5. Take the blower out of the fireplace through the access opening.

Version A
Unscrew these two screws
Version B
Or these screws
to remove the blower
F161 REV. 2 07/2013
2
Installing the new Blower
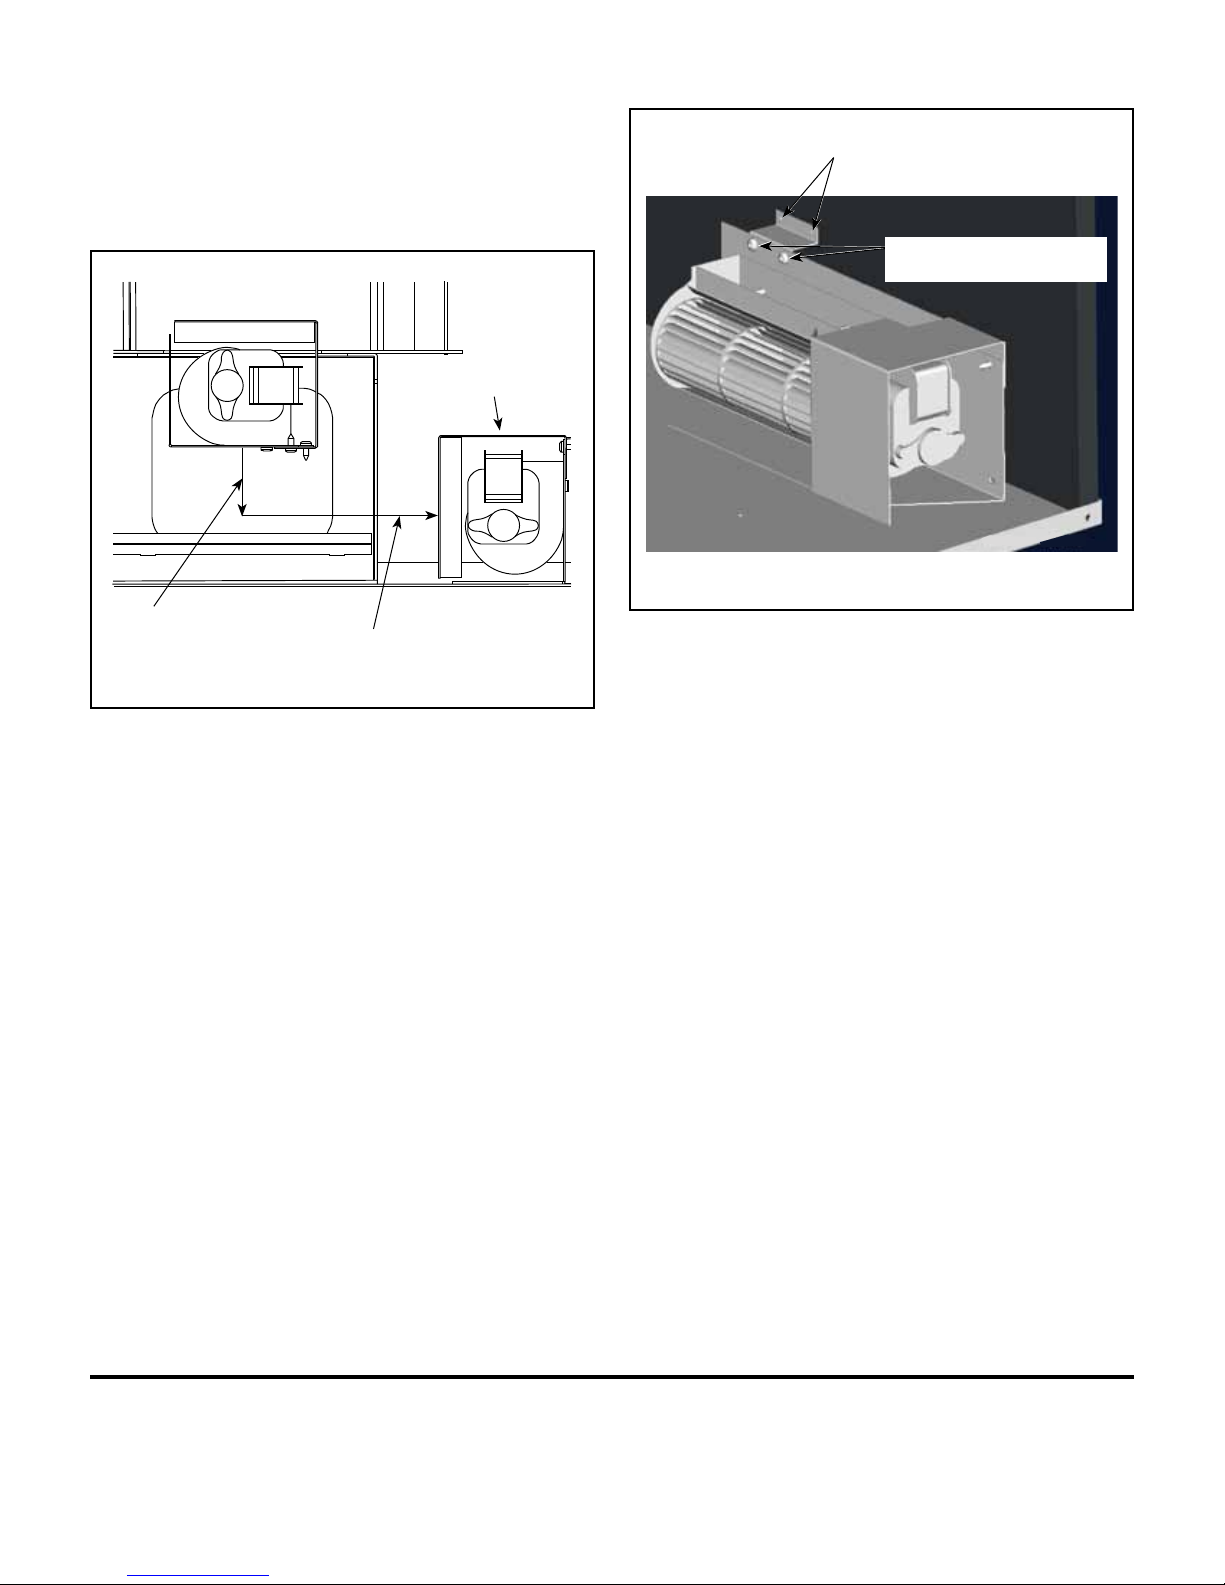
Step 6. Insert the new blower in the fireplace. Since the new support
bracket is bigger, insert the blower in the access opening with the
back side down, sliding it backward in the fireplace and rotating
it up in position (see Figure 2).
Figure 2
Figure 3
1 - Insert the blower
backside down 2 - Slide the blower to the
back of the fireplace
3 - Rotate the blower
up in position
Steps 7, 8 and 9 apply if the blower you removed is an older version.
Otherwise go to step 10.
Step 7. There are two 1” spacer left after removing the old blower. Leave
them there because they are riveted, but they won’t be used
anymore.
Step 8. Position the blower so that the new 1” spacer is touching the
back of the fireplace and the blower is offsetted about four (4)
inches to the right (so the motor of the blower is not under the
firebox).
Step 9. Screw the blower in place using the supplied black self tapping
screws through the 1” spacer holes and drilling through the
fireplace back (see figure 3, step 9).
Step 10 applies only if the blower you removed is a newer version
Step 10.Screw the blower in place using the same black screws in the
1” spacer holes (see figure 3, step 10).
Step 9. Screw in these holes through the fireplace
back. By offsetting the blower 4” to the right,
this spacer will be centered in the fireplace.
Step 10.Reinstall these two screws
into the 1” spacer.
Finishing the installation
Step 11. Plug the blower back in the electrical receptacle.
Step 12. Apply new high temperature sealant (Mill-Pack, included) to seal
the access plate, making a 1/4” rope covering all 12 screw holes of
the access opening.
Step 13. Reinstall the access plate and strongly screw it back on the firebox
floor using the 10-32 x 1/2” white screws supplied.
Step 14. Reinstall the front and bottom refractories and the andirons.
Printed in U.S.A. © 2011 IHP LLC
P/N 506019-80 Rev. B 07/2013
IHP reserves the right to make changes at any time, without notice, in design, materials, specifications, prices and also to discontinue colors, styles and products. Consult your local distributor
for fireplace code information.
NOTE: DIAGRAMS & ILLUSTRATIONS ARE NOT TO SCALE.
IHP
1508 Elm Hill Pike, Suite 108 • Nashville, TN 37210
F161 Rev. 2 07/2013

Popular Accessories manuals by other brands

Sensor Switch RM-PC-ADC manual

Sensor Switch

Sensor Switch RM-PC-ADC manual

Delta GT-9000 user guide

Delta

Delta GT-9000 user guide

Air Lift 3H installation guide

Air Lift

Air Lift 3H installation guide

WHISPER KOOL Extreme 3500tiR owner's manual

WHISPER KOOL

WHISPER KOOL Extreme 3500tiR owner's manual

Chef's Choice EdgeCraft E1520 manual

Chef's Choice

Chef's Choice EdgeCraft E1520 manual

Smart Technologies sba-v manual

Smart Technologies

Smart Technologies sba-v manual

Vega VEGASON S 61 operating instructions

Vega

Vega VEGASON S 61 operating instructions

SVBONY SV105 user manual

SVBONY

SVBONY SV105 user manual

SimPal SimPal-T40-V2 user manual

SimPal

SimPal SimPal-T40-V2 user manual

SICK GLS6 operating instructions

SICK

SICK GLS6 operating instructions

Sewha SI 530 user manual

Sewha

Sewha SI 530 user manual

Condec UMC 600IS installation manual

Condec

Condec UMC 600IS installation manual

Dorner 2200 series Installation, maintenance & parts manual

Dorner

Dorner 2200 series Installation, maintenance & parts manual

Manitowoc MDB-290 installation instructions

Manitowoc

Manitowoc MDB-290 installation instructions

Stobag Jumbo S2160 manual

Stobag

Stobag Jumbo S2160 manual

Lencore MPI-2 LOCAL user manual

Lencore

Lencore MPI-2 LOCAL user manual

GP PB420 instruction manual

GP

GP PB420 instruction manual

Renfert Silent Faq

Renfert

Renfert Silent Faq

manuals.online logo
manuals.online logoBrands
  • About & Mission
  • Contact us
  • Privacy Policy
  • Terms and Conditions

Copyright 2025 Manuals.Online. All Rights Reserved.