IKEA Anratta User manual

ANRÄTTA SG
MY
TH
HK
ID


ENGLISH 5
BAHASAMELAYU 16
28
39
INDONESIABAHASA 50
For the IKEA appointed Authorized Service
Centre, please refer to the IKEA catalogue or
www.IKEA.com
and select your local store for phone
numbers and opening times.
Untuk Pusat Layanan Resmi yang ditunjuk
oleh IKEA, silakan lihat katalog IKEA atau
www.IKEA.com
dan pilih toko lokal di sekitar Anda untuk
nomor telepon dan jam buka.
如需IKEA指定授權服務中心的相關資訊,請參考
IKEA型錄或造訪
www.IKEA.com
並選擇當地分店以取得電話號碼和營業時間。
Untuk Pusat Servis Sah yang dilantik oleh
IKEA, sila rujuk katalog IKEA atau
www.IKEA.com
dan pilih kedai tempatan anda untuk
mendapatkan maklumat nombor telefon dan
waktu operasi.
www.IKEA.com

Min 560 mm
600 mm
Min 560 mm
583 + 2 mm
560 mm
560 mm

5
Before using the appliance, read these
safety instructions. Keep them nearby for
future reference.
These instructions and the appliance itself
provide important safety warnings, to be
observed at all times. The manufacturer
declines any liability for failure to observe
these safety instructions, for inappropriate
use of the appliance or incorrect setting of
controls.
SAFETY WARNINGS
Very young children (0-3 years) should
be kept away from the appliance. Young
children (3-8 years) should be kept away
from the appliance unless continuously
supervised. Children from 8 years old and
above and persons with reduced physical,
sensory or mental capabilities or lack of
experience and knowledge can use this
appliance only if they are supervised or
have been given instructions on safe use
and understand the hazards involved.
Children must not play with the appliance.
Cleaning and user maintenance must
not be carried out by children without
supervision.
WARNING! The appliance and its
accessible parts become hot during use.
Care should be taken to avoid touching
heating elements. Children less than
8 years old must be kept away unless
continuously supervised.
WARNING! Never leave the appliance
unattended during food drying. If the
appliance is suitable for probe usage, only
use a temperature probe recommended
for this oven - risk of re.
Keep clothes or other ammable
materials away from the appliance, until
Safety Information 5
Product description 7
Control panel 7
First use 8
Daily use 8
Cooking tables 10
Cleaning and maintenance 11
What to do if ... 12
Technical data 13
Installation 14
Electrical connection 14
Environmental concerns 14
IKEA GUARANTEE 15
Safety Information
Table of contents
all the components have cooled down
completely - risk of re. Always be vigilant
when cooking foods rich in fat, oil or
when adding alcoholic beverages - risk of
re. Use oven gloves to remove pans and
accessories. At the end of cooking, open
the door with caution: allowing hot air or
steam to exit gradually before accessing
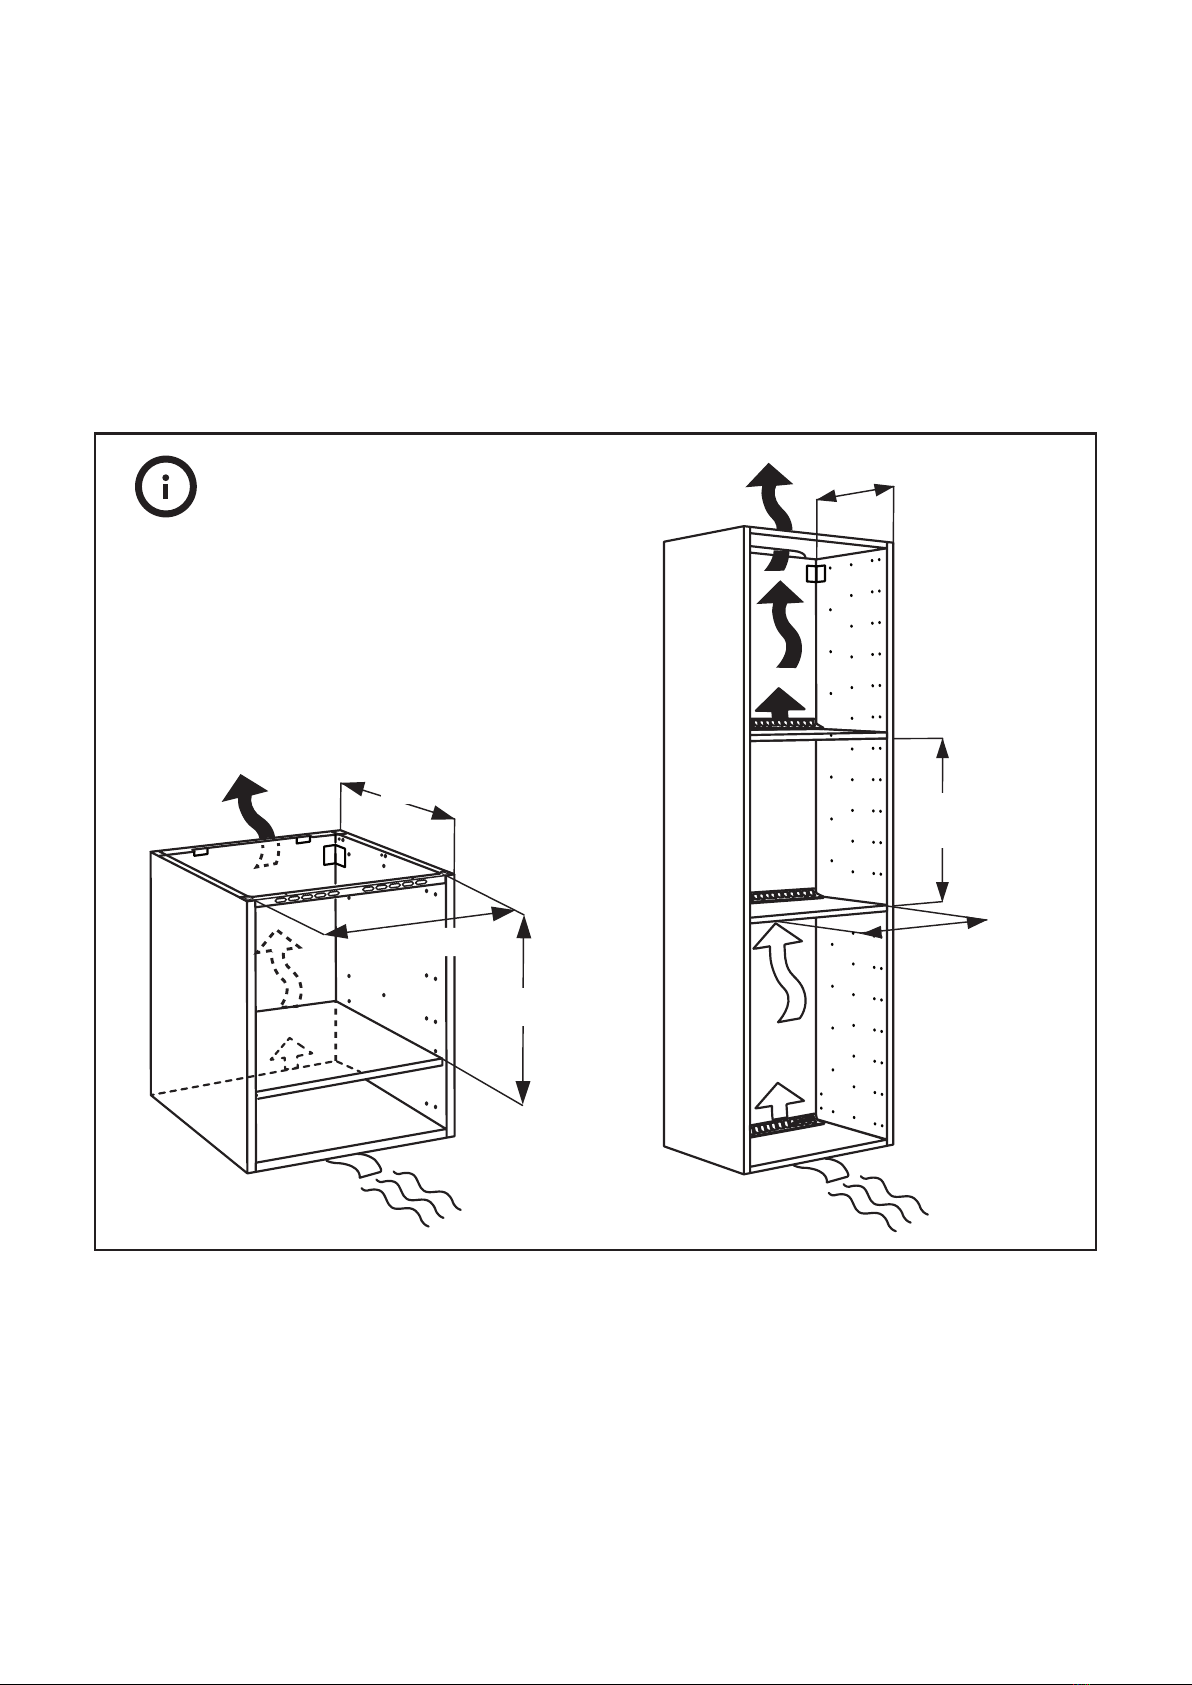
the cavity - risk of burns. Do not obstruct
hot air vents at the front of the oven - risk
of re.
Exercise caution when the oven door
is in the open or down position, to avoid
hitting the door.
PERMITTED USE
CAUTION: the appliance is not intended
to be operated by means of an external
switching device, such as a timer, or
separate remote controlled system.
This appliance is intended to be used
in household and similar applications
such as: sta kitchen areas in shops,
oces and other working environments;
farm houses; by clients in hotels, motels,
bed & breakfast and other residential
environments.
This appliance is not for professional
use. Do not use the appliance outdoors.
No other use is permitted (e.g. heating
rooms).
Do not store explosive or ammable
substances (e.g. gasoline or aerosol cans)
inside or near the appliance - risk of re.
INSTALLATION
The appliance must be handled and
installed by two or more persons - risk of
injury. Use protective gloves to unpack and
install - risk of cuts.
GB
ENGLISH

ENGLISH 6
Installation, including water supply
(if any) and electrical connections, and
repairs must be carried out by a qualied
technician. Do not repair or replace any
part of the appliance unless specically
stated in the user manual. Keep children
away from the installation site. After
unpacking the appliance, make sure that it
has not been damaged during transport.
In the event of problems, contact the
dealer or your nearest After-sales Service.
Once installed, packaging waste (plastic,
styrofoam parts etc.) must be stored out
of reach of children - risk of suocation.
The appliance must be disconnected from
the power supply before any installation
operation - risk of electrical shock. During
installation, make sure the appliance
does not damage the power cable - risk of
re or electrical shock. Only activate the
appliance when the installation has been
completed.
Carry out all cabinet cutting works
before tting the appliance in the furniture
and remove all wood chips and sawdust.
Do not obstruct the minimum gap
between the worktop and the upper edge
of the oven - risk of burn.
Do not remove the oven from its
polystyrene foam base until the time of
installation.
After installation, the bottom of the
appliance must no longer be accessible -
risk of burn.
Do not install the appliance behind a
decorative door - risk of re.
ELECTRICAL WARNINGS
The rating plate is on the front edge of
the oven (visible when the door is open).
It must be possible to disconnect
the appliance from the power supply by
unplugging it if plug is accessible, or by a
multi-pole switch installed upstream of the
socket and the appliance must be earthed,
in conformity with national electrical safety
standards.
Do not use extension leads, multiple
sockets or adapters. The electrical
components must not be accessible to the
user after installation.
Do not use the appliance when you are wet
or barefoot.
Do not operate this appliance if it has
a damaged power cable or plug, if it is
not working properly, or if it has been
damaged or dropped.
If the supply cord is damaged, it must
be replaced with an identical one by the
manufacturer, its service agent or similarly
qualied persons in order to avoid a
hazard - risk of electrical shock.
In case of replacement of power cable,
contact an authorized service center.

ENGLISH 7
Product description
1
Control panel
2Cooling fan (not visible)
3
Grill element
4
Oven lamp
5
Oven fan
6
Lower heating element (hidden)
7
Oven door
8
Lateral grids
Inserting the wire shelf and other accessories
Insert the wire shelf onto the level you require by holding it
tilted slightly upwards and resting the raised rear side (pointing
upwards) down rst. Next, slide it horizontally along the shelf
guide as far as possible.
The other accessories, such as the baking tray, are inserted
horizontally by sliding them along the shelf guides.
If you want to buy an accessory, call the Authorized Service
Centre.
1
2
3
4
5
7
6
8
Accessories
Baking tray
1x
Deep tray
1x
Wire Shelf
1x
Telescopic Runners
1x
Control panel
A
Selection push-push knob
B
Back button
C
Light
D
Display
E
Conrmation button
F
Minute minder
G
Adjust push-push knob
Retractable knobs
To use this type of knob, press it in the middle.
The knob comes out.
Turn it to the required position.
Once cooking is over, turn the knob to and press it again to
restore it to its original position.
A D GB CEF

ENGLISH 8
Remove the accessories from the oven and heat it at 200°
for about an hour to eliminate the smell and fumes from the
insulating materials and protective grease
Settings
Turn the “Functions” knob
A
indicator to display setting and turn
the
G
knob to access a submenu containing four display settings
which can be changed once cooking is over, turn the knob to its
original position.
• Clock
Turn the
G
knob to display CLOCK. The two left digits will then
start to blink, turn the
G
knob to set hours. Press
E
button to
conrm the value and the right two digit will start to blink. Turn
the
G
knob to set minutes and press the
E
button to conrm
the selection.
• Sound
To activate or deactivate the acoustic signal, proceed as follows:
1. Turn the Gknob to display “SOUND”
2. press E button to conrm
3. Use the Gknob to select the desired setting
4. Press E button to conrm
• Brightness
To change the display brightness, proceed as follows:
1. Turn the Gknob to display “BRIGHTNESS and press Eto
conrm.
2. The current brightness value is visible
3. Turn the Gknob to increase or decrease brightness and
conrm by pressing E.
• Eco
1. Turn the Gknob to display “ECO”.
2. Press Eto access the setting (ON/OFF).
3. Turn the G knob to select the desired setting and conrm
by pressing button E.
4. During a cooking function, if the Eco Mode is activated, the
display reduces the brightness to the lowest level after 1
minute, the cavity lamp will be switched o after 1 minute
of cooking and reactivated by pressing button C.
First use
Daily use
Function
A
Knob
Function
G
Knob
PREHEAT Temperature Time Delay to Start
OFF
– – – – –
FORCED AIR
–
X X X X
CONVENTIONAL
(TOP AND BOTTOM HEAT)
–
X X X X
CONVECTION BAKE
–
X X X X
MAXI COOKING
–
X X X X
GRILL GRILL
–
level 1-2-3 X X
GRILL TURBO GRILL
–
level 1-2-3 X X
BREAD BREAD X
X
X
–
PIZZA PIZZA X
X
X
–
SPECIALS ECO
FORCED AIR*
–
X X X
SPECIALS DEFROST
– –
X X
SPECIALS WARM KEEPING
–
65° X X
SPECIALS RISING
–
30° 35° 40° X X
FAST PREHEAT
–
X X X
–
Browning
At the end of cooking, with certain functions, the display indicates
the possibility of extra browning. This function can only be used
when cooking time has been set.
At the end of cooking time, the display shows: “PRESS
E
TO
BROWN”. Press
E
, and the oven starts a 5 minute browning cycle.
This function can be selected consecutively a maximum of twice.
Minute Minder
This option activate the minute minder only when there are no
other functions active. Keep pressing until the and «00:00»
start ashing on the display, select and press ok to conrm.
An down the selected audible signal will sound once the timer has
nished counting.
To activate a Function
1. select the desidered funtion with
A
knob and press
E
button
to conrm.
2. the Temperature is Blinking and you can adjust with
G
knob
and press
E
button to conrm.
3. the cooking time is visible on the display, you can adjust it
with Gknob or leave to for an immediate start and press E
button to conrm.
4. if you selected before a desired cooking time, the display will
show the expected time of end, you can postpone it with
G
knob and press
E
button to conrm the delay.
Preheat
The preheat will start atomatically when available (Check the table)
and is included in the cooking time if you select it before starting
the function.
If you select the temperature and a cooking time the preheat starts
automatically. If you do not select the cooking time the timer will
start only after reached the desired temperature.
Always an audible sound will advice when the temperature is
reached.
Delay to Start
Will be postpone the end of cooking time, when available (Check the
table).

ENGLISH 9
Oven functions table
The oven has 5 cooking levels. Count up from the lower level.
Function Description of function
OFF For switching o the oven.
FORCED AIR For cooking dierent foods that require the same cooking temperature on several shelves
(maximum
three)
at the same time. This function can be used to cook dierent foods without
odours being transferred from one food to another.
CONVENTIONAL
(Top and Bottom Heat)
For cooking any kind of dish on one shelf only.
It is best to use the 2nd or the 3rd shelf. Preheat the oven before insert the food.
CONVECTION BAKE To cook meat and pies with liquid lling (savoury or sweet) on a
single shelf. Use the 2nd shelf. Preheat the oven before cooking.
MAXI COOKING To cook large joints of meat (above 2.5 kg). Use the 1st or 2nd shelf, depending on the size of the
joint. It is advisable to turn the meat over during cooking for more even browning. It is best to
baste the meat every now and again to avoid it drying out.
GRILL
For grilling steaks, kebabs and sausages, cooking vegetables au gratin or toasting bread. It is
best to use the 4th or 5th Shelf. When grilling meat, we recommend using a drip tray to collect
the cooking juices: position the pan on the 3rd/4th level and add 500 ml of water. the oven door
should be closed during cooking.
TURBOGRILL
To roast large joints of meat (legs, roast beef, chickens). Position the food on the middle shelves.
Use the drip tray to collect the cooking juices. Position it on the 1st/2nd shelf, adding approx.
half a litre
of
water. The oven does not have to be preheated. During cooking the oven door must
remain closed.
BREAD To bake dierent types and sizes of bread.
Simply indicate the values required (temperature and time) and the oven will manage the cooking
cycle automatically. Place the dough on the 2nd shelf.
PIZZA
To bake dierent types and sizes of pizza.
Simply indicate the values required (temperature and time) and the oven will manage the cooking cycle
automatically. Place the dough on the 2nd shelf.
ECO
FORCED AIR*
To cook stued roasts and meat in pieces on one shelf. This function uses discontinuous, delicate
fan assistance, which prevents excessive drying of foods. In this ECO function the light remains
o during cooking and can be temporarily switched on again by pressing the conrm button.
In order to maximize energy eciency, it is advisable not to open the door during cooking. It is
advisable to use 3rd level. The
oven does not have to be preheated.
DEFROST To speed up defrosting of food. Place food on the middle shelf.
Leave food in its packaging in order to prevent it from drying out on the outside.
WARM KEEPING For keeping just-cooked food hot and crisp (e.g: meat, fried food or ans). Place food on the
middle shelf.
RISING For optimal rising of sweet or savoury dough. To safeguard the quality of proving, the function will
not activate if the temperature in the oven is above 40°C. Place the dough on the 2nd shelf. The
oven does not have to be preheated.
FAST PREHEAT To preheat the oven rapidly. At the end of the prehear the oven will select automatically the
CONVENTIONAL function. Wait the end of the preheat before inserting te food inside the oven.
- + SETTINGS To set the display (Time, Light, Volumes of sounds, energy saving)
*Function used as reference for the energy eciency declaration in accordance with Regulation (EU) No. 65 / 2014

ENGLISH 10
Cooking tables
Type of food Function Preheating Level
(from the bottom)
Temperature (°C) Cooking time
(min)
SWEETS, PASTRY, ETC
Leavened cakes X 2/3 150–170 30-90
X 1-4 160-180 30-90
Filled pies (cheesecake, strudel,
fruit pie)
X 2 160-200 35-90
X 2-4 160-200 40-90
Biscuits/tartlets X 3 150-170 20-45
X 2-4/5-3-1 150-170 20-45
Choux buns X 3 180-200 30-40
X 2-4 170-190 35-45
Meringues X 2 90 150-200
X 2-4/5-3-1 90 140-200
Bread X 2 180-220 30-50
Pizza X 2 220-250 15-30
Bread/pizza/focaccia X 2-4/5-3-1 190-250 20-40
Frozen pizza X 2 250 10-30
X 2-4 230-250 10-30
Savoury pies (vegetable pie,
quiche)
X 2 180-200 30-50
X 2-4/5-3-1 180-190 30-60
Vols-au-vent/Pupastrycrackers
X 2 190-200 20-30
X 2-4/5-3-1 180-190 20-40
Lasagne, baked pasta, cannelloni,
ans X 2 190-200 45-65
Lasagna & Meat X 2-4 200 50-100***
Meat & Potatoes X 1-4 190-200 45-100***
Fish & Vegetables X 1-4 180 30-50***
Complete meal
Fruit tart (Level 5) /
Lasagna (Level 3) / Meat (Level 1) X 1-3-5 180-190 40-120***
Roastmeat/stuedroasting
joints - 2 180-200 100-150***
MEAT
Meat pieces
(rabbit, chicken, lamb) - 2 180-200 60-100***
Roast meat 2 kg X 2 170-190 110-150
Lamb/Veal/Beef 1Kg X 2 190-200 80-120
Chicken/Rabbit/Duck 1Kg X 2 200-230 50-100
Turkey/Goose 3Kg X 2 200-230 150-200
FISH
Bakedsh/enpapillote0.5Kg
(llet, whole) X 2 170-190 30-50
VEGETABLES
Stuedvegetables (tomatoes,
courgettes, aubergines) X 2 180-200 50-70

ENGLISH 11
Cooking table with GRILL function
Type of food Function Preheating Level
(from the bottom)
Temperature (°C) Cooking time
(min)
Toast 5’ 5 3
(High)
1-3
Fishllets/slices 5’ 3/4 2
(Medium)
15-30*
Sausages/kebabs/spare ribs/
hamburgers 5’ 4/5 2-3
(Medium-High)
15-30*
Leg of lamb/knuckle - 3 2
(Medium)
60-90**
Vegetable gratin - 3 3
(High)
10-25
Roast potatoes - 3 2
(Medium)
35-60**
Roast chicken
1-1.3 Kg - 2 2-3
(Medium-High
55-80**
Roast beef rare 1Kg - 3 2
(Medium)
35-50**
Note: cooking temperatures and times are for guidance only.
* Turn food halfway through cooking
** Turn food two-thirds of the way through cooking (if necessary).
*** Estimated length of time: dishes can be removed from the oven at dierent times depending on personal preference.
Cleaning and maintenance
CLEANING
WARNING!
- Never use steam cleaning equipment.
- Only clean the oven when it is cool to the touch.
- Disconnect the appliance from the power supply.
Oven exterior
i
IMPORTANT: do not use corrosive or abrasive detergents.
If any of these products accidentally comes into contact
with the appliance, clean immediately with a damp cloth.
• Clean the surfaces with a damp cloth. If it is very dirty, add
a few drops of washing up detergent to the water. Finish o
with a dry cloth.
Oven interior
i
IMPORTANT: do not use abrasive sponges or metallic
scrapers or scourers. Over time, these can ruin enamelled
surfaces and the oven door glass.
• After every use, allow the oven to cool then clean it
preferably while it is still warm in order to remove built-up
dirt and stains caused by food residues (e.g. food with a high
sugar content).
• Use proper oven detergents and follow the manufacturer’s
instructions to the letter.
• Clean the door glass with a suitable liquid detergent.
The oven door can be removed to facilitate cleaning (see
MAINTENANCE). Inner glass is smooth to facilitate cleaning.
NOTE: during prolonged cooking of foods with a high water
content (e.g. pizza, vegetables, etc.) condensation may form on
the inside of the door and around the seal. When the oven is
cold, dry the inside of the door with a cloth or sponge.
Accessories
• Soak the accessories in water with washing up detergent
immediately after use, handling them with oven gloves if still
hot.
• Food residues can be easily removed using a brush or
sponge.
MAINTENANCE
WARNING!
- Use safety gloves.
- Ensure the oven is cold before carrying out the following
operations.
- Disconnect the oven from the power supply.
To remove the shelf guides
rmly grip the external part of the guide, and pull it towards
you to extract the support and the two internal pins from the
lodging.
To reposition the shelf guides
position them near the cavity and initially insert the two pins into
their lodgings. Next, position the external part near
its lodging, insert the support, and rmly press towards the wall
of the cavity to make sure the shelf guide is properly secured.
To remove the door
1. Open the door fully.
2. Lift the catches and push them forwards as far as they will go
(Fig. 1).
Fig. 1

ENGLISH 12
3. Close the door as far as it will go (A), lift it up (B) and turn it
(C) until it is released (D) (Fig. 2, 3, 4).
A
Fig. 2
B
B
C
Fig. 3
D
Fig. 4
Toretthedoor
1. Insert the hinges in their seats.
2. Open the door fully.
3. Lower the two catches.
4. Close the door
Cleaning the glass
1. After removing the door and resting it on a soft surface
with the handle downwards, simultaneously press the two
retaining clips and remove the upper edge of the door by
pulling it towards you.
2. Lift and rmly hold the inner glass with both hands, remove
it and place it on a soft surface before cleaning it. Do the
same operation for the intermediate glass.
3. To reposition both the intermediate and the internal glass
properly, be sure that the “R” can be seen in the left corner.
First insert the long side of the glass indicated by “R” into the
support seats, then lower it into position.
4. Ret the upper edge: A click will indicate correct positioning.
Make sure the seal is secure before retting the door.
To replace the lamp
1. Disconnect the oven from the power supply.
Fig. 5
2. Unscrew the lamp cover (Fig. 5), replace the lamp (see note
for lamp type) and screw the lamp cover back on.
3. Reconnect the oven to the power supply.
NOTE:
- Only use 25W/230 V type G9, T300°C halogen lamps.
- The lamp used in the appliance is specically designed for
electrical appliances and it is not suitable for household
room illumination (Commission Regulation (EC) No
244/2009).
- Lamps are available from IKEA Authorized Service Centre.
Problem Possible cause Solution
The oven does not work. No presence of mains electrical power. Verify the presence of mains electrical power.
The oven is not connected to the
electrical supply.
Connect the oven to the power supply.
The display shows the letter “F”
followed by a number
Software problem Contact you nearest After-sales Service Centre
and state the letter or number that follows the
letter “F”
What to do if ...
Before calling the Authorized Service Centre:
1. See if you can solve the problem yourself with the help of the
suggestions given in the “What to do if ...” table.
2. Switch the appliance o and back on again it to see if
the fault persists.
If after the above checks the fault still occurs, contact
IKEA Authorized Service Centre.
Always specify:
• a brief description of the fault;
• the type and exact model of the oven;
• the service number (number after the word Service on the
rating plate), located on the right hand edge of the oven
cavity (visible when the oven door is open);
• your full address;
• your telephone number.
If any repairs are required, please contact IKEA Authorized Service Centre (to guarantee that original spare parts will be used and
repairs carried out correctly).

ENGLISH 13
Technical data
Type of product: Built-in Electrical Oven
Model identication:
ANRÄTTA 705.082.36
Number of cavities
1
Heat source
Electrical
Number of functions
9
Usable volume. Measured with any side grids and catalytic panels removed l
71
Area of the largest baking sheet cm
2
1191
Energy Eciency Class (Lowest Consumption)
A+
Energy Eciency Index
81,2
Energy consumption
Conventional function (with a standard load and top + bottom heating)
kWh/cycle
0,89
Energy consumption
Fan Forced function (with a standard load and forced air heating) kWh/cycle
0,69
Top heating element W
2200
Bottom heating element W
2200
Grill heating element W
1800
Fan heating element W
1800
Cooling fan W
15
Oven lamp W
25
Oven Fan Wattage W
22
Total rating W
2700-3000
Dimensions
Width mm
595
Height mm
595
Depth mm
550
Mass of the appliance
ANRÄTTA Kg 30,5
The technical informations are situated in the rating plate inside the appliance.

ENGLISH 14
Door lock device
To open the door with the door lock device see Fig 1.
Fig. 1
The door safety device can be removed
by following the sequence of images (see Fig. 2).
Fig. 2
Installation
Make sure the power voltage specied on the appliance rating
plate is the same as the mains voltage. The rating plate is on the
front edge of the oven (visible when the door is open).
Power cable replacement (type H05 V2V2 x 1,5 mm2) must be
carried out by a qualied electrician. Contact IKEA Authorized
Service Centre.
Electrical connection
WARNING! Ensure that the appliance
is switched o and disconnected from
the power supply before performing
any maintenance operation - risk of
electrical shock. Never use steam cleaning
equipment.
Do not use harsh abrasive cleaners or
metal scrapers to clean the door glass since
they can scratch the surface, which may
result in shattering of the glass.
Ensure the appliance is cooled down
before any cleaning or maintenance. - risk of
burn.
WARNING! Switch o the appliance
before replacing the lamp - risk of electrical
shock.
DISPOSAL OF PACKAGING MATERIALS
The packaging material is 100% recyclable and is marked with
the recycle symbol. The various parts of the packaging must
therefore be disposed of responsibility and in full compliance
with local authority regulations governing waste disposal.
SCRAPPING OF HOUSEHOLD APPLIANCES
This appliance is manufactured with recyclable or reusable
materials. Dispose of it in accordance with local waste disposal
regulations. For further information on the treatment, recovery
and recycling of household electrical appliances, contact your
local authority, the collection service for household waste or
the store where you purchased the appliance. This appliance
is marked in compliance with European Directive 2012/19/EU,
Waste Electrical and Electronic Equipment (WEEE). By ensuring
this product is disposed of correctly, you will help prevent
negative consequences for the environment and human health.
The symbol on the product or on the accompanying
documentation indicates that it should not be treated as
domestic waste but must be taken to an appropriate collection
center for the recycling of electrical and electronic equipment.
ENERGY SAVING TIPSs
Only preheat the oven if specied in the cooking table or your
recipe. Use dark lacquered or enamelled baking trays as they
absorb heat better. Food requiring prolonged cooking
will continue
to cook even once the oven is switched o.
DECLARATION OF CONFORMITY
This appliance meets the Eco Design requirements of European
Regulations n.65/2014 and 66/2014 in conformity to the
European standard EN 60350-1.
n
Environmental concerns

ENGLISH 15
IKEA GUARANTEE
How long is the IKEA guarantee valid?
This guarantee is valid for ve (5) years from the original date
of purchase of your appliance at IKEA. The original sales receipt,
is required as proof of purchase. If service work is carried out
under guarantee, this will not extend the guarantee period for
the appliance.
Who will execute the service?
IKEA service provider will provide the service through its own
service operations or authorized service partner network.
What does this guarantee cover?
The guarantee covers faults of the appliance, which have been
caused by faulty construction or material faults from the date
of purchase from IKEA. This guarantee applies to domestic use
only. The exceptions are specied under the headline “What is
not covered under this guarantee?” Within the guarantee period,
the costs to remedy the fault e.g. repairs, parts, labour and
travel will be covered, provided that the appliance is accessible
for repair without special expenditure. On these conditions the
EU guidelines (Nr. 99/44/EG) and the respective local regulations
are applicable. Replaced parts become the property of IKEA.
What will IKEA do to correct the problem?
IKEA appointed Service Provider will examine the product and
decide, at its sole discretion, if it is covered under this guarantee.
If considered covered, IKEA Service Provider or its authorized
service partner through its own service operations, will then, at
its sole discretion, either repair the defective product or replace
it with the same or a comparable product.
What is not covered under this guarantee?
• Normal wear and tear.
• Deliberate or negligent damage, damage caused by failure
to observe operating instructions, incorrect installation or by
connection to the wrong voltage, damage caused by chemical
or electrochemical reaction, rust, corrosion or water damage
including but not limited to damage caused by excessive
lime in the water supply, damage caused by abnormal
environmental conditions.
• Consumable parts including batteries and lamps.
• Non-functional and decorative parts which do not aect
normal use of the appliance, including any scratches and
possible color dierences.
• Accidental damage caused by foreign objects or substances
and cleaning or unblocking of lters, drainage systems or
soap drawers.
• Damage to the following parts: ceramic glass, accessories,
crockery and cutlery baskets, feed and drainage pipes, seals,
lamps and lamp covers, screens, knobs, casings and parts of
casings. Unless such damages can be proved to have been
caused by production faults.
• Cases where no fault could be found during a technician’s visit.
• Repairs not carried out by our appointed service providers
and/or an authorized service contractual partner or where
non-original parts have been used.
• Repairs caused by installation which is faulty or not according
to specication.
• The use of the appliance in a non-domestic environment i.e.
professional use.
• Transportation damages. If a customer transports the product
to his home or another address, IKEA is not liable for any
damage that may occur during transport. However, if IKEA
delivers the product to the customer’s delivery address, then
damage to the product that occurs during this delivery will be
covered by IKEA.
• Cost for carrying out the initial installation of the IKEA
appliance.
• However, if an IKEA appointed Service Provider or its
authorized service partner repairs or replaces the appliance
under the terms of this guarantee, the appointed Service
Provider or its authorized service partner will reinstall the
repaired appliance or install the replacement, if necessary.
How country law applies
The IKEA guarantee gives you specic legal rights, which cover
or exceed all the local legal demands. However these conditions
do not limit in any way consumer rights described in the local
legislation.
Area of validity
For appliances which are purchased in one EU country and
taken to another EU country, the services will be provided in
the framework of the guarantee conditions normal in the new
country.
An obligation to carry out services in the framework of the
guarantee exists only if the appliance complies and is installed in
accordance with:
- the technical specications of the country in which the
guarantee claim is made;
- the Assembly Instructions and User Manual Safety
Information.
The dedicated AFTER SALES for IKEA appliances
Please don’t hesitate to contact IKEA appointed Authorized
Service Centre to:
• make a service request under this guarantee;
• ask for clarications on installation of the IKEA appliance in
the dedicated IKEA kitchen furniture;
• ask for clarication on functions of IKEA appliances.
To ensure that we provide you with the best assistance, please
read carefully the Assembly Instructions and/or the User Manual
before contacting us.
How to reach us if you need our service
For the IKEA appointed Authorized Service
Centre, please refer to the IKEA catalogue or
www.IKEA.com
and select your local store for phone
numbers and opening times.
Before calling us, assure that You have to hand the IKEA
article number (8 digit code) and the Serial Number (8
digit code that can be found on the rating plate) for the
appliance of which you need our assistance.
SAVE THE SALES RECEIPT!
It is your proof of purchase and required for the guarantee
to apply. The sales receipt also reports the IKEA name and
article number (8 digit code) for each of the appliances you
have purchased.
Do you need extra help?
For any additional questions not related to After Sales of your
appliances please contact your nearest IKEA store call centre.
We recommend you read the appliance documentation carefully
before contacting us.

16
Sebelum menggunakan perkakas, baca
arahan keselamatan ini. Simpannya
berdekatan untuk rujukan masa depan.
Arahan dan perkakas ini sendiri
memberikan amaran keselamatan yang
penting untuk dipatuhi pada setiap
masa. Pengilang menolak sebarang
tanggungjawab terhadap kegagalan
untuk mematuhi arahan keselamatan ini,
untuk penggunaan perkakas yang tidak
sepatutnya atau penetapan kawalan yang
salah.
AMARAN KESELAMATAN
Kanak-kanak yang sangat kecil (0-3
tahun) harus dijauhkan daripada perkakas.
Kanak-kanak kecil (3-8 tahun) harus
dijauhkan daripada perkakas melainkan
diawasi secara berterusan. Kanak-kanak
berusia 8 tahun dan ke atas dan individu
yang kurang keupayaan zikal, deria
atau mental atau tiada pengalaman
dan pengetahuan boleh menggunakan
perkakas ini hanya jika mereka diawasi
atau telah diberikan arahan tentang
penggunaan yang selamat dan memahami
bahaya yang terlibat. Kanak-kanak
tidak patut bermain dengan perkakas.
Pembersihan dan penyelenggaraan
pengguna tidak patut dijalankan oleh
kanak-kanak tanpa pengawasan.
AMARAN! Perkakas dan bahagian
boleh capainya menjadi panas semasa
penggunaan. Berhati-hati supaya tidak
menyentuh elemen pemanasan. Kanak-
kanak kurang daripada 8 tahun harus
dijauhkan melainkan mereka diawasi
secara berterusan.
AMARAN! Jangan sesekali
meninggalkan perkakas semasa
pengeringan makanan. Jika perkakas
Maklumat Keselamatan 16
Penerangan Produk 18
Panel kawalan 18
Penggunaan pertama 19
Penggunaan harian 19
Jadual memasak 21
Pembersihan dan penyelenggaraan 22
Maklumat Keselamatan
Isi Kandungan
sesuai untuk penggunaan percubaan,
hanya gunakan suhu percubaan yang
disyorkan untuk ketuhar ini - risiko
kebakaran.
Jauhkan pakaian atau bahan mudah
terbakar yang lain daripada perkakas
sehingga semua komponen telah sejuk
sepenuhnya - risiko kebakaran. Sentiasa
berhati-hati semasa memasak makanan
yang banyak lemak dan minyak atau
semasa menambahkan minuman
beralkohol - risiko kebakaran. Gunakan
sarung tangan ketuhar untuk mengalihkan
kuali dan alat tambahan. Di hujung
pemasakan, buka pintu dengan berhati-
hati: membenarkan udara panas atau
stim untuk keluar perlahan-lahan sebelum
memeriksa lubang- risiko terbakar. Jangan
menghalang bolong udara panas di
hadapan ketuhar- risiko kebakaran.
Berhati-hati semasa pintu ketuhar
terbuka atau ke bawah untuk
mengelakkan terlanggar pintu.
PENGGUNAAN YANG DIBENARKAN
AMARAN: perkakas ini tidak bertujuan
untuk dikendalikan oleh peranti pensuisan
luaran, seperti penentu masa atau sistem
kawalan jauh berasingan.
Perkakas ini bertujuan untuk digunakan
di rumah dan penggunaan serupa seperti:
kawasan dapur kakitangan di kedai,
pejabat dan persekitaran bekerja yang
lain; rumah ladang; oleh pelanggan di
hotel, motel, penginapan & sarapan dan
persekitaran kediaman yang lain.
Perkakas ini bukanlah untuk
penggunaan profesional. Jangan gunakan
perkakas di luar.
Tiada penggunaan lain yang dibenarkan
(cth. bilik pemanasan).
Perkara untuk dilakukan jika ... 24
Data teknikal 24
Pemasangan 25
Sambungan elektrik 25
Kebimbangan Persekitaran 26
JAMINAN IKEA 27
MY
BAHASA MELAYU

BAHASAMELAYU 17
Jangan simpan bahan letupan atau
mudah bakar (cth. gasolin atau tin aerosol)
di dalam atau berdekatan perkakas- risiko
kebakaran.
PEMASANGAN
Perkakas mesti dikendalikan dan
dipasang oleh dua atau lebih orang
- risiko kecederaan. Gunakan sarung
tangan untuk membuka bungkusan dan
memasang - risiko terluka.
Pemasangan, termasuk sambungan
bekalan air (jika ada) dan elektrik, dan
pembaikan mesti dikendalikan oleh
juruteknik yang bertauliah. Jangan baiki
atau gantikan mana-mana bahagian
perkakas melainkan dinyatakan secara
khusus dalam manual pengguna.
Jauhkan kanak-kanak dari tempat
pemasangan. Selepas membuka
bungkusan perkakas, pastikan perkakas
tidak rosak semasa mengangkutnya.
Sekiranya terdapat masalah, hubungi
wakil pengedar atau Perkhidmatan
Selepas Jualan berdekatan anda. Selepas
dipasang, sampah pembungkusan
(plastik, bahagian styrofoam dll.) mesti
disimpan jauh daripada kanak-kanak -
risiko lemas. Perkakas mesti dipisahkan
daripada bekalan kuasa sebelum operasi
pemasangan - risiko kejutan elektrik.
Semasa pemasangan, pastikan perkakas
tidak merosakkan kabel kuasa - risiko
kebakaran atau kejutan elektrik. Hanya
hidupkan perkakas apabila pemasangan
telah lengkap.
Jalankan semua kerja pemotongan
kabinet sebelum meletakkan perkakas
ke dalam perabot dan alihkan semua
serpihan kayu dan habuk gergaji.
Jangan halang ruang minimum di antara
permukaan kerja dan bucu bahagian atas
ketuhar- risiko terbakar.
Jangan alihkan ketuhar daripada
bekas polistirenanya sehingga masa
pemasangan.
Selepas pemasangan, bahagian bawah
perkakas mestilah tidak boleh dicapai lagi -
risiko terbakar.
Jangan pasang perkakas di belakang
pintu hiasan- risiko kebakaran.
AMARAN ELEKTRIK
Plat penilaian terdapat pada bucu
bahagian hadapan ketuhar (boleh dilihat
apabila pintu dibuka).
Perkakas mesti boleh dipisahkan
daripada bekalan kuasa dengan mencabut
palam jika palam boleh dicapai atau
dengan suis pelbagai kutub yang dipasang
menentang arus soket dan perkakas mesti
dibumikan, selaras dengan piawaian
keselamatan elektrik kebangsaan.
Jangan gunakan wayar pemanjangan
dan beberapa soket atau adapter.
Komponen elektrik mestilah tidak
boleh dicapai oleh pengguna selepas
pemasangan.
Jangan gunakan perkakas semasa anda
basah atau berkaki ayam.
Jangan gunakan perkakas ini jika kabel
atau palam kuasanya rosak, jika perkakas
tidak berfungsi dengan betul, atau
perkakas telah rosak atau terjatuh.
Jika kord bekalan rosak, kord tersebut
mesti digantikan dengan kord yang sama
oleh pengilang, ejen perkhidmatannya
atau individu yang sama bertauliah untuk
mengelakkan bahaya - risiko kejutan
elektrik.
Sekiranya berlaku penggantian kabel
kuasa, hubungi pusat perkhidmatan yang
sah.

BAHASAMELAYU 18
Penerangan Produk
1
Panel kawalan
2
Kipas pendingin (tidak kelihatan)
3
Elemen gril
4
Lampu ketuhar
5
Kipas ketuhar
6
Elemen pemanasan bawah (tersembunyi)
7
Pintu ketuhar
8
Grid lateral
Memasukkan rak dawai dan aksesori lain
Masukkan rak dawai ke paras yang anda kehendaki dengan
memegangnya senget sedikit ke atas dan letakkan bahagian
belakang yang diangkat (memandang ke atas) ke bawah dahulu.
Kemudian, tolaknya secara melintang sejauh mungkin sepanjang
susur rak.
Aksesori lain, seperti dulang pembakar, dimasukkan secara
melintang dengan menolaknya sepanjang susur rak.
Jika anda ingin membeli aksesori, hubungi Pusat Perkhidmatan
yang Sah.
1
2
3
4
5
7
6
8
Aksesori
Dulang pembakar
1x
Dulang dalam
1x
Rak Kawat
1x
Pelari Teleskopik
1x
Panel kawalan
A
Pilihan tombol tolak-tolak
B
Butang balik
C
Lampu
D
Paparan
E
Butang pengesahan
F
Penjaga minit
G
Laraskan tombol tolak-tolak
Tombol boleh tarik
Untuk menggunakan jenis tombol ini, tekannya di tengah.
Tombol terkeluar.
Pusingnya ke kedudukan yang diperlukan.
Selepas pemasakan selesai, pusing tombol itu ke dan tekannya
semula untuk mengembalikannya ke kedudukan asal.
A D GB CEF

BAHASAMELAYU 19
Alihkan aksesori daripada ketuhar dan panaskannya pada suhu
200° lebih kurang sejam untuk menyingkirkan bau dan wasap
daripada bahan penebatan dan minyak perlindungan
Tetapan
Pusing penunjuk tombol “Fungsi”
A
untuk memaparkan
tetapan dan pusing tombol
G
untuk mengakses submenu yang
mengandungi empat tetapan paparan yang boleh diubah selepas
pemasakan selesai, pusing tombol ke kedudukan asalnya.
• Jam
Pusing tombol
G
untuk memaparkan JAM. Dua digit kiri
kemudian akan mula berkelip, pusing tombol
G
untuk
menetapkan tempoh jam. Tekan butang
E
untuk mengesahkan
nilai dan dua digit kanan akan mula berkelip. Pusing tombol
G
untuk menetapkan minit dan tekan butang
E
untuk
mengesahkan pilihan.
• Bunyi
Untuk mengaktifkan dan menyahaktifkan isyarat akustik,
teruskan seperti berikut:
1. Pusing tombol Guntuk memaparkan “BUNYI”
2. tekan butang Euntuk mengesahkan
3. Gunakan tombol Guntuk memilih tetapan yang
dikehendaki
4. Tekan butang Euntuk mengesahkan
Penggunaan pertama
• Kecerahan
Untuk mengubah kecerahan paparan, teruskan seperti berikut:
1. Pusing tombol Guntuk memaparkan “KECERAHAN dan
tekan Euntuk mengesahkan.
2. Nilai kecerahan semasa boleh dilihat
3. Pusing tombol Guntuk meningkatkan atau
mengurangkan kecerahan dan mengesahkan dengan
menekan E.
• Eko
1. Pusing tombol Guntuk memaparkan “EKO”.
2. Tekan Euntuk mengakses tetapan (HIDUP/MATI).
3. Pusing tombol Guntuk memilih tetapan yang dikehendaki
dan mengesahkan dengan menekan butang E.
4. Semasa fungsi pemasakan, jika Mod Eko diaktifkan,
paparan akan mengurangkan kecerahan kepada paras
terendah selepas 1 minit, lampu rongga akan dimatikan
selepas memasak selama 1 minit dan diaktifkan semula
dengan menekan butang C.
Penggunaan harian
Untuk mengaktifkan Fungsi
1. pilih fungsi yang dikehendaki dengan tombol
A
dan tekan butang
E
untuk mengesahkan.
2. Suhu Berkelip dan anda boleh laraskan dengan tombol
G
dan tekan butang
E
untuk mengesahkan.
3. masa memasak boleh dilihat pada paparan, anda boleh laraskannya dengan tombol
G
atau meninggalkannya untuk permulaan serta-
merta dan tekan butang
E
untuk mengesahkan.
4. jika anda memilih sebelum masa memasak yang dikehendaki, paparan akan menunjukkan masa akhir yang dijangka, anda boleh
menundanya dengan tombol
G
dan tekan butang
E
untuk mengesahkan penundaan tersebut.
Prapanaskan
Prapanas akan bermula secara automatik apabila tersedia (Periksa jadual) dan termasuk dalam masa memasak jika anda memilihnya
sebelum memulakan fungsi tersebut.
Jika anda memilih suhu dan masa memasak, prapanas bermula secara automatik. Jika anda tidak memilih masa memasak, penentu masa
akan bermula hanya selepas ia mencapai suhu yang dikehendaki.
Bunyi boleh didengar akan sentiasa memberi peringatan apabila suhu telah dicapai.
Tundakan untuk Mula
Akan menundakan hujung masa memasak, apabila tersedia (Periksa jadual).
Fungsi
A
Tombol
Fungsi
G
Tombol
PRAPANAS Suhu Masa Tundakan untuk
Mula
MATI – – – – –
UDARA PAKSA – X X X X
KONVENSIONAL
(Haba Atas dan Bawah) –XXXX
MEMBAKAR BIASA – X X X X
PEMASAKAN MAKS – X X X X
PANGGANG PANGGANG – paras 1-2-3 X X
PANGGANG PANGGANG TURBO – paras 1-2-3 X X
ROTI ROTI X X X –
PIZA PIZA X X X –
ISTIMEWA EKO
UDARA PAKSA* – X X X
ISTIMEWA CAIR BEKU – – X X
ISTIMEWA KEKAL PANAS – 65° X X
ISTIMEWA PENAIKAN – 30° 35° 40° X X
PRAPANAS CEPAT – X X X –

BAHASAMELAYU 20
Menjadi perang
Pada hujung pemasakan, dengan fungsi tertentu, paparan
menunjukkan kemungkinan menjadi lebih perang. Fungsi ini hanya
boleh digunakan apabila masa memasak telah ditetapkan.
Pada hujung masa memasak, paparan menunjukkan: “TEKAN
E
UNTUK PERANG”. Tekan
E
, dan ketuhar akan memulakan kitaran
menjadi perang selama 5 minit. Fungsi ini boleh dipilih maksimum
dua kali secara berturut-turut.
Penjaga Minit
Pilihan ini mengaktifkan penjaga minit hanya apabila tidak terdapat
fungsi lain yang aktif. Terus tekan sehingga dan «00:00» mula
berkelip pada paparan, pilih dan tekan ok untuk mengesahkan.
Di bawah isyarat boleh didengar yang dipilih akan berbunyi selepas
penentu masa telah selesai mengira.
Jadual fungsi ketuhar
Ketuhar mempunyai 5 tahap masakan. Kira ke atas dari tahap bawah.
Fungsi Penerangan fungsi
MATI
Untuk mematikan ketuhar.
UDARA PAKSA
Untuk memasak makanan berbeza yang memerlukan suhu memasak yang sama pada beberapa rak
(maksimum tiga) pada masa yang sama. Fungsi ini boleh digunakan untuk memasak makanan berbeza
tanpa bau dipindahkan dari satu makanan ke yang lain.
KONVENSIONAL
(Haba Atas dan Bawah)
Untuk memasak apa-apa jenis hidangan pada satu rak sahaja.
Penggunaan rak ke-2 atau ke-3 adalah terbaik. Prapanaskan ketuhar sebelum memasukkan makanan.
MEMBAKAR BIASA
Untuk memasak daging dan pai dengan inti berair (savouri atau manis) pada rak tunggal. Gunakan rak
ke-2. Prapanaskan ketuhar sebelum memasak.
PEMASAKAN MAKS
Untuk memasak daging potongan besar (melebihi 2.5 kg). Gunakan rak 1 atau ke-2, bergantung kepada
saiz potongan tersebut. Dinasihatkan untuk mengalihkan daging tersebut sepanjang pemasakan untuk
menjadikannya lebih perang. Adalah terbaik untuk melumuri daging sekali-sekala untuk mengelaknya
daripada kering.
PANGGANG
Untuk memanggang stik, kebab dan sosej, memasak sayur-sayuran secara au gratin atau membakar
roti. Penggunaan rak ke-4 atau ke-5 adalah terbaik. Apabila memanggang daging, kami menyarankan
penggunaan dulang titis penyalir untuk mengumpulkan air masakan : letakkan dulang di paras ke-3/ke-4
dan tambahkan 500 ml air. Pintu ketuhar sepatutnya ditutup sepanjang pemasakan.
PANGGANG TURBO
Untuk memanggang daging potongan besar (peha, daging lembu panggang, ayam). Letakkan makanan
di rak tengah.
Gunakan dulang titis penyalir untuk mengumpulkan air masakan. Letakkannya di rak 1/ke-2, tambahkan
lebih kurang setengah liter air. Ketuhar tidak perlu diprapanaskan. Sepanjang pemasakan pintu ketuhar
perlu kekal tertutup.
ROTI
Untuk membakar jenis dan saiz roti yang berbeza.
Hanya perlu menyatakan nilai yang diperlukan (suhu dan masa) dan ketuhar akan mengendalikan kitaran
pemasakan secara automatik. Letakkan adunan di rak ke-2.
PIZA
Untuk membakar jenis dan saiz piza yang berbeza.
Hanya perlu menyatakan nilai yang diperlukan (suhu dan masa) dan ketuhar akan mengendalikan kitaran
pemasakan secara automatik. Letakkan adunan di rak ke-2.
EKO
UDARA PAKSA*
Untuk memasak panggangan berisi dan ketulan daging di rak pertama. Fungsi ini menggunakan bantuan
kipas lembut yang tidak berterusan yang mencegah makanan daripada menjadi terlalu kering. Dalam
fungsi EKO ini lampu akan terus dimatikan sepanjang pemasakan dan boleh dihidupkan semula buat
sementara waktu dengan menekan butang pengesahan. Untuk memaksimumkan kecekapan tenaga,
dinasihatkan untuk tidak membuka pintu sepanjang pemasakan. Dinasihatkan untuk menggunakan paras
ke-3. Ketuhar tidak perlu diprapanaskan.
CAIR BEKU
Untuk mempercepatkan pencairan beku makanan. Letakkan makanan di rak tengah.
Biarkan makanan dalam bungkusannya untuk mencegahnya daripada menjadi kering di bahagian luar.
KEKAL PANAS
Untuk mengekalkan makanan yang baru sudah dimasak panas dan rangup (cth.: daging, makanan yang
digoreng atau an). Letakkan makanan di rak tengah.
PENAIKAN
Untuk penaikan adunan manis atau savouri yang optimum. Untuk menjaga kualiti penaikan adunan,
fungsi tersebut tidak akan diaktifkan jika suhu dalam ketuhar melebihi 40°C. Letakkan adunan di rak ke-2.
Ketuhar tidak perlu diprapanaskan.
PRAPANAS CEPAT
Untuk prapanaskan ketuhar dengan pantas. Pada hujung prapanas, ketuhar akan memilih fungsi
KONVENSIONAL secara automatik. Tunggu sehingga penghujung prapanas sebelum memasukkan
makanan ke dalam ketuhar.
- + TETAPAN
Untuk menetapkan paparan (Masa, Lampu, Volum bunyi, penjimatan tenaga)
*Fungsi digunakan sebagai rujukan untuk pengakuan kecekapan tenaga mengikut Peraturan (Kesatuan Eropah) No. 65 / 2014
Other manuals for Anratta
10
Table of contents
Languages:
Other IKEA Oven manuals

IKEA
IKEA 105.570.41 User manual

IKEA
IKEA IBS550DS03 User manual

IKEA
IKEA MATÄLSKARE User manual

IKEA
IKEA IBS324PVS0 User manual

IKEA
IKEA MATÄLSKARE User manual

IKEA
IKEA 205.569.08 User manual

IKEA
IKEA HJALTEBY User manual

IKEA
IKEA GRÄNSLÖS User manual

IKEA
IKEA LAGAN User manual

IKEA
IKEA KULINARISK User manual
Popular Oven manuals by other brands

Middleby Marshall
Middleby Marshall PS555 series parts manual

Bosch
Bosch HBF113BR0Y instruction manual

Blaupunkt
Blaupunkt 5RC92490AU Instructions for installation and use

Beko
Beko BBISM14300BPE installation instructions

Zanussi
Zanussi BMS 641 Instruction booklet

Electrolux
Electrolux EOB6635 User information