IKEA KYLIG User manual

KYLIG
KYLD
GB
FR
DE
IT


ENGLISH 4
DEUTSCH 17
FRANÇAIS 33
ITALIANO 49

ENGLISH 4
Beforerstuse
This appliance is intended to be used in
household. To ensure best use of your
appliance, carefully read this User Manual
which contains a description of the product
and useful advice.
Keep these instructions for future reference.
1. After unpacking the appliance, make
sure it is not damaged and that the door
closes properly.
Any functional fault must be reported
to IKEA After Sales Service as soon as
possible.
2. Wait at least two hours before switching
the appliance on, to ensure that the
refrigerant circuit is fully efcient.
3. The electrical installation and the
electrical connection must be carried
out by a qualied technician according
to the manufacturer’s instructions and
in compliance with the local safety
regulations.
4. Clean the inside of the appliance before
using it.
Precautionsandgeneralrecommendations
Installationandconnection
• The appliance must be handled and
installed by two or more persons.
• Be careful not to damage the oors (e.g.
parquet) when moving the appliance.
• During installation, make sure the
appliance does not damage the power
cable.
• Make sure the appliance is not near a
heat source.
• To guarantee adequate ventilation,
leave a space on both sides and above
the appliance and follow the installation
instructions.
• Keep the appliance ventilation openings
free.
• Do not damage the appliance refrigerant
circuit pipes.
• Install and level the appliance on a oor
strong enough to take its weight and in a
place suitable for its size and use.
• Install the appliance in a dry and well-
ventilated place.
The appliance is arranged for operation
in places where the temperature comes
within the following ranges, according
to the climatic class given on the rating
plate.
The appliance may not work properly if
it is left for a long time at a temperature
outside the specied range.
• Make sure the voltage specied on the
rating plate corresponds to that of your
home.
ClimaticClass Amb.T.(°C) Amb.T.(°F)
SN From 10 to 32 From 50 to 90
N From 16 to 32 From 61 to 90
ST From 16 to 38 From 61 to100
T From 16 to 43 From 61 to 110
• Do not use single/multi adapters or
Safetyinformation 4
Productdescription 6
Firstuse 8
Dailyuse 8
Cleaningandmaintenance 10
Whattodoif... 12
Technicaldata 15
Environmentalconcerns 16
SafetyInformation
Contents

ENGLISH 5
extension cords.
• For the water connection, use the pipe
supplied with the new appliance; do not
reuse that of the previous appliance.
• Power cable modication or replacement
must only be carried out by qualied
personnel or by After-sales Service.
• It must be possible to disconnect the
appliance from the power supply by
unplugging it or by means of a mains
two-pole switch installed upstream of the
socket.
Safety
• Do not store explosive substances such as
aerosol cans with a ammable propellant
in this appliance.
• Do not store or use petrol, ammable
liquids or gas in the vicinity of this or
other electrical appliances. The fumes
can cause res or explosions.
• Do not use mechanical, electric or
chemical means other than those
recommended by the Manufacturer to
speed up the defrost process.
• Do not use or place electrical devices
inside the appliance compartments
if they are not of the type expressly
authorised by the Manufacturer.
• This appliance is not intended for use by
persons (including children) with reduced
physical, sensory or mental capabilities,
or lack of experience and knowledge,
unless they have been given supervision
or instruction concerning use of the
appliance by a person responsible for
their safety.
• To avoid the risk of children becoming
trapped and suffocating, do not allow
them to play or hide inside the appliance.
• Do not swallow the contents (non-toxic) of
the ice packs (in some models).
• Do not eat ice cubes or ice lollies
immediately after taking them out of the
freezer since they may cause cold burns.
Use
• Before carrying out any maintenance or
cleaning operation, unplug the appliance
or disconnect it from the power supply.
• All appliances equipped with an
automatic ice-maker and water
dispenser must be connected to a water
supply that only delivers drinking water
(with mains water pressure of between
0.17 and 0.81 Mpa (1.7 and 8.1 bar)).
Automatic ice-makers and/or water
dispensers not directly connected to the
water supply must be lled with drinking
water only.
Use the refrigerator compartment only
for storing fresh food and the freezer
compartment only for storing frozen food,
freezing fresh food and making ice cubes.
• Do not store glass containers with liquids
in the freezer compartment since they
may break.
• Avoid storing unwrapped food in direct
contact with internal surfaces of the
refrigerator or freezer compartments.
The Manufacturer declines any liability if
the above advice and precautions are not
respected.

ENGLISH 6
Productdescription
KYLIG
Refrigeratorcompartment
1 Filter in fan
1a
button of fan
1b
cover of fan
2 Shelves
3 Lighting
4 Bottle rack
5 Rating plate
6 Crisper drawer
7 Crisper divider
8 Reversibility kit
9 Separator
10 Door trays
11 Balcony egg tray
Freezercompartment
12 Upper basket (freezing zone)
13 Shelves
14 Storage baskets for frozen food
Carefully read the operating instructions before using the appliance.
Accessories
Balcony egg tray
1x
Freezer block
1x
Ice tray
2x
Handles
1x
1b
1a
1
2
4
2
5
6
7
12
8
13
14
10
9
10
11
14
13
3
The refrigerator accessories must not be
placed in a dishwasher.

ENGLISH 7
KYLD
Refrigeratorcompartment
1 Shelves
2 Lighting
3 Bottle rack
4 Rating plate
5 Crisper drawer
6 Crisper divider
7 Reversibility kit
8 Separator
9 Door trays
10 Balcony egg tray
Freezercompartment
11 Upper basket (freezing zone)
12 Shelves
13 Storage baskets for frozen food
Accessories
Balcony egg tray
1x
Freezer block
1x
Ice tray
2x
Handles
1x
1
3
1
4
5
6
11
7
12
13
9
8
9
10
12
13
2
The refrigerator accessories must not be
placed in a dishwasher.

ENGLISH 8
Connect the appliance to the main power
supply.
The ideal temperatures for preserving food
have already been set at the factory.(MED)
Note: After switching the appliance on,
it will be necessary to wait for 4 to 6
hours before a temperature suitable for a
standard appliance load is reached.
Firstuse
Guidetoselectingfunctionstemperature
selection
Press the push button on the control panel
to adjust the temperature. Temperature
selection push button is used to set desired
temperature level, from warmest through
lower to coldest . Pressing push button
setpoint will change cyclically. Temperature
set-point is done for both compartments at
one time - fridge and freezer.
At rst plug-in of appliance factory set-point
is chosen - medium position.
Following table shows set-points level:
High temperature
Mid-high temperature
Middle temperature
Mid-low temperature
Low temperature
Legend:
Led OFF Led ON
FastCooling
The use of this function is recommended to
increase the cooling speed when placing a
very high quantity of food in the refrigerator
compartiment by pressing and holding
the push button on the control panel for 3
seconds.
Fast cool Fast cool
ON OFF
The Fast Cool light (yellow LED) will turn on.
The function is automatically deactivated
after 6 hours.
The Fast Cool function can be manually
deactivated by pressing and holding the
same push button on the control panel for 3
sec., the yellow LED is off.
Note: fast cool function should be also
switched ON before placing fresh food to be
frozen in the freezer compartment, in order
to maximize the freezing capacity.
Dailyuse
3”
C
A Fast cool function indicator
B Indication of temperature settings
C Temperature selection /
Fast cool push button
D Internal light switch
Controlpanel
DB
A

ENGLISH 9
Freezingfreshfood
Place the fresh food to be frozen inside
upper basket in the freezer compartment.
Avoid direct contact with already frozen
food.
To freeze the quantity of food shown on the
rating plate.
Fan(ifprovided)
The fan improves temperature distribution
inside the refrigerator compartment,
allowing better preservation of stored food.
To switch on or switch off the fan press the
button.(1a)
By default, the fan is ACTIVE.
It is advisable to keep the fan active, when
the ambient air temperature is above 27 ÷
28°C or if you perceive drops of water on
the glass shelves or in the severe humidity
conditions.
To guarantee the right performance at
lower ambient temperature (colder than
18°C) and to minimize Energy Consumption,
turn off the fan.
The fan is equipped with the lter. The
replacement procedure is attached with
documents set in the crisper drawer.
Caution!
Do not obstruct the air intake area with food
items.
Freezercompartment
This appliance is a refrigerator with a
star rating freezer compartment.
Packed frozen foods can be stored for the
period indicated on the packing. Fresh
food can also be frozen, ensuring that any
contact with already frozen food is avoided.
The quantity of fresh food that can be frozen
in a 24 hour period is given on the rating
plate. Re-freezing of partially defrosted
food is not recommended. This food should
be consumed within 24 hours.
Removingthebaskets(dependingonthe
model)
Pull the drawers out as far as they go, then
lift slightly and remove.
Note: The freezer can also be used without
the drawers, in order to maximise space.
Ensure that after placing the food on the
racks, the freezer door closes properly.
Makingicecubes
Fill the ice cube tray up to 2/3 with water
and place in the freezer compartment. Do
not use sharp or pointed objects to detach
the tray.
Selfclosingmechanism
Appliance is equipped in feature, which
helps customer to close the door.

ENGLISH 10
Regularly clean the appliance using a
cloth and a solution of warm water, with
some soft detergent suitable for cleaning
the inside of the refrigerator compartment.
Do not use abrasive detergents or tools.
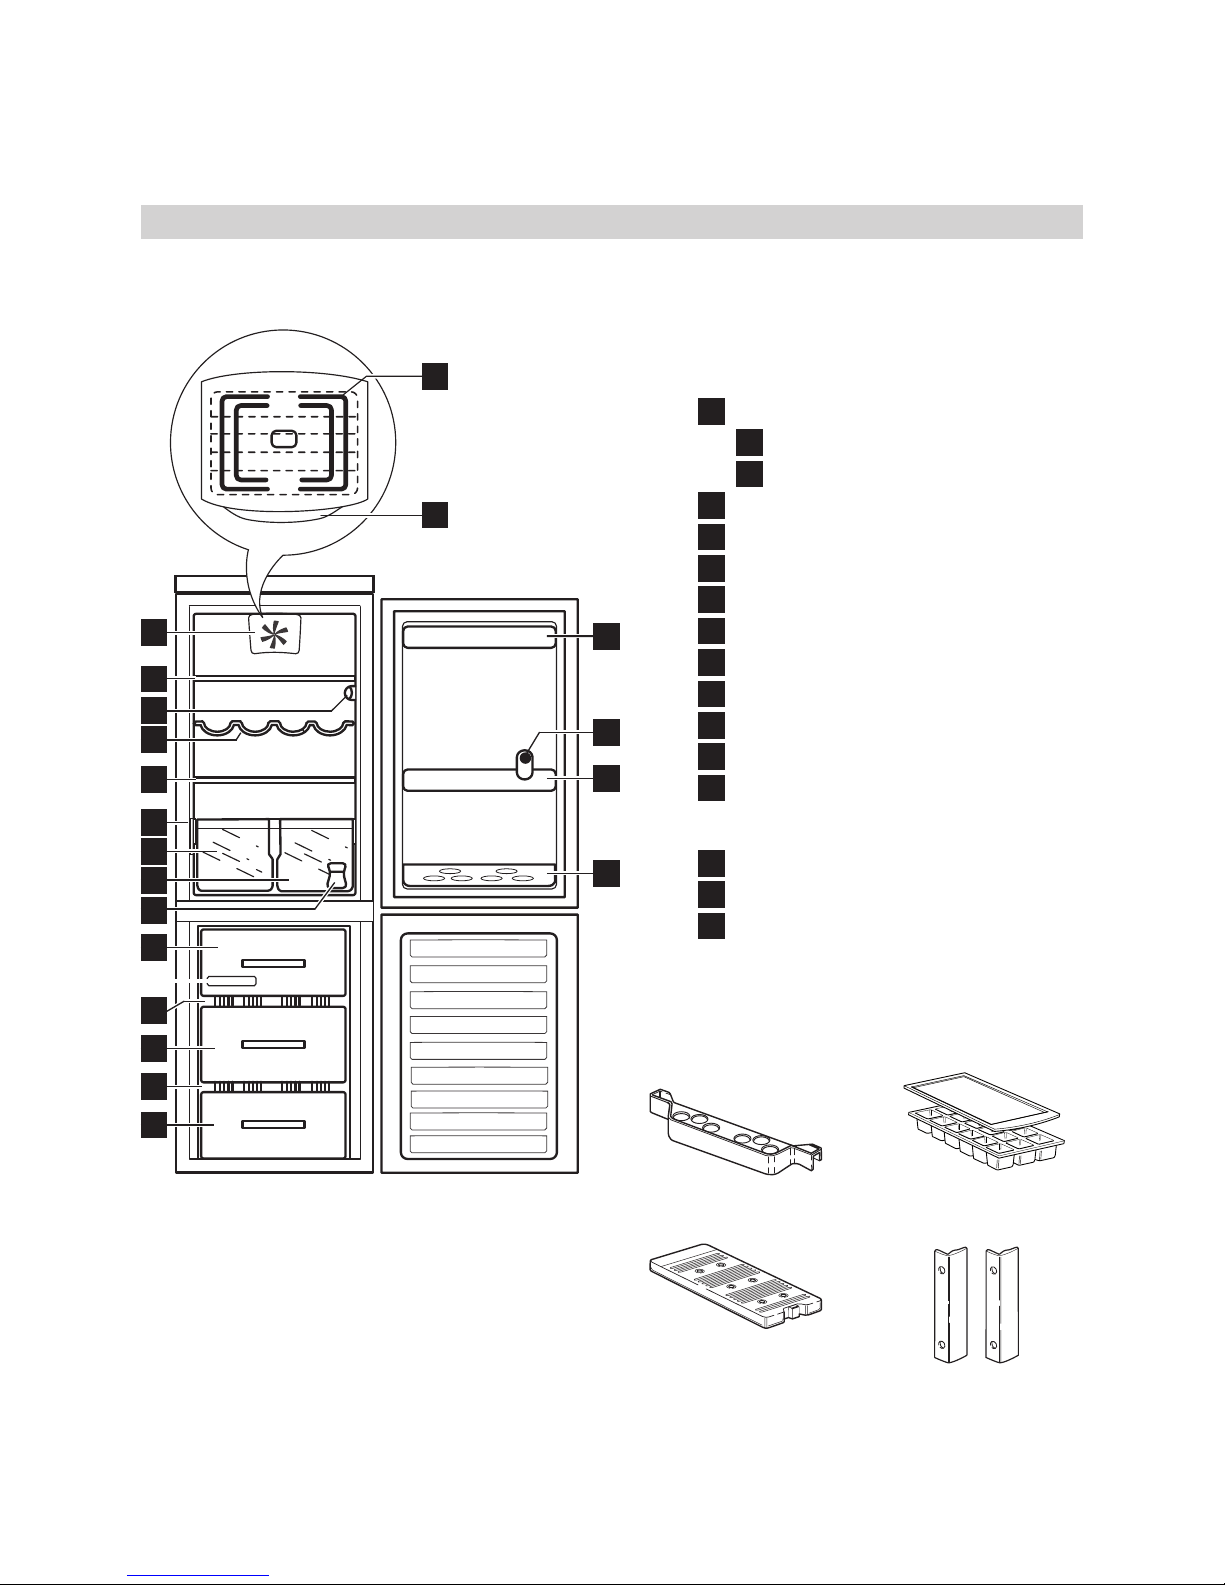
To ensure continuous and correct ow of
defrost water, regularly clean the inside
of the draining hole on the back of the
refrigerator near the fruit and vegetable
drawer, using the tool provided (see g.1).
Before carrying out any cleaning or
maintenance operation, unplug the
appliance or disconnect it from the power
supply.
Fig 1
Defrostingthefreezercompartment
No Frost freezers provide chilled air
circulation around the storage areas and
prevent the formation of ice, thereby
completely eliminating the need for
defrosting.Frozen items don’t stick to the
walls, labeling stays legible and storage
space remains neat and clear.
Storingfood
Wrap food so that no water, moisture or
condensate can enter; this will prevent
odours or aromas going from one part to
another in the refrigerator, ensuring better
preservation of frozen foods.
Never place hot food in the freezer. Cooling
hot foods before freezing saves energy and
prolongs the life of the appliance.
Incaseofshortvacation
There is no need to disconnect the
appliance from the power supply if you will
be away for less than three weeks.
Use up perishable food, freeze other food.
If your appliance has an automatic ice
maker:
1. Turn it off.
2. Shut off the water supply to the
automatic ice maker.
3. Empty the ice bucket.
Incaseofmoving
1. Take out all internal parts.
2. Wrap them well, and x them together
with adhesive tape so that they do not
bang together or get lost.
3. Screw the adjustable feet so that they
do not touch the support surface.
4. Close and x both doors with adhesive
tape and,again using adhesive tape, x
the power cable to the appliance.
Iftheapplianceisnotgoingtobeused
Disconnect the appliance from the power
supply, remove all the food, defrost and
clean. Leave the doors open enough for air
to circulate inside the compartments. This
will prevent the formation of mould and bad
odours.
Incaseofpowerfailures
Call the local ofce of your electricity supply
company and ask how long it is going to
last.
For power failures lasting up to 24 hours.
Keep both doors of the appliance closed.
This will allow the stored food to stay cold
as long as possible.
For power failures lasting more than 24
hours.
1. Empty the freezer compartment and
arrange the food in a portable freezer.
If this type of freezer is not available
and, likewise, no articial ice packs are
available, try to use up the food, which
is more easily perishable.
2. Empty the ice bucket.
Cleaningandmaintenance

ENGLISH 11
Note:
- Bear in mind that a full appliance will
stay cold longer than a partially lled
one.
- If ice crystals are still visible on the food,
it may be frozen again, although avour
and aroma may be affected.
- If food is found to be in a poor condition,
it is best to throw it away.
ReplacingtheLED
Always disconnect the refrigerator from the
power supply before replacing any light
bulb.
If the inside light is not working, it is
necessary to:
1. Remove the light cover: put the ngers
into the side ventilation holes (1), stretch
the cover gently and move it upwards.
2. Check the bulb. If necessary unscrew the
broken bulb and replace it with a LED
bulb of the same type available only at
After Sales Service.
3. Put on the light cover.
Do not leave the bulb uncovered.
Abnormalapplianceoperation
When the product is plugged in to
the mains, during rst 10 minutes of its
performance, possible temperature sensor
failure will be displayed according to
following table:
Refrigerator Evaporator
sensor failure
Refrigerator sensor failure
Refrigerator & Evaporator
sensor failure
Legend:
Led off Led ashing
The appliance will work preserving the food
stored, but it is necessary to contact after-
sales service and provide alarm code.

ENGLISH 12
Problem Possiblecause Solution
The appliance is too noisy.
(see Notes)
The appliance is not
installed properly.
Check if the appliance stands
stable (all the feet should be
on the oor).
The storage inside
appliance is not correct.
Check that:
- The internal components are
correctly placed.
- Bottles and containers are
not in contact with each
other.
The appliance does not
operate
There might be a
problem with the electric
power supply to the
appliance.
Check that:
- there isn’t a power supply
failure.
- the power plug is correctly
inserted in the power socket
and the two-pole switch,if
present, is in the correct
position (on).
- the electric circuit safety
devices installed in the
house are fully functional.
- the power supply cable is
not broken.
The appliance is
switched off
Switch on the appliance.
The inside light does not work - The lamp might need
replacing
Disconnect the appliance
from the power supply, check
the lamp and, if necessary,
replace it with a new one (see
the section “Replacing the
LED”).
- The lamp is xed
incorrectly
Disconnect the appliance from
the electric power supply,
check the lamp and screw the
lamp.
Whattodoif...
Caution! Before troubleshooting, disconnect the power supply.
Only a qualied electrician or competent person must do the troubleshooting that is not in
this manual.

ENGLISH 13
Problem Possiblecause Solution
The temperature inside the
compartments is not cold
enough. Water seems to run
too much.
There may be several
causes (see solutions)
Check that:
- The doors are closed
correctly.
- The appliance is not placed
near a heat source.
- The temperature set is
appropriate.
- Air circulation through
the ventilation grills at the
bottom of the appliance is
not obstructed.
- a large amount of food
has been added to the
appliance.
- The doors are opened
too often
- on hot days or if the
room is warm, the
motor naturally runs
longer.
No solution is necessary
There is water at the bottom of
the refrigerator compartment.
The defrost water drain
is obstructed.
Clean the defrost water drain
hole (see “Cleaning and
maintenance”).
There is moisture build-up Air ows vents inside the
compartment are not
blocked, as this prevents
the circulation of air
No solution is necessary.
- Humidity from the
room air enters the
appliance.
- The food is not
properly packaged.
Do not keep the door open
longer than necessary.
Dry any dampness containers
before placing into the
appliance.
The front edge of the
appliance is hot at the door
seal edge.
This is not a fault. It is
part of the design to
prevent the formation of
condensation.
No solution is necessary

ENGLISH 14
Problem Possiblecause Solution
The doors do not open and
close properly
There may be several
causes (see solution)
Check that:
- food packages are not
blocking the door.
- the internal accessories are
not out of position
- the door seals are not dirty
or sticky
- the appliance is properly
leveled
Fan does not work - Fan is not switched on Press the button.
- Compressor is not
switched on.
No solution is necessary
Note:
Some of functional noises coming from
appliance during normal use can be within
hearing:
- A hissing sound when switching on the
appliance for the rst time or after a long
pause.
- A gurgling sound when refrigerant uid
enters into the pipes.
- Buzzing sound when water valve or fan
start working.
- A cracking sound when compressor starts
or when ready ice drops into ice box
Abrupt clicks when compressor switches on
and off.
Different working time of compressor
(run and stop) is a normal operation and
depends on the ambient temperature and/
or thermostat knob adjustment
BeforecontactingtheAfter-salesservice:
Switch the appliance on again to see if the
problem has disappeared. If not, switch it
off again and repeat the operation after an
hour.
If your appliance still does not work
properly after carrying out the checks listed
in the troubleshooting guide and switching
the appliance on again, contact the After-
sales service, clearly explaining the problem
and specifying:
• the type of fault;
• the model;
• the type and serial number of the
appliance (given on the rating plate);
• the Service number (the number after the
word SERVICE on the rating plate inside
the appliance).
Note:
Reversing of appliance door opening is not
covered by the warranty.

ENGLISH 15
Technicaldata
Productdimensions KYLIG KYLD
Height 1875 1875
Width 595 595
Depth 640 640
NetVolumeFridge(l) 225 226
NetVolumeFreezer(l) 97 97
Defrostsystem
Fridge Automatic Automatic
Freezer Automatic Automatic
StarRating 4 4
RisingTime(h) 15 15
FreezingCapacity(kg/24h) 4,5 4,5
Energyconsumption(kwh/24h) 0,85 0,85
Noiselevel(dba) 42 42
Energyclass A+ A+
The technical information
are situated in the rating
plate on the internal side
of the appliance and in
the energy label

ENGLISH 16
Environmentalconcerns
1.Packing
The packing material is 100% recyclable
and bears the recycling symbol. For
disposal, comply with the local regulations.
Keep the packing materials (plastic bags,
polystyrene parts, etc.) out of the reach of
children, as they are a potential source of
danger.
2.Scrapping/Disposal
The appliance is manufactured using
recyclable material. This appliance is
marked in compliance with European
Directive 2002/96/EC on Waste Electrical
and Electronic Equipment (WEEE). By
ensuring the correct disposal of this
appliance, you can help prevent potentially
negative consequences for the environment
and the health of persons.
The symbol on the appliance, or on the
accompanying documents, indicates that this
appliance should not be treated as domestic
waste but must be taken to a special collection
centre for the recycling of electrical and
electronic equipment.
When scrapping the appliance, make it
unusable by cutting off the power cable
and removing the doors and shelves so
that children cannot easily climb inside and
become trapped.
Scrap the appliance in compliance with local
regulations on waste disposal, taking it to
a special collection centre; do not leave the
appliance unattended even for a few days,
since it is a potential source of danger for
children.
For further information on the treatment,
recovery and recycling of this product, contact
your competent local ofce, the household
waste collection service or the shop where you
purchased the appliance.
Information:
This appliance does not contain CFCs. The
refrigerant circuit contains R600a (HC) (see the
rating plate inside the appliance).
Appliances with Isobutane (R600a): isobutane
is a natural gas without environmental impact,
but is ammable. Therefore, make sure the
refrigerant circuit pipes are not damaged.
Declarationofconformity
• This appliance has been designed for
preserving food and is manufactured
in compliance with Regulation (CE) No.
1935/2004.
n
• This appliance has been designed,
manufactured and marketed in
compliance with:
- safety objectives of the “Low
Voltage” Directive 2006/95/CE (which
replaces 73/23/CEE and subsequent
amendments);
- the protection requirements of Directive
“EMC” 2004/108/EC.
Electrical safety of the appliance can only
be guaranteed if it is correctly connected to
an approved earthing system.

DEUTSCH 17
VordemerstenGebrauch
Dieses Gerät ist für die Verwendung in
einem Haushalt bestimmt. Lesen Sie bitte
für die optimale Nutzung Ihres Gerätes die
vorliegende Gebrauchsanleitung sorgfältig
durch, in der die Beschreibung des Produkts
und hilfreiche Hinweise enthalten sind.
Heben Sie diese Anleitung bitte als
Nachschlagewerk gut auf.
1. Überprüfen Sie das Gerät nach dem
Auspacken auf Beschädigungen und
kontrollieren Sie, ob die Tür einwandfrei
schließt. Jede Funktionsstörung muss
dem IKEA Kundendienst so schnell wie
möglich gemeldet werden.
2. Warten Sie vor der Inbetriebnahme
des Gerätes mindestens zwei Stunden,
damit der Kühlkreislauf seine volle
Funktionstüchtigkeit erreichen kann.
3. Die Installation und der elektrische
Anschluss müssen von einer Fachkraft
gemäß den Herstelleranweisungen
und den gültigen örtlichen
Sicherheitsbestimmungen ausgeführt
werden.
4. Reinigen Sie den Innenraum vor der
Inbetriebnahme des Gerätes.
Vorsichtsmaßnahmenundallgemeine
Empfehlungen
InstallationundAnschluss
• Das Gerät muss von mindestens zwei
Personen transportiert und installiert
werden.
• Achten Sie beim Umstellen des Gerätes
darauf, dass der Fußboden (z. B. Parkett)
nicht beschädigt wird.
• Achten Sie bei der Installation darauf,
dass das Gerät nicht auf dem Netzkabel
steht.
• Stellen Sie das Gerät nicht neben einer
Wärmequelle auf.
• Lassen Sie zur ausreichenden
Belüftung an beiden Seiten
und oberhalb des Geräts einen
Zwischenraum frei und befolgen Sie die
Installationsanweisungen.
• Die Belüftungsöffnungen des Gerätes
nicht abdecken oder zustellen.
• Die Leitungen des Kühlkreislaufs dürfen
nicht beschädigt werden.
• Nivellieren Sie das Gerät auf einer
tragfähigen Fläche und stellen Sie es in
einem seinen Abmessungen und seinem
Verwendungszweck entsprechenden
Raum auf.
• Stellen Sie das Gerät in einem trockenen
und gut belüfteten Raum auf.
Das Gerät ist für den Einsatz
in Räumen mit nachstehenden
Temperaturbereichen ausgelegt, die
ihrerseits von der Klimaklasse auf dem
Typenschild abhängig sind. Wird der
vorgegebene Temperaturbereich für
das Gerät für einen längeren Zeitraum
unter- oder überschritten, kann es zu
Funktionsstörungen kommen.
• Die auf dem Typenschild
angegebene Spannung muss der
Sicherheitsinformationen 17
BeschreibungdesGeräts 19
Inbetriebnahme 21
TäglicherGebrauch 21
ReinigungundPege 23
Wastun,wenn... 25
TechnischeDaten 28
Umweltschutz 29
IKEAGARANTIE 30
Sicherheitsinformationen
Inhalt

DEUTSCH 18
Spannungsversorgung in Ihrem Haus
entsprechen.
Klimaklasse Raum-Temp.
(°C)
Raum-Temp.
(°F)
SN von 10 bis 32 von 50 bis 90
N von 16 bis 32 von 61 bis 90
ST von 16 bis 38 von 61 bis 100
T von 16 bis 43 von 61 bis 110
• Verwenden Sie keine Verlängerungskabel
oder Einzel-/Mehrfachstecker.
• Verwenden Sie zum Anschließen an die
Wasserleitung den im Lieferumfang des
neuen Gerätes enthaltenen Schlauch und
nicht den des Vorgängergerätes.
• Die Änderung oder der Austausch
des Netzkabels darf ausschließlich
durch qualizierte Techniker oder den
Kundendienst erfolgen.
• Die elektrische Abschaltung des Gerätes
muss durch Ziehen des Netzsteckers oder
durch einen der Steckdose vorgeschalteten
Zweipolschalter möglich sein.
Sicherheit
• Lagern Sie keine Behälter mit brennbaren
Materialien wie z.B. Spraydosen in
diesem Gerät.
• Lagern und verwenden Sie kein Benzin,
Gas oder andere entammbare Stoffe/
Flüssigkeiten in der Nähe des Geräts
oder anderer Haushaltsgeräte. Durch
die Dämpfe besteht Brand- oder
Explosionsgefahr.
• Zum Beschleunigen des Abtauvorganges
niemals zu anderen mechanischen,
elektrischen oder chemischen Hilfsmitteln
greifen als zu den vom Hersteller
empfohlenen.
• Keine elektrischen Geräte in den
Geräteräumen verwenden, wenn diese
nicht den vom Hersteller genehmigten
entsprechen.
• Das Gerät darf von Personen (einschließlich
Kindern) mit herabgesetzten physischen,
sensorischen oder geistigen Fähigkeiten
und Mangel an Erfahrung und Kenntnissen
nur unter Aufsicht oder nach ausreichender
Einweisung durch eine für ihre Sicherheit
verantwortliche Person benutzt werden.
• Kindern das Spielen und Verstecken im
Gerät nicht gestatten, um Erstickungs-
und Einschließgefahr zu vermeiden.
• Die in den (eventuell vorhandenen)
Kälteakkus enthaltene (ungiftige)
Flüssigkeit darf nicht verschluckt werden.
• Eiswürfel oder Wassereis nicht sofort
nach der Entnahme aus dem Gefrierraum
verzehren, da sie Kälteverbrennungen
hervorrufen können.
Gebrauch
• Ziehen Sie vor jeder Reinigungs- und
Wartungsarbeit den Netzstecker des
Geräts oder unterbrechen Sie die
Stromversorgung.
• Alle Geräte, die mit einem Eisautomaten
und Wasserspender ausgestattet
sind, müssen an eine Wasserleitung
angeschlossen werden, die nur Trinkwasser
(mit einem Hauptdruck zwischen 0,17
und 0.81 MPa (1,7 und 8,1 bar)) abgibt.
Nicht direkt an die Wasserleitung
angeschlossene Eisautomaten und/oder
Wasserspender dürfen nur mit Trinkwasser
gefüllt werden. Verwenden Sie den
Kühlraum nur zur Lagerung von frischen
Lebensmitteln und den Gefrierraum nur zur
Lagerung von Tiefkühlware, zum Einfrieren
frischer Lebensmittel und zur Herstellung
von Eiswürfeln.
• Stellen Sie keine Glasbehälter mit
üssigem Inhalt in den Gefrierraum, da
diese platzen können.
• Lagern Sie unverpackte Lebensmittel so,
dass sie nicht mit den Innenwänden des
Kühl- oder Gefrierraums in Berührung
kommen.
Bei Nichtbeachtung der o. g. Empfehlungen
und Vorschriften lehnt der Hersteller jede
Verantwortung ab.

DEUTSCH 19
BeschreibungdesGeräts
KYLIG
Kühlraum
1 Filter im Lüfter
1a
Lüftertaste
1b
Lüfterabdeckung
2 Ablagen
3 Beleuchtung
4 Flaschengestell
5 Typenschild
6 Obst- und Gemüsefach
7 Unterteilung für Obst- und
Gemüsefach
8 Bausatz für Türanschlagwechsel
9 Trennplatte
10 Türablagen
11 Seitenfach-Eierbehälter
Gefrierraum
12 Oberkorb (Einfrierbereich)
13 Ablagen
14 Ablagekörbe für Tiefkühlgut
Lesen Sie bitte vor dem Gebrauch Ihres Gerätes die Bedienungsanleitung sorgfältig durch.
Zubehör
Seitenfach-
Eierbehälter
1x
Gefrierblock
1x
Eiswürfelschale
2x
Griffe
1x
1b
1a
1
2
4
2
5
6
7
12
8
13
14
10
9
10
11
14
13
3
Das Kühlschrankzubehör darf nicht im
Geschirrspüler gewaschen werden.

DEUTSCH 20
KYLD
Kühlraum
1 Ablagen
2 Beleuchtung
3 Flaschengestell
4 Typenschild
5 Obst- und Gemüsefach
6 Unterteilung für Obst- und
Gemüsefach
7 Bausatz für Türanschlagwechsel
8 Trennplatte
9 Türablagen
10 Seitenfach-Eierbehälter
Gefrierraum
11 Oberkorb (Einfrierbereich)
12 Ablagen
13 Ablagekörbe für Tiefkühlgut
Zubehör
Seitenfach-
Eierbehälter
1x
Gefrierblock
1x
Eiswürfelschale
2x
Griffe
1x
1
3
1
4
5
6
11
7
12
13
9
8
9
10
12
13
2
Das Kühlschrankzubehör darf nicht im
Geschirrspüler gewaschen werden.
Other manuals for KYLIG
3
This manual suits for next models
1
Table of contents
Languages:
Other IKEA Refrigerator manuals

IKEA
IKEA BCF228/64 User manual

IKEA
IKEA ID5HHEXWS03 User manual

IKEA
IKEA EFFEKTFULL User manual

IKEA
IKEA FÖRKYLD User manual

IKEA
IKEA ISANDE User manual

IKEA
IKEA FROSTIG BCF201/65 User manual

IKEA
IKEA VINDÅS User manual

IKEA
IKEA FÖRKYLD User manual

IKEA
IKEA LAGAN 004.969.39 User manual

IKEA
IKEA Haftigt User manual
Popular Refrigerator manuals by other brands

Turboair
Turboair TSR-23SD-N6 Installation and operation manual

Silvercrest
Silvercrest SMB 140 A1 operating instructions

Isotherm
Isotherm TB15-TB18 Instructions for use

Turboair
Turboair PUR-48-D2-N Installation and operation manual

Range Master
Range Master DxD 15 user guide

Schaub Lorenz
Schaub Lorenz SL SE311WE user manual