IKH AWD1134 User manual

AWD1134
KANNETTAVA VINSSI
MOBIL VINSCH
PORTABLE WINCH
• Käyttöohje • Bruksanvisning • Instruction manual •
Alkuperäisten ohjeiden käännös • Översättning av originalbruksanvisning • Original manual
Maahantuoja/ Importör / Importer:
ISOJOEN KONEHALLI OY
Keskustie 26, 61850 Kauhajoki As, Finland
Tel. +358 - 20 1323 232, Fax +358 - 20 1323 388
www.ikh.fi
HUOMIO! Lue käyttöohjeet huolellisesti ennen laitteen käyttöä ja noudata
kaikkia annettuja ohjeita. Säilytä ohjeet myöhempää tarvetta varten.
OBS! Läs noggrant igenom bruksanvisningen innan du använder maskinen
och följ alla angivna instruktioner. Spara instruktionerna för senare behov.
NOTE! Read the instruction manual carefully before using the machine and
follow all given instructions. Save the instructions for further reference.


Vinssi on varustettu kestomagneettimoottorilla, ja se on suunniteltu jaksottaiseen käyttöön. Sitä ei
ole suunniteltu teolliseen tai kaupalliseen käyttöön eikä nostamiseen. Valmistajan myöntämä takuu
ei kata laitteen soveltuvuutta tällaiseen käyttöön.
Vapautuskytkintä käytetään vetämällä ja kääntämällä nuppia, joka vapauttaa vaihteiston ja vaijeri
voidaan vetää ulos ilman sähkövoimaa. Vaijerin ohjain vähentää välystä sekä sotkeutumista vaijeria
ulosvedettäessä.
YLEISTURVAOHJEET
VAROITUS!
Lue käyttöohjeet huolellisesti ennen laitteen käyttöä ja noudata kaikkia annettuja ohjeita
sähköiskun, tulipalon ja loukkaantumisen estämiseksi. Säilytä ohjeet laitteen läheisyydessä
myöhempää tarvetta varten.
•Pidä aina kädet etäällä vaijerista, koukun silmukasta, koukun ja ohjainrullan aukosta
asennuksen, käytön sekä sisään- ja uloskelauksen aikana.
•Ole aina erittäin varovainen, kun käsittelet koukkua ja vaijeria kelauksen aikana.
•Älä käytä vinssiä ihmisten nostamiseen tai siirtämiseen.
•Älä käytä vinssiä nostamiseen tai lastin kannattamiseen.
•Maksimikapasiteetti saavutetaan, kun rummulla on yksi vaijerikerros. Älä ylikuormita laitetta.
Älä suorita laitteella pitkäkestoisia vetoja painavalla kuormalla. Ylikuormitus voi vahingoittaa
vinssiä ja/tai vaijeria ja aiheuttaa vaaratilanteita. Yli 225 kg kuormien vinssaamiseen
suositellaan käyttämään kaksinkertaista vaijeria väkipyörän avulla. Väkipyörän käyttö vähentää
vinssiin ja vaijeriin kohdistuvaa kuormaa noin 50 prosentilla. Kiinnitä koukku kuorman
kantavaan osaan. Ajoneuvon moottorin on oltava käynnissä vinssaamisen aikana. Jos ajoneuvoa
vinssataan pitkään moottorin ollessa sammutettuna, akun varaus voi laskea liian alhaiselle
tasolle moottorin uudelleenkäynnistämiseksi.
•Opettele käyttämään vinssiä luettuasi käyttöohjeen. Harjoittele vinssin käyttöä asennuksen
jälkeen.
•Älä liikuta ajoneuvoa avustaaksesi vinssiä kuorman vetämisessä. Vinssin ja ajoneuvon
aiheuttama veto yhdessä voi ylikuormittaa vaijeria ja vinssiä.
•Pysyttele turvallisella etäisyydellä. Varmista, ettei kukaan ole liian lähellä vinssiä sen käytön
aikana. Pysy aina poissa vaijerin, koukun ja vinssin tieltä käytön aikana. Jonkin osan
vaurioituminen käytön aikana on epätodennäköistä, mutta silti on suositeltavaa pysytellä etäällä
laitteesta.
•Tarkista vaijerin ja laitteen kunto säännöllisesti. Kulunut vaijeri, jossa on rikkinäisiä säikeitä, on
vaihdettava välittömästi. Vaihda vaijeri aina alkuperäiseen vastaavaan vaijeriin. Tarkista
vinssin asennus säännöllisesti ja varmista, että kaikki pultit ovat kireällä.
•Käytä paksuja hanskoja, kun käsittelet vaijeria. Älä koskaan liu’uta vaijeria käsiesi kautta,
vaikka käyttäisitkin käsineitä.
•Pidä vähintään viisi kierrosta vaijeria rummun ympärillä, muuten vaijerin kiinnitys ei kestä
kuormaa.
•Käytä aina vaijerin ohjaamiseen asianmukaisia lisävarusteita.Älä koskaan kiinnitä vaijeria
itseensä kiinni, koska vaijeri voi vaurioitua. Käytä nailonhihnaa. (Katso kuva 1)
3


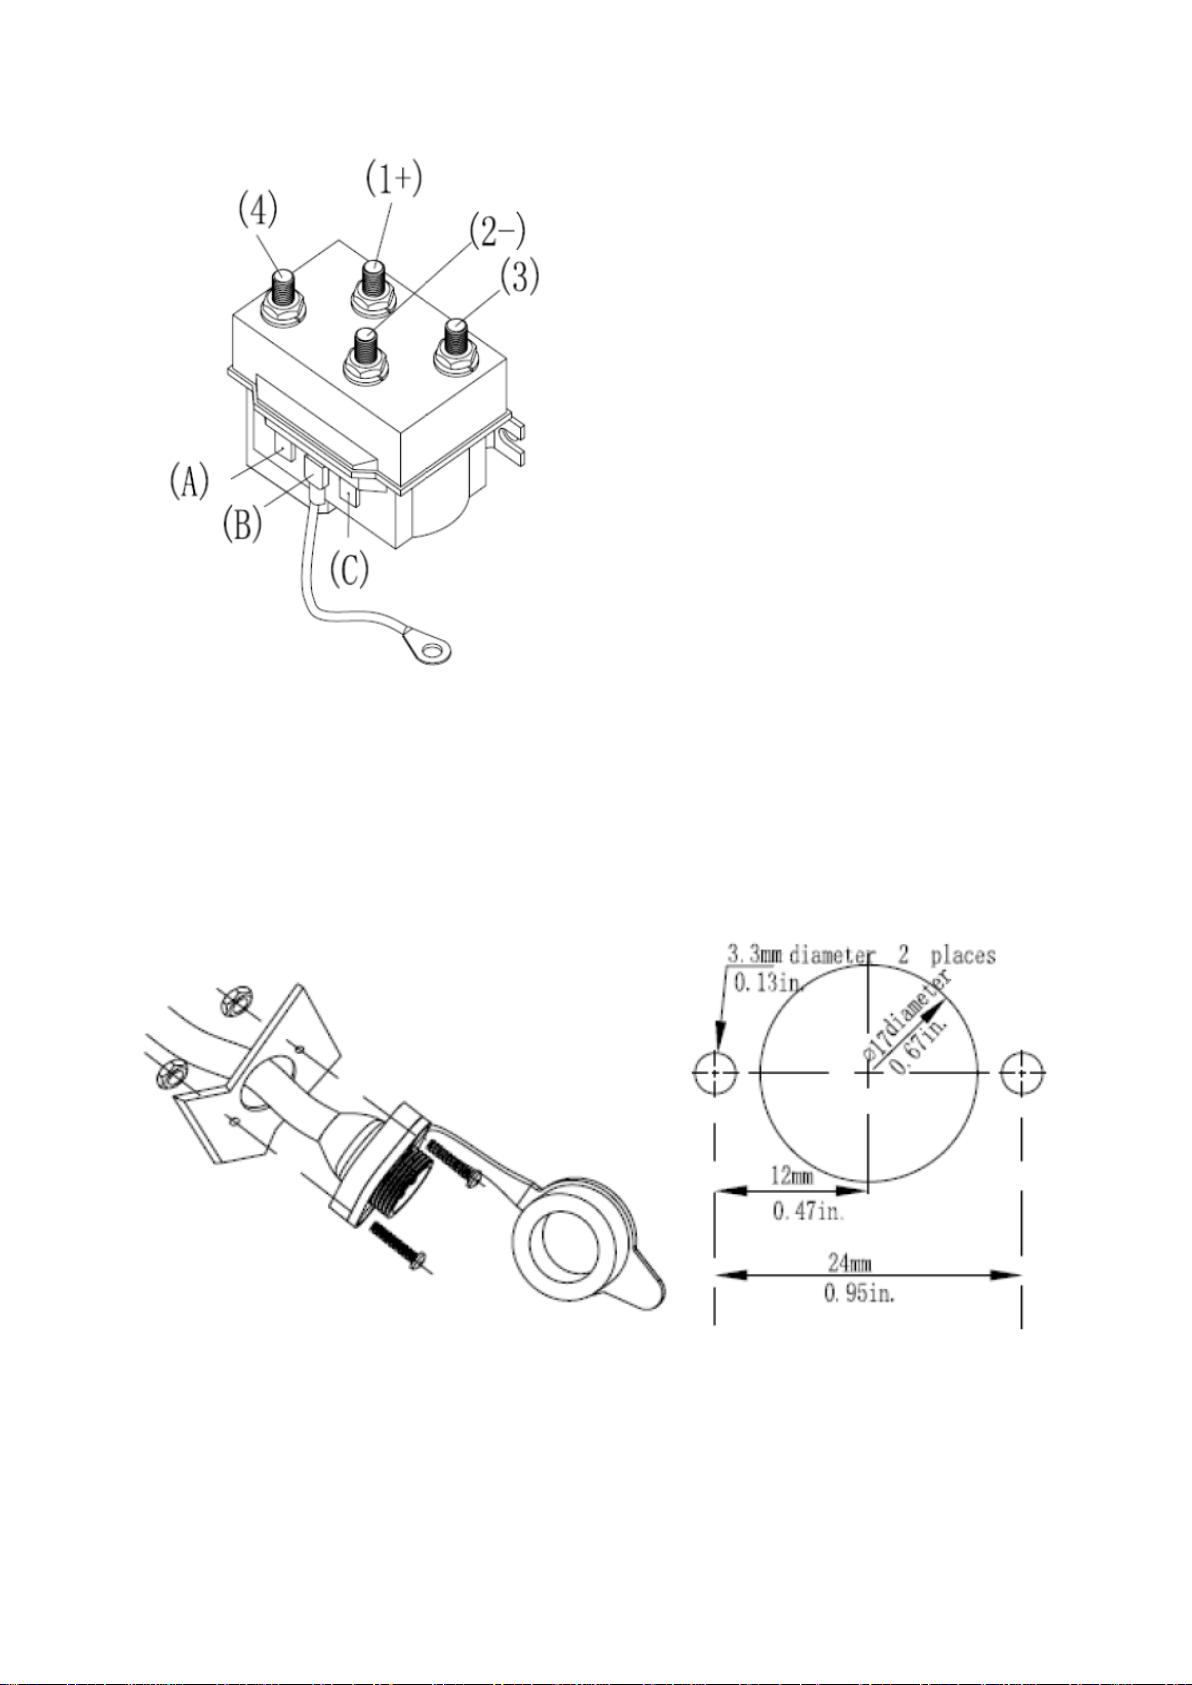
Kytke solenoidi jäljempänä esitetyn sähkökaavion mukaisesti.
Pistoke
Valitse paksuudeltaan 2–5 mm asennuspaikka kromipäällysteiselle pistokkeelle. Poraa reiät
jäljempänä olevan kuvan mukaisesti.
Irrota pultti pistokkeesta ja työnnä johto suurimman reiän läpi.
Käytä M3×16-pulttia pistokkeen kiinnittämiseen.
Huom: Noudata käyttöohjeen lopussa olevaa kaaviota pistokkeen ja solenoidin asennuksessa.
Kiinnitä huomiota asianmukaisiin sähköliitäntöihin.
a. Pitkä punainen johto (pituus: 1,8 m, halkaisija: 10 mm²), yksi napa moottorin pohjanapaan
ja toinen napa moottorin akun positiiviseen napaan (1+).
b. Pitkä musta johto (pituus: 1,8 m, halkaisija: 10 mm²), yksi napa moottorin pohjanapaan (1-)
ja toinen napa moottorin akun negatiiviseen napaan (-).
6

Huom:
1. Varmista, etteivät akun johdot tartu kiinni mihinkään pintaan, mikä voisi vaurioittaa niitä.
2. Varmista, etteivät akun johdot kosketa mitään kuumaa pintaa tai takerru kiinni.
3. Puhdista kaikki liitännät ja etenkin kauko-ohjaimen vipu ja liitin.
HUOLTO
•Tarkista säännöllisesti kiinnityspulttien kireys ja sähköliitännät.
•Poista sähköliitäntöihin kerääntynyt lika tai ruoste.
•Älä yritä purkaa vaihdelaatikkoa. Purkaminen mitätöi takuun.
•Tässä käyttöohjeessa olevat varoitukset ja ohjeet eivät kata kaikkia mahdollisia
käyttötilanteita ja -olosuhteita. Terve järki ja varovaisuus ovat tekijöitä, joita ei voi
sisäänrakentaa mihinkään laitteeseen. Siksi käyttäjän on itse huolehdittava näistä tekijöistä.
•HUOMAUTUS: Ainoastaan valtuutettu huoltoliike saa korjata vinssiä.
7


Koppla solenoiden enligt elscheman nedan.
Plugg
Välj en 2-5 mm tjock monteringsbas för den krombelagd proppen. Borra hål enligt figuren nedan.
Avlägsna bulten och tryck kabeln genom det största hålet.
Använd en M3×16 bult för att fästa proppen.
Obs!: Följ scheman i slutet av bruksanvisningen när du monterar proppen och solenoiden.
Säkerställ att elkopplingarna är korrekt.
a. Lång röd kabel (längd: 1,8 m, diameter: 10 mm²), anslut den ena polen till motorpolen och
den andra till batteriets pluspol (1+).
b. Lång svart kabel (längd: 1,8 m, diameter: 10 mm²), anslut den ena polen till motorpolen (1-)
och den andra till batteriets minuspol (-).
12

Obs!:
1. Kontrollera att batterikablar inte kan fastna på någon yta som kan skada dem.
2. Kontrollera att batterikablarna inte är i kontakt med någon het yta eller fastnar.
3. Rengör alla kopplingar och i synnerhet fjärrkontrollens spak och anslutning.
UNDERHÅLL
•Kontrollera regelbundet att monteringsbultarna och elkopplingarna inte är lösa.
•Avlägsna smuts eller rost som bildas i elanslutningar.
•Försök inte demontera växellåda. Vid demontering upphör garantin att gälla.
•Varningarna och anvisningarna i denna bruksanvisning täcker inte alla möjliga
användningssituationer eller förhållanden. Sunt förnuft och aktsamhet är faktorer vilka inte
går att inbygga på någon utrustning. Därför skall användaren själv ge dessa faktorer.
•NOTERA: Endast ett auktoriserat servicecenter får utföra reparationer på vinschen.
13

This winch is equipped with a permanent magnet motor and is designed for intermittent duty
winching. The winch is not designed to be used for industrial or hoisting applications and the
manufacturer does not warrant it to be suitable for such use.
The free spool clutch is operated by a pull and turn knob, which disengages the gearbox to allow the
wire rope to be pulled out without using electric power. A tension plate presses the wire rope to
reduce backlash and snarling when pulling out the wire rope.
GENERAL SAFETY INSTRUCTIONS
ATTENTION!
When working with electric tools, always follow these safety instructions which protect you
against electric shock and risk of injury and fire. Save the instructions near the machine for
further reference.
•Keep always your hands away from wire, hook and the opening of the fairlead when operating
the winch.
•Use caution when handling the hook and wire when operating the winch.
•Do not use the winch for lifting or moving people.
•Do not use the winch for lifting or supporting load.
•Maximum working load capacity is on the first layer closest to the drum. Do not overload. Do
not attempt prolonged pulls at heavy loads. Overloads can damage the winch and/or the wire
rope and create unsafe operating conditions. For loads over 225 kg we recommend the use of a
pulley block to double line the wire rope. This reduces the load on the winch and the strain on
the wire rope by approximately 50%. Attach hook to load bearing parts. The vehicle engine
should be running during winch operation. If considerable winching is performed with the
engine turned off, the battery may become too weak to re-start the engine.
•After reading and understanding this manual, learn to use your winch. After installing the winch
practice using it.
•Do not move your vehicle to assist the winch in pulling the load. The combination of the winch
and vehicle pulling together could overload the wire rope and winch.
•Keep a safety distance. Ensure that all people stand well clear of winch during the operation.
Always stand clear of wire rope, hook and winch. To avoid the unlikely event of component
failure, it is best that you stay out of the way.
•Inspect the wire rope and equipment frequently. A frayed wire rope with broken strands should
be replaced immediately. Always replace wire rope with identical original replacement part.
Periodically check the winch installation to ensure that all bolts are tight.
•Use thick gloves when handling the wire rope. Do not let the wire rope slide through your
hands even when wearing gloves.
•Never winch with less than 5 turns of wire rope around the winch drum since the wire rope
fastener will not withstand a load.
•Always use the appropriate accessories when guiding the wire rope in or out.
•Never hook the wire rope back onto itself because it could damage the wire rope. Use a nylon
sling. (See Figure 1)
15

•Place a heavy cloth etc. on the wire as shown in Figure 2. If a wire failure should occur, the
cloth will act as a damper.
•Avoid continuous pulls from extreme angles as this will cause the wire rope to pile up at one
end of the drum. This can jamb the wire rope in the winch, causing damage to the winch or the
wire rope.
•Always operate the winch with an unobstructed view of the winching operation.
•All accessories should be sized to the winching task and should be periodically inspected for
damage that could reduce their strength.
•Take appropriate precautions to disable the winch when not in use or under supervision to
prevent use by children or other unauthorized persons. Do not operate the winch when under
the influence of drugs, alcohol or medication.
•When moving a load, slowly take up the wire rope slack until it becomes taut. Stop and recheck
all winching connections. Be sure the hook is properly seated. If a nylon sling is used, check
the attachment to the load.
•When using a winch to move a load, place the vehicle transmission in neutral, set the vehicle
parking brake and chock the wheels.
•Do not machine or weld the winch. Such alterations may weaken the structural integrity of the
winch.
•Do not power the winch longer than 120 seconds. The drum and wire rope/synthetic rope may
get too hot.
•Do not connect the winch to the mains as winch burnout or fatal shock may occur. Never allow
shock loads to be applied to the winch or wire rope.
•Use caution when pulling or lowering a load up and down a ramp or incline. Keep people, pets
and property clear of the path of the load.
INSTALLATION AND OPERATION
Choose a suitable and safe mounting location for the winch. The thickness of the location must be at
least 5 mm. Drill four 9 mm holes positioned 124 mm x 76 mm as shown in Figure 3. Note:
Different brands or models may have different mounting possibilities.
16

Installation drawing
Insert the mounting bolts through the holes and the mounting plate from the bottom up.
Note: Use only the mounting bolts (M8 ×30MM) and washers supplied by the manufacturer.
Be sure the bolts are properly tightened, otherwise the base can be damaged.
Clutch
Turn the clutch 90° to the Free spool position. Let the wire from the drum. Connect the clevis hook
on the wire.
Turn the clutch 90° back to the Engaged position.
Note: Make sure that the drum is engaged by pulling the wire.
Fix the fairlead on the mounting plate.
Note: If the rope is synthetic, you can fix the aluminium fairlead on the mounting plate and then
reel the rope.
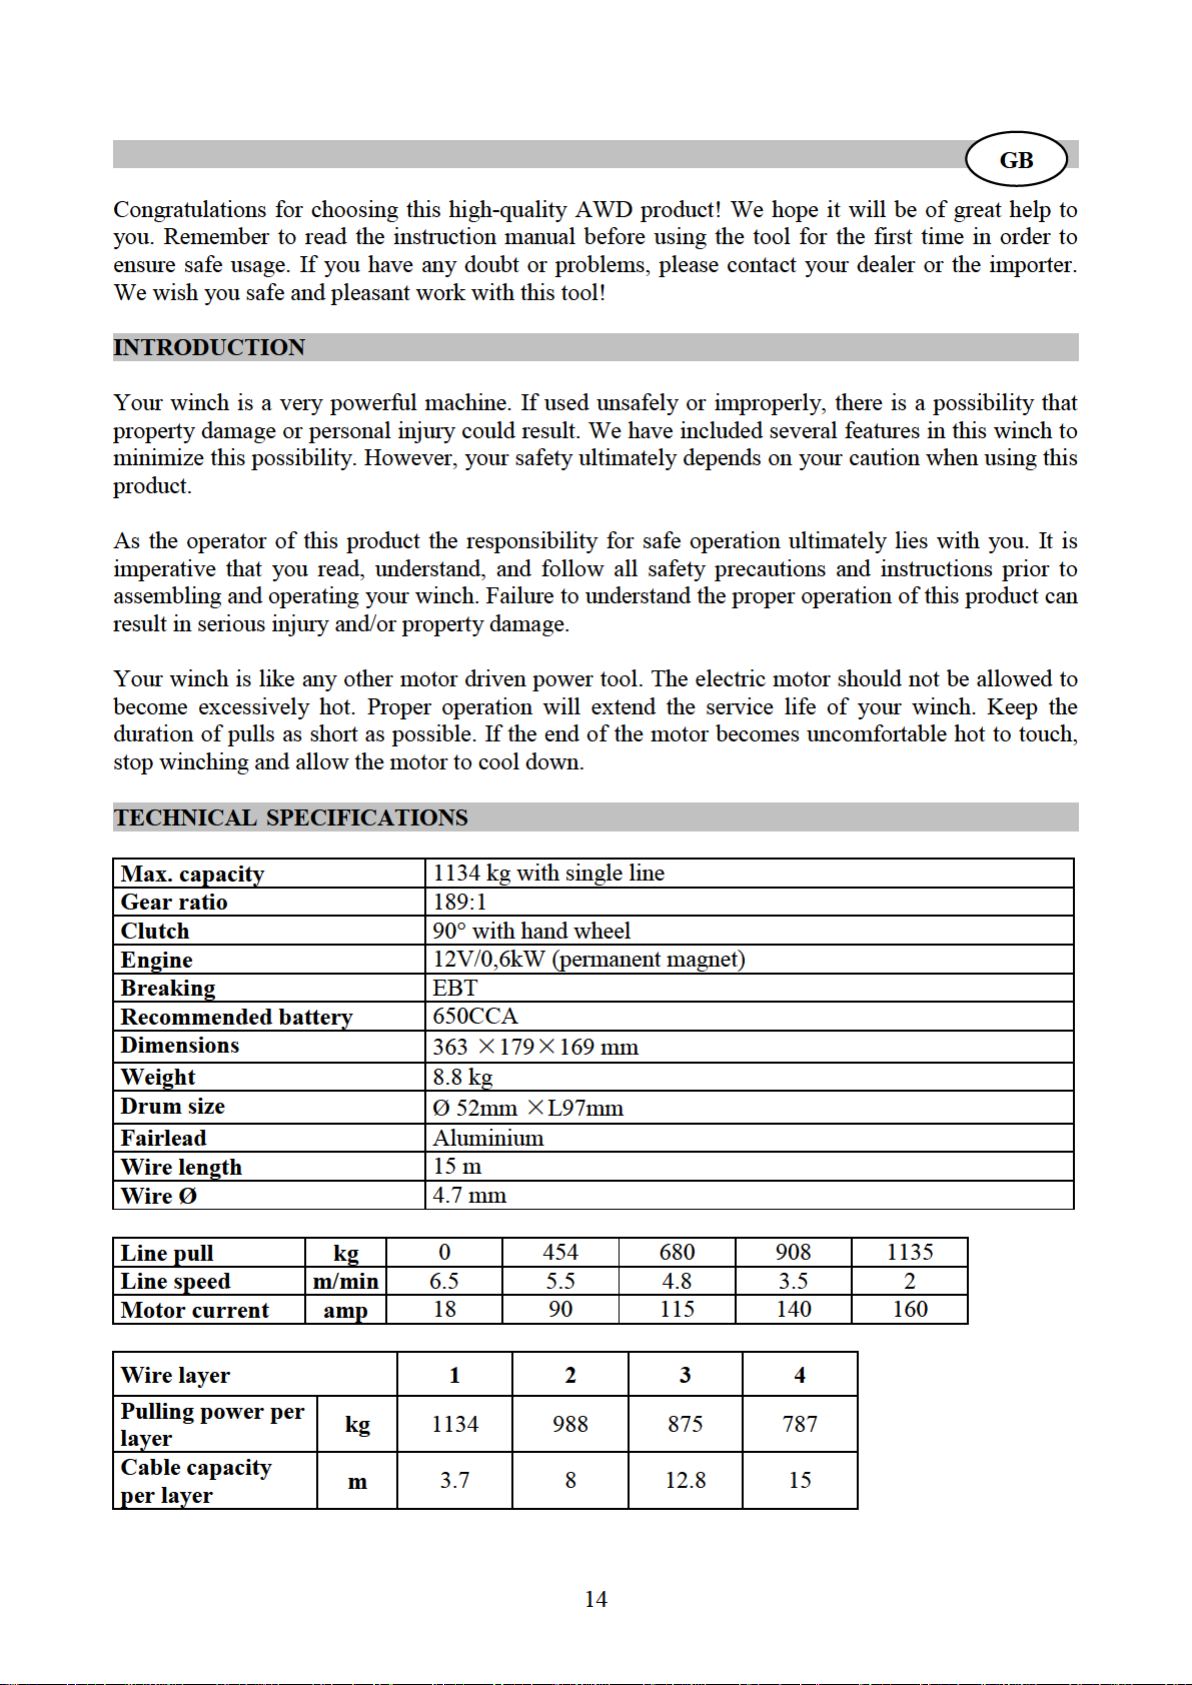
ISM
Choose a suitable and safe mounting location for the ISM. The thickness of the location must be 1-
3mm. Drill two 6 mm holes with the distance 67 mm. Fix then the ISM with the bolts (M5X12)
properly.
17

Connect the ISM as shown in the electric diagram below.
Socket
Choose a 2–5 mm mounting location for installing the chrome-plated socket. Drill the holes as
shown in the figure below.
Remove the bolt on the socket and push the wire through the biggest hole.
Use a M3×16 bolt to fasten the socket.
Note: Connect the socket and ISM as shown in the figure in the end of this manual.
Pay attention to proper electrical connections.
a. Long red cable (length: 1,8 m, diameter: 10 mm²), one terminal to the bottom terminal of the
motor and the other terminal to the positive (1+) terminal of the battery.
b. Long black cable (length: 1,8 m, diameter: 10 mm²), one terminal to the bottom terminal of
the motor (1-) and the other terminal to the negative (-) terminal of the battery.
18

Note:
1. Make sure that battery cables are not caught to any surface, which could damage them.
2. Make sure battery cables are not touching any hot surfaces or getting caught.
3. Clean all connections especially in remote control and receptacle.
MAINTENANCE
•Periodically check tightness of mounting bolts and electrical connections.
•Clear any dirt or corrosion that may have accumulated on the electrical connections.
•Do not attempt to disassemble the gear box. Disassembly will void the warranty.
•The safety precautions and instructions in this manual can not cover all possible conditions
and situations that may occur. It must be understood by the operator that common sense and
caution are factors, which cannot be built into this product, but must be applied by the
operator.
•NOTE: Repairs should be carried out by an authorised repair centers only.
19

20
Table of contents
Other IKH Winch manuals


Popular Winch manuals by other brands


Mile Marker
Mile Marker SEC15 Installation & operator's manual

Mile Marker
Mile Marker SEC18 Installation & operator's manual

Ramsey Winch
Ramsey Winch HD-P800 Operating, Service and Maintenance Manual

Badland
Badland ZXR 2500 user manual

HADEF
HADEF 45/10E Installation, operating and maintenance instructions

Harken
Harken 200 user manual


