iLive ISP389B User manual

1
ISP389B User GuideCustomer Helpline Number: 0844 481 5000
ISP389B
User Guide
2.1 Channel Home Music System
with Dock for iPhone and iPod

2ISP389B User Guide 3
ISP389B User GuideCustomer Helpline Number: 0844 481 5000
Congratulations on purchasing this 2.1 Channel Home Music System with Dock for iPhone
and iPod. You can now listen to your iPod, or other external device through your Music
system’s 2.1 channel speakers.
Please read the warning section on page 13 carefully before using your music system.
Your 2.1 Channel Home Music System
with Dock for iPhone and iPod
Set up
Everyday use
Advanced use
iPod and iPhone adapter chart
Troubleshooting
Maintenance
Warnings
Technical specifications
Contents
Welcome
01
02
03
04
05
06
07
08
09
Need something else?
There are a wide range of accessories and
other products that can be ordered direct to
your door from ASDA. For more information
see www.asda.com
2.1 Channel Home Music System
Docking Brackets for iPod/iPhone
You should have
- Headphones
- Video Cable
- 3.5mm Line-in cable (2x)
You may also need
AC/DC Adaptor
Remote Control

4ISP389B User Guide 5
ISP389B User GuideCustomer Helpline Number: 0844 481 5000
VIDEO OUT
21
AUX INDC IN 12V
VOLUME / HR / MIN
POWER
SOURCECLK ADJ
EQ
Your 2.1 Channel Home Music system
01
Clock adjust button
Display
Video Output
Power/Play/
Pause button
DC Power Input
Auxiliary Inputs
1 & 2
iPhone/iPod
dock
EQ button
Volume/Hour/
Minute buttons
Source
button
Tip:
Where a button that appears on both the radio
and remote control is referenced in this guide
you can use either button to use that function.
MUTE button
PLAY/PAUSE button
EQ button
Press the EQ button to switch
between the different EQ Modes.
Rock, Classic, Jazz, and Pop.
SELECT button
Press the Select button
to make a selection on a
docked iPod/iPhone.
HOUR/MINUTE+/SKIP
FORWARD buttons
Press the buttons to adjust
the hour and minute up
when setting the time.
Press to skip tracks forward
on a docked iPhone or iPod.
SHUFFLE button
Press the Shuffle button to
activate or deactivate Shuffle
Mode. In Shuffle Mode,
the docked iPod/iPhone will
play songs in a random order.
VOLUME buttons
ALBUM buttons
Press the Album buttons
to cycle through albums
on a docked iPod/iPhone.
POWER button
SOURCE button
Press the Source button to
switch between the unit’s
different modes.
iPod, Auxiliary 1, and Auxiliary 2.
CLOCK ADJUST/
MENU button
Press the Clock Adjust button
to set the time. Press the Menu
button to move to the previous
menu on a docked iPod/iPhone.
HOUR/MINUTE-/SKIP
BACK buttons
Press buttons to adjust the hour and
minute down when setting the time.
Press to skip tracks backward on a
docked iPhone or iPod.
CHAPTER buttons
Press the Chapter buttons to
cycle through chapters on a
docked iPod/iPhone.
PLAYLIST buttons
Press the Playlist buttons
to cycle through playlists
on a docked iPod/iPhone.
MENU UP/DOWN
buttons
Press the Menu Up/Down buttons
to navigate through the menus
on a docked iPod/iPhone.
REPEAT button
Press the Repeat button
to repeat the current
track, album, or playlist.
Press the Repeat button once to
repeat the current track
Press the Repeat button
twice to repeat the current
album or playlist.
Press the Repeat button
a third time to cancel the
repeat function.

6ISP389B User Guide 7
ISP389B User GuideCustomer Helpline Number: 0844 481 5000
Set up
Setting up your 2.1 Channel Home
Music system
1 Plug one end of the power cable into
the socket on the rear of your unit
as shown.
2 Plug the other end of the power cable
into a standard three pin wall socket
and switch the power on at the wall.
The display will illuminate to read 12.00.
Replace the battery
To change the batteries follow the
steps below.
1 Remove the battery cover from the
back of the remote as shown.
2 Insert the batteries as shown.
3 Replace the battery cover.
02
Setting the time
With the music system off, press the CLK
ADJ button on the top of the system or
on the remote control for 3 seconds.
When the hour digit begins to blink on
the LCD Display, use the HR/MIN buttons
on the top of the system or the and
on the remote to adjust the hour.
1
Battery backup for your 2.1 Channel
Home Music System
You will need to insert 2 AAA (not included)
batteries as described below.
1 Remove the battery cover from the
bottom of the Home Music System.
2 Insert the batteries as shown. Make
sure you place the batteries in with
the positive (+) and negative (-) ends
the correct way round.
3 Replace the battery cover.
2
1
2
Note:
Remove the plastic
sheet before
operating the
remote control.
The remote control battery
The remote control comes with a CR2025
button cell battery. The battery is already
inserted into remote control and blocked by a
plastic sheet.
To set the minutes press the CLK ADJ
button again and the minute digits will
begin to blink. Use the VOLUME/HR/MIN
buttons on the top of the system or
the and on the remote to adjust
the minutes.

8ISP389B User Guide 9
ISP389B User GuideCustomer Helpline Number: 0844 481 5000
Everyday use
Docking your iPod/iPhone
1 Find the bracket that fits your iPod or
iPhone. Each bracket has a number to
indicate which iPod or iPhone model
it’s compatible with. See the iPod/iPhone
adapter chart on page 11 for more
information on compatible iPods
and iPhones.
2 Place the bracket in place over the iPod
connector on the top of the unit.
3 Connect the iPod or iPhone to the dock.
Note:
You can select the desired volume using the
VOLUME + and - . Press the button to
turn the sound off, press it again to return to
the previous volume level.
Volume
Note:
When using your music system you can change
the sound mode by pressing the EQ button.
You can chose between POP, CLASSIC, JAZZ
and ROCK.
Sound type
03
Playing your iPod
You can play your iPod through your 2.1
Home Music System. Turn the unit on using
the POWER and then select iPod mode
using the SOURCE button. Connect your
iPod to the cradle on the
top of the unit.
1 Press the POWER to turn the unit on.
2 Press the SOURCE button to switch
the unit to iPod mode.
3 Press the button on your iPod/iPhone
to begin playing the docked iPod.
There are a range of other functions you
can use whilst playing your iPhone or
iPod, please see page 5 for more details.
Connecting an external device
You can connect an external device to your 2.1 Channel Home Music system using
a 3.5mm Line-in cable A (not included, for more information see www.asda.com)
as shown below. This will allow the device to play through your music system’s speakers.
You can connect a second device in the same way using the Auxiliary 2 input B.
Press the SOURCE button on your music system repeatedly to scroll to AUX 1 or AUX2,
alternatively press the AUX button on the remote control. Once the device is connected
you can control playback as you would usually. In addition to this, some of the music system
controls will still work.
Press the VOLUME + and - buttons on the music system or remote control to increase
or reduce the volume.
Press the button to turn the sound off, press it again to return to the previous
volume level.
Press the EQ button to scroll through the different preset equaliser modes.
These are POP, JAZZ, CLASSIC, and ROCK.
Note:
Charging your iPod
While the power is on, the Home Music system
will automatically charge your iPod.
VIDEO OUT
21
AUX INDC IN 12V
External device
External device B
A

10 ISP389B User Guide 11
ISP389B User GuideCustomer Helpline Number: 0844 481 5000
Playing videos through a TV
You can play Video content from your iPod or iPhone through an attached TV.
You will need to use a video cable as shown below. Make sure the yellow cable is
connected to the VIDEO IN socket on your TV and the VIDEO OUT on the Home System.
1 Connect your iPhone or iPod as you normally would.
2 Press the SOURCE button to switch to iPod mode.
3 Select a video on the docked iPod or iPhone and press the to begin playing it
through the connected television.
Please note that your iPod or iPhone settings need to be set to ‘Video Out;
or ‘TV Out’.
Advanced use
04
TV
iPod and iPhone adapter chart
Need extra help?
Don’t worry we’re just the other end of the
phone. If you’re experiencing problems using
your new product, before returning it to the
retailer just call 0844 481 5000.
Monday - Friday 9am - 8pm, Saturday 9am - 5pm
Sunday 11am - 4pm. Calls charged at local rates.
Loving your new iLive 2.1 channel home music
system? ASDA has a wide variety of electrical
and other products that are available either
instore or online.
For more information visit your local store
or find us online at www.asda.com
Need something else?
05
iPod and iPhone model Play and charge
compatibility
Included bracket Video out
compatibility
iPod mini 4GB 6GB
iPod 4th generation 20GB, 40GB 10
iPod 4th generation (colour display) 20GB 30GB 10
iPod 4th generation (colour display) 40GB 60GB
iPod shuffle 1st & 2nd generation 512MB 1GB
iPod nano 1st generation 1GB 2GB 4GB 8
iPod 5th generation (video) 30GB 60GB 80GB 10
iPod nano 2nd generation (aluminium) 2GB 4GB 8GB 8
iPod classic 80GB, 160GB (2007), 120GB 160GB (2009) 10
iPod nano 3rd generation (video) 4GB 8GB 13
iPod touch 1st generation 8GB 16GB 32GB 14
iPod touch 3rd generation 32GB 64GB 14
iPhone 4 16GB 32GB
iPhone 4GB 8GB 16GB 12
iPhone 3G 8GB 16GB 12
iPhone 3GS 8GB 16GB 32GB 12
iPod nano 4th generation (video) 8GB 16GB 8
iPod touch 2nd generation 8GB 16GB 32GB 64GB 14
iPod nano 5th generation (video camera) 8GB 16GB 8

12 ISP389B User Guide 13
ISP389B User GuideCustomer Helpline Number: 0844 481 5000
Warnings
This product was designed and manufactured to meet
strict quality and safety standards. There are, however,
some operation precautions that you should be aware of:
• Read all warnings.
• Follow all instructions.
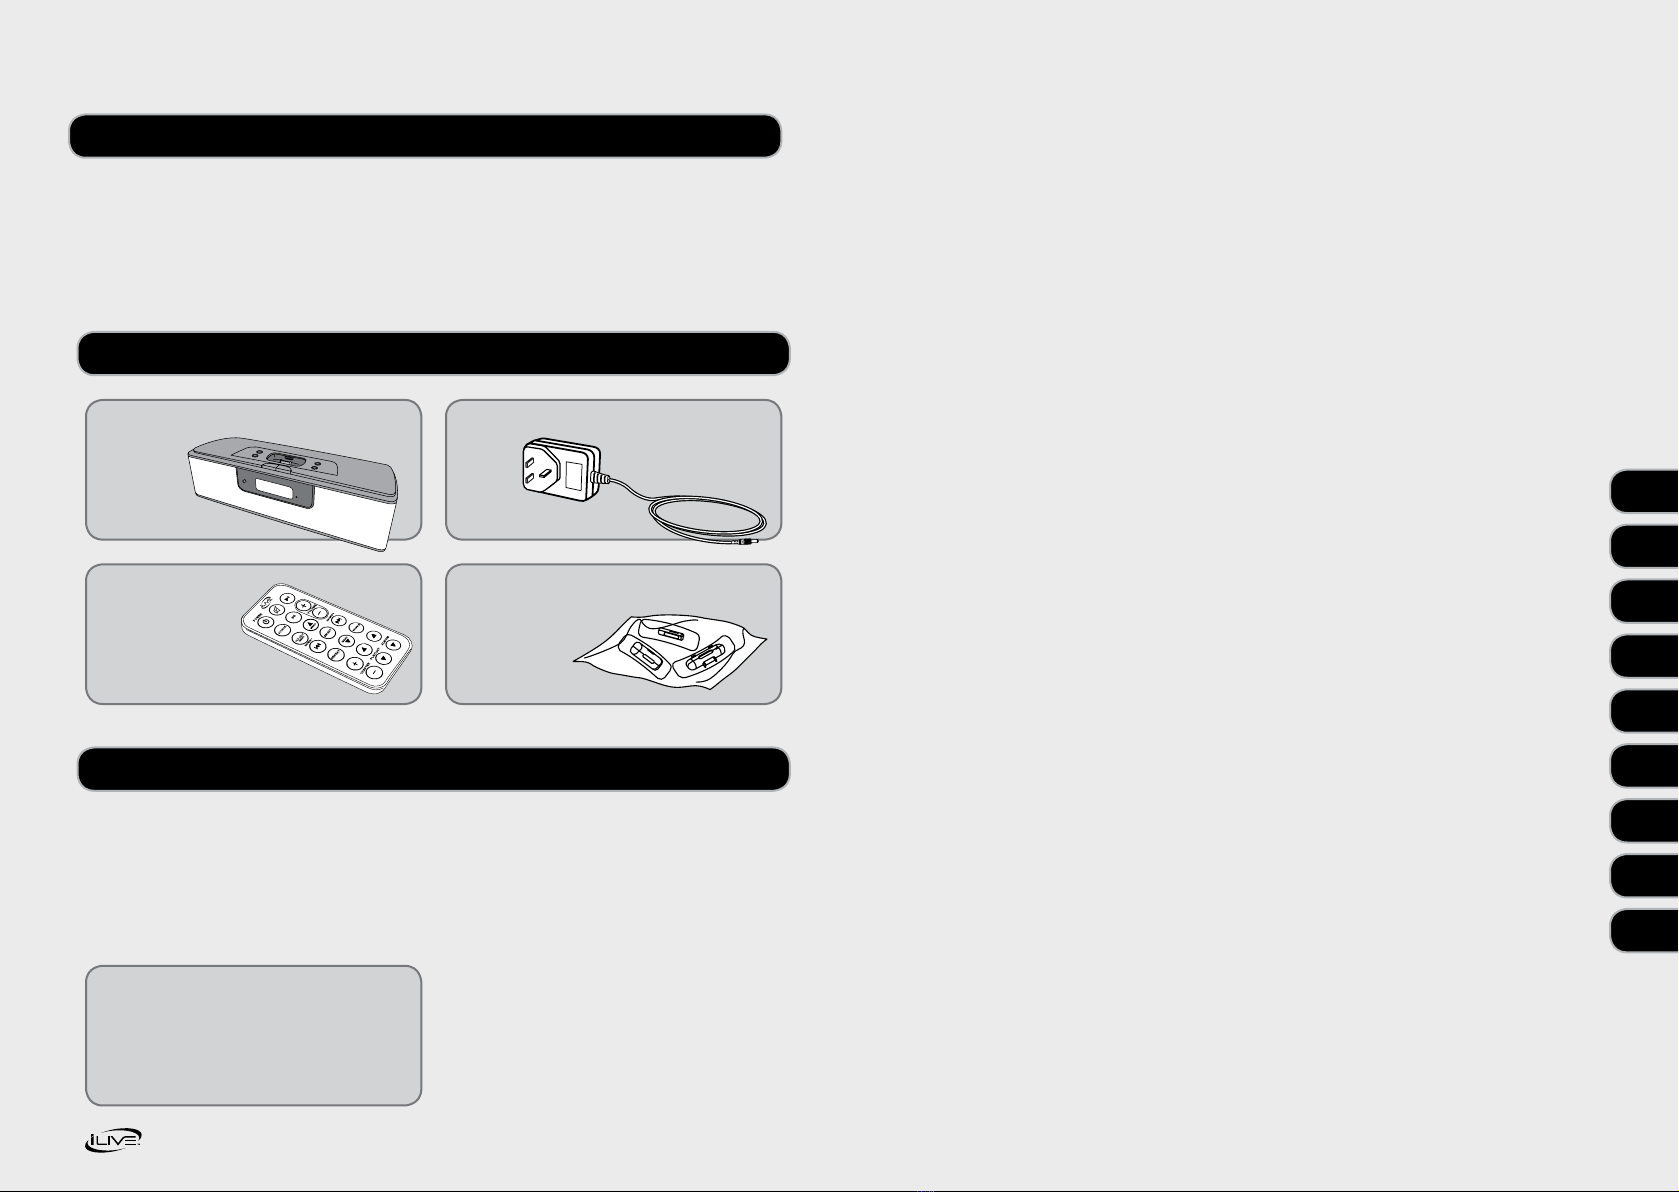
• Check the mains voltage stated on the mains adaptor
rating plate corresponds to the local electricity
supply, if it doesn’t, return the product to the store
where you bought it.
• Unwind and straighten the adaptor cord before use.
• Place the product on a firm and level surface.
• Turn off the appliance during thunder storms.
• To completely disconnect this product from the
mains, disconnect the plug from the wall socket
outlet. The mains plug is used to completely interrupt
the power supply to the unit and must be easily
operable by the user.
• Remove the adaptor from the outlet, when the
product is unused for a long period of time and
during thunderstorms.
• Clean only with a dry cloth, unplug the outlet before
cleaning. Do not use aggressive cleaners as these will
damage the surface.
• Do not locate the appliance in the vicinity of a heat
source or in direct sunlight. Do not place a naked
flame source on or near this product.
• Do not attempt to open the cabinet or remove any
covers. If the power adapter or its lead becomes
damaged, it must be replaced with an adapter of the
same type and rating.
• Repairs must only be performed by the manufacturer
or its service agent or similarly qualified person.
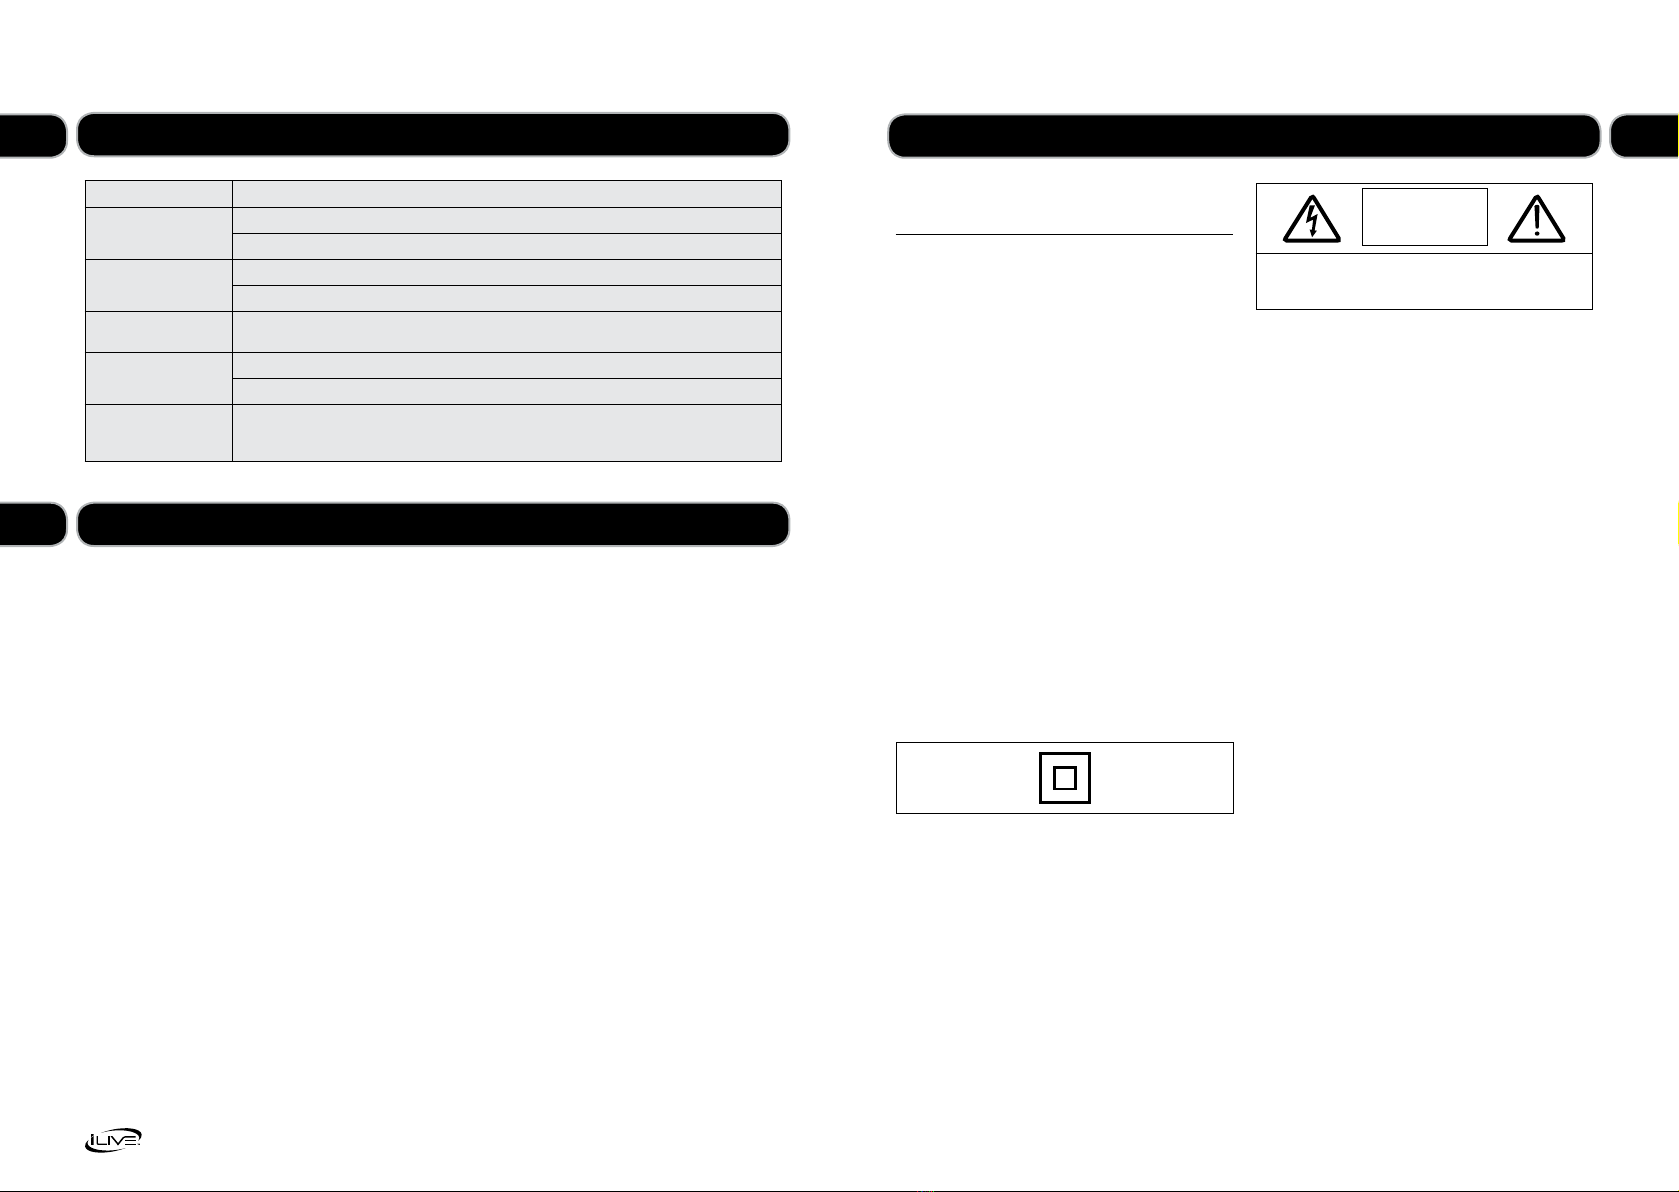
This external adaptor is a Class II or double insulated
electrical appliance. It has been designed in such a way
that it does not require a safety connection to electrical
earth.
Please see the name plate on the bottom of your unit
for a full product description.
WARNING: To reduce the risk of electric shock, do not
remove cover (or back) as there are no user-serviceable
parts inside. Refer servicing to qualified personnel.
• This lightning flash with arrowhead symbol within
an equilateral triangle is intended to alert the user to
the presence of non-insulated “dangerous voltage”
within the product’s enclosure that may be of
sufficient magnitude to constitute a risk of electric
shock.
• The exclamation point within an equilateral triangle
is intended to alert the user to the presence of
important operating and maintenance instructions in
the literature accompanying the appliance.
WARNING: To reduce the risk of fire or electric shock,
do not expose this apparatus to rain or moisture. The
apparatus shall not be exposed to dripping or splashing
and that objects filled with liquids, such as vases, shall
not be placed on apparatus.
CAUTION: Danger of explosion if battery is incorrectly
replaced. Replace only with the same or equivalent type.
WARNING: The battery, batteries, or battery pack) shall
not be exposed to excessive heat such as sunshine, fire
or the like.
WARNING: The direct plug-in adapter is used as
disconnect device, the disconnect device shall remain
readily operable.
Do not install this equipment in a confined or building-
in space such as a book case or similar unit, and remain
a well ventilation conditions. The ventilation should not
be impeded by covering the ventilation openings with
items such as newspaper, table- cloths, curtains etc.
WARNING: Only use attachments/accessories specified
or provided by the manufacturer (such as the exclusive
supply adapter, battery etc).
CAUTION
RISK OF ELECTRIC SHOCK
DO NOT OPEN
CAUTION: TO REDUCE THE RISK OF ELECTRIC SHOCK, DO NOT
REMOVE COVER (OR BACK). NO USER SERVICEABLE PARTS INSIDE.
REFER SERVICING TO QUALIFIED SERVICE PERSONNEL.
06 08
07 Maintenance
1 Do not use harsh or abrasive cleaning
agents or solvents.
2 Polish the screen with soft cloth and if
necessary a recommended glass cleaner.
3 Do not attempt to disassemble
your product.
4 Do not paint your product.
5 Do not drop, throw or try to bend
your product.
6 Do not expose your product to open
flames or lit tobacco products.
Troubleshooting
Problem What to do
No power Check that the power is switched on at the wall.
Check if the power cord is properly connected to the power outlet.
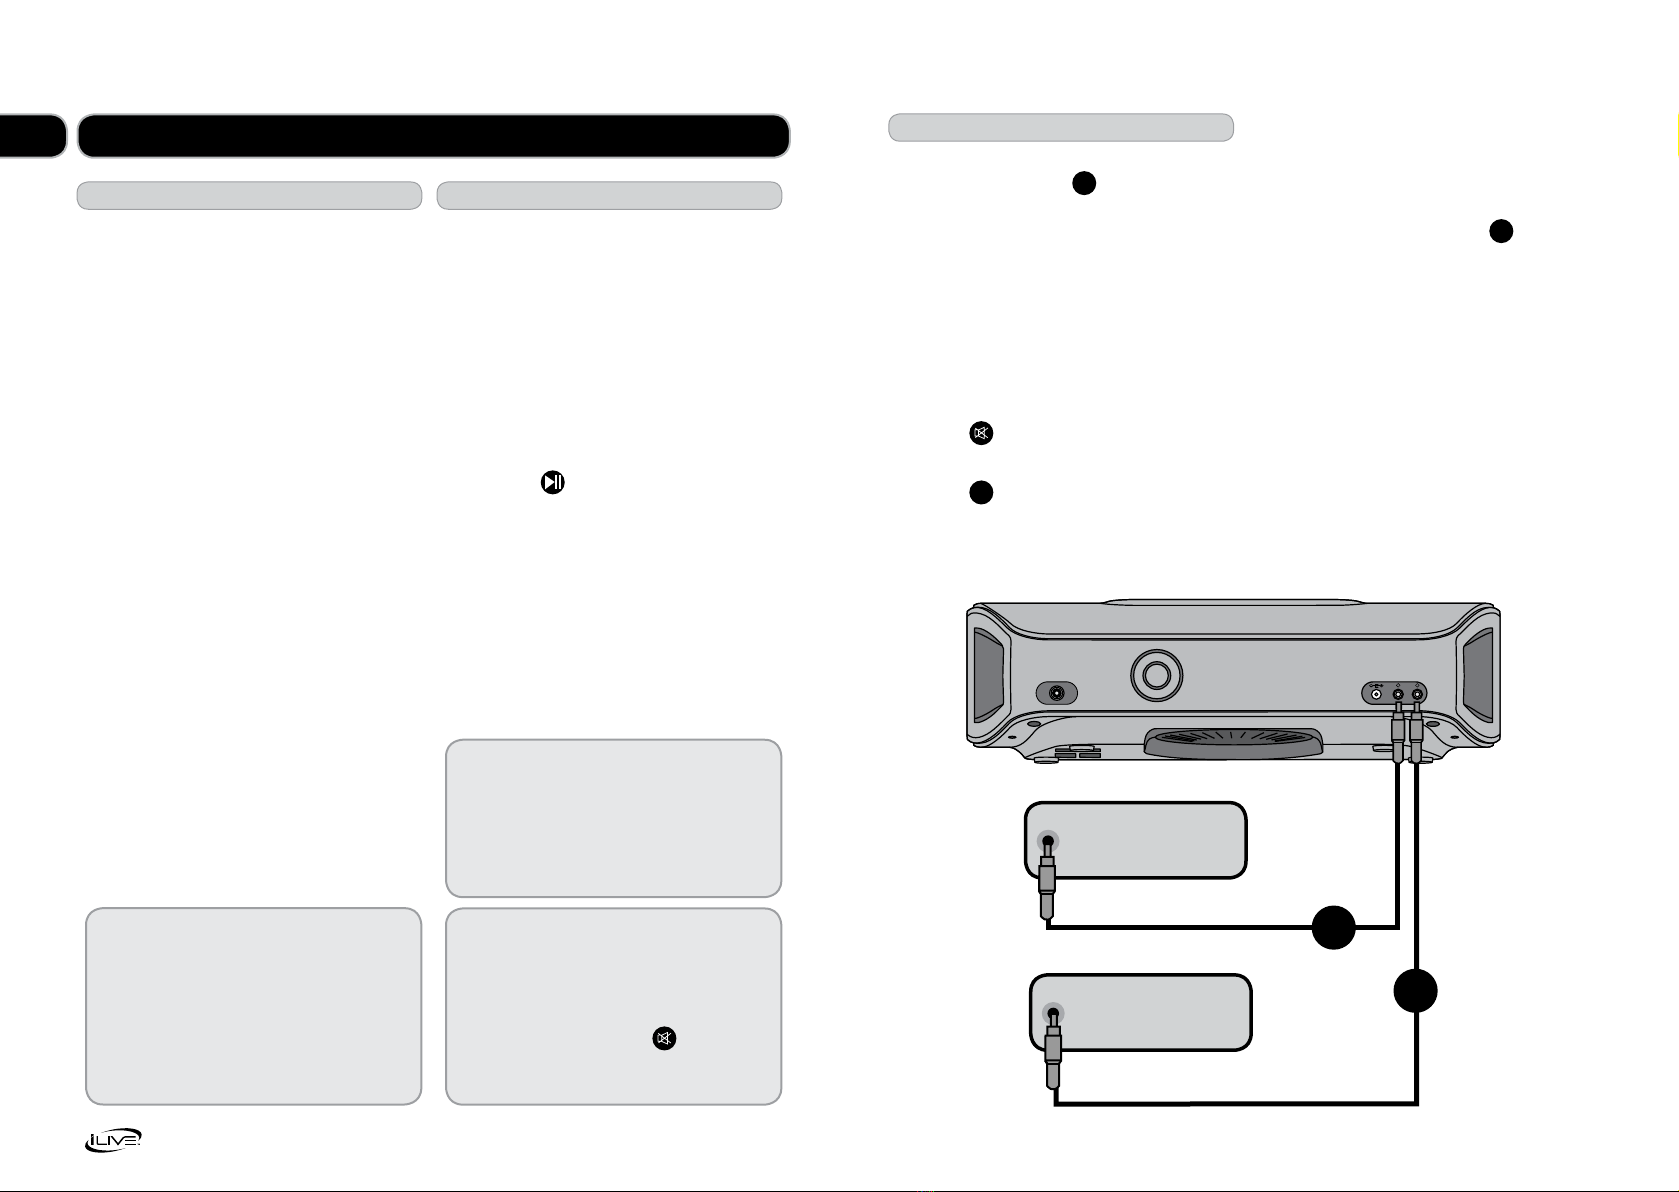
No sound Check that the volume control is NOT at minimum setting.
Check that it is NOT set to mute.
Function disturbed If none of the above solutions work, try switching off and unplugging your music system,
leaving it for two minutes and then switching it back on again.
The remote control
won’t work
Inspect or replace the batteries.
Make sure there are no obstacles obscuring the front of the player.
TFT display is frozen
(or partially frozen) with
a mosaic like pattern
ESD (electrostatic discharge) due to contact with the TFT screen frame.
Disconnect the unit from the power supply and then reconnect.

14 ISP389B User Guide 15
ISP389B User GuideCustomer Helpline Number: 0844 481 5000
28 day no quibble refund
If you’re not delighted by your product, simply bring it back within 28 days for a no quibble refund.
Don’t forget to include all of the item’s original components (for example remote control or power
cable) and packaging along with your receipt or other proof of purchase.
Free 1 year guarantee
All our electrical items are covered by a full 1 year ASDA guarantee from the day you buy it. In the
unlikely event that your product is faulty or you are simply struggling to set it up, don’t worry, here’s
what you should do:
1 First call our Customer Helpline as they may
be able to help you with the problem.
2 If the problem can’t be resolved, you will
receive a reference number.
3 Take the reference number along with the
item, all its components and your receipt
to your nearest store for a full refund.
This does not affect your statutory rights.
Customer Helpline
0844 481 5000
Monday - Friday 9am - 8pm, Saturday 9am - 5pm
Sunday 11am - 4pm. Calls charged at local rates.
© 2010 Digital Products International (DPI, Inc.) | All other trademarks appearing herein are the property of
their respective owners. Specifications are subject to change without notice
Technical specifications
Input Voltage DC 12V, 100-240V AC/DC Adaptor
Speaker unit 3” speaker x 2 & 4” Speaker for sub.
Output power 4.5W x 2 +10W @ 10% THD
Standby power consumption <2w
09

© 2010 Digital Products International (DPI, Inc.) | All other trademarks appearing herein are
the property of their respective owners. Specifications are subject to change without notice
This symbol on the product or in the instructions means that your electrical and
electronic equipment should be disposed at the end of its life separately from your
household waste. There are separate collection systems for recycling in the EU.
For more information, please contact the local authority or your retailer where you
purchased the product.
Other manuals for ISP389B
2
Table of contents
Other iLive Stereo System manuals

iLive
iLive IHB340 User manual

iLive
iLive IHB248 User manual

iLive
iLive ITTB757 User manual

iLive
iLive IHT3807DT User manual

iLive
iLive IHB624B User manual

iLive
iLive IHP610B User manual

iLive
iLive ITBSW397 User manual

iLive
iLive IKB333S User manual

iLive
iLive IHB617B User manual

iLive
iLive IH818B User manual