Ilti Luce WALIMLED025/12 User manual
indoor
LINEAR SYSTEM
OUTDOOR/UNDERWATER
Riga Opal - Front light gen.2 ISTRUZIONI DI MONTAGGIO / INSTALLATION INSTRUCTIONS
(mm)
r >20cm
8,5W/m
IP68
max
50°C
-20˚C
15
2m
1030/2030/3030/4030/5030
MRIG09_0G61_FL
-Mediamente la temperatura colore potrebbe variare a causa
dei processi di produzione
-On average CCT colour temperature, this value can vary due to
the manufacturing processes.
si consiglia la conservazione delle seguenti istruzioni - we suggest you to keep this copy for your les
ILTI LUCE srl · Lungo Dora P. Colletta, 113/9· 10153 Torino (Italy); tel (39) 011 765 73 01; fax (39) 011 853855; www.iltiluce.com; ilti@signify.com MADE in ITALY_12 - 2018 (M)
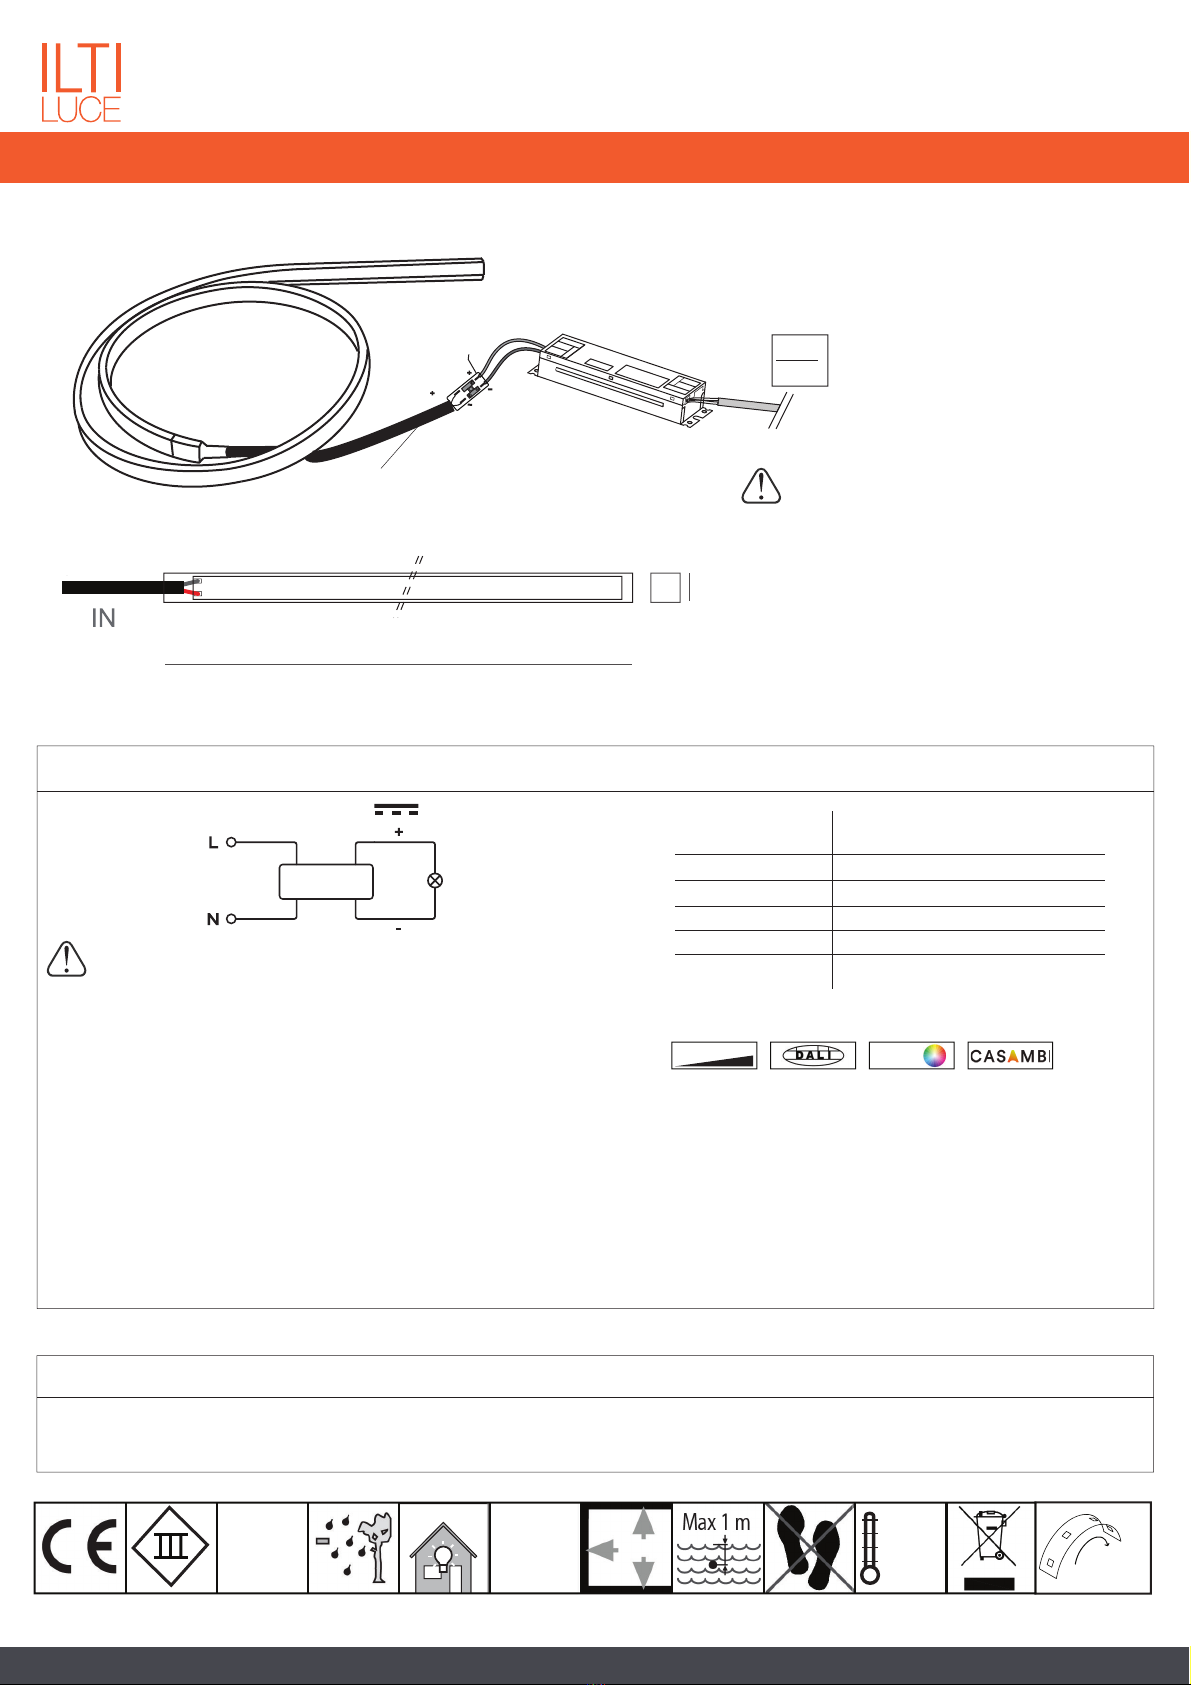
L=2mt (sez. 2x0,5mm2)
OUTPUT
12V-DC
Black
L
N
INPUT
Red
110 - 240V*
50~60Hz
Alimentatori consigliati (SELV)
Driver suggested (SELV)
* Vericare la tensione di ingresso supportata dagli alimentatori / Verify the input tension supported from drivers
CABLAGGIO (connessione in parallelo)
WIRING (parallel connection)
Driver
12V
Connessione in parallelo/parallel connection
50/60 Hz
110V-240V* Riga OP FL gen.2 WALIMLED025/12
WALIMLED060/12
WALIMLED100/12
Codice/Code
non inclusi/not included
Caratteristiche/
Specications
25W - 12V
60W - 12V
100W - 12V
WALIMLED240/12 240W - 12V
-I moduli Led ed i componenti non devono essere stressati meccanicamente
LED module itself and all its components must not be mechanically stressed
-L'installazione deve essere fatta da personale qualicato.
Installation should be carried out by a suitable qualied installer.
-Cavi e led all’interno del prodotto non sono sostituibili
Cables and Led inside are not replaceable
-Tutte le operazioni di cablaggio e manutenzione vanno eseguite con l’interruttore
generale in posizione OFF.
All wiring and maintenance must be performed with the main switch in the OFF position.
- Collegare l'apparecchio all'alimentatore e poi connettere l'alimentatore al 220V.
Connect the tting to the feeder and then connect the feeder at 220V.
-Eettuare il cablaggio usando un sistema che garantisca almeno il grado IP della lampada.
Make the wiring using a system that guarantees at least the IP grade of the lamp.
-La temperatura ottimale durante l’assemblaggio deve essere compresa tra i+18°C e +35°C.
Best temperature for assembly is between +18°C e +35°C.
Controlli compatibili / Compatible controls:
DMX
0/1-10V SYSTEM
TAGLIO
CUTTING
- Per ogni eventuale misura speciale contattare l’ucio tecnico di Ilti Luce.
For every special cut to contact Ilti Luce Technical dept.
Connectors
(not included)
MRIGALIMIP68
OK
si consiglia la conservazione delle seguenti istruzioni - we suggest you to keep this copy for your les
ILTI LUCE srl· Lungo Dora P. Colletta, 113/9· 10153 Torino (Italy); tel (39) 011 765 73 01; fax (39) 011 853855; www.iltiluce.com ; ilti@signify.com MADE in ITALY_12 - 2018 (M)
LINEAR SYSTEM
OUTDOOR/UNDERWATER
Riga Opal - Front light gen.2 ISTRUZIONI DI MONTAGGIO / INSTALLATION INSTRUCTIONS
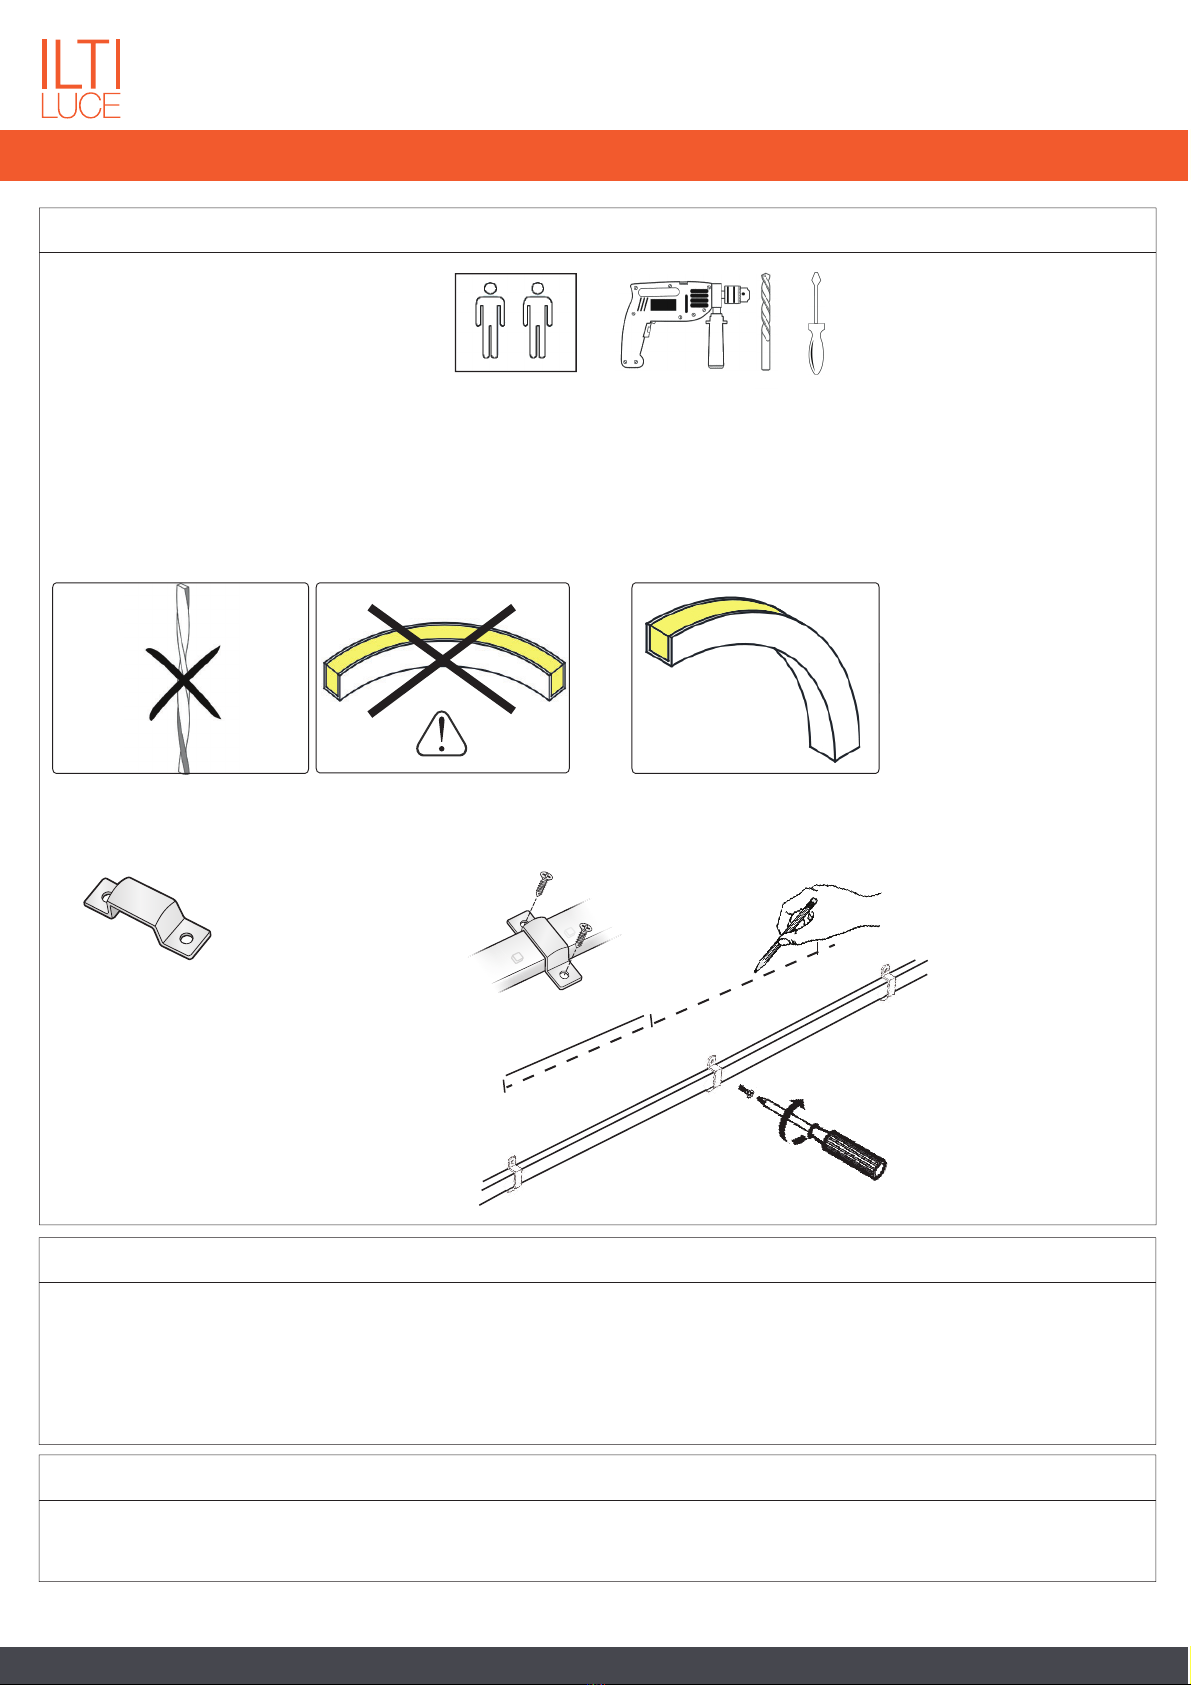
ACCESSORI
ACCESSORIES
30 - 40 cm
- Montare le stae
- Fix the brackets
- Clips (included)
NON CONSENTITO
NOT ALLOWED:
Twisted
CONSENTITO
ALLOWED:
INSTALLAZIONE
INSTALLATION
-L'installazione deve essere fatta da personale qualicato.
Installation should be carried out by a suitable qualied installer.
-L’installazione deve essere eseguita da 2 PERSONE, soprattutto per prodotti
superiori a 2m.
-Installation must be done by 2 PEOPLE, especially when the product is
longer than 2m.
-Togliere tensione prima di eseguire operazioni di manutenzione.
-Disconnect main voltage before maintenace operation.
-Temperature troppo elevate di funzionamento e stoccaggio potrebbero ridurre il
ciclo di vita o danneggiare il prodotto.
-Exceeding maximum ratings for operating and storage will reduce expected life time
or damage the product.
-Le tolleranze sul prodotto potrebbero variare no a 5 mm in lunghezza e no a
+/-1mm in larghezza.
-Due to production, tolerances in linear expansion of up to 5 mm have to be
expected. In width by up to +/-1mm.
-E’ raccomandata una regolare pulizia della lampada con prodotti neutri, non chimici.
-It’s recommended regular cleaning of the luminaire not using chemical products.
MANUTENZIONE
MAINTENANCE
-Maneggiare il prodotto con cura, per evitare danneggiamento dei conduttori.
To handle the product very careful, to avoid damage on the conductor tracks.
SMALTIMENTO
DISPOSAL
Secondo la direttiva comunitaria WEEE (Waste Electrical and Electronic
Equipment) l’apparecchio non può essere smaltito con i riuti indierenziati.
Deve essere portato nelle strutture locali per lo smaltimento ed il riciclaggio
dei prodotti elettronici.
In accordance with EU Directive WEEE (Waste Electrical and Electronic
Equipment), luminaires must not be disposed of with other household waste.
At the end of their life, luminaires must be taken to the appropriate local
facility available for the disposal or recycling of electronic products.
Per l’installazione della lampada sono necessari/
To install luminaire are needed:
- 2 persone / 2 people
- Trapano / drill
- Cacciavite / screwdriver (electric screwdriver)
- E’ consentito accorciare il cavo di alimentazione non al di sotto di 50 cm.
It is allowed shorten cable min 50cm.
-E’ raccomandata una regolare pulizia della lampada con prodotti neutri, non chimici.
-It’s recommended regular cleaning of the luminaire not using chemical products.
BENDING DIRECTION
indoor
LINEAR SYSTEM
OUTDOOR/UNDERWATER
Riga Opal gen.2 - Side light ISTRUZIONI DI MONTAGGIO / INSTALLATION INSTRUCTIONS
(mm)
8,5W/m
IP68
max
50°C
-20˚C
15
2m
1030/2030/3030/4030/5030
MRIG09_0G61_SL
r >20cm
si consiglia la conservazione delle seguenti istruzioni - we suggest you to keep this copy for your les
ILTI LUCE srl · Lungo Dora P. Colletta, 113/9· 10153 Torino (Italy); tel (39) 011 765 73 01; fax (39) 011 853855; www.iltiluce.com; ilti@signify.com MADE in ITALY_12 - 2018 (M)
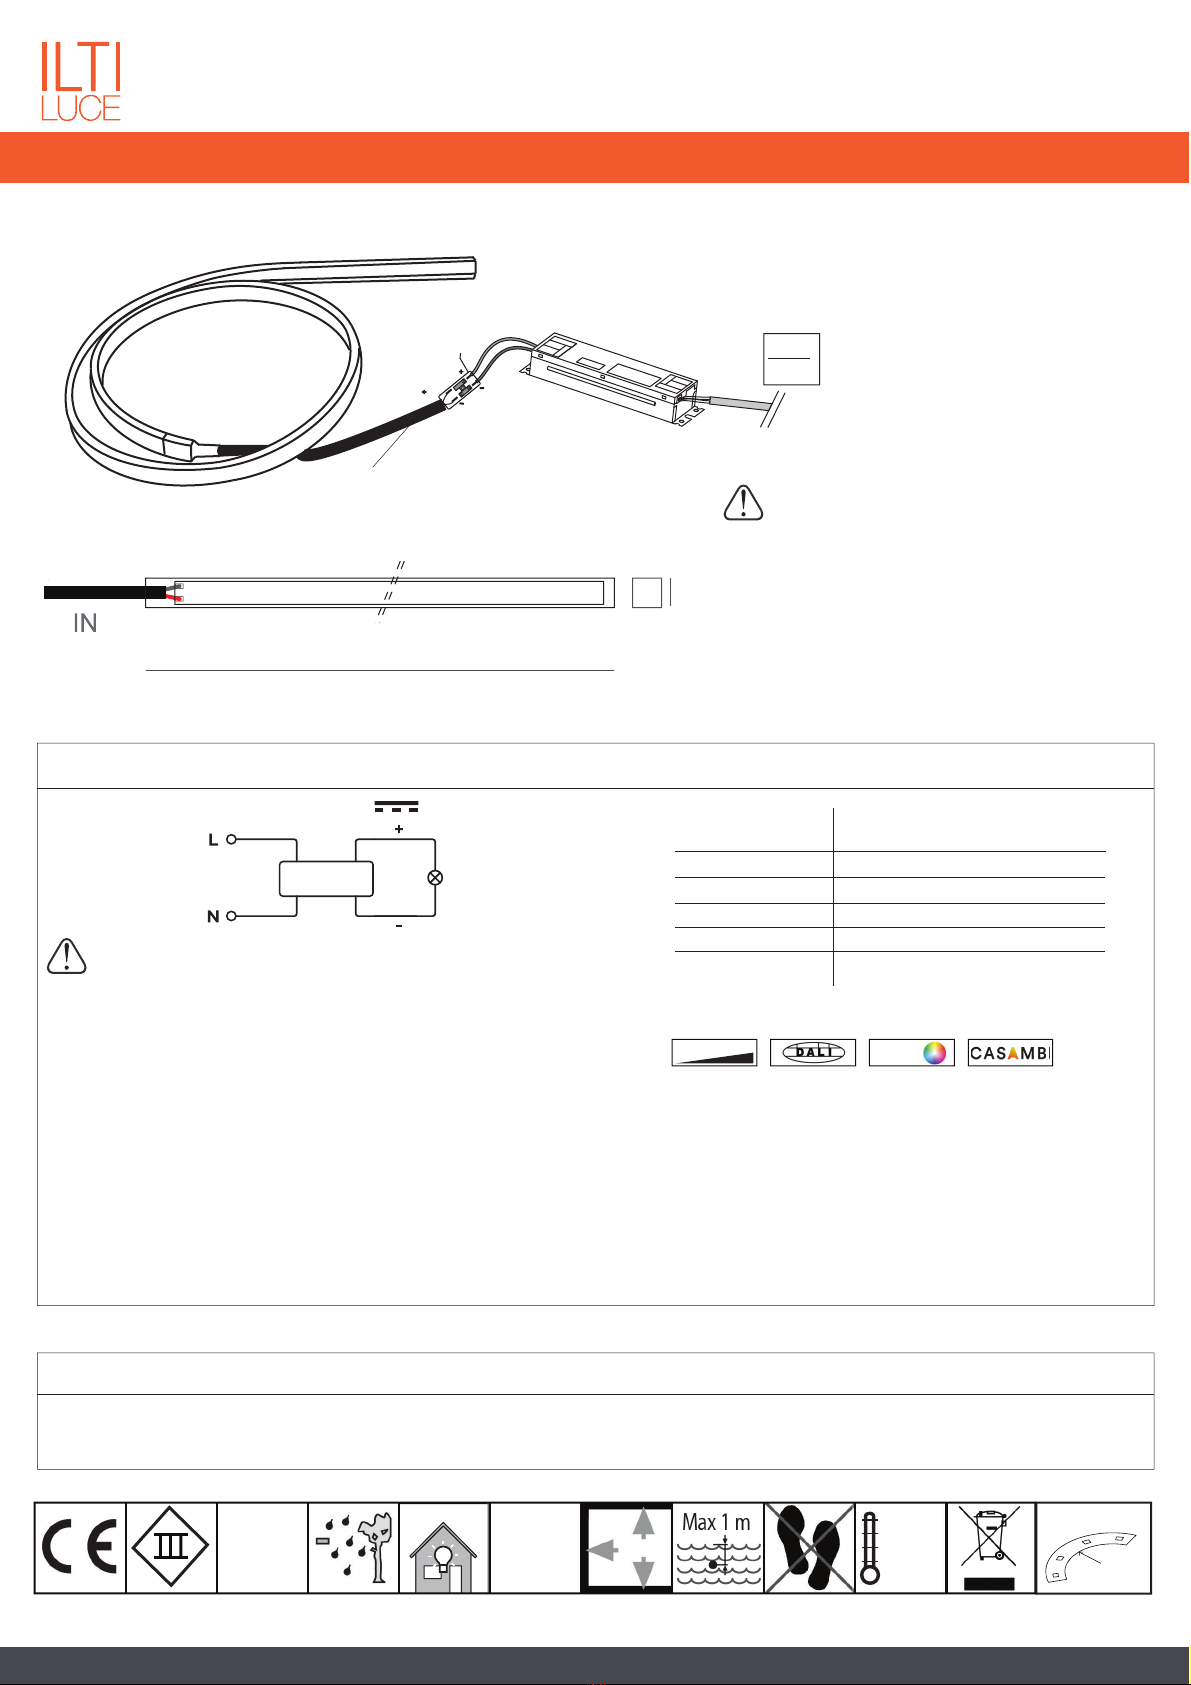
L=2mt (sez. 2x0,5mm2)
OUTPUT
12V-DC
Black
L
N
INPUT
Red
110 - 240V*
50~60Hz
-Mediamente la temperatura colore potrebbe variare a causa
dei processi di produzione
-On average CCT colour temperature, this value can vary due to
the manufacturing processes.
Alimentatori consigliati (SELV)
Driver suggested (SELV)
* Vericare la tensione di ingresso supportata dagli alimentatori / Verify the input tension supported from drivers
CABLAGGIO (connessione in parallelo)
WIRING (parallel connection)
Driver
12V
Connessione in parallelo/parallel connection
50/60 Hz
110V-240V* Riga OP SL gen.2 WALIMLED025/12
WALIMLED060/12
WALIMLED100/12
Codice/Code
non inclusi/not included
Caratteristiche/
Specications
25W - 12V
60W - 12V
100W - 12V
WALIMLED240/12 240W - 12V
-I moduli Led ed i componenti non devono essere stressati meccanicamente
LED module itself and all its components must not be mechanically stressed
-L'installazione deve essere fatta da personale qualicato.
Installation should be carried out by a suitable qualied installer.
-Cavi e led all’interno del prodotto non sono sostituibili
Cables and Led inside are not replaceable
-Tutte le operazioni di cablaggio e manutenzione vanno eseguite con l’interruttore
generale in posizione OFF.
All wiring and maintenance must be performed with the main switch in the OFF position.
- Collegare l'apparecchio all'alimentatore e poi connettere l'alimentatore al 220V.
Connect the tting to the feeder and then connect the feeder at 220V.
-Eettuare il cablaggio usando un sistema che garantisca almeno il grado IP della lampada.
Make the wiring using a system that guarantees at least the IP grade of the lamp.
-La temperatura ottimale durante l’assemblaggio deve essere compresa tra i+18°C e +35°C.
Best temperature for assembly is between +18°C e +35°C.
Controlli compatibili / Compatible controls:
DMX
0/1-10V SYSTEM
TAGLIO
CUTTING
- Per ogni eventuale misura speciale contattare l’ucio tecnico di Ilti Luce.
For every special cut to contact Ilti Luce Technical dept.
Connectors
(not included)
MRIGALIMIP68

BENDING DIRECTION
si consiglia la conservazione delle seguenti istruzioni - we suggest you to keep this copy for your les
ILTI LUCE srl· Lungo Dora P. Colletta, 113/9· 10153 Torino (Italy); tel (39) 011 765 73 01; fax (39) 011 853855; www.iltiluce.com ; ilti@signify.com MADE in ITALY_12 - 2018 (M)
LINEAR SYSTEM
OUTDOOR/UNDERWATER
Riga Opal gen.2 - Side light ISTRUZIONI DI MONTAGGIO / INSTALLATION INSTRUCTIONS
OK
ACCESSORI
ACCESSORIES
30 - 40 cm
- Montare le stae
- Fix the brackets
- Clips (included)
NON CONSENTITO
NOT ALLOWED:
Twisted
CONSENTITO
ALLOWED:
INSTALLAZIONE
INSTALLATION
-L'installazione deve essere fatta da personale qualicato.
Installation should be carried out by a suitable qualied installer.
-L’installazione deve essere eseguita da 2 PERSONE, soprattutto per prodotti
superiori a 2m.
-Installation must be done by 2 PEOPLE, especially when the product is
longer than 2m.
-Togliere tensione prima di eseguire operazioni di manutenzione.
-Disconnect main voltage before maintenace operation.
-Temperature troppo elevate di funzionamento e stoccaggio potrebbero ridurre il
ciclo di vita o danneggiare il prodotto.
-Exceeding maximum ratings for operating and storage will reduce expected life time
or damage the product.
-Le tolleranze sul prodotto potrebbero variare no a 5 mm in lunghezza e no a
+/-1mm in larghezza.
-Due to production, tolerances in linear expansion of up to 5 mm have to be
expected. In width by up to +/-1mm.
-E’ raccomandata una regolare pulizia della lampada con prodotti neutri, non chimici.
-It’s recommended regular cleaning of the luminaire not using chemical products.
MANUTENZIONE
MAINTENANCE
-Maneggiare il prodotto con cura, per evitare danneggiamento dei conduttori.
To handle the product very careful, to avoid damage on the conductor tracks.
SMALTIMENTO
DISPOSAL
Secondo la direttiva comunitaria WEEE (Waste Electrical and Electronic
Equipment) l’apparecchio non può essere smaltito con i riuti indierenziati.
Deve essere portato nelle strutture locali per lo smaltimento ed il riciclaggio
dei prodotti elettronici.
In accordance with EU Directive WEEE (Waste Electrical and Electronic
Equipment), luminaires must not be disposed of with other household waste.
At the end of their life, luminaires must be taken to the appropriate local
facility available for the disposal or recycling of electronic products.
Per l’installazione della lampada sono necessari/
To install luminaire are needed:
- 2 persone / 2 people
- Trapano / drill
- Cacciavite / screwdriver (electric screwdriver)
- E’ consentito accorciare il cavo di alimentazione non al di sotto di 50 cm.
It is allowed shorten cable min 50cm.
-E’ raccomandata una regolare pulizia della lampada con prodotti neutri, non chimici.
-It’s recommended regular cleaning of the luminaire not using chemical products.
This manual suits for next models
3
Other Ilti Luce Lantern manuals


Popular Lantern manuals by other brands


Harbor Breeze
Harbor Breeze WL131MBK manual

Sealite
Sealite SL-70 Installation & service manual

Flash Technology
Flash Technology OL2A user manual

Nature Power
Nature Power Eco instruction manual

AS LED Lighting
AS LED Lighting MidPower Line HML-057057 Mounting instructions

nordlux
nordlux HELIX 77498038 Mounting instruction

Craftmade
Craftmade Z859CF installation instructions

GE
GE ABVG2 Series Install Instruction Guide

LUG
LUG MEDICA 2.0 TUNABLE WHITE Installation instruction

Seto
Seto ALDEBARAN GLADIUS 2K LED operating instructions

North Coast Lighting
North Coast Lighting 522PHM Series Assembly and installation instructions

less'n'more
less'n'more Athene A-SL General Instructions for Use