Iluv i277 User manual

Stereo Audio System for Your iPod
Instruction Manual
Model: i277
Please read this manual carefully before operating and save it for future reference.
Have a question? Please visit http://www.i-Luv.com

iLuvTM Stereo Audio System for Your iPod V11M10_IM_EN_11012006
www.i-Luv.com
- 1 -
USER SAFETY GUIDE
YOU CAN HELP TO PROTECT THE ENVIRONMENT!
Please remember to respect the local regulations: Hand in the non-working electrical equipment to an appropriate waste disposal center.
FOR BATTERIES
Attention: All batteries must be recycled and disposed of properly.
IMPORTANT SAFETY WARNINGS
1. FCC regulations state that any change or modification to the equipment, not expressly approved by maker or its authorized parties, could void user’s
authority to operate this equipment.
2. To prevent fire or electric shock, do not expose the unit to rain or moisture.
3. Never attempt to open the cabinet. Always refer servicing to a qualified technician.
IMPORTANT SAFETY INSTRUCTIONS
1. READ INSTRUCTIONS - All the safety and operating instructions should be read before the appliance is operated.
2. RETAIN INSTRUCTIONS - The safety and operating instructions should be retained in a secure place for future reference.
3. HEED WARNINGS - All warnings on the appliance and in the operating instructions should be adhered to.
4. FOLLOW INSTRUCTIONS - All operating and use instructions should be followed.
5. WATER AND MOISTURE - The appliance should not be used near water. For example: near a bathtub, kitchen sink, laundry tub, and/or swimming
pool.
6. HEAT - The appliance should be situated away from heat sources such as radiators, heat registers, stoves, or other appliances (including amplifiers)
that produce heat.

iLuvTM Stereo Audio System for Your iPod V11M10_IM_EN_11012006
www.i-Luv.com
- 2 -
USER SAFETY GUIDE
IMPORTANT SAFETY INSTRUCTIONS – CONTINUED
7. POWER SOURCES - The appliance should be connected to a power supply only of the type described in the operating instructions or as marked on
the appliance.
8. CLEANING - The appliance should be cleaned with a dry cloth.
9. OBJECT and LIQUID ENTRY - Care should be taken so that objects do not fall and liquids are not spilled into the device’s openings.
10. CARTS AND STANDS - The appliance should be used only with a cart or stand that is recommended by the manufacturer. An
appliance and cart combination should be moved with care. Quick stops, excessive force, and uneven surfaces may cause the
appliance and cart combination to overturn
11. DAMAGE REQUIRING SERVICE - The appliance should be serviced by qualified service professional when:
a. The power-supply cord or plug has been damaged.
b. Objects have fallen into, or liquid has been spilled into the appliance’s apertures.
c. The appliance has been exposed to rain.
d. The appliance has been dropped and suffered damage.
e. The appliance does not appear to operate normally, or exhibits a change in performance.
12. SERVICING - The user should not attempt to service the appliance beyond that described in the user's operating instructions. All other servicing should
be referred to qualified service professional.
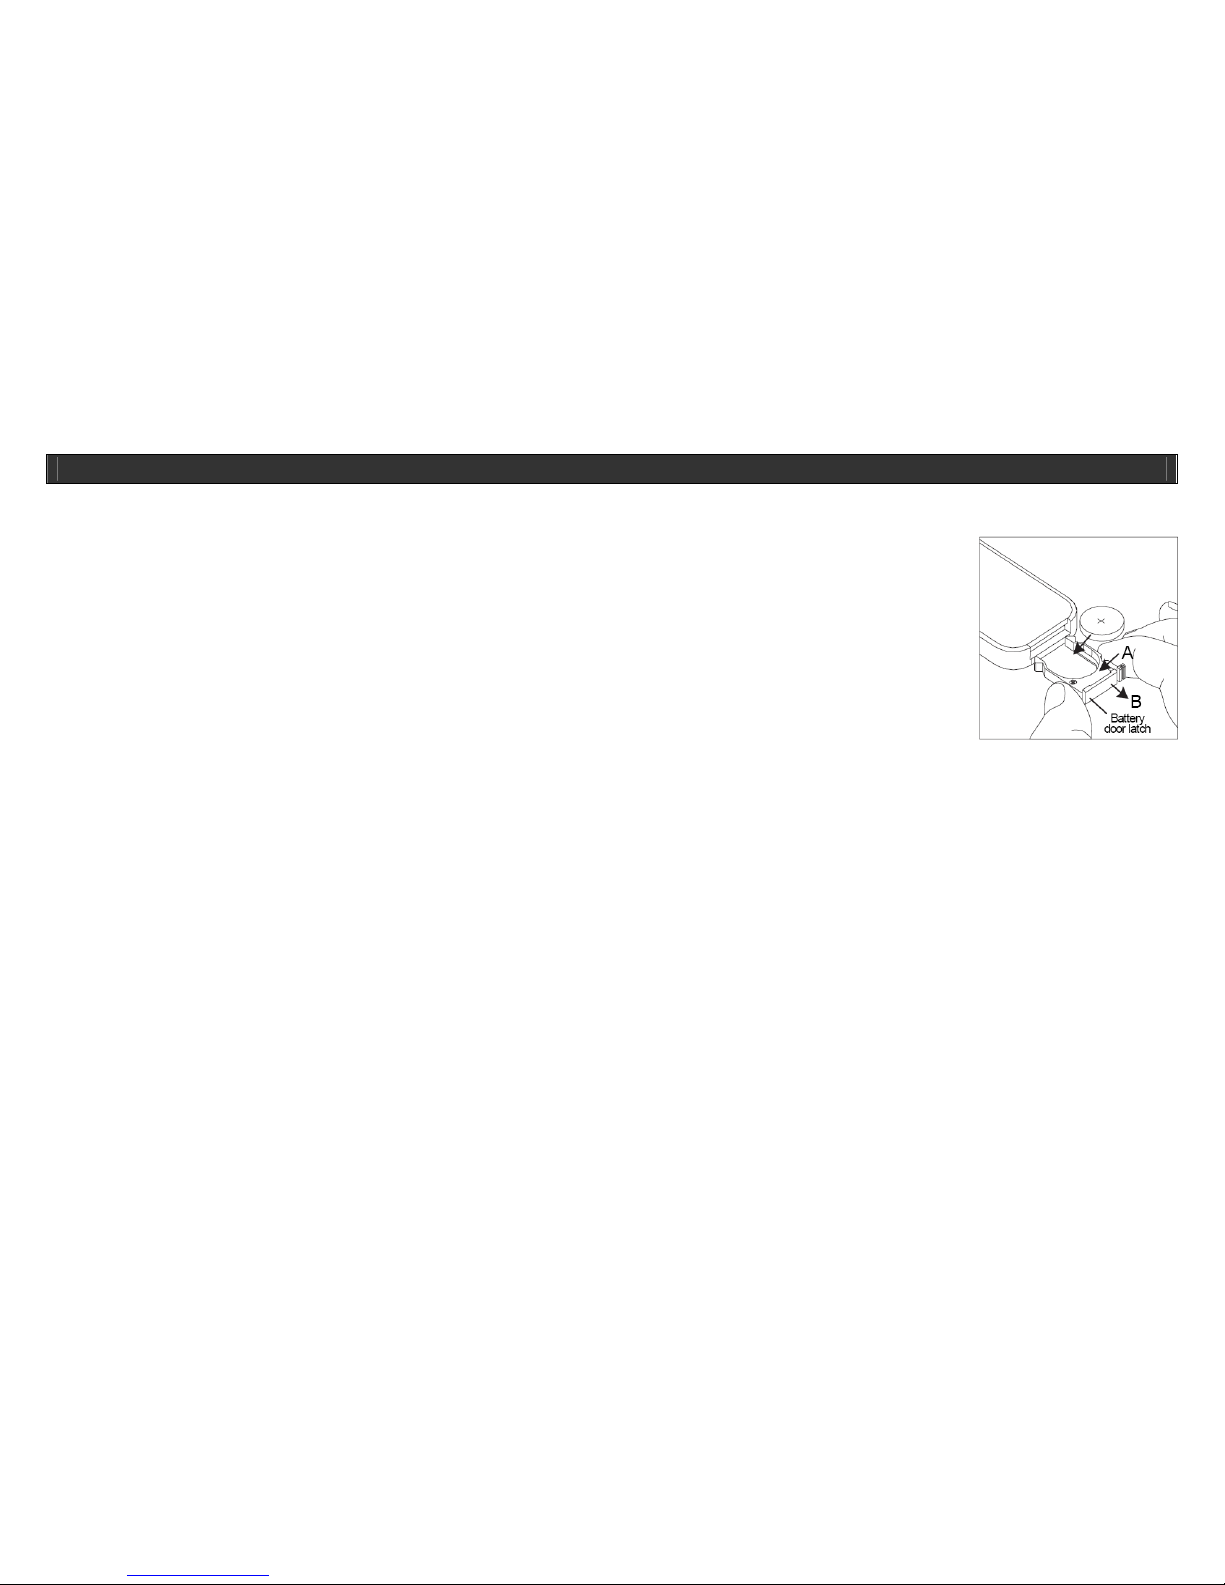
13. BATTERY USAGE – To prevent battery leakage, which may result in bodily injury, property damage or damage to the unit, follow these instructions:
a. Install all batteries correctly according to the polarity (+ -) as marked on the unit.
b. Do not mix old and new batteries, carbon and alkaline, etc.
c. Remove batteries from the unit when the device will not be used for an extended period of time.
14. LEAD AND MERCURY - This product may contain lead and/or mercury. Disposal of these materials may be regulated by your local authorities due to
environmental considerations. For more detailed disposal or recycling information, please contact your local authorities or the EIA (Electronic Industries
Alliance) – http://www.eiae.org

iLuvTM Stereo Audio System for Your iPod V11M10_IM_EN_11012006
www.i-Luv.com
- 3 -
USER SAFETY GUIDE
TO A USER IN USA
As specified in Part 15 of the FCC Rules, this equipment complies within the limits of a Class B digital device. These restrictions provide sufficient protection
against radio and TV interference in residential areas. However, even during normal operation, this device may cause TV or radio interference. In attempting
to eliminate some or all interference, you should try one or more of the following corrective measures:
1. Increase the distance between the device and the radio and/or TV
2. Try a different outlet on various electrical circuits for the device, the radio and/or TV.
3. Reposition the receiving antenna
Do not attempt to fix technical problems yourself if they continue to still exist. Refer servicing only to a qualified technical professional. Interfering or
modifying with your product’s internal components may cause a malfunction and an invalidation of the system’s warranty. This tampering can also void the
FCC authorization to operate it.
This device complies with Part 15 of the FCC Rules. Operation is subject to the condition that this device does not cause harmful interference.

iLuvTM Stereo Audio System for Your iPod V11M10_IM_EN_11012006
www.i-Luv.com
- 4 -
TABLE OF CONTENTS
Getting Started
General features ……………………………………………………………………………………………………………………………………………...… 5
Installing the AC adapter…………….……………………………………………………………..………………………………………………………..… 6
Installing the backup battery for clock and alarm settings ………………..……………………….………………………………………………………. 6
Installing the remote control battery ….....………………………………………………………………………………………………………….………… 7
Installing the AM loop antenna ………………………………………………………………………………………………………………………….…….. 7
Installing the dock adapter …………………………………………………………………………………………………………………………………….. 7
Location of controls on the main unit ……………………………………………………………………………………………………………….…...…… 8
Location of controls on the remote control …………………………………………………………………………………………………………………... 9
Location of indications on the LCD screen …...…………………………………………………………………………………………………………….. 10
Setting the clock time …….....…………….…………...………………………………………………………………………………………………………. 11
Setting the alarm time ………………………………………………………………………………………………………………………………………..… 11
Operational Instructions
Outputting the video signal to an external monitor or TV ……..…………………………………………………………………………………………… 12
Listening to your favorite songs on iPod …………………………………………………………………………………………………………………….. 12
Charging your iPod ……………………………………………………………………………………………………………………………………………. 13
Listening to other audio devices ……………………………………………………………………………………………………………………………… 13
Listening to your favorite radio stations ……………………………………………………………………………………………………………………… 14
Using the alarm function ………………………………………………………………………………………………………………………………………. 14
Adjusting the brightness of LCD screen ………...…………………………………………………………………………………………………………… 15
Setting the sleep time ………………………………………………………………………………………………………………………………………….. 15
Maintenance & Troubleshooting Guide ……………………………………………………………………………………………………………..………….. 16

iLuvTM Stereo Audio System for Your iPod V11M10_IM_EN_11012006
www.i-Luv.com
- 5 -
GETTING STARTED
Congratulations on your purchase of the new iLuvTM i277 for your iPod. Targeted specifically to work with iPod, iLuv stereo audio system with the built-in
universal dock provides advanced audio and radio performance that brings out the best in your music. Do not forget to keep this manual for future reference.
Enhance Your Enjoyment of the Music Stored on Your iPodwith iLuvTM Stereo Audio System
Enhance the richness of your iPod sound with jAuraTM acoustic speaker technology
Powerful built-in speakers allow you to hear your music with depth and clarity
Watch your favorite videos on your TV if your iPod has the video capability
Digital clock display with dual alarm function
Sleep or wake to your iPod, AM/FM radio, or buzzer
Charges your iPod*
Integrated universal dock for your iPod
Supports iPod shuffle
Auxiliary line input for 1st and 2nd generations of the iPod and other audio devices
AM/FM radio with PLL digital tuning technology
External loop antenna provides better AM reception
Liquid crystal display with white backlight
Remote control included
In the box
Stereo audio system
Remote control (Battery included)
Dock adapters
AC adapter
AM loop antenna
AV (3.5mm to RCA) cable
Instruction manual
Warranty card

iLuvTM Stereo Audio System for Your iPod V11M10_IM_EN_11012006
www.i-Luv.com
- 6 -
GETTING STARTED
Installing the AC Adapter
Locate the AC adapter jack on the back of the unit. Insert the AC adapter cable into this jack, and then plug the AC adapter into the wall outlet.
Installing the Backup Battery for Clock and Alarm Settings
In order to offer consistent clock settings and alarm functions, i277 uses a backup battery system. This means that despite the occurrence of a power failure,
all the settings of i277 will remain saved. For example, after the installation of the Backup Battery, if for some reason the AC cord is disconnected or a power
failure does occur, the display will not remain lit, but the current time and alarm time settings will be temporarily maintained. Otherwise, you must reset the
time and alarm settings. To install Backup Battery, follow the instructions below:
1. First, make sure the connection between the AC adapter and the unit is secure. This is important because during battery replacement it is possible for
all settings to be lost if you already set the clock time and alarm time.
2. Locate the battery compartment on the bottom of the unit and open.
3. Insert 2 “AA” batteries, following the correct polarity that matches the drawings inside the battery compartment. For longer battery life, it is suggested to
use alkaline batteries. Please note that various types of new and used batteries should not be mixed. Alkaline, standard (carbon-zinc) or rechargeable
(nickel-cadmium) batteries should also not be used together.
4. Secure the battery compartment by closing the cover.
YOU CAN HELP TO PROTECT THE ENVIRONMENT!
Please remember to respect the local regulations: Hand in the non-working electrical equipment to an appropriate waste disposal center.
FOR BATTERY
Attention: All batteries must be recycled and disposed of properly.

iLuvTM Stereo Audio System for Your iPod V11M10_IM_EN_11012006
www.i-Luv.com
- 7 -
GETTING STARTED
Installing the Remote Control Battery
The remote control battery has been previously installed and ready for operation for the first time use. When the remote control
stops functioning, you must replace the battery with a new one. To do so, you must first locate the battery compartment on the
side of the remote and follow the three steps below:
1. Squeeze the notch labeled “Tab A” while pulling the “battery door latch B” out towards you. This will allow the battery
holder to release and pop out. Please refer to the picture in the right side.
2. Insert a “CR2025” 3V lithium battery. Make certain to follow the correct polarity, following the directions of the
corresponding symbols (+/-).
3. Secure battery and push the battery holder back into the remote control until it is fully inserted.
Installing the AM Loop Antenna
For AM radio operation, locate the AM antenna jack on the back of the unit, and then plug the AM loop antenna into the connector. To achieve the best
reception possible, it is recommended to have a distance of 12” between the AM antenna, the unit and the iPod.
Installing the Dock Adapter
To guarantee that your iPod will fit properly into the built-in universal dock, we have included several detachable dock adapters for old iPod players with this
product. Please check the bottom of dock adapters to see the compatibility with your iPod.
1. How to insert a dock adapter
a. First choose the dock adapter that corresponds with the type of iPod you would like to dock. Using the correct dock adapter ensures the
proper fit for your iPod.
b. Gently push the dock adapter down into the universal dock.
c. Carefully place your iPod into the universal dock. Please note that iPod must not be in a case or “Skin”.
2. How to remove the dock adapter
a. First remove your iPod, then grasp the dock adapter and lift upwards carefully.

iLuvTM Stereo Audio System for Your iPod V11M10_IM_EN_11012006
www.i-Luv.com
- 8 -
GETTING STARTED
Location of Controls on the Main Unit
1. PLAY / PAUSE 2. iPod / Bluetooth 3. AM/FM
4. VOLUME 5. AUX 6. ALARM 1
7. BluePin 8. Built-in Universal Dock 9. ALARM 2
10. SELECT 11. SLEEP 12. POWER
13. WAKE TO 14. SET TIME 15. SNOOZE/DIMMER
16. LCD Display 17. Battery Compartment 18. Speaker Ports
19. FM Antenna Wire 20. LINE-IN Jack 21. AM Loop Antenna Socket
22. AV-OUT Jack 23. AC Adapter Jack

iLuvTM Stereo Audio System for Your iPod V11M10_IM_EN_11012006
www.i-Luv.com
- 9 -
GETTING STARTED
Location of Controls on the Remote Control
24. POWER Turns i277 ON/OFF or resets alarm when alarm is sounding.
25. AM / FM Chooses radio function.
26. AUX Enables the AUX function.
27. iPod/Bluetooth Chooses iPod/Bluetooth function.
28. / DOWN
31. / UP
Skips to the previous/next track when iPod is playing, or scans current playing track toward
the beginning/end of the track by pressing and holding, In the radio mode, it tunes the radio
stations by pressing and holding.
29. VOLUME - Decreases the volume level.
30. VOLUME + Increases the volume level.
32. PLAY / PAUSE Selects iPod and plays a track. In the play mode, it pauses the playback.
33. SNOOZE / DIMMER Enables the snooze mode when the alarm sounds. Otherwise, it adjusts the strength of the
LCD backlight.
34. SLEEP To set the automatic switch-off time
35. MUTE Mutes the sound
Note: The included remote control commands all of the basic functions on i277. Aim the remote control towards the bottom right corner of the main unit for
the best results. Please note that the provide remote control cannot control the first generation of iPod, and the second generation of iPod.
To install a new battery, please refer to the section “Installing the Remote Control Battery”.
24
25
26
27
28
29
35
34
33
32
31
30

iLuvTM Stereo Audio System for Your iPod V11M10_IM_EN_11012006
www.i-Luv.com
- 10 -
GETTING STARTED
Location of Indications on the LCD Screen

iLuvTM Stereo Audio System for Your iPod V11M10_IM_EN_11012006
www.i-Luv.com
- 11 -
GETTING STARTED
Setting the Clock Time
1. To set the time, first locate the SET TIME button. Press and hold the SET TIME button down until the display begins to flash. Turn the SELECT wheel
to select 24H or 12H. Then press SET TIME button to confirm. Rotate the SELECT wheel until the desired time is displayed. Remember to choose the
correct AM or PM setting.
Note: There is an icon to the right of the time display that signifies PM. Please be aware that there is no AM indicator.
2. To secure the time setting, press the SET TIME button once more to confirm.
3. To set the correct year you may either, rotate the SELECT wheel until the present year is displayed, or you may press the SET TIME button initially to
accept the current setting. Press the SET TIME button once more to secure year setting.
4. At this point, you will see the date display flashing in the lower right corner of the display. Press the SET TIME button to accept the current setting or
turn the SELECT wheel until the current date is displayed. Press the SET TIME button to secure date setting.
Setting the Alarm Time
This unit supports two alarm settings for dual alarm feature.
1. To set the Alarm Time, first press and hold the ALARM 1 or the ALARM 2 button until the display begins to flash. Then rotate the SELECT wheel until
the desired alarm time is displayed, an icon to the right of the time will light up indicating PM, but please take notice that there is no indicator for AM.
2. Press the WAKE TO button and select the option for desired alarm sound: iPod, radio or buzzer.
3. Press the ALARM 1 or ALARM 2 button to pre-set the volume level when the Alarm(s) are activated. Use the SELECT wheel to adjust the volume level
from 1to 40. When the Alarm(s) are activated, the volume will gradually rise from low to the pre-set setting.
4. Press the ALARM 1 or ALARM 2 button once more to exit the alarm setting mode.
Notes:
Now that you have set the Alarm Time, the i277 is now activated and set to wake you up. To ensure this setting, you will see an Alarm Icon appear on
the display. If see Wake Icon need press again Alarm button the Wake Icon show on display few second
Take notice of the adjusted volume level and make sure it is set at an appropriate level for waking up.

iLuvTM Stereo Audio System for Your iPod V11M10_IM_EN_11012006
www.i-Luv.com
- 12 -
OPERATIONAL INSTRUCTIONS
IMPORTANT:
1. Occasionally, files on iPod can become corrupted. This may cause an erratic behavior with your iLuv products. Apple recommends visiting their
website www.apple.com to obtain instructions on resetting or restoring your iPod to factory settings.
2. It is imperative to your iPod and the built-in universal dock that you use the correct dock adapter for your iPod and that the dock adapter fits
appropriately into the built-in universal dock. Ignoring these rules can cause severe damage to your iPod. Please refer to the section “Installing the
Dock Adapter” to install the dock adapter properly before operating i277 with your iPod.
Outputting the Video Signal to an External Monitor or TV
i277 has a feature to output the video signal of your iPod to the external display device, such as TV or a monitor, if your iPod has the ability to play a video.
To do so, please follow the instructions below:
1. Connect the 3.5mm plug of the provided AV cable into the AV-out jack on the rear of i277 and the RCA plugs of the AV cable to the AV input jacks of
the external display device.
2. Turn on the i277 and the external display device. Change the mode of the external display device to the AV mode if necessary.
3. Place your iPod in the built-in universal dock, and change the mode to iPod.
4. Play the video on your iPod.
Note: The line output isn’t affected by the volume setting on the i277. Please use the volume control of the external device to raise or lower the volume level.
The audio signal of i277 in the AV output mode will mute with the volume level “0” and will remain same with volume range from “1” to “40”.
Listening to Your Favorite Songs on iPod
1. In order to listen to music, make sure that iPod is playing and inserted into the built-in universal dock correctly. It will then automatically be turned ON
and music will begin to play. NOTE: If the sound seems inaudible, i277 may not be detecting that iPod is in the play mode. In this case, press the
PLAY/PAUSE button on i277 or the PLAY/PAUSE button on the Remote Control twice for music play to begin.
2. To play music when iPod is already in the dock and in the standby mode, press the PLAY/PAUSE button on i277 or the PLAY/PAUSE button on the
Remote Control. When iPod is in the play mode, an iPod icon will appear on the LCD screen of the i277.

iLuvTM Stereo Audio System for Your iPod V11M10_IM_EN_11012006
www.i-Luv.com
- 13 -
OPERATIONAL INSTRUCTIONS
Listening to Your Favorite Songs on iPod – Continued
3. To pause music, press the PLAY/PAUSE button during the play mode. To resume playback, press it once more.
4. To adjust the volume, either rotate the VOLUME wheel on the i277, or use the VOLUME+ and VOLUME- buttons on the remote control.
5. To go to the Next or Previous track, use the or button on the remote control. To search the current track using high speed forward or rewind,
press and hold the or buttons while track is playing.
6. To power the unit off, press the POWER OFF button on i277 (or on the remote control). If iPod is left in the built-in universal dock, it will continue to
charge.
7. This unit may not operate while in the pause mode. Press the PLAY/PAUSE button on i277 or on iPod to initiate the play mode.
Charging Your iPod
Your iPod will always be CHARGING, until reaching the FULL CHARGE mode while it is in the built-in universal dock. Please note that this unit cannot
charge iPod without 30-pin connector.
Listening to Other Audio Devices
You can still listen to the first and second generations of iPod, or any other audio player that is not an iPod, with i277 by simply using the LINE-IN jack,
located on the rear of i277. Please ensure that before using the LINE-IN jack there is no iPod in the built-in universal dock.
1. Insert the plug of the audio patch cord (not included) into the HEADPHONE or LINE-OUT jack on your audio device, and then insert the other end of
the patch cord into the LINE-IN jack, located on the rear of i277.
2. To get into the AUX mode, press the AUX button on i277, or the AUX on the Remote Control, until the AUX icon appears.
3. At this point it is safe to turn ON your device and enjoy the music.
4. Use the VOLUME wheel on the i277, or the Volume + and Volume – buttons on the Remote Control to adjust the decibel level. You may also need to
adjust the audio device volume if with HEADPHONE jack output
5. To power OFF the unit, press the POWER button on i277 (or on the Remote Control). Please don’t forget to power off your audio device too.

iLuvTM Stereo Audio System for Your iPod V11M10_IM_EN_11012006
www.i-Luv.com
- 14 -
OPERATIONAL INSTRUCTIONS
Listening to Your Favorite Radio Station
For the best FM radio clarity, you should fully extend the pig-tail wire antenna, located on the rear of i277. It is important not to alter, obstruct or attach to
other antennas to this wire antenna. To achieve the best AM reception possible, it is recommended to have a distance of 12” between the AM antenna, the
unit and iPod. Rotate the AM loop antenna to have the better reception.
1. To turn the radio on, press the AM/FM button on i277 (or on the Remote Control). Once on, the radio frequency will appear in the lower right corner of
the display.
2. To select the AM or FM band, press the AM/FM button again on i277 (or on the Remote Control).
3. To tune in the desired station, rotate the SELECT wheel on i277 (or use the or buttons on the Remote Control).
4. To automatically scan to the next clear station, press and hold the or buttons on the Remote Control for 4 seconds. Press it again to enter into the
seek mode.
5. To adjust the volume, rotate the VOLUME wheel on i277 (or the VOLUME+ and VOLUME- buttons on the remote control).
6. To power OFF the unit, press the POWER OFF button (or the POWER ON/OFF button on the Remote Control).
Using the Alarm Function
1. To preview the alarm time, press the ALARM 1 or ALARM 2 buttons once.
2. To change the sound mode, press the Wake-To button.
3. To activate or deactivate the alarm, press the ALARM 1 or ALARM 2 buttons once more.
4. To snooze, press the SNOOZE / DIMMER button on i277 (or on Remote Control), following the sounding of the alarm. The alarm will then shut off and
will return again in approximately 9 minutes. You will have the opportunity to repeat this cycle many times during the1 hour allotted alarm cycle.
5. To turn the alarm off, press the POWER button on i277 (or the POWER ON/OFF button on the Remote Control). If all settings remain the same, then
the following day at the same time the alarm will turn on. In the case where the alarm is not turned off after it sounds, it will then play for an estimated
60 minutes, and then turn off automatically. This cycle will repeat every 24 hours unless the controls are changed.

iLuvTM Stereo Audio System for Your iPod V11M10_IM_EN_11012006
www.i-Luv.com
- 15 -
OPERATIONAL INSTRUCTIONS
Using the Alarm Function - Continued
6. To stop the alarm from coming on daily, press the ALARM 1 or ALARM 2 buttons and set to off. Both the Alarm Icon and Wake-to icon will disappear to
signify that the alarm is deactivated.
Note:
Set iPod to the repeat mode if you’ve selected Wake To iPod, and your iPod has less than one hour of songs.
If you have selected the Wake To iPod setting, yet no iPod is present or there is no music on the iPod at the alarm time, i277 will automatically switch
to the buzzer mode.
Adjusting the Brightness of LCD Screen
To adjust the brightness of the LCD screen, press the SNOOZE / DIMMER button during normal operation. Each press will change the brightness level of
the LCD screen.
Setting the Sleep Time
1. To enter into the sleep mode, while the i277 is off or while listening to your iPod or the radio, press the SLEEP button. The unit will automatically turn off
after the selected time. The sleep mode also has a feature called the “Gentle Sleep”, which features volume that decreases gradually.
2. To adjust the sleep time, press the SLEEP button again and choose from 15 to 120 minutes. Pressing the SLEEP button while the sleep function is set
to 15 minutes will turn off the unit.
3. To view the sleep time, wait until the display changes back to the real time, and then press the SLEEP button once. It will show the sleep time
remaining. Pressing it again will change the sleep time to the next lowest increment.
4. To stop listening at any time, press the POWER button or the POWER ON/OFF button on the Remote Control.
Note: i277 has the independent volume settings for the sleep mode without affecting the alarm volume. The sleep volume will remain at that level until the
setting is changed.

iLuvTM Stereo Audio System for Your iPod V11M10_IM_EN_11012006
www.i-Luv.com
- 16 -
MAINTENANCE & TROUBLESHOOTING GUIDE
Maintenance
Place the unit on a level surface away from sources of direct sunlight or excessive heat.
Protect your furniture when placing your unit on a natural wood and lacquered finish. A cloth or other protective material should be placed between it
and the furniture.
Clean your unit with a soft cloth moistened only with mild soap and water. Stronger cleaning agents, such as Benzine, thinner or similar materials can
damage the surface of the unit.
Troubleshooting
Symptom Possible Problem Solution
The unit gets warm after operation. This is normal. Lower the volume or power off the unit and let it rest.
The AC adapter may not be inserted securely into
the wall outlet or into the power supply jack located
on the back of the unit.
Insert the AC adapter fully into a wall outlet and then plug
the connector into the supply jack on the unit.
i277 does not turn on.
Wall outlet is not functioning. To confirm the outlet is functional, plug another device into
the same outlet and see if it operates correctly.
Using incorrect dock adapter for your iPod. Be certain that the dock adapter is correct for your iPod.iPod does not fit into the built-in
universal dock.
iPod was not secured properly. Take your iPod out of the dock. Look for any obstructions on
the connector in the dock and on your iPod. Once completed
and everything is secured, place your iPod back into the
built-in universal dock.

iLuvTM Stereo Audio System for Your iPod V11M10_IM_EN_11012006
www.i-Luv.com
- 17 -
MAINTENANCE & TROUBLESHOOTING GUIDE
Symptom Possible Problem Solution
iPod was not secured properly. Take your iPod out of the dock. Look for any obstructions on
the connector in the dock and on your iPod. Once completed
and everything is secured, place your iPod back into the
built-in universal dock.
Your iPod software may be outdated. Upgrade software on your iPod. For details visit
http://www.apple.com/iPod/download
iPod is locked up or frozen. Check that your iPod is operating properly before putting into
the dock. Please refer to your iPod manual for reference.
Using 1st and 2nd generation iPod, iPod shuffle or
other devices.
i277 cannot control the recognition of other iPod or various
types of players.
iPod is not recognized.
iPod is in Pause mode Press the PLAY/PAUSE button on i277 or iPod.
iPod is not secured properly. Take your iPod out of the dock. Look for any obstructions on
the connector in the dock and on your iPod. Once completed
and everything is secured, place your iPod back into the
built-in universal dock.
iPod is not charged even though it
was in the dock.
iPod is locked up or frozen. Check that your iPod is operating properly before placing it
in the dock. Please refer to your iPod manual for reference

iLuvTM Stereo Audio System for Your iPod V11M10_IM_EN_11012006
www.i-Luv.com
- 18 -
MAINTENANCE & TROUBLESHOOTING GUIDE
Symptom Possible Problem Solution
There is no sound on the external
speakers when connected by the
audio patch cable.
Speakers lack the power source. The signal from LINE IN/OUT jacks needs to be amplified.
Use the active speakers or another amplified audio device.
There is radio, but the AM band is
not functioning.
The AM loop antenna is not connected securely to
the unit.
Insert the AM loop antenna connector to the jack on the
back of the unit.
AM band radio is very noisy. The AM loop antenna is not connected securely to
the unit
Rotate the AM loop antenna and keep away from the main
unit for the best reception.
Volume level on the device or the i277 is set too
high.
Decrease the volume.Sound is distorted.
Sound source is distorted. If the iPod original sound source (MP3) is of poor quality,
distortion and noise are easily noticed with high-power
speakers. Try a different audio source such as a music CD
to test.
Batteries are weak and outdated. Change current battery with new battery.Remote Control does not operate.
Remote control aimed away from the i277. Move within 10 feet of the unit and then point the remote
control toward i277.

iLuv is a trademark of jWIN Electronics Corp. iPod is a trademark of Apple Computer Inc. All logos and brands are property of their respective owners. iPod
is not included in this package. Features and specifications are subject to change without prior notification.
© 2006 jWIN Electronics Corp. All rights reserved. No portion of this printing material or product enclosed herewith including design, shape and graphics,
may be not reproduced or transmitted in any form without the expressed written consent of jWIN Electronics Corp. by any means, electronics or mechanical,
including photocopy, recording or information storage and retrieval system. Any unauthorized distribution or reproduction of this printing material or product,
or any portion there of, will be prosecuted to the fullest possible extent of the law. iPod is not included with this product.
TEL: 516-626-7188
FAX: 516-626-7105
website: www.i-Luv.com
Other manuals for i277
1
Table of contents
Other Iluv Docking Station manuals