ILVE IVN900X Configuration guide

RangeHoods
GeneralManual
For Models: IVN900X, IVN900N, IVCC900X, IVCG900, IVSG900
IVG901X

1
IMPORTANTSAFETYINFORMATION
**Readthecompletemanualcarefullybefore installation**
IntendedforDomestic KitchenUse Only
Warnings:
TOREDUCETHERISKOFFIRE,ELECTRICALSHOCKORPERSONALINJURY,
PLEASEOBSERVETHEFOL-LOWING:
1.Installationandelectricalworkmustbedonebya qualifiedpersoninaccordancewithall
ap-plicablecodesandstandards
2.If thesupplycordisdamaged,itmustbereplacedbythemanufacturer,itsserviceagent
orasimilarlyqualifiedpersontoavoidahazard.Any modificationsthatmayberequiredto
theelectricalsystemfortheinstallationoftherangehoodmustonlybemadebyqualified
electri-cians.
3.Beforeservicingorcleaningunit,switchpoweroffattheservicepanel.Lockpanelto
preventpowerfrombeingswitchedonaccidentally.
4.Usethisunitonlyinthemannerintendedbythemanufacturer.
5.Whencuttingordrillingintowallorceiling,becarefullytodonotdamageexisting
electricalwiringandotherhiddenutilities.
6.Ductedfansmustalwaysbeventedtotheoutdoors.
7.Thisunitmustbegrounded.

2
CAUTION
1.Toreduce theriskoffireand toproperlyexhaustair, besuretoductair
outside. Donotventexhaustairintospaceswithinwallsorceilingorintoattics,
crawlspacesorgarages.
2.Takecarewhenusingcleaningagentsordetergents.
3.Avoidusingfoodproductsthatproduce flamesundertherangehood.
4.Therangehoodmustonlybeusedfortheexhaustofcookingfumesinhome
kitchens.Themanufacturerdisclaimsallliabilityforanyotheruseofthe
appliance.
5.Twoinstallersarerecommendedbecauseofthelargesizeand weightofthis
hood.
6.Usewithapprovedcord-connectionkitonly.
7. Pleasereadspecificationlabelonproductforfurtherinformationand
requirements.
8. Donotflambeundertherangehood.
9.
Two installation screws are required to prevent the hood falling down.Two installation screws are required to prevent the hood falling downTwo installation screws are required to prevent the hood falling down

3
INSTALLATIONINSTRUCTIONS
BeforeYouStart...
1.Readthismanualcarefullyandcompletely.
2.Therangehoodsconformtorelatedappliancesstandards. Pleasecheckyourlocal
building codesforanyadditionalrequirements.
3. Theappliance hasbeenmanufacturedasclassI,there-foregroundconnectionis
necessary.Therangehoodmustbeinstalledsothatthattheplug iseasilyaccessible.
1. Measurethefloortoceilingheight.Thishood
canbeinstalledonwallsbetween8 (203mm)and
9(229mm)tall.
2.Find thecentrepointofyouropening.Marka
plumblinethroughthispointfromceilingtoyour
range/cook-top.
3.Checkyourrange/cook-topUserManualforthe
minimumdistanceaboveyourcookingsurface.
Theminimumdistancebetweenanyelementor
flameheightand thenearestcombustiblesurfaceis
650mm.
4.Decidedwheretheductworkwillrunbetween
thehoodandtheoutside.Short,straightductruns
will providethemostairflow.
5.If theunitisinstalledwithducting(i.e.notin
re-circulatingmode)plsremovethecharcoalfilter.
Unpacking
Removethepackagingwiththeproductinplace.Cutoff thepackingribbonsand carefullycut
openthepackaging (donotcuttoo deeply),removethepackaging.Checkthattheproductisfree
fromtransportdamage.Anydamageshall bereportedimme-diatelytothecarrierorseller.
Damage, faultsand missingpartsmustbereportedimmediatelytotheseller.
PlanningYourInstallation

(1)
(2)
(3)
(4)
(5)
DD
EE
FF
Installin
g
theDuctwork
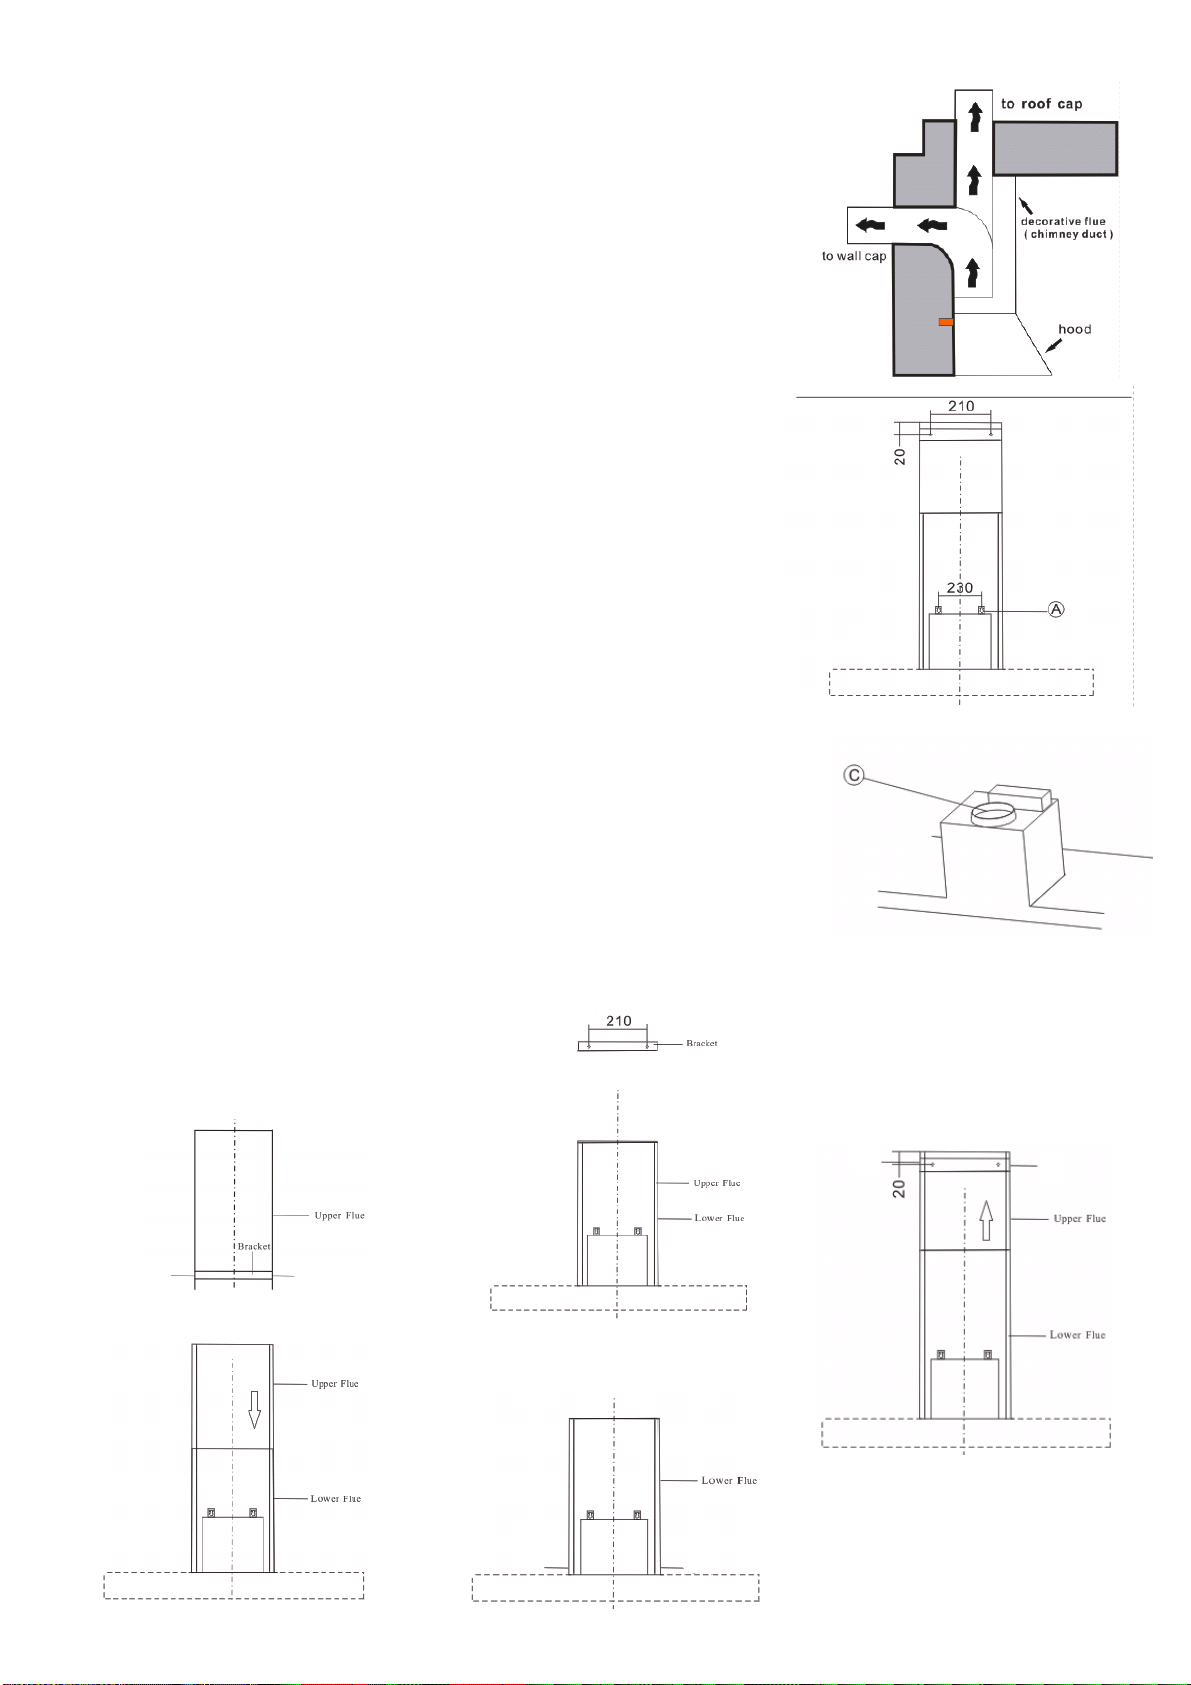
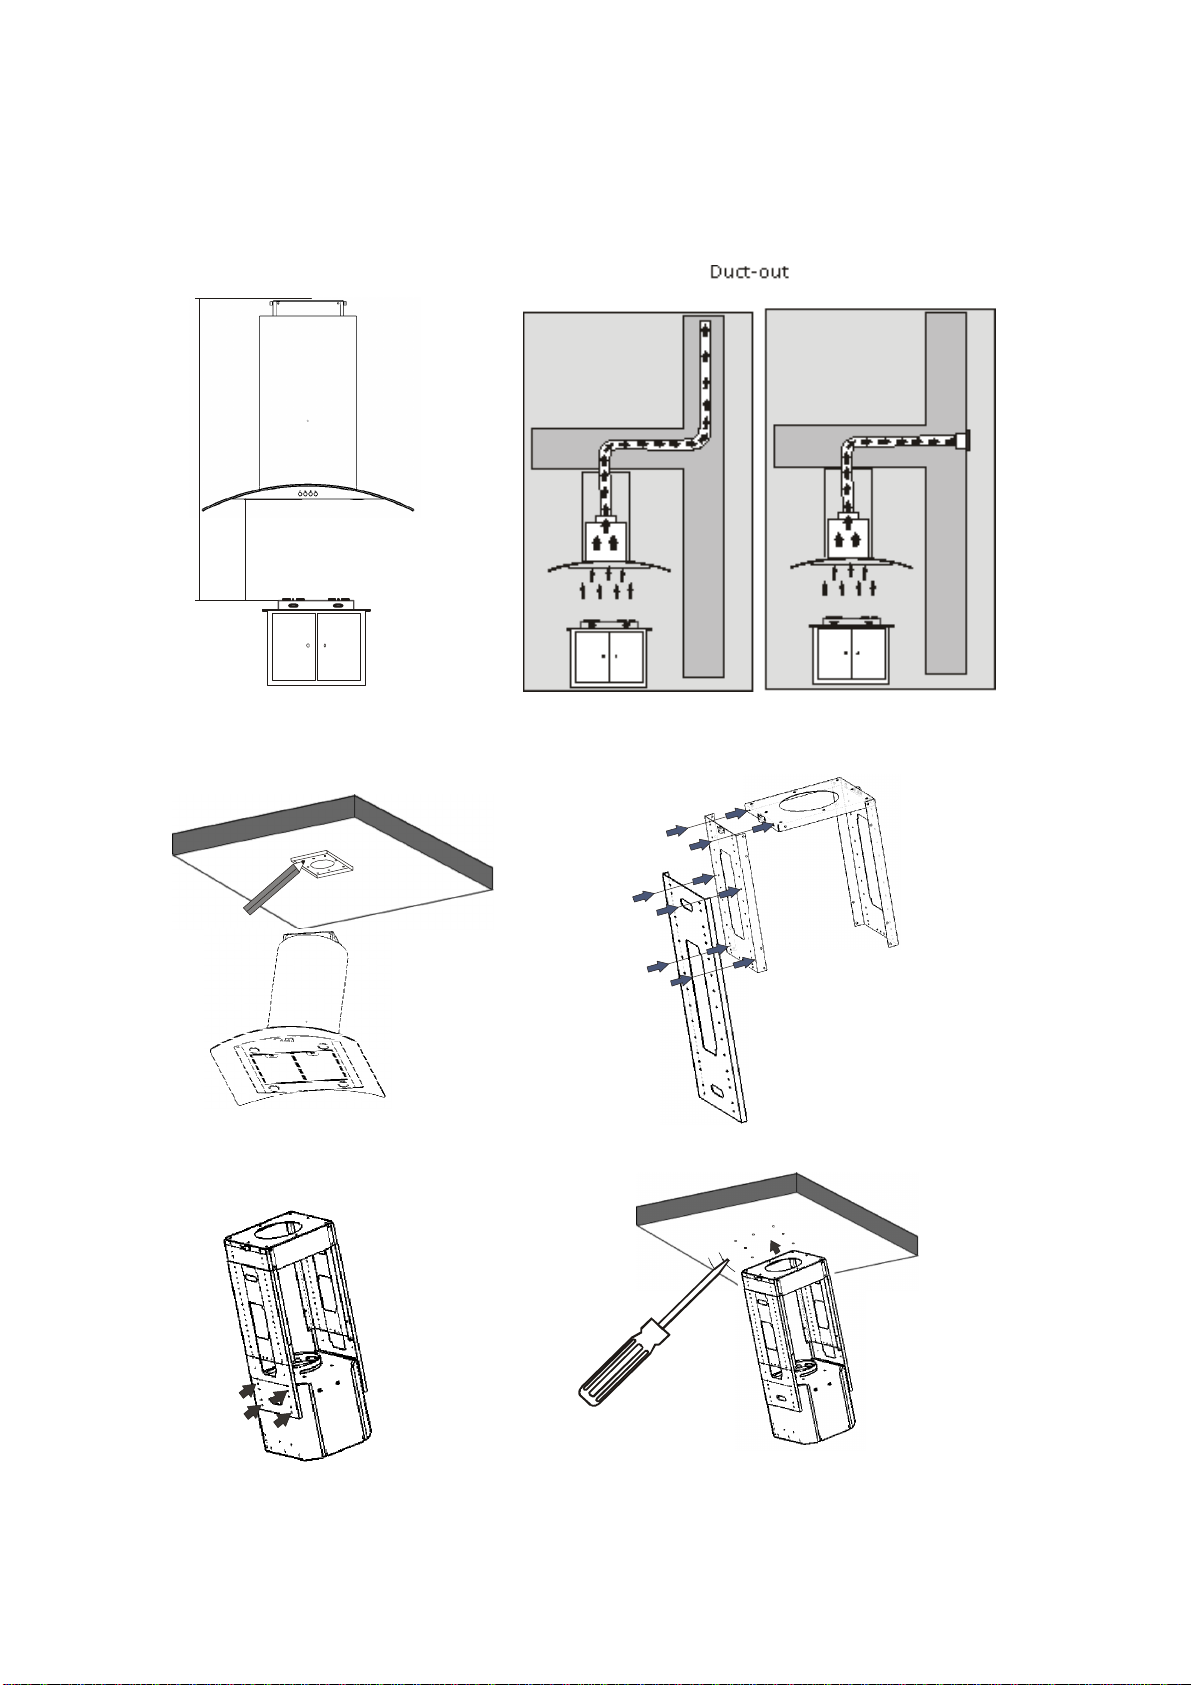
1.Planwheretheductworkwillrunbetweenthehoodandtheoutside.Thehoodsexhaust
verticallybutcanbeductedtotherearbehindthechimneyductthroughanoutsidewall or
verticallyup throughtheceiling totheroof. Ashortstraightductrunwillproduce themost
airflow. Lengthand elbowswill reduce theefficiencyoftheblower.
2. Installarooforwall cap. Connecta6 round metalducttothecapandworkbackwards
towardthehood. Ensurejointsarecompletelysealedwithducttape.
Fixin
g
totheWall
1. Beforemountingthehood, pluginand testallfunctionsforproperoperation.
2.Removedthefiltersfromthebottomof thehoodtopre-ventdamageduring the
installation.
3. Withassistance,holdthehoodtemporaryinpositionensuringthebottomisabovethe
minimumclearance forthecookingsurface.Markonthewall theholesforthetwo
mountingscrews.
4.Drilltheholes(A)at thedistancesindicated.Usetheappropriatescrewsandscrew
anchorsforyourwall type(e.g.reinforcedconcrete, drywall,etc.).Ifnecessary,prepare
backwall withcross framingforsecureinstallation.
5. Mountthehoodonthewallscrews.Alignitinahori-zontalpositionrelativeto
cabinets.Whenthehoodhasbeenadjusted,secureunitbytighteningscrews(A).
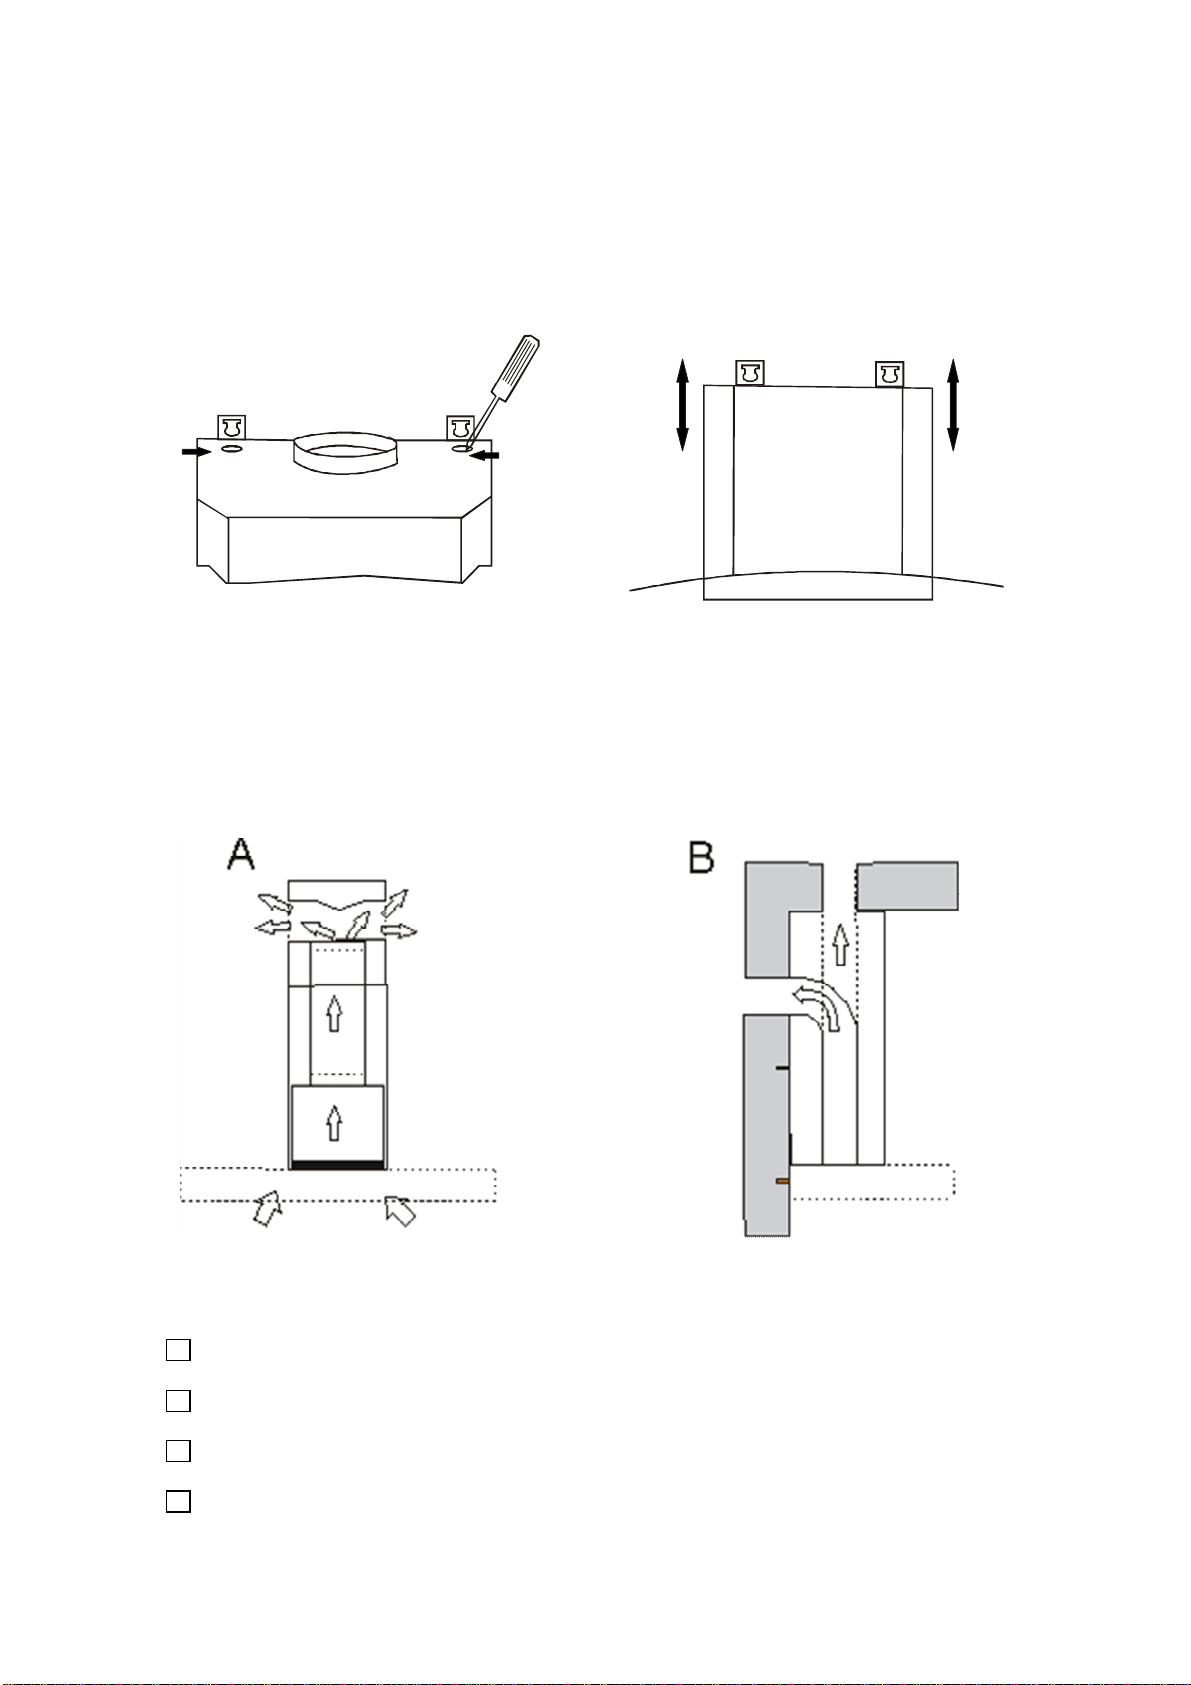
6.Connecta6 metalducttube(notincluded) totheexhaustpiece usingducttapeon
allseals. (C)
Fixin
g
the Fixi
ng
theFlues
1.Fixonefluebracket tothescrewholes(D)atthelowerendof theupperflue,tomake
suretheupperfluewill notdistortduring&aftertheinstallation (Thisstepisoptional
and recommendedforheightover700mm from bottom of thehoodtotheceiling).
2. Inserttheupperflueinsidethelowerflue.
3.Measureandmarktheheightatwhichtheupperflueshallbemountedonthewall,fix
theotherfluebracketonthewallattheheightmarked.
4. Fixthelowerfluetothehoodthroughscrewholes(E).
5.Bringup theupperflueandfixitthroughscrewholes(F)tothefluebracketonthe
wall
4

5
InstallationGuideline
allMounted -
1200~1700mm
650~700mm
Island hood step 1
Island hood step 2
Island hood step 3
Island hood step 4
Note:Theaboveinstallationguidelineisforreference only,pleaseyourcontactlocal
dealerforinstallationservices.

6
LevelingDevice
Whenmountinghoodonthewall, thelevelcanbeadjustedbyturningthetwoscrewsonthe
motorhousing.
InstallationAlternatives
Thecookerhood canbeinstalledinthefollowingways:
Circulatingindoorair(A)
Outdoorventing(B)
REMEMBER!
Thedistance betweenthetop ofthehob andthelowestpartofthecookerhoodmustbeat
least65cm.
Ifatwo-partconnectiontubeisused,thelowersectionmustsitoutsidetheupper
sec-tion.
Donotconnectthecookerhood exhausttoaductusedtocirculatehotairorventsteam
fromanotherappliance.
Alwaysuseprotective gloveswheninstallingtheappliance!

7
USEAND CAREINSTRUCTIONS
Operations
1.Foroptimumperformance inremovingcookingodors,itisrecommendedthatyou
turnonyourrangehood priortocookingandyouleave it operatingfor15min-utesafter
cooking.
2.Cleanthesurfacesoftherangehoodregularlyusinganon-abrasive detergent.
3.Theanti-greasefilterscapture thegreaseparticlessus-pendedintheair. They will
accumulategreaseanddirtdependingonthefrequency oftheuseofyourrange/cook top.
4. Inordertopreventafirehazard, itisrecommendedthatyoucleanthealuminumfilter
atleastevery2months
WARNINGS:Donotattempttoremove thefil-ters whiletheRangeHoodisoperating.
Disconnecttheelectricalplugpriortoanymaintenance.
Thisappliance isnotintendedforuseby persons(includingchildren)withreduced
physical, sensoryormentalcapabilities,orlackofexperience andknowledge, unless they
have beengivensupervisionorinstructionconcerninguseoftheappliance byaperson
responsiblefortheirsafety.Childrenshouldbesupervisedtoensurethatthey do notplay
withtheappliance.
.
Thereshouldbeadequateventilation intheroomwhentheRangeHood isusedatthe
sametimeasotherfuelburningappliances.
CAUTION:Accessiblepartsmaybecomehotwhenusedwithcookingappliances.
Theairmustnotbedischargedintoafluethatisusedforexhaustingfumesfrom
appliancesburninggasorotherfuels.
Regulationsconcerningthedischargeofairhave tobefulfilled

8
DescriptionofControls
A. Slidecontrol
Motor ON/OFF
LIGHT
TIMER/TURBO SLIDE CONTROLLER DIGITDISPLAY
Motor:
Touchshorttime-blueindicatorflash:defaultsetinspeed1, byslidecontrolcanadjustto
speed2, 3
Afterstopononespeedlevel, thelightwillflash10sec.
Light:
Touchshorttime-blueindicatorflash-defaultsetin25%lux, -byslidecontrolcanadjustto,
25%, 50%, 75%&100%available.
Timer(Delay-offFunction)
Touchshorttime-blueindicatorflash-byslidecontrolcanadjustto, 5,10, 15, 20mindelay
off functionavailable.
B.TouchControl
( For models: IVN900X, IVN900N, IVCC900X ):

9
C. Pushbuttoncontrol
E. ElectriccontrolwithLCD screen
LIGHTON/OFF
TIMESETTING LCD SCREEN MOTORON/OFF
TIMERDELAYOFF
SETINCREASE SETDECREASE
( For models: IVCG900, IVSG900, IVG901X ):
D. Electronic switch control
1). Push "Light" button, the lights will be on (Indicating light in "Light" button is on).
2). Push "1" button, the motor will run at low speed (Indicating light in "1" button is on).
3). Push "2" button, the motor will run at middle speed (Indicating light in "2" button is on).
4). Push "3" button, the motor will run at high speed (Indicating light in "3" button is on).

10
CAREAND CLEANING
General
Regularmaintenanceisrequiredtoensurethat
thecookerhoodfunctionsproperly.Thisis
espe-ciallytrueofthegreaseand charcoalfilters.
Cleanthefanandothersurfacesofthecooker
hoodregularlywitha clothdippedindenatured
alcoholora non-abrasiveliquidcleaner.
Thecharcoalfiltercleansthecirculatingairin
theroom. Suchfilterscannotbecleanedor
recycledandmustbereplacedatleasteveryfour
months.Thespeedatwhichthecharcoalfilter
becomessaturateddependsonhowoftenthefan
isused, thetypeoffoodthatiscookedandhow
oftenthegreasefilteriscleaned.
Topreventtheriskoffireandtoensurethatthe
cookerhoodfunctionsproperly, thegreasefilter
mustalwaysbecleanedasinstructedbelow
whenthedisplayindicatestheneedoratleast
everytwomonths.
*Thereisafireriskifcleaningisnotcarried
outinaccordance withtheinstructions.
Cleaningthegreasefilter
Removethefilterfromthecookerhoodand
cleanitina solutionofwaterand neutral
cleaningliquid. Leavethefiltertosoakinthe
solutionfora while.
-Rinsethoroughlywithhotwaterand leavethe
filtertodry.
-Thefiltercanalsobecleanedina dishwasher.
Thecolorofthegreasefiltermaychangeaftera
fewwashes.Thisisnormal.
NB:
Ifyoucleanthegreasefilterinthe
dishwasher:loadonlythegreasefilterand
nootheritemsasfood particlesfromdishes
canfasteninthefilter.
Replacingthecharcoalfilter
(standardhood)
Replacethecharcoalfilter(standard
hood)asfollows:
Removethegreasefilter.
Squeezetheclipsonthecharcoalfiltera
pull thecharcoalfilterbacktoremoveit.
Replacingthecharcoalfilter(for
hoodwithslopingsurface)
1.Press themiddleoftherightedgeof
theglass covertoopenit
2.Removethegreasefilter
3.Squeezetheclipsonthecharcoalfilterand
pull thecharcoalfilterbacktoremoveit.

1
Emptying andcleaning theoil collector(Forthosemodelsfittedwithoilcollector)
Thefanisfittedwitha oilcollectorthatcollectsoilfromthefanbladesand fanhousing.
1.Removethegreasefilterand thecharcoalfilter(iffitted).
2.Removetheoilcollectorand cleanitinwarmwaterwithwashingup liquid. Itcanalsobe
cleanedina dishwasher.
DO NOTletdirtbuild up onthehood
DO NOTusesteelwoolorsteelbrushestocleanthehood
DO NOTleavesalt solutions, disinfectants, bleachesorcleaning compoundsonthehoodfor
any lengthoftimeastheymaydamagethestainless steel. Rinseafterusewithcleanwater
and wipedrywitha cleancloth.
Replacingthebulbs
Dependingonyourmodelofhood, therearetwopossibletypesoflighting, halogenandLED.
Theilluminationisdesignedforuseduringcookingand notforprolongedgeneral
illuminationofyourkitchen. Prolongeduseofthelightsmayreducethelifetimeofthebulbs.
WARNING:Donottouchorchangelightbulbs whilethehoodisoperating. Wait
until thebulbhascooledbeforeremoving.
Useonlythesamebulbsastheoriginalspecification. Re-placementlightsareavailable
throughthedealers.
HalogenandLEDLights.
Withthegreasefilterremoved, frominsidethehood press thelightfixtureoutofitsmounting
bracket. Unplugthelightfromthewiringharness.Avoiddirectcontactbetweenthelensesand
yourhands.
Replacethedamagedlampbyreversingthesteps. Snapinplace.
Replacethebulbsasfollows:
Halogenlights:
1.Liftup and removethelightfittingwitha screwdriverorothersuitabletool.
11

2.Removetheblownhalogenbulb(ifthefanhas4bulbs=10W, 2bulbs=20W).
Rememberthatthebulbcanbehot!
3.Insertthenewhalogenbulb.
If youtouchthehalogenbulbwithyourbarehandsthismayreduceitsservicelife.Always
usea gloveoraclothtoavoiddirectcontact.
LEDlights:
1.Withthegreasefilterremoved, frominsidethehood press thelightfixtureoutofits
mountingbracket.
2.Unplugthelightfromthewiringharness.Avoiddirectcontactbetweenthelenseandyour
hands, thenreplacewitha newone
3. Pushthelightintoitsmountingbracket.
NB:
Thelightisonlymeantforuseduringcookingand notforilluminatingthesurroundingsfor
longerperiods. If thelightisusedforlongerperiods, thiswill considerablyshortentheburn
timeofthebulbs.
Recycling
ThisappliancecomplieswithEuropeanCommunitydirective2002/96/EC, WasteElectrical
and ElectronicEquipment(WEEE). Byensuringthatthisproductisrecycledresponsibly, the
userhelpspreventpossiblenegativeimpactontheenvironment.
NB:
Disposeofthisproductresponsibly. Irresponsibledisposalcanresultinnegative
environmentalimpactorpersonalinjury.'
Undernocircumstancesmaythisextractorfanbedisposedofashouseholdwaste. Itmustbe
takentoa recyclingcentreforelectricaland electronicequipment.
Thisproductmustbedisposedofinaccordancewithlocallegislation.
Formoreinformationondisposal, recycling andreuseofthisproduct, contactyourlocal
authority, yourhouseholdwastecollectionserviceorthestorewhereyoupurchasedthe
product
12

13
TroubleShootingGuide
Problem PossibleReason Solution
Noelectricalsupply. Checktheplugisconnect-ed.
Checktheplugisconnect-ed.
Hooddoesn'tturnon. Powercordisdamaged Contacttechnicianservice
Aluminumgreasefiltersclogged Cleanthefiltersand replace
whendry.
PoorAirflow Charcoalfiltersclogged.
Re-circulatingmodeonly. Replacethecharcoalfilters.
Hoodisvibrating Hoodisnotsecuredinplace Checktheinstallationofhood.
Tightenmountingscrews.
Motorrunningbutno
airflow Butterflyvalvejammed. Contacttechnicianservice
Hightemperaturesafetydevice
activated. Thekitchenisnotsufficiently
ventilated.Motorstopsaftera few
minutes Thehoodisinstalledtoonearthe
cookingsurface. Thehoodmustbeatleast
650mmfromthestove
Fanspeedtoolow Useoneofthehigherset-tings.
Strong cooking smell. Charcoalfiltersnotinstalled. Inre-circulating mode,
char-coalfiltersmustbe
installed.
Oildrippingonto
stove. Aluminumgreasefilter
satu-rated. Washthealuminumgrease
filters
Whirringsound Somethingincontactwithfan
blade. Contacttechnicianservice
Lightsareworkingbut
fanisn't Contacttechnicianservice
Fanisworkingbut
lightsarenot Contacttechnicianservice
GUARANTEE AND SERVICE!
Beforebookinga servicecall, readtheTroubleShootingGuideabove, formoreinformation
onguaranteeandserviceconditions, pleasecontactlocaldealer.

ILVE LIMITED WARRANTY
Eurolinx Pty Limited A.B.N. 50 001 473 347 trading
as ILVE (“ILVE”)
Oce: 48-50 Moore Street, Leichhardt N.S.W 2040
Post: Locked Bag 3000, Annandale, N.S.W 2038
P: 1300 MY ILVE (694 583)
WARRANTY REGISTRATION
Your ongoing satisfaction with your ILVE product is
important to us. We ask that you complete the enclosed
Warranty Registration Card and return it to us so that
we have a record of the ILVE products you purchased.
Alternatively you can register on line (see registration
card for details)
PRIVACY
ILVE respects your privacy and is committed to
handling your personal information in accordance with
the National Privacy Principles and the Privacy Act 1988
(Cth). A copy of the ILVE Privacy Policy is available at
www.ilve.com.au. ILVE will not disclose any personal
information set out in the Warranty Registration Card
(“Personal Information”) without your consent unless
required by:
1. law;
2. any ILVE related company;
3. any service provider which provide services to ILVE
or assist ILVE in providing services (including repair
and warranty services) to customers. Our purpose in
collecting the Personal Information is
to keep a record of the ILVE product purchased by you,
in order to provide a better warranty service to you in
the unlikely event that there is a problem with your ILVE
product. ILVE may contact you at any one or more of
the address, email address or telephone numbers set
out in the Warranty Registration Card. Please contact
ILVE on 1300 694 583 should you not wish to be
contacted by ILVE.
WARRANTY
1. Warranty
ILVE warrants that each ILVE product will remain, for
a period of twenty four (24) months computed from
the date of purchase of the ILVE product, free from
defects arising in the manufacture of the ILVE product
(“Warranty”). Except for consumer guarantees set
out in the Competition and Consumer Act 2010 (Cth)
(“Act”), ILVE does not make any further warranties or
representations in relation to ILVE products.
2. What is not Covered by the Warranty.
The Warranty does not apply if an ILVE product is
defective by a factor other than a defect arising in the
manufacture of the ILVE product, including but not
limited to:
(a) damage through misuse (including failure to
maintain, service or use with proper care), neglect,
accident or ordinary wear and tear (including
deterioration of parts and accessories and glass
breakage);
(b) use for purpose for which the ILVE product was not
sold or designed;
(c) use or installation which is not in accordance with
any specied instructions for use or installation;
(d) use or operation after a defect has occurred or been
discovered;
(e) damage through freight, transportation or handling in
transit (other than when ILVE is responsible);
(f ) damage through exposure to chemicals, dusts,
residues, excessive voltage, heat, atmospheric
conditions or other forces or environmental factors
outside the control or ILVE;
(g) repair, modication or tampering by the purchaser or
any person other than ILVE, an employee of ILVE or an
authorised ILVE service contractor;
(h) use of parts, components or accessories which have
not been supplied or specically approved by ILVE.
(i) damage to surface coatings caused by cleaning or
maintenance using products not recommended in the
ILVE product handbook provided to the purchaser upon
purchase of the ILVE product;
(j) damage to the base of an electric oven due to items
having been placed on the base of the oven cavity or
covering the base, such as aluminium foil (this impedes
the transfer of heat from the element to the oven cavity
and can result in irreparable damage); or
(k) damages, dents or other cosmetic imperfections not
aecting the performance of the ILVE in respect of an
ILVE product purchased as a “factory second” or from
display. The Warranty does not extend to light globes
used in ILVE products.
3. Domestic Use
Each ILVE product is made for domestic use. This
Warranty may not extend to ILVE products used for
commercial purposes; under those circumstances the
warranty period is limited to 3 month.
4. Time for Claim under the Warranty
You must make any claim under this Warranty within
twenty eight (28) days after the occurrence of an event
which gives rise to a claim pursuant to the Warranty, by
booking a service call on the telephone number below.
5. Proof of Purchase
Customers must retain proof of purchase in order to be
eligible to make a warranty claim in respect of an ILVE
product.
Continued over...

6. Claiming under the Warranty
Customers will bear the cost of claiming under this
Warranty unless ILVE determines the expenses are
reasonable, in which case the customer must claim
those expenses by providing written evidence of
each expense to ILVE at the address on the Warranty
Registration Card.
7. Statutory Rights
(a) These terms and conditions do not a ect your
statutory rights.
(b) The limitations on the Warranty set out in this
document do not exclude or limit the application of the
consumer guarantees set out in the Act or any other
equivalent or corresponding legislation in the relevant
jurisdiction where to do so would:
(i) contravene the law of the relevant jurisdiction; or
(ii) cause any part of the Warranty to be void.
(c) ILVE excludes indirect or consequential loss of any
kind (including, without limitation, loss of use of the
ILVE product) and (other than expressly provided for in
these terms and conditions) subject to all terms,
conditions and warranties implied by custom, the
general law, the Act or other statute.
(d) The liability of ILVE to you for a breach of any
express or non-excludable implied term, condition or
warranty is limited at the option of ILVE to:
(i) replacing or repairing the defective part of the ILVE
product;
(ii) paying the cost of replacing or repairing the defective
part of the ILVE product;
(iii) replacing the ILVE product; or
(iv) paying the cost of replacing the ILVE product.
(e) Our goods come with guarantees that cannot be
excluded under the Australian Consumer Law.
You are entitled to a replacement or refund for a major
failure and for compensation for any other reasonably
foreseeable loss or damage. You are also entitled to
have the goods repaired or replaced if the goods fail
to be of acceptable quality and the failure does not
amount to a major failure.
8. Defects
Any part of an ILVE product deemed to be defective and
replaced by ILVE is the property of ILVE. ILVE reserves
the right to inspect and test ILVE products in order to
determine the extent of any defect and the validity of a
claim under the Warranty.
*To locate your closest ILVE authorised service agent
please contact ILVE on 1300 649 583, customercare@
eurolinx.com.au or visit
http://ilve.com.au/support/service/
IMPORTANT!
All warranty service calls must be booked via
the customer care department. The team can
be contacted on 1 300 85 64 11 option 1 or
customercare@eurolinx.com.au
Service is delivered through a network of Service
Agents. If the Appliance is located outside our
normal Service Area of our agents you, t he
Customer will need to bear the cost of travel outside
that area.
If you are unable to provide proof of purchase, the
fault is not covered under warranty or the product
is found to be working to specication you may be
required to bear the full cost of the service visit
08042016
ILVE LIMITED WARRANTY
Please complete and send to ilve at: REPLY PAID 83617
LEICHHARDT NSW
2040
Last Name: First Name:
Address:
State: Postcode: Email:
Home Phone: Mobile:
Purchase Date: / / (Please attach proof of purchase to validate warranty)
MODEL NUMBER SERIAL NUMBER
(if you cannot locate the serial number please call ILVE on 1300 85 64 11)
1
2
3
4
WARRANTY REGISTRATION CARD
08042016
This manual suits for next models
5
Table of contents
Other ILVE Ventilation Hood manuals

ILVE
ILVE CU-79 User manual

ILVE
ILVE IVX45/60 User manual

ILVE
ILVE HU Series User manual

ILVE
ILVE C 90 User manual

ILVE
ILVE CAL Series User manual

ILVE
ILVE CHR1000W User manual

ILVE
ILVE FR60 User manual

ILVE
ILVE T29 Series User manual

ILVE
ILVE H10 User manual

ILVE
ILVE T11 IVCC900X-20140811 Configuration guide
Popular Ventilation Hood manuals by other brands

AEG
AEG protect d. 3000 Operating and installation instructions

Sirius Satellite Radio
Sirius Satellite Radio SILT-21 B installation instructions

Sears
Sears Kenmore ELITE 233.58172600 Use & care / installation manual

Halton
Halton Capture Ray KVE-UV Operator's manual

ROBLIN
ROBLIN PROFIL 900 Dimensions

Franke
Franke FJO 924 XS user manual