iM3 LAZ010 Parts list manual

PRODUCT CODE: LAZ010
iM3 Veterinary Dental and
Therapy Laser.
INSTRUCTIONS FOR USE AND
TECHNICAL MANUAL

CONTENT
CONTENT
0. INTRODUCTION .............................................................................................. 1
1. SAFETY............................................................................................................ 2
1.1. Safety Classification............................................................................ 2
1.2. Operator .............................................................................................. 2
1.3. Laser Radiation Hazards ..................................................................... 3
1.4. Nominal Ocular Hazard Distance (NOHD) ........................................... 4
1.5. Laser Protective Eyewear.................................................................... 4
1.6. Optical Fiber Cable and FastFiber Tip................................................. 5
2. INSTALLATION AND OPERATION .................................................................. 6
2.1. Packing List......................................................................................... 6
2.2. Structure.............................................................................................. 7
2.3. Environment and Equipment Requirement.......................................... 8
2.4. Installation and Setting Up .................................................................. 9
2.4.1. Install Power Adapter or Use Rechargeable Battery............... 9
2.4.2. Remote Interlock................................................................... 11
2.4.3. Install FastFiber Tip............................................................... 11
2.4.4. Therapy Handpiece (Optional) .............................................. 12
2.4.5. Biostimulation Handpiece (Optional)..................................... 13
2.4.6. Turn on the iM3 Laser........................................................... 14
2.4.7. Use Aiming Beam to Check the Integrity of the Delivery
System 14
2.4.8. Enter READY Mode .............................................................. 15
2.4.9. Activate Laser by Pressing Wireless Footswitch .................. 15
2.4.10. Tip Initiation .......................................................................... 15
2.4.11. Emergency Stop ................................................................... 16

CONTENT
2.4.12. Quit READY Mode ................................................................ 17
2.4.13. Power Off.............................................................................. 17
3. SOFTWARE OPERATION .............................................................................. 18
3.1. Operation Screen .............................................................................. 18
3.2. Patients ............................................................................................. 21
3.3. Training.............................................................................................. 21
3.4. Settings ............................................................................................. 22
3.4.1. Volume.................................................................................. 22
3.4.2. Brightness............................................................................. 22
3.4.3. Language .............................................................................. 22
3.4.4. Change Password................................................................. 22
3.4.5. Multi-accounts...................................................................... 22
3.4.6. Upgrade ................................................................................ 22
4. TECHNICAL DATA......................................................................................... 23
5. MAINTENANCE AND SERVICE ..................................................................... 25
5.1. Battery............................................................................................... 25
5.1.1. Rechargeable Battery of the Base Unit................................. 25
5.1.2. The battery of Wireless Footswitch....................................... 25
5.2. Power Calibration.............................................................................. 26
5.3. Cleaning, Disinfection, and Sterilization............................................ 26
5.3.1. Cleaning and Sterilizing Instructions for the disposable tip,
the handpiece sleeve, and the tip bender ............................................. 26
5.3.2. Cleaning and Disinfecting Instructions for Therapy
Handpiece ............................................................................................. 26
5.3.3. Cleaning, Disinfecting and Sterilizing Instructions for the
Biostimulation Handpiece...................................................................... 27
5.3.4. Cleaning and Disinfecting Instructions for the Base Unit...... 27
5.3.5. Cleaning Instructions for the optical window of the
handpiece body..................................................................................... 28

CONTENT
5.4. Troubleshooting ................................................................................ 29
5.5. Transportation ................................................................................... 30
5.6. Storage.............................................................................................. 30
APPENDIX A – SYMBOLS DESCRIPTION ............................................................. 32
APPENDIX B - LABELS POSITION ........................................................................ 34
APPENDIX C - LIMITED WARRANTY .................................................................... 35
APPENDIX D - EMC DECLARATION ..................................................................... 37
APPENDIX E - DISPOSAL...................................................................................... 42
APPENDIX F – ESD (ELECTROSTATIC DISCHARGE) PROTECTION.................... 43

PG 1
INTRODUCTION
0. INTRODUCTION
The iM3 Veterinary Dental Laser diode laser uses a laser diode as the
beam source to radiate laser light, which isdelivered tothe operating area
bya fiber cable. Wireless technology is applied to connect the base unit
with the wireless footswitch. The laser can be powered by an external
mains power supply or an internal replaceable Li-ion battery.
The FastFiber tips are designed as disposable material, which helps to
prevent cross infections andsimplify the preparation. Three types of fiber tips
are provided - 400μm, 300μm, and 200μm. A tip bender isalso delivered
within the package tohelp bend the tip to any angle.
The iM3 Veterinary Dental Laser isa Class 4 laser product which may cause
injuries in improper handling. Therefore, itMUST be operated only by
trained andqualified personnel. Users are required toread this User
Manual carefully before using the device. For any question, please
contact us or our authorized service representative.

PG 2
SAFETY
1. SAFETY
1.1. Safety Classification
Working beam (according to IEC/EN 60825-1:2014): Class 4
Aiming beam (according to IEC/EN 60825-1:2014): Class 2
Protection against electric shock: Class I, Type B applied part
Laser protective eyewear conform to standard DIN EN207 Annex II of
the Directive 89/686/EEC with protection level L5 for the wavelength
range of 190-450nm and 800-1100nm
Degree of protection of wireless footswitch:IPX8
1.2. Operator
The iM3 Veterinary Dental Laser MUST be operated only bytrained and
qualified personnel. The operators should master the laser surgery and be
familiar with the manual knowing how to choose the proper operating
parameters accordingtoindications. They must know how toprotect
themselves and the patients against hazardous laser radiation and take
proper actions in dangerous situations. Wesuggest all operators be
trained before their operations of the iM3 Veterinary Dental Laser.
CAUTION
:
Operators will be required to enter a password
to access the
laser functions. Please keep this code and don’t leak it to avoid
unauthorized use.

PG 3
SAFETY
CAUTION
:
Federal law restricts this device to sale or on the order of a
physician.
1.3. Laser Radiation Hazards
Never direct the laser or aiming beam towards any person's eyes! All
personnel presenting in the room must keep their laser protective
eyewear.
Never direct the laser to the human body except for the treatment
region, the laser radiation may cause skin burns.
Never direct the laser beam toward paper, plastics, textile or other
inflammable materials. They could catch fire due to the high
temperatures produced by the laser beam.
WARNING
: A risk of fire and/or explosion exists when the laser
output is used in the presence of Flammable materials, solutions
or gases, or in an oxygen enriched environment.
The high
temperature produced in normal use of the laser equipment may
ignite some materials, for example, cotton wool, when saturated
with oxygen. The solvents of adhesives and flammable solutions
used for cleaning and disinfecting should be allowed to
evaporate before the laser equipment is used. Attention should
also be drawn to the danger of ignition of endogenous gases.
WARNING
: Laser fume and/or plume may contain viable tissue
particulates.

PG 4
SAFETY
WARNING: Use of controls or adjustments or performance of
procedures other than those specified herein may result in
HAZARDOUS radiation exposure.
WARNING
: Do not aim the laser at metallic or reflective surfaces,
such as surgical instruments or dental mirrors. The laser beam
will be reflected to create potential hazards.
1.4. Nominal Ocular Hazard Distance (NOHD)
The Nominal Ocular Hazard Distance (NOHD) of the iM3 Veterinary Dental
Laser is3.7 meters @450nm, 0.9 meters @635nm, 4.4 meters @810nm,
and 5.1 meters @980nm, calculating from the distal end of the optical fiber.
1.5. Laser Protective Eyewear
All persons present inthe room must always wear the laser protective
eyewears from the iM3 Veterinary Dental Laser package.
Before using the laser protective eyewear, please make sure that your laser
protective eyewear:
are not damaged
conform to protection level L5 from standard EN 207
are suitable for the working wavelength (labeled on the eyewear)
These instructions apply particularly when using eyewear supplied from
outside sources that are not included in the scope of delivery of the iM3
Veterinary Dental Laser.

PG 5
SAFETY
WARNING
: Never use optical instruments such as microscopes,
eye loupes or magnifiers together with the original protective
eyewear.
Otherwise sufficient eye protection can no longer be
ensured.
1.6. Optical Fiber Cable and FastFiber Tip
Do not sharply bend, twist or knot the fiber cable, which leads to the
damage to the fiber and harm to the patient and laser operator.
Prior to each use, please examine the optical windows of the handpiece
body to make sure there are no dirt or dust contaminations which can
cause overheating and damage of the connector, raising the risk of fire
hazards.
If the optical cable or the fiber tip is damaged during operation, the
operator must immediately stop laser and get it replaced. Otherwise it
can cause overheat of the connector, raising the risk of fire hazards.
After the operation, please cover the distal end of the handpiece body
with the protective cap to keep clean of the optical windows.
The FastFiber tip is designed only for single use. It must be disposed of
after each use.

PG 6
INSTALLATION AND OPERATION
2. INSTALLATION AND OPERATION
2.1. Packing List
The iM3 Veterinary Dental Laser package includes the following parts:
No. Name Quantity
1 Base Unit 1
2 Handpiece Body (with Protective Cap) 1
3
FastFiber Tip
200μm 3
4 300μm 7
5 400μm 10
6 Handpiece Sleeve 2
7 Wireless Footswitch 1
8 Therapy Handpiece (optional) 1
9 Biostimulation Handpiece (optional) 1
10 Laser Protective Eyewear 2
11 Patient Goggle 1
12 DC Power Adapter with Cord 1
13 Tip Bender 1
14 User Manual 1
Table 2.1 List of standard package
WARNING
: No modification of this equipment is allowed.

PG 7
INSTALLATION AND OPERATION
2.2. Structure
Base Unit
Figure 3.1 Front view of the base unit
Figure 3.2 Back view of the base unit
PG 8
INSTALLATION AND OPERATION
Handpiece body
Figure 3.3 Handpiece body
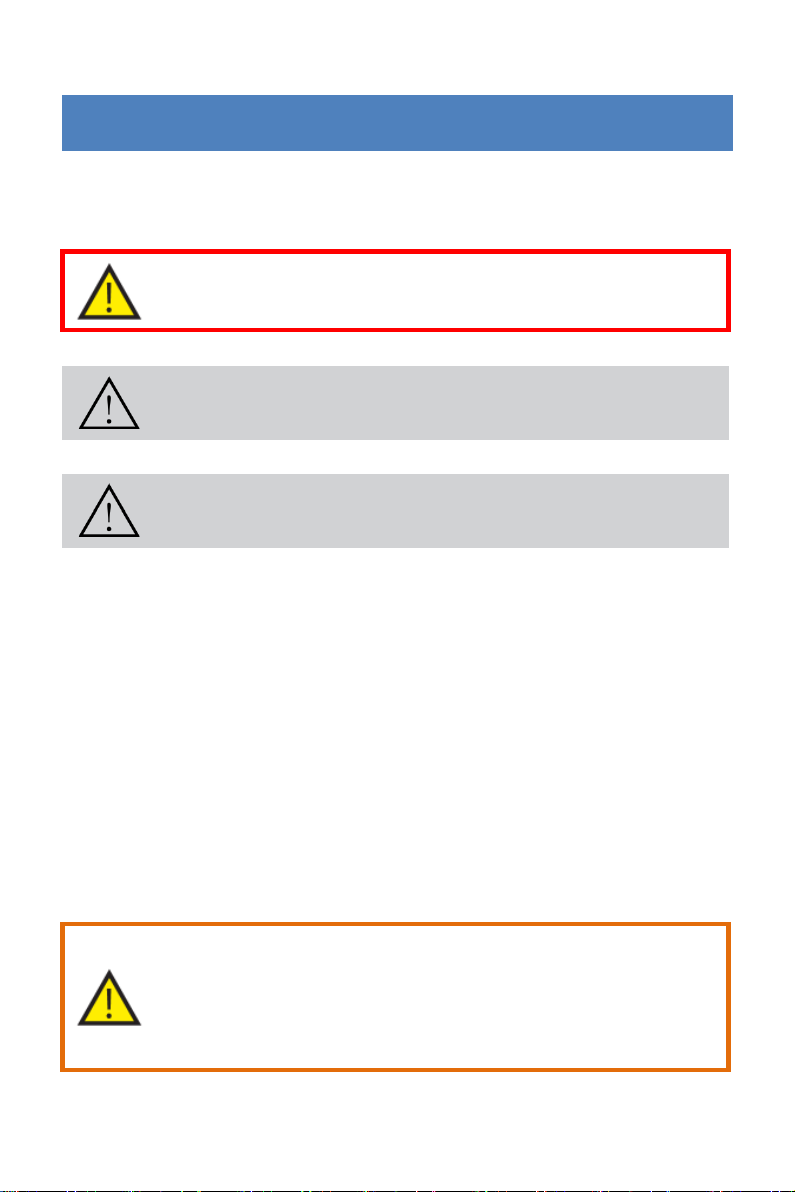
Wireless Footswitch
Figure 3.4 Wireless footswitch
2.3. Environment and Equipment Requirement
Electrical Supply: 100-240VAC, 50-60Hz
Working Temperature: 10-30℃
Relative Humidity: 15-70%
PG 9
INSTALLATION AND OPERATION
Atmospheric Pressure: 710-1060hPa
WARNING
: To avoid the risk of electric shock, this equipment
must be connected to a mains supply with protective earth.
NOTE:Place the iM3 Veterinary Dental Laser ona flat horizontal
plane to
avoid shake.
NOTE
: Do not cover or block air vents to ensure enough cooling
of the laser.
2.4. Installation and Setting Up
2.4.1. Install Power Adapter or Use Rechargeable Battery
a) Powered by Power Adapter
Connect the power adapter to a wall outlet (100-240VAC, 50-60Hz), and then
insert the DC power connector into the DC IN socket at the back of the base
unit with an arrow marked on the top (Figure 3.5) until it “click” into place.
To disconnect the DC power adapter from the base unit, unplug the power
cord from the wall outlet and grab the connector at the part marked with an
arrow and slowly pull it straight back.
CAUTION
: The DC power connector has a snap-locking feature,
helping to prevent accidental disconnection. To unplug from the
socket, grabbing and pulling at the part marked with an arrow is
necessary. Inappropriate or forced plugging may break the
connector.

PG 10
INSTALLATION AND OPERATION
CAUTION
: Only use the DC power adapter from package or
others authorized. Damages caused by using of unauthorized
power adapter are not be covered and lead to an automatic void
of warranty.
Figure 3.5 Connect DC power adapter to the base unit
b) Powered by Battery
The iM3 Veterinary Dental Laser can be powered by a chargeable battery
inside the base unit when the power adapter isdisconnected. Tocharge
the battery, connect the DC power adapter tothe DC INsocket after
plugging into a wall outlet. When charging, the charging indicator on the
front panel will light up, and will go out after fully charged. The indicator will
flash when charging isabnormal. Before first use, fully charge the battery for
at least 4 hours.

INSTALLATION AND OPERATION
2.4.2. Remote Interlock
Remote interlock isused with a door switch toprevent unintentional entry.
Once the door is opened,the interlock circuit triggers and the laser emission
is immediately shut off. The interlock connector used byiM3 Veterinary
Dental Laser is a standard 3.5mm audio jack. To usethisfunction,
connect the remote interlock cable tothe door switch and plug itinto the
interlock socket located at the back ofthe base unit. The door switch
should be anormally closed switch.Therefore, the interlock circuit can be
cut when the door is opened, and then the laser emission is interrupted with
an error message appears on the screen. Toclear this error, please close
the door andpress “Clear” button on the screen.
NOTE
: If you don’t need this feature, don’t connect the interlock
cable to the base unit.
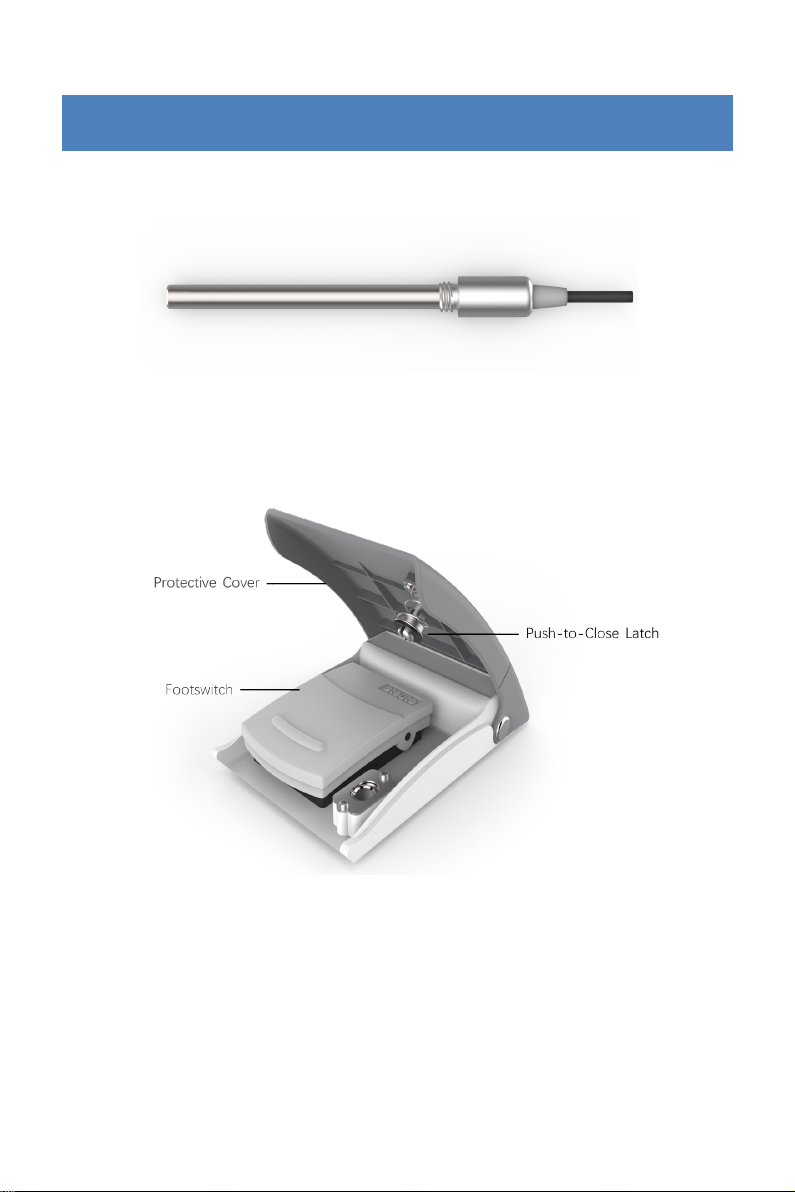
2.4.3. Install FastFiber Tip
The iM3 Veterinary Dental Laser provides disposable fiber tips with three
types ofcore diameters - 200μm, 300μm, and 400μm, in the color of pink,
blue and grey respectively. Please choose proper fiber tip before use.
The
fiber tips must be cleaned andsterilized before use
.For instructions on
how tosterilize the tips, refer to Section 6.4.1.
To install, insert the handpiece sleeve from the front of the handpiece body
and screw it clockwise until snug,then insert the FastFiber tip to the
handpiece sleeve and click into place (Figure 3.6).
Operators can use a bender tobend the tip tothe angle needed forbest
PG 11

PG 12
INSTALLATION AND OPERATION
handling. Do not bend the tip to an angle higher than 60°, that makes it easy
to break during laser emission.
Figure 3.6 Disposable fiber tip assembly
Pull the FastFiber tip straight back to disconnect it (Figure 3.7).
Figure 3.7 Remove the disposable fiber tips
The tip end may be contaminated during operation due to the accumulation
of tissue debris. In this case, please stop lasing and regularly wipe off the tip
with a sponge dipped with water. Do not use flammable solvents such as
alcohol when cleaning a hot tip!
WARNING
: The FastFiber tips are for SINGLE USE ONLY. Reuse
significantly increases the chance of patient cross-infection!
CAUTION
: The FastFiber tips must be disposed of in a sharps
container after use.
2.4.4. Therapy Handpiece (Optional)

PG 13
INSTALLATION AND OPERATION
The therapy handpiece should be disinfected prior to use. For instructions on
cleaning and disinfection, refer to Section 6.4.2. The diameter of the light
spot can be changed from 10mm to 30mm by rotating the focus ring (Figure
3.9).
Figure 3.9 Therapy handpiece
CAUTION
: The therapy handpiece cannot be sterilized in the
autoclave, as it may damage the internal optics.
2.4.5. Biostimulation Handpiece (Optional)
Different from the therapy handpiece, the biostimulation handpiece is
typically used for relatively small areas inside the mouth. It should be
sterilized with autoclave before use. For instructions on cleaning and
disinfection, refer to Section 6.4.3.
Figure 3.10Biostimulation handpiece

PG 14
INSTALLATION AND OPERATION
2.4.6. Turn on the iM3 Veterinary Dental Laser To access
the SOLASE VET App:
1) Turn on the power switch of the base unit and the green status indicator
on the front panel will light.
2) The laser starts to self-check, which may last for more than 30 seconds.
Please wait patiently. After successful self-check, the device will ask
you to enter a 4-digit password. If you forget the password, please
contact us or our authorized service representative to reset the
password.
NOTE
: The factory default password is “0000”. To change your
password, refer to section 4.4.4.
2.4.7. Use Aiming Beam to Check the Integrity of the Delivery System
As the aiming beam passes down the same delivery system as the working
beam, it provides a good way of checking the integrity of the delivery system.
Figure 3.11 Aiming beam spot emitted from good fiber compares with that
from bad fiber
Place the distal end of the laser handpiece perpendicular to a piece of white
paper at distance of 5-10 mm. Turn on the aiming beam and adjust it to
maximum brightness. The visible light should be transmitted from the
handpiece, and a well-formed round spot should appear. If the spot is not
round in shape or its density is reduced, the beam delivery system may be
defective. Replace the laser delivery system and try again. If problems still

PG 15
INSTALLATION AND OPERATION
exist, please contact us or our representative for assistance.
WARNING
: Never emit the laser if the aiming beam is not present
or has a significantly different shape.
2.4.8. Enter READY Mode
Press “READY” button and the laser gets into the READY mode. The status
indicator will show orange light. Now you can activate laser by pressing
wireless footswitch.
NOTE:
STANDBY mode: The laser is not capable of emitting the working
beam even if the wireless footswitch is activated.
READY mode: The READY mode keeps the laser equipment
enabled so that it is capable of emitting laser when the wireless
footswitch is activated.
2.4.9. Activate Laser by Pressing Wireless Footswitch
In READY mode, the laser is activated when the wireless footswitch pressed,
with a beeping sound indicating that the laser energy is present, and the
orange status indicator begins flashing. Release the footswitch, the laser
stops and the beeping sound disappears. To re-adjust the laser parameters,
please press the "STANDBY" button to back into “STANDBY” mode firstly.
2.4.10. Tip Initiation
Soft tissue has a weak absorption for wavelength of 600-1300nm. The laser
energy cannot be well absorbed by the soft tissue and cannot reach the

PG 16
INSTALLATION AND OPERATION
temperature required for cutting when using 810nm or 980nm laser. So,
when lasers are used in contact mode to make an incision or excise soft
tissue, they often need “initiation” of the laser tip end. An energy absorbing
material is used to absorb the emitted laser and is rapidly heated to several
hundred degrees. This “hot tip” is used to melt proteins thus separating the
tissue.
The “initiation” steps are as follows: Prepare a dark paper (such as
articulating paper), move the end of the fiber tip gently on the paper with the
laser power set to 0.7W CW. The tip end will retain the pigment of the paper.
Observe the aiming beam against a surface. If it is still clearly visible, repeat
more times.
Actually, the tip initiation by articulating paper or wood is not satisfied, as the
pigmentation in the tip end is quickly burned off during laser surgery,
resulting in a decrease of cutting efficiency. The operators have to initiate the
tip again and again to continue the operation.
We have developed a new pre-initiated tip with durable, peel-resistant black
coating. The specially crafted coating withstands high temperature during
laser cutting of up to hundreds of degrees, ensuring a smooth and fast
surgical treatment.
NOTE:
Protein has a strong absorption for 450nm laser, so there is no
need to initiate the tip when using this wavelength.
2.4.11. Emergency Stop
In case of emergency, press the red Emergency Stop button to turn off the
laser emission immediately. A beeping sound will appear, and the status
Table of contents
Other iM3 Dental Equipment manuals


