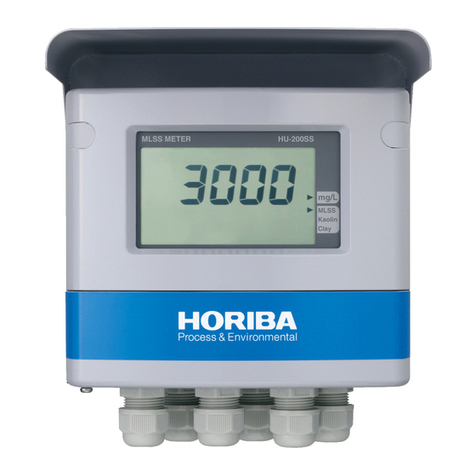
Imbotec Horiba IG-340 User manual

December, 2019 © 2019 HORIBA, Ltd.
Instruction Manual
Gloss Checker
SKU: GF-14000

Contents
1 Preface . . . . . . . . . . . . . . 3
Warranty and responsibility . . . 3
Trademarks . . . . . . . . . . . . . . . 4
Use conditions of the open source
software . . . . . . . . . . . . . . . . . . 5
Open source software license in-
formation . . . . . . . . . . . . . . . . . 5
For your safety. . . . . . . . . . . . . 6
Operational precautions. . . . . . 8
Disposal of the product . . . . . . 9
Designed life . . . . . . . . . . . . . . 9
Description in this manual . . . . 9
2 Overview . . . . . . . . . . . . . 10
Features of the product . . . . . . 10
Checking supplied items . . . . . 10
Names of parts . . . . . . . . . . . . 11
Types of displays . . . . . . . . . . . 18
Types of measurement modes 19
3 Using the product for the
first time . . . . . . . . . . . . .20
4 How to use . . . . . . . . . . . 21
Measurement procedure . . . . . 21
Note for measurement . . . . . . . 23
Measurement display functions 25
5 Memory display . . . . . . . 30
Memory display overview . . . . 30
Memory display functions . . . . 31
6 Setting display . . . . . . . 37
Setting display overview . . . . . 37
Setting display functions . . . . . 38
7 Maintenance . . . . . . . . . 42
Contact for maintenance . . . . . 42
Maintenance item list . . . . . . . . 42
8 Troubleshooting . . . . . . 45
9 Reference . . . . . . . . . . . 50
Product specifications . . . . . . . 50
About glossiness . . . . . . . . . . . 52

3
1 Preface
1 Preface
This manual describes the operation of the gloss checker, IG-
340.
Be sure to read this manual before using the product to ensure
proper and safe operation of the product. Also safely store the
manual so it is readily available whenever necessary.
Product specifications and appearance, as well as the contents
of this manual are subject to change without notice.
Warranty and responsibility
HORIBA, Ltd. warrants that the Product shall be free from
defects in material and workmanship and agrees to repair or
replace free of charge, at option of HORIBA, Ltd., any
malfunctioned or damaged Product attributable to
responsibility of HORIBA, Ltd. for a period of one (1) year from
the delivery unless otherwise agreed with a written agreement.
In any one of the following cases, none of the warranties set
forth herein shall be extended;
• Any malfunction or damage attributable to improper handling
or wrong use
• Any malfunction attributable to repair or modification by any
person not authorized by HORIBA, Ltd.
• Any malfunction or damage attributable to the use in an
environment not specified in this manual
• Any malfunction or damage attributable to violation of the
instructions in this manual or operations in the manner not
specified in this manual
• Any malfunction or damage attributable to any cause or
causes beyond the reasonable control of HORIBA, Ltd. such
as natural disasters

4
1 Preface
• Any malfunction or damage attributable to falling of the
product or impact on the product
• Any malfunction or deterioration in appearance attributable
to corrosion, rust, battery leakage, and so on
HORIBA, LTD. SHALL NOT BE LIABLE FOR ANY
INCIDENTAL DAMAGES RESULTING FROM USE OF THE
PRODUCT OR INABIITY TO USE THE PRODUCT
(SCRATCH OR SOIL OF MEASURED OBJECTS CAUSED
BY THIS PRODUCT, CHANGE OR LOSS OF DATA, LOSS OF
BUISINESS INTEREST, OPPORTUNITY LOSS, AND SO
ON).
Trademarks
• Windows is a registered trademark or trademark of Microsoft
Corporation in the United States and other countries.
• QR Code is a registered trademark of DENSO WAVE
INCORPORATED in Japan and in other countries.
Other company names and brand names are either registered
trademarks or trademarks of the respective companies. (R)
and (TM) symbols may be omitted in this manual.

5
1 Preface
Use conditions of the open source software
If the Software includes open source software (referred to as
OSS in the rest of this document) owned by a third party other
than HORIBA Ltd., customers shall comply with the terms and
conditions required by the OSS. HORIBA Ltd. grants the
license for the use of the Software to customers so long as
customers comply with such terms and conditions. In the event
of inconsistency between the terms and conditions of the OSS
and this manual, the terms and conditions of the OSS shall
prevail. For customers' information, the OSS included in the
Software is described in this manual.
Open source software license information
This product adopts OSS. The Conditions appropriate for each
of the OSS licenses are applied to each of these software.
Before using the software, refer to
http://www.horiba.com/ig-340/legal/
where the information about the OSS adopted in this product is
available.
No maintenance services are available for the OSS.

6
1 Preface
For your safety
Hazard classification and warning symbols
Warning messages are described in the following manner.
Read the messages and follow the instructions carefully.
Hazard classification
Warning symbols
This indicates a potentially hazardous
situation which, if not avoided, may result
in minor or moderate injury. It may also be
used to alert against unsafe practices.
Description of what should be done, or what
should be followed
Description of what should never be done, or
what is prohibited

7
1 Preface
Safety precautions
This section provides precautions for using the product safely
and correctly and to prevent injury and damage. The terms of
CAUTION indicate the degree of imminency and hazardous
situation. Read the precautions carefully as it contains
important safety messages.
CAUTION
Do not drop the protective cover or have a strong impact on
it. The standard plate of the protective cover is made of
glass. A hand may be cut by broken glass.
Do not cause a short circuit between terminals of the battery
case.
If a short circuit occurs due to a contact of metal, smoking,
firing or rupture may result. In the case of short circuit, stop
using the product immediately, and contact HORIBA, Ltd. or
your dealer.
Do not disassemble the product.
This may cause a malfunction or deterioration in
performance.
Do not touch the IG-340 main unit or the batteries with wet
hands.
This may cause a malfunction or deterioration in
performance.

8
1 Preface
Operational precautions
Use of the product in a manner not specified by the
manufacturer may impair the protection function or product
performance provided by the product. Exercise the following
precautions.
• Do not use or store the product at a location exposed to
direct sunlight, dusty location and high-temperature/high-
humidity location.
• Do not drop the IG-340 main unit or have a strong impact on
it. This may cause a malfunction or deterioration in
performance.
• The IG-340 main unit realizes a dust-proof/drip-proof
structure (IP42) with the USB terminal cover attached. Note
that the drip-proof function for the inside the protective cover
is not provided. Do not subject the product to excessive
moisture or dust.
• Keep the product away from fire.
• Turn OFF the power after use. Remove the batteries if the
product is not used for prolonged periods.
• The lens is particularly a delicate item. Be careful not to rub it
with force or scratch it when using.
If there is a scratch on the lens, stop using the product
immediately, and contact HORIBA, Ltd. or your dealer.
• Do not touch the lens and the standard plate attached on the
protective cover with bare hands or a dirty item.
• If the standard plate or lens is dirty, correct measurements
cannot be performed. If there is dirt or dust attached on it, be
sure to wipe it off with a soft dry cloth to always keep it clean.
If there is a scratch on the standard plate, stop using the
product immediately, and contact HORIBA, Ltd. or your
dealer.

9
1 Preface
• Do not press the buttons with great force. Also, do not press
them with any sharp objects such as a pen and a
screwdriver. The product may be damaged or a malfunction
may occur.
• The provided accessories are only for use with this product.
Disposal of the product
When disposing of the product, follow the related laws and/or
regulations of your country.
Designed life
This product is designed with an intended life-span of five
years.
Description in this manual
Note
This interprets the necessary points for correct operation and
notifies the important points for handling the product.
Tip
This indicates reference information.

10
2 Overview
2 Overview
Features of the product
The attribute that the light hitting a surface of an object is
regularly reflected is called the gloss, and the amount that
shows the degree is called the glossiness. This product is a
checker that clearly quantifies ambiguous distinctions of the
gloss.
Measured glossinesses can be stored in the IG-340 main unit
or used for calculations of average data. Also, the data
(measured data and average data) stored in the IG-340 main
unit can be output to a personal computer (referred to as PC in
the rest of this document) equipped with Windows via USB
(refer to page 34).
Checking supplied items
The following items are included with this product.
Note
Batteries (refer to page 43) and a micro USB cable (refer to
page 34) are not included. They are to be prepared by the
customer.
• IG-340 main unit 1 pc
• Protective cover (with standard plate) 1 pc
• Instructions for Use (in Japanese only) 1 pc
• Regulations, Safety, and Packing List (in English) 1 pc
• Lens cloth 1 pc
• Soft case 1 pc

11
2 Overview
Names of parts
Appearance
Fig. 1 IG-340 main unit
Display
Control panel
USB connector
(with cap)
Standard plate
Side button
Protective cover
Measurement
area
Mesurement position mark
(for center of major axis)
Lens
Battery cover

12
2 Overview
Display
Fig. 2 Display (all lighting)
37
6
8
9
2
1
4
5
No. Name Function Reference
1Time The current time or time when data
is stored is indicated.
2[AVG]
• Measurement display: [AVG]
lights when average data is
being calculated.
• Memory display: [AVG] lights
when average data is being
displayed.
page 27
page 32
3
Measurement
mode and
measurement
status
The display conditions of
measurement values are
indicated.
[MAX] lighting: MAX mode
[HOLD] lighting: Measurement
value hold status
Both illuminations are off: Normal
mode or measurement value
updating status
page 19
page 25

13
2 Overview
4Operating
status
The current operating status is
indicated.
[MEAS] lighting: Measurement
display
[DATA] lighting: Memory display
[SET] lighting: Setting display
5USB
The USB connection status is
indicated only on the memory
display.
OFF: USB not connected
Lighting: USB connected
Blinking: Data being output
page 34
6 Battery level
The battery remaining amount is
indicated. Fewer the scale
indications, less the battery
remaining amount.
When the battery level is displayed
only with a frame, replace the
batteries as soon as possible.
When the frame blinks, button
operations are ignored and the
power turns OFF in approximately
30 seconds.
page 43
No. Name Function Reference
(Light) (Blink)

14
2 Overview
7 Data No.
• Memory display: Data No. is
indicated.
• When an error has occurred:
Error No. is indicated.
• In MAX mode of measurement
display: Current measurement
value is indicated.
page 31
page 19
8 Glossiness
• Measurement value, measured
data, average data and in MAX
mode: Maximum value among
measurement values (hereafter
referred to as MAX value) is
indicated.
• When an error has occurred:
[Err] is indicated.
9 [OVER]
The status that the measurement
value is outside the guaranteed
range is indicated.
Lighting: From 100.1 to 199.9
Blinking: 200.0 or more
No. Name Function Reference

15
2 Overview
Control panel
Fig. 3 Control panel
1
45
6
23
8
9
10
7
No. Button name Function Ref.
1 Power Pressing this button turns the power
ON/OFF.
2[DATA IN/
MEAS]
Pressing this button performs either
of the following.
• Storing a measurement value
displayed on the measurement
display
• Switching from the memory
display or setting display to the
measurement display
page 26
page 18
3[CAL] Pressing this button calibrates this
product. page 28
4[DATA] Pressing this button switches to the
memory display. page 18

16
2 Overview
5[/HOLD]
Pressing this button performs either
of the following.
• Holding or canceling a
measurement value
• Switching displayed data or
changing setting values
page 25
page 37
6[AVG] Pressing this button calculates
average data from stored data.
page 27
page 32
7[ALL
CLEAR]
Pressing this button deletes all
stored data (measurement data and
average data).
page 33
8 [CLEAR] Pressing this button deletes MAX
value data or the latest stored data.
page 24
page 33
9[]
Pressing this button switches
displayed data or changes setting
values.
page 37
10 [SET/ ]
Pressing this button switches to the
setting display.
Outputs all stored data.
page 18
page 34
No. Button name Function Ref.

18
2 Overview
Types of displays
This product has three types of displays as shown below.
• Measurement display: Measuring gloss values and storing
data can be performed (refer to page 22).
• Memory display: Stored data is displayed (refer to page 30).
• Setting display: Settings can be performed (refer to page 37).
Fig. 5 shows the displays and buttons used for switching
between displays.
Fig. 5 Display flow diagram
[DATA]
button
Measurement display
[SET/ ]
button
[DATA IN/MEAS]
button
Setting display
Memory display

19
2 Overview
Types of measurement modes
Two types of measurement modes are provided for the
measurement display.
• Normal mode
Only the glossiness being measured is displayed. Use this
mode to check the glossiness at the measurement position.
• Measurement values are displayed at the glossiness
display position as needed.
• MAX mode
Both a glossiness being measured and a maximum value
immediately after the measurement starts are displayed.
• The MAX value is displayed at the glossiness display
position.
• Measurement values are displayed at the data No.
display position as needed.
Fig. 6 Types of measurement modes
For switching the measurement mode, refer to "Measurement
mode setting" (page 41), and for measurement method, refer
to "Measurement" (page 22).
MAX value
Normal mode MAX mode
Measurement
value

20
3 Using the product for the first time
3 Using the product for the first time
Perform the following preparation work before using the
product for the first time.
1. Attaching the batteries (refer to page 43)
2. Power ON (refer to page 21)
3. Clock setting (refer to page 38)
4. Standard value setting (as needed)
(refer to page 39)
5. Auto power OFF setting (as needed)
(refer to page 40)
6. Measurement mode setting (as needed)
(refer to page 41)
7. Calibration (refer to page 28)
8. Power OFF (refer to page 23)
This manual suits for next models
1
Table of contents


