iMerciv BuzzClip User manual

For the full instruction manual as well as helpful
videos full of tips and tricks, please visit
www.imerciv.com/user-guide
BuzzClip Quick Start Guide
For the full instruction manual as well as helpful
videos full of tips and tricks, please visit
www.imerciv.com/user-guide
BuzzClip Quick Start Guide

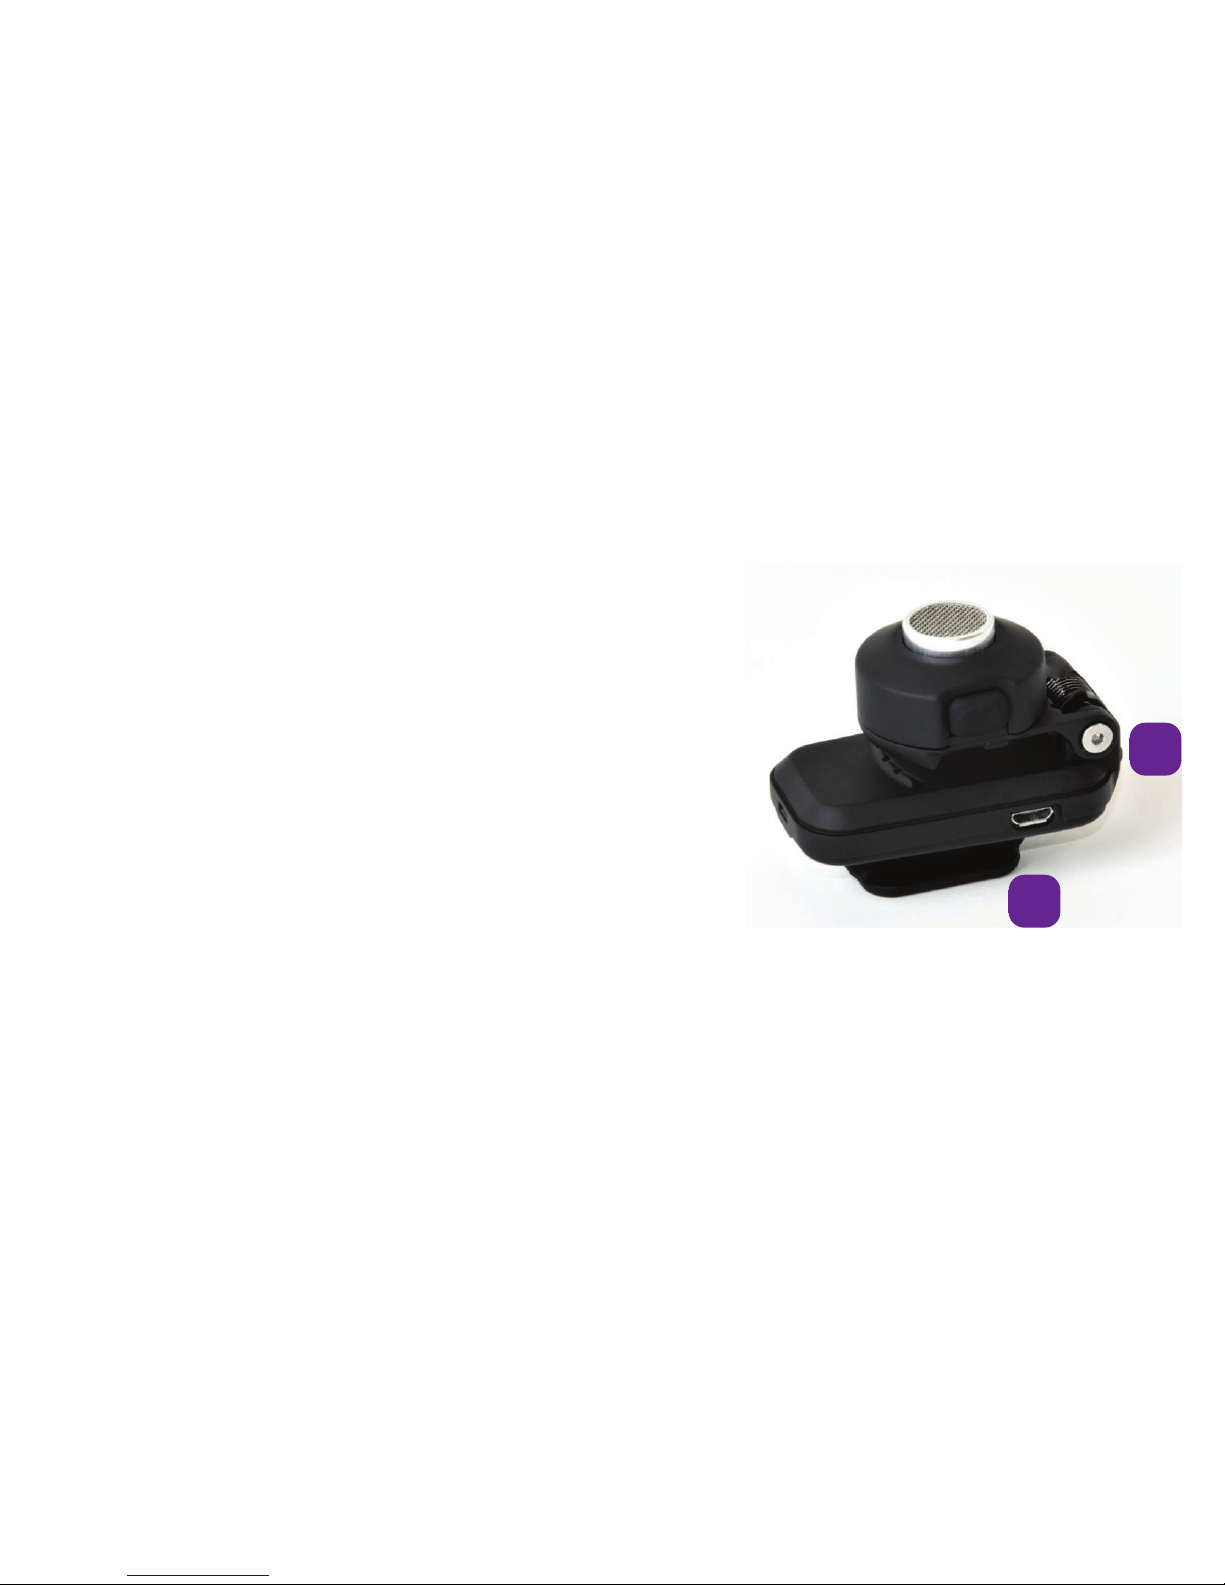
Getting Familiar with your BuzzClip
Your BuzzClip consists of 4 main parts:
The Rounded Top (A) –This is the main control panel
for the BuzzClip and it can be found at the top of the
device. The sensor is housed here and it slightly
protrudes out of it’s rounded enclosure. There are two
buttons are located to the left and right of the sensor.
The rounded top is on a hinged spring, thus this part of
the BuzzClip can be rotated and locked at a 90-degree
angle so it may also be used as a handheld.
The Main Body (B)–The Main Body contains the battery, circuit board as well as the
charging port of the device. Edges of the main body have been chamfered, allowing
you to run the finger along the part in order to locate the Micro-USB charging port.
The Lanyard Loop (C) –This is a small hole or loop
located along the chamfered edge of the main body. This
hole is to attach the lanyard that is included in your box
for additional safety and security purposes (in case of
drops, etc.)
The Vibrator Housing (D) –This rubberized part is where
tactile information is delivered through vibrations. It will
always be in contact with your body, so you can easily
feel the vibrations. It is located at the back or bottom of
the device. The shape of the housing provides a stable
anchor point for when the BuzzClip is being worn.
B
A
BuzzClip Quick Start Guide
D
C
Operating your BuzzClip
Turning On your BuzzClip:
Locate the On/Off Button –With the BuzzClip in
your palm, you should be able to feel a circular ring
at the top which is the sensor. To the left of the
sensor, there is a rubberized button indented with a
tactile marking to indicate the On/Off button.
1. Press and hold this button to turn on your BuzzClip. You should then
immediately feel a series of short vibrations followed by two longer
vibrations. The shorter initial vibrations indicate the BuzzClip’s battery level:
•4 vibrations indicate that the battery is above 75%.
•3 vibrations indicate that the battery is between 50% -75%.
•2 vibrations indicate that the battery is between 25% -50%.
•1 vibration indicates that the battery is less than 25%. Charge it soon!
The two longer vibrations that follow are to let you know that the BuzzClip
is ready to go and begin detecting obstacles around you.
2. Your BuzzClip’s default starting mode is a one-meter range.
Switching Between Modes on your BuzzClip:
Locate the Mode Button –With the BuzzClip in your
palm, you should be able to feel a circular ring at the
top which is the sensor. To the right of the sensor,
there is a rubberized button with NO tactile mark. This
is the Mode button.
1. You can only switch between modes when
the BuzzClip is ON. The device comes with three-modes: a 1-meter mode, a
2-meter mode and a 3-meter mode. We suggest using the 1-meter mode
for indoor use and the 2-meter and 3-meter modes for outdoor use.
2. While the BuzzClip is ON, Press and hold the Mode button to change modes
on your BuzzClip. You should then immediately feel two short rapid
vibrations. This indicates that the BuzzClip is now in the 2-meter mode.
3. Press and hold the Mode button again and you should then feel three short
rapid vibrations. This indicates that the BuzzClip is now in the 3-meter
mode. We recommend using this mode for open areas and general
landscaping of the surrounding environment.
Turning Off your BuzzClip:
Locate the On/Off Button –With the BuzzClip in your palm, you should be able to
feel a circular ring at the top which is the sensor. To the left of the sensor, there is a
rubberized button indented with a tactile marking to indicate the On/Off button.
1. Press and hold this button to turn off your BuzzClip. You should then
immediately feel one long continuous vibration. Your BuzzClip is now Off!
Wearing your BuzzClip
The rounded top where the sensor and buttons are
housed can be slightly pulled away or rotated from
the main body due to the hinged spring. Your clothes
are to go in between this space that separates the
rounded top from the main body of the BuzzClip.
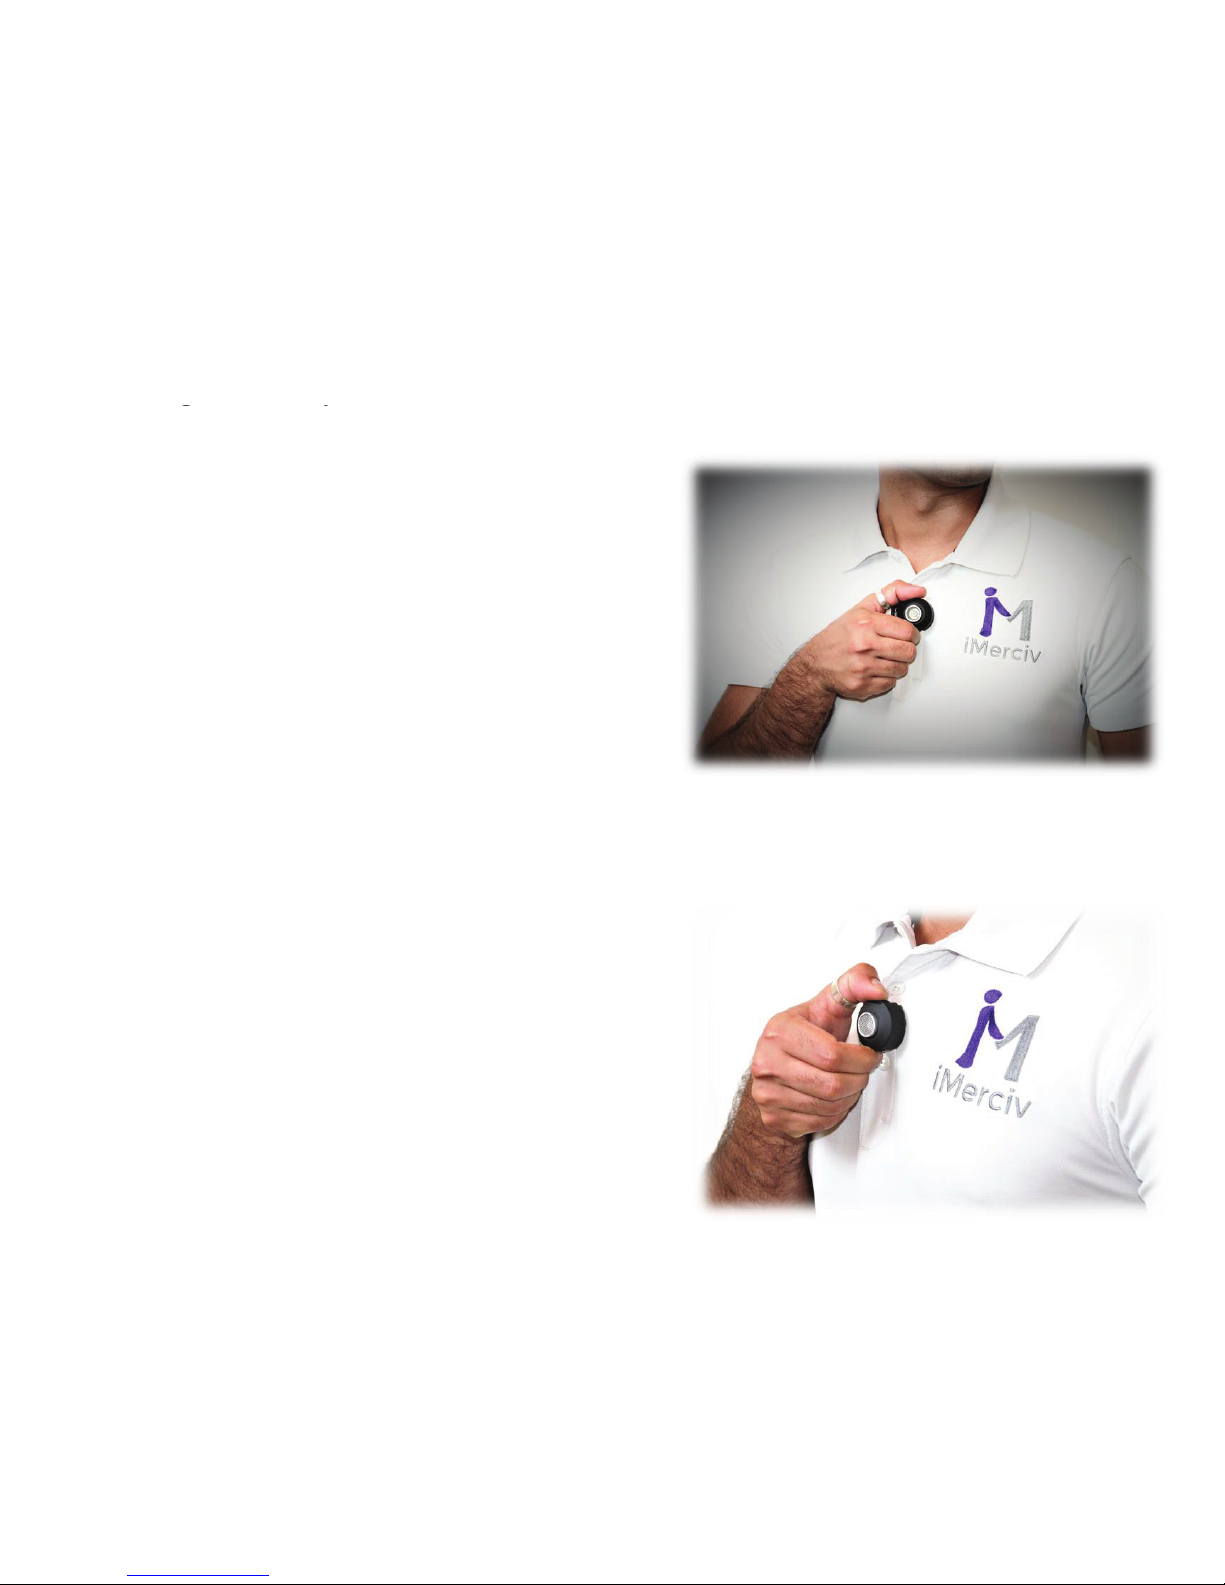
Fastening the BuzzClip:
1. The main body and the vibrator housing
always go under or between your
clothing. Only the rounded top with the
sensor and the buttons should be exposed
on the outside of your clothing (i.e. on the
lapel of a jacket, between the buttons on
a shirt or blouse, on the rounded neck of a
T-shirt, on the beltline, out of pockets, on
the sleeves of a shirt, etc.)
2. Always ensure that the sensor is exposed
outwards and is not covered by anything so that you do not receive any
false positive responses.
Clothing Clothing

3. Press and hold the Mode button again and you should then feel three short
rapid vibrations. This indicates that the BuzzClip is now in the 3-meter
mode. We recommend using this mode for open areas and general
landscaping of the surrounding environment.
Turning Off your BuzzClip:
Locate the On/Off Button –With the BuzzClip in your palm, you should be able to
feel a circular ring at the top which is the sensor. To the left of the sensor, there is a
rubberized button indented with a tactile marking to indicate the On/Off button.
1. Press and hold this button to turn off your BuzzClip. You should then
immediately feel one long continuous vibration. Your BuzzClip is now Off!
Wearing your BuzzClip
The rounded top where the sensor and buttons are
housed can be slightly pulled away or rotated from
the main body due to the hinged spring. Your clothes
are to go in between this space that separates the
rounded top from the main body of the BuzzClip.
Fastening the BuzzClip:
1. The main body and the vibrator housing
always go under or between your
clothing. Only the rounded top with the
sensor and the buttons should be exposed
on the outside of your clothing (i.e. on the
lapel of a jacket, between the buttons on
a shirt or blouse, on the rounded neck of a
T-shirt, on the beltline, out of pockets, on
the sleeves of a shirt, etc.)
2. Always ensure that the sensor is exposed
outwards and is not covered by anything so that you do not receive any
false positive responses.
Clothing Clothing
3. Ensure that the sensor is as parallel to your
body as possible. For example, if you are
wearing a buttoned up shirt, make sure
that the sensor is parallel to your chest and
that it is not tilted to the left or right.
4. Ensure that you are able to operate both
buttons on the BuzzClip from where you
are wearing it.
5. Ensure that the vibrator housing on the back of the device is pressed up
against you and in proper contact with your body so that you always feel
the vibrational information delivered to you.
The BuzzClip can be worn many different ways based on one's mobility needs.
It can be easily clipped onto shirts, t-shirts, on sleeves (long or short),
sweaters, jeans, sweatpants, and more. Multiple BuzzClips can also be used at
once for greater coverage around one's body. This would give a blind or
partially sighted user much more information about their immediate
surroundings. For example, one on the chest and one of each sleeve in order to
protect your front and sides.
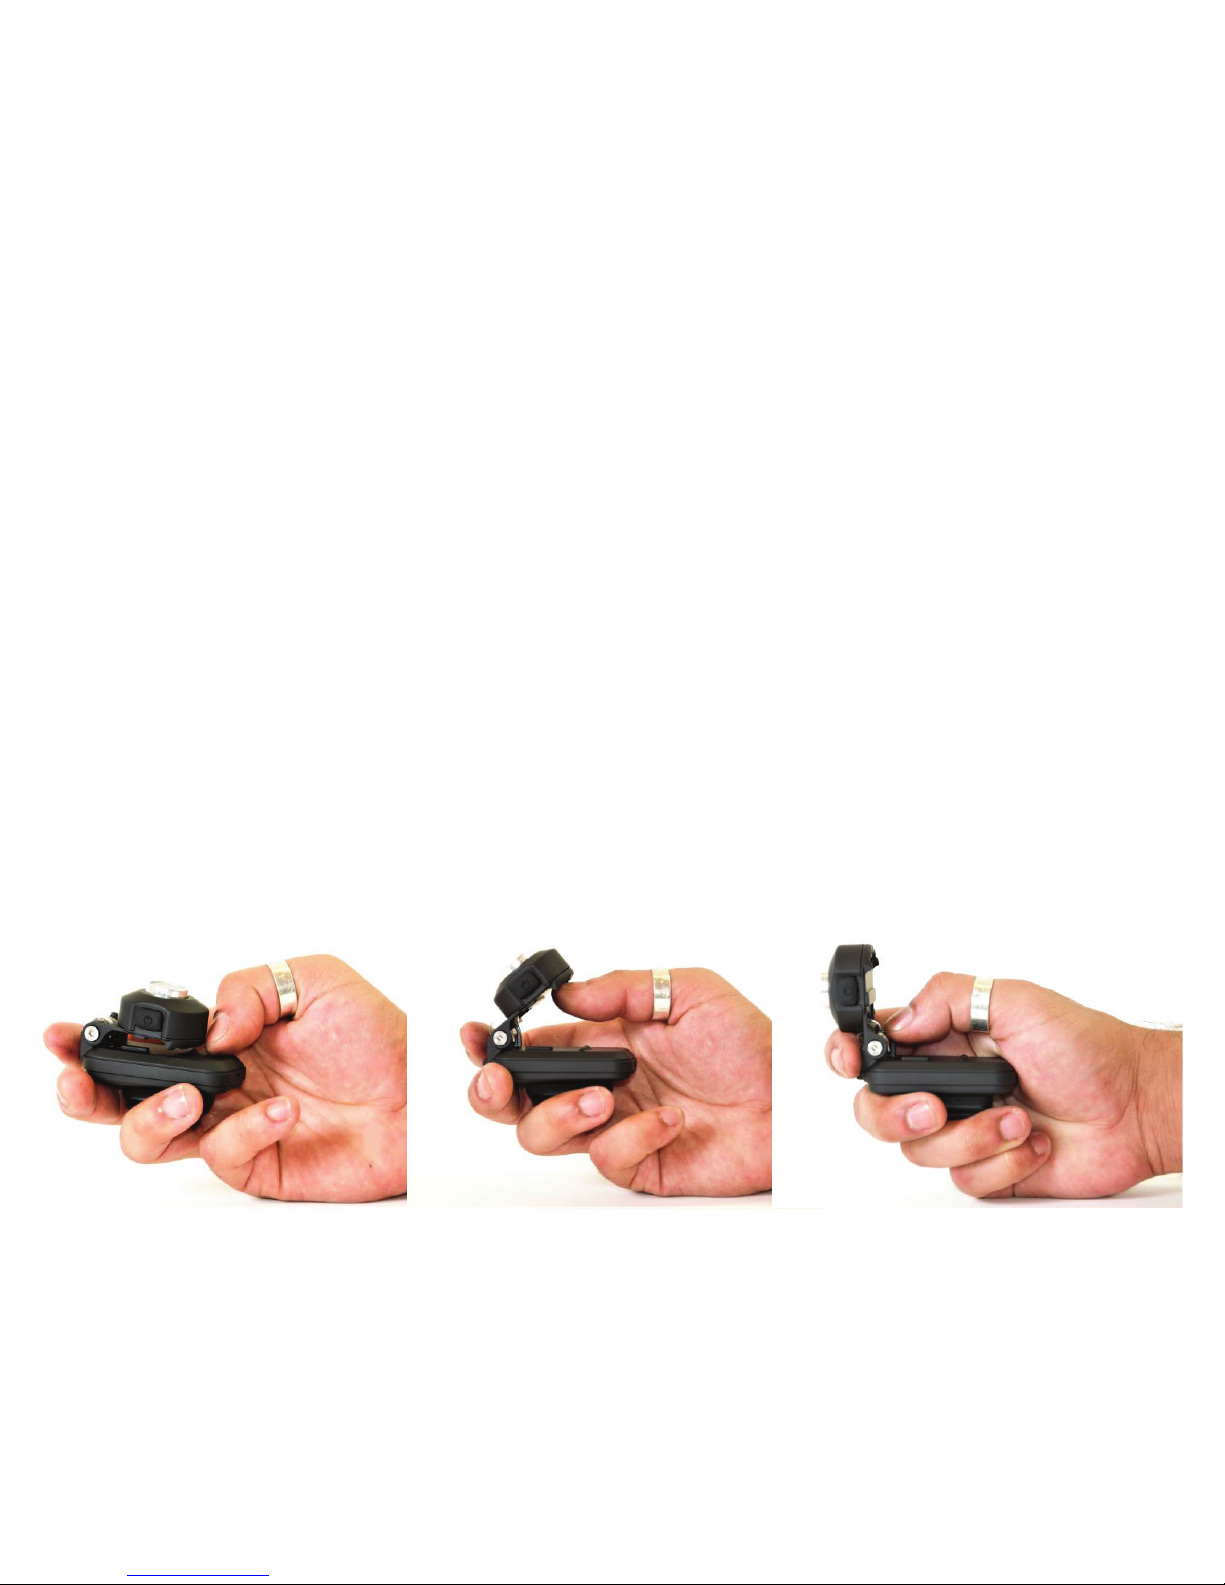
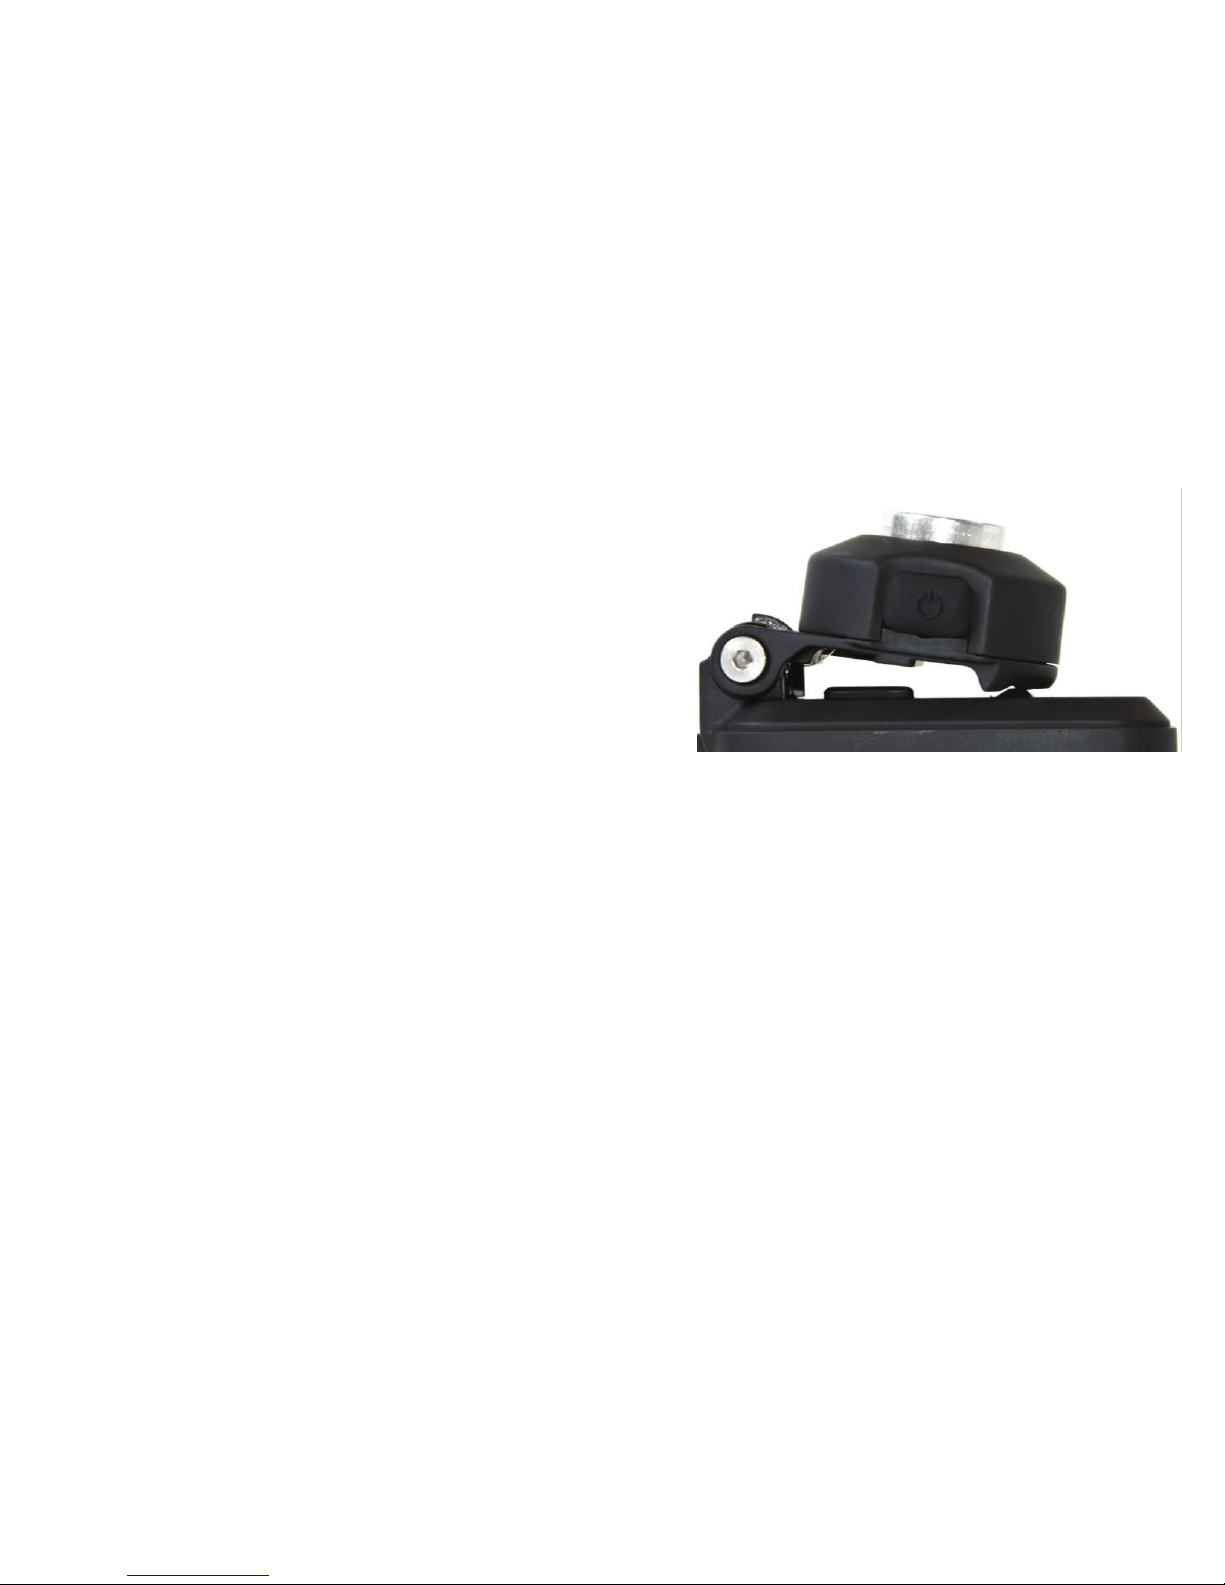
Holding your BuzzClip
Your BuzzClip can be used as both a wearable and a handheld!
Locked Position:
1. Place the device in your hand with the vibrator housing in your palm.
2. Position or slide your thumb under the rounded top and you will be able to
push the sensor up until it locks at a 90-degree angle so that the sensor is
now facing forward rather than up at you.
3. You can now hold the BuzzClip in your hand similarly to how you would
hold a flashlight and use it as a handheld to detect obstacles. We
recommend using the 3-meter mode when holding the BuzzClip.
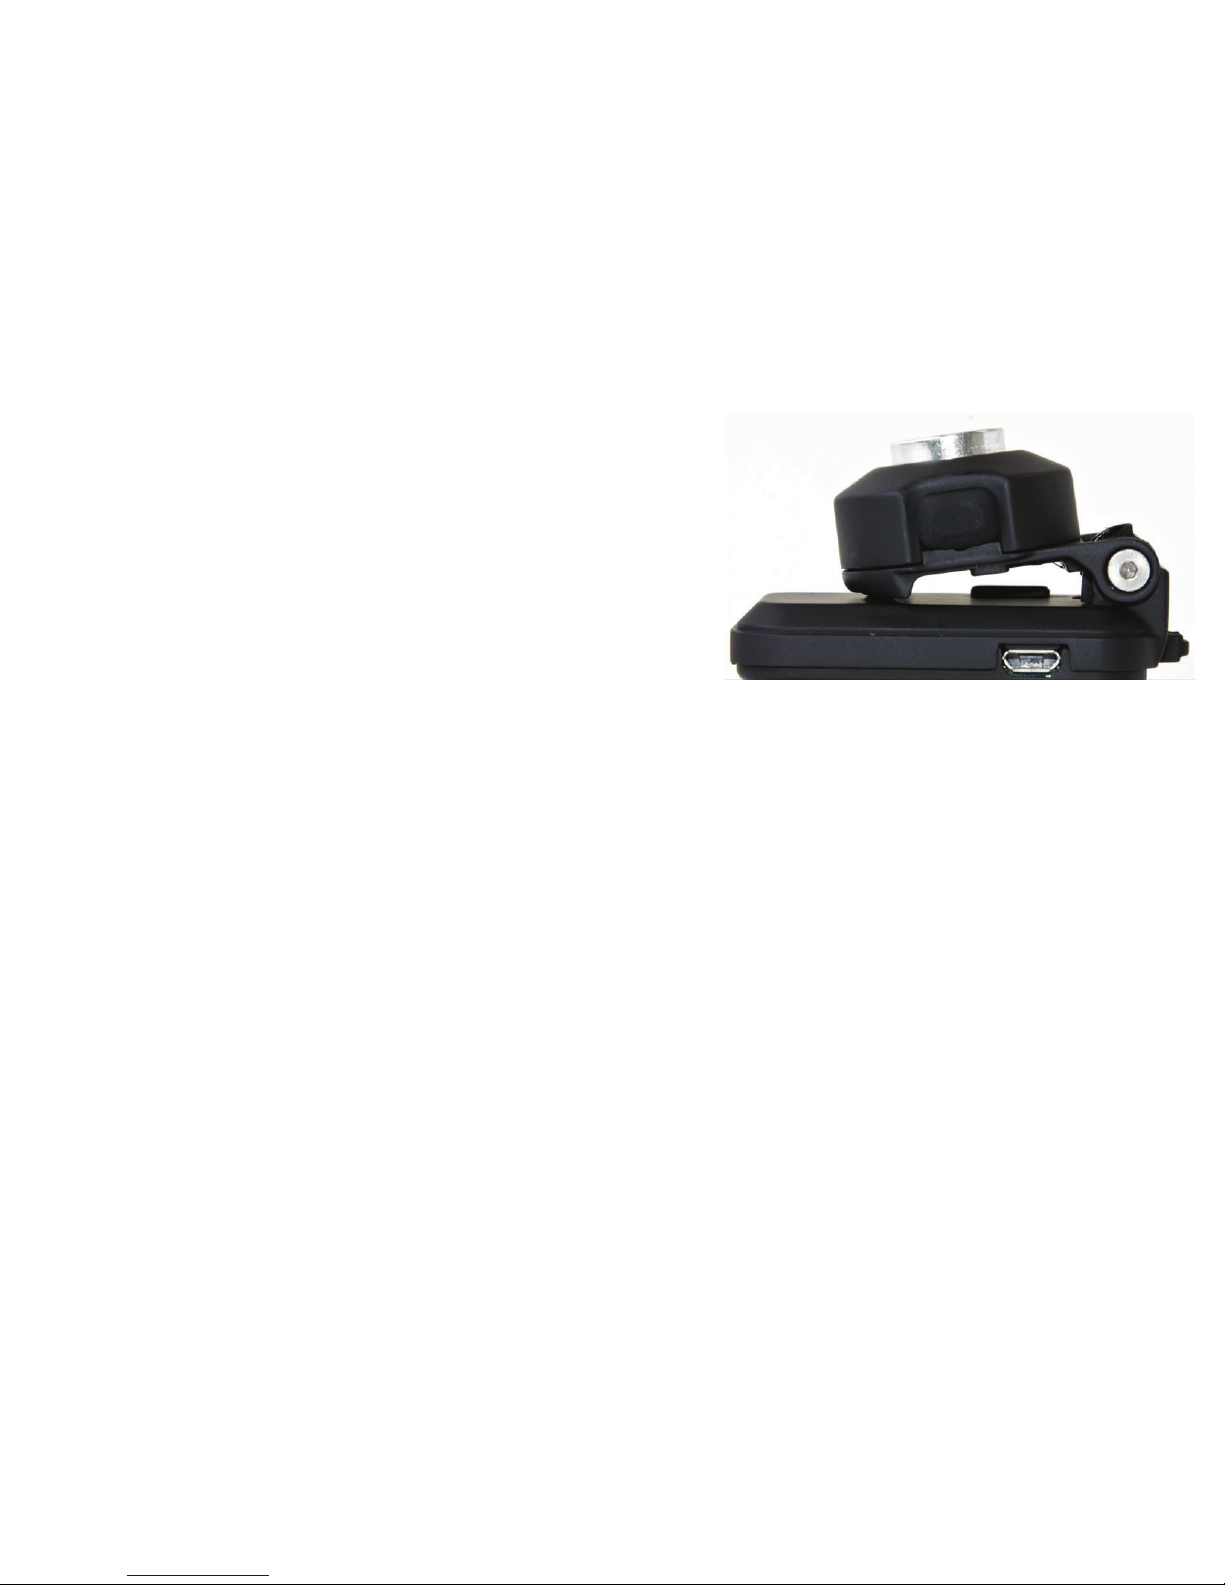
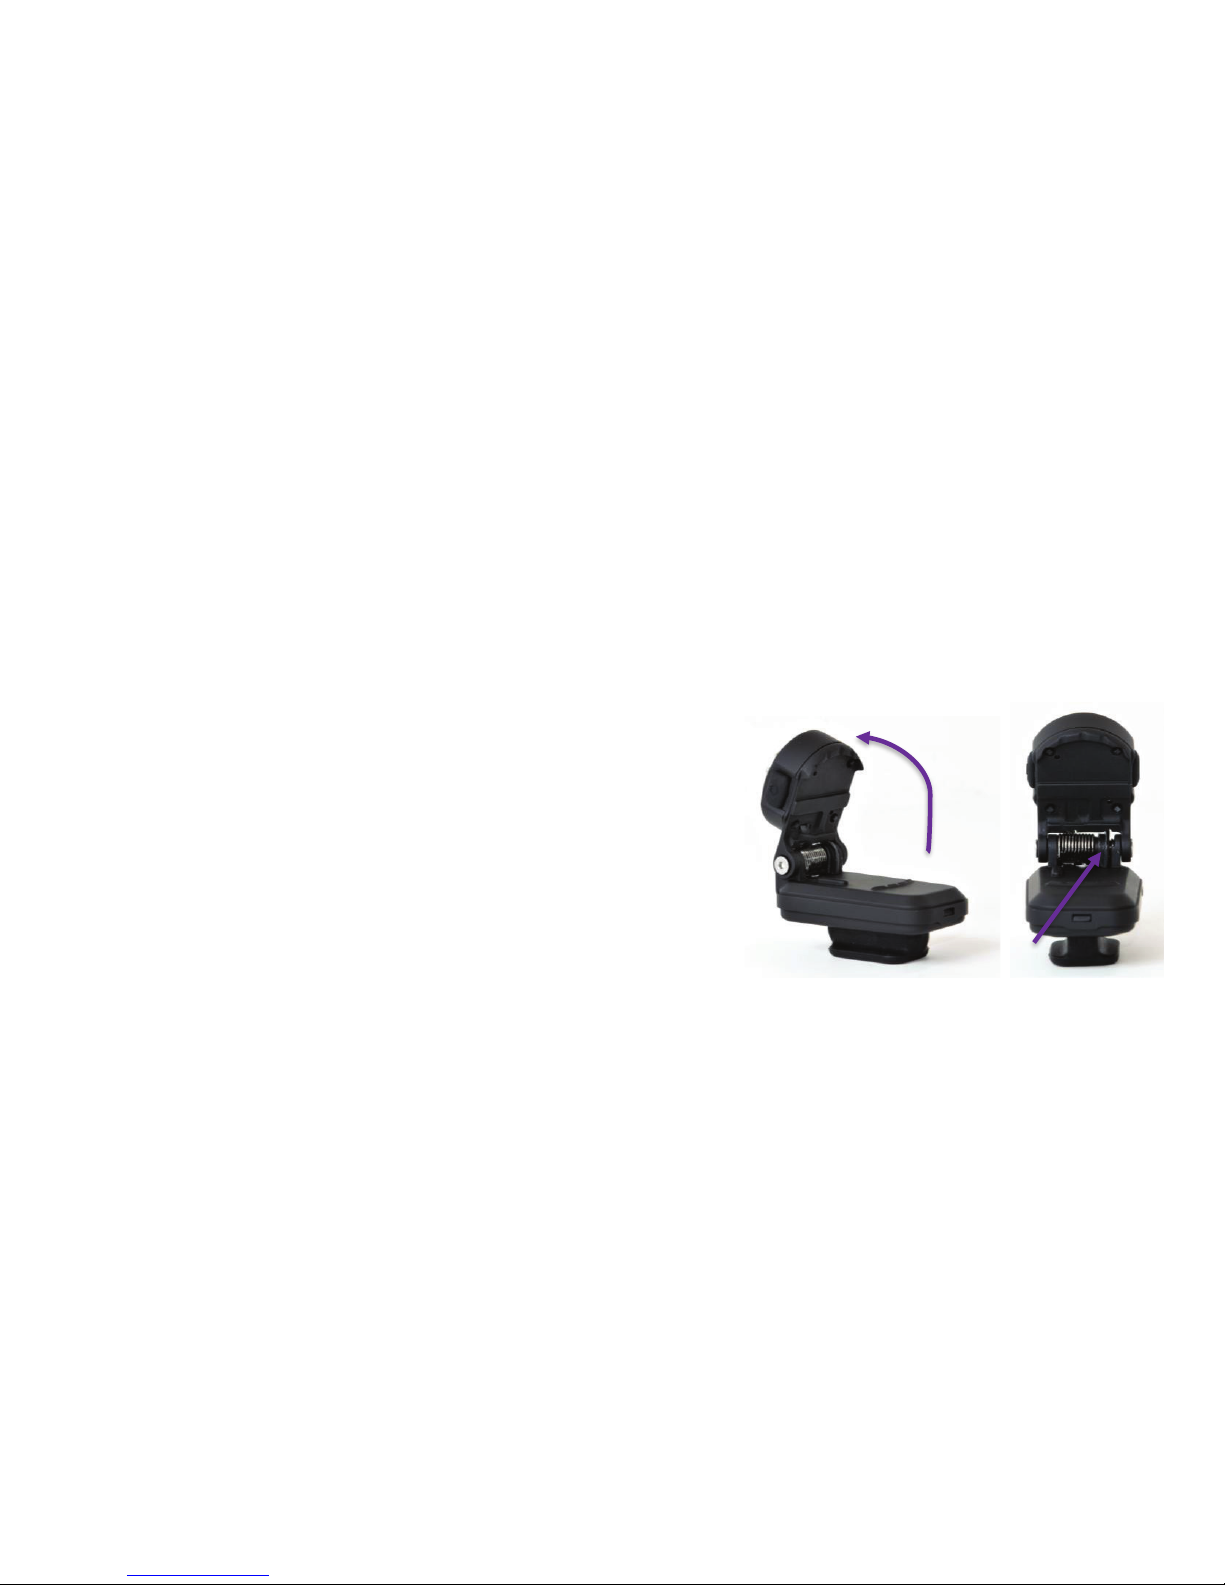
Unlocked Position:
1. While in the locked position (sensor at 90 degrees), between the rounded
top and the main body, there is a coiled spring. Feel along this spring and
locate the plastic stopper on the right side.
2. Gently push the rounded top a little past a 90-degree angle and then slide
this plastic stopper to the right with your thumb.
3. Now the BuzzClip is in the Unlocked Position with the rounded top and
sensor back in their resting states.
Stopper
Holding your BuzzClip
Your BuzzClip can be used as both a wearable and a handheld!
Locked Position:
1. Place the device in your hand with the vibrator housing in your palm.
2. Position or slide your thumb under the rounded top and you will be able to
push the sensor up until it locks at a 90-degree angle so that the sensor is
now facing forward rather than up at you.
3. You can now hold the BuzzClip in your hand similarly to how you would
hold a flashlight and use it as a handheld to detect obstacles. We
recommend using the 3-meter mode when holding the BuzzClip.
Unlocked Position:
1. While in the locked position (sensor at 90 degrees), between the rounded
top and the main body, there is a coiled spring. Feel along this spring and
locate the plastic stopper on the right side.
2. Gently push the rounded top a little past a 90-degree angle and then slide
this plastic stopper to the right with your thumb.
3. Now the BuzzClip is in the Unlocked Position with the rounded top and
sensor back in their resting states.
Stopper

Using your BuzzClip
The BuzzClip is not a replacement for a cane but a complementary mobility tool. It is
intended to be used in combination with a cane or a guide dog. For those who
frequently travel with a cane or a guide dog, we recommend using the BuzzClip to
address upper body and head level obstacles while the cane can address changes in
elevation and lower obstacles. The BuzzClip can also be used on its own for when in
familiar indoor environments and for people living with partial sight who do not use a
cane or a guide dog.
Detection Accuracy and Range of the BuzzClip:
1. The BuzzClip can accurately detect anything coming into its range of
detection. The sensor ensures that the distance to any nearby obstacles is
accurately measured regardless of lighting conditions or transparency of
the object. It does this by sending and receiving sound waves. The received
information is then relayed back to the user instantly through intuitive
vibrations.
2. The angle of detection is a conical shape from the center of the sensor
(mesh within circular ring) and the BuzzClip has three ranges of detection: a
1-meter mode, a 2-meter mode and a 3-meter mode.
1 meter
2 meters
3 meters
0.5 m
1 m
1.5 m

3. When the BuzzClip is clipped around your upper body or chest area in the
2-meter mode, the detection range will cover you shoulder to shoulder and
from about your waist to just above the top of your head.
4. When the BuzzClip is clipped around your upper body or chest area in the
3-meter mode, the detection range will cover you more than shoulder to
shoulder and from about your ankles to just above the top of your head.
5. The frequency of vibrations from the BuzzClip increases as you get closer to
an obstacle.
6. The BuzzClip delivers three strong rapid vibrations when it is 50 cm (arm’s
length) away from an obstacle as an indication to stop and proceed with
caution as there is something that is now less than 50 cm away from you.
The Automatic Sleep Feature:
1. The BuzzClip has a built-in automatic sleep feature to conserve battery and
to reduce irritation for when remaining a fixed distance away from a person
or obstacle.
2. For example, if you were having a conversation with someone face to face,
you would be within 1 or 3 meters of each other, meaning the BuzzClip
would be vibrating constantly while you are conversing.
3. The automatic sleep feature activates when you are a fixed distance away
from a person/object for longer than 5-7 seconds.
4. After 5 to 7 seconds of being a fixed distance away from something (i.e. you
are not moving and neither is the obstacle/person), the BuzzClip will stop
vibrating and is now in its ‘sleep mode’.
5. As soon as you or the person/object begins to move more than 5 cm, the
BuzzClip will kick back into gear and start detecting and vibrating again.

Using your BuzzClip in Wet Winter Weather:
1. The BuzzClip is water resistant. It will
function perfectly in light rain. Don’t go
swimming with it though!
2. If rain drops land directly into the sensor, the
rain may create a film of water in the
sensor’s mesh. The unit may stop functioning
temporarily. Simply wipe or shake the water
off or out of the sensor, give it a few minutes
to recalibrate and then it’s good to go!
3. The BuzzClip can function in extreme winter conditions (-30°C)
4. Ensure that the sensor is always exposed even with heavy winter clothing.
Charging your BuzzClip
The BuzzClip’s battery will easily last up to 10 hours under rigorous use and can be
charged using a standard Micro-USB cable.
To Charge your BuzzClip:
1. Plug in the provided Charger into an electrical outlet in your home.
2. Plug in the larger end (USB) of the provided charging cable into the Charger.
3. Locate the Micro-USB Charging Port on the main body of the BuzzClip.
4. Plug in the smaller end (Micro-USB) of the charging cable into the Micro-
USB charging port on the BuzzClip.
5. Your BuzzClip is now charging! It should take less than an hour for the
BuzzClip to reach a full charge. The BuzzClip indicates its battery level to
you through specific vibrations as soon as it's turned on:
•4 vibrations indicate that the battery is above 75%.
•3 vibrations indicate that the battery is between 50% -75%.
•2 vibrations indicate that the battery is between 25% -50%.
•1 vibration indicates that the battery is less than 25%. Charge it soon!

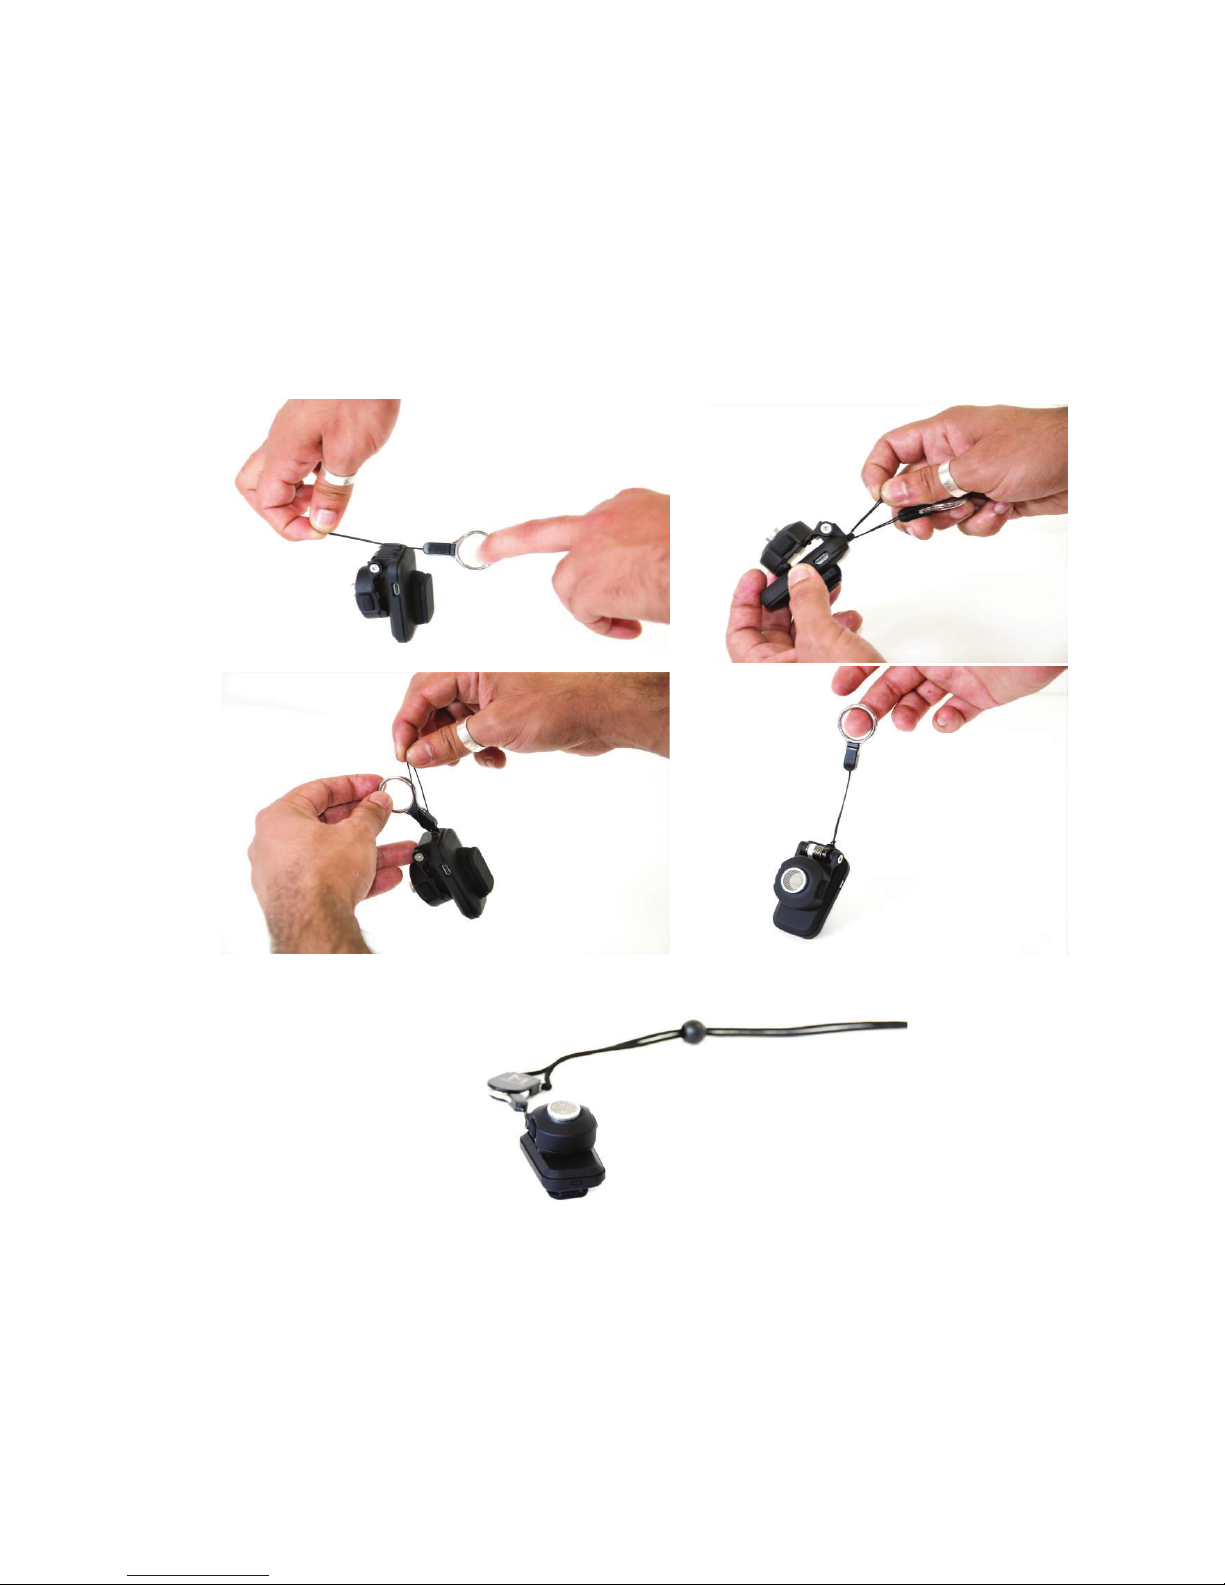
Connecting the Lanyard to your BuzzClip
Locate the Lanyard Loop –This is a small hole or loop located along the chamfered
edge of the main body. This hole is to attach the lanyard that is included in your box
for additional safety and security purposes (in case of drops, etc.)
To Attach the Lanyard:
1. Locate the thin rope that is attached to the small plastic adaptor.
2. Thread the thin rope through the lanyard loop.
3. Open the end of the rope that has been threaded through the lanyard loop
and pull the other end of the lanyard all the way through to firmly attach
the lanyard to the device.
4. To detach the lanyard, push the small round button at the center of the
plastic adaptor and pull out the ring on the perimeter of the adaptor.

Disclaimers and Warranty Information
Warning: Please read this document before using the
device. Follow the instructions listed below to operate the
device safely.
1.0 PRODUCT DISCLAIMER
• Read the instruction manual carefully before use.
• Do not use the BuzzClip while it is charging.
• Do not wash your BuzzClip in the washing machine.
• Do not wash your BuzzClip with water.
• Do not clean it when the BuzzClip is turned on or being
charged.
• Do not clean the BuzzClip with household cleaning
products.
• Do not swim with your BuzzClip.
• Do not take showers with your BuzzClip.
• Do not dry it inside the microwave or drier.
• Do not expose the BuzzClip to temperatures above + 70°C.
• Do not use it under -30°C.
• Do not clip the BuzzClip onto your skin or your hair.
• Do not open the BuzzClip.
•Do not remove or replace parts.
•Do not leave it exposed to heat for long periods of time.
•Do not sink it into any liquid.
•Do not ingest parts of the BuzzClip.
1.1 Warning:
As with many other electrical devices, failure to take the
following precautions can result in serious injury or death
from electric shock, fire, or damage to the BuzzClip.
• Use only an approved charging cable
•Do not allow a wireless device or charging cable to
become wet
•Unplug the charging cable during lightning storms or when
unused for long periods
•To prevent damage, avoid sitting or stepping on a wireless
device, its cable, or the cable plug or connector.
Other manuals for BuzzClip
1
Table of contents
Popular Medical Equipment manuals by other brands


Getinge
Getinge Arjohuntleigh Nimbus 3 Professional Instructions for use

Mettler Electronics
Mettler Electronics Sonicator 730 Maintenance manual

Pressalit Care
Pressalit Care R1100 Mounting instruction

Denas MS
Denas MS DENAS-T operating manual

bort medical
bort medical ActiveColor quick guide

AccuVein
AccuVein AV400 user manual


