manuals.online logo
Brands
  1. Home
  2. •
  3. Brands
  4. •
  5. IMI
  6. •
  7. Water Filtration System
  8. •
  9. IMI NORGREN F64B Series Installation and operating instructions

IMI NORGREN F64B Series Installation and operating instructions

Our policy is one of continued research and development. We therefore reserve the right to amend,
without notice, the speciications given in this document. (1999-xxxxb) © 2020 IMI International s.r.o.
05/21
IM/en 8.240.115.001
Technical Data
Fluid: Compressed air
Metal bowl: 17 bar (250 psig)
Transparent bowl: 10 bar (150 psig
Operating temperature*:
Metal bowl: –20° ... +65°C (0° ... +150°F)
Transparent bowl: –20° ... +50°C (0° ... +125°F)
* Air supply must be dry enough to avoid ice forma-
tion at temperatures below +2°C (+35°F).
Integral F64B/L Pre-ilter Element: 40 µm
nominal
Particle Removal F64B/L: 0,01 µm
Maximum Remaining Oil Content:
0,003 mg/m3 at +21°C (+70°F)
Air Quality: Within ISO8573-1:2010: 1:7:0
Typical performance characteristics
Inlet pressure
(bar)
Maximum low (dm3/s) *
F64B F64L
1 6,7 7,1
3 10,7 11,3
5 13,8 14,4
6,3 15,6 16,3
7 16,5 17,2
9 18,8 19,5
* Maximum low to maintain stated oil removal
performance.
Automatic drain connection: 1/8”
Automatic drain operating conditions:
Bowl pressure required to close drain:
Greater than 0,3 bar (5 psig)
Bowl pressure required to open drain:
Less than 0,2 bar (3 psig)
Minimum air low required to close drain:
1 dm3/s (2 scfm)
Manual operation: Depress pin inside drain
outlet to drain bowl
Nominal bowl size: 0,2 litre (7 luid oz)
Materials:
Body: Zinc
Bowl:
Metal: Zinc
Transparent: Polycarbonate
Metal bowl sight glass, standard: Pyrex
Element: Composite materials
Elastomers: Synthetic rubber
Replacement Items
Service Kit
(Item No. (s) 3, 5, 8, 9, 14, 16, 17, 18, 20):
F64B- F64B-KITA0V
F64L- F64L-KITA0V
Pyrex sight glass kit (Item No. 7) 2273-97
Element, coalescing (Item No. 3):
F64B 5350-99
F64L 5350-98
Element, integral pre-ilter
(Item No. 16) 3698-02
Activated carbon pack
(Item No. 18) 5568-02
Manual drain (Item No. 9, 12, 13, 14) 684-84
Automatic drain (Item No. 8) 6000-70
Automatic drain - USA only
(Item No. 8) 3000-70
Operation
On exceptionally dirty lines it may be neces-
sary to clean the pre-ilter element at 90 day
intervals.
Do not exceed Maximum Flow rating or
excessive pressure drop will result or oil carry
over may occur.
The top ilter element acts as absorbant
pack to remove any small traces of oil or
hydro-carbon gases which might
be carried over from the lower bowl.
These elements also provide protection in the
event of any failure of the lower ilter.
Resistance to air low will gradually increase
as the ilter element collects solid particles.
The pressure differential across the element
should not be allowed to exceed 0,7 bar
(10 psi) or damage to the element may
occur.
Servicing
Air Service equipment should be initially
maintained annually. Use, quality of air and
condition at examination may indicate ad-
justment of the maintenance interval.
1. Open manual drain to expel accumulated
liquids. Keep liquids below element (3).
2. To operate automatic drain manually, lift
operating pin in bottom outlet with a blunt
rod.
3. Clean or replace ilter element when dirty.
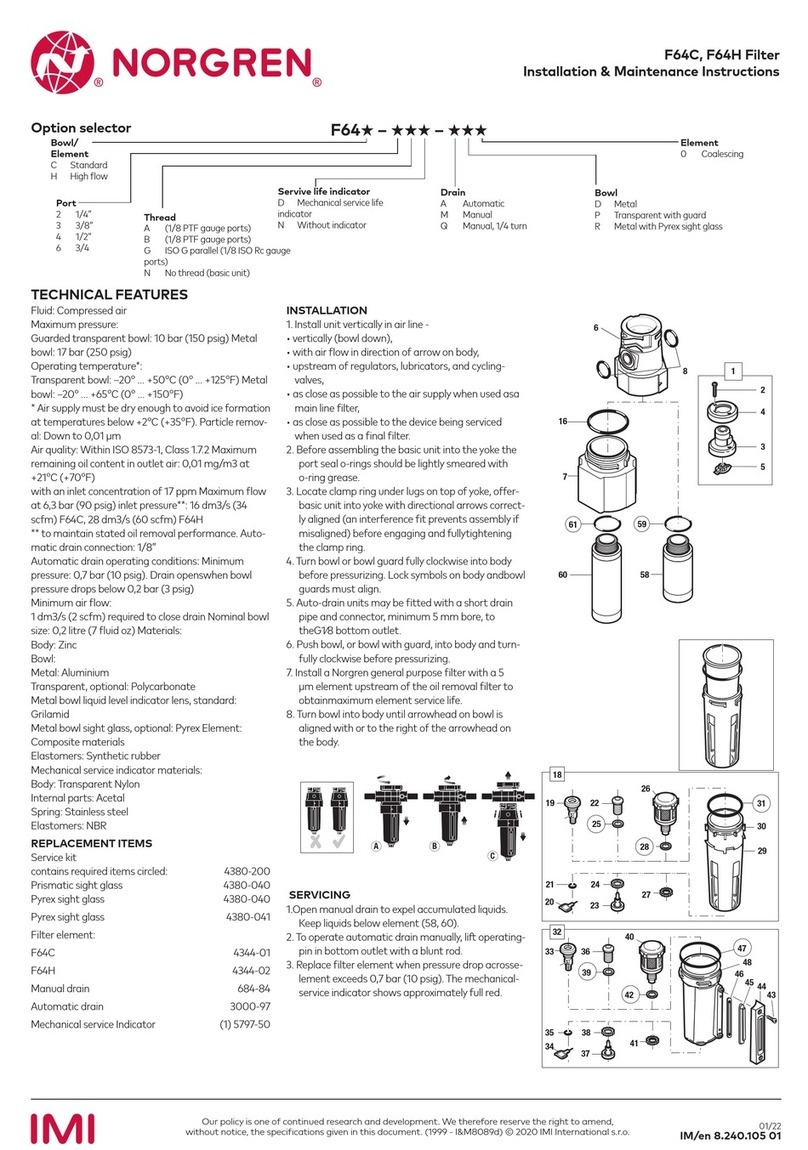
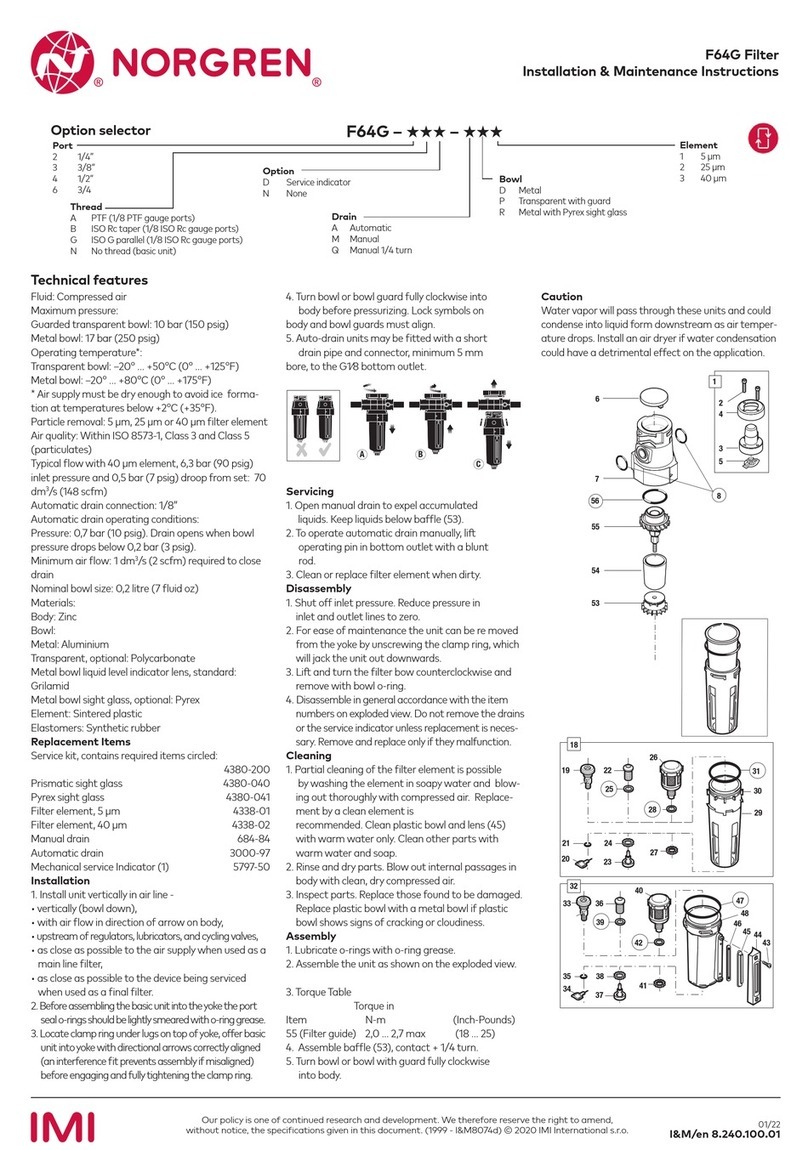
Option selector
Port
2 1/4“
3 3/8“
4 1/2“
6 3/4“
N No yoke
Drain
A Automatic
M Manual Bowl
R Metal with Pyrex sight glass
T Transparent
Thread
A PTF
B ISO Rc tapered
G ISO G parallel
N No yoke
F64˙– ˙˙N – ˙˙0
Bowl
B Coalescing &
activated carbon element
L Extended coalescing &
activated carbon element
8
9
18
18
21
15 15
17
20
16
19
3
3
1
1
10
9
10
5
5
12
14
13
14
20
16
6
19
3
3
9
5
12
14
10
13
10
8
9
5
14
4
14
21
28
37
17
4
22
7
7
F64B, F64L - Ultra High Eficiency Coalescing Filter
Installation & Maintenance Instructions
05/21
Our policy is one of continued research and development. We therefore reserve the right to amend,
without notice, the speciications given in this document. (1999-xxxxb) © 2020 IMI International s.r.o.
IM/en 8.240.115.002
Disassembly
1. Shut off inlet pressure. Reduce pressure in
inlet and outlet lines to zero.
2. For ease of maintenance the unit can be
removed from the yoke by unscrewing the
clamp ring, which will jack the unit out
downwards.
3. To disassemble the lower ilter section
unscrew the ilter bowl (10) and remove
with bowl o-ring (5).
4. Remove coalescing element (3) by hand.
5. Remove pre-ilter element (16).
6. Unscrew top bowl and remove top
element (18).
7. Disassemble in general accordance with
the item numbers on exploded view. Do
not remove the drains unless replacement
is necessary. Remove and replace
only if they malfunction.
Cleaning
1. Partial cleaning of the pre-ilter element
(16) is possible by washing the element
in soapy water and blowing out thoroughly
with compressed air. Replacement by a
clean element is recommended. The main
coalescing element (3) will need re
newing if pressure drop becomes excessive.
It is not designed to be cleaned.
Replace carbon pack (18) with new
element if discoloured due to oil
adsorption. When replacing or renewing
top element, wipe main ilter body
thoroughly to remove all traces of oil and
renew o-ring. If top element becomes
saturated with oil in a short period, the
main element or o-ring may be faulty and
should be replaced.
Clean plastic bowl (10) with warm
water only. Clean other parts with warm
water and soap.
2. Rinse and dry parts. Blow out internal
passages in body with clean, dry
compressed air.
3. Inspect parts. Replace those found to be
damaged. Replace plastic bowl with a
metal bowl if plastic bowl shows signs of
cracking or cloudiness.
Assembly
1. Lubricate o-rings with o-ring grease.
2. Assemble the unit as shown on the
exploded view.
3. Turn bowl (10) fully clockwise into body.
Caution
Water vapor will pass through these units
and could condense into liquid form down-
stream as air temperature drops. Install an
air dryer if water condensation could have
a detrimental effect on the application.
Warning
These products are intended for use in
industrial compressed air systems only. Do
not use these products where pressures and
temperatures can exceed those listed under
Technical Data.
Polycarbonate plastic bowls can be dam-
aged and possibly burst if exposed to such
substances as certain solvents, strong
alkalies, compressor oils containing es-
ter-based additives or synthetic oils. Fumes
of these substances in contact with the
polycarbonate bowl, externally or internally,
can also result in damage. Clean with warm
water only.
Use metal bowl in applications where a
plastic bowl might be exposed to substances
that are incompatible with polycarbonate.
Before using these products with luids other
than air, for non industrial applications, or for
life-support systems consult Norgren.
8
9
18
18
21
15 15
17
20
16
19
3
3
1
1
10
9
10
5
5
12
14
13
14
20
16
6
19
3
3
9
5
12
14
10
13
10
8
9
5
14
4
14
21
28
37
17
4
22
7
7

This manual suits for next models

1

Other IMI Water Filtration System manuals

IMI norgren F64C Installation and operating instructions

IMI

IMI norgren F64C Installation and operating instructions

IMI NORGREN F64G Installation and operating instructions

IMI

IMI NORGREN F64G Installation and operating instructions

Popular Water Filtration System manuals by other brands

Hydac OLF-5/Z Installation and maintenance instructions

Hydac

Hydac OLF-5/Z Installation and maintenance instructions

Plymovent MDB GO Installation and user manual

Plymovent

Plymovent MDB GO Installation and user manual

Waterdrop WD-UA system installation instructions

Waterdrop

Waterdrop WD-UA system installation instructions

GRE FS550 Installation and maintenance manual

GRE

GRE FS550 Installation and maintenance manual

Eureka Forbes Dr. Aquaguard Eterniti user manual

Eureka Forbes

Eureka Forbes Dr. Aquaguard Eterniti user manual

Hyundai Poseidon user guide

Hyundai

Hyundai Poseidon user guide

OVIO OHC-7000D user manual

OVIO

OVIO OHC-7000D user manual

DracoDrum Minima User guide and installation manual

DracoDrum

DracoDrum Minima User guide and installation manual

Vestergaard LifeStraw PEAK Series Cleaning instructions

Vestergaard

Vestergaard LifeStraw PEAK Series Cleaning instructions

AQUAMAXX FR-SE installation guide

AQUAMAXX

AQUAMAXX FR-SE installation guide

Jesco C 2700 Operating and maintenance instructions

Jesco

Jesco C 2700 Operating and maintenance instructions

3M ScaleGard HP Installation and operation instructions

3M

3M ScaleGard HP Installation and operation instructions

BaySaver BayFilter Design manual

BaySaver

BaySaver BayFilter Design manual

Brilix FSP350 Installation and user guide

Brilix

Brilix FSP350 Installation and user guide

Perma-Trade permasolvent primus 2.1 operating instructions

Perma-Trade

Perma-Trade permasolvent primus 2.1 operating instructions

SimPure Y6 owner's manual

SimPure

SimPure Y6 owner's manual

3M Aqua-Pure AP717 Installation and operating instructions

3M

3M Aqua-Pure AP717 Installation and operating instructions

Klingenburg AS2 manual

Klingenburg

Klingenburg AS2 manual

manuals.online logo
manuals.online logoBrands
  • About & Mission
  • Contact us
  • Privacy Policy
  • Terms and Conditions

Copyright 2025 Manuals.Online. All Rights Reserved.