IMMAX NEO LITE User manual
Smart home devices
UŽIVATELSKÝ NÁVOD
Výrobce a dovozce:
IMMAX, Pohoří 703, 742 85 Vřesina, EU | www.immax.cz
Navrženo v České republice, vyrobeno v Číně
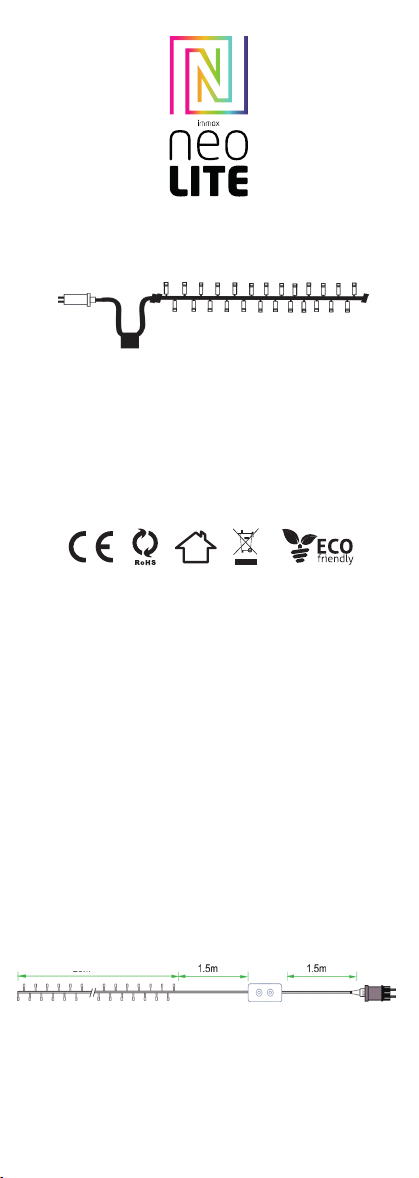
Immax NEO LITE Smart vánoční LED osvětlení -
řetěz 40m, 400diod, WW+RGB, WiFi, TUYA
INSTALACE
1. Používejte pouze napájecí adaptér s výstupním napětím DC 24V.
2.Rozložte LED stromeček, abyste předešli problémům s přehřátím. Připojte kabely
LED stromečku se správnou polohou na ovladači. Otestujte aplikaci APP, abyste
zkontrolovali, zda dokáže správně ovládat LED stromek. Pokud je vše v pořádku,
přejděte ke kroku hnízdění.
3. Zkontrolujte a ujistěte se, že jsou napájecí zdroj, ovladač a LED stromek správně
připojeny.
UPOZORNĚNÍ
1. Kolem ovladače neumisťujte žádné kovové prvky, které by mohly blokovat
signál WiFi.
2. Ujistěte se, že jsou napájecí zdroj a ovladač správně připojeny.
3. Výstupní napětí zdroje napájení by mělo být stejné jako pracovní napětí LED
stromu.
4. Nezakrývejte nic na povrchu napájecího zdroje, regulátoru a LED stromu.
5. Před zapnutím se ujistěte, že je připojení správné.
SCHÉMA VÝROBKU
STAŽENÍ A REGISTRACE
Naskenujte QR kód a stáhněte si aplikaci “Immax NEO PRO”. Nebo vyhledejte
“Immax NEO PRO” v App Store nebo Google Play pro instalaci APP. Otevřete
APLIKACI “Immax NEO PRO”, klepněte na “Register” (Registrovat) a získejte účet
pomocí svého telefonního čísla nebo e-mailu. Přihlaste se do APP.
Immax NEO LITE Smart Christmas LED lighting
- chain 40m, 400 diodes, WW+RGB, WiFi, TUYA
INSTALLATION
1.Use the power adapter with DC 24V of output voltage only.
2.Please unfold the LED lightstring to avoid the overheat issues. Please connect
the cables of LED lightstring with the right position on the controller. Test the APP
to check if it can control the LED lightstring correctly. If everything goes well,go
to nest step.
3.Check and ensure the power supply, controller and LED lightstring are connected
correctly.
ATTENTIONS
1. Do not put any metal around the controller,which could block WiFi signal.
2. Ensure the power supply and controller are connected correctly.
3. The power supply output voltage should be same as LED lightstring working
voltage.
4. Do not cover anything on the surface of power supply,controller and LED
lightstring.
5. Ensure the connection is correct before powering.
PRODUCT FUNCTIONS DIAGRAM
DOWNLOAD AND REGISTRATION
Scan the QR Code to download “Immax NEO PRO” APP. Or Search “Immax NEO
PRO” in App store or Google Play to install the APP. Open the “Immax NEO PRO”
APP, tap “Register” to get an account with your phone number or E-mail. Sign in
the APP.
Smart home devices
USER MANUAL
Manufacturer and importer:
IMMAX, Pohoří 703, 742 85 Vřesina, EU | www.immax.cz
Designed in Czech Republic, Made in China
PŘIPOJENÍ K APLIKACI
Příprava: Zapněte LED stromek a vstupte do domovské APP, ujistěte se, že váš
mobilní telefon a chytré soupravy jsou připojeny ke stejné WIFI.
Resetujte LED strom - dlouze stiskněte tlačítko ‘ L ‘ na ovladači na více než
10 vteřin. Kontrolka WiFi na ovladači začne rychle červeně blikat.
Vyhledejte “+” (v příslušné místnosti APP) pro přidání zařízení. Pokud jste již
před připojením LED stromu zapnuli Bluetooth na mobilním telefonu, nemusíte
Bluetooth znovu zapínat, APP se k LED stromu připojí automaticky. Pokud váš
mobilní telefon Bluetooth nezapne, APP zobrazí rozhraní s tipy a požádá vás o
zapnutí Bluetooth. Poté zvolte “Allow” (Povolit), čímž se funkce Bluetooth vašeho
mobilu zapne. Poté APP zobrazí tipy s informacemi o LED stromu a zvolte “Go to
add” (Přejít na přidání). Přejde do rozhraní zařízení Bluetooth, zvolte “+” a přejděte
do dalšího rozhraní (Zadejte heslo k Wi-Fi). Zadejte heslo k WIFI a zvolte “Conrm”
(Potvrdit), poté přejde do stavu “Connecting......” (Připojení......), v tomto kroku
budete muset počkat, až se mobil spáruje s ovladačem. Zvolte “Done” (Hotovo),
když se zobrazí “Added successfully” (Úspěšně přidáno), poté přejděte do
provozních režimů.
APLIKACE
V aplikaci Immax NEO PRO můžete zapínat a vypínat LED strom nebo ovládat
přednastavené programy a časovač.
PROGRAMY
Můžete si vybrat z těchto 3 přednastavených programů: Steady, Flash, Fade
ČASOVAČ
S funkcí časovače můžete nastavit požadovaný rozvrh osvětlení.
OVLADAČ
V režimu párování bliká kontrolka L ČERVENĚ.
Při připojování k internetu bliká kontrolka L ZELENĚ.
Po připojení k síti svítí kontrolka L trvale ZELENĚ.
Kontrolka L bliká ZELENĚ, pokud se nedaří zařízení připojit k internetu.
Funkční tlačítko ‘ L ‘
-stisknutím 1× změníte funkci
-dlouhým stisknutím na déle než 10 vteřin resetujete zařízení
Funkční tlačítko ‘ R ‘
-stisknutím 1krát změníte teplotu barev
Bezpečnostní informace
UPOZORNĚNÍ: Uchovávejte mimo dosah dětí. Tento výrobek obsahuje malé části,
které mohou při požití způsobit udušení nebo zranění.
VAROVÁNÍ: Z každé baterie mohou unikat škodlivé chemické látky, které mohou
poškodit pokožku, oděv nebo místo, kde je baterie uložena. Abyste předešli riziku
zranění, nedovolte, aby se jakákoli látka z baterie dostala do kontaktu s očima
nebo pokožkou. Každá baterie může prasknout nebo dokonce explodovat, pokud
je vystavena ohni nebo jiným formám nadměrného tepla. Při manipulaci s bateriemi
buďte opatrní. Abyste snížili riziko zranění v důsledku nesprávné manipulace s
bateriemi, dodržujte následující bezpečnostní opatření:
- Nepoužívejte v jednom zařízení baterie různých značek a typů.
- Při výměně baterií vždy vyměňte všechny baterie v zařízení.
- Nepoužívejte dobíjecí baterie nebo baterie pro opakované použití.
- Nedovolte dětem vkládat baterie bez dozoru.
- Dodržujte pokyny výrobce baterií pro správnou manipulaci s bateriemi a jejich
likvidaci.
UPOZORNĚNÍ: Výrobek a baterie by měly být zlikvidovány v recyklačním středisku.
Nelikvidujte je společně s běžným domovním odpadem.
UPOZORNĚNÍ: Pro zajištění bezpečného používání výrobku musí být na místě
instalace přivedeny vodiče v souladu s platnými předpisy. Instalaci smí provádět
pouze osoba s příslušným osvědčením v oblasti elektroniky. Během instalace nebo
při zjištění poruchy musí být napájecí kabel vždy odpojen od zásuvky (v případě
přímého připojení musí být příslušný jistič vypnut). Nesprávná instalace může
výrobek poškodit a způsobit zranění.
UPOZORNĚNÍ: Výrobek nerozebírejte, mohlo by dojít k úrazu elektrickým
proudem.
UPOZORNĚNÍ: Používejte pouze originální napájecí adaptér dodaný s výrobkem.
Nepoužívejte zařízení, pokud napájecí kabel vykazuje známky poškození. UPO-
ZORNĚNÍ: Postupujte podle pokynů uvedených v přiloženém návodu.
Údržba
Chraňte zařízení před znečištěním a znečištěním. Zařízení otírejte měkkým
hadříkem, nepoužívejte hrubé nebo drsné materiály.
NEPOUŽÍVEJTE rozpouštědla ani jiné agresivní čisticí prostředky nebo chemikálie.
Technické specikace:
Protokol: Protokol: Wi
Frekvence: 2400 MHz~2483,5 MHz
Maximální výstupní výkon RF: Wi: 20 dBm
40m 40m

Smart home devices
GEBRAUCHSANLEITUNG
Hersteller und Importeur:
IMMAX, Pohoří 703, 742 85 Vřesina, EU | www.immaxneo.cz | www.immaxneo.com
Entworfen in der Tschechischen Republik, hergestellt in China
APP CONNECTION
Preparation: Power on the LED lightstring and enter the home of APP, please make
sure your mobile and the smart kits are connected to the same WIFI.
Reset the LED tree - long press the ‘ L ‘ button on the controller for more than
10 second. The WiFi LED on the controller will ash red quickly. Find the “+” (in
the corresponding room of the APP) to add devices. If your mobile have already
turned on blue tooth before connecting the LED lightstring, then no need to turn
on blue tooth again, the APP will connect to the LED lightstring automatically.
If your mobile doesn’t turn on the Bluetooth, the APP will pop up an interface
with tips to ask you to turn on bluetooth. Then please choose “Allow”, then the
bluetooth function of your mobile will be turned on. After that, the APP will pop
up tips with info of the LED lightstring, then choose “Go to add”. Will go into an
interface of Bluetooth device, choose “+” and go into next interface (Enter Wi-Fi
password). Input the password of the WIFI and choose “Conrm”, then it will go
into status of “Connecting......”, you will need to await for mobile to pair with the
controller at this step. Choose “Done” when it shows “Added successfully”, then
go into operation modes.
APPLICATION
In Immax NEO PRO you can turn the LED lightstring on and off or control preset
programs and the timer.
3 PROGRAMS
You can choose from these 3 preset functions: Steady, Flash, Fade.
You can adjust color temperature and light brightness under each function.
TIMER
With Timer function, you can set the desired lighting schedule.
CONTROLLER
The L indicator light blinks RED in pairing mode
The L indicator light blinks GREEN when connecting to the Internet.
The L indicator light is steady GREEN after connected to the Network.
The L indicator light blinks GREEN when the wireless router has Network error.
Function Button ‘ L ’
- press 1 time to change function
- long press 10 seconds to reset the device
Function Button ‘ R ’
- press 1 time to change color temperature
Safety Information
CAUTION: Keep out of reach of children. This product contains small parts, which
may cause suffocation or injury if swallowed.
WARNING: Every battery has the potential to leak harmful chemicals that can dam-
age skin, clothing or area where the battery is stored. To avoid the risk of injury,
do not allow any substance from the battery to come into contact with the eyes or
skin. Every battery may burst or even explode if exposed to re or other forms of
excessive heat. Take care when handling the batteries. To reduce the risk of injury
from mishandling the batteries, take the following precautions:
- Do not use different brands and types of batteries in the same device
- When replacing the batteries, always replace all the batteries in the device
- Do not use rechargeable or reusable batteries.
- Do not allow children to insert batteries without supervision.
- Follow the battery manufacturer’s instructions for proper battery handling and
disposal.
CAUTION: The product and batteries should be disposed of at a recycling centre.
Do not dispose of them with normal household waste.
CAUTION: To ensure safe use of the product, wires must be brought at the
installation site according to valid regulations. The installation must only be carried
out by an individual with the appropriate certication in the eld of electronics.
During installation or when a fault is detected, the power cable must always be
disconnected from the socket (in the case of direct connection, the relevant circuit
breaker must be switched off). Improper installation can damage the product and
cause injury.
CAUTION: Do not disassemble the product, electric shock may occur.
CAUTION: Use only the original power adapter provided with the product. Do not
operate the device if the power cord shows signs of damage. CAUTION: Follow
the instructions in the enclosed manual.
Maintenance
Protect the device from contamination and soiling. Wipe the device with a soft
cloth, do not use rough or coarse materials.
DO NOT USE solvents or other aggressive cleaners or chemicals.
Technical specications:
Protocol: Wi
Frequency: 2400 MHz~2483.5 MHz
Maximum RF output power: Wi: 20 dBm
Intelligenter LED-Weihnachtsbaum
INSTALLATION
1. verwenden Sie nur das Netzteil mit einer Ausgangsspannung von DC 24V.
2. bitte klappen Sie den LED-Baum aus, um Überhitzung zu vermeiden. Bitte
verbinden Sie die Kabel des LED-Baums mit der richtigen Position auf dem
Controller. Testen Sie die APP, um zu prüfen, ob sie den LED-Baum richtig steuern
kann. Wenn alles gut geht, gehen Sie zum nächsten Schritt.
Überprüfen Sie, ob die Stromversorgung, das Steuergerät und der LED-Baum
richtig angeschlossen sind.
ACHTUNG
1. Legen Sie kein Metall um das Steuergerät, das das WiFi-Signal blockieren
könnte.
2. Vergewissern Sie sich, dass die Stromversorgung und das Steuergerät richtig
angeschlossen sind.
3. Die Ausgangsspannung des Netzteils sollte mit der Betriebsspannung des LED-
Baums übereinstimmen.
4. Decken Sie nichts auf der Oberäche des Netzteils, des Controllers und des
LED-Baums ab.
5. Vergewissern Sie sich vor dem Einschalten, dass die Verbindung korrekt ist.
DIAGRAMM DER PRODUKTFUNKTIONEN
DOWNLOAD UND REGISTRIERUNG
Scannen Sie den QR-Code, um die “Immax NEO PRO” APP herunterzuladen. Oder
suchen Sie “Immax NEO PRO” im App Store oder bei Google Play, um die APP zu
installieren. Öffnen Sie die “Immax NEO PRO” APP, tippen Sie auf “Registrieren”,
um ein Konto mit Ihrer Telefonnummer oder E-Mail zu erhalten. Melden Sie sich
bei der APP an.
APP-VERBINDUNG
Vorbereitung: Schalten Sie den LED-Baum ein und rufen Sie die APP auf. Verge-
wissern Sie sich, dass Ihr Handy und die Smart Kits mit demselben WIFI verbunden
sind.
Setzen Sie den LED-Baum zurück - drücken Sie die Taste ‘ L ‘ auf dem Controller
für mehr als 10 Sekunden. Die WiFi-LED auf dem Controller wird schnell grün
blinken. Suchen Sie das “+” (in dem entsprechenden Raum der APP), um Geräte
hinzuzufügen. Wenn Ihr Handy bereits vor dem Verbinden des LED-Baums die
Blauzahnfunktion eingeschaltet hat, brauchen Sie die Blauzahnfunktion nicht erneut
einzuschalten, die APP wird sich automatisch mit dem LED-Baum verbinden. Wenn
Ihr Handy Bluetooth nicht aktiviert hat, wird die APP ein Fenster mit Hinweisen
öffnen, um Sie aufzufordern, Bluetooth zu aktivieren. Wählen Sie dann bitte “Zulas-
sen”, dann wird die Bluetooth-Funktion Ihres Handys eingeschaltet. Danach wird
die APP Tipps mit Informationen über den LED-Baum anzeigen, dann wählen Sie
“Go to add”. Sie gelangen zu einer Schnittstelle für Bluetooth-Geräte, wählen Sie
“+” und gehen Sie zur nächsten Schnittstelle (Wi-Fi-Passwort eingeben). Geben Sie
das WIFI-Passwort ein und wählen Sie “Bestätigen”, dann wird der Status “Verbin-
den......” angezeigt, und Sie müssen warten, bis das Handy mit dem Controller
gekoppelt ist. Wählen Sie “Fertig”, wenn “Erfolgreich hinzugefügt” angezeigt wird,
und gehen Sie dann in den Betriebsmodus.
ANWENDUNG
Im Immax NEO PRO können Sie den LED-Baum ein- und ausschalten oder vorein-
gestellte Programme und den Timer steuern.
3 PROGRAMME
Sie können aus diesen 3 voreingestellten Funktionen wählen:
Dauerlicht, Blitzlicht, Überblendung
Bei jeder Funktion können Sie die Farbtemperatur und die Helligkeit des Lichts
einstellen.
ZEITSCHALTUHR
Mit der Timer-Funktion können Sie den gewünschten Beleuchtungsplan einstellen.
40m
Other manuals for NEO LITE
8
Table of contents
Other IMMAX Home Lighting manuals


