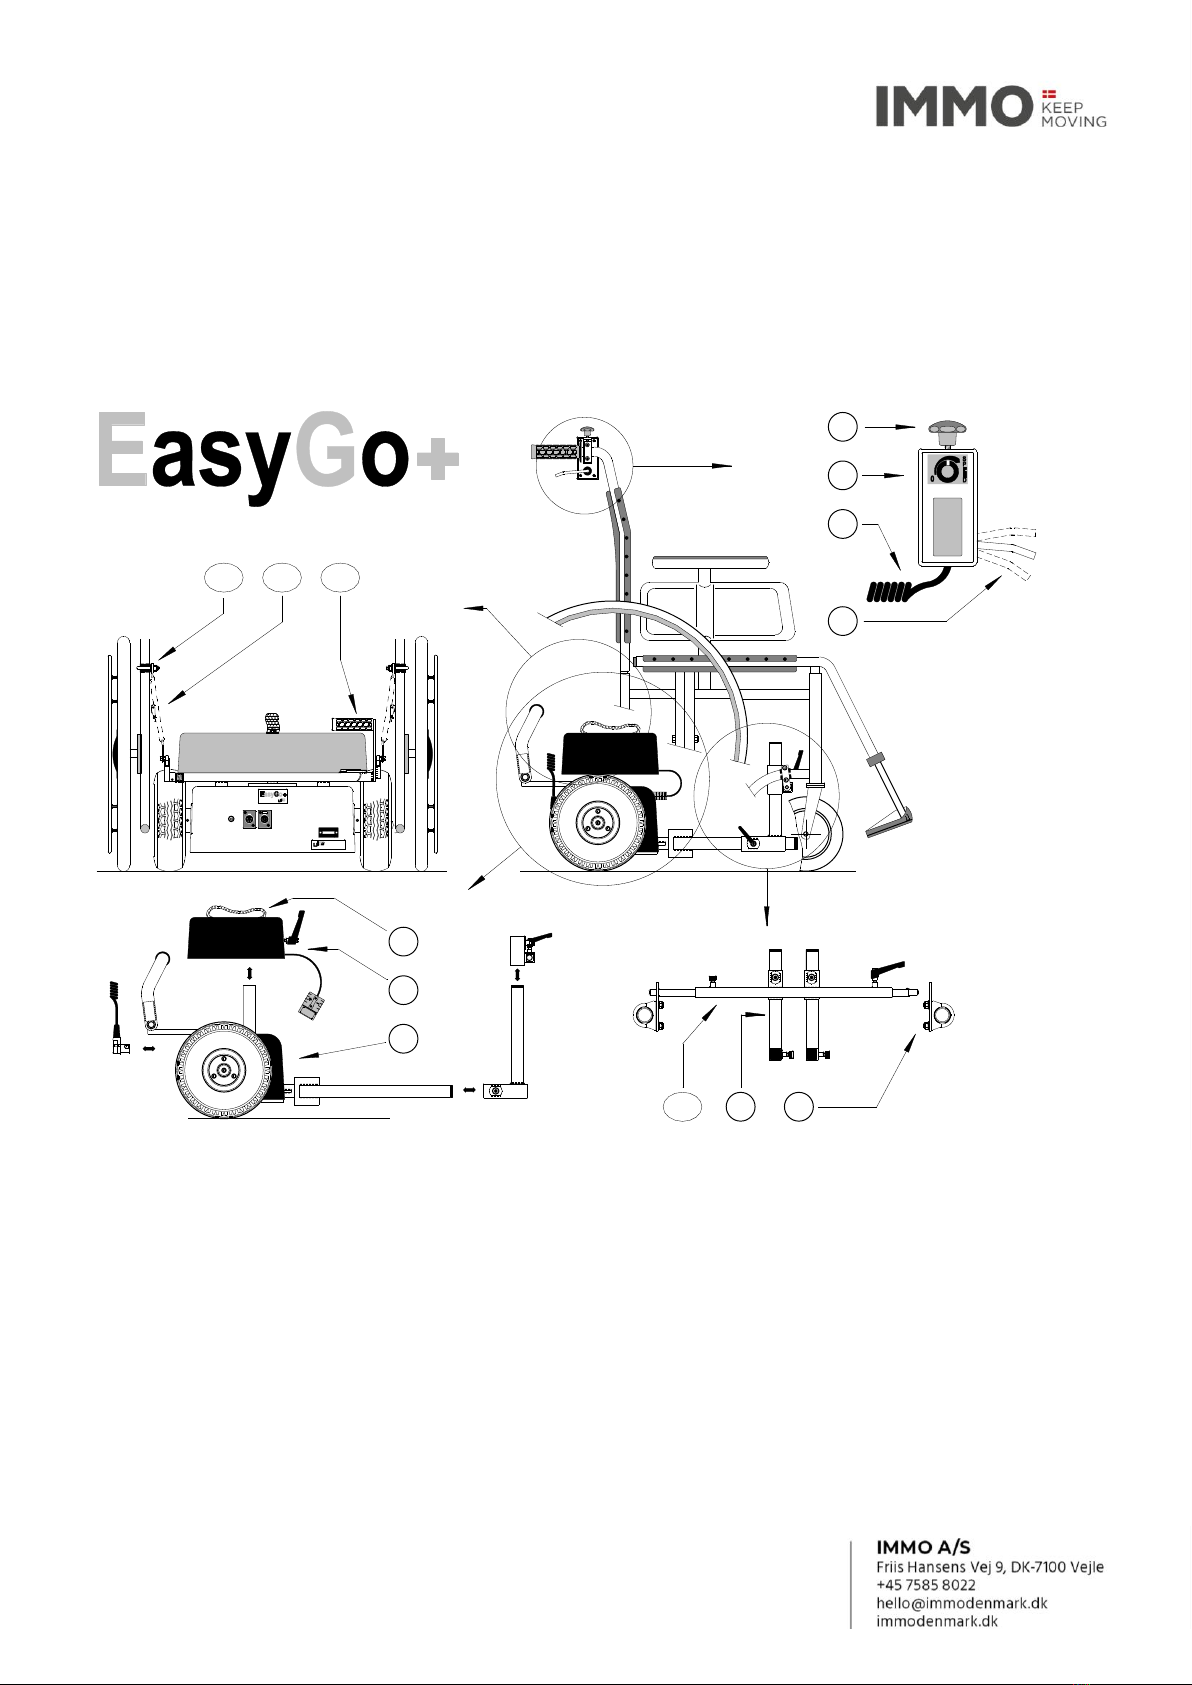
IMMO EasyGo+ User manual

Instruction manual
EasyGo +
Machine no.
Preface:
You have now received your new EasyGo+ power pack. It will help you push the wheelchair up a hill
and restrain it on your way down again. As an attendant you just need to control the motor power while
gently guiding the chair and enjoying the trip.
EasyGo+ is manufactured in our production facilities in Denmark by a specialist staff possessing a
thorough knowledge of the problems associated with walking disabilities. This ensures that both
operation and day-to-day maintenance are limited to a minimum.
All you need to do before putting your EasyGo+ into operation is to make yourself familiar with the
instructions specified in this manual as well as to ensure that the batteries are fully charged.
We wish you good luck with your new power pack and hope that the instructions provided in the
following pages will contribute to getting you off to a good start.
Yours sincerely,

CONTENTS
ASSEMBLY- & OPERATION SURVEY: functions and use - page 2, 3 and 4
CHARGING INSTRUCTION: charging and maintaining the batteries - page 5
DRIVING INSTRUCTIONS: first time use and daily operation - page 6
TROUBLESHOOTING & TECHNICAL DATA: - page 7
GENERAL: maintenance, guarantee, disposal etc. - page 8
PRODUCT DESCRIPTION
MOTOR UNIT: FRONT FITTINGS:
1. Motor part 8. Front brackets
2. Battery part 9. Angled connector
3. Lifting handle 10. Traction bar
SPEED CONTROLLER: REAR FITTINGS:
4. Finger screw 11. Strap brackets
5. On / off / top speed control 12. Straps
6. Coiled cable 13. Declutching pedal
7. Speed control lever
1.
2.
4.
5.
6.
3.
7.
10. 9. 8.
13.11. 12.
U-B-LetA/S
FriisH ansens Vej 9 , DK -7100 Vejl e
tel.+45 75 85 80 22 fax +45 75 85 95 51
U-B-LetA/S
FriisHansensVej9,DK-7100Vejle
tel.+4575858022fax+4575859551

HANDLING INSTRUCTIONS
Below you will find the instructions required to profit from the EasyGo+ capacity.
Before starting up you should check that:
- the charger plug is disconnected
- the power pack is correctly attached to the wheelchair
- the coiled speed controller cable is not jammed, e.g. at the rear wheels
- the wheelchair brakes are released and in safe working condition.
Fig. 1 on/off switch
Turn the black switch on the side of the speed
controller clockwise. Now the green lamp at the rear of
the motor unit is on, indicating that power is switched
on, and you are ready to go.
REMEMBER always to turn off the power and lock the
brakes before leaving the wheelchair.
Fig. 2 engaging
Behind the wheelchair, you will find a pedal on the
right side of the motor unit. Pull the pedal to lower the
EasyGo+ onto the ground.
Now the power pack is on the ground and ready to
drive the wheelchair.
Fig. 3 declutching
When you want to push the chair or the wheelchair
user wants to drive the chair on their own, you step on
the pedal and push it down. This will raise the EasyGo+
from the ground and let it hang by the straps. In
addition, when you want to cross a curb or drive
through a deep puddle, the power pack should be
declutched this way.
The EasyGo+ should not be left declutched for longer
periods. This will stretch the straps and stress the wheels
and frame of the wheelchair.
Therefore, leave it standing on the ground (fig. 2).
fig. 2
fig. 3
fig. 1

Fig. 4 dismounting
When you want to use the wheelchair
without the EasyGo+ or you want to fold
it, it is easy to take off the power pack.
Turn off the power and disconnect the
speed control unit. To do so, you need to
press in the catch on the socket and at the
same time pull the plug.
If you choose to let the speed control unit
stay on the handle, please make sure the
cable is not tangled with the rear wheels.
If the chair is to be folded and packed into
the boot of a car, you should take off the
speed controller and keep it in a safe place.
Lift up the pedal and lower the EasyGo+
onto the ground.
Lift the two pawls out of their sockets on
the pedal arm and let the straps hang down
beside the power pack.
Go to the front of the chair, release the
finger screw on the traction bar and slide
the pin into the tube. Then pull the traction
bar out of the bracket on the opposite side
and lower the front end of the EasyGo+.
Now you can push the chair forwards and
leave the power pack on the ground.
REMEMBER to tighten the finger screw to
avoid the pin to get lost.
Fig. 5 disassembling and handling
If you need to lift and handle the EasyGo+,
please note the weight: 32 kg.
Therefore, never attempt to lift the power
pack without taking it apart!
Pull out the red plug in front of the battery
and release the finger screw. Then lift off
the battery by the handle/strap and you can
now lift the motor unit grasping the pedal
arm and the traction bar.
fig. 4
1
3
2
fig. 5

CHARGING INSTRUCTION
EasyGo+ is not equipped with a gauge to show you how much battery capacity is left while driving.
Therefore, you should check that the green lamp on the charger is shining and the battery is fully
charged before leaving.
After each outing, you reconnect the charger to ensure the EasyGo+ is ready next time you need it. If
you only go out for short trips during the day, you should wait and charge the battery over the night.
The batteries installed in the power pack are GEL-type,
maintenance-free batteries. They are sealed, and can be
placed in any direction and do not need to have their
acid-level checked. Do not try to open them!
1. Switch off the power while charging.
Please note: For safety reasons the EasyGo will not
run while the charger is plugged in.
2. Connect the charger plug Bto the socket A on the
motor unit (marked Cfor ”charger”), then connect
the power plug Cto your wall socket and switch it
on.
3. When the charger is connected, the lamp goes on
to confirm it is switched on. In the beginning, when
the voltage is low, it will shine orange. Later, when
80% capacity is reached, it will change to yellow.
Finally, when charging is completed, it turns to
green.
4. During the process the charger automatically adjusts
how much power the battery can absorb.
Subsequently, when it is fully charged, it will
maintain the charge with a very low current.
Therefore, always keep the EasyGo+ connected when
not in use.
5. Normally it will take 5-6 hours to recharge the battery.
6. At extreme use, when the battery is run completely out of power, it may last up to 12 hours.
7. If you at some point feel that the EasyGo+ no longer has the same range as usual, even though
the battery is fully charged, time has come where it needs replacement. Batteries are worn
down and have an average lifetime of 3 years. Replacement should be carried out by a skilled
technician –do not attempt to open covers and do repairs yourself!
8. Never let the battery stay uncharged, if you do not use the EasyGo+ for longer periods of time.
Charge the battery and unplug the charger, and after 3-4 weeks repeat the procedure. Keep
the power pack in a dry and frost-free place.
When you want to start using it again, charge the battery for 5-6 hours –then it is ready.
BA
C
U-B-Let A/S
Friis Ha nsens Ve j 9, DK-71 00 Vej le
tel. +45 75 8 5 80 22 fax +45 75 8 5 95 51

APPLICATION:
EasyGo+ is an electric power pack, designed to relieve the strain and effort of pushing a wheelchair
uphill and restraining it on the way down again. Therefore, it will make your everyday life as an
attendant for the wheelchair user easier, but it will also enable you to go driving in places where you did
not go before. Therefore, to avoid any risks or damages it is important to familiarize yourself with the
performance of the EasyGo+ before you go for more demanding outings. Follow the instructions given,
both in this manual and in the wheelchair manual - misuse can cause unnecessary risks.
First time you go walking with the EasyGo+, you should choose a spacious place with a firm surface and
no particular obstacles, like curbstones or steep ramps. We recommend you to do the first test drive with
the empty wheelchair.
1. Lower the EasyGo+ onto the ground; switch on the power and check that the wheelchair brakes are
released and in good working condition. Further, you should check the tire pressure before leaving.
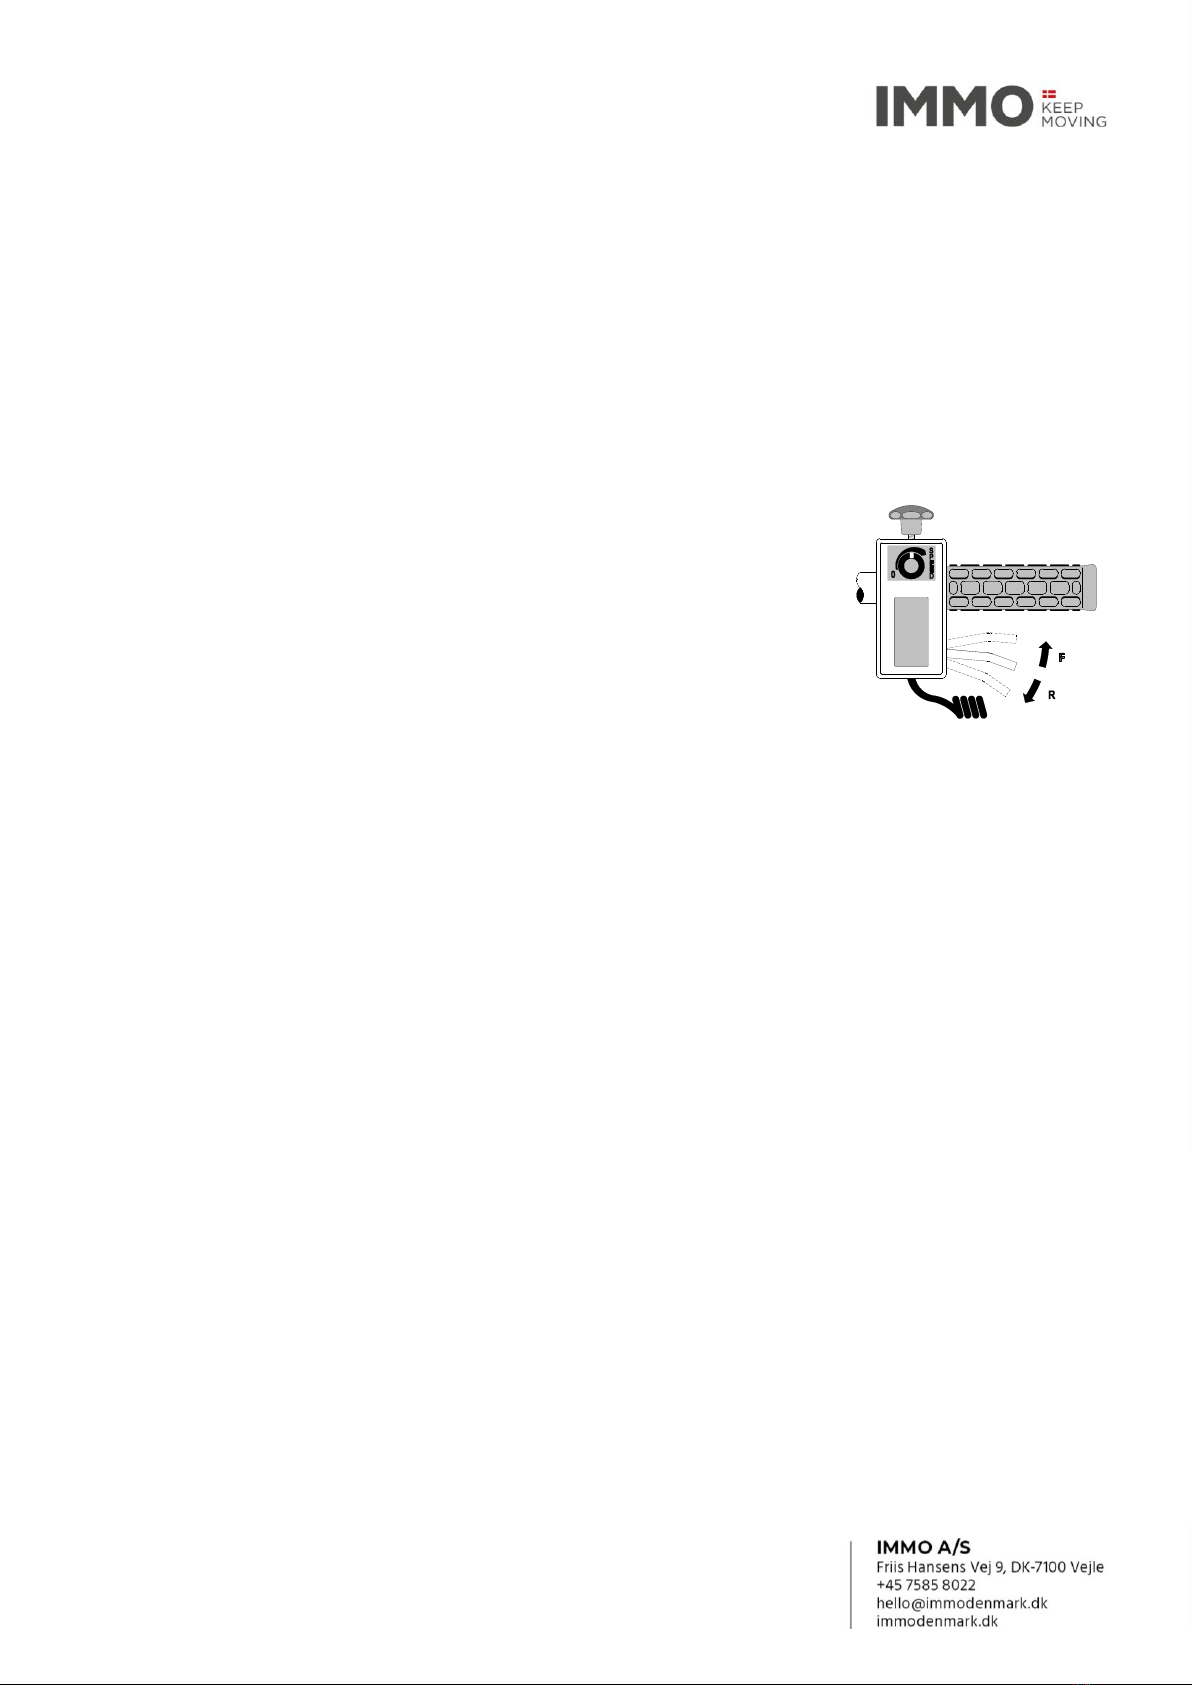
2. When you turn on the power, the switch should be turned a bit further than
just past the first ”click”. The more you turn it, the faster the power pack
will be able to go.
When you gently pull the throttle lever upwards with a finger, the
EasyGo+ will start driving forwards, and you should not be surprised
that the chair moves without you pushing it. Just follow it and guide it.
Pushing the lever gently downwards will make the chair go backwards.
REMEMBER: If you do not feel confident in the beginning, you just release the lever, and the chair will
stop instantly - do not attempt to hold back the wheelchair by force.
We recommend you to start by turning up the on/off switch only halfway. On level ground, this speed
will usually be adequate. Later, when you need more power to climb hills, you should turn it up to full
speed. This gives you a comfortable choice to adjust to your walking speed.
3. Driving downhill you ease off a bit on the throttle lever, and the EasyGo+ will help you brake
smoothly. Therefore, the speed is infinitely variable and you can adapt it to any given situation.
However, you should be careful driving on dirty surfaces, like pavements covered with sand or snow.
Here the wheels of the power pack may loose traction, and you should be prepared to use the
wheelchair brakes, in particular going downhill.
On ramps, you should always reverse down. This way you use the brake effect of the EasyGo+ and at
the same time, you are in the best position to restrain the chair if required.
4. Crossing a curb, you should find a place where the curbstone has a ramp.
We recommend you to cross the ramp at a right angle, but as an attendant, you need to estimate the
abilities of wheelchair user to remain upright in the chair during the action.
If the curbstone does not have a ramp, please declutch the EasyGo+ (by pushing down the pedal), tilt
the chair slightly and go backwards up or forwards down.
CAUTION: Do not attempt to cross a curbstone forwards. This may damage the forks and front wheels of
the wheelchair. Do not let the footrests touch the curb or the road surface.
5. REMEMBER: - to turn off the power when taking a break or leaving the wheelchair.
- to engage the brakes when parking the wheelchair.
6. EasyGo+ is not particularly vulnerable towards water. Still, we recommend avoiding driving
through deep puddles, or at least declutch the power pack while passing them.

Troubleshooting and technical data
The electronic controller will immediately stop the power pack, if an electric problem occurs on the
EasyGo+. In situations like that, you should follow the below procedure:
1. Turn off the power and wait for about 5 seconds, before you turn it back on.
REMEMBER: Do not operate the throttle lever, while you turn on the power.
2. Check if the coiled cable from the speed controller has been damaged, and that the plug is attached
correctly to the power pack.
3. Check that the battery has been fully charged, and charger cable, -plug and –socket are undamaged.
REMEMBER: EasyGo+ cannot drive, while the charger is plugged in.
Should none of the above procedures cure the problem, please contact your supplier for further
assistance. When contacting your supplier, you will be asked for the serial no. of the power pack, which
is printed on the CE metal sign at the rear of the motor unit and on the front page of this manual.
In certain situations the green lamp on the motor unit will start blinking, and it can be important to your
supplier, if you describe how it blinks e.g. 4 blinks - pause - 1 blink - etc., but:
Do never attempt to open the unit and do repairs on your own!
TECHNICAL DATA
EasyGo+ 17
EasyGo+ 28
Article No.
202014
202015
Measurements height
270 mm
330 mm
width
490 mm
490 mm
length
240 mm
240 mm
Total weight
32 kg
44 kg
motor unit
18 kg
18 kg
battery
14 kg
26 kg
Batteries –maintenance free
17 AmpH
28 AmpH
Charger
24 V/3 A
24 V/5 A
Charging time
5 hours
8 hours
Top speed
6 km/h
6 km/h
Test reference load *)
200 kg
200 kg
Max. range when fully charged /w. 100 kg.
18 km
25 km
Max. safe slope /w. 100 kg.
max. 7°/12%
Max. 7°/12%
Electronic controller
Curtis 70 A
Curtis 70 A
Motor
300 W / 24 V
300 W / 24 V
Gear ratio
19,7:1
19,7:1
Tire size –puncture proof
2.50 - 3 (210 x 65)
2.50 - 3 (210 x 65)
Operation temperatures
0° to +40°
0° to +40°
Storage temperatures
-15° to +40°
-15° to +40°
Resistance against moisture and dirt
IP 44
IP 44
*) standard test load - see max. load in wheelchair manual.
RADIO INTERFERENCE:
Although the EasyGo+ is tested and approved, there is still a theoretical risk, that:
- the power pack can generate electromagnetic noise and e.g. start shop alarms.
- the electronic control system can be affected by e.g. mobile telephones.

GENERAL INSTRUCTIONS
MAINTENANCE:
To ensure the battery a long lifetime, charging and maintaining it is very important –Please read
the instructions on page 5 carefully.
The EasyGo+ is fitted with puncture proof tires, but often the wheelchair is supplied with
inflatable tires, where the pressure has to be checked regularly. We recommend you to follow the
instructions given by the wheelchair manufacturer and always keep the pressure at the highest
level. This will make the wheelchair easy to operate and ensure the best possible range with the
EasyGo+.
You should check the brackets regularly and keep them safely tightened. At the same time, check
all external cables and plugs for visual damages.
After a while, the straps at the rear of the wheelchair will be stretched, and the EasyGo+ will no
longer lift up sufficiently from the ground. This can easily be adjusted by releasing the buckle and
shorten the straps 1 cm at both sides. After the adjustment, both straps should have the same
length, and there should be 2-3 cm space under the wheels when the unit is declutched
CLEANING:
EasyGo+ is to be cleaned with a damp cloth –do not use running water and/or solvents!
FINGER SCREWS:
To prevent the use of tools the EasyGo+ is fitted with a few
finger screws. The handle of these screws can however get in
your way, and you may want to turn them:
1. pull out the handle,
2. turn it into the wanted position, while pulled out, and
3. let it fall into place again.
SPARE PARTS:
The EasyGo+ has an expected average lifetime of 8-10 years, but you should expect the following
parts to be replaced: tires every 2./ 3. year
batteries every 3./ 4. year
carbon (motor) brushes every 4./ 5. year
When replacing these parts, other service jobs should be carried out –detailed cleaning and
testing of internal parts, evaluation of the overall condition etc.
Therefore, they have to be replaced by a skilled and educated technician.
GUARANTEE:
General period of guarantee for new motor units is 2 years after date of invoice (batteries only 1
year). Tires and other parts exposed to wear and tear are not covered.
DISPOSAL:
The batteries are the only items in the EasyGo+, which are to be considered environmentally non-
compatible, and therefore they must be deposited for recycling.
All other parts are to be deposited as electronic waste.
Should a situation occur, where you get in touch with the GEL from a leaking battery:
- immediately wash your hands with plenty of water!
- never attempt to charge defective batteries!
This manual suits for next models
4
Table of contents
Popular Mobility Aid manuals by other brands

EZee Life
EZee Life CH3051 user manual

Harbor Freight Tools
Harbor Freight Tools 96514 operating instructions

Ki Mobility
Ki Mobility Tyke Technical manual

Lumex
Lumex LX5000 Allura user manual

Allegion
Allegion NORMBAU 457 Series installation instructions

Brangs + Heinrich
Brangs + Heinrich myTURNY switchTURNY operating manual