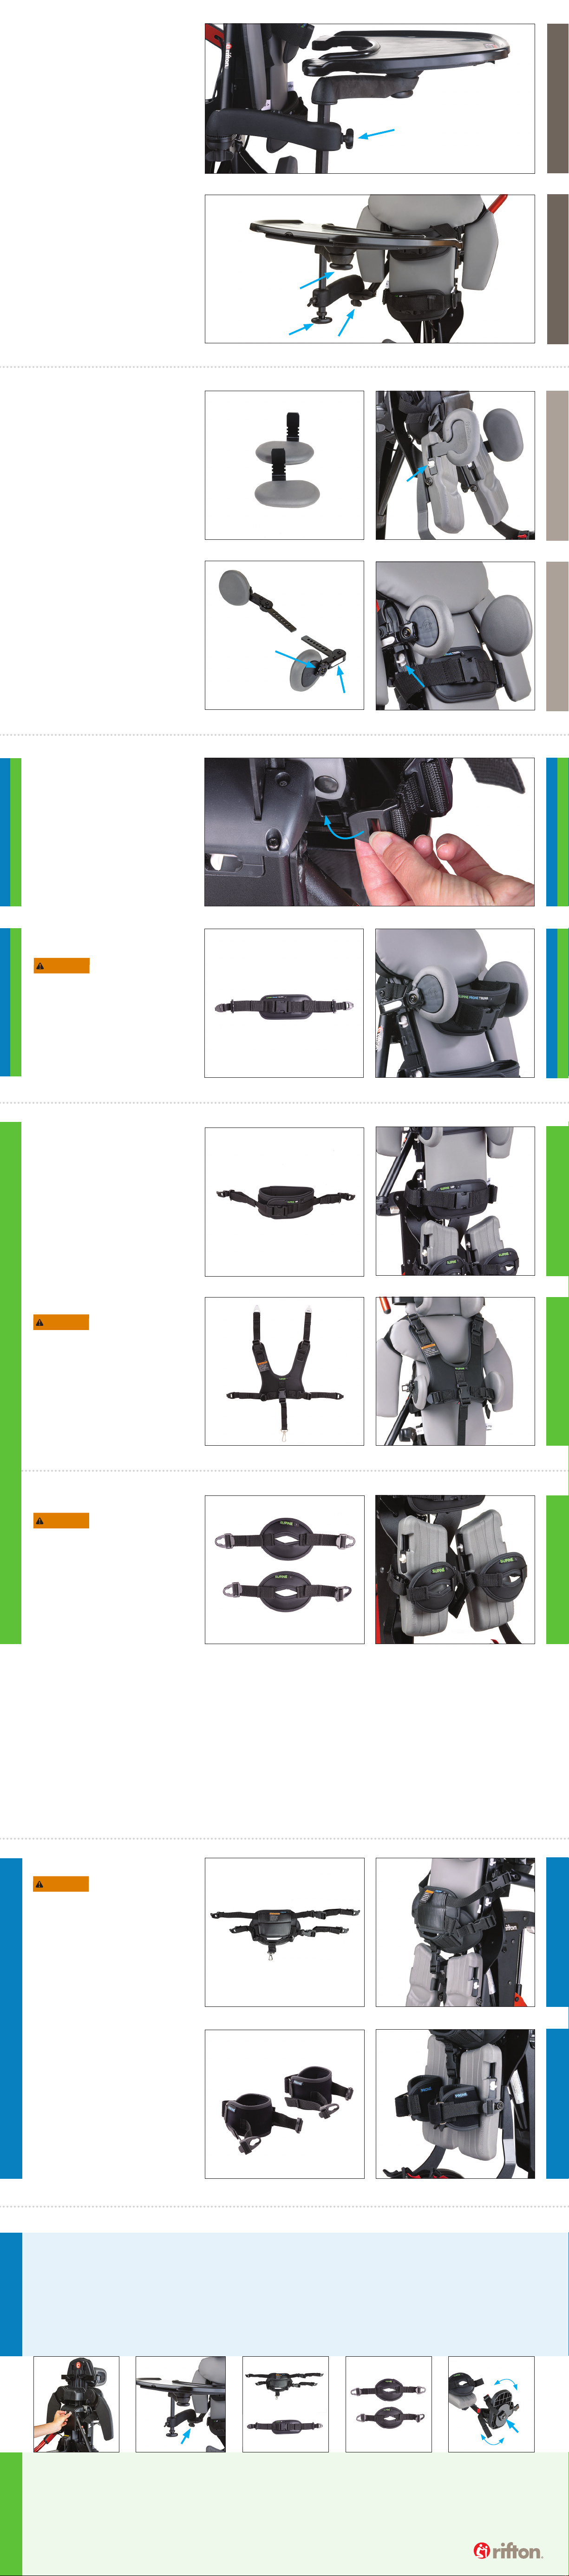
Tray
Tray adjustments
Loosen the knob that faces
forward to adjust tray height.
Loosen all three knobs that face
downward to rotate and position
the tray. The knob under the
center of the tray also allows some
angle adjustment.
Medial/Lateral thigh supports
Trunk laterals
All straps
Multi-Position Stander ONLY– Switching between PRONE and SUPINE
Mount the medial/lateral thigh
supports on the inside for medial
support, or on the outside for lateral
support. Adjust the width using the
white trigger (A). The mounting bracket
is off-center, so the pad has two
possible height positions. Swap pads to
change height position.
Attach the laterals either at the level
of the trunk or pelvis. Adjust width
using trigger (B) on side of body
support. Adjust height by loosening
knob (C) on the outside and moving
pad up or down. The pads swing away
for transfers using the white button.
To attach straps to the body support,
insert the tip of the clip into the correct
socket behind the body support and
pull forward until it clicks. Pull the
clip back and away from the pad to
remove the strap.
Thigh Medial / LateralsTray Trunk Laterals
Tray Adjustments
Tray Height
3 knobs for
rotation
1 2
A
*Hip strap/hip rotation
control strap
Butterfly Harness Pelvic HarnessSupine Hip Strap Knee Straps Prone Knee Cuffs
TO PRONE
TO SUPINE
Butterfly harness
*Knee straps
*Pelvic harness
Prone knee cuff
These straps are used in supine
configuration. The rotation control strap
has a webbing loop that runs behind
the trunk support pad. Close the
padded strap snugly around the user,
then close the buckle and tighten either
side to control rotation of the pelvis.
In supine standing a butterfly harness
may be used in place of a trunk strap.
Use all five attachment points.
The knee straps clip onto the posts on
either side of the knee. Pull the strap
end to tighten and pull the plastic tab
to loosen before unclipping the strap.
Use the three buckles on the right side
and center when transferring the user in
and out. Tighten lower side straps first
when positioning.
The Prone knee cuffs clip onto the posts
on either side of the knee. Pull the strap
end to tighten and pull the plastic tab to
loosen before unclipping the strap.
To prevent strangulation,
always attach center safety
strap and make sure all straps are snug before
every use.
WARNING
To prevent strangulation or
other injury, in supine the
user’s knees MUST be secured with knee straps.
WARNING
To prevent strangulation
or other injury, in prone
standing the prone pelvic harness MUST be
used with all five attachment points secured.
WARNING
**Trunk strap/trunk rotation
control strap
These straps may be used in prone or
supine. The rotation control strap has a
webbing loop that runs behind the pad.
Close the padded strap snugly around the
user, then close the buckle and tighten
either side to control rotation of the trunk.
To prevent falls or other
injury, all users should be
secured with a trunk strap (or butterfly harness
in supine configuration).
WARNING
1. Remove upper
trunk support
1. Add upper trunk
support
2. Switch tray direction 3. Switch to supine
hip strap
4. Add knee straps
2. Switch tray direction 3. Switch to pelvic
harness
4. Remove knee straps 5. Rotate sandals 180°
5. Rotate sandals 180°
Squeeze the triggers on the
back of the trunk support.
Pull the upper trunk support
up and rotate it back to
remove it.
If the tray is used, loosen
attachment knob (A), remove
the tray and attach it facing
the other direction. For use in
prone, adjust the tray up, and
the caregiver handle down and
out of the way.
Remove the supine hip
strap. Install the pelvic
harness by attaching all 5
attachment clips.
Optional prone knee cuffs
may be added.
Insert the stampings into
slots on top of body support.
Squeeze triggers on back of
body support to adjust the
upper trunk support down to
the desired position.
If the tray is used, loosen
attachment knob (A), remove
the tray and attach it facing the
other direction.
Remove the pelvic harness at
all 5 attachment points. Install
the supine hip strap (standard,
or rotation control).
Clip the knee straps onto the
posts on either side of the knee.
AA
D
C
BB
Trunk StrapAll Straps
Loosen the knob under the
sandal (B), rotate it to the
desired position, and tighten
the knob.
4
Pelvic harness
3
Supine hip strap
5
B
Loosen the knob under
the sandal (B), rotate it to
the desired position, and
tighten the knob.


