impact Cruiser TTL-500 User manual

INSTRUCTIONS
ACDC-500-TTL
Cruiser AC/DC 500 Ws
TTL Monolight

2
Thank you for choosing Impact.
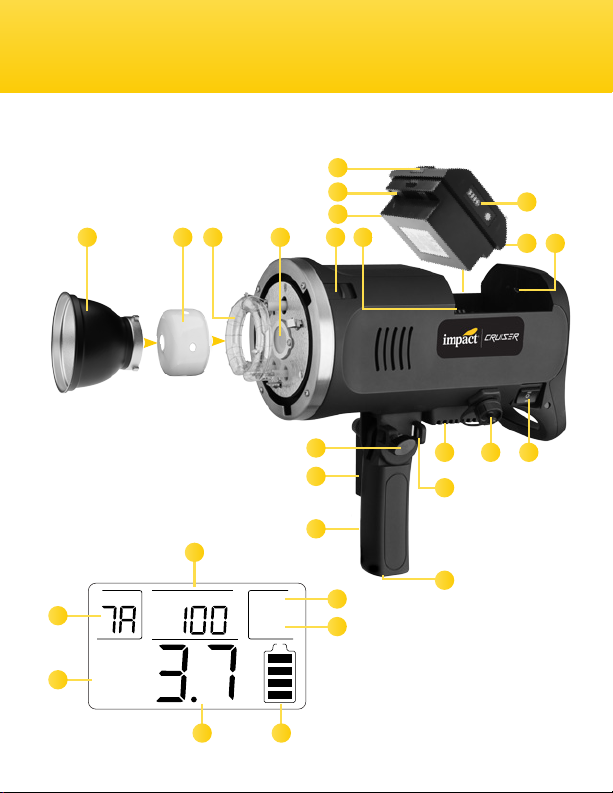
The Cruiser TTL-500 is a professional 500 Ws monolight that runs
on AC power or an included rechargeable lithium-ion battery that
provides over 350 full-power ashes. It features a 9-stop brightness
range that’s adjustable in 1/10-stop increments. The Cruiser is
perfect for studio use, and it’s also ideal for location work where a
powerful ash is needed for stunning outdoor fashion and
portrait results.
This monolight has a simple user interface that allows for optimal
performance with minimal setup and adjustment time. It has group
and channel functions that allow you to isolate your units and
prevent them from being triggered by other ashes in the vicinity.
For TTL and HSS operation, the Cruiser has an integrated 2.4 GHz
receiver that’s compatible with Canon, Nikon, and Sony cameras
when used with the Cruiser Wireless Controller. An integrated
optical sensor allows the Cruiser to be used as an optical slave for
a variety of studio applications. An adjustable 10 Ws LED modeling
light draws minimal power and gives off nominal heat.
The Cruiser is easy to transport. With the included universal-voltage
battery charger, you can use the Cruiser TTL-500 at home or abroad.
Introduction

3
• 500 Ws monolight
• Supports TTL and HSS when used with the Cruiser Wireless
Controller
• Wireless TTL, optical slave, and direct sync options
• Flash duration from 1/1000 to 1/9000 sec.
• 10 Ws LED modeling lamp
• Built-in 2.4 GHz receiver
• User-replaceable ashtube
• Runs on battery or AC power
Box Contents
• Cruiser TTL Monolight
• Battery
• Battery charger
• Stand mount
• PC cord
• 7 in. reector
• AC adapter
• Protective cap
Features

4
1. Optical slave eye
Optical sensor
2. Group button
Selects group A, B, or C.
3. Channel button
Selects channel 1 to 8.
4. Model button
Turns the modeling light on and off, and selects between
100% and 50% brightness.
5. Power dial
Adjusts the ash output from 2 to 10, in
1/10-stop increments.
6. Test button
Fires a test ash.
7. Optical slave button
Turns optical sensor mode on and off.
8. Sound button
Turns alert sound on and off.
Overview

5
Overview (continued)
2
5
1
3
4
8
7
6

6
Top/side view:
1. S-type reector
2. Glass dome
3. Flashtube
4. Modeling LED
5. Accessory release
6. Battery compartment /
Battery contacts
7. Umbrella locking screw
8. Tilt lock
9. Locking screw
10. 5/8-inch receiver
11. Umbrella mount
12. Air vent
13. AC power port
14. Three-way power switch
a. Up: AC power
b. Down: Battery power
c. Center: Off
15. Micro-USB port
16. 3.5 mm sync port
Battery:
17. Charge indicator lights/
button
18. Battery release button
19. Battery contacts
20. DC power input
LCD screen:
21. Channel and group
22. Manual/TTL
23. Power output
24. Battery icon
25. Sound
26. Optical slave
27. Modeling light
Overview (continued)

7
Overview (continued)
ON
%
ON
CELL
BEEP
MODEL
CH
TTL
1 2
12 13 14
8
21
22
25
26
23
27
24
1516
7
9
10
11
4 5 63
17
19
20
18

8
1. Group buttons
Press to select group A, B, or C.
The selected group is outlined.
Press and hold to enable or
disable a group.
2. Mode button
Selects Manual or TTL mode.
3. Sync button
(Canon and Sony)
Selects rst-curtain sync,
second-curtain sync.
Go to our website
impactstudiolighting.com for
information on the Cruiser’s
compatibility with Sony cameras.
4. Plus (+) and minus (-) buttons
Raise and lower the output
power of the selected channel.
Press to change power in
increments of 1/10-stop.
Press and hold to rapidly scroll
through the power range.
In TTL mode, press to adjust EV
compensation.
5. Power LED
Indicates when power is on.
6. Power button
7. Channel button
Selects channels 1 to 8.
8. Test button
Fires a test ash.
9. Modeling light button
Turns the modeling light on and
off for the selected group, and
selects between 100% and 50%
brightness.
The modeling light can be set
independently for each group.
10. Sound button
Turns the alert sound
on
and
off.
11. Mounting foot
12. Locking collar
13. Battery compartment
Cruiser Wireless Controller

9
Cruiser Wireless Controller (continued)
1
11
2
5
10
12
13
7
8
9
6
3
4

10
LCD screen:
1. Modeling light
2. Output power
3. Manual/TTL
4. FCS, SCS, HSS indicators
5. Channel
6. Sound
7. Group
Firmware Notice
The latest rmware updates are available on impactstudiolighting.com.
If there are compatibility or performance issues with your camera,
make sure your unit has the latest rmware version.
Cruiser Wireless Controller (continued)
A
B
C
MODE
SYNC
CHANNEL
TTL
1
6
7
2
3 4 5

11
Precautions ⚠⚡
Before using the Cruiser TTL, please
read the following safety notices
carefully and thoroughly. This will
ensure safe use and help prevent
damage to your ash and injury to
yourself or others.
Prolonged, fast shooting at
fast recycling rates might cause
overheating. The Cruiser TTL’s
protection circuit will shut the unit off
for approximately 5 to 10 minutes if
overheating occurs.
Warning
• There are no user-serviceable
parts inside the unit. Only
qualied service engineers
should access the inside of the
case. Due to the high-voltage
circuitry inside this device, do
not attempt to disassemble or
repair the unit yourself. Doing so
will void the warranty.
• Do not re the ash at close
range directly into the eyes of
people or animals. This can
cause damage to the retina and
may even lead to blindness.
• If the ashtube or modeling light
becomes cracked or damaged in
any way, replace immediately.
• Frequent use of HSS will have
an adverse effect on the lifetime
of the ashtube.
• Do not use or store the Cruiser
TTL 500 in ammable conditions
(such as environments
containing ammable gases or
liquid chemicals). This could
damage the ash, start a re, or
cause an electric shock.
• Do not clean the Cruiser TTL 500
with agents containing corrosive
or ammable substances such
as paint thinner, benzene, or
nail-polish remover.
• This product is not water
resistant. Keep it away from
rain, snow, humidity, and general
moisture.

12
• Use only the correct,
recommended battery.
• If you detect excessive
heat, smoke, or a burning
smell coming from the ash,
immediately stop operation, and
remove the battery to prevent
the product from igniting or
melting. Take the product to an
authorized service center for
repair.
• If the product is not used
for two months, turn the unit
on for 10 minutes with the
modeling light off, and re
the ash several times over
that time period to charge the
capacitors.
• Turn the power off and remove
the battery when the monolight
is not in use.
• Handle this product with care.
• Do not stare at the lights when
they are powered on.
• Clean this product with only a
soft, dry cloth.
• Always wear cotton gloves
when handling the ashtube.
• Keep this product away from
children.
• Make sure that this product
is intact and that there are no
missing parts before use.
• All images are for illustrative
purposes only.
Recycling lithium-ion batteries
Lithium-ion batteries are recyclable.
You should help preserve the
environment by returning your
used rechargeable batteries to a
collection and recycling location
near you.
For more information about recycling
rechargeable batteries, call the
Call2Recycle helpline toll free at
1-800-822-8837, or visit www.rbrc.
com (www.call2recycle.org).
.
Precautions ⚠⚡ (continued)

13
A rechargeable battery and multivoltage charger are
included with the Cruiser TTL 500.
Note: Impact recommends fully charging the battery before
its initial use and after an extended period of inactivity
(more than two months).
To charge and then install the battery, follow these steps:
1. Plug the AC cord into a wall outlet. The charger’s
indicator light will glow green when the charger is
receiving power.
2. Connect the DC cord to the battery. The charger
indicator light will glow red when the battery is
charging, and green when the battery is charged.
3. Install the battery by orienting the contacts on the inside edge of the
battery with the contacts in the battery compartment. Press it down into
the battery compartment until the locking buttons click shut.
Checking the Battery Level
When the battery is installed in the Cruiser, the remaining
charge is always displayed by the battery icon on the
LCD screen.
If the battery is not installed, check the battery level by
pressing and holding the charge indicator button. The
indicator lights will show the remaining charge.
Charging and Installing the Battery

14
The Cruiser is equipped with a universal power input so it can be used in the US
and abroad with the proper plug adapter.
For AC operation:
1. Remove the protective cap from the AC power port.
2. Insert the 4-pin plug into the power port, and
then turn the locking collar clockwise to secure
the plug in place.
3. Attach the AC cord to the power adapter, and
plug it into a wall outlet.
Wall Outlet Operation

15
Mounting on a Light Stand
The Cruiser TTL-500 features a 5/8-inch baby receiver. If your light stand or
mounting plate does not have a 5/8-inch post, make sure to use the appropriate
adapter to mount the Cruiser.
1. Set the 5/8-inch baby receiver onto your light stand's mounting pin, and
tighten the locking screw until secure.
2. Adjust the angle, and then secure it with the tilt lock.
Attaching the Reector
The Cruiser is equipped with a S-Mount to let you add light modiers like the
included reector, as well as softboxes and other light-shaping attachments.
1. Remove the protective cap by pulling back the accessory release button
and turning the cap counterclockwise.
2. To attach the reector, align the three studs on
the reector with the three mounting slots on the
ash head.
3. Press the reector in, and turn clockwise until
the reector clicks into place.
Preparing for Use

16
Mounting an Umbrella
1. Loosen the umbrella locking screw, and insert the
umbrella shaft through the two mounting loops.
2. Tighten the locking screw to secure the umbrella.
Connecting Your Camera to the
Cruiser
The Cruiser has a 3.5 mm sync input for a wired
connection to your camera or a wireless receiver
(other than the Cruiser Wireless Controller). Use the
following steps to connect your devices:
1. Insert a 3.5 mm sync cable into the Cruiser’s sync
port.
2. Insert the PC connector to your camera’s PC
socket.
Note: Check you camera’s instruction manual for more
detailed information about PC sync capabilities.
Preparing for Use (continued)

17
1. Loosen the locking wheel by turning it
counterclockwise.
2. Slide the mounting foot all the way into your
camera’s hot shoe.
3. Turn the locking wheel clockwise to tighten until
secure.
Note: Make sure your camera has the appropriate settings. Consult the
camera’s user manual to set features for TTL and HSS modes.
Powering On and Firing a Test
1. To power on the Cruiser, move the power switch to either AC or
battery power mode. When the Test button lights up, the Cruiser is
charged and ready to re.
2. Press the Test button to re a ash.
The Test button will turn off while the Cruiser is recycling. When it lights up, the
unit is ready to re again.
Note: Channel and group settings from the previous session are stored in the
Cruiser’s memory. When the Cruiser is powering up, it will be set to the channel
and group that were previously selected.
Attaching the Cruiser Wireless Controller to
Your Camera

18
Selecting Channels and Groups Via the Cruiser
The Cruiser and the wireless remote must be set to thesame channel.
1. Press the CH button repeatedly to cycle through channels 1 to 8. Selecting
“–” (dash) disables wireless communication.
2. Press the Group button repeatedly to select group A, B, or C.
Selecting Channels and Groups via the Remote
To select a group, press one of the group buttons (A, B, or C). A border will
surround the selected group.
Groups with the "--"indicator are disabled, press and hold the corresponding
group button to enable the group. The most recent brightness value will appear
under the group letter. Press the button a second time to select the group.
To select a channel, repeatedly press the channel button to scroll through
channels 1 to 8.
Setting the Modeling Light Output via the Cruiser
Press the Model button repeatedly to select 50% power, 100% power, or off.
Setting Modeling Light Output via the Remote
1. To select the group you want to control, press one of the group buttons (A,
B, or C).
2. Press the Model button once for a modeling light power of 50%. The
modeling light icon will appear next to the group.
Conguring the Settings

19
3. Press the Model button again for a modeling light power of 100%.
4. Pressing the Model button a third time to turn the modeling light off.
Note: The wireless remote can set modeling light power on each group
individually. Changing the modeling light options on one group will not affect the
others.
Alert Sound
Press the Sound button to toggle the sound function on or off.
When activated, the alert will sound whenever a change is made to the settings
(except ash output power). The tone is also a recycling alert and will sound
when the Cruiser is recharged and ready to re.
In TTL mode, the tone will sound when the power requirement for a correct
exposure is greater or less than the Cruiser’s output range.
Optical Slave
The Cruiser can be used as an optical slave. To set the Cruiser to re when it
senses the ash from another ash unit, follow these steps:
Manually adjust the ash and modeling light power (see page 20).
Press the CELL button. The Cell indicator on the LCD screen will read On to show
that the optical sensor has been activated.
Conguring the Settings (continued)

20
The Cruiser’s ash power output level can be set manually in 1/10-stop
increments over a 9-stop range. 10 is the full-power ash, and each stop halves
the light output.
To use the Cruiser in manual mode, follow these steps:
1. Connect the sync cord to the Cruiser and to your camera. Follow your
camera’s instructions for using the correct camera settings for manual
exposure photography.
Note: If the TTL icon appears onscreen while using the Cruiser Wireless
Controller, press the Mode button on the wireless controller to exit TTL
mode.
1. Set the ash power output, and adjust the modeling light power.
2. Set the exposure setting you want to use on your camera (check your
camera’s manual for specic instructions).
3. Take a test exposure, and make the necessary changes to the camera or
monolight.
Tip: For best results, use a handheld ash meter when shooting in the
manual ash mode.
Using the Cruiser in Manual Mode
Table of contents
Other impact Lighting Equipment manuals

impact
impact DLS-G User manual

impact
impact VC-500LR User manual

impact
impact PCLK-120 User manual

impact
impact Luxbanx Duo LB-QL300 User manual

impact
impact FRC-RL19 User manual

impact
impact VE-TTLHX32 User manual

impact
impact CC -131 User manual

impact
impact VC-500WLN-II User manual

impact
impact VC-500WL User manual

impact
impact VC-500LR User manual
Popular Lighting Equipment manuals by other brands

American Lighting
American Lighting MINI-P2-NF Series instructions

Ceravision
Ceravision UV420 user guide

Chauvet
Chauvet Intimidator wave irc user manual

Lonza
Lonza ARCH CCH A300N Operator's manual

DTS
DTS Scena LED 150 user manual

Edge Lighting
Edge Lighting Greta LED GRETA-W-L1 Series installation instructions