Impecca courant CBM-5010 User manual

ENGLISHESPAÑOLFRANÇAIS
–i–
Bread Maker
User Manual
Manual de usuario
Mode d’emploi
Model: CBM-5010

ENGLISH ESPAÑOL FRANÇAIS
–ii–
TABLE OF CONTENTS
Important Safeguards 1
Product Features 3
Bread Baking Tips 6
Introduction to Control Panel 6
Operating Guide 8
Functions 14
Recommended Recipe 16
Cleaning and Maintenance 21
Technical Specications 22
Trouble Shooting Guide 22

ENGLISHESPAÑOLFRANÇAIS
–1–
IMPORTANT SAFEGUARDS
When using electrical appliances, basic safety precautions should
always be followed to reduct the risk of re, electric shock and
personal injury:
1. READ ALL INSTRUCTIONS CAREFULLY.
2. This appliance can be used by children aged from 8 years and above and persons
with reduced physical, sensory or mental capabilities or lack of experience and
knowledge if they have been given supervision or instruction concerning use of the
appliance in a safe way and understand the hazards involved. Children shall not
play with the appliance. Cleaning and user maintenance shall not be made by chil-
dren unless they are older than 8 and supervised. Close supervision is necessary
when any appliance is used by or near children.
3. Keep the appliance and its cord out of reach of children less than 8 year.
4. Do not operate any appliance with a damaged cord or plug or aer the appliance
malfunctions or has been damaged in any manner. Return appliance to the nearest
authorized service facility for examination, repair or electrical or mechanical adjust-
ment. If the supply cord is damaged, it must be replaced by the manufacturer, its
service agent or similarly qualified persons in order to avoid a hazard.
5. CAUTION: Hot surfaces. Do not touch hot surfaces. Use handles or knobs. Do not let
cord hang over edge of table or counter or touch hot surface.
6. The appliances are not intended to be operated by means of an external timer or
separate remote-control system.
7. Clean surfaces in contact with food.
8. Before use, check that the voltage of wall outlet corresponds to the one shown on
the rating plate.
9. To protect against electric shock do not immerse cord, plugs, or housing in water
or other liquid.
10. Unplug from outlet when not in use and before cleaning. Allow to cool before put-
ting on or taking o parts.
11. Do not place on or near a hot gas or electric burner, or in a heated oven.
12. Extreme caution must be used when moving an appliance containing hot oil or
other hot liquids.
13. Do not touch any moving or spinning parts of the machine when baking.
14. Never switch on the appliance without properly placed bread pan filled ingredients.
15. Never beat the bread pan on the top or edge to remove the pan, this may damage
the bread pan.

ENGLISH ESPAÑOL FRANÇAIS
–2–
16. Always attach plug to appliance first, then plug cord into the wall outlet. To discon-
nect, turn any control to OFF, then remove plug from wall outlet.
17. The appliance is not intended to be operated by means of an external timer or sep-
arate remote-control system.
18. Do not operate the unit without bread pan placed in the chamber to avoid damag-
ing the appliance.
19. The use of attachments not recommended by the manufacturer may cause fire,
electric shock or injury.
20. Do not use outdoors.
21. Do not use appliance for other than intended use.
SAVE THESE INSTRUCTIONS
HOUSEHOLD USE ONLY
a. A short power-supply cord should be used to reduce the risk re-
sulting from becoming entangled in or tripping over a longer cord.
b. Longer extension cords are available and may be used if care is
exercised in their use.
c. If a longer extension cord is used:
1) The marked electrical rating of the cord set or extension cord
should be at least as great as the electrical rating of the appliance;
and
2) The cord should be arranged so that it will not drape over the
countertop or table top where it can be pulled on by children or
tripped over unintentionally.
If the appliance is of the grounded type, the extension cord should
be a grounding-type 3-wire cord.

ENGLISHESPAÑOLFRANÇAIS
–3–
PRODUCT FEATURES
1. LCD Indicator controlled with microcomputer.
2. Automatic modes for making bread, sticky rice, cake, kneading, jam, baking.
Multiple taste selections include sweet bread, French bread, etc.
Lid
View Window
Control
Panel
Bread Pan
Measuring
Cup
Measuring Spoon Stirring Rod Hook
Steel
Housing
Product Parts

ENGLISH ESPAÑOL FRANÇAIS
–4–
Precautions for use of measuring cup:
The unit “cup” in the recipe is not a full cup and is 240 ml as shown on
the diagram on the right side.
1. Measure out liquid ingredients:
place the measuring cup on a
level surface, look at the liquid
surface with sightline parallel,
and level to the appropriate
mark. When liquid ingredients
such as egg and milk are to
be used, place them into the
measuring cup and ll water
until the volumetric mark is
reached (that is to say, less
water should be used when
liquid ingredients are used, and
the total volume must be the
same).
2. Measure out powder
ingredients: vibrate the
measuring cup containing
powdery materials until the upper surface is level and read the
volume. Do not vibrate violently for a long time; otherwise, the our
will be compacted and excessive our may be used, making your
bread dry.
Tips: A cup of our weighs about 160 g.
Measuring spoon: There are tablespoon and teaspoon which are to
measure ingredients.
Hook: To remove the stirring rod from bread.
BREAD BAKING TIPS
Quick Start Guides for Bread Making
Making 1.5LB medium color light bread:

ENGLISHESPAÑOLFRANÇAIS
–5–
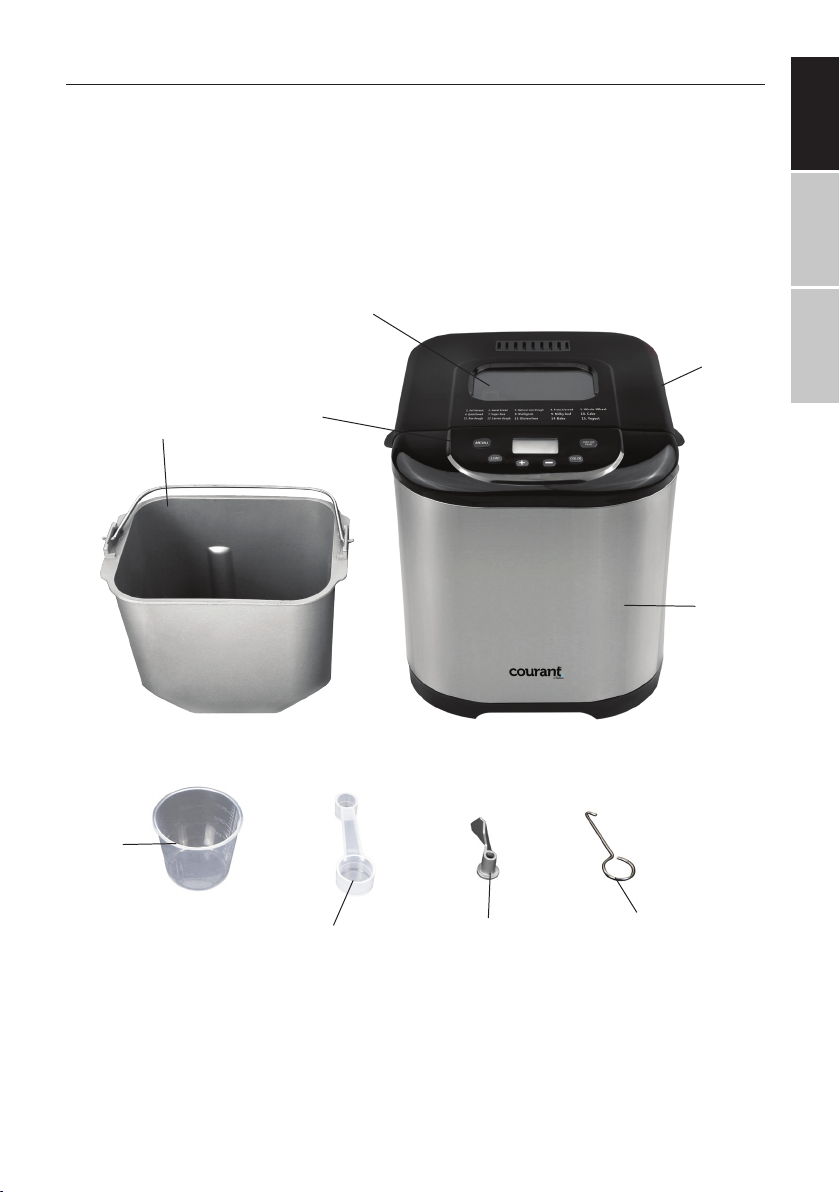
1. Clean the bread pan, stirring rod, measuring cup, and measuring
spoon.
2. Aim the stirring rod against the rotation axis in the bread pan and
insert it into place.
3. As stated in the 1.5LB Light Bread recipe, put the ingredients into
the bread pan and place yeast powder on our, taking care to
prevent it from soaking in water.
4. Replace the bread pan back into the bread maker, and insert it into
the base slot at an angle of about 20°. Rotate it clockwise by about
20° and put on the lid.
5. After the bread maker is switched on, the default menu will be
displayed on the screen: 1.5LB medium color, light bread.
6. Press START/STOP/PAUSE button. The buzzer will sound, and the
indicator light will light up, as the dough begins kneading.
7. At the end of the timer countdown, bread is ready and the bread
maker is in a holding state.
8. Press START/STOP/PAUSE button for about 2 seconds. The buzzer
will sound again, and holding state is over.
9. When the bread is ready, wear oven mitts or use pot holders to
turn the bread pan clockwise by about 20°, lift it out of the bread
maker, and ip the pan upside down to release the bread.
Note: in the whole process of bread making, you do not need to select
“Menu”, “Weight”, “Baking Color”. See Operation Manual for detailed
method of operation (Pages 8-15).
Tips: When bread is removed, the
stirring rod may be in the bread.
Just remove the stirring rod with
the hook as stated below:
1. Insert the hook into the hole on the
stirring rod as shown on Fig. A:
2. Lift up the stirring rod and pull it out (as shown in Fig. B).
Attention: the above bread-making approach is the easiest,

ENGLISH ESPAÑOL FRANÇAIS
–6–
no need to use “Menu”, “Loaf” and “Color”. Please refer to
“User Manual” for more details (Page 08-15 ).
INTRODUCTION OF CONTROL PANEL
1. Menu:
For selecting the menus in setting mode, menus 1-15 displayed
on LCD are listed below:
1—— Soft Bread
2—— Sweet Bread
3——Natural Sourdough
4——French
5——Whole-wheat
6——Quick
7——Sugar-free
8——Multigrain
9——Milky Loaf
10——Cake
11——Raw Dough
12——Leaven Dough
13——Gluten free
14——Bake
15——Yogurt

ENGLISHESPAÑOLFRANÇAIS
–7–
2. Weight: for selecting bread weight in setting mode,
1LB/1.5LB/2LB are available; press “Weight” button to set weight.
Only menus 1-9 and menu 13 are adjustable.
3. Baking color: for selecting baking color in setting mode, press
menus 1-9 and menu 13 in proper order. Light/Medium/Dark
colors will be displayed, and the color selected will be indicated.
4. START/STOP/PAUSE: press the button to turn on, turn o or
pause the bread maker, and buzzer will sound. When the bread
maker is operating, the button is protected from “False Stop” from
touching accidentally. That is to say, the bread maker will stop
operation only if the button is pressed for 2 seconds, and the
buzzer makes a sound. After the bread maker is started, pressing
the button momentarily will cause it to pause and the current
process will be restored automatically after 3 seconds.
5. “+”: in setting mode, press the button and time setting will be
extended by 1, 5, or 10 minutes, and pressing on the button will
extend time setting rapidly. When the maximum time setting is
displayed, the minimum time setting will be displayed and ano-
ther cycle will start.
6. “-”: in setting mode, press the button and time setting will be
reduced by 1, 5, or 10 minutes, and pressing on the button will
reduce time setting rapidly. When time setting is reduced to the
minimum, the maximum time setting will be displayed and ano-
ther cycle will start.
7. Operating process display includes:
Preset (if required) - Stir 1 - Pause - Stir 2 - Ferment 1 - Ferment 2
-Ferment 3 - Bake - Warm –End

ENGLISH ESPAÑOL FRANÇAIS
–8–
OPERATION MANUAL
Considerations before use:
• Make sure that the wire, the socket and the fuse box are as
required for over 6A rated load current.
• As a bread maker is class-1 domestic appliance, it must be
rmly grounded. The ground wire must be distinguished from
zero line strictly, and lapping the zero line and the ground wire
in three-plug connector is strictly forbidden.
Bread maker start, pause and stop
1. Menus 1-9, 12, and 13 of the bread maker can be preset. Af-
ter presetting, press START/STOP/PAUSE button, “:” will ash,
presetting is complete, and countdown begins. Press START/
STOP/PAUSE button to undo the presetting, “:” ashes, and the
bread maker will start.
2. Menus 14 and 15 cannot be preset, but time setting is avai-
lable. After setting time, press START/STOP/PAUSE button.
Time display no longer ashes, indicating that the time is set.
Press START/STOP/PAUSE button once again, “:” ashes, and
the bread maker starts operation.
3. In the process of either presetting or regular operation of
the bread maker, press START/STOP/PAUSE button, the buzzer
sounds, time display ashes, and the bread maker stops opera-
tion; to undo the pause, just press START/STOP/PAUSE button
once again. For stop operation of the bread maker, press the
START/STOP/PAUSE button, the buzzer makes a sound, the LCD
returns to default state, and the bread maker stops operation.

ENGLISHESPAÑOLFRANÇAIS
–9–
Hold handle of the bread pan and
turn it counterclockwise until it
stops (about 20 degrees).
Pull the bread pan straight up.
2. Put wet ingredients in the bread pan rst; add our at the
ratio you select, and put yeast powder into the pan last.
Aim the stirrer rod against
the rotation axis in the
bread pan and insert it
into place.
Place yeast powder on the
our. Do not mix it with
water, sugar and salt, or
the yeast will not activate.
Instruction manual of “toasting” function
1. Remove the bread pan from the bread maker and place
the stirring rod into the bread pan.

ENGLISH ESPAÑOL FRANÇAIS
–10–
3. Place the bread pan containing raw ingredients into the
bread maker and close the lid.
• If you feel resistance when pressing down the bread pan,
lift the bread pan and turn the driving lever at bottom of the
bread pan by a certain angle and then put the pan into the
bread maker.
• Hold handle of the bread pan and turn it clockwise until it
stops turning (by about 20 degrees).
4. Switch on the bread maker, the buzzer will sound, and dis-
play will look like this:
5. Select the bread menu as you need.
6. Select the baking color and weight as you need.
Press “Weight” button and “Baking Color” button.
The default setting after starting
the unit is 750g/Medium Color/
soft bread.
The number will be cycling through
1-15.
1-9 and 13 are bread recipes.
(Refer to Page 3 )

ENGLISHESPAÑOLFRANÇAIS
–11–
7. Preset Time
Press “+” or “-” to preset the time.
*If you want to make bread right now, please skip this step.
8. Switch on the bread maker and start bread making.
Press“START/STOP/PAUSE”
Weight Indicator
Adjust to appropriate time of the recipe.
Please refer to Page15-16 “Reserve Function”
to set Reserve Time
Baking Color Indicator
Countdown Begins

ENGLISH ESPAÑOL FRANÇAIS
–12–
• When the bread maker is started, our mixing begins; the rst
5-7 minutes are for program-controlled intermittent stirring,
and to prevent our from rising. Continuous stirring will be
started automatically after 7 minutes.
• After presetting, in startup, “ : ” on the display ashes, and
our mixing will not start until the preset time.
• Note: At the beginning, there may be smoke or smell which
will disappear slowly and have no impact.
FOR THE FIRST USE
The appliance may emit a little smoke and a characteristic smell
when you turn it on for the rst time. This is normal and will soon
stop. Make sure the appliance has sucient ventilation.
1. Please check whether all parts and accessories are complete
and free of damage.
2. Clean all the parts according to the section “CLEANING AND
MAINTENANCE”.
3. Set the bread maker on BAKE mode and bake empty for about
10 minutes. Then let it cool down and clean all the detached parts
again.
4. Dry all parts thoroughly and assemble them, the appliance is
ready for using.
9. Bread making is completed:
When the timer counts down to zero, the buzzer sounds to in-
dicate that bread is baked. The bread maker will then keep the
bread warm.
Automatic “Warm
Bread” function
Warm See “Warm” on Page 15
Press eq \o\ac(○,1)
Press “START/STOP/PAUSE”
button for 2 seconds
Remove power cord.
No Warm

ENGLISHESPAÑOLFRANÇAIS
–13–
10. Removing Bread from the Pan
and gently turn upside down to release the bread. If the stirring
rod is in the bread, remove it using the hook.
To Make Cake
Make a cake using the bread maker following the same instruc-
tions for bread making. Select the ingredients for cake and select
“Cake” making function, which is Menu 10.
The default time is 1 hour and 33 minutes.
To Make Raw Dough
Prepare dough by following the same instructions for bread
making. For Raw Dough, just select the ingredients for dough and
select “Raw Dough” function. Select Menu 11. The default time is
23 minutes.
There is no need to select baking color and weight, as the dough
will not actually bake. The buzzer will sound when dough is ready.
To Make Leaven Dough
The bread maker can be a dough fermenting machine. You can
start “Leaven Dough” as instructed in the operating manual for
Leaven Dough or at your discretion without using salt, sugar and
milk.
Select Menu 12; the default time is 1 hour and 24 minutes.
There is no need to select baking color and weight, as the dough
will not bake, and the buzzer will sound when Leaven Dough is
complete. Of course, you can also stop the fermenting process
considering the degree of fermentation you need.
To Bake
This function is very practical. After you become more familiar
with bread making, you can select “Raw Dough at low speed”,
“Knead dough at high speed”, and “Ferment” and set stirring time
and fermenting time and then start “Bake”. You can select baking
time. Combining the functions and following instructions on other
bread baking cookbooks, you can make various delicious breads

ENGLISH ESPAÑOL FRANÇAIS
–14–
Select Menu 14, default time is 10 minutes, which is adjustable
between 10 and 70 minutes, and you can press “START/STOP/
PAUSE” button at any time to undo the selection.
To Make Yogurt
This function is a separate one and can be for fermented dough,
yogurt, or sweet wine as you need.
Select Menu 15, the default time is 8 hours, which is adjustable
between 5 and 13 hours.
SPECIFIC FUNCTIONS DESCRIPTION
Reserve Function
The purpose of this function is to bake the bread overnight for
fresh bread at breakfast. For example, if it is 8:30 in the evening,
bread could be ready by 7:00 in the morning.
1. Compute Reserving Time: it should be 10 hours and 30 mi-
nutes from the evening 8:30 to the next morning 7:00.
2. Set Reserving Time: Press the “+” and “-” to set the time. Press
the «Start» button. Note: The time displayed on the screen is
set to 10 hours and 30 minutes, this display time includes the
time to make bread to have the bread done by 7:00.
Reserve Function Tips:
1. When using Reserve Function, do not add eggs, as they can go
bad and aect the taste of bread.
2. Cover the yeast with our to maintain the activity of the yeast.
Buzzer Sound:
1. A buzzer sound is given as electricity is connected.
2. A buzzer sound is given as Loaf, Color, Menu or Time Setup is
pressed.
3. A buzzer sound is given each time “Start/Stop” is pressed.
4. During the kneading process, the buzzer sound will conti-
nuously to remind you to add ingredients.

ENGLISHESPAÑOLFRANÇAIS
–15–
5. A buzzer is sounded as the operation is nished.
6. The intermittent buzzer sound is given as “Keep Warm” is
closed down.
Memory Function
1. In case of a brief electricity disruption after starting the bread
maker, the bread maker will continue from where it left o, as
long as the disruption lasts no more than 15 minutes. After
reconnecting, the timer could be changed to reect the time it
was interrupted.
2. If the duration of electricity disruption is more than 15 mi-
nutes, the bread maker should be reset manually.
Keep Warm
When bread or other snacks are nished and cannot be taken out
in time, “Keep Warm” can keep them fresh.
*After bread is done the program automatically begins the “Keep
Warm” function. The “:” symbol will ash for up to 1 hour. “Keep
Warm” will shut down when the buzzer sounds intermittently. To
manually end “Keep Warm”, press On/O for 2 seconds until the
buzzer sounds..

ENGLISH ESPAÑOL FRANÇAIS
–16–
RECOMMENDED RECIPES
1. Soft
Material 1LB(3 : 07) 1.5LB(3 : 12) 2LB(3 : 17)
Water 160ml 240ml 310ml
Butter 2 Big Spoon 2 Big Spoon 3 Big Spoons
Table Salt 1/2 Small Spoon 1/2 Small Spoon 1 Small Spoons
Sugar 1 Big Spoon 2 Big Spoon 3 Big Spoon
Milk Powder 2 Big Spoons 3 Big Spoons 5 Big Spoons
Flour 300g 400g 500g
Yeast Powder 1 Small Spoon 1 Small Spoon 1 Small Spoon
2. Sweet
Material 1LB(2 : 55) 1.5LB(3 : 00) 2LB(3 : 05)
Water 160ml 240ml 310ml
Butter 2 Big Spoons 2 Big Spoons 4 Big Spoons
Table Salt 1/2 Small Spoon ½ Small Spoon 1/2 Small Spoon
Sugar 4 Big Spoons 6 Big Spoons 8 Big Spoons
Milk Powder 2 Big Spoons 3 Big Spoons 4 Big Spoons
Flour 250g 375g 500g
essences A little A little A little
Yeast Powder 1 + 1/4 Small Spoon 1+1/4 Small Spoons 1+1/2 Small Spoons
3. Natural curing
Material 1LB(6 : 34) 1.5LB(6 : 44) 2LB(6 : 49)
Water 160ml 240ml 310ml
Sugar 1 Big Spoon 1 Big Spoon 3 Big Spoons
Milk Powder 1 Big Spoon 1 Big Spoon 3 Big Spoons
Vegetable oil 1 Big Spoon 1 Big Spoon 2 Big Spoons
Table Salt 1/2 Small Spoon 1/2 Small Spoon 1 Small Spoon
Flour 300g 400g 500g
Yeast Powder 1/3 Small Spoon 1/3 Small Spoon 1/3 Small Spoon
Essences A little A little A little
4. French
Material 1LB(3 : 09) 1.5LB(3 : 19) 2LB(3 : 24)
Water 155ml 230ml 300ml
Butter 2 Big Spoons 2 Big Spoons 3 Big Spoons

ENGLISHESPAÑOLFRANÇAIS
–17–
Table Salt 1/2 Small Spoon 1/2 Small Spoons 1 Small Spoons
Flour 250g 375g 500g
Yeast Powder 1 Small Spoon 1+1/4 Small Spoons 1+1/2 Small Spoons
5. Whole Wheat
Material 1LB(3 : 08) 1.5LB(3 : 18) 2LB(3 : 23)
Water 155ml 230ml 310ml
Butter 2 Big Spoon 2 Big Spoons 3 Big Spoons
Table Salt 1/2 Small Spoon 1/2 Small Spoons 1 Small Spoons
Flour 150g 200g 250g
Whole Wheat Flour 150g 200g 250g
Sugar 2 Big Spoon 3 Big Spoons 4 Big Spoons
Milk Powder 2 Big Spoon 3 Big Spoons 4 Big Spoons
Yeast Powder 1 Small Spoon 1+1/4 Small Spoons 1+1/2 Small Spoons
6. Quick
Material 1LB(1 : 33) 1.5LB(1:38) 2LB(1 : 43)
Water(40-50˚C) 160ml 240ml 310ml
Butter 2 Big Spoons 2 Big Spoons 3 Big Spoons
Table Salt 1 Small Spoon 1 Small Spoon 1 Small Spoon
Flour 300g 400g 500g
Sugar 1 Big Spoon 2 Big Spoons 3 Big Spoons
Milk Powder 2 Big Spoon 3 Big Spoons 5 Big Spoons
Yeast Powder 2 Small Spoons 3 Small Spoons 4 Small Spoons
7. Sugar-free
Material 1LB(3 : 04) 1.5LB(3 : 11) 2LB(3 : 18)
Water 150ml 240ml 310ml
Butter 2 Big Spoons 2 Big Spoons 3 Big Spoons
Table Salt 1 Small Spoon 1 Small Spoon 2 Small Spoons
Flour 300g 400g 500g
Egg one one one
Xylitol 3 Big Spoons 4 Big Spoons 6 Big Spoons
Milk Powder 2 Big Spoons 3 Big Spoons 5 Big Spoons
Yeast Powder 1 Small Spoon 1+1/4 Small Spoons 1+1/2 Small Spoons

ENGLISH ESPAÑOL FRANÇAIS
–18–
8. Multigrain Bread
Material 1LB(3 : 00) 1.5LB(3 : 07) 2LB(3 : 14)
Water 120ml 170ml 210ml
Butter 2 Big Spoons 2 Big Spoons 3 Big Spoons
Table Salt 1/2 Small Spoon 1/2 Small Spoons 1 Small Spoon
Sugar 1 Big Spoon 1 Big Spoon 2 Big Spoons
Whole Wheat Flour 50g 75g 100g
Oatmeal 50g 75g 100g
Flour 150g 230g 300g
Egg one one one
Milk Powder 1 Big Spoon 2 Big Spoons 3 Big Spoons
Yeast Powder 1 Small Spoon 1+1/4 Small Spoons 1+1/2 Small Spoons
9. Milky Loaf
Material 1LB(2 : 59) 1.5LB(3 : 06) 2LB(3 : 13)
Milk 160ml 240ml 310ml
Butter 2 Big Spoons 2 Big Spoons 3 Big Spoons
Sugar 1 Big Spoon 1 Big Spoon 2 Big Spoons
Flour 300g 400g 500g
Egg one one one
Milk Powder 2 Big Spoons 3 Big Spoons 5 Big Spoons
Yeast Powder 1 Small Spoon 1+1/4 Small Spoons 1+1/2 Small Spoons
10. Cake
Material
Egg4 pcs
Butter 100g
Sugar 150g
Cake Flour 380g
Table Salt 1 Small Spoon
Baking Soda 3.5g
Baking Powder 3 Small Spoons
Table of contents
Languages:
Popular Bread Maker manuals by other brands

Moulinex
Moulinex OW2208 manual

Mellerware
Mellerware MA-BAKER 26500 instructions

Morphy Richards
Morphy Richards 48300 instructions

Panasonic
Panasonic SD-ZB2512 Operating instructions and recipes

Black & Decker
Black & Decker B1620 Operating instructions & cook book

Kenwood
Kenwood BM350 Multilingual instructions